Cloud Databases - Connect an web app with AWS Aurora
 yyounos shaik
DIFFICULTY : EASY TIME : 1 HOUR COST : 0$
WHAT YOU’LL NEED : An AWS account - Create one here!
AWS SERVICES :
Amazon Aurora
Relational databases
EC2
AWS Command Line Interface
Overview
In this project we’ll learn one of the most common use cases of cloud computing i.e building an web app and connecting it to the database.
Let’s Get ready to :
Create an Aurora MySQL Database.
Build and connect a web app.
connect yoru database to the web app.
Enter data through your web app, and see the data get stored in your Aurora database.
Let’s Get Started…
Step 1 : Login with IAM user
For this project, you'll need your IAM user, not your root user. If you are already logged in as your IAM user, skip to Step 2!
Log In with your IAM Admin User.
If you've logged in successfully as your IAM user, skip to the next step.
If you don't have an IAM user set up, here are the steps to create one:
Head to your AWS Account as the root user.
Open the
AWS IAMconsole.From the left-hand navigation panel, choose
Users.Choose
Create user.For the User name, use
Yourname-IAM-Admin.Make sure to select the checkbox next to
Provide user access to the AWS Management Console - optional.If you're prompted with a pop-up panel that says
Are you providing access to a person?, chooseI want to create an IAM user.For the console password, choose
Custom password.Type in a password that you will be able to remember/access in the future.
Deselect the checkbox for
Users must create a new password at next sign-in - Recommended.Choose
Next.In the permissions set up page, choose
Attach policies directly.From the list of
Permissions policies, selectAdministratorAccess.Choose
Next.Choose
Create user.Voilà - you've just created your new user! Stay on this page.
Choose
Download .csv file.Copy the
Console sign-in URL.Now you're ready to start using your IAM user.
Log out of your root user's AWS Account.
Paste and go to your copied console sign-in URL.
Open your downloaded .csv file containing your user's access instructions.
Log in using your IAM user's username and password in the .csv file.
Step 2 : Launch an EC2 for your Web App
In this step, we're going to create an Amazon EC2 instance using our default VPC and default subnets.
In this step, you're going to :
Create an EC2 instance to host a web app.
Open a new tab in your web browser and go to your AWS console (this means we can keep our Aurora database set-up in progress!)
In the upper-right corner of the AWS Management Console, make sure your AWS Region is the same as that in your Aurora database creation.
In the AWS console search bar, search for EC2.

Select Instances in the left hand menu and choose Launch instances.
Choose the following settings in the Launch an instance page.
Under Name and tags, for Name, enter
My-ec2-instance-web-serverUnder Application and OS Images (Amazon Machine Image), choose Amazon Linux.
Choose the Amazon Linux 2023 AMI.
Keep the defaults for the other choices.
Under Instance type, choose t2.micro.
Under Key pair (login), choose a Create new key pair.
For your Key pair name, enter
final.Leave your Key pair type as RSS
Leave your Private key file format as .pem since we're using SSH later on to access our EC2 instance.
Select Create key pair.
Back in our EC2 creation, under Network settings, set these values and keep the other values as their defaults:
For Allow SSH traffic from, choose your IP address if it's correct (you can check your IP by clicking here). Otherwise select Anywhere.
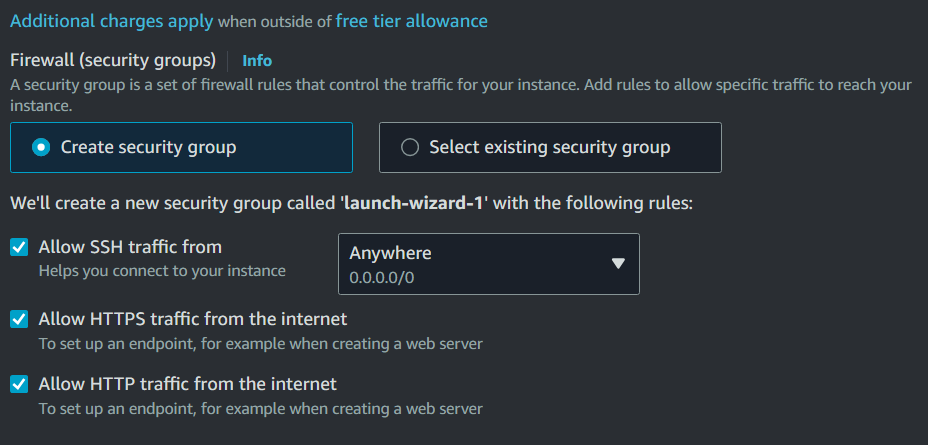
Check the boxes for Allow HTTP traffic from the internet.
Leave the default values for the remaining sections.
Review the summary panel of your instance configuration.
When you're ready, choose Launch instance.
Navigate back to your list of EC2 instances, and then select the checkbox next to your new instance.
In the Details tab, note the following important details:
In Instance summary, note the Public IPv4 DNS.
Note the value for Key pair name.
Wait until Instance state for your instance is Running before continuing.
Step 3 : Create an Aurora MySQL Database
In this step, you are going to:
Create an Aurora relational database from scratch.
What is Aurora Database? How is it different from other databases?
AWS Aurora is a type of relational database. As you can tell form the first few steps of creating a relational database, there are plenty of optins to choose from!
We'd use AWS Aurora if we needed something large scale, with peak performance and uptime. This is because Aurora databases use Clusters . Ordinary relational databases, they suit smaller databases and less demanding workloads.
Let's create your Aurora database:
Head to RDS console - search for
rdsin search bar at the top of the screen.
Notice that even if you search for
Aurora, the same result shows up!In the left navigation bar, select Databases.
In the Database section, select Create Database.
On the Create database page, choose Standard Create.
In the Configuration section, make the following changes:
For Engine type, choose Aurora (MySQL Compatible).
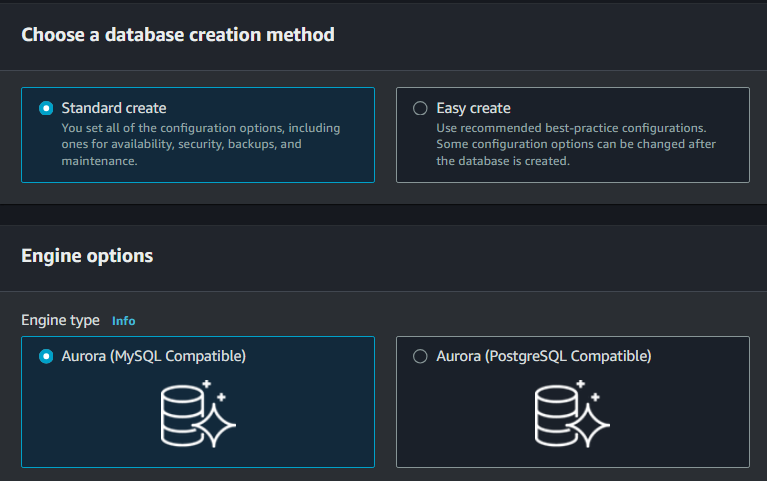
What is engine type?
The engine type is like the core software that powers our database. Imagine it as the operating syste of a computer, but for databases.
For Engine Version, choose Aurora MySQL 3.05.2 (compatible with MySQL 8.0.32) - default for major version 8.0.
What is Engine Version?
The engine version is like choosing the specific version of software that your database will use. For example, Aurora MySQL 3.05.2 (compatible with MySQL 8.0.32) is a specific version of Aurora that's compatible with a particular MySQL version (8.0.32).
For Templates, choose Dev/Test.
What are Templetes?
Templates are pre-set settings that help you quickly set up your database environment according to your needs. It's basically AWS helping you make selections for the rest of this set-up page! The Dev/Test template is designed for development and testing environments, helping you pick lower cost options.
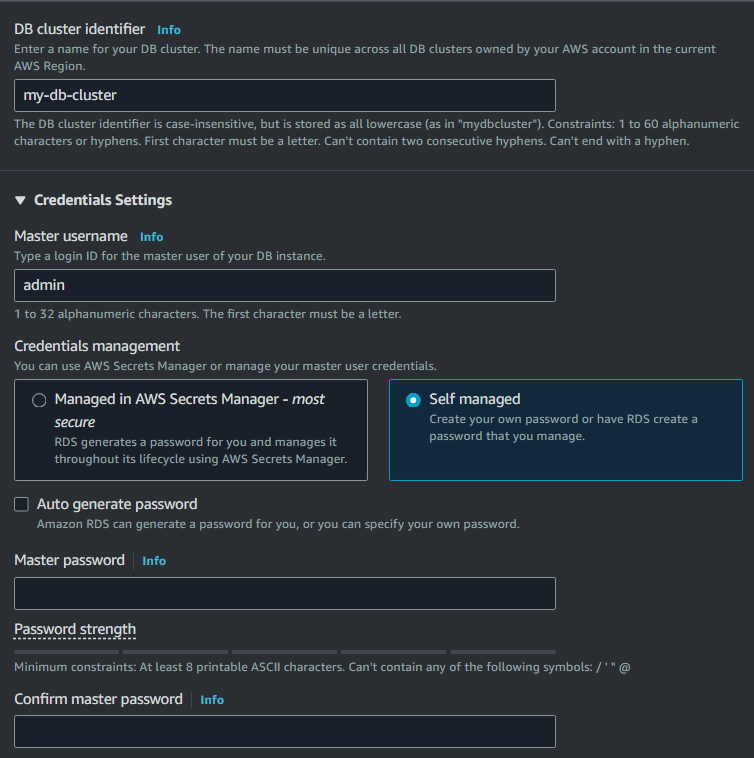
In the Settings section, set these values:
DB cluster identifier :
my-db-cluster.Master username:
admin.For Credentials management select Self managed.
Master password : set a password.
Confirm password : retype the password.
Make sure you save your database login details soemwhere safe!
Leave the Cluster storage configuration settings as default.
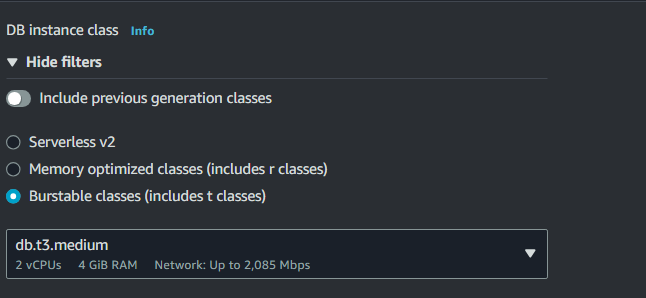
In the Instance configuration section, set these values:
What is Instance configuration?
Instance configuration is where we can select the type of virtual computer that our Aurora database will run on.
The instance type that we choose determines how powerful, and how much memory, our virtual computer has. The more powerful it is, the better it will perform - but also more expensive the price!
Burstable classes (includes t classes)
db.t3.medium
What are Burstable classes?
The Burstable classes (includes t classes) are cost-effective types of database instances ideal for consistent baseline traffic with occasional, random spikes. By choosing burstable classes, our database can handle high traffic efficiently while saving costs during quieter times.
In the Availability and durability section, use the default values.
In the Connectivity section, the first thing it asks is whether we need to connect to an EC2 instance or not?
Why do we need an EC2 instance to be a web app server?
Any web app needs to run on a computer. But do we need to have a physical computer to do this?
Well No! We're going to use a virtual computer that we rent through AWS.
This is what an EC2 instance is for. An EC2 instance as a rented virtual computer that you use to run your web app. It is the place where all processing, data handling, and user interactions happen.
Connect your EC2 instance to your database.
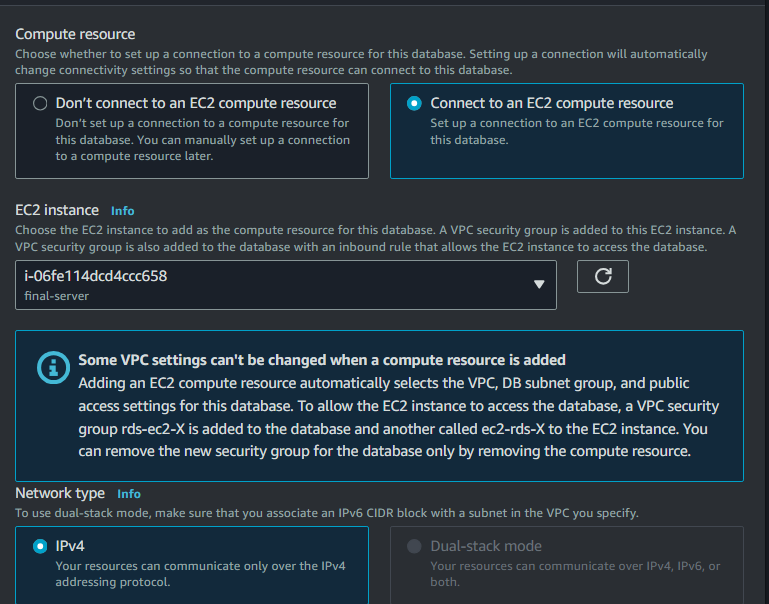
Scroll down and open the Additional configuration section.
Enter
samplefor Initial database name.
Keep the default settings for the other options and create your database.
Wait! Your database has the name
my-db-clusterand there are two of them?What’s this database cluster?
A database cluster in Aurora is a group of database copies that work together so your data is always available.
Each cluster consists of a primary instance (where all write operations occur) and multiple read replicas as back-ups. If your database's primary instance fails, one of the replicas can be promoted to primary automatically.
Wait for the Status of your new DB cluster to show as Available.
Select the DB identifier of your top database to take a look at the details.
Notice that there are two Endpoints in our Database. Cool! This is our cluster in action.
What are these reader and writer instances? and why are they seperate?
Our writer database instance is our primary instance that handles all the "write" operations like INSERT, UPDATE, and DELETE.
Our reader database instance is our backup instance that can do very basic operations like SELECT. This is used to get data, but not to add or change data.
We only want one writer instance at a time so that things stay focused and controlled...but we want multiple reader instances so that we can share the workload for read requests as our database grows and have a backup if our writer instance fails.
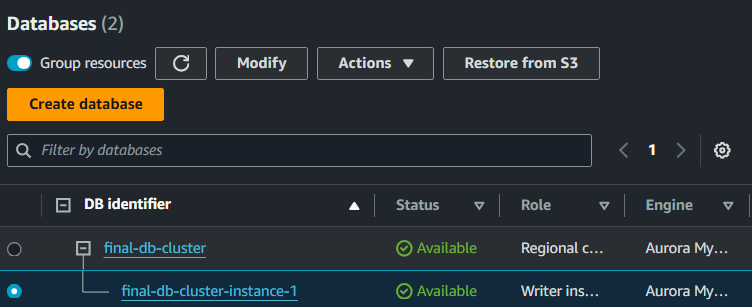
- Well done! Your database is finally created! Now, let’s move on and create the web application we planned. Yippee!
Step 4 : Create an Web App
Now in this step we are going to :
Connect the EC2 instance through SSH.
Install a basic web app that runs through EC2 instance.
Open your local Terminal
On a Mac:
Press Cmd + Space to open Spotlight.
Type
Terminaland press Enter.
On a Windows/Linux:
Press Windows + R to open the Run dialog.
Type
cmdorpowershelland press Enter.
Note : There are a few commands that might not run on Terminal/cmd, so I suggest use Git Bash for creating the web app.
Connect to your EC2 instance
You need to access your .pem file in order to login successfully to your EC2 instance - remember, the .pem file is like your keys to your EC2 instance!
Find your .pem file on your local computer (it's probably in your downloads folder!) and put it in a new folder on your Desktop labelled of your choice.
Nice! Now we need to navigate to that folder from your terminal, so we can use it.
Run the command
lsin your terminal - this shows you all the folders that you can see from your current terminal position.To go into a folder, run the command
cd folder-nameand replace folder-name with the name of the folder you'd like to enter.Run
lsto make sure your .pem file is there!back in your terminal run the following command:
ssh -i YOUR_PEM_FILE_NAME ec2-user@YOUR_EC2_IPv4_ADDRESSWhoops! Did you get an error telling you permissions denied?
That's because you need the right permissions to access your .pem file.
Try running this one instead:chmod 400 YOUR_PEM_FILE_NAME
Make sure you replace 'YOUR_PEM_FILE_NAME' with the name of your .pem file.
Let’s brack down what does this command do?
chmod : stands for Change Mode. It’s a command used to change the permissions of a file or directory in Unix and Linux systems.
The
400has a lot of meaning in it...4means "read-only" permission. The owner of the file can read the file but cannot write to it or execute it.0means "no permission." Neither the group nor others have any permissions (cannot read, write, or execute the file).So,
400means the owner of the file can read it, but no one else (including the group or other users) can access it.
Once you've given your computer access to your .pem file, run the command to connect to our EC2 instance again:
ssh -i YOUR_PEM_FILE_NAME ec2-user@YOUR_EC2_IPv4_ADDRESS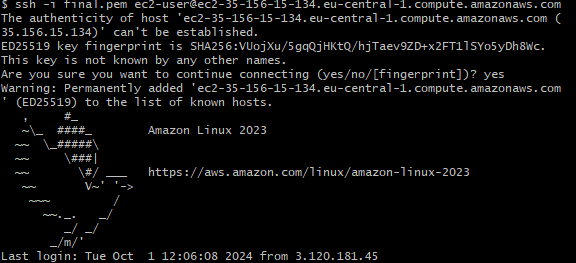
Now remember that our EC2 instance is just another computer. First thing we need to do is make sure all the software on it is up to date.
Run the following command:
sudo dnf update -y
how does this command update our ec2 system?
sudo means 'superuser do' and is like saying you have admin or root user rights.
dnf is what is used to manage all the software on our EC2 instance.
update tells 'dnf' to update all the software on the instance.
-y means automatically answer yes to any prompts that appear during the update process.
After the update we are going to install few things such as:
Apache web server
PHP
php-mysqli
mariaDB
sudo dnf install -y httpd php php-mysqli mariadb105
httpd: installs the Apache HTTP Server package.
php: installs PHP.
php-mysqli: installs MySQL extension for PHP.
mariadb105: installs MariaDB, a version of the MySQL database management system.
All systems go! Let's start the most basic version of our web app with the following command:
sudo systemctl start httpd
Test that your web app is running by entering your IPv4 DNS address into your browser.
Eg.
http://ec2-42-8-168-21.us-west-1.compute.amazonaws.com- just make sure it's actually your one!Make sure you change https to http - no 's'!

Step 5 : Update your web app
In this step we are going to connect the web app to the database we created a few minutes ago .
Connect your EC2 instance to your database
While still connected to your EC2 instance, navigate to the www folder (this is where we store all our files for our web app!).
cd /var/www
Create a new sub-folder named inc.
mkdir inc
Whoops! Did you get another permission denied error?
Let's find out what's going on here. Who actually has permissions in this folder?
Run the following command to find out:ls -ld
ls : list the files
-ld : details of the files

This means that the root user is the owner of this folder, and only the owner can make changes to this folder.When you access an EC2 instance using a key pair, you're by default logging in as an admin user (called ec2-user) which is not the root user!
Let's change the owner of this folder so you (ec2-user) can edit it.
Let’s navigate back to where we started.
cd ../../Run the following command:
sudo chowm ec2-user:ec2-user /var/wwwchown means change the owners permission
ec2-user : ec2-user means we change the individual and group user from root to ec2-user.
now lets see if the command worked or not:
ls -ld /var/www
Okay, so the ownership is shifted from the root to you and now you are the sole user who can make changes to the EC2 instance.
Let's try it again.
- Navigate to your www folder
cd /var/www
- Create a new sub-folder named inc.
mkdir inc

- Navigate into your new inc folder.
cd inc
- Create a new file in the inc directory named dbinfo.inc
>dinfo.inc
- Cool! Now we have a blank file. We can edit our new file by calling nano.
nano dbinfo.inc
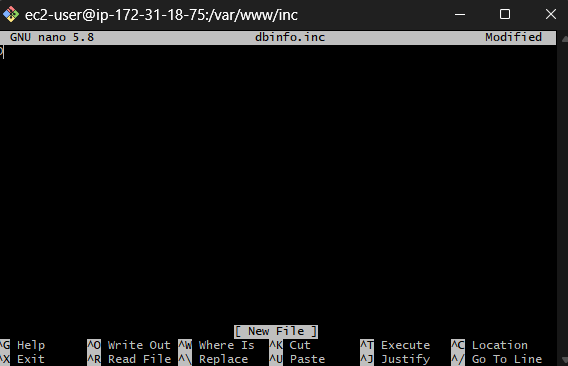
dbinfo.inc is a settings file that stores the connection details our EC2 instance will need to connect to our Aurora database. To complete this file, we need our Aurora database endpoint.
Navigate to your Aurora database details in AWS and copy the Endpoint of your Writer instance.
Copy and paste the following code to connect our EC2 instance to our Aurora database to the dbinfo.inc file.
Make sure you replace YOUR_ENDPOINT with your actual Aurora Endpoint!
Make sure to update
DB_PASSWORDtoo.
<?php

define('DB_SERVER', 'YOUR_ENDPOINT');
define('DB_USERNAME', 'admin');
define('DB_PASSWORD', 'password');
define('DB_DATABASE', 'sample');
?>

- Save and close the dbinfo.inc file by using Ctrl+S to save and then Ctrl+X to exit.
Nice! Now that our database is all connected, let's upgrade our web app page!
Upgrade your Web App
- Navigate to your html folder:
cd /var/www/html
Create a new file in the html directory named SamplePage.php, and then edit the file by calling nano. (You should know the commands to do this now!)
Copy and paste the following script into your SamplePage.php file:
<?php include "../inc/dbinfo.inc"; ?>
<html>
<body>
<h1>Sample page</h1>
<?php

  /* Connect to MySQL and select the database. */
  $connection = mysqli_connect(DB_SERVER, DB_USERNAME, DB_PASSWORD);

  if (mysqli_connect_errno()) echo "Failed to connect to MySQL: " . mysqli_connect_error();

  $database = mysqli_select_db($connection, DB_DATABASE);

  /* Ensure that the EMPLOYEES table exists. */
  VerifyEmployeesTable($connection, DB_DATABASE);

  /* If input fields are populated, add a row to the EMPLOYEES table. */
  $employee_name = htmlentities($_POST['NAME']);
  $employee_address = htmlentities($_POST['ADDRESS']);

  if (strlen($employee_name) || strlen($employee_address)) {
    AddEmployee($connection, $employee_name, $employee_address);
  }
?>


<form action="<?PHP echo $_SERVER['SCRIPT_NAME'] ?>" method="POST">
  <table border="0">
    <tr>
      <td>NAME</td>
      <td>ADDRESS</td>
    </tr>
    <tr>
      <td>
        <input type="text" name="NAME" maxlength="45" size="30" />
      </td>
      <td>
        <input type="text" name="ADDRESS" maxlength="90" size="60" />
      </td>
      <td>
        <input type="submit" value="Add Data" />
      </td>
    </tr>
  </table>
</form>


<table border="1" cellpadding="2" cellspacing="2">
  <tr>
    <td>ID</td>
    <td>NAME</td>
    <td>ADDRESS</td>
  </tr>

<?php

$result = mysqli_query($connection, "SELECT * FROM EMPLOYEES");

while($query_data = mysqli_fetch_row($result)) {
  echo "<tr>";
  echo "<td>",$query_data[0], "</td>",
       "<td>",$query_data[1], "</td>",
       "<td>",$query_data[2], "</td>";
  echo "</tr>";
}
?>

</table>


<?php

  mysqli_free_result($result);
  mysqli_close($connection);

?>

</body>
</html>


<?php

/* Add an employee to the table. */
function AddEmployee($connection, $name, $address) {
   $n = mysqli_real_escape_string($connection, $name);
   $a = mysqli_real_escape_string($connection, $address);

   $query = "INSERT INTO EMPLOYEES (NAME, ADDRESS) VALUES ('$n', '$a');";

   if(!mysqli_query($connection, $query)) echo("<p>Error adding employee data.</p>");
}

/* Check whether the table exists and, if not, create it. */
function VerifyEmployeesTable($connection, $dbName) {
  if(!TableExists("EMPLOYEES", $connection, $dbName))
  {
     $query = "CREATE TABLE EMPLOYEES (
         ID int(11) UNSIGNED AUTO_INCREMENT PRIMARY KEY,
         NAME VARCHAR(45),
         ADDRESS VARCHAR(90)
       )";

     if(!mysqli_query($connection, $query)) echo("<p>Error creating table.</p>");
  }
}

/* Check for the existence of a table. */
function TableExists($tableName, $connection, $dbName) {
  $t = mysqli_real_escape_string($connection, $tableName);
  $d = mysqli_real_escape_string($connection, $dbName);

  $checktable = mysqli_query($connection,
      "SELECT TABLE_NAME FROM information_schema.TABLES WHERE TABLE_NAME = '$t' AND TABLE_SCHEMA = '$d'");

  if(mysqli_num_rows($checktable) > 0) return true;

  return false;
}
?>
So If you are again getting permission denied don’t save and exit using ctrl+x .
run
ls -ldcommand.update the ownership to you by this command:
sudo chown ecw-user:ec2-user .try saving the SamplePage.php file again.
And done you have successfully saved the file.
Verify that your web server successfully connects to your DB cluster by opening a web browser and browsing to
http://EC2-instance-endpoint/SamplePage.php.
Step 6 : Check if the web app worked!!
In this step you are going to:
Test your new web app in the browser.
- In your browser, where your new web app is running, add some new data.

Connect to yoru database usign MySQL CLI
To access your database, you're going to use MySQL.
Download the MySQL repository into your EC2 instance:
sudo yum install https://dev.mysql.com/get/mysql80-community-release-el7-3.noarch.rpm -yInstall MySQL:
sudo yum install mysql-community-client -y
Connect to your Aurora MySQL Database:
mysql -h YOUR_ENDPOINT -P YOUR_PORT -u YOUR_AURORA_USERNAME -p
Make sure you replace:
YOUR_ENDPOINT with the Endpoint from your Aurora Writer instance
YOUR_PORT with the Port from your Aurora Writer instance;
3306YOUR_AURORA_USERNAME with your Aurora username;
admin
Enter in your Aurora password when prompted;

Run
USE sample;- sample is the name you gave your first database schema.
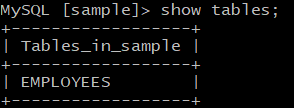
Run
SHOW TABLES;This shows you the tables in your sample schema.
If you're wondering where Employees came from, check your SamplePage.php file. It's all there! (Hint: this is also where you can change it if you're feeling creative).
Run
DESCRIBE EMPLOYEES;This tells you how the Employees table is structured.

Run
SELECT * FROM EMPLOYEES;This shows you the actual data in your table!
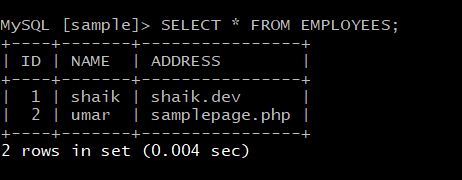
- Now it's over to you! Have a play around adding more data in your web app, then re-running the commands above to check the data in your database.
Summary
Congrats! We've successfully connected the web app to the database and ran a few queries to check the connection! Now, don't forget to delete the resources you created to avoid any charges.
Subscribe to my newsletter
Read articles from yyounos shaik directly inside your inbox. Subscribe to the newsletter, and don't miss out.
Written by

yyounos shaik
yyounos shaik
An Aspring Cloud Engineer