Intermediate Tasks for Beginners using Compute Engine
 Hridhi Kumari
Table of contents
- Task 10: Create a Custom Image and Use It for VM Creation
- Task 12: Setting Up Firewall Rules
- Task 13: Configure Load Balancer for High Availability
- Task 14: Automate VM Management with Google Cloud SDK
- Task 15: Schedule a Task on VM (Using Cronjob)
- Task 16: Monitor RAM and CPU Usage of VM
- Task 17: Attach a Disk to a VM During/After Creation
- Task 18: Take a Backup of the VM (Snapshots)

Task 10: Create a Custom Image and Use It for VM Creation
Steps:
Create a VM:
Log in to GCP Console.
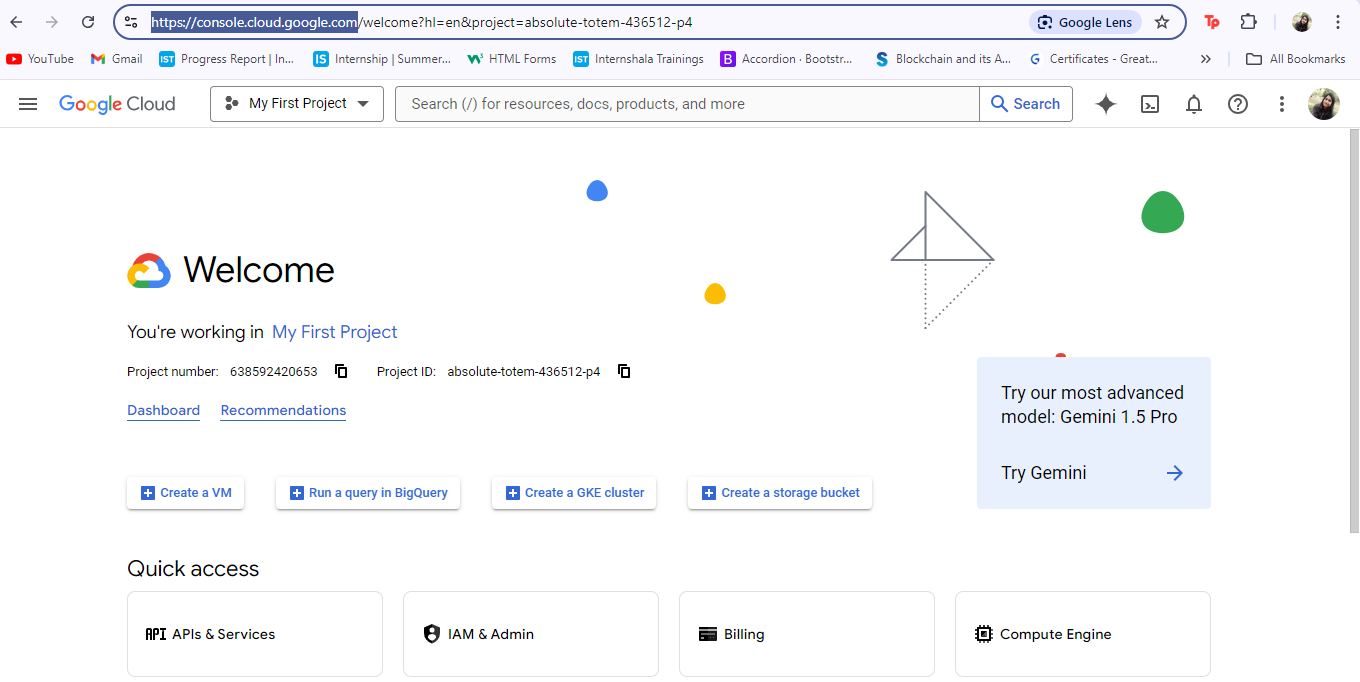
Navigate to the "Compute Engine" section.
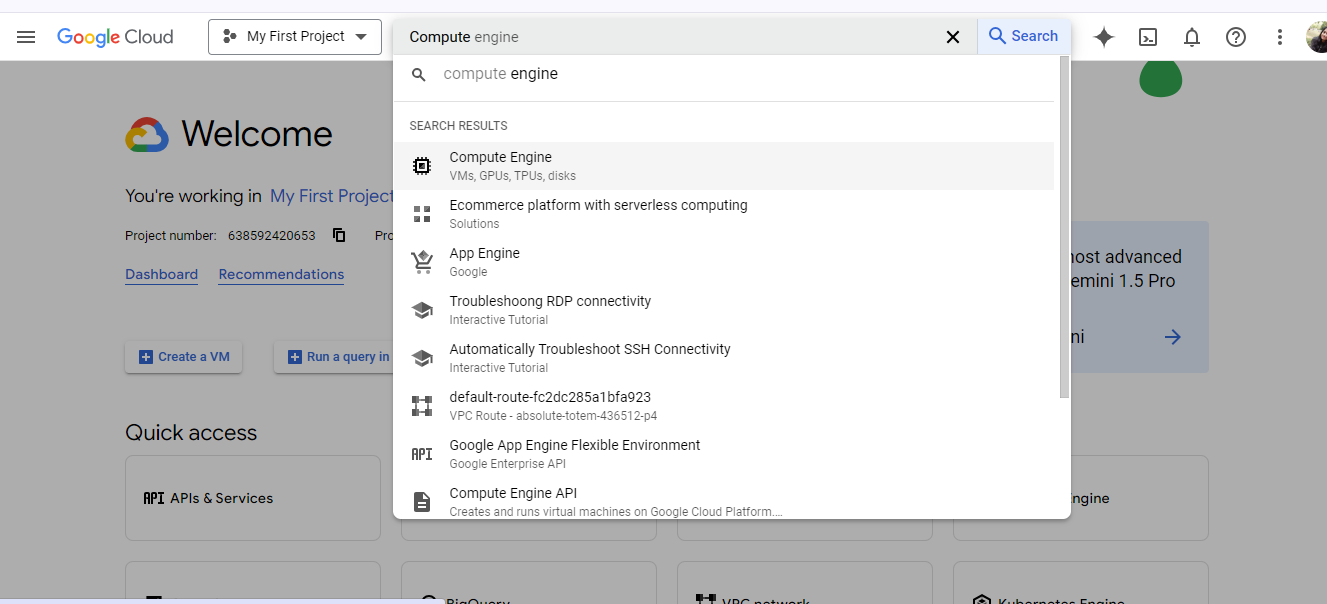
Click on "VM instances" and then "Create instance."
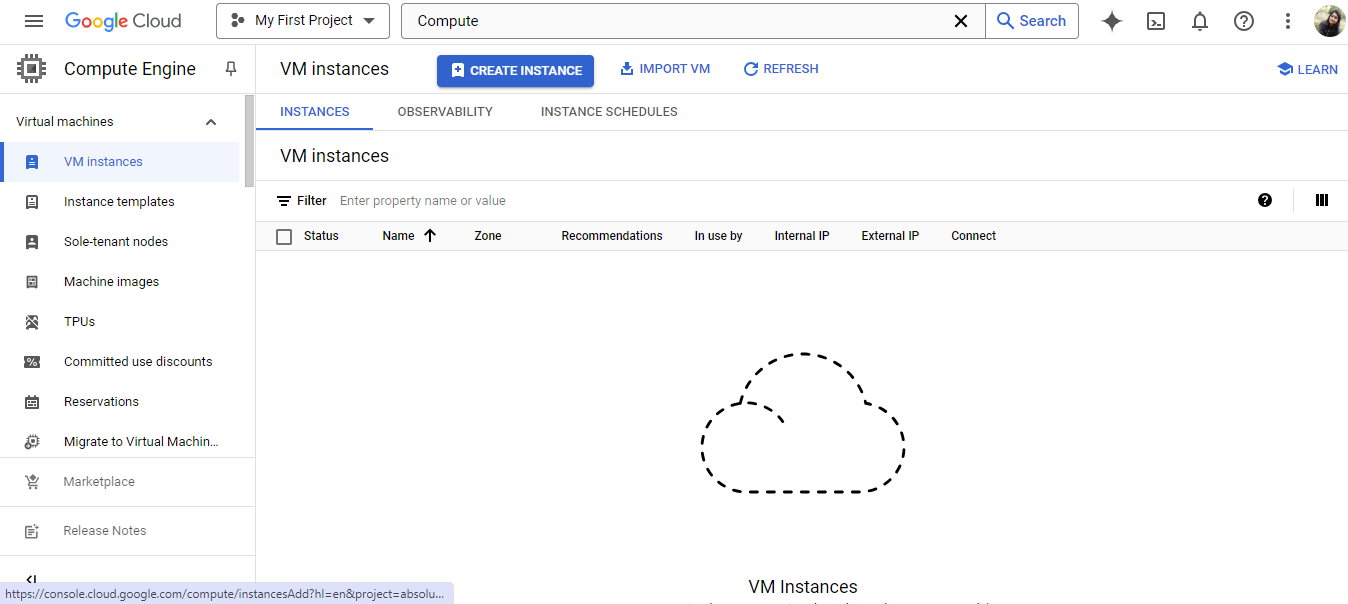
Configure your VM with the desired settings (name, region, machine type, etc.).
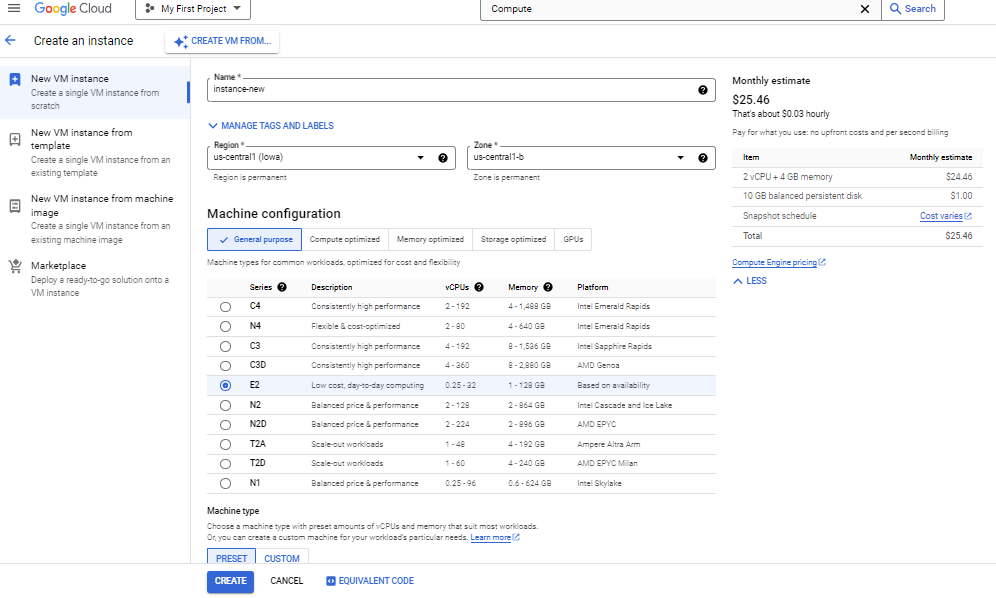
Click "Create."

Create a Custom Image:
In the Google Cloud Console, go to "Compute Engine" > "Images."
Click "Create image."
Select the source disk of your configured VM.
Fill in the image name and other settings, then click "Create."
Launch a New VM from the Custom Image:
Go back to "VM instances" and click "Create instance."
In the "Boot disk" section, select "Custom images" and choose your created image.
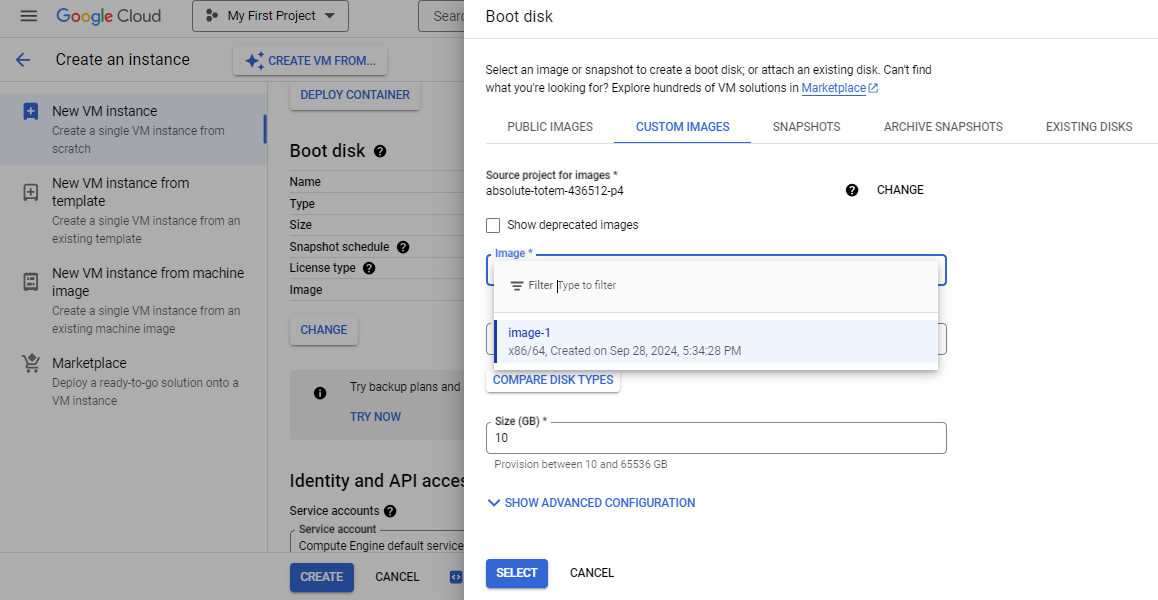
Configure other settings as needed and click "Create" , this will create new VM Instance using existing image.

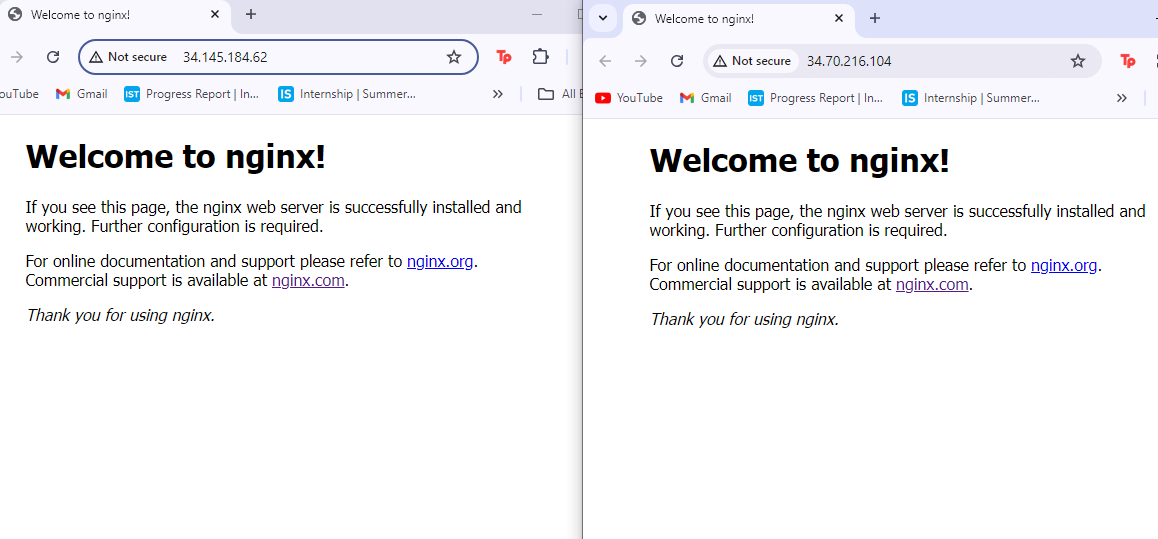
Now click on External IP of both VM and compare them.
Task 12: Setting Up Firewall Rules
Steps:
Go to Firewall Rules:
Log in to GCP Console.
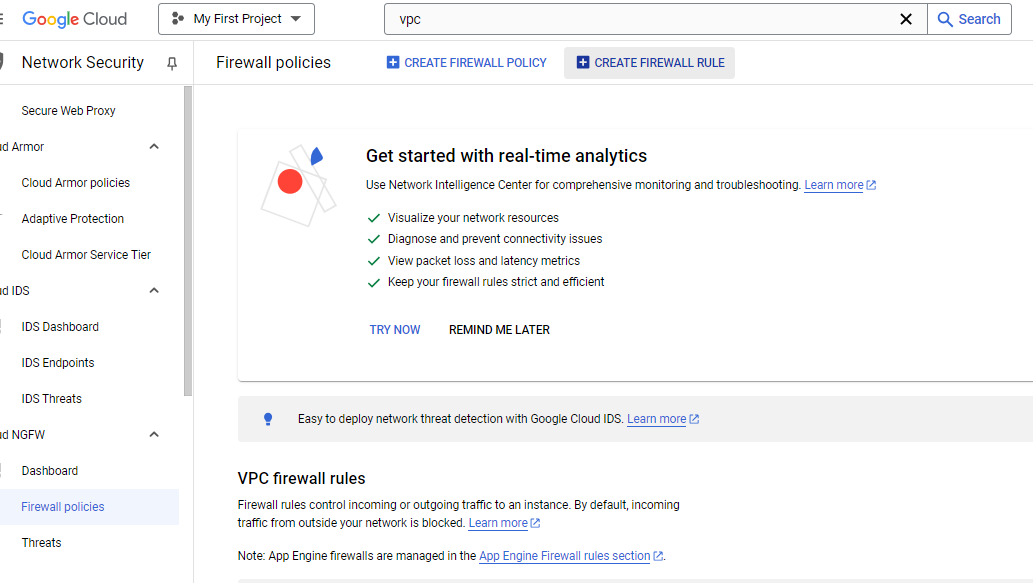
In the Google Cloud Console, navigate to "VPC network" > "Firewall rules".

Click "Create firewall rule".
Fill in the name, and select the target (e.g., "All instances in the network" or specific instances),Source IP ranges( Set to
0.0.0.0/0for all IPs).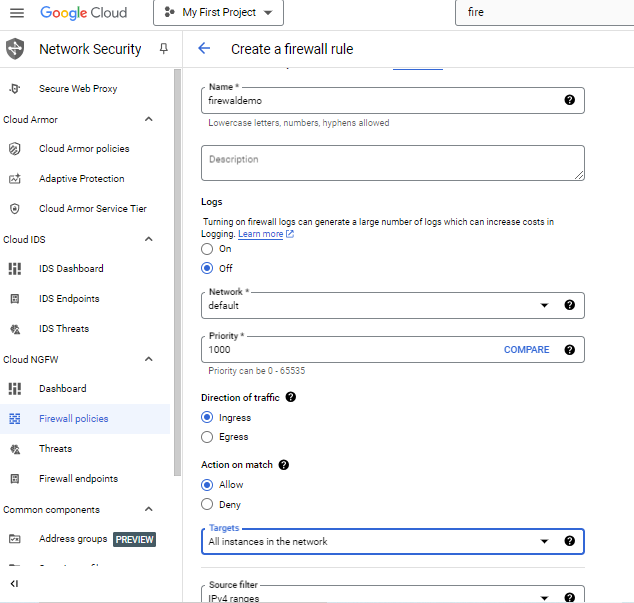
Specify the protocols and ports to allow, such as TCP: 80 for HTTP.
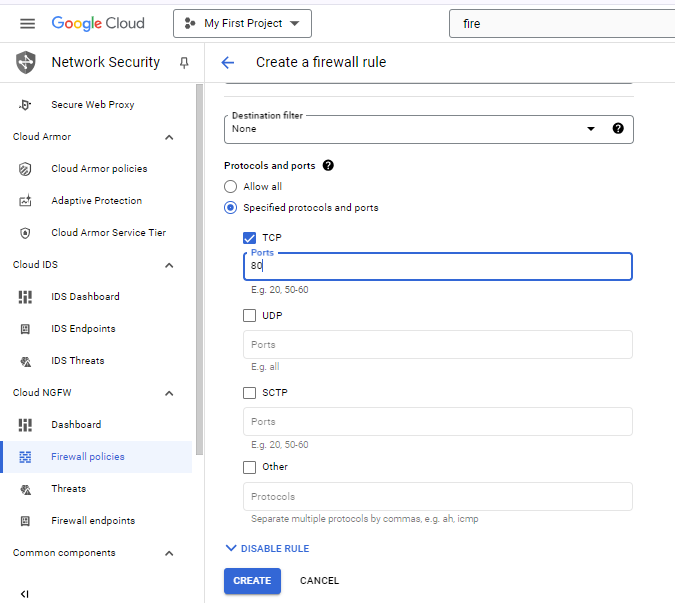
Click "Create".

Task 13: Configure Load Balancer for High Availability
Steps:
Create Instance Groups:
Log in to GCP Console.
In the Google Cloud Console, navigate to "Compute Engine" > "Instance groups".
Click "Create instance group".
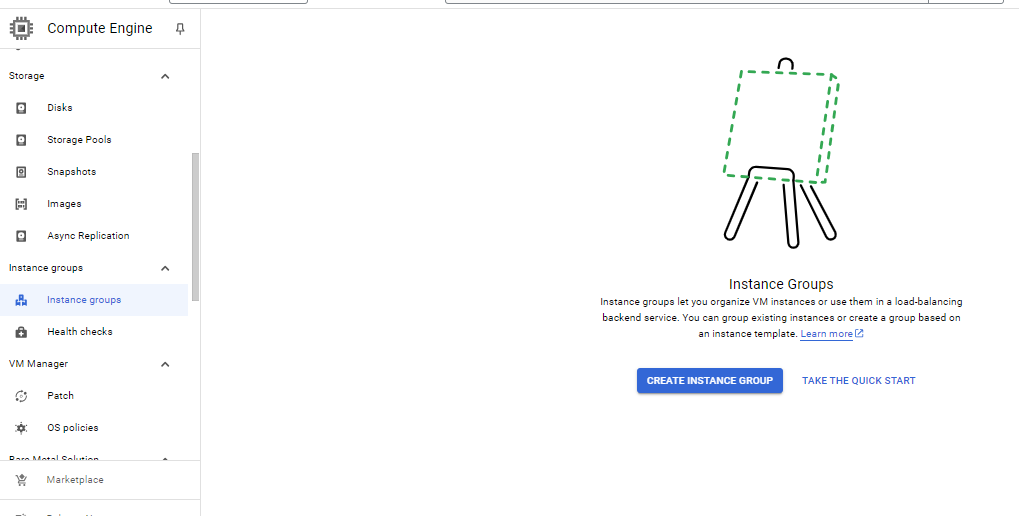
Choose either a managed or unmanaged instance group and set it up with your desired VM instances.
Add Instance group name, instance template, location, autoscaling, initialization period etc.
To add instance template, click on Create New Instance template.
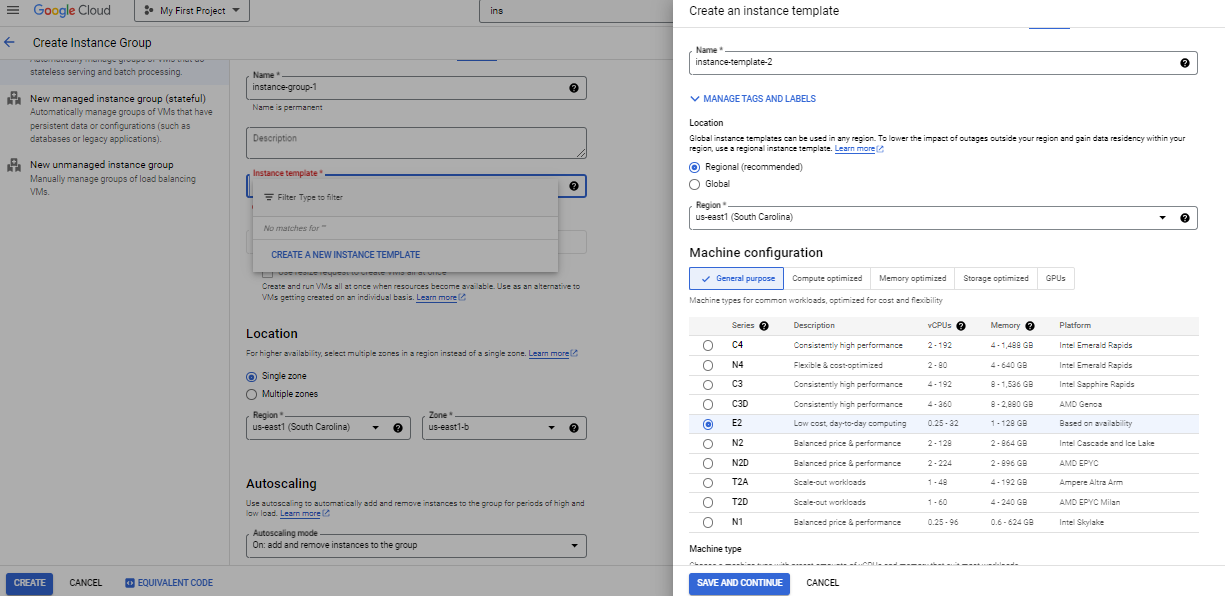
Click Save and Continue and then click Create.

Set Up a Load Balancer:
Go to "Network services" > "Load balancing."
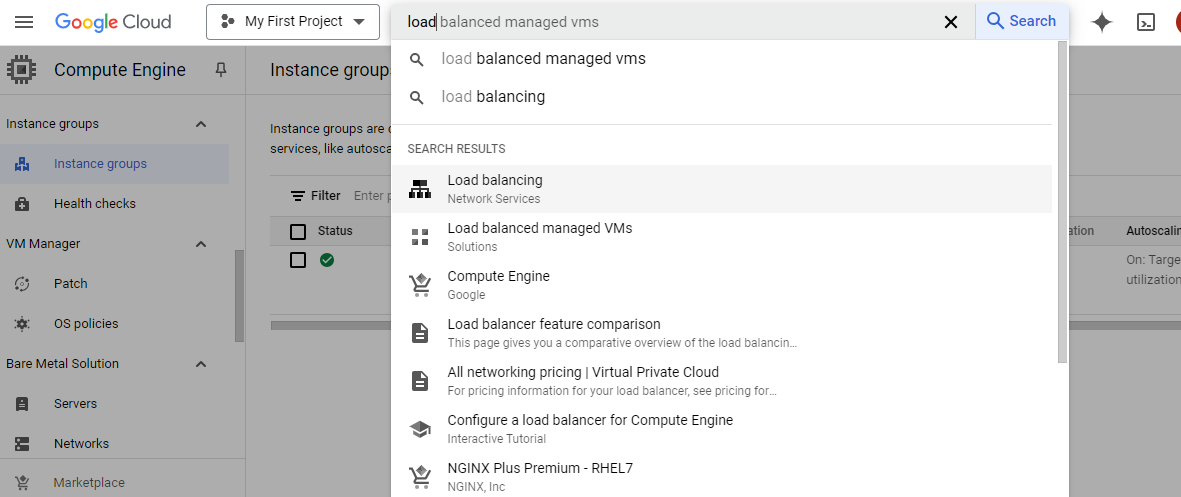
Click Create load balancer.

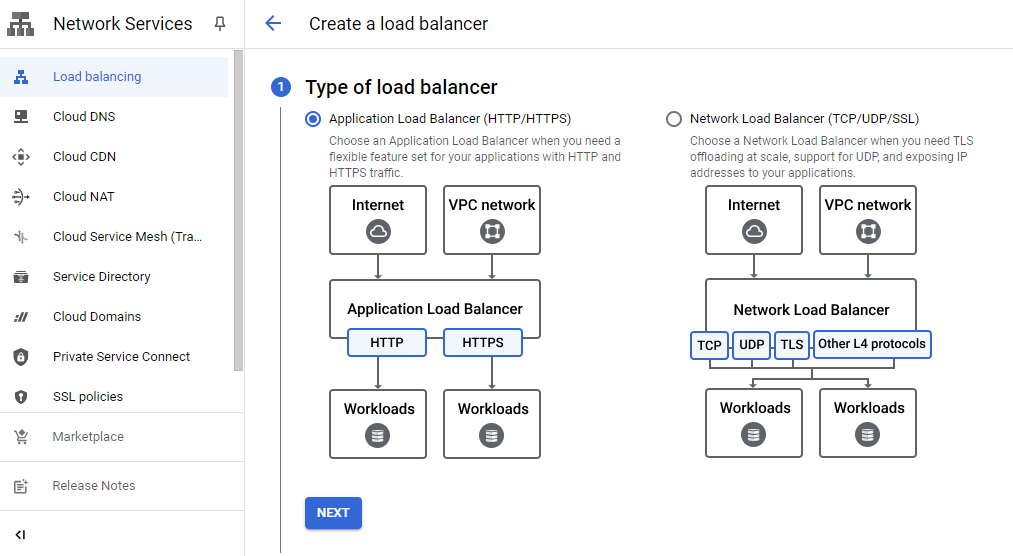
Choose the type of load balancer (HTTP(S) for web traffic), public facing, global or single region deployment, load balancer generation and click Next.
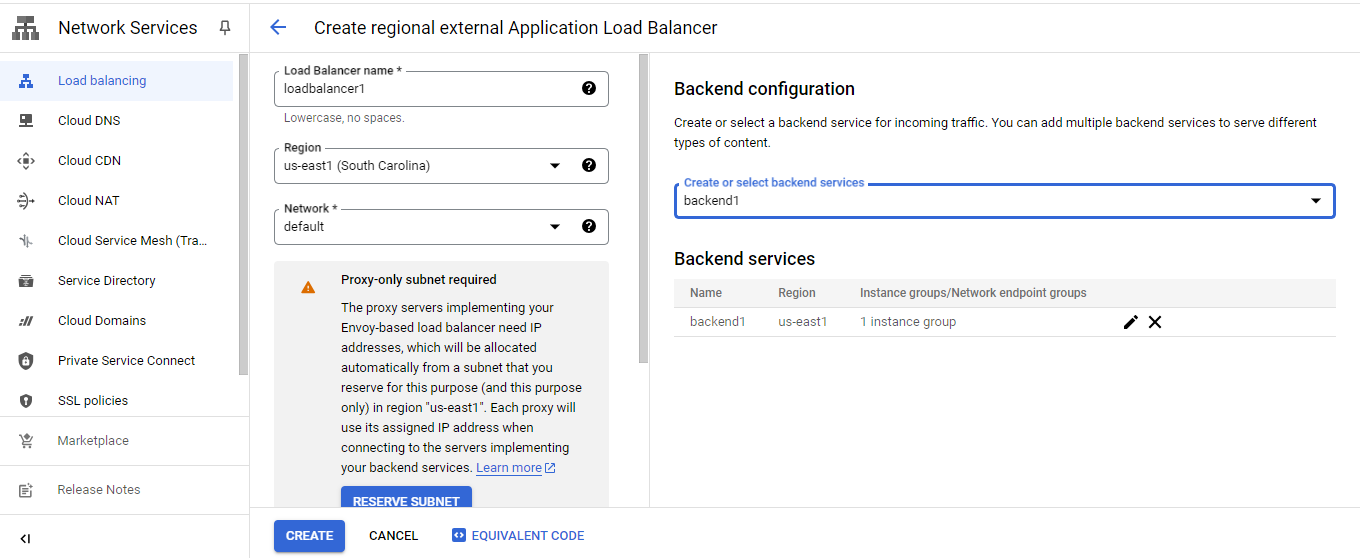
Add Name, Region, Network, configure the Frontend, Backend service by selecting your instance group.
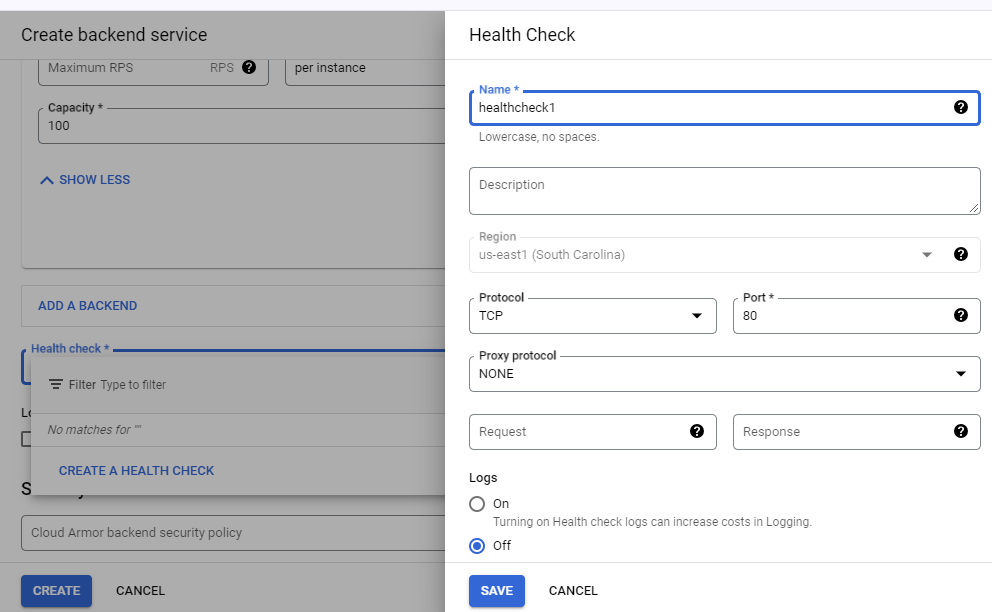
Set up health checks and create the load balancer.
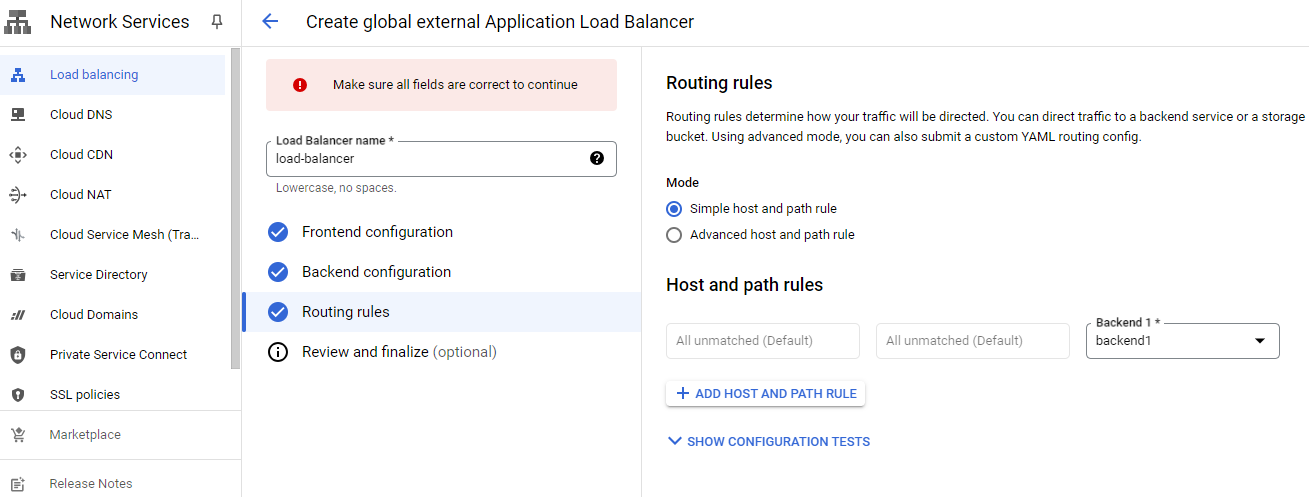
Add Routing rule(simple host and path rule).
Click Create.
Task 14: Automate VM Management with Google Cloud SDK
Steps:
Open Cloud Shell:
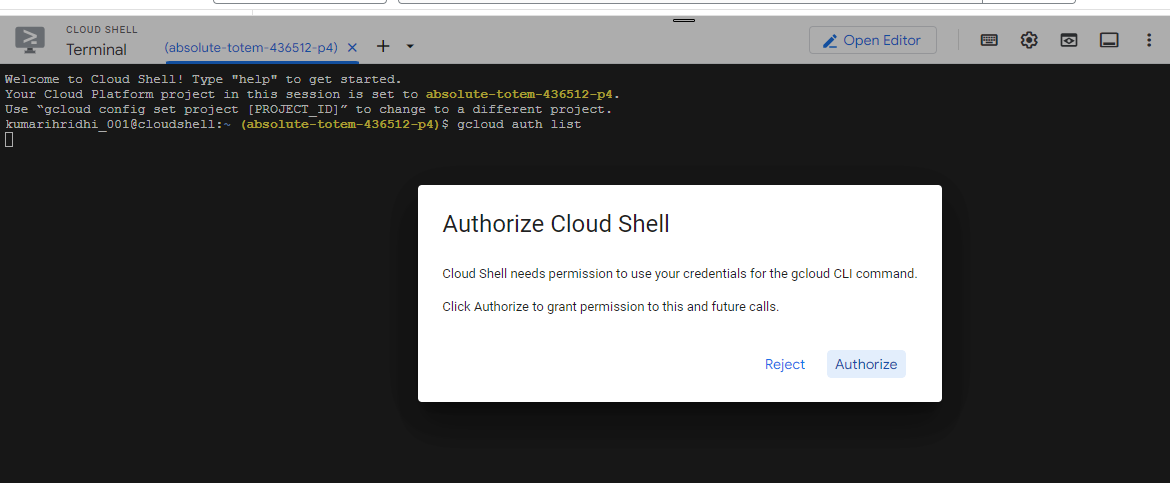
Go to the Cloud Shell by clicking on the terminal icon in the top right corner which comes with the SDK pre-installed.
Use
gcloudcommands to connect to terminal and click Authorize .gcloud auth list gcloud config list projectUse
gcloudcommands to manage your VMs.Create a VM:
gcloud compute instances create instance-ee --zone asia-south2-b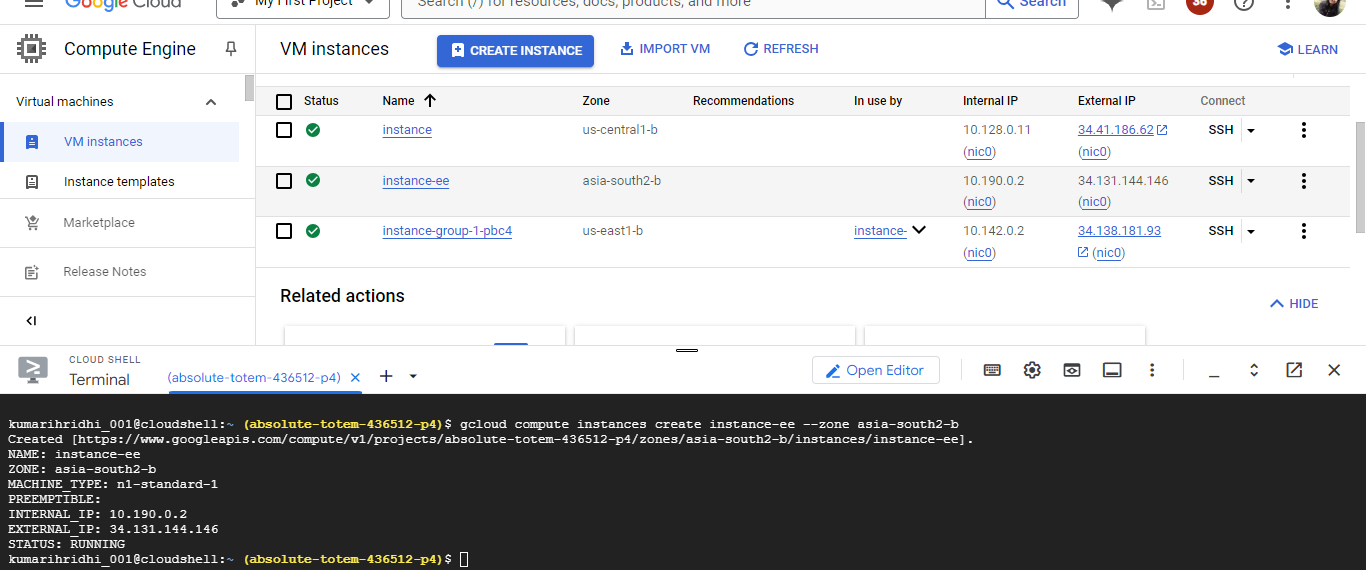
Delete a VM:
gcloud compute instances delete instance-ee --zone asia-south2-b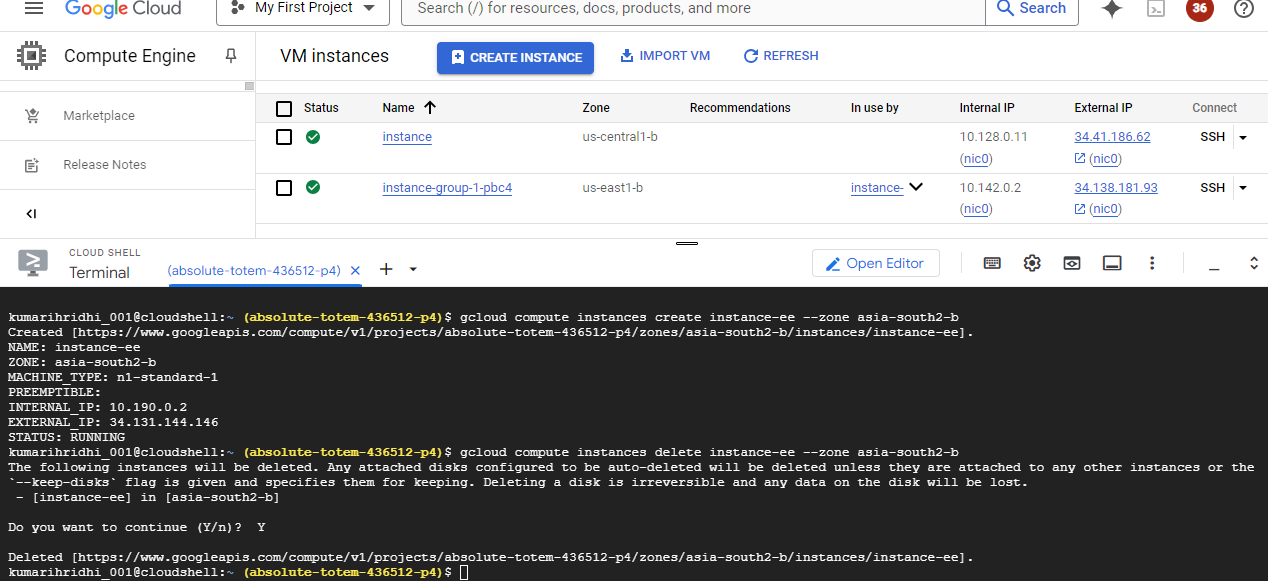
Task 15: Schedule a Task on VM (Using Cronjob)
Steps:
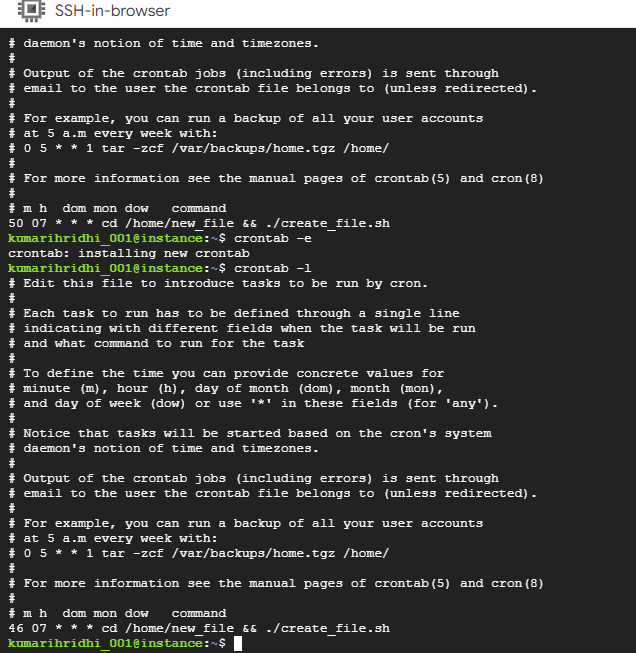
Open Crontab:
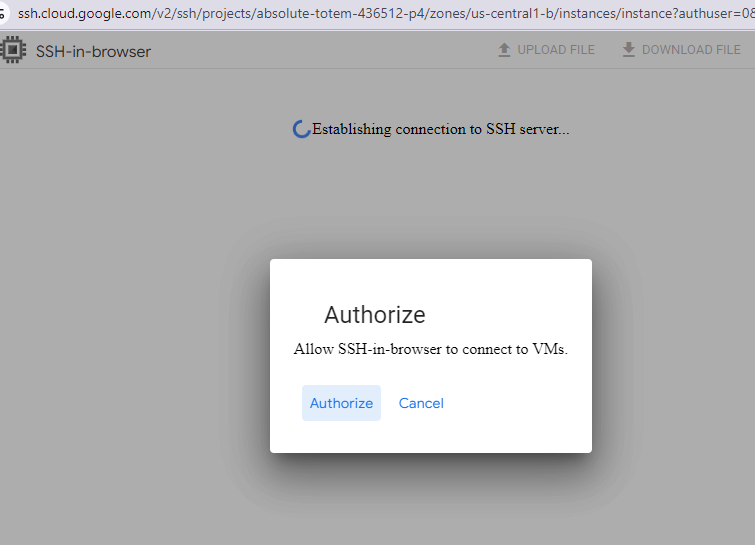
SSH into your VM and click Authorize.
Open the crontab editor by typing-
  crontab-e
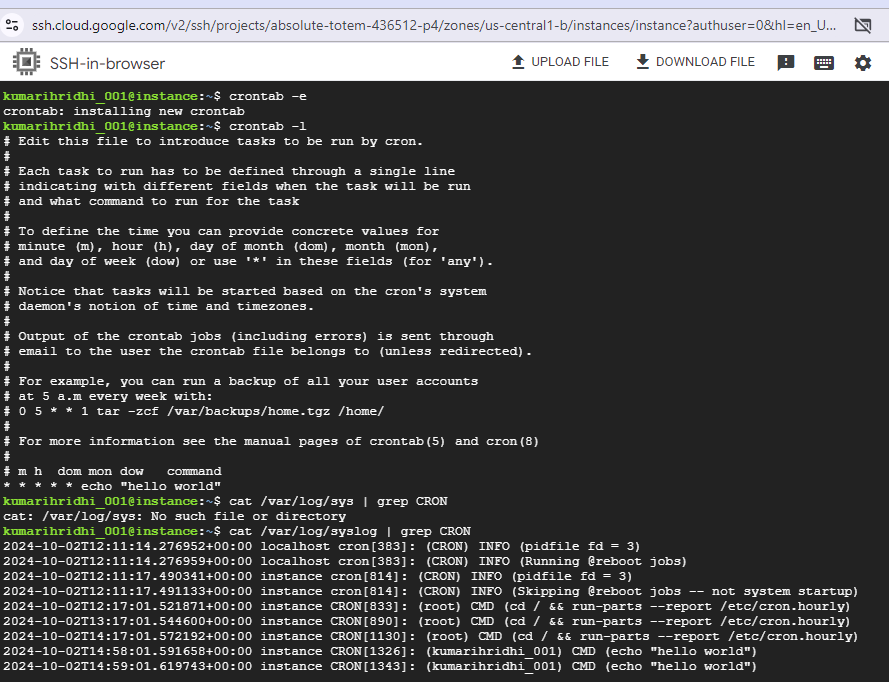
  crontab-l
Add a Cron Job:
At the bottom of the crontab file, add the desired schedule and command. For example, run “hello world” every minute.
Save and Exit:
Save your changes and exit the editor.
Task 16: Monitor RAM and CPU Usage of VM
Steps:
- Use Built-in Tools:
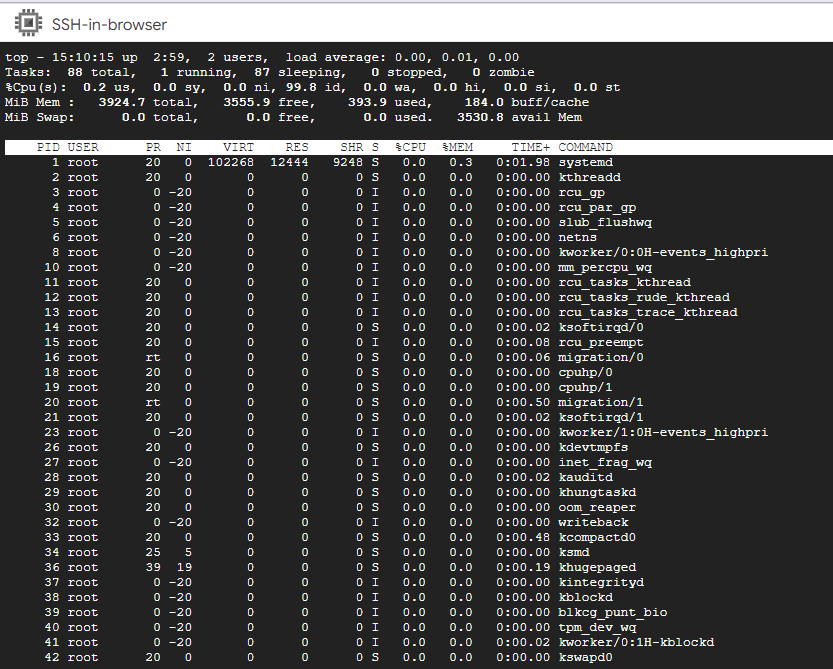
SSH into your VM.
Use tools like
toporhtopto view CPU and memory usage interactively.
OR
Navigate to Monitoring > Metrics explorer.
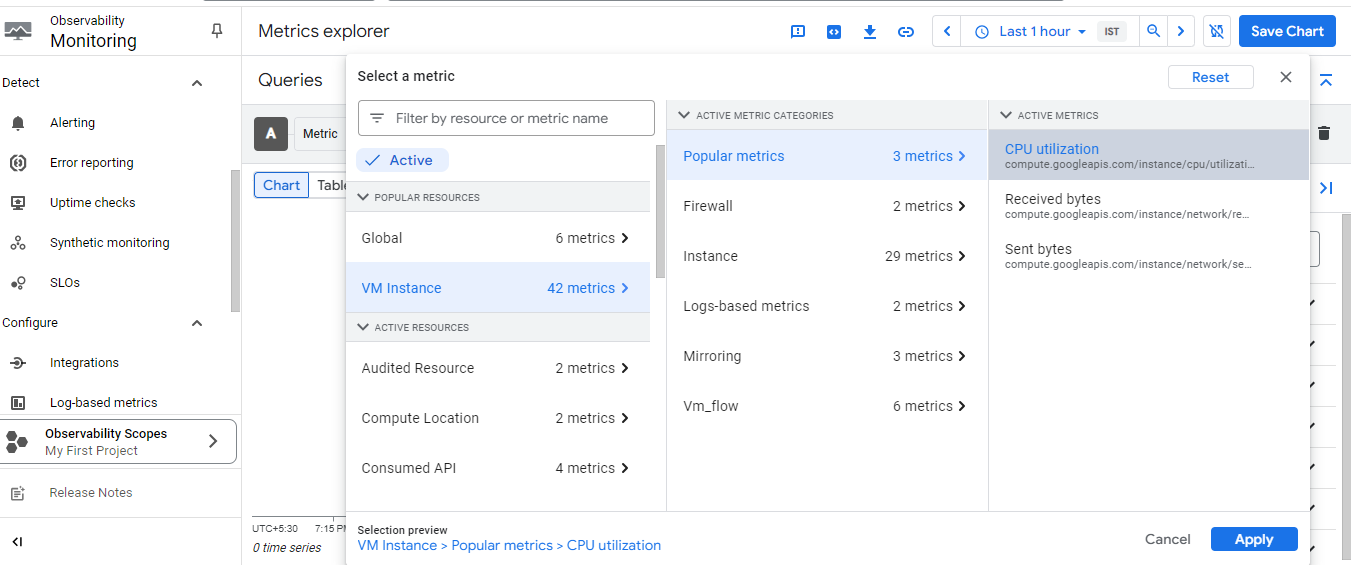
Select a Matric resources, category and then click Apply.
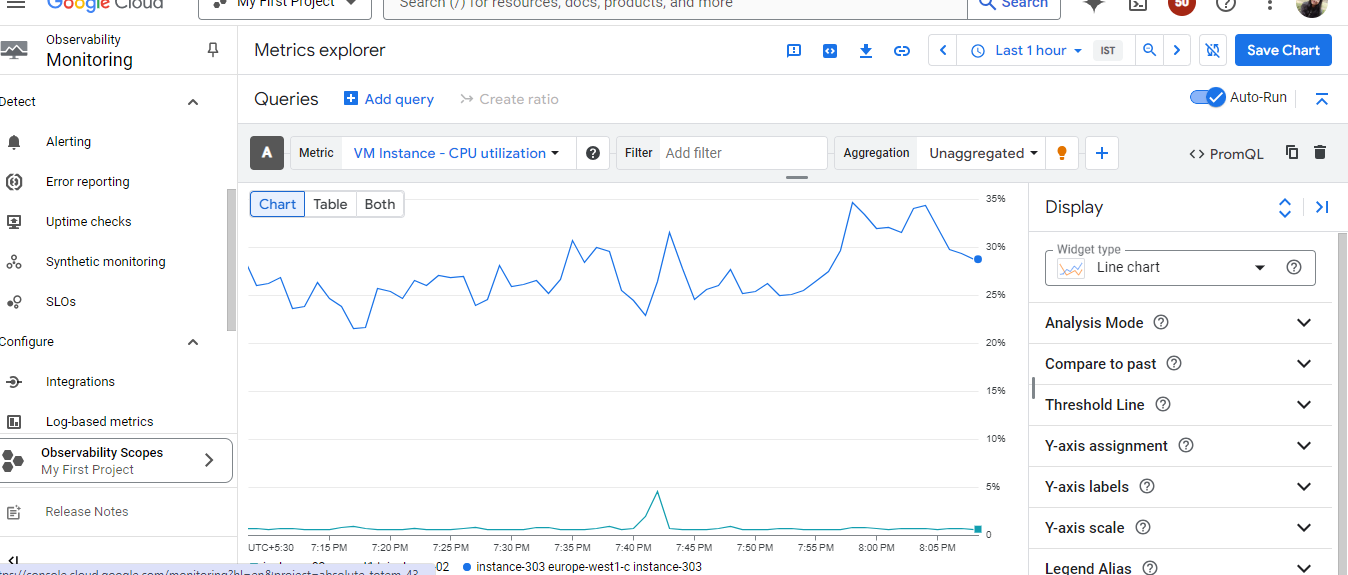
Here we can see the logs of CPU Utilization of VM.
Task 17: Attach a Disk to a VM During/After Creation
Step :
Attach a Disk During VM Creation-
Log in to GCP Console.
From the Navigation Menu, go to Compute Engine > VM instances.
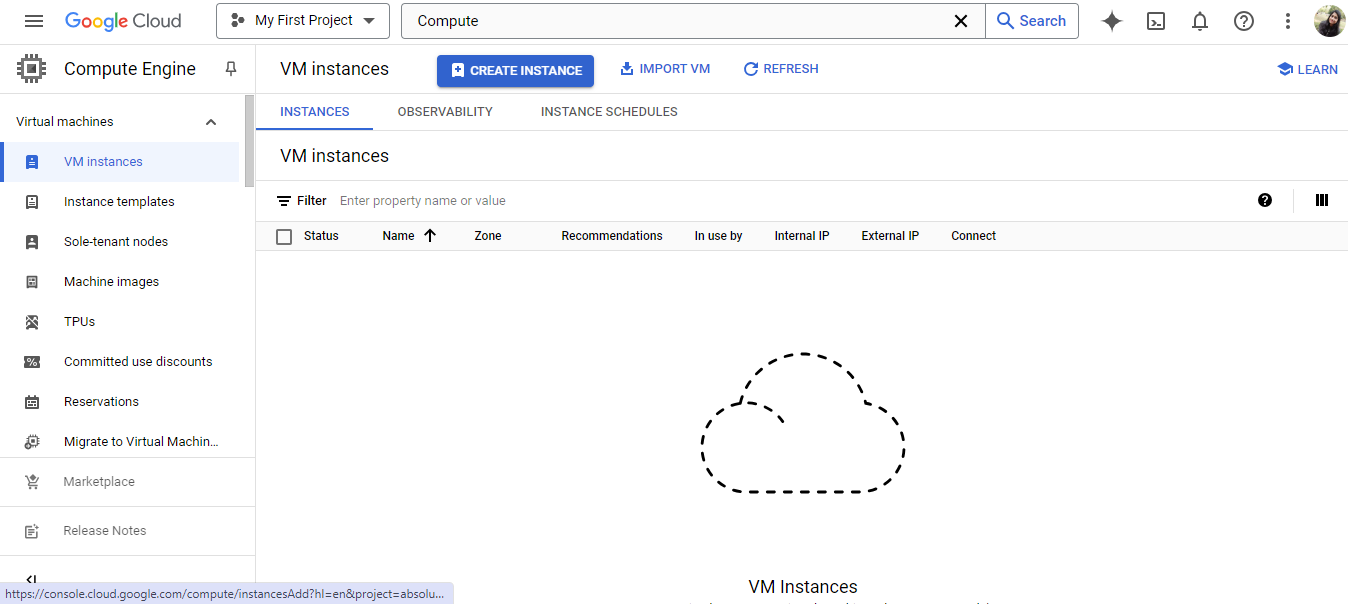
Click on Create Instance.
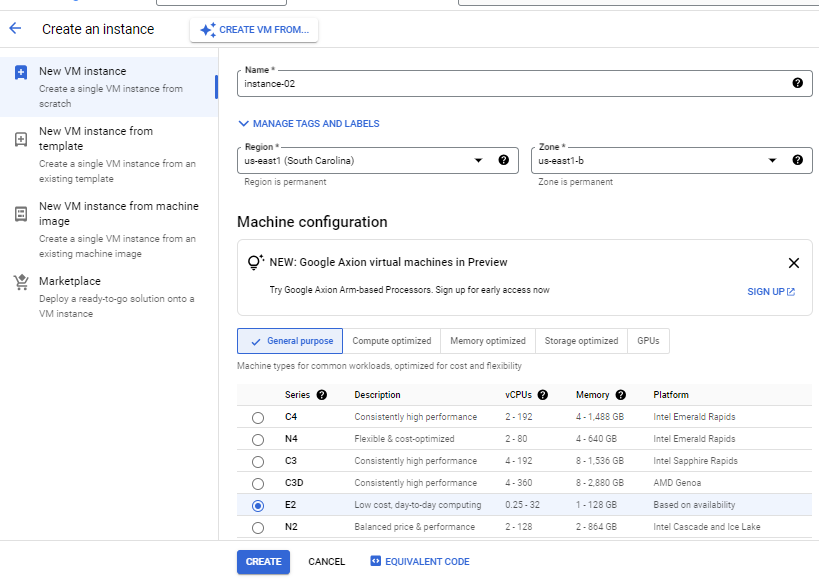
Set the name, region, and machine type for your instance.
Scroll down to Advance Options > Disks and backups.
Click Add new disk.
Specify the disk name, type (e.g., SSD, standard persistent), and size.
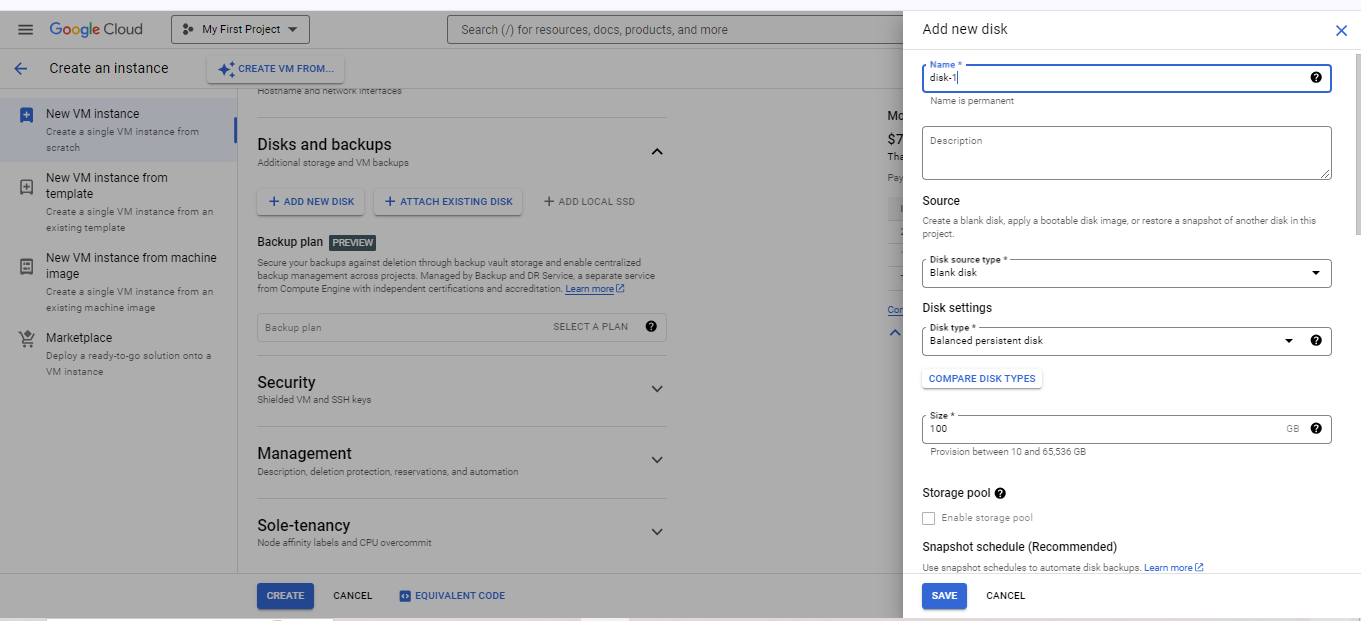
Click Save.
To create a VM Instance with a disk, click Create.

VM Instance should now be UP and running.
Attach a Disk After VM Creation
Go to Compute Engine > VM instances.
Click on the name of the VM Instance you want to attach the disk.

On the VM instance page, scroll to the Disks section.
Click Edit.
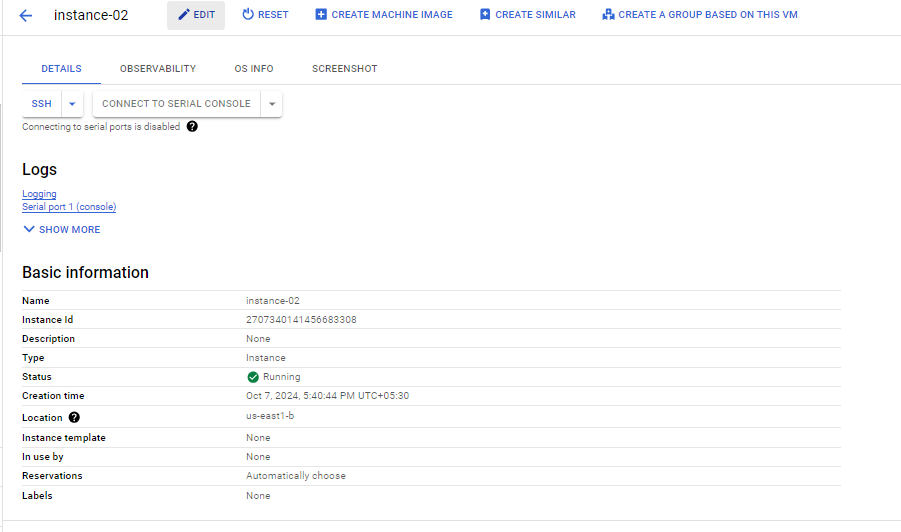
In the Additional Disks section, click Add new disk or select an existing disk.
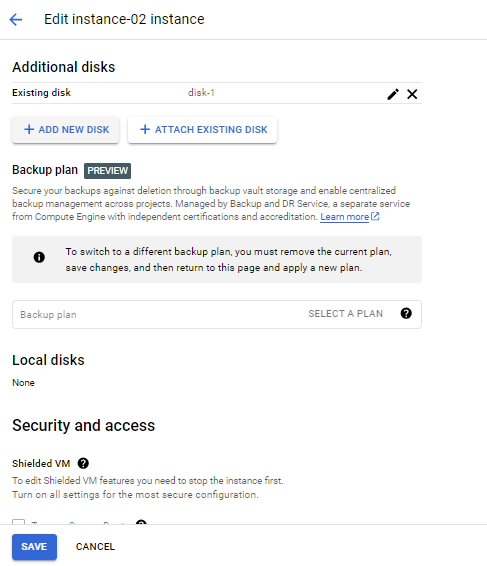
Specify the name, disk source type, disk type, and size.
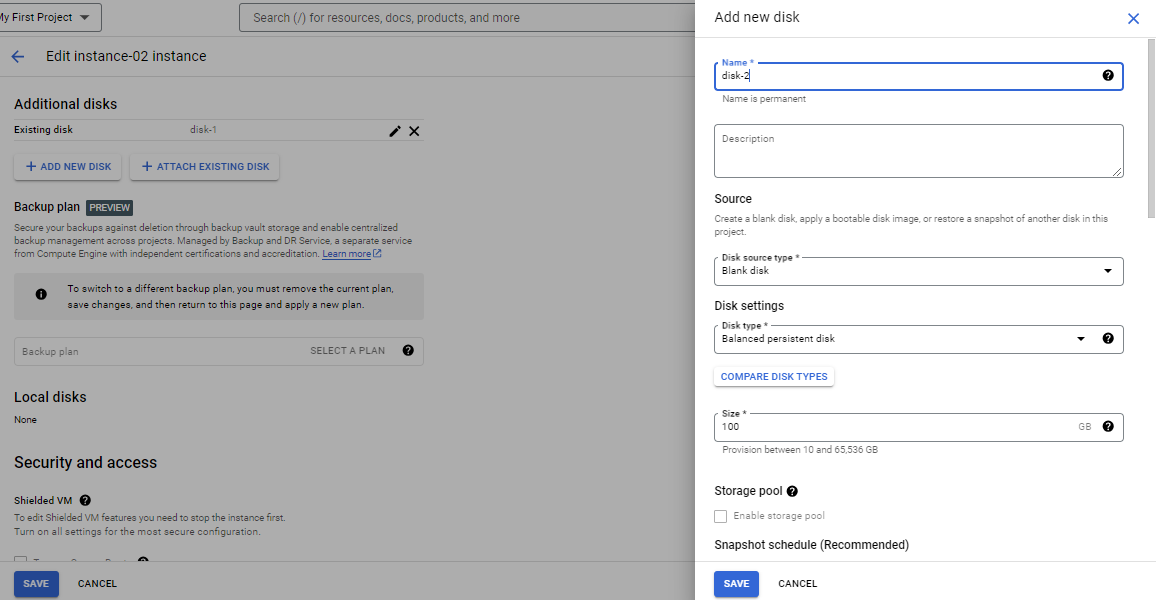
Click Save twice.

Here we can see the disks attached to the VM.
Task 18: Take a Backup of the VM (Snapshots)
Step :
Navigate to the Snapshots Page-
Log in to GCP Console.
From the Navigate to Compute Engine > Snapshots.

Create a Snapshot-
Click on Create Snapshot.

Set a name for snapshot.
In the Source disk section, select the disk from which you want to create a snapshot.
Select any disk attached to a VM.
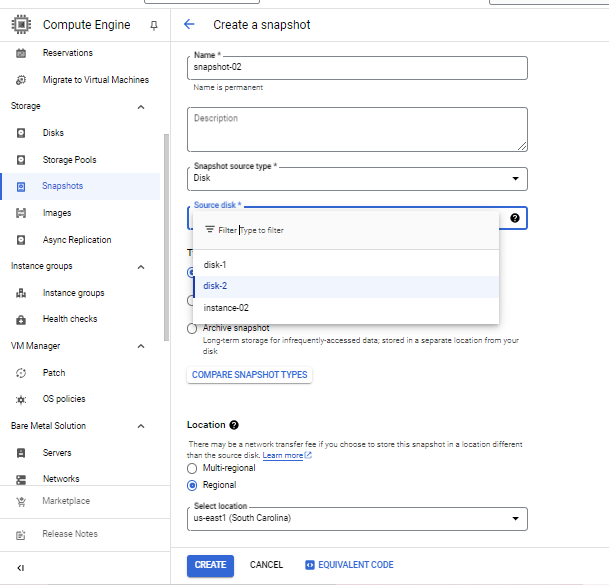
Click Create to take the snapshot.
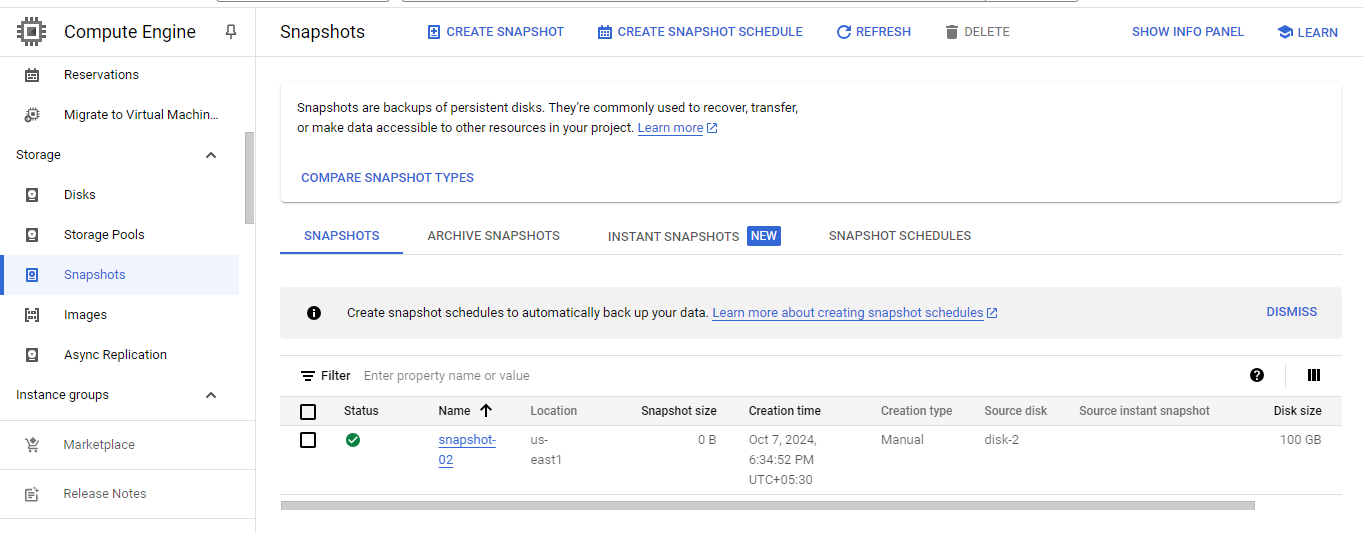
Snapshot will be ready.
Restore a VM from a Snapshot (Disaster Recovery)-
Go to Compute Engine > Disks.
Click Create Disk.

Set the name, location, and disk type.
Under Disk Source Type, choose Snapshot.
Select the snapshot you previously created.
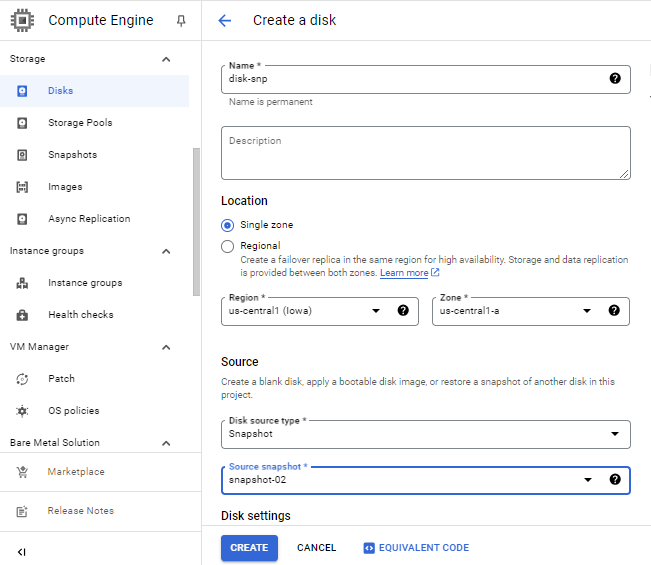
Click Create.
Attach the New Disk to a VM:
Navigate, to Compute Engine > VM instances.
Click on Create Instance.
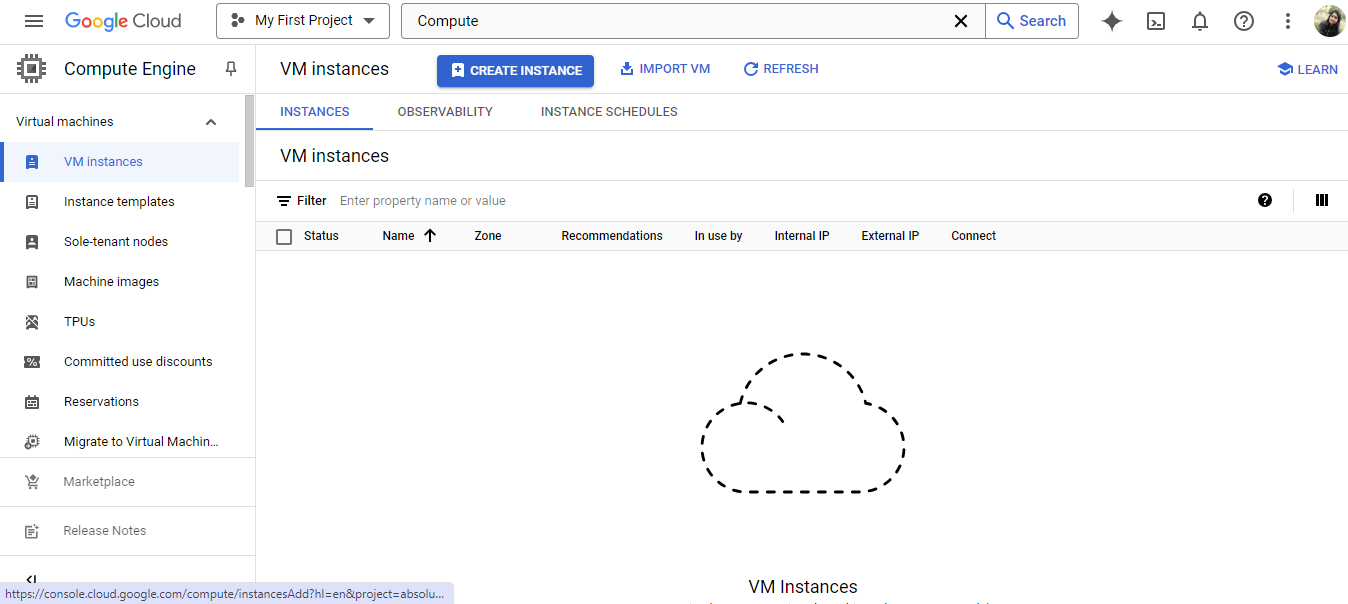
Set the name, region, and machine type for your instance.
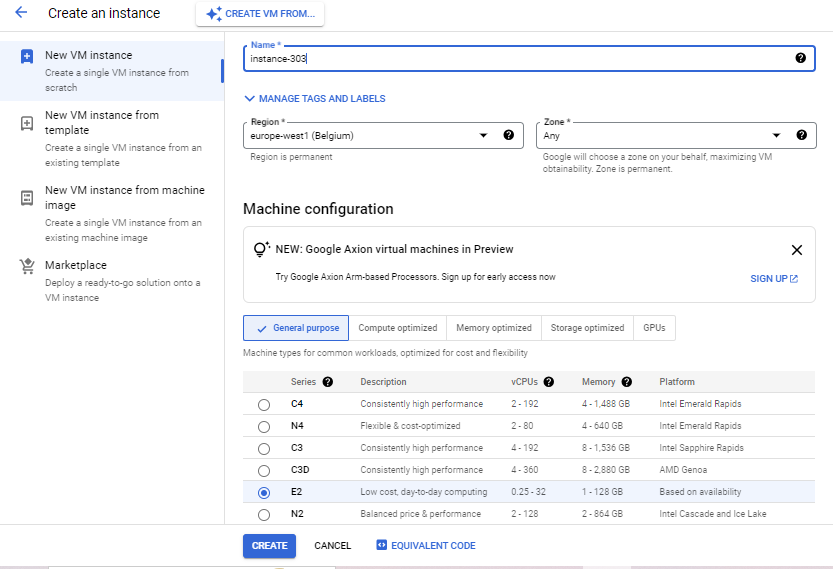
Scroll down to the Boot disk section.
Click Change to configure the boot disk.
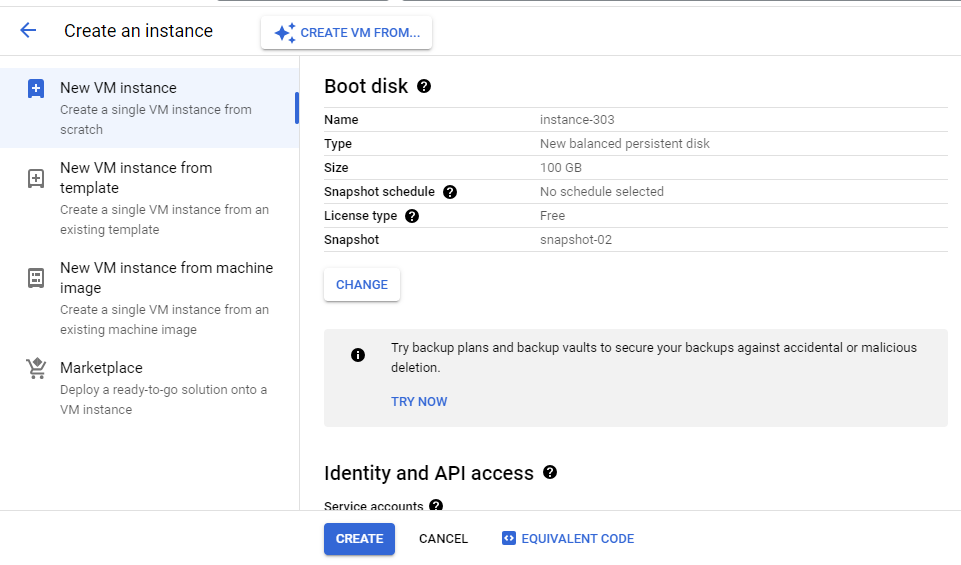
Select Snapshot.
Set snapshot name, disk type and size.
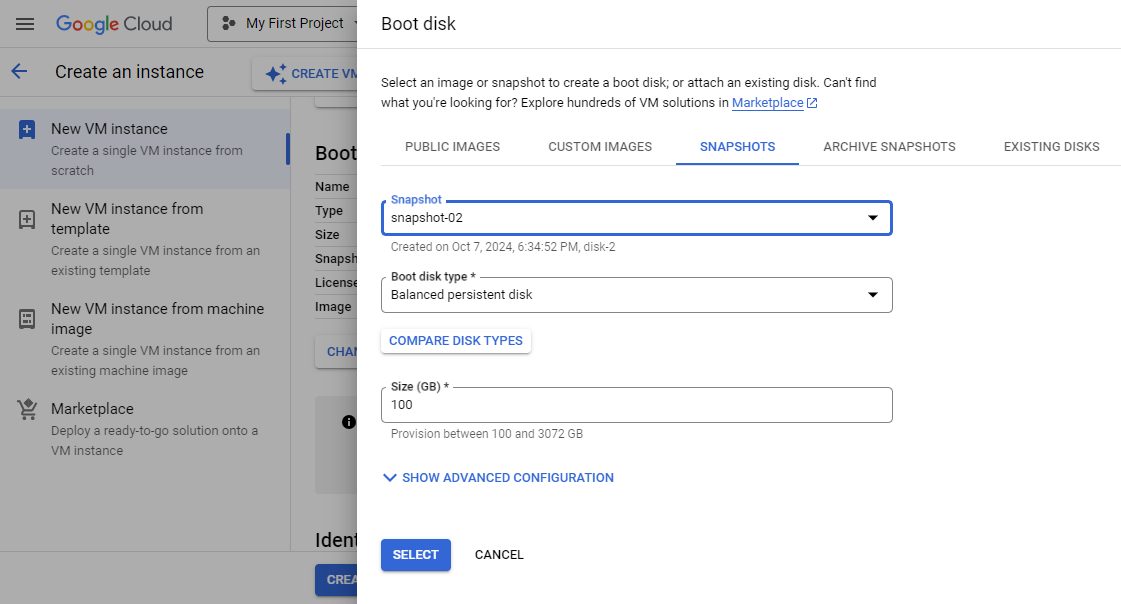
Click on Select and then Create.

VM will be create using snapshot as a disk.
Subscribe to my newsletter
Read articles from Hridhi Kumari directly inside your inbox. Subscribe to the newsletter, and don't miss out.
Written by
