PostgreSQL DOXXED: Tracing Data's Journey from Structure to Storage
 Eyad Youssef
In this article, we’re stripping down how PostgreSQL structures our data into clusters, databases, schemas, relations, indexes and tuples, and figuring out where and how it’s stored with tablespaces and forks.
To get the most out of this article, you should have some basic understanding of databases. It doesn't have to be with PostgreSQL specifically, but having some experience with tables, indexes, and querying will make things easier to follow.
The Skeleton
Tuples
Starting off with the actual data stored in the database, our data is stored in the form of Rows, but they are not stored in this raw form, there are some additional metadata attached to each row, creating what’s called Tuples.

Tuple is an internal term used at the storage level, while Row is more of a user-level term, both are used to refer to a single entry in the database but in different contexts.
Tuples metadata occupy at least the first 23 bytes of a row, which are primarily used for transaction management, as PostgreSQL uses the MVCC (Multi-Version Concurrency Control) architecture to enable transactions to work on the same row(s) concurrently, resulting in creating multiple versions of the same row. This approach allows transactions to work in isolated environments without interfering with each other.
A good example to demonstrate it would be when we try to update a tuple in a table, PostgreSQL does not immediately overwrite the tuple, instead, it creates another version of that tuple and keeps the old value stored and marks it as “dead”, allowing any on-going transactions to operate with the old tuple value, avoiding potential inconsistent or incorrect results from these transactions.
These dead tuples will be removed later when they are no longer required for any transaction and need to free up space. PostgreSQL uses various mechanisms to manage this process, such as pruning and vacuuming.
Rows in a table are typically identified by a Primary Key, which helps us find and reference specific rows in our queries. However, the primary key is not used when it comes to knowing where exactly that row is stored on disk.
For this purpose, PostgreSQL uses a special identifier which tells the exact physical location of the row within the table, which is called CTID (Current Tuple ID), and it is presented as a pair of 2 values (page, offset):
pagerefers to the block/page where the row is stored.offsetis the position of the row within that block/page.
Therefore, the primary key helps us identify a row logically, and CTID helps locating where that row is stored on the disk.
CTID serves similar purpose as ROWID with some characteristic differencesLet’s take an example to see how PostgreSQL deals with tuples:
CREATE TABLE table1 (
    id UUID PRIMARY KEY
);

-- Bulk insert new rows
INSERT INTO table1 (id) VALUES
    ('ff1b90d9-116b-44ca-bc4b-9c427de1605c'),
    ('6dd21e3d-b6f7-4e20-a4eb-ed158434eda6');

-- Insert a single new row
INSERT INTO table1 (id) VALUES('f2b038a9-e293-49da-8372-6600cd439471');

-- Insert a single new row
INSERT INTO table1 (id) VALUES ('7d072daa-4282-40f4-9619-31531c3ea423');

-- We can see the CTID by explicitly specifying it in the select
SELECT ctid, * FROM table1;
| ctid | id |
| (0,1) | ff1b90d9-116b-44ca-bc4b-9c427de1605c |
| (0,2) | 6dd21e3d-b6f7-4e20-a4eb-ed158434eda6 |
| (0,3) | f2b038a9-e293-49da-8372-6600cd439471 |
| (0,4) | 7d072daa-4282-40f4-9619-31531c3ea423 |
Now, let’s try updating the third-row value
-- Update the third row with a new value
UPDATE table1 SET id = 'b0579978-3491-4d1e-a575-724958cb77be'
WHERE id = 'f2b038a9-e293-49da-8372-6600cd439471';

SELECT ctid, * FROM table1;
| ctid | id |
| (0,1) | ff1b90d9-116b-44ca-bc4b-9c427de1605c |
| (0,2) | 6dd21e3d-b6f7-4e20-a4eb-ed158434eda6 |
| (0,4) | 7d072daa-4282-40f4-9619-31531c3ea423 |
| (0,5) | b0579978-3491-4d1e-a575-724958cb77be |
update operation in PostgreSQL can be regarded as two subsequent operations: delete then insert. Therefore, in the select result we can see that it removed the old tuple with CTID value (0,3) from the table and created new one at the end of table with a new CTID value (0,5).
But is the old tuple value completely gone? Not really……...at least not immediately, we can answer this question by inspecting the page on disk where it stores the tuples.
/*
    This function fetches tuples stored in a specific page and decodes
    some values to make them easier to read.
*/
CREATE FUNCTION fetch_table_page(table_name text, page_number int)
RETURNS TABLE(ctid tid,  t_ctid tid,  t_xmin xid,  t_xmax xid,  t_data bytea,  xmin_status text,  xmax_status text)
AS $$
SELECT (page_number,lp)::text::tid AS ctid, t_ctid, t_xmin, t_xmax, t_data,
       CASE
           WHEN (t_infomask & 256) > 0 THEN 'committed'
           WHEN (t_infomask & 512) > 0 THEN 'rolled back'
           ELSE ''
           END AS xmin_status,
       CASE
           WHEN (t_infomask & 1024) > 0 THEN 'committed'
           WHEN (t_infomask & 2048) > 0 AND (t_xmax::text::bigint > 0) THEN 'rolled back'
           ELSE ''
           END AS xmax_status
FROM heap_page_items(get_raw_page(table_name, page_number))
$$ LANGUAGE SQL;

/*
    0 is the first page that stores data, it should contain all tuples
    since they are small in size
*/
SELECT * FROM fetch_table_page('table1', 0);
| ctid | t_ctid | t_data | t_xmin | t_xmax | xmin_status | xmax_status |
| (0,1) | (0,1) | ff1b90d9-116b-44ca-bc4b-9c427de1605c | 803 | 0 | committed | |
| (0,2) | (0,2) | 6dd21e3d-b6f7-4e20-a4eb-ed158434eda6 | 803 | 0 | committed | |
| (0,3) | (0,5) | f2b038a9-e293-49da-8372-6600cd439471 | 804 | 807 | committed | committed |
| (0,4) | (0,4) | 7d072daa-4282-40f4-9619-31531c3ea423 | 805 | 0 | committed | |
| (0,5) | (0,5) | b0579978-3491-4d1e-a575-724958cb77be | 807 | 0 | committed |
You may have observed that there are two similar column names, ctid and t_ctid.
ctid indicates the tuple’s current physical location as we discussed, whereas t_ctid points to the next tuple version after an update. If the tuple has never been updated, it will have the same value as ctid, or in other words, point to itself, as demonstrated by other tuples.
In our case, the old tuple with ctid = (0,3) still exists with the old UUID value on the page, and its t_ctid value points to the newer version of it, which is (0,5).
This concept can be extended further to form a chain of t_ctid pointers when the new tuple version (0,5) receives another update for its value:
UPDATE table1 SET id = '0e86dee8-5560-4011-990d-68a90a6869d6'
WHERE id = 'b0579978-3491-4d1e-a575-724958cb77be';

SELECT * FROM fetch_table_page('table1', 0);
| ctid | t_ctid | t_data | t_xmin | t_xmax | xmin_status | xmax_status |
| (0,1) | (0,1) | ff1b90d9-116b-44ca-bc4b-9c427de1605c | 803 | 0 | committed | |
| (0,2) | (0,2) | 6dd21e3d-b6f7-4e20-a4eb-ed158434eda6 | 803 | 0 | committed | |
| (0,3) | (0,5) | f2b038a9-e293-49da-8372-6600cd439471 | 804 | 807 | committed | committed |
| (0,4) | (0,4) | 7d072daa-4282-40f4-9619-31531c3ea423 | 805 | 0 | committed | |
| (0,5) | (0,6) | b0579978-3491-4d1e-a575-724958cb77be | 807 | 808 | committed | committed |
| (0,6) | (0,6) | 0e86dee8-5560-4011-990d-68a90a6869d6 | 808 | 0 | committed |
We can see that a new tuple has been added with ctid (0,6), and the old version with ctid (0,5) has its t_ctid pointing to the new tuple now. Meanwhile, the ctid = (0,3) still has its t_ctid pointing to (0,5), creating a chain (0,3) → (0,5) → (0,6).
PostgreSQL also stores two values in the header of each tuple: xmin, which tracks the transaction ID that created the tuple, and xmax, which tracks the transaction ID that deleted the tuple.
We can notice that for the first 2 tuples, they have the same xmin value, because they were bulk inserted in the same transaction, and the other tuples have different transaction IDs because were inserted in separate transactions.
We can also see that the xmax of all tuples is 0, except for the dead tuples, which means that these tuples were deleted and may or may not have newer versions, but the other ones were not modified or deleted, which can also be used to indicate that this is the latest version of each one of them.
PostgreSQL also stores the Transaction IDs regardless of whether the transaction was committed or rolled back. We can know what happened by decoding some of the tuple statuses stored in the infomask column, specifically xmin_status and xmax_status as shown in the result.
If we try to roll back a DELETE operation, it will look like this
BEGIN;
DELETE FROM table1 WHERE id = 'ff1b90d9-116b-44ca-bc4b-9c427de1605c';
ROLLBACK;

SELECT ctid, * FROM table1 WHERE id = 'ff1b90d9-116b-44ca-bc4b-9c427de1605c';

SELECT * FROM fetch_table_page('table1', 0) LIMIT 1;
| ctid | id |
| (0,1) | ff1b90d9-116b-44ca-bc4b-9c427de1605c |
| ctid | t_ctid | t_data | t_xmin | t_xmax | xmin_status | xmax_status |
| (0,1) | (0,1) | ff1b90d9-116b-44ca-bc4b-9c427de1605c | 803 | 809 | committed | rolled back |
We can see that the xmax value changed from 0 to the Transaction ID 809 and the xmax_status shows that it was rolled back.
At the end, you might be wondering, when will the old tuples be removed? Especially since there are no on-going transactions requiring them. The clean-up process will kick in when PostgreSQL sees the need to do so. As for now, there is plenty of space on the page for new tuples to fit in, just like you do not empty the trash bin when there is barely anything in it, you do it when it’s full.
There are also other metadata that we haven’t touched on:
infomask2contains other flags indicating various different statuses of a tuple.cidcontains inserting or deleting command ID, or both.NULLs bitmapis used to efficiently track which columns areNULLwithout having to storeNULLvalues in each field directly. This bitmap size is dynamic and depends on how many columns are there, that’s why we explicitly mentioned “the tuple’s header is at least 23 byes” because it may exceed that.hoffholds the size of the header, including bitmap.
Relations
Moving on to the collections of rows, rows are grouped into Relations with columns of pre-defined datatypes and varying or fixed sizes. The term Relation is used by PostgreSQL to describe objects that have rows, an object in this context can be a table, index, sequence, view, materialized view, and any other similar structures.
Each relation has a unique numeric identifier, known as an oid, which is used at the storage level to identify it on disk.
PostgreSQL tables are not Index-Organized, where tables have their primary key and rows data stored inside the index structure (B*-Tree for example).
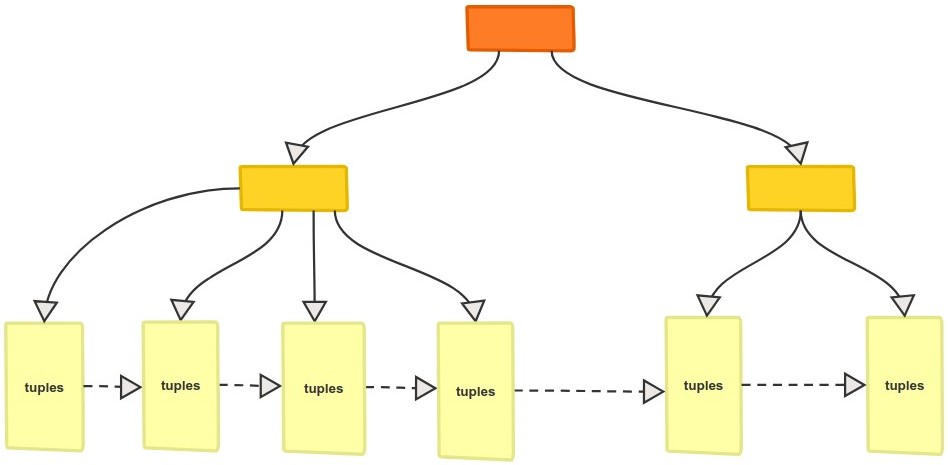
Instead, tables are Heap-Organized, which means that rows are stored in the order they are inserted on disk, one after the other.
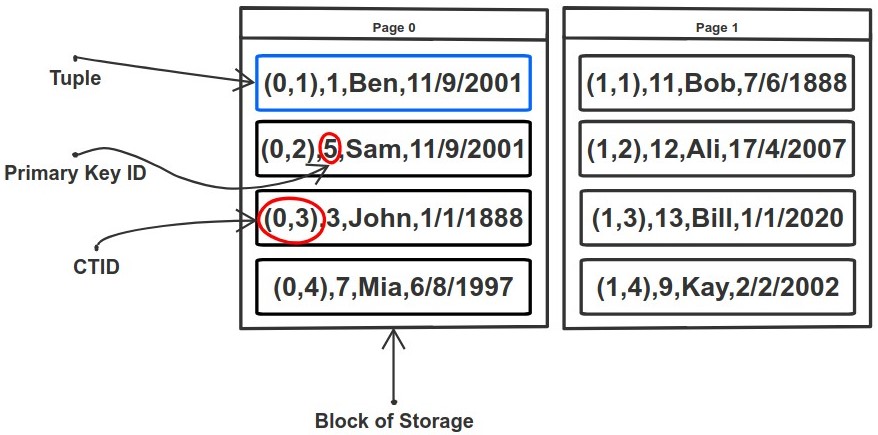
You might have noticed in the previous example in the Tuples section, when we ran the select ctid, * from table1 query, the rows appeared in the same order they were inserted/updated.
| ctid | id |
| (0,1) | ff1b90d9-116b-44ca-bc4b-9c427de1605c |
| (0,2) | 6dd21e3d-b6f7-4e20-a4eb-ed158434eda6 |
| (0,4) | 7d072daa-4282-40f4-9619-31531c3ea423 |
| (0,6) | 0e86dee8-5560-4011-990d-68a90a6869d6 |
We can still order our table on disk manually using the command CLUSTER table_name USING index_name. It physically reorders the tuples based on the index provided. It’s a one-time operation, which means that any subsequent inserts or updates will not be affected, and we would need to run the command again. Be careful when doing it because it is a blocking operation, reads and writes will be prevented on the table until the CLUSTER operation is complete.
Force reordering the table can be useful in scenarios where we frequently need to do a range query SELECT * FROM table1 WHERE id > 1 AND id < 10. It can make retrieval faster as these tuples could potentially be found on the same page if they are small in size, instead of being scattered around.
In general, Heap-Organized tables are potentially faster in write scenarios, because PostgreSQL by default does not need to maintain any sorting or ordering of rows, but could be slower when it comes to reading, unless we utilize indexes, which we are going to talk about in the next section.
Indexes
Indexes are used to speed up the search and retrieval of the query in large tables, by avoiding the full table scan to find the required row(s) for the result.
All indexes are stored as Secondary Indexes, there is no such thing as a Primary Index, due to the fact that tables are Heap-Organized as we mentioned, and the indexes we create on these tables are stored separately from the main data area of the tables.
So for example, when a B-Tree index is created on a text column, each node contains a key (the value to be searched for) and pointers to child nodes or leaf nodes. The leaf nodes store the indexed key along with CTID values that point to the actual table rows on disk. The primary key is not involved in this process.
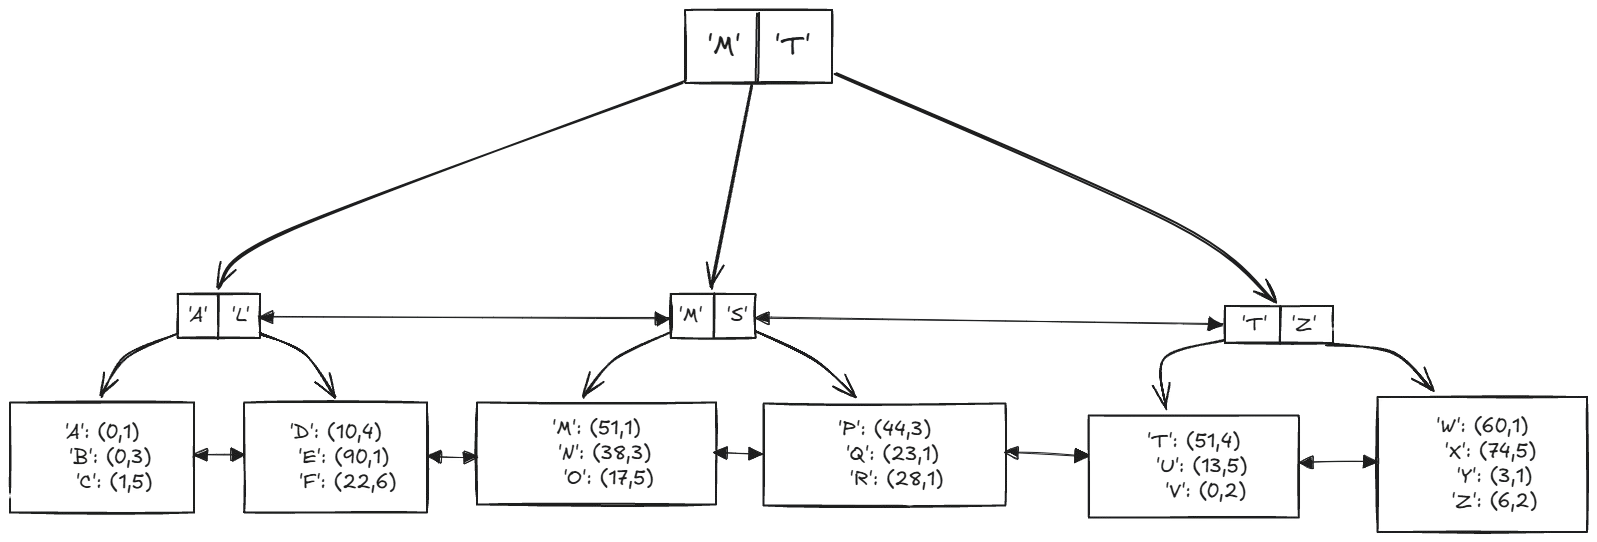
This also means that when we create an index on the table’s primary key specifically and try to retrieve a row using it, PostgreSQL typically requires two steps to retrieve the data: first, searching through the index, then fetching those rows from the table on disk. Unlike the Index-Organized Tables in other RDBMS, where data retrieval only requires one step because the index and data are stored together.
However, PostgreSQL can optimize retrieval through caching, or we can make use of Index-Only Scan, where data is retrieved directly from the index, bypassing going to the table step.
When it comes to storing them on disk, indexes are stored in the form of rows inside pages, and they need to maintain an order for the entries. The entries point to all tuple versions in a table, which means that indexes will contain dead tuples, and will need to be cleaned up at some point.
Let’s take a look at the index page(s) of the previous example in the Tuples section to demonstrate what we just said:
-- Index data pages starts from 1, page 0 holds metadata
SELECT data, ctid FROM bt_page_items('table1_pkey', 1);
| data | ctid |
| 0e 86 de e8 55 60 40 11 99 0d 68 a9 0a 68 69 d6 | (0,6) |
| 6d d2 1e 3d b6 f7 4e 20 a4 eb ed 15 84 34 ed a6 | (0,2) |
| 7d 07 2d aa 42 82 40 f4 96 19 31 53 1c 3e a4 23 | (0,4) |
| b0 57 99 78 34 91 4d 1e a5 75 72 49 58 cb 77 be | (0,5) |
| f2 b0 38 a9 e2 93 49 da 83 72 66 00 cd 43 94 71 | (0,3) |
| ff 1b 90 d9 11 6b 44 ca bc 4b 9c 42 7d e1 60 5c | (0,1) |
There are various types of indexes that can be used besides B-Tree, such as Hash, GIN, GIST, SP-GIST, and BRIN. Each of these indexes has specific use cases where they offer more advantages over the others.
Schemas
Relations then are logically grouped into different namespaces called Schemas. They can also contain other objects such as data types, functions, and operators.
Objects can have the same name in different schemas, for example, schema1 and schema2 can contain two different tables both named mytable.
The default schema inside a newly created database is called public, it is where our newly created tables go by default if we do not explicitly specify another schema. It also works the same way when querying a table, it will search straight inside the public schema for the requested table.
Let’s take a look at this example:
-- Creating users table without specifying schema
-- it will be created in the public schema
CREATE TABLE users (
   id SERIAL PRIMARY KEY,
   first_name VARCHAR(50),
   last_name VARCHAR(50),
   email VARCHAR(100));

INSERT INTO users (first_name, last_name, email)
VALUES ('John', 'Doe', 'john.doe@example.com');

-- Creating new schema auth
CREATE SCHEMA auth;

-- Creating new table and explicitly specifying the auth schema
CREATE TABLE auth.users (
   id SERIAL PRIMARY KEY,
   first_name VARCHAR(50),
   last_name VARCHAR(50),
   email VARCHAR(100));

INSERT INTO auth.users (first_name, last_name, email)
VALUES ('Alice', 'Becker', 'alice.becker@example.com');

-- Querying the users table without specifying a schema.
SELECT * FROM users;
| id | first_name | last_name | |
| 1 | John | Doe | john.doe@example.com |
As we can see, the result was retrieved from the users table inside the public schema, not from the one inside the auth schema, this is because by default if we do not specify a schema, it will search inside the public schema as it is the one specified in something called the database’s search path.
The Search Path determines where to add a table within a schema when no schema is specified. It also ensures that there will be no ambiguity when trying to retrieve data from a table that has the same name in different schemas. We can check the search path using the following command:
SHOW search_path;
| search_path |
| "$user", public |
By default, it points to $user and public. $user represents a placeholder that will be dynamically replaced by the current session's username, this allows each user to have their own schema with the same name as their username.
We can modify this behavior by adding another schema name or a sequence of different schema names. Therefore, when we add a new table without specifying a schema, it will be added to the first schema listed in the search_path. Similarly, when querying without specifying a schema, if the table is present in the first schema in the search_path, the result will be retrieved from there. If not, it will attempt to retrieve it from the subsequent listed schemas.
Let’s extend the previous example:
-- This will overwrite the default search path
SET search_path TO auth,public;

-- Querying users table after changing the search_path
SELECT * FROM users;
| id | first_name | last_name | |
| 1 | Alice | Becker | alice.becker@example.com |
-- Dropping users table inside the auth schema
DROP TABLE auth.users;

-- Querying users table after dropping the one inside the auth schema
SELECT * FROM users;
| id | first_name | last_name | |
| 1 | John | Doe | john.doe@example.com |
-- Creating new table called roles
CREATE TABLE roles (
   id SERIAL PRIMARY KEY,
   name VARCHAR(50) UNIQUE
);

-- Retrieving metdata about the tables and what schema they belong to
SELECT table_name, table_schema
FROM information_schema.tables
WHERE table_name = 'roles';
| table_name | table_schema |
| roles | auth |
Schemas are beneficial for logically organizing tables in a meaningful manner, where each subset of tables can be grouped under a relevant schema. They also help enforce security permissions, allowing different users to access only specific tables.
Databases & Clusters
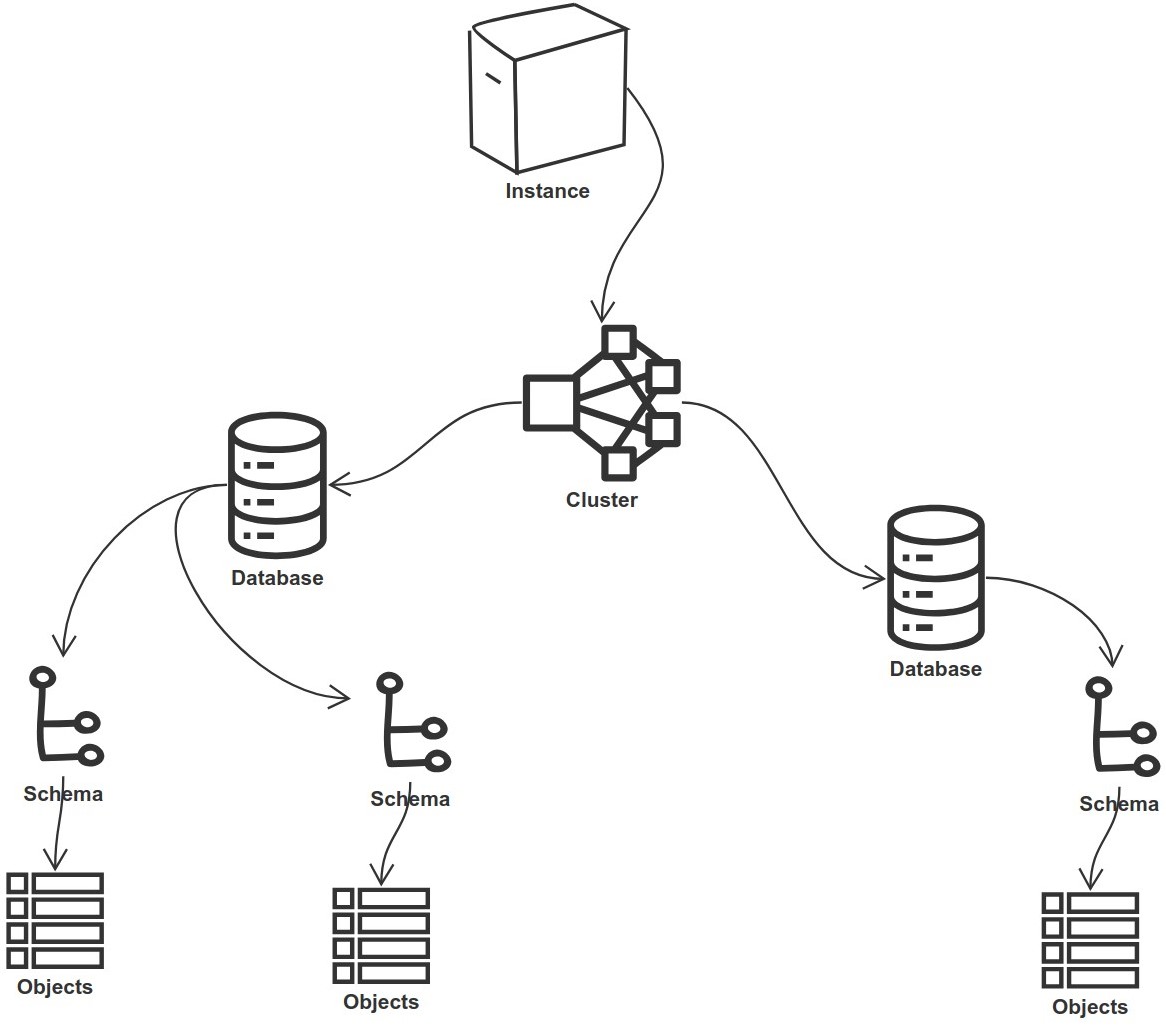
All schemas then are logically grouped into Databases. A database serves as a container that enhances data organization and makes data easier to be backed up and restored independently.
Multiple databases together form what’s called a Cluster, the cluster lives inside the Instance, and the instance can have one and only one cluster initialized.
The files/data of the cluster are usually saved on a common data directory on disk, referred to as PGDATA, which is the environment variable pointing to this directory.
After the cluster has been initialized, we will find 3 identical databases inside by default:
template1is the default blueprint for all the databases we create. We can alter, add, or remove objects as needed to meet our requirements. This ensures we do not have to repeat ourselves each time we create a new database.When we execute the command
CREATE DATABASE dbnameit copies thetemplate1database by default unless we specify another template using the commandCREATE DATABASE new_db TEMPLATE dbnameIf we have objects inside the template we copy from, they will be copied into the new database.
It does not copy the template database
GRANTpermissions; the new database comes with the default permissions.
template0is the same exact thing as the defaulttemplate1database but this one serves as a clean blueprint with original settings, which can be used for cases like restoring data from a backup or creating a pristine database. Therefore, it should never be changed, altered, or modified.postgresis a regular default database that we can use to create our schemas and tables, it is a copy oftemplate1database.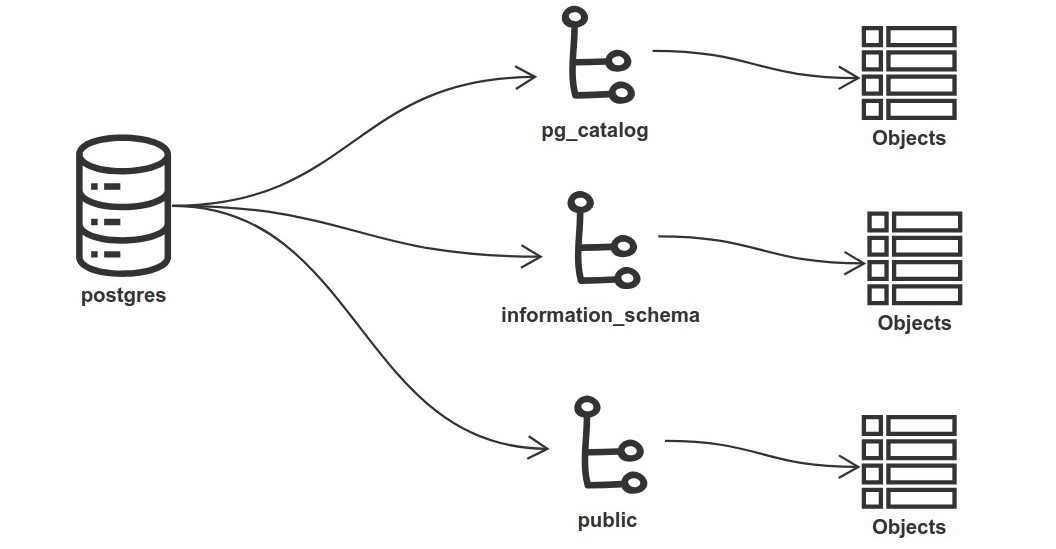
Here’s an example on creating a database using a template:
-- Create a new database
CREATE DATABASE ecommerce;

-- Create a users table
CREATE TABLE ecommerce.public.users (
                       id SERIAL PRIMARY KEY,
                       first_name VARCHAR(50),
                       last_name VARCHAR(50),
                       email VARCHAR(100));

-- Insert a record into users
INSERT INTO ecommerce.public.users (first_name, last_name, email)
VALUES ('John', 'Doe', 'john.doe@example.com');

/*
 Make sure there isn't any other connection to the ecommerce database
 exists when it starts otherwise it will fail.
*/
CREATE DATABASE ecommerce_copied TEMPLATE ecommerce;

SELECT * FROM ecommerce_copied.public.users;
| id | first_name | last_name | |
| 1 | John | Doe | john.doe@example.com |
System Catalog
System Catalogs are regular tables which store metadata about all objects inside the different databases, each database has its very own catalog tables which describes its tables, indexes, and others.
This metadata includes table names and their types, column names and their data types, the schemas they belong to, constraints such as foreign keys, indexes, and much more.
There are also global catalogs, which do not belong to a specific database but physically shared across all databases in a cluster. We can find and access them inside any database.
Examples of what we can find in the global catalog tables:
pg_databasetable which contains information about all the databases in the cluster.pg_authidtable which contains details about all users.
The catalog tables can be found under the pg_catalog schema, as well as the information_schema views, which offer an alternative method for viewing the data.
Let’s take a look at what’s inside some of these database-specific catalog tables:
CREATE DATABASE ecommerce;

-- Create a users table
CREATE TABLE ecommerce.public.users (
        id SERIAL PRIMARY KEY,
        first_name VARCHAR(50),
        last_name VARCHAR(50),
        email VARCHAR(100)
);

-- Create a roles table
CREATE TABLE ecommerce.public.roles (
        id SERIAL PRIMARY KEY,
        name VARCHAR(50) UNIQUE
);

-- Create a unique index on email in the users table
CREATE UNIQUE INDEX idx_users_email ON ecommerce.public.users(email);

-- Create a table to handle the many-to-many relationship
CREATE TABLE ecommerce.public.user_roles (
        user_id INT REFERENCES ecommerce.public.users(id) ON DELETE CASCADE,
        role_id INT REFERENCES ecommerce.public.roles(id) ON DELETE CASCADE,
        PRIMARY KEY (user_id, role_id)
);

-- Create a view that selects users' id, first name, and their roles
CREATE VIEW ecommerce.public.users_view AS
SELECT u.id, u.first_name, u.email, r.name AS role_name
FROM ecommerce.public.users u
         JOIN ecommerce.public.user_roles ur ON u.id = ur.user_id
         JOIN ecommerce.public.roles r ON ur.role_id = r.id;

-- Show users table columns details
SELECT column_name, data_type
FROM information_schema.columns
WHERE table_name = 'users';
| column_name | data_type |
| id | integer |
| first_name | character varying |
| last_name | character varying |
| character varying |
-- Show all tables and views in the public schema
SELECT table_name, table_type
FROM information_schema.tables
WHERE table_schema = 'public'
AND table_catalog = 'ecommerce';
| table_name | table_type |
| users | BASE TABLE |
| roles | BASE TABLE |
| user_roles | BASE TABLE |
| users_view | VIEW |
-- Show indexes created for users, roles and user_roles tables
SELECT tablename, indexname, indexdef
FROM pg_catalog.pg_indexes
WHERE tablename IN ('users', 'roles', 'user_roles');
| tablename | indexname | indexdef |
| users | users_pkey | CREATE UNIQUE INDEX users_pkey ON public.users USING btree (id) |
| users | idx_users_email | CREATE UNIQUE INDEX idx_users_email ON public.users USING btree (email) |
| roles | roles_pkey | CREATE UNIQUE INDEX roles_pkey ON public.roles USING btree (id) |
| roles | roles_name_key | CREATE UNIQUE INDEX roles_name_key ON public.roles USING btree (name) |
| user_roles | user_roles_pkey | CREATE UNIQUE INDEX user_roles_pkey ON public.user_roles USING btree (user_id, role_id) |
We can visualize what we have talked about so far in this section as top-down tree. Below is an image that illustrates this structure:
Where’s My Data?
Tablespaces
Now let’s to talk about how this data is organized on disk. We just mentioned that Databases and Schemas define the logical grouping of the objects/relations.
On the other hand, Tablespaces define the physical distribution of the data. They determine where the data files for different objects are stored on the disk, which can significantly impact the performance in certain use cases.
PostgreSQL by default has 2 tablespaces:
pg_default: Where it stores all the databases and associated objects by default.pg_global: Which stores the common system catalog tables that are shared across the cluster.
We can create multiple new tablespaces on different disks or storage systems and distribute our data across them.
This can be useful in scenarios where the volume runs out of space, or to store archived data on a slow-access disks (HDD), while actively used data can be placed on fast-access disks (SSD), and this can be even extended further by storing heavily used indexes on an expensive hyper fast-access disks.
Here is an example demonstrating the process:
Assume that we have the instance running on a fast-access storage and we want to create/move some tables to a slow-access one.
CREATE DATABASE ecommerce;

-- Create a users table
CREATE TABLE ecommerce.public.users (
        id SERIAL PRIMARY KEY,
        first_name VARCHAR(50),
        last_name VARCHAR(50),
        email VARCHAR(100)
);

-- Create a products table
CREATE TABLE ecommerce.public.products (
       id SERIAL PRIMARY KEY,
       name TEXT,
       description TEXT,
       quantity INT
);

-- Create a tablespace on the slow access storage
-- Make sure you replace the path to the directory
CREATE TABLESPACE slow_access_storage LOCATION '/path/to/dir';

-- Create a deleted_users table specifying the slow_access_storage tablespace
CREATE TABLE ecommerce.public.deleted_users (
        id INT,
        first_name VARCHAR(50),
        last_name VARCHAR(50),
        email VARCHAR(100)
) TABLESPACE slow_access_storage;

-- Move the products table to the new tablespace
ALTER TABLE ecommerce.public.products
SET TABLESPACE slow_access_storage;

-- Retrieve tables alongside their tablespaces from the catalog
SELECT tablename, CASE
       WHEN tablespace IS NULL THEN 'pg_default'
       ELSE tablespace
       END AS tablespace
FROM pg_catalog.pg_tables
WHERE schemaname = 'public';
| tablename | tablespace |
| users | pg_default |
| deleted_users | slow_access_storage |
| products | slow_access_storage |
/*
 The function pg_relation_filepath shows
 the file path where the table is stored
*/
SELECT pg_relation_filepath('ecommerce.public.users');
| pg_relation_filepath |
| base/19711/19713 |
SELECT pg_relation_filepath('ecommerce.public.products');
| pg_relation_filepath |
| pg_tblspc/19741/PG_16_202307071/19711/19745 |
Note that in the Users table the file path starts with base, which indicates it’s stored in the default pg_default tablespace, while the Products table starts with pg_tblspc which is the newly created tablespace.
To visualize the structure and provide a clearer understanding combining everything we have talked about so far, let’s take a look at this figure:
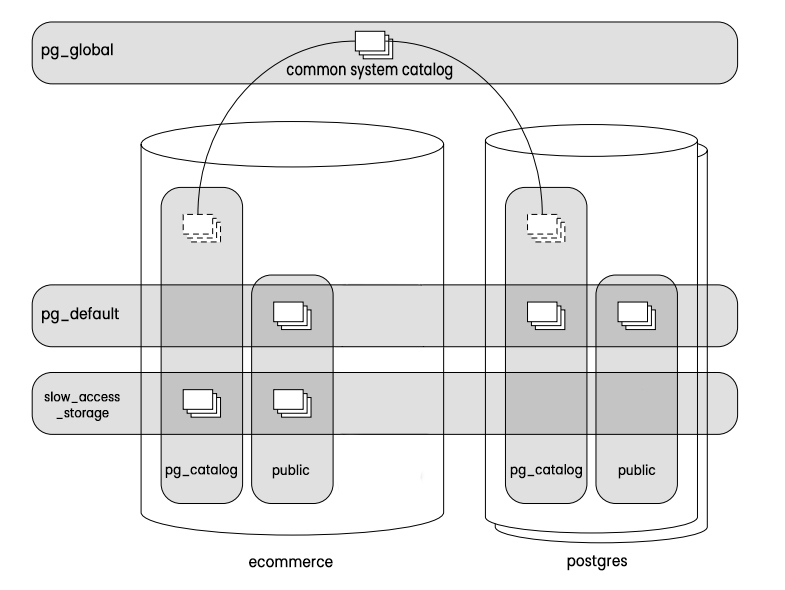
The pg_global schema contains the common system catalog tables, which are shared across all databases. Additionally, using the actions performed in the previous example, the slow_access_storage tablespace holds some tables from the public schema, while the remaining tables are kept in the pg_default tablespace.
Forks
Tables data and metadata are represented on disk by several forks (physical files), each table must have 3 mandatory forks, and each fork contains certain information associated with particular table. These forks help maintain and organize the tables.
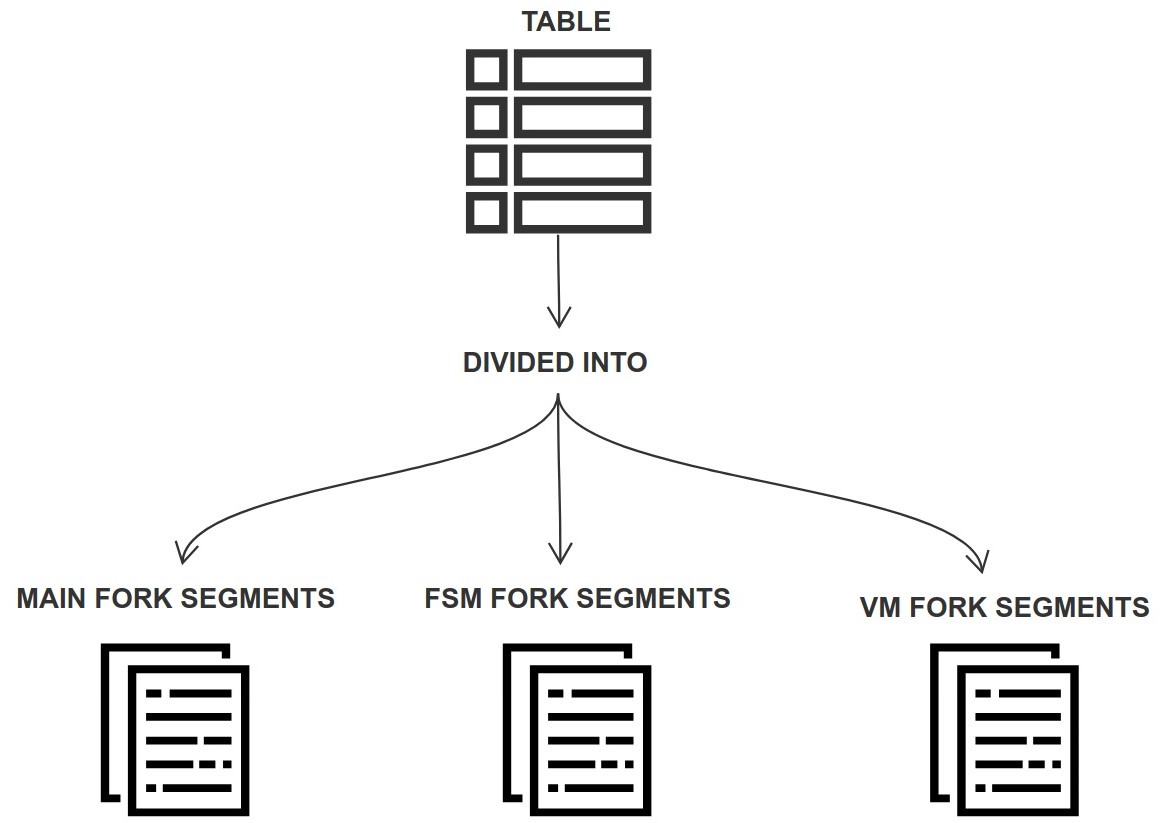
The 3 mandatory forks are:
Main: Contains the actual data of a table.
Free Space Map (FSM): Keeps track of available space within a table’s pages. It's used to quickly find a page where the new data can fit in.
Visibility Map (VM): Tracks which pages contain only tuples that are visible to all transactions (do not contain dead tuples), so they don't need to be cleaned up (vacuumed), and which pages contain frozen tuples.
- It uses two bits per page, one to indicate that all tuples in the page are visible to all transactions, and the other to indicate that all tuples are frozen.
We can examine the contents of these VM and FSM forks in the following example:
-- These extensions allow us to see the fsm and vm information.
CREATE EXTENSION pg_freespacemap;
CREATE EXTENSION pg_visibility;

-- Create a table with a column of size 2 KB
CREATE TABLE users (
       name CHAR(2000)
);

-- Insert 6 rows with around 2 KB of data each
INSERT INTO users (name) VALUES (repeat('A', 2000));
INSERT INTO users (name) VALUES (repeat('B', 2000));
INSERT INTO users (name) VALUES (repeat('C', 2000));
INSERT INTO users (name) VALUES (repeat('D', 2000));
INSERT INTO users (name) VALUES (repeat('E', 2000));
INSERT INTO users (name) VALUES (repeat('F', 2000));

/*
    Run the clean up (VACUUM) command to update
    the visibility map and free space map of the table
*/
VACUUM users;

-- Check the free space map information
SELECT blkno AS page_number, avail AS available_space
FROM pg_freespace('users');
| page_number | available_space |
| 0 | 0 |
| 1 | 4064 |
We have inserted 6 rows, each approximately 2 KB in size, the first page could accommodate 4 rows as its size is 8 KB, the second page stored the remaining 2 rows, and there is around 4 KB left inside of the second page as free space.
-- Check the visibility map information
SELECT blkno AS page_number, all_visible FROM pg_visibility('users');
| page_number | all_visible |
| 0 | true |
| 1 | true |
For now, there are no dead tuples in these pages, as no update or deletion operations happened on the tuples, so they all are visible to all transactions.
-- Update the last row with a new value
UPDATE users SET name = repeat('G', 2000) WHERE name = repeat('F', 2000);

-- Check the visibility map information again after the update
SELECT blkno AS page_number, all_visible FROM pg_visibility('users');
| page_number | all_visible |
| 0 | true |
| 1 | false |
After we updated the last tuple, the second page now contains a dead tuple, changing its visibility to false.
Each fork at first is represented by a single file, and as the file grows and reaches its limit of 1 GB (which can be changed) another file for this fork is created, which then these files are called segments.
The naming of the different fork segments begins with the oid of the table, followed by a suffix to distinguish each fork type, followed by a sequence number in case of having multiple segments/files for a fork type.
For example:
1234512345.112345.212345.312345.4(Main Fork)12345_fsm12345_fsm.112345_fsm.2(Free Space Map Fork)12345_vm(Visibility Map Fork)
References
Subscribe to my newsletter
Read articles from Eyad Youssef directly inside your inbox. Subscribe to the newsletter, and don't miss out.
Written by

Eyad Youssef
Eyad Youssef
A regular everyday normal software developer