React Essentials: Virtual DOM and Props
 Omkar Kasture
Virtual DOM, Fibre and Reconciliation
Virtual DOM
The Virtual DOM is a lightweight copy of the actual DOM that React uses to optimize updates.
Instead of directly manipulating the real DOM (which is slow), React creates a virtual representation of the UI in memory.
When the app’s state changes, React updates the Virtual DOM first, compares it with the previous version (using a process called "diffing"), and then updates only the changed parts in the actual DOM. This improves performance significantly.
Fiber
React Fiber is the new reconciliation engine introduced to enhance the rendering process. Fiber makes React's rendering system more flexible, enabling interruptible rendering.
This means React can pause and resume rendering, making the UI more responsive even during heavy updates.
Fiber also prioritizes updates, ensuring that important tasks like animations or user input are handled faster.
Reconciliation
Reconciliation is the process React uses to compare the new Virtual DOM with the old one (after a state or prop change) and efficiently update the real DOM.
It uses an algorithm that finds differences between two trees (the old and new Virtual DOM), and updates only the parts that have changed, minimizing DOM operations.
These three concepts work together to ensure React apps stay fast and responsive, even with complex UIs.
Read Detailed Document here: react-fiber-architecture
React Props
In React, props (short for "properties") are used to pass data from one component to another. They are similar to function arguments and are immutable, meaning they cannot be modified by the receiving component. Props enable components to be dynamic and reusable.
import React from 'react';

// Child component receiving props
function Greeting(props) {
  return <h1>Hello, {props.name} {props.surname}!</h1>;
}

// Parent component passing props
function App() {
  return (
    <div>
      <Greeting name="Omkar" surname="Kasture"/>
      <Greeting name="John" surname="Doe"/>
    </div>
  );
}

export default App;
Greeting component: It takes a name prop and displays it within an h1 tag.
App component: It passes different name values ("Omkar" and "Alice") as props to the Greeting component.
Note: We wrote two components in single file, but this is not the correct practice, It is recommended to write different components in different files.
Direct Destructuring and Default Values
Instead of accessing props.name or props.surname, you can destructure them directly in the function's parameter list.
You can also assign default values while destructuring. If a prop is not passed, React will use the default value instead.
import React from 'react';

// Destructuring with default value for surname
function Greeting({ name, surname = 'Guest' }) {
  return <h1>Hello, {name}, {surname}!</h1>;
}

// Parent component passing props
function App() {
  return (
    <div>
      <Greeting name="Omkar" surname="Kasture" />
      <Greeting name="Shubham" />
    </div>
  );
}

export default App;
Object as Props
import React from 'react';

// Child component receiving an object as props
function UserDetails({ user }) {
  return (
    <div>
      <h2>{user.name}</h2>
      <p>Age: {user.age}</p>
      <p>Location: {user.location}</p>
    </div>
  );
}

// Parent component passing an object as a prop
function App() {
  const user = { name: 'Omkar', age: 23, location: 'Pune' };
  return (
    <div>
      <UserDetails user={user} />
    </div>
  );
}

export default App;
Array as Props
import React from 'react';

// Child component receiving an array as props
function ItemList({ items }) {
  return (
    <ul>
      {items.map((item, index) => (
        <li key={index}>{item}</li>
      ))}
    </ul>
  );
}

// Parent component passing an array as a prop
function App() {
  const shoppingList = ['Milk', 'Eggs', 'Bread', 'Butter'];
  return (
    <div>
      <h1>Shopping List:</h1>
      <ItemList items={shoppingList} />
    </div>
  );
}
export default App;
Project: Building Bg Changer
Now let’s create our first react project step by step.
Step1: Create React Project
React-Quick Guide> npm create vite@latest
√ Project name: ... 02_bg-changer
√ Select a framework: » React
√ Select a variant: » JavaScript
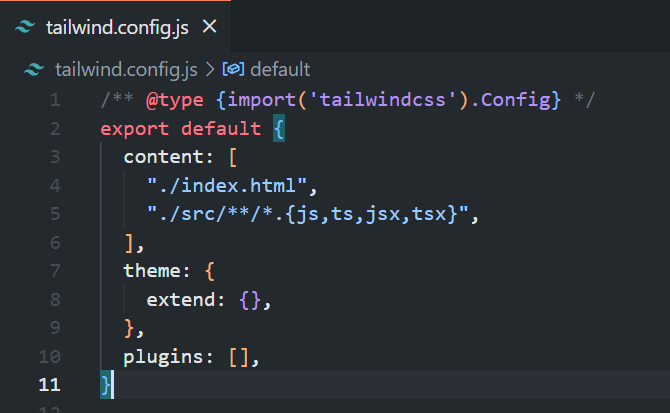
Step 2: Add Tailwind
Refer: Tailwind with Vite
npm install -D tailwindcss postcss autoprefixer
npx tailwindcss init -p
Configure Template paths

Add the Tailwind directives to your CSS: index.css
@tailwind base;
@tailwind components;
@tailwind utilities;
Write code in App.jsx
Get Code : GitHub
Key takeaways of project
onClick Requires a Callback Function:
When using onClick, always pass a callback function. For example, instead of directly calling setColor
("red"), use an arrow function like this:onClick={() => setColor("red")}This prevents the immediate execution of the function and ensures it runs only when the event occurs.
Inline Styles with Curly Braces:
When applying styles in React, use curly braces to denote that you are passing a JavaScript object. For example:
<div style={{ color: color }}>
Curly Braces for Variables and Functions:
Any variable or function you want to use within JSX must be enclosed in curly braces. This allows you to embed JavaScript expressions directly into your JSX code. For example:
<h1>{title}</h1>
These principles help maintain proper syntax and functionality in your React components.
Subscribe to my newsletter
Read articles from Omkar Kasture directly inside your inbox. Subscribe to the newsletter, and don't miss out.
Written by

Omkar Kasture
Omkar Kasture
MERN Stack Developer, Machine learning & Deep Learning