How do I load custom fonts in a Svelte/Kit app
 Andrea Barghigiani
While I still work with React/Next.js, I have to say that once I started to dig a bit deeper into the logic and tools of Svelte/Kit, I began to love this framework and wanted to work more on it.
There’s not much to say, not in this article, at least because I want to focus on the topic. But Svelte is refreshing. While it tries to be as close as possible to web standards, it doesn’t have to face all the intricacies of an interpreted library like React.
For example, as far as I know, the main full-stack frameworks for React (Next.js and Remix) have fought hard with the React implementations to let them work as the web wishes.
One such example is precisely the fonts.
Fonts should be the bread and butter of any webpage, it shouldn’t be too hard to insert them in a framework that uses React under the hood. Instead, as soon as you start to work with Next.js, you’ll find out that to add a custom font, you have to use their next/font API that allows you to use (and optimize) both Google and local fonts.
Don’t get me wrong. I am grateful that Next.js aims to help us with our work, but honestly, the more I get to know the framework, the more I get the WordPress vibes that pushed me away from such a CMS.
What fascinated me about Svelte is that it’s genuinely a JavaScript-first framework.
That’s because it’s a compiled framework.
I know, I know… You started reading this article because you wanted to know how to load your local fonts in Svelte, and I’ve opened Pandora's box to compare React and Next.js.
So, let’s skip all the drama—I’ll save it for a future article—and explore how to load local fonts in a SvelteKit application.
How to load your local fonts in SvelteKit
I am talking specifically about local fonts because that was one of the first things I had to do while porting a Next.js application into SvelteKit.
I believe this work will inspire many articles down the road 😅
At my company, we bought a custom font in a .woff2 format, and since we don’t like to waste money, we wanted to use it on our application.
To load a custom font in your SvelteKit application, you have to… Do as you were building a standard HTML/CSS website 😮
You read that right! You could read the MDN documentation, and you’d be able to load your fonts without any issues!
But I took a few approaches in this SvelteKit app that I wanted to share with you, so don’t feel gambled and keep reading.
Structure of a SvelteKit application
Let’s start with how this SvelteKit application is structured:

As you can see this is just a standard SvelteKit app, I just wanted to highlight the folder and files that we will use in this article.
I chose to save all my fonts files inside /static/font. At least this looked like a good choice to me 😅 The important part is to place your files inside the static/ folder because SvelteKit has an excellent utility that will help us find the path to our static files.
Next, I wanted to highlight the /src/app.css because we will need it to load our custom font via CSS, and since we’re talking about CSS I also highlighted the fact that this project uses TailwindCSS. Don’t worry. I’ll also show you how to set it up with your custom font.
If you haven’t installed TailwindCSS inside your project (and you want to do so), the fastest way is with svelte-add package. Just open your terminal, write npx svelte-add@latest tailwindcss , and you’re done.
Ok, now that we are ready let’s move on.
Since the font I use at work is proprietary, and I want to give you precise instructions on how to use a custom font in your project, I decided to work with an Open-Source font called Cascadia Code by Microsoft.
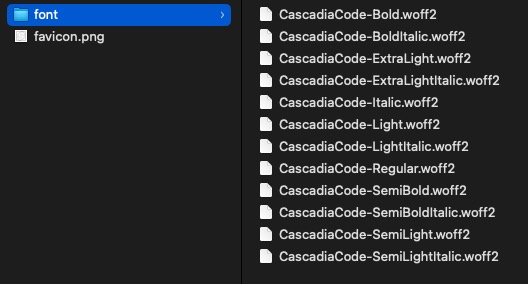
Download the .zip file from the previous link, it’s the latest release. Unzip it and copy the woff2/static/ (we will just use standard font, not variable ones) folder inside the static/ one of your projects. I’ve renamed static/ into font/ for consistency.
Now your static/font/ folder should look like this:

I’ve cherry-picked the CastadiaCode family otherwise, there were too many. You’ll later see why 😜
Preload the font in your HTML
Since SvelteKit, and Svelte in general, do not reinvent the wheel, we have a standard HTML file in src/app.html open it, and you’ll see that it contains HTML code and a bunch of strange snippets that start and end with %.
Our focus is to the <head> of the page, at the <link /> element, to be exact.
As you’ll see, to load the favicon of our website, SvelteKit uses a rel=”icon” and inside the href the path to the file is %sveltekit.asset%/favicon.png. Since you’ll be able to customize the path to the static/ folder via the svelte.config.js file, more details here, the team decided to use a placeholder.
That means that when the compiler reads %sveltekit.asset% it knows to check the configuration for the proper path.
Open your src/app.html and start to put a <link /> element for each .woff2 file you want to preload inside your application.
<!doctype html>
<html lang="en">
    <head>
        <meta charset="utf-8" />
        <link rel="icon" href="%sveltekit.assets%/favicon.png" />

        <!-- Preloading Cascadia Code Fonts -->
        <link
            rel="preload"
            href="%sveltekit.assets%/font/CascadiaCode-Regular.woff2"
            type="font/woff2"
            cas="font"
            crossorigin
        />
        <link
            rel="preload"
            href="%sveltekit.assets%/font/CascadiaCode-Italic.woff2"
            type="font/woff2"
            cas="font"
            crossorigin
        />
        <link
            rel="preload"
            href="%sveltekit.assets%/font/CascadiaCode-Bold.woff2"
            type="font/woff2"
            cas="font"
            crossorigin
        />
        <link
            rel="preload"
            href="%sveltekit.assets%/font/CascadiaCode-BoldItalic.woff2"
            type="font/woff2"
            cas="font"
            crossorigin
        />
        <!-- End Preload Cascadia Code Fonts -->

        <meta name="viewport" content="width=device-width, initial-scale=1" />
        %sveltekit.head%
    </head>
    <body data-sveltekit-preload-data="hover" class="font-aeonik">
        <div style="display: contents">%sveltekit.body%</div>
    </body>
</html>
As you can see, to keep the code short, I chose to preload just the Regular, Italic, Bold, and BoldItalic CascadiaCode fonts.
The
rel=’preload’in our<link />tells the browser to load these resources as soon as possible, even before the main rendering starts. If you want to know more you can read the MDN documentation.
Now, we told the browser to fetch the .woff2 files as soon as possible, but they’re not available on our page.
Not yet…
Load fonts via CSS with @font-face
Now that our HTML does what it can to preload the fonts, it’s time to tell our CSS (and TailwindCSS) how to use the resources we need to use on our page.
Open the src/app.css file and start to add your fonts.
Before doing that, I want to share a little trick to simplify your work. Up until now, all we know about loading with @font-face was to add a custom name to each weight and style of the font.
This forced us to have CascadiaCode, CascadiaCodeItalic, CascadiaCodeBold, and CascadiaCodeBoldItalic.
In addition to the possible confusion, we should consider telling TailwindCSS to extend our theme with a font name for each.
But we don’t have to do it. We can use the same name for all of the variants we want to load, and the CSS (also TailwindCSS) will be smart enough to load the proper .woff2 file based on the rules that we will apply to the text.
Now that we know that, all we have to do is to implement the @font-face inside our CSS, like so:
@tailwind base;
@tailwind components;
@tailwind utilities;

@layer base {
    /* Other Rules */

    /* Custom font */
    @font-face {
        font-family: 'CascadiaCode';
        src: url('/font/CascadiaCode-Regular.woff2') format('woff2');
        font-weight: 400;
        font-style: normal;
        font-display: swap;
    }

    @font-face {
        font-family: 'CascadiaCode';
        src: url('/font/CascadiaCode-Italic.woff2') format('woff2');
        font-weight: 400;
        font-style: italic;
        font-display: swap;
    }

    @font-face {
        font-family: 'CascadiaCode';
        src: url('/font/CascadiaCode-Bold.woff2') format('woff2');
        font-weight: 500;
        font-style: normal;
        font-display: swap;
    }

    @font-face {
        font-family: 'AeonikPro';
        src: url('/font/CascadiaCode-BoldItalic.woff2') format('woff2');
        font-weight: 500;
        font-style: italic;
        font-display: swap;
    }
}
Now that we have instructed the CSS on handling the fonts, it’s time to tell TailwindCSS how to use them to create a class we can use in our files.
Open your tailwind.config.ts and add the following:
import { fontFamily } from "tailwindcss/defaultTheme";
import type { Config } from "tailwindcss";

const config: Config = {
    darkMode: ["class"],
    content: ["./src/**/*.{html,js,svelte,ts}"],
    safelist: ["dark"],
    theme: {
        extend: {
            /* Maybe you have other configs */
            fontFamily: {
                cascadia: ['CascadiaCode', 'sans-serif']
            }
        }
    },
};

export default config;
And now, to use the font wherever you like, you have to use font-cascadia. If you, like me, want to use it for the entire site, all that is missing is to open it src/app.html and add the class font to our <body> tag.
This way, we can leverage the CSS hierarchy to apply the font everywhere.
I hope that you found this helpful article. Please do not hesitate to comment on it and let me know what you think if you have any feedback.
Subscribe to my newsletter
Read articles from Andrea Barghigiani directly inside your inbox. Subscribe to the newsletter, and don't miss out.
Written by

Andrea Barghigiani
Andrea Barghigiani
Born as WordPress theme developer and switched on React.js while the CMS was still fighting with its own community about the Gutenberg editor. Now working daily building full-stack applications with Next.js