Spring Series - Setting Up a Spring Boot Project and Investigating Dependencies, Starters, Configurations, and Loggers
 Nipuna Upeksha
What is Spring?
In the beginning, Java Standard Edition(Java SE) was used to build almost all types of applications including applications that needed graphical user interfaces(GUI). However, with the advent of technology, the developers found it hard to develop complex applications with Java SE since it lacked certain tools for enterprise application development (e.g. dynamic web page generation, RESTful web services, etc.).
To address the issues encountered by developers, a new API named Servlet API was developed by Sun Microsystems. With that, Sun Microsystems, also provided Java 2 Platform, Enterprise Edition(J2EE). However, there were several problems with J2EE, and Spring came to light. With that, Spring Boot came to light providing tools to simplify the Spring’s architectures. Nowadays, when we refer to Spring applications, we mostly mean Spring applications configured via Spring Boot.
Setting Up a Spring Project
There are several ways to create a new Spring Boot project, the most famous one being the Spring Initializr. This is a web-based service that allows you to add the necessary dependencies to your project either using Maven or Gradle. It also caters to several language options like Java, Kotlin, and Groovy. We will first check how to create a Spring application using Java, and while proceeding we will check how to use Kotlin with your Spring project. Also, we will be using Maven to create our project. We will create a simple project named, Demo, to learn the Spring concepts for now, and will create a capstone project after learning the Spring concepts.
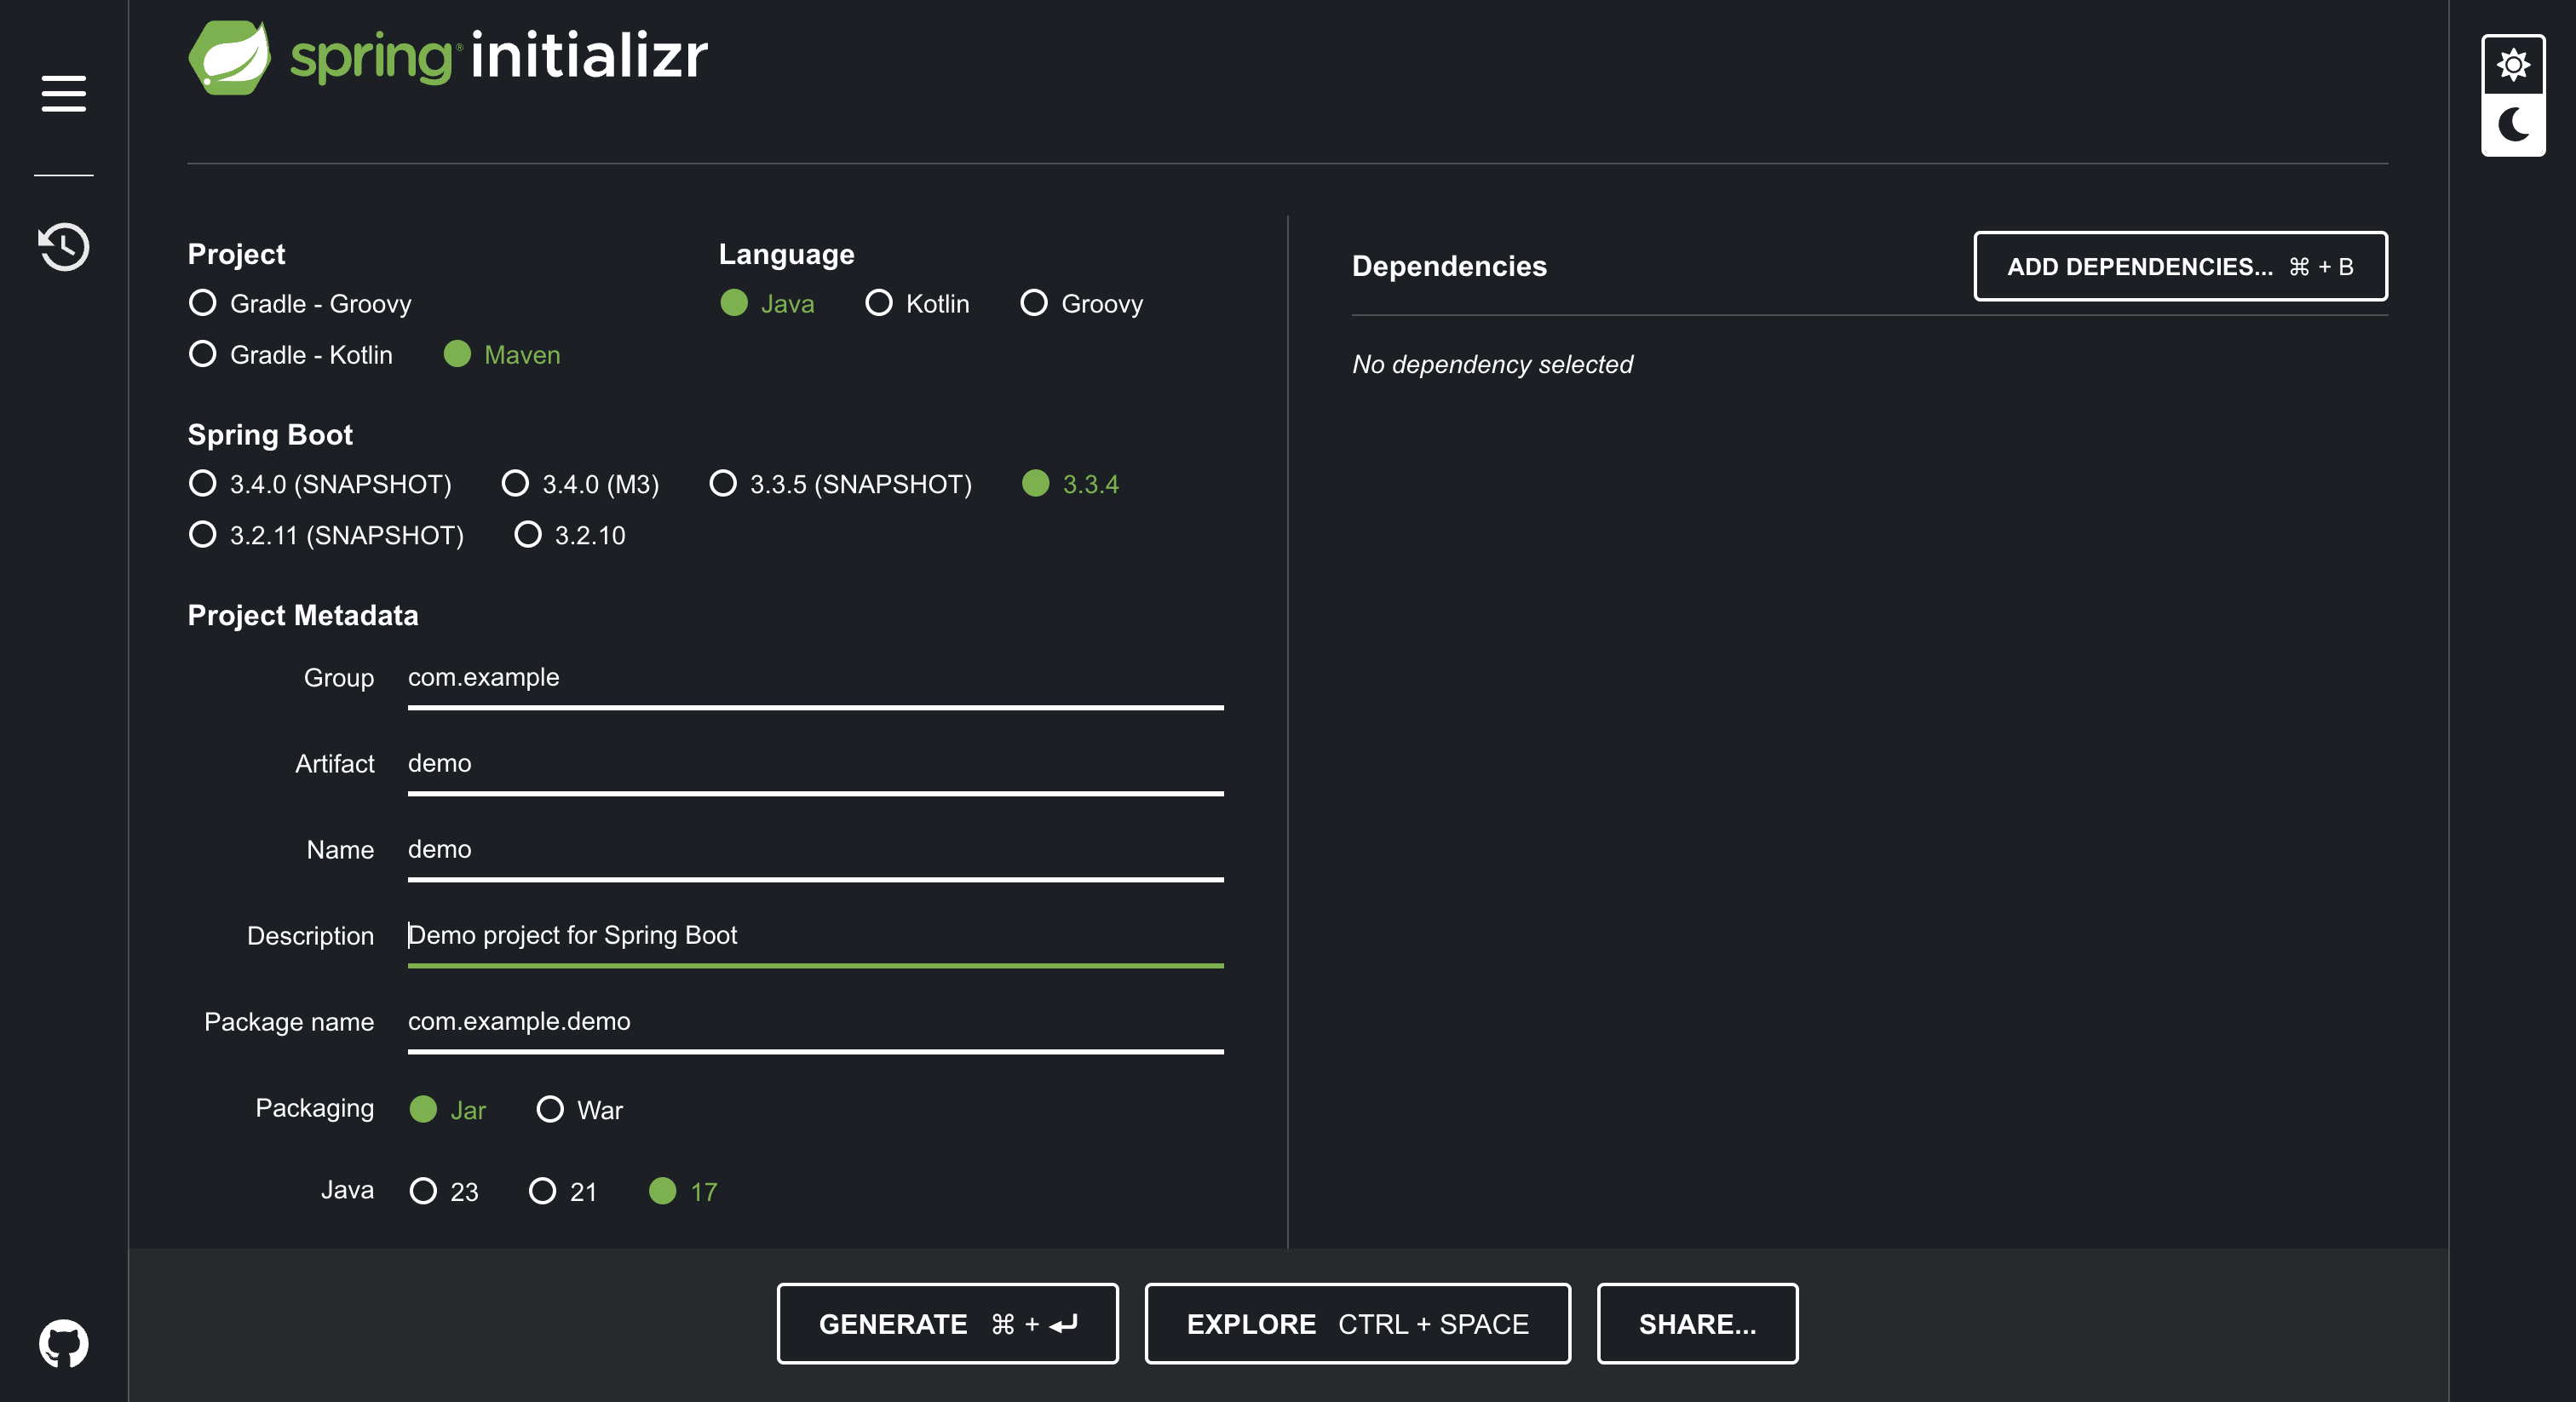
To learn about what Group, Artifact, and Name in a Maven project means, you can refer to my article on Maven. The Dependencies section on the right allows you to add Spring-supported projects. For instance, if you have something to do with the creation of getters and setters, and you need to create them at the compilation level, you can use Spring-supported Lombok dependency. For now, we will not add any dependencies. Moreover, before Generating(or downloading) your project, you can explore the structure of the project by clicking the Explore button.
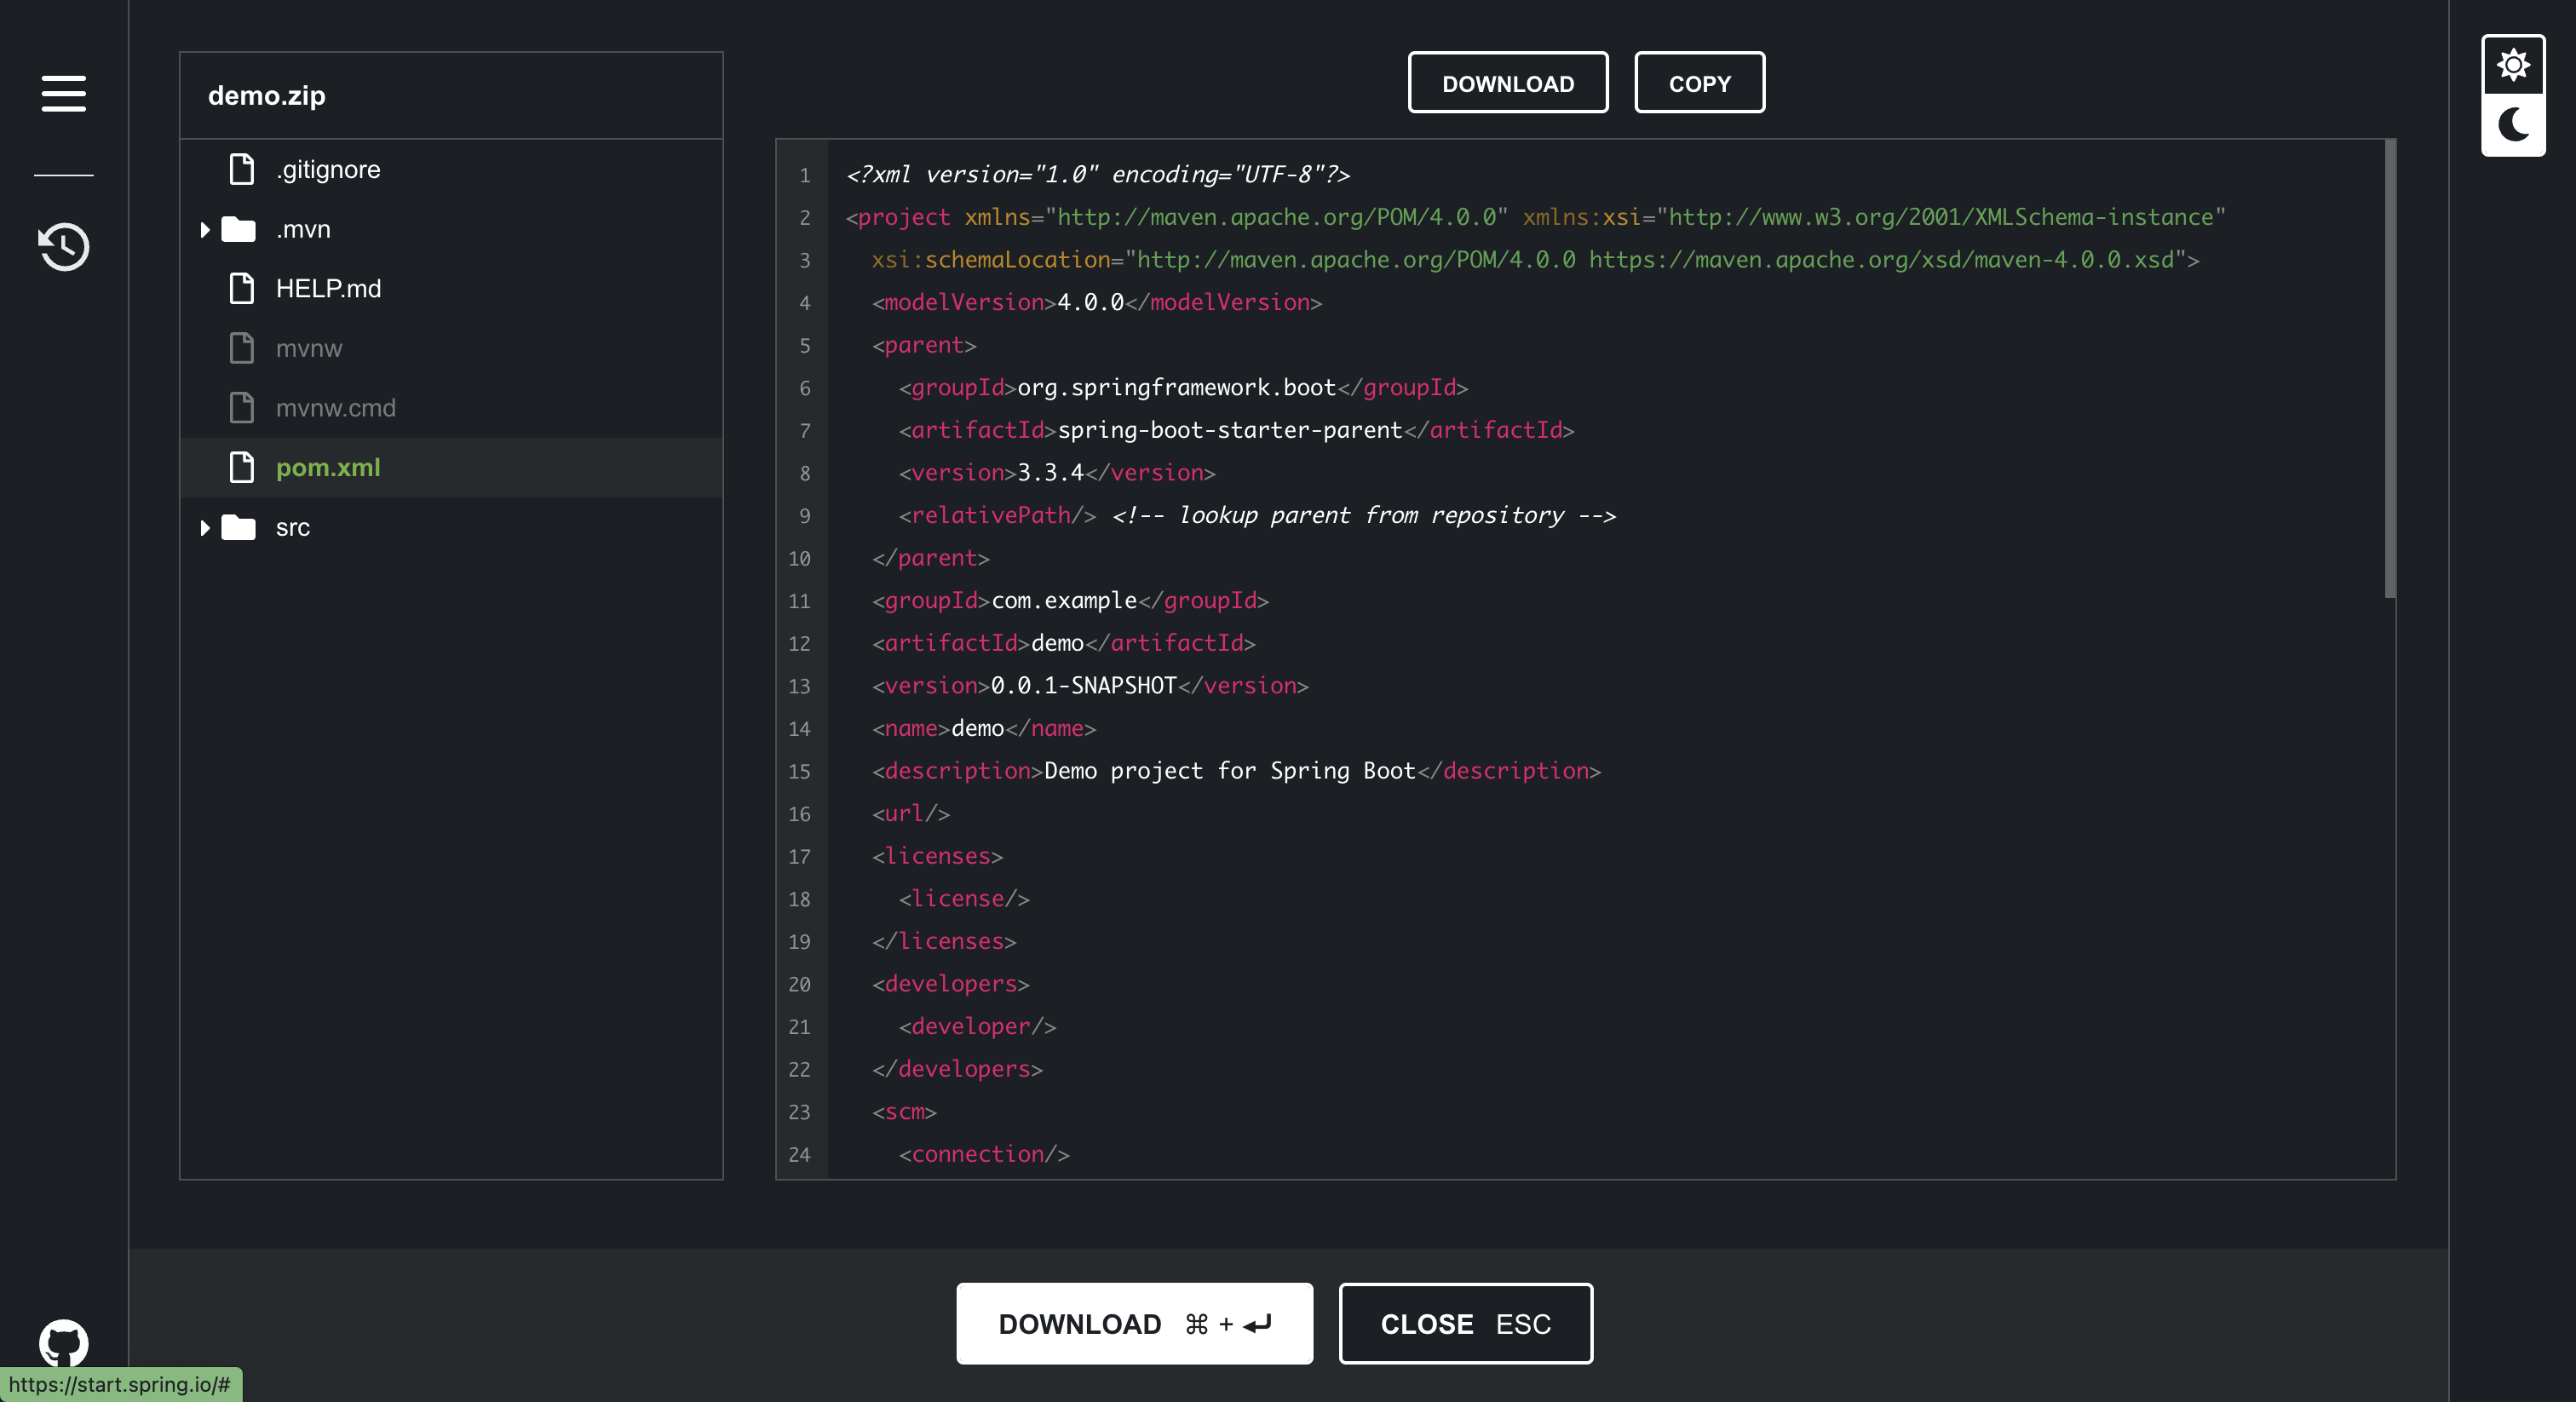
After that, you can download the project as a .zip file by clicking the Download button.
Next, extract the project and open it in an IDE. For this article series, I will be using IntelliJ IDEA - Ultimate Edition as it is my get-to-go IDE. But if you prefer to use any other IDE, there is no harm in using that. Some of the other popular choices are IntelliJ IDEA - Community Edition, Eclipse, VS Code, and, Netbeans.
To proceed with Spring development, you need to have Java and Maven. To install them on your local machine, you can either use a tool like SDKMAN or install them separately following the respective documentation. You can check out my article on how you can use SDKMAN from here.
Next, open the project with IDE and run the following in the terminal.
./mvnw -version
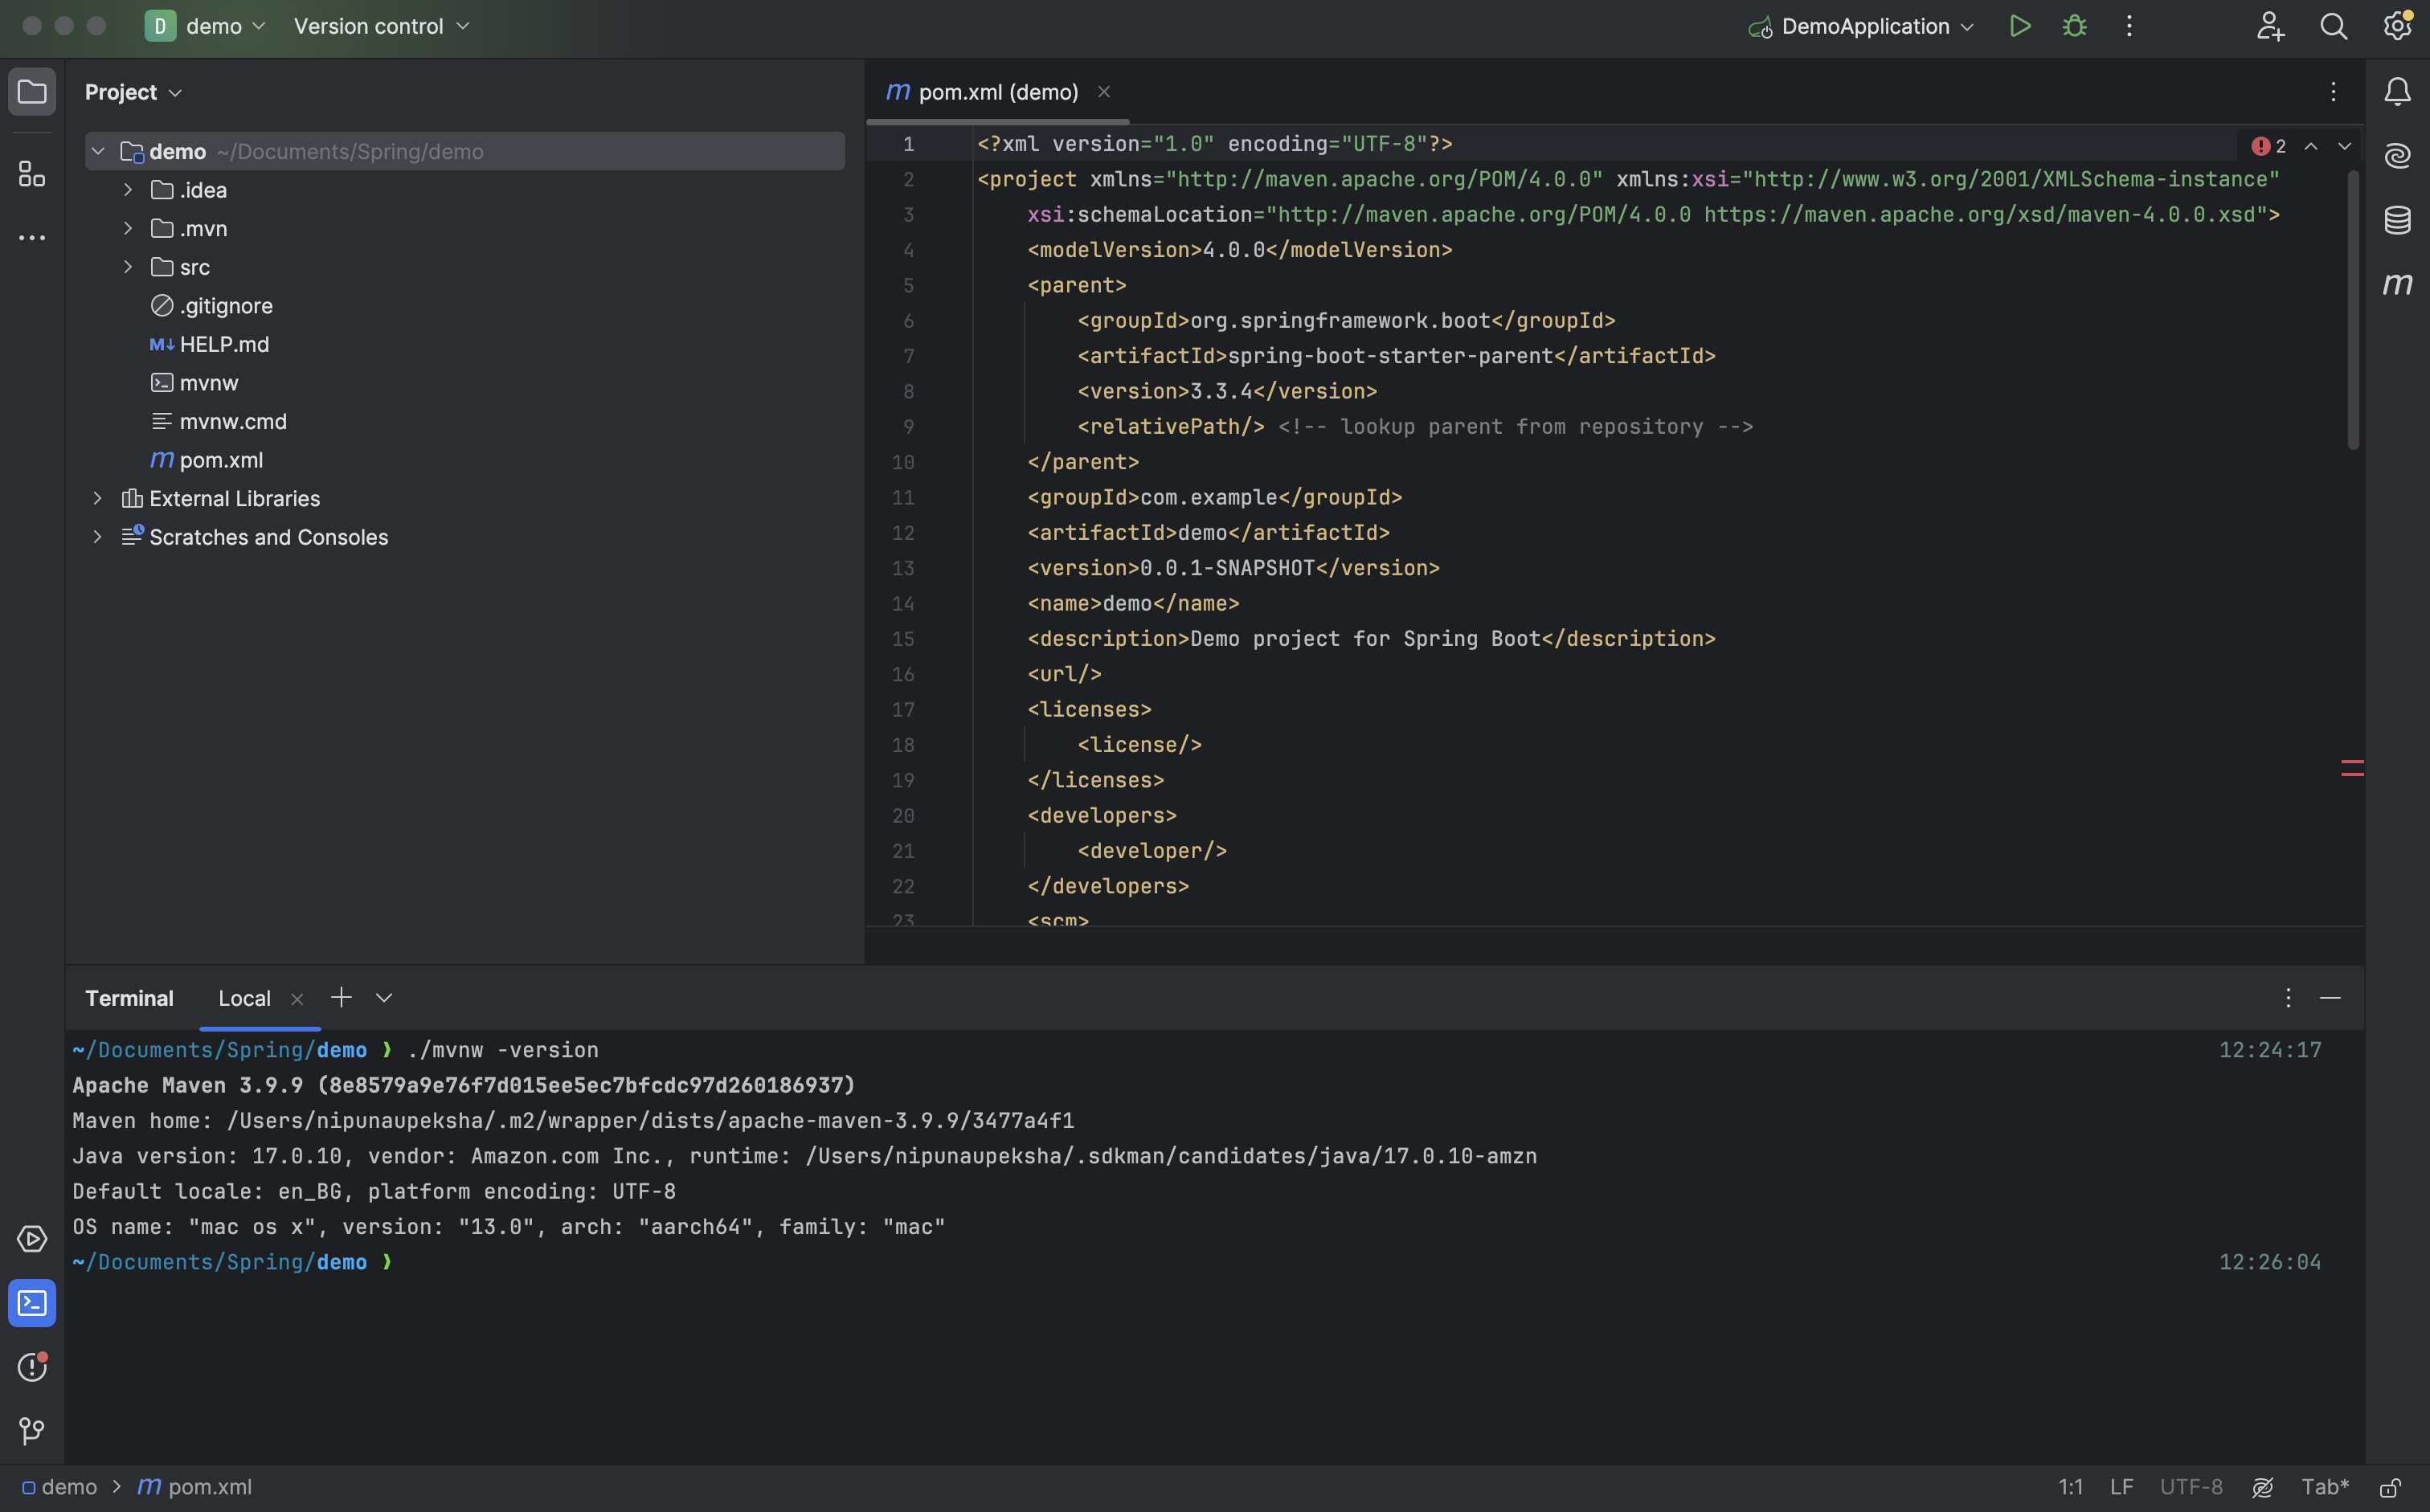
This version should be your local Maven version if you want to use the local mvn command. Otherwise, you can use the mvnw file, which came with the project. But, I suggest you have the Maven locally with the correct version(for which you can use SDKMAN) since it is easier to use local versions with IntelliJ IDEA.
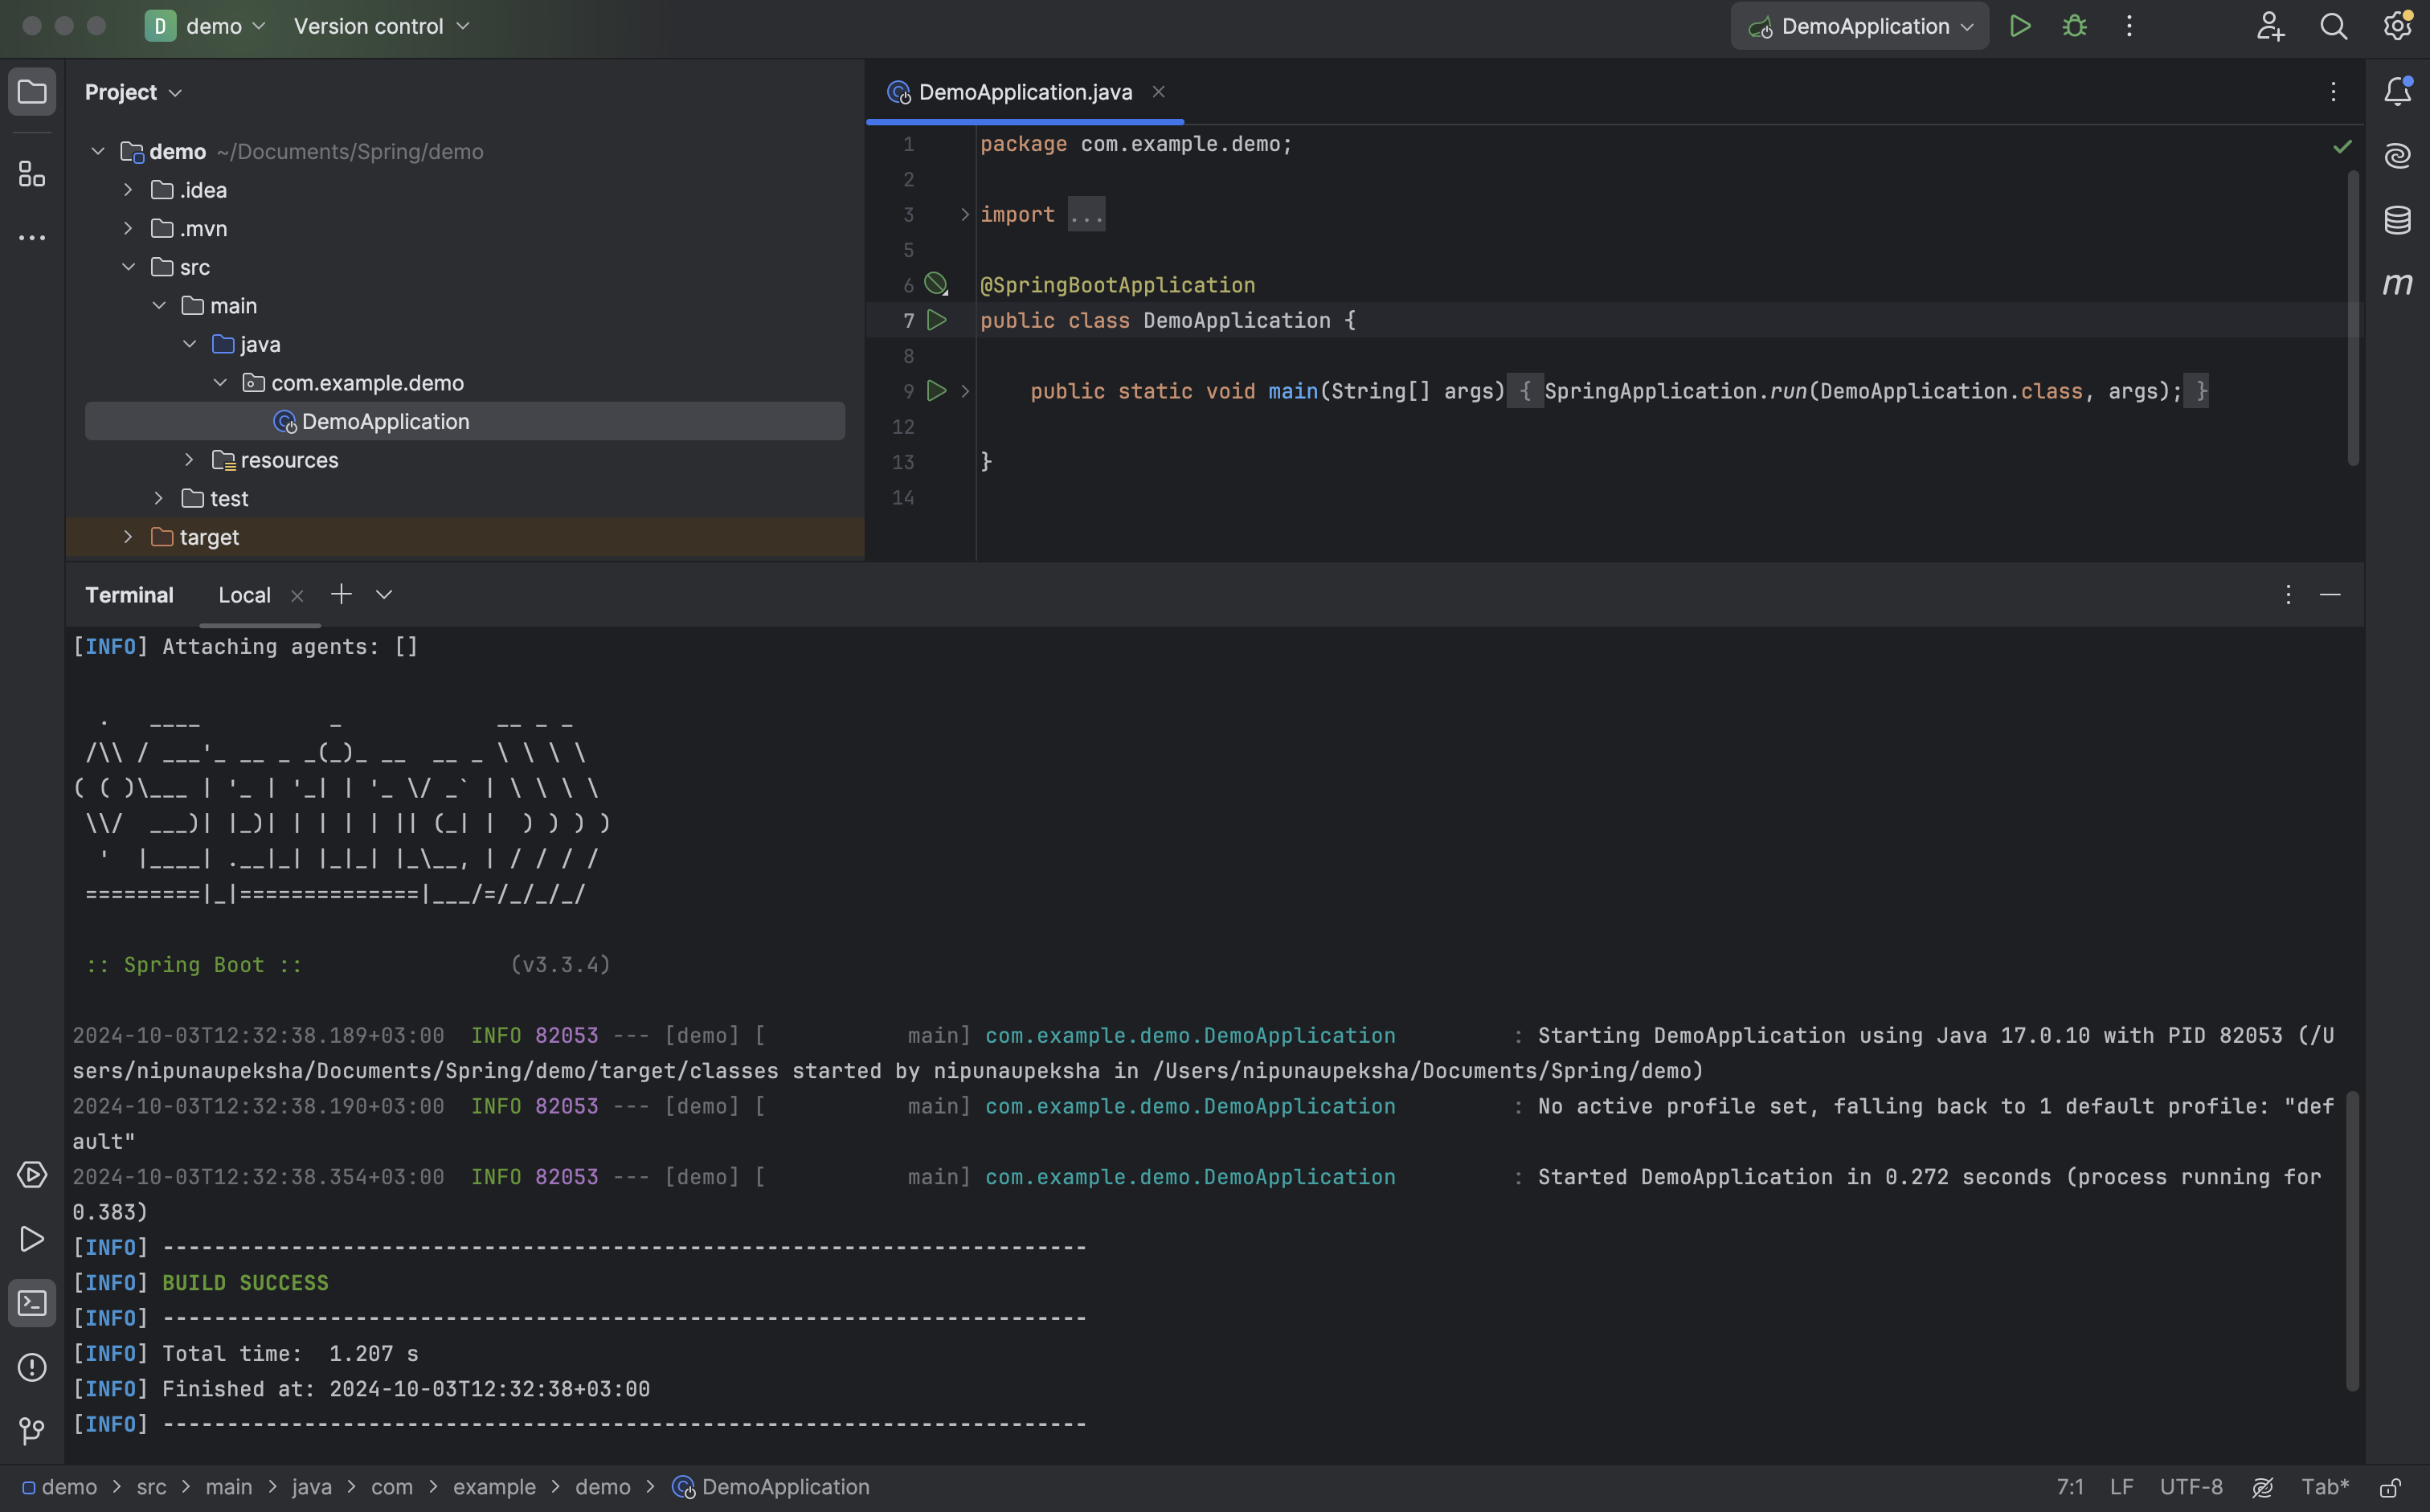
Now, to run your project, you can use the following command.
./mvnw spring-boot:run
or
mvn spring-boot:run
This will start your Spring Application, and you will see something like this in the integrated terminal of your IDE.
Spring Boot Project: Dependencies and Starter
Now, let’s look at the dependencies of our Spring Boot project.
<?xml version="1.0" encoding="UTF-8"?>
<project xmlns="http://maven.apache.org/POM/4.0.0" xmlns:xsi="http://www.w3.org/2001/XMLSchema-instance"
    xsi:schemaLocation="http://maven.apache.org/POM/4.0.0 https://maven.apache.org/xsd/maven-4.0.0.xsd">
    <modelVersion>4.0.0</modelVersion>
    <parent>
        <groupId>org.springframework.boot</groupId>
        <artifactId>spring-boot-starter-parent</artifactId>
        <version>3.3.4</version>
        <relativePath/> <!-- lookup parent from repository -->
    </parent>
    <groupId>com.example</groupId>
    <artifactId>demo</artifactId>
    <version>0.0.1-SNAPSHOT</version>
    <name>demo</name>
    <description>Demo project for Spring Boot</description>
    <url/>
    <licenses>
        <license/>
    </licenses>
    <developers>
        <developer/>
    </developers>
    <scm>
        <connection/>
        <developerConnection/>
        <tag/>
        <url/>
    </scm>
    <properties>
        <java.version>17</java.version>
    </properties>
    <dependencies>
        <dependency>
            <groupId>org.springframework.boot</groupId>
            <artifactId>spring-boot-starter</artifactId>
        </dependency>

        <dependency>
            <groupId>org.springframework.boot</groupId>
            <artifactId>spring-boot-starter-test</artifactId>
            <scope>test</scope>
        </dependency>
    </dependencies>

    <build>
        <plugins>
            <plugin>
                <groupId>org.springframework.boot</groupId>
                <artifactId>spring-boot-maven-plugin</artifactId>
            </plugin>
        </plugins>
    </build>

</project>
Parent POM
The default Maven project created by Spring Initializr includes a reference to a parent POM, along with Maven coordinates such as groupID, artifactID, and version. This is the superclass of our project. It can be used to transfer information to our project. As shown in the pom.xml it uses org.springframework.boot:spring-boot-starter-parent
<?xml ...?>
<project ...>
    ...
    <parent>
        <groupId>org.springframework.boot</groupId>
        <artifactId>spring-boot-starter-parent</artifactId>
        <version>3.3.4</version>
        <relativePath/>
    </parent>
    ...
<project>
The parent POM defines some properties like java.version for the Java version number, which Spring Boot 3 sets to Java 17 by default, and java.version to initialize maven.compiler.source and maven.compiler.target. Moreover, UTF-8 encodings are also set by default.
Bill of Materials (BOM)
The Spring Boot Starter parent itself references another parent POM named, org.springframework.boot:spring-boot-dependencies. This POM defines a bill of materials(BOM). The version numbers of dependencies are declared in the BOM. When declaring the BOM, the Spring team first declares numerous properties as shown below.
<properties>
    <activemq.version>6.1.3</activemq.version>
    <angus-mail.version>2.0.3</angus-mail.version>
    <artemis.version>2.33.0</artemis.version>
    <aspectj.version>1.9.22.1</aspectj.version>
    ...
</properties>
These properties are usually composed of the artifact ID and the version number. Next, the dependencies are declared via a dependency management block.
<dependencyManagement>
    <dependencies>
        <dependency>
            <groupId>org.apache.activemq</groupId>
            <artifactId>activemq-console</artifactId>
            <version>${activemq.version}</version>
            ...
        </dependency>
        ...
    </dependencies>
</dependencyManagement>
Dependency management means that the named dependencies are not included in the classpath but only declared with their version number. When setting the versions the <dependency> block refers to the previously declared properties.
In our pom.xml file, we don’t need to specify the version number of a dependency when we add it later because the version numbers are referenced through BOM.
This also means that we need to regularly adjust our Spring Boot version to get the updated libraries. But if we want to correct the version numbers of individual projects, we can override the properties by adding the correct version numbers to our properties block while using the correct properties key.
<properties>
    <h2.version>1.4.200</h2.version>
</properties>
Milestones and Snapshots Repository
Maven Central exclusively hosts release versions of libraries and does not support development versions like snapshots or milestones. However, in the Spring ecosystem, the Spring team maintains a separate repository specifically for accessing snapshots and milestones. This repository is beneficial when working with features that are still in development or when bug fixes are needed before the next official release. In these scenarios, developers might need to rely on a frequently updated version, even though it hasn't been officially released yet. For milestones and snapshots, we can use this in the POM.
<repositories>
    <repository>
        <id>spring-milestones</id>
        <name>Spring Milestones</name>
        <url>https://repo.spring.io/milestone</url>
        <snapshots><enabled>false</enabled></snapshots>
    </repository>
    <repository>
        <id>spring-snapshots</id>
        <name>Spring Snapshots</name>
        <url>https://repo.spring.io/snapshot</url>
        <releases><enabled>false</enabled></releases>
    </repository>
</repositories>
Annotation Processors
The Spring Initializr generates a POM file, which serves as a foundation for adding dependencies and other configurations. Often, a compiler plugin is set up to include annotation processors. These annotation processors are capable of interpreting annotations in the code, generating supplementary code, or carrying out specific tasks tied to the annotations. Within the Spring framework, annotation processors are frequently employed to create JSON files for defining external configurations or to build meta-model classes. Annotation processors can be integrated in various ways, one of which is through the <annotationProcessorPaths> configuration.
<build>
    <plugins>
        <plugin>
            <groupId>org.apache.maven.plugins</groupId>
            <artifactId>maven-compiler-plugin</artifactId>
            <configuration>
                <annotationProcessorPaths>
                <! -- -->
                </annotationProcessorPaths>
            </configuration>
        </plugin>
</build>
Spring Starters
In the pom.xml file, we can see two dependencies. One is spring-boot-starter and the other one is spring-boot-starter-test. With starters, we don’t have to worry about the fine-grained dependencies as we get a collection of dependencies through a starter. The official starters all start with a prefix, spring-boot-starter- and the group ID is always org.springframework.boot. There are various Spring Boot Application starters such as spring-boot-starter-jdbc, spring-boot-starter-data-jpa which we can use for specific use cases.
The official starters all start with spring-boot-starter- such as spring-boot-starter-web. But the starters that don’t come from VMWare should have a well-defined name and start with the project name, followed by -spring-boot-starter(e.g. okta-spring-boot-starter).
Configurations
The Spring Initializr creates various documents, among them the application.properties file, which only has spring.application.name=demo. This file can be used to set up various Spring Boot configurations. If you don’t want to use the default application.properties like spring.main.banner-mode and prefer using .yml, you can rename the file to application.yml. Usually, the application.properties file is located in the classpath, that is, in the source code folder src/main/resources. Everything in this directory will later be in the root directory of the built application.
To test out configurations, add the following line to the application.properties file, and execute ./mvnw spring-boot:run in the terminal.
spring.main.banner-mode=off
Then, you will note that the Spring banner we have seen when running the application is not shown.
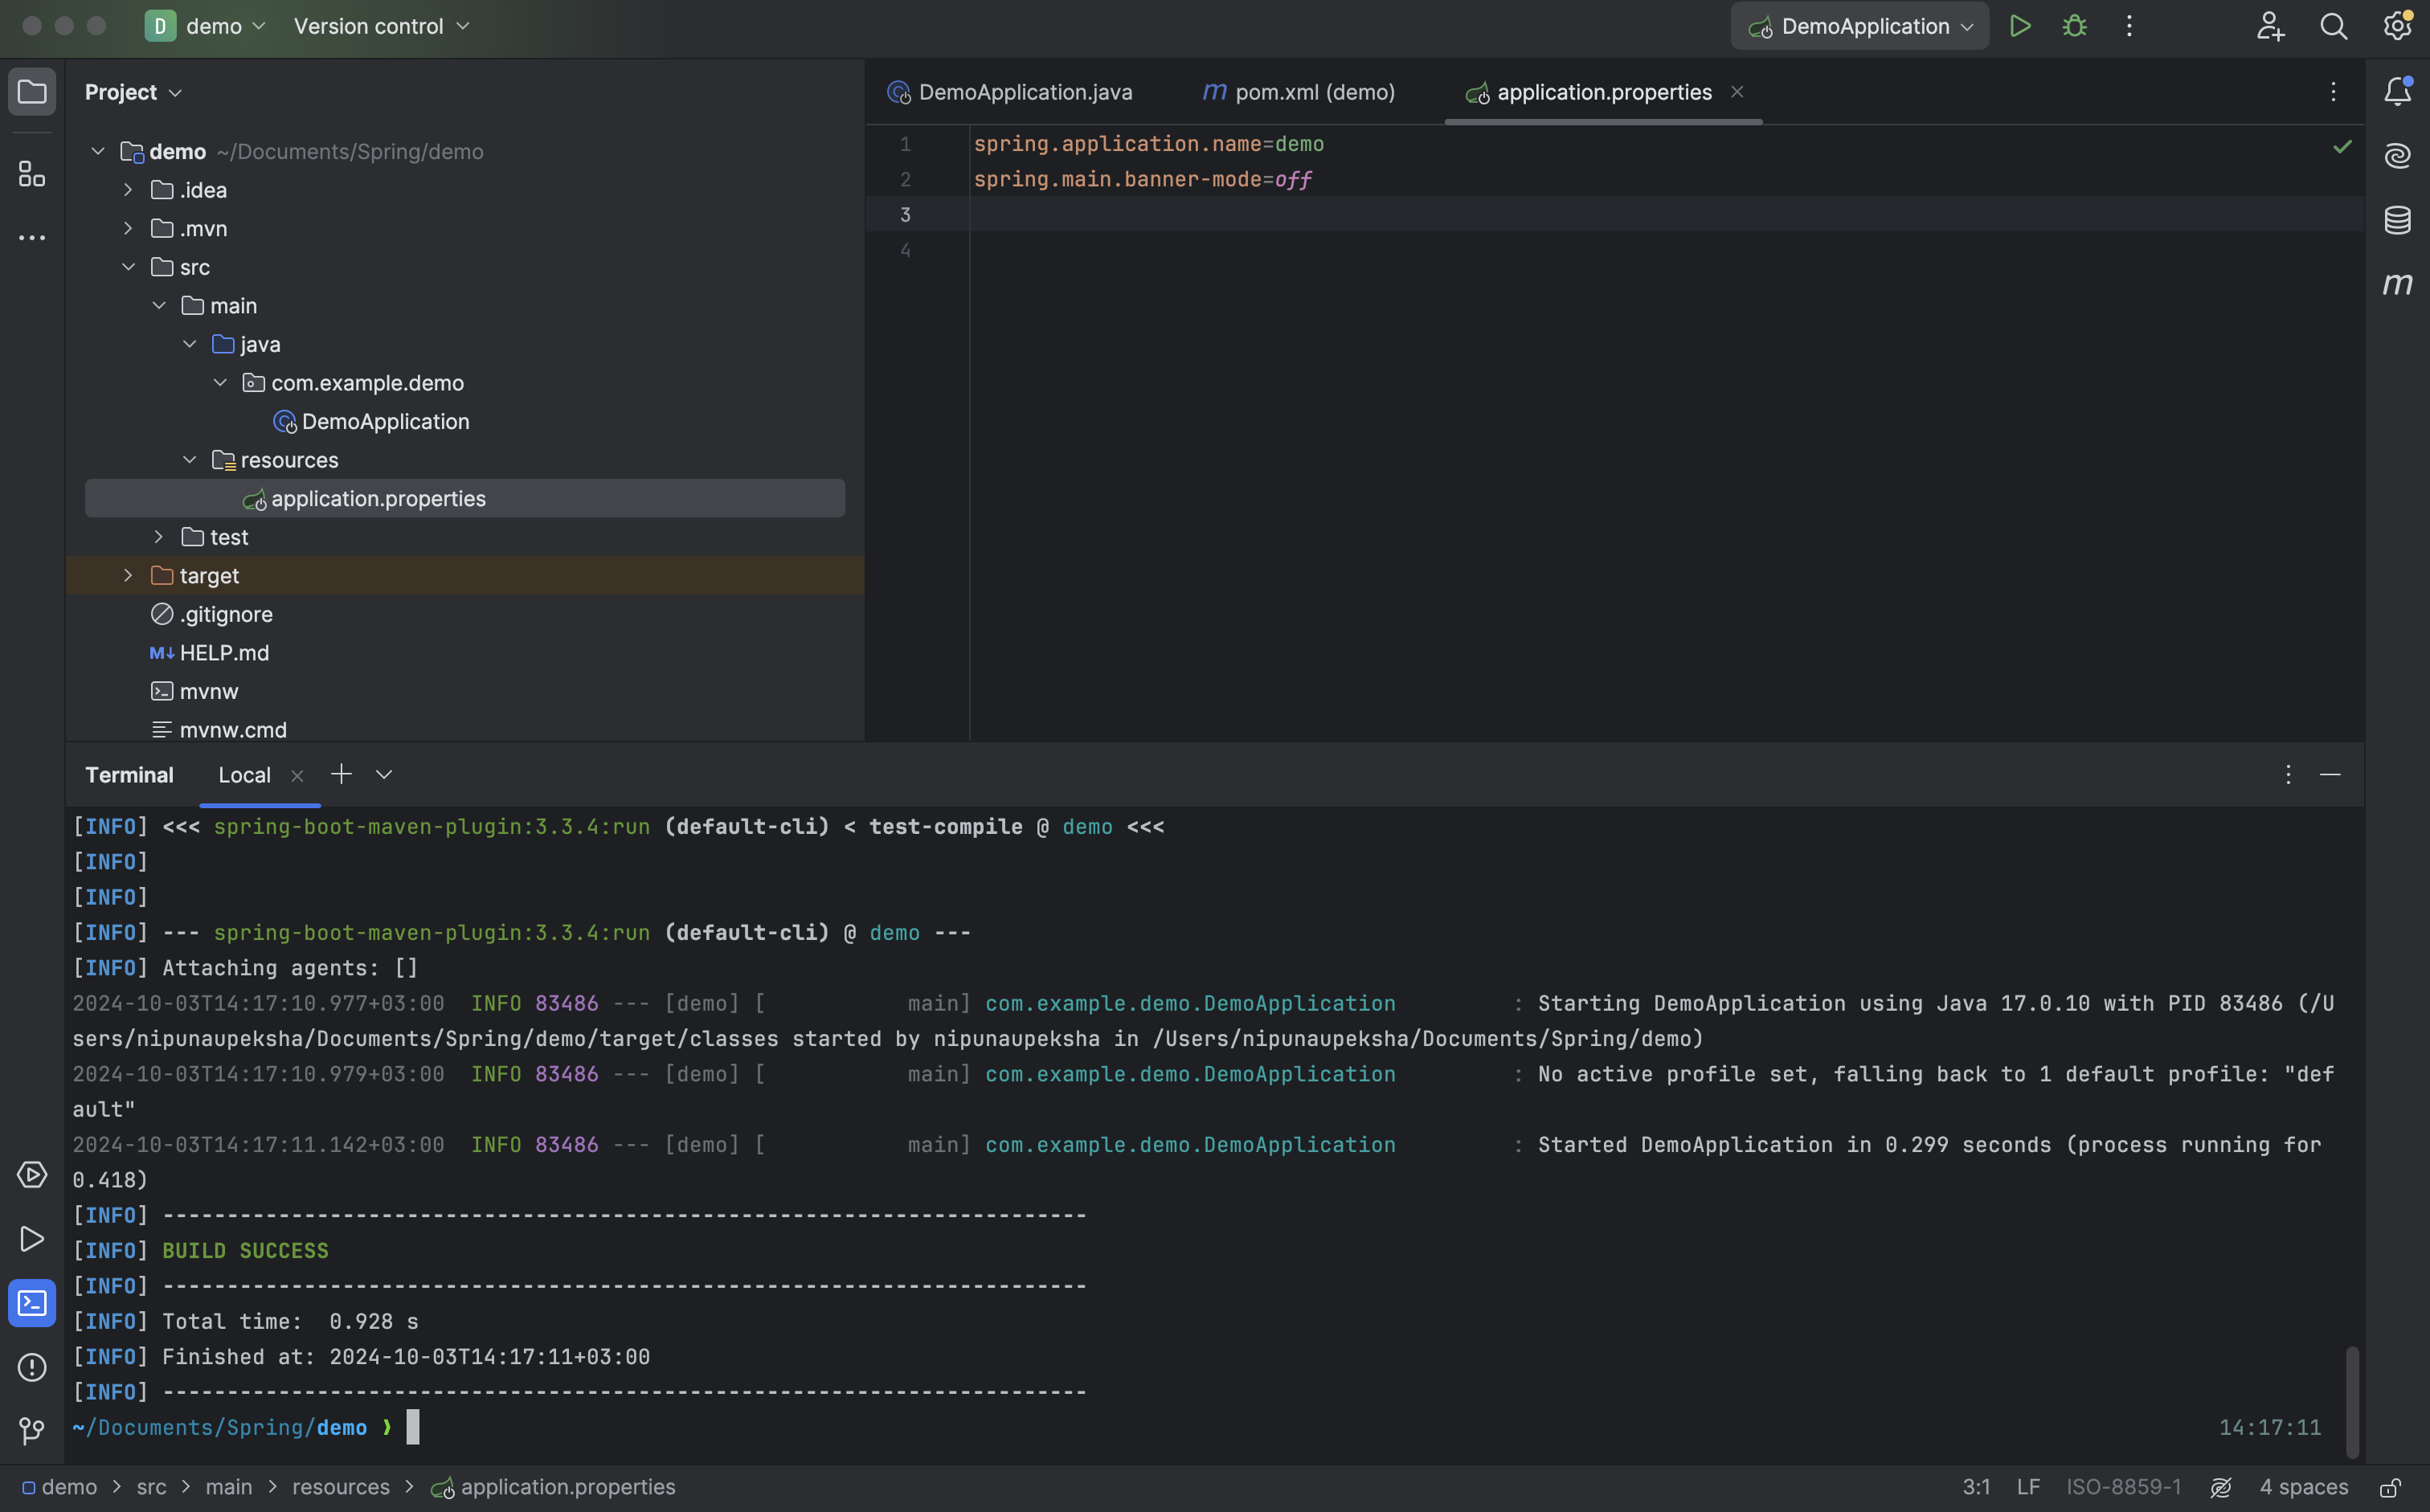
When you start typing a configuration, IntelliJ IDEA’s intelli-sense will provide various configurations you can choose and the values you can use with those configurations. With spring.main.banner-mode configuration, there are three valid assignments.
off→ Switch off completelyconsole→ This is the default. The banner appears onSystem.out.log→ Write the banner to the current log stream.
Logging API and Simple Logging Facade for Java
The spring-boot-starter has a dependency on spring-boot-starter-logging which provides logging infrastructure and configures two logging facades.
Simple Logging Facade for Java (SLF4J)
Apache Commons Logging API
Typically, it is uncommon to work directly with a logging library such as Logback or Log4j. Instead, logging facades are often used. A facade is a well-known design pattern that accepts requests from external sources and then delegates them to a complicated subsystem. By logging solely through a facade, the details of the underlying libraries are concealed. This enables logging implementations to be modified with ease.
Testing SLF4J
To test how to use SLF4J, make the following changes to DemoApplication.java file.
package com.example.demo;

import org.springframework.boot.SpringApplication;
import org.springframework.boot.autoconfigure.SpringBootApplication;
import org.slf4j.*;

@SpringBootApplication
public class DemoApplication {
    private static final Logger log = LoggerFactory.getLogger(DemoApplication.class);
    public static void main(String[] args) {
        log.info("Starting Spring Application: {}", "Demo");
        SpringApplication.run(DemoApplication.class, args);
    }
}
Now, if you run this, you can see the logline, INFO com.example.demo.DemoApplication -- Starting Spring Application: Demo in the terminal.
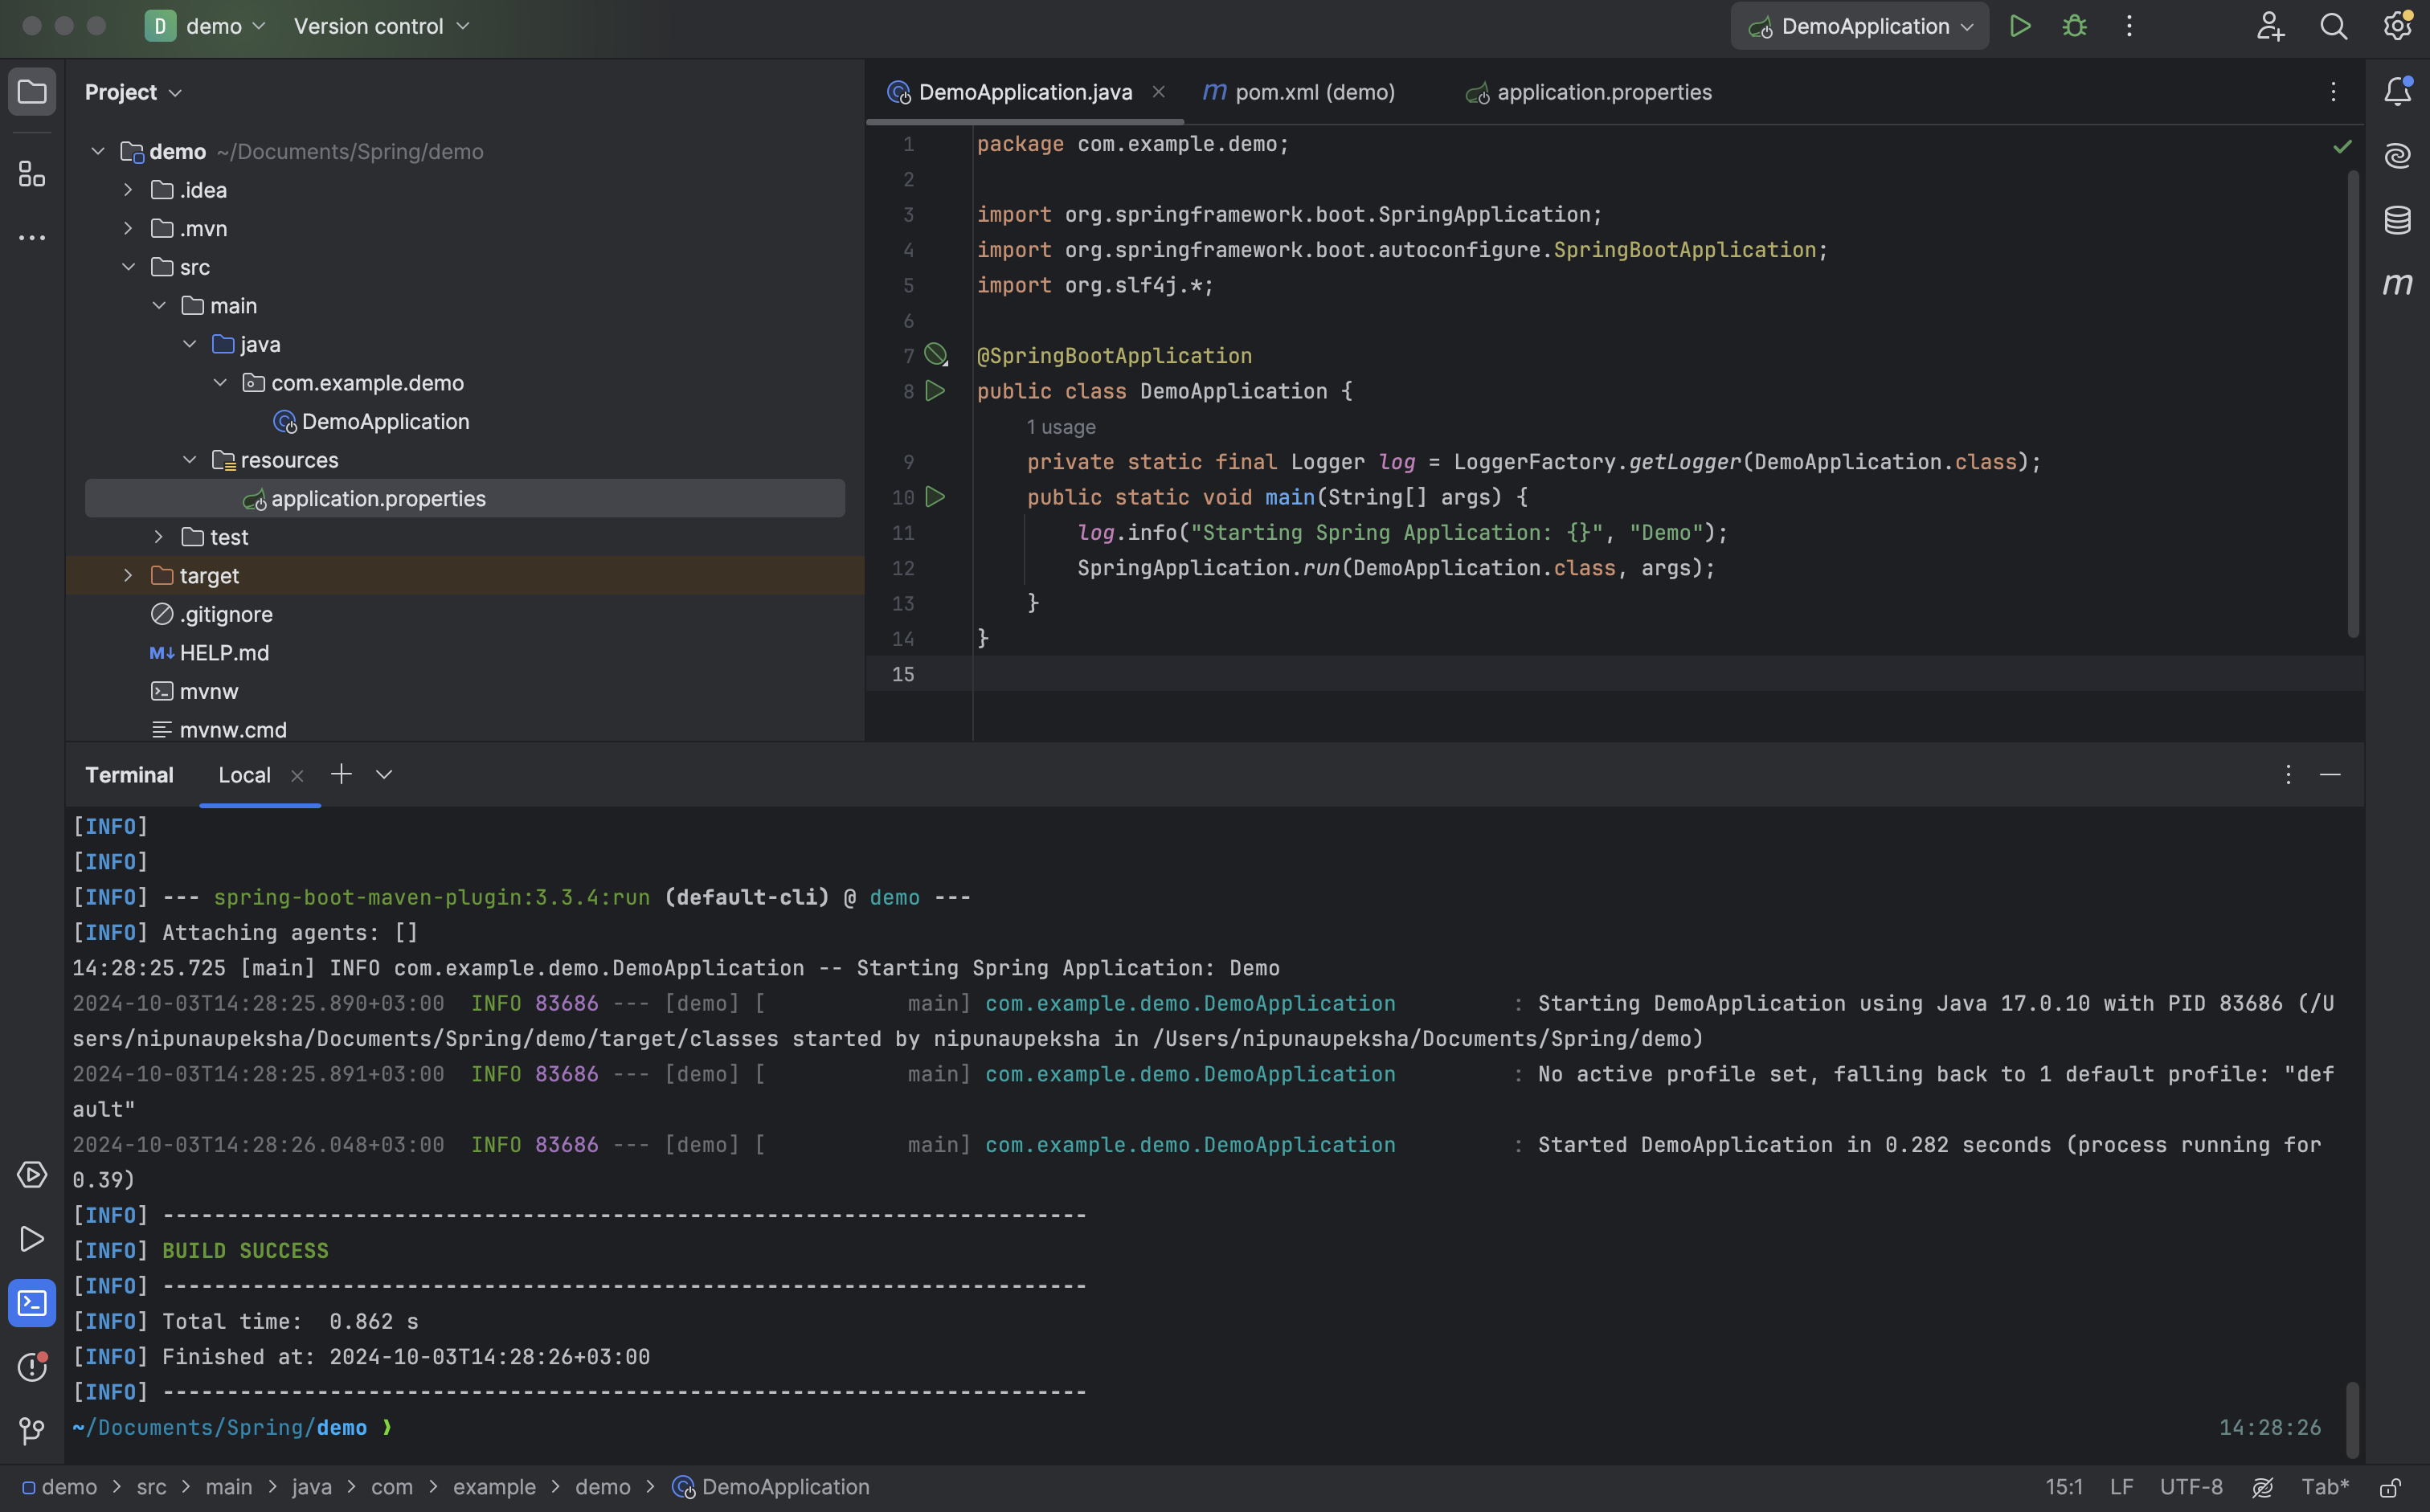
Logger methods are called debug(…), info(…), error(…), and so on. They indicate the urgency with which something should be reported. For instance, info(…) method shows something comparable to System.out.printf(…). But sometimes, you need to declare log levels so that you can filter the logs properly. To set up the log levels, you can refer to the application.properties file.
logging.level.com.example.demo=DEBUG
logging.level.org.springframework=ERROR
The configuration properties start with the prefix logging.level and are followed by package specification or a fully qualified type.
So this is it regarding, Setting Up a Spring Boot Project and Investigating Dependencies, Starters, Configurations, and Loggers. In the next article, we’ll check about Spring Containers.
Subscribe to my newsletter
Read articles from Nipuna Upeksha directly inside your inbox. Subscribe to the newsletter, and don't miss out.
Written by
