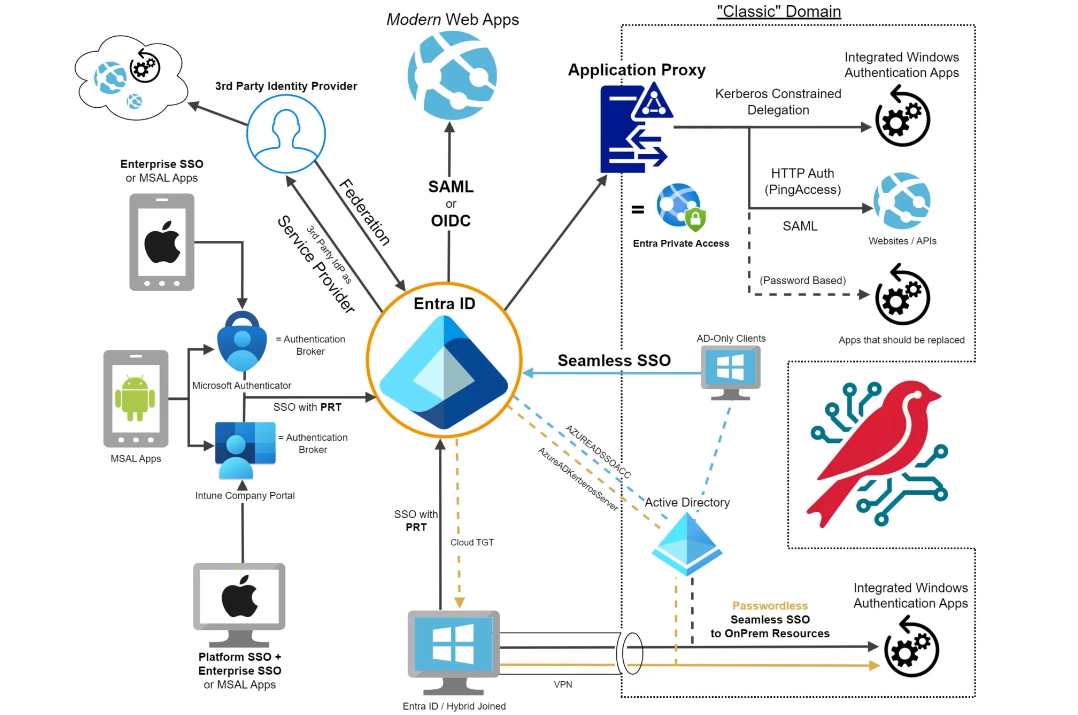
Enable Single Sign-On for On-Prem Applications with Entra ID Easily
 SUJIT KUMAR SAHOO
Requirements and Prerequisites to enable SSO for an On-Prem application
1.Identity Provider (IdP): This is a service like Okta, Azure AD, or Ping Identity that handles the authentication. I am using Azure AD, but you could choose anyone from this.
2.On-Premises Application: Your application should ideally support SSO protocols like SAML, OAuth, or OpenID Connect. If it doesn't, you might need an additional connector or agent.
3.Network Setup: Make sure your on-premises application can communicate with the IdP. This might involve setting up a VPN or using an application proxy. 4.Certificates: You'll need SSL/TLS certificates to secure the communication between the IdP and your application. 5.User Directory: A user directory like Active Directory that the IdP can use to authenticate users.
Now the time to enable SSO
Step 1: Prepare Your On-Premises Application
1.Check SSO Support: First, confirm that your application supports SSO protocols like SAML, OAuth, or OpenID Connect. 2.Install Application Connector (if needed): If your application doesn't support these protocols, you might need to install an application connector or agent provided by your IdP.
Step 2: Configure Your Identity Provider (IdP)
Create a New Application: Log in to your IdP's with admin console and create a new application for your on-premises app.. I am using Azure AD, but you could choose anyone from these- Google, Microsoft Entra ID, Okta, Ping Identity, etc.
Configure SSO Settings: You'll need to enter some details like:
Entity ID: A unique identifier for your application.
SSO URL: The URL where authentication requests should be sent.
Audience URI: The intended audience for the SSO token.
NameID Format: The format of the user identifier, like an email address.
Upload Certificates: Upload the SSL/TLS certificates required for secure communication. 4- Map Attributes: Map user attributes from the IdP to your on-premises application, like username and email.
Step 3: Configure Your On-Premises Application
Enter IdP Metadata: In your on-premises application, enter the IdP metadata, which usually includes:
IdP Entity ID
SSO URL
Certificate Fingerprint
Configure Assertion Consumer Service (ACS) URL: Set the ACS URL where the IdP should send the SAML assertion.
Test the Configuration: Perform a test login to make sure everything is working correctly.
Step 4: Secure the Connection
Firewall Rules: Update your firewall rules to allow communication between the IdP and your on-premises application.
SSL/TLS: Ensure that all communication is encrypted using SSL/TLS.
SSL/TLS Setup: Generate Certificates: Use a Certificate Authority (CA) to generate SSL/TLS certificates. Install Certificates: Install the certificates on your servers and configure your application to use them. Verify Configuration: Use tools like OpenSSL to verify that the SSL/TLS setup is correct and that the connection is secure.
Step 5: User Provisioning (Optional)
SCIM or API: Use SCIM (System for Cross-domain Identity Management) or an API to provision users from the IdP to your on-premises application.
Group Mapping: Map user groups in the IdP to roles or permissions in your on-premises application.
Conclusion
Setting up SSO for an on-premises application involves configuring both your Identity Provider and the application itself. The exact steps can vary depending on the specific IdP and application you're using, but the general process remains the same. Once everything is set up, your users will be able to log in to your on-premises application using their single set of credentials, making their experience smoother and more secure.
Please go through to Microsoft site for more update and information.
Thanks for Reading this content.
Subscribe to my newsletter
Read articles from SUJIT KUMAR SAHOO directly inside your inbox. Subscribe to the newsletter, and don't miss out.
Written by
