Understanding SSH Keys: How They Work and Steps to Create Your Own
 Dushmanta
Hello developers! In this article, we'll explore how SSH keys work, how to generate them, and how to retrieve the public SSH key for use wherever needed.
Before we dive into the process of generating them, let's briefly understand SSH keys.
What are SSH Keys?
SSH, or Secure Shell keys, are pairs of cryptographic keys (a public key and a private key) used to securely access a remote server or computer with an encrypted connection, instead of using a username and password.
Why use SSH Keys?
The advantage of using SSH keys is that you don't have to enter a username and password every time you need to access a remote server, allowing for passwordless login using key-based authentication.
Another major advantage is that key-based authentication ensures the private key never leaves your local device and is never transmitted over the network, unlike a username and password. This significantly reduces the risk of attacks like phishing. But how does it work?
How SSH Keys Work:
When we generate SSH keys, two keys are created: one is the public key, and the other is the private key. We add the public key to the remote server or computer we want to access. The private key stays on your device (never share your private key with anyone; it’s only for you).
Think of the public key as a lock on your server, and the private key as the only key that can open that lock. No other key can open it.
How Does the Verification Work?
You might wonder how this differs from using a username and password if the private key is involved. The key verification process works a bit differently. When you try to access the server with SSH, instead of sending your private key to the server, the server sends an encrypted challenge to your device. This challenge can only be decrypted by your private key. Once decrypted, it’s sent back to the server, and if the server can verify it, access is granted.
The important part is that your private SSH key never leaves your device, making it much more secure than the usual username and password login. Now, let's go ahead and generate SSH keys that we can use whenever needed.
Generating SSH Keys:
To generate SSH keys, run the following command in your terminal:
ssh-keygen -t rsa -b 4096
Additionally, you can add a comment to the command to help identify your SSH keys if you have many, using the -C flag. You can also use an email address as the comment to identify the SSH user when multiple people are adding keys. The command will look like this:
ssh-keygen -t rsa -b 4096 -C "personal laptop"
# or
ssh-keygen -t rsa -b 4096 -C "your_email@example.com"
The terminal will prompt you to enter the filename to save the key.
One thing to keep in mind is that when you generate SSH keys, the file should be stored inside the .ssh folder in your root directory. So, if you’re generating an SSH key for GitHub, give the filename as ~/.ssh/<your-file-name>. For example, ~/.ssh/id_rsa_github (keeping the id_rsa prefix for better naming). In this article, I haven’t used this convention for demonstration purposes.
Adding a Passphrase:
Next, the terminal will prompt you to enter a passphrase. This acts like a password for your private key, meaning that even if someone gains access to your private key, they won’t be able to use it without the passphrase. This adds an extra layer of security.
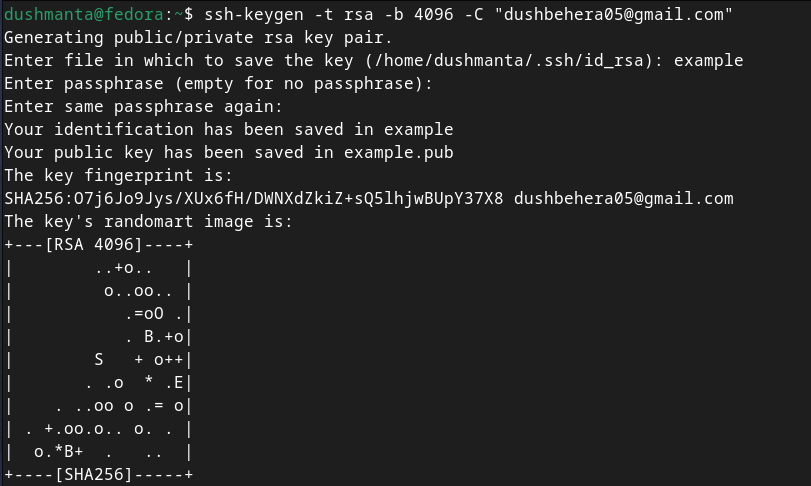
The above prompts will look something like this:

And voilà! You’ve successfully generated your SSH keys. The output will look something like this:

Retrieving the Public Key:
Now, we need to retrieve the public key, which can be added to the remote server or computer you want to access.
Run the following command with the filename you provided earlier while creating the keys (here filename is "example") to retrieve the public key:
cat <file-name>
# cat example.pub
# cat ~/.ssh/id_rsa_github.pub
The resulting file will look something like this. Now, add this SSH key wherever required.

As you can see, the email address provided appears at the end of the key, making it easier to identify. If you’ve passed a comment instead, the comment will appear in place of the email address.
Viewing the Private Key:
If you’re curious to see what the private key looks like, you can do so by using the same filename without the .pub extension, like this:
cat example # without the extension
# cat ~/.ssh/id_rsa_github
The private key will look something like this:
-----BEGIN OPENSSH PRIVATE KEY-----
# The long string like key here
-----END OPENSSH PRIVATE KEY-----
Also, keep in mind what I mentioned earlier:
DO NOT EVER SHARE YOUR PRIVATE KEYS.
I hope this article helped you gain a basic understanding of SSH keys, how they work, and how to generate them. Please share your feedback or any suggestions for improvements. Happy coding! :)
Subscribe to my newsletter
Read articles from Dushmanta directly inside your inbox. Subscribe to the newsletter, and don't miss out.
Written by

Dushmanta
Dushmanta
Passionate Software Engineer