Using Gitea as a private image repository
 Andre Wong
Previously we have written a simple API server that interacts with MongoDB, redis, and influxDB. We also managed to run our deployments on our Kubernetes cluster with the image pulled from docker.
Now let's try to create our own private image repository. The Gitea application we set up before has a container registry that is compliant with the Open Container Initiative. As such, we can push and pull docker images to our Gitea.
Prerequisites: we need to have SSL enabled on our Gitea application, check here to find out more on how to enable it.
Pushing to a private repository
My main PC is using Docker Desktop with WSL2. To push our image successfully, we must enable insecure-registries in the Docker desktop configuration.
Under Settings -> Docker Engine, add the following:
{ "builder": { "gc": { "defaultKeepStorage": "20GB", "enabled": true } }, "experimental": false, "insecure-registries": [ "192.168.1.4:3000" ] }192.168.1.4:3000is the URL of our Gitea application. This can be a simple domain name such asgitea.localif the DNS record is added into the DNS server (e.g. on PiHole).Perform a login to save credentials, and enter the username and password used for Gitea login. Here I have an account name called
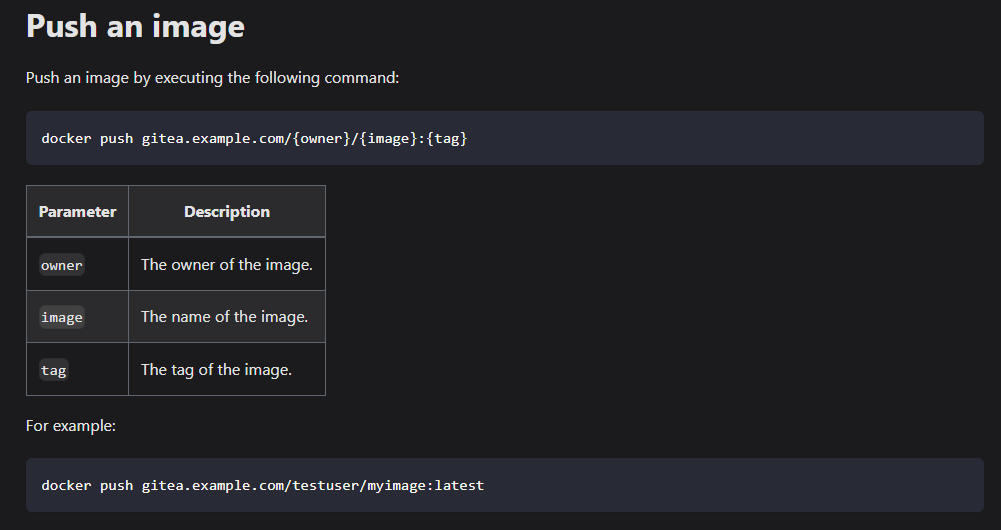
andre.docker login 192.168.1.4:3000 --username andre --password *******Next, we need to tag the docker image before pushing. According to Gitea documentation:

We need to first tag our image according to the above format
  # tag with an image ID
  docker tag 9b0f43d3c161 192.168.1.4:3000/andre/api-server:1.0.1

  # tag when building image
  docker build -t 192.168.1.4:3000/andre/api-server:1.0.1 .
Now we can push to Gitea as shown below
  # push to gitea
  docker push 192.168.1.4:3000/andre/api-server:1.0.1

  # to view all the list of images you have pushed
  curl -ik --user andre https://192.168.1.4:3000/v2/_catalog
  # output
  # {"repositories":["andre/api-server"]}
# to view all the tags of image curl -ik --user andre https://192.168.1.4:3000/v2/andre/api-server/tags/list # output # {"name":"andre/api-server","tags":["1.0.1"]}Here is a list of APIs we can use to view the images we have pushed
Pulling from a private repository
we are following their guide here
we first create our auth value which comprises of <username>:<password> which is then baseb4 encoded. We use -n to prevent echo from adding extra newlines.
echo -n "andre:12345678" | base64
# output
# YW5kcmU6MTIzNDU2Nzg=
Next, we can create our dockerconfig.json to store our credentials secrets. The "192.168.1.4:3000" key is the IP and port where our image repository is located, we provide the credential info such as username, password, email and auth, which we had just encoded earlier into this JSON file.
// dockerconfig.json
{
    "auths": {
        "192.168.1.4:3000": {
            "username": "andre",
            "password": "12345678",
            "email": "andre@mail.com",
            "auth": "YW5kcmU6MTIzNDU2Nzg="
        }
    }
}
Now we can parse this JSON file into base64 again.
base64 dockerconfig.json
# output
# eyJhdXRocyI6eyIxOTIuMTY4LjEuNDozMDAwIjp7InVzZXJuYW1lIjoiYW5kcmUiLCJwYXNzd29yZCI6IjEyMzQ1Njc4IiwiZW1haWwiOiJhbmRyZUBtYWlsLmNvbSIsImF1dGgiOiJZVzVrY21VNk1USXpORFUyTnpnPSJ9fX0=
using this output value, we can then create a image-pull-secret.yaml file and store this value under data.\.dockerconfigjson. The type of secret here is kubernetes.io/dockerconfigjson, which is used to authenticate with a container registry when pulling a private image.
# image-pull-secret.yaml
apiVersion: v1
kind: Secret
metadata:
  name:  image-pull-secret
data:
  .dockerconfigjson:  eyJhdXRocyI6eyIxOTIuMTY4LjEuNDozMDAwIjp7InVzZXJuYW1lIjoiYW5kcmUiLCJwYXNzd29yZCI6IjEyMzQ1Njc4IiwiZW1haWwiOiJhbmRyZUBtYWlsLmNvbSIsImF1dGgiOiJZVzVrY21VNk1USXpORFUyTnpnPSJ9fX0= # dockerconfigjson is a base64 encoded string:  cat ~/.docker/config.json | base64 -w 0
type: kubernetes.io/dockerconfigjson
Now we just need to include this secret in our api-server.yaml so that it knows to use this to authenticate our Gitea application
We can add imagePullSecrets it under the deployment spec.template.spec.
Change the spec.template.spec.containers.image to the one pointing to your private image repository as well
image: 192.168.1.4:3000/andre/api-server:1.0.1
# api-server.yaml
apiVersion: apps/v1
kind: Deployment
metadata:
  name: api-server-deployment
  annotations:
    description: "this is my normal backend server deployment"
    version: "1.0"
spec:
  replicas: 1
  selector:
    matchLabels:
      app: api-server
  template:
    metadata:
      labels:
        app: api-server
    spec:
      containers:
        - name: api-server-container
          image: 192.168.1.4:3000/andre/api-server:1.0.1 # update the link to image registry
          resources: # declare resources limits and request
            limits:
              memory: "512Mi"
              cpu: "1"
            requests:
              memory: "256Mi"
              cpu: "0.2"
          ports: # container ports exposed
            - containerPort: 8080
          envFrom:
            - configMapRef:
                name: homek8-configmap
            - secretRef:
                name: homek8-secret
      imagePullSecrets:
        - name: image-pull-secret
Making deployments to k8s
Now we are ready to deploy to Kubernetes.
First, we need to ensure that we added our Gitea SSL certificate to our Kubernetes nodes. To do that, copy the giteaCA.crt over to our k8 nodes then update the ca-certificate:
sudo cp giteaCA.crt /usr/local/share/ca-certificates/
sudo update-ca-certificates
Next, we can create a namespace for deployment:
kubectl create namespace homek8-custom-registry
kubectl config set-context --current --namespace=homek8-custom-registry
Lastly, deploy
kubectl apply -f .
Now we can see the container being successfully pulled and created.
Subscribe to my newsletter
Read articles from Andre Wong directly inside your inbox. Subscribe to the newsletter, and don't miss out.
Written by

Andre Wong
Andre Wong
I am a software developer who is passionate about creating innovative and efficient solutions to complex problems. I also enjoy writing about my personal projects and sharing my knowledge with others. I am maintaining a blog to document my coding adventures, share tips and tricks for software development, and discuss interesting topics in computer science.