☑️Day 34: Understanding Replica Sets in Kubernetes🚀
 Kedar Pattanshetti
🔹Table of Contents :
What is a Replica Set in Kubernetes?
Why Use Replica Sets?
Components of Replica Sets
Life Cycle of a Replica Set
Hands-On Task: Creating and Managing Replica Sets
Task 1: Creating a ReplicaSet
Task 2: Scaling Pods with Replica Sets
Task 3: Using Node Selectors to Assign Pods to Specific Nodes
Real-Time Scenario for Replica Sets
Step-by-Step Commands and Explanations
✅1. What is a Replica Set in Kubernetes?
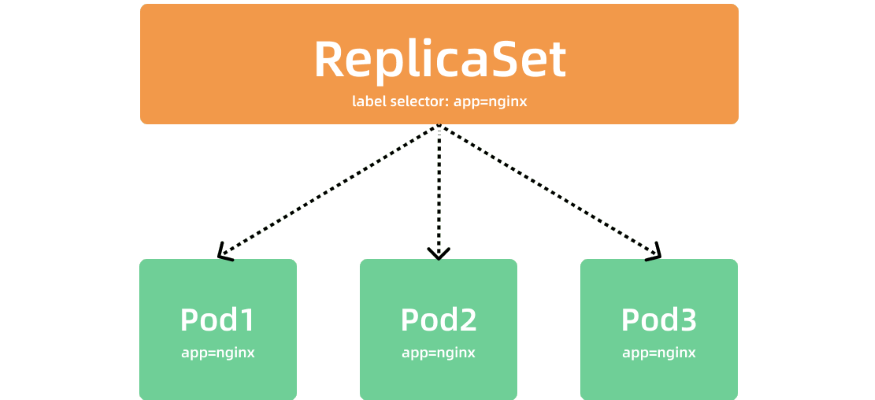
A Replica Set in Kubernetes ensures a specified number of pod replicas are running at all times. It acts as a self-healing system that automatically recreates failed pods and scales them up or down as needed.
In essence, a Replica Set guarantees the availability of your application, even in the face of pod failures or scaling demands.
✅2. Why Use Replica Sets?
Replica Sets are useful in scenarios where:
You want high availability for your application.
Your application needs to scale up or down based on demand.
You want to ensure a minimum number of pods are always running.
Real-time Scenario: Imagine you are running an e-commerce site, and due to increased demand during a flash sale, you need to ensure multiple replicas of your frontend service are running across the cluster to handle the traffic. A Replica Set will ensure you have the right number of pod instances running to meet the demand and can automatically scale them as needed.
✅3. Components of a Replica Set
A Replica Set is composed of three main components:
Selector
The selector defines the criteria that determine which pods are managed by the Replica Set. It’s like a filter based on labels that picks the right pods to manage.
Replicas
The replicas field specifies the number of pod copies that should be running at any given time. If any of these pods fail or get terminated, the Replica Set controller will create new ones to maintain the desired count.
Template
The template contains the pod specification, including the container image, labels, and resource requirements that the Replica Set will create.
✅4. Life Cycle of a Replica Set
The Replica Set lifecycle revolves around the following key stages:
Create
When you create a Replica Set, it spins up the number of pods specified in the replicas field based on the template provided.
Scale
The Replica Set can be scaled up or down by increasing or decreasing the number of replicas. Kubernetes handles scaling seamlessly by adding or removing pods as needed.
Manage
Kubernetes continuously monitors the state of the pods and manages the Replica Set to ensure that the desired state matches the actual state.
✅5. Hands-On Task: Creating and Managing Replica Sets
Task 1: Creating a Replica Set
Let's start by creating a basic Replica Set. Here's the YAML file to define it.
apiVersion: apps/v1
kind: ReplicaSet
metadata:
  name: my-replicaset
spec:
  replicas: 3
  selector:
    matchLabels:
      app: my-app
  template:
    metadata:
      labels:
        app: my-app
    spec:
      containers:
      - name: nginx
        image: nginx:1.23
- Step 1: Create the Replica Set using this YAML file.
kubectl apply -f replicaset.yaml
- Step 2: Verify that the pods have been created.
kubectl get pods
- Step 3: Check the Replica Set status.
kubectl get rs
- Step 4: Delete a pod and see how the Replica Set recreates it.
kubectl delete pod <pod-name>
Task 2: Scaling Pods with Replica Sets
Now, let's scale the Replica Set to increase or decrease the number of pods.
- Step 1: Scale up the Replica Set.
kubectl scale rs my-replicaset --replicas=5
- Step 2: Scale down the Replica Set.
kubectl scale rs my-replicaset --replicas=2
Task 3: Using Node Selectors to Assign Pods to Specific Nodes
Node selectors allow you to schedule pods on specific nodes in your cluster. This is particularly useful for resource optimization or deploying production workloads.
- Step 1: Label the node where you want the pod to be scheduled.
kubectl label nodes worker2.example.com nodetype=production
- Step 2: Modify the Replica Set YAML to use a node selector.
spec:
  template:
    spec:
      nodeSelector:
        nodetype: production
- Step 3: Apply the updated Replica Set configuration.
kubectl apply -f replicaset.yaml
- Step 4: Verify that the pods are running on the specific node.
kubectl get pods -o wide
✅6. Real-Time Scenario for Replica Sets
Let's consider an example where you run a backend service for a banking application that handles thousands of transactions every second. The service must always be available and able to handle high traffic without failures. A Replica Set helps by ensuring multiple instances of your backend service are running and can automatically scale during peak times to handle additional traffic.
✅7. Step-by-Step Commands and Explanations
kubectl apply -f replicaset.yaml: Creates the Replica Set using the YAML file.
kubectl get pods: Lists all running pods.
kubectl get rs: Lists the Replica Sets in the cluster.
kubectl delete pod <pod-name>: Deletes a pod to simulate failure.
kubectl scale rs my-replicaset --replicas=N: Scales the number of pod replicas.
kubectl label nodes <node-name> nodetype=production: Labels the node for node selector.
🚀Thanks for joining me on Day 34! Let’s keep learning and growing together!
Happy Learning! 😊
#90DaysOfDevOps
Subscribe to my newsletter
Read articles from Kedar Pattanshetti directly inside your inbox. Subscribe to the newsletter, and don't miss out.
Written by
