Building a Powerful Backend with Next.js, Prisma, and PostgreSQL: Best Practices
 Ayush Khatri
Table of contents

Introduction
In today’s web development, having a fast and scalable backend is essential. Prisma and PostgreSQL work great together to help build strong and reliable APIs. This blog will walk you through how to set up a Next.js backend using Prisma and PostgreSQL, making sure your app is well-organized and runs smoothly.
Prerequisites:
Node.js and npm (or yarn) installed
A basic understanding of Next.js, Prisma, and PostgreSQL
A PostgreSQL database instance
You can easily set up a free PostgreSQL instance by visiting the Neon.tech website, which offers reliable and cloud-based database solutions. Their free plan includes 0.5 GiB of storage, 24/7 database availability.
Step-by-Step Guide:
Project Setup:
Create a new Next.js project:
npx create-next-app@latest ./
Install Dependencies:
Install Prisma and PostgreSQL client:
npm install prisma
Finally setup prisma for your project:
npx prisma init --datasource-provider postgresqlThis command does two things:
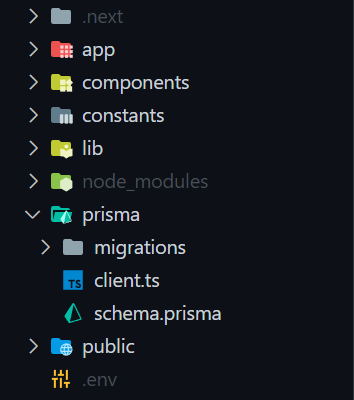
Creates a folder called
prismawith a fileschema.prismathat holds your database connection info and models.Adds an
.envfile in the project’s root directory for storing environment variables like your database connection.
Add models of data in prisma schema in
prisma/schema.prisma:
model User {
  id    Int     @id @default(autoincrement())
  email String  @unique
  name  String?
  posts Post[]
}

model Post {
  id        Int     @id @default(autoincrement())
  title     String
  content   String?
  published Boolean @default(false)
  author    User    @relation(fields: [authorId], references: [id])
  authorId  Int
}

- Run migrations for creating tables in database:
npx prisma migrate dev --name init
- This command will create a migration file in
prisma/migrationsfolder
Now you can send Queries to your database:
 import { PrismaClient } from '@prisma/client'

 const prisma = new PrismaClient();

 async function main() {
   const user = await prisma.user.create({
     data: {
       name: 'John Doeeeey',
       email: 'example@john.com',
     },
   })
   console.log(user);
 }

 main()
   .then(async () => {
     await prisma.$disconnect();
   })
   .catch(async (e) => {
     console.error(e);
     await prisma.$disconnect();
     process.exit(1);
   })
If you're building an app with Next.js and Prisma ORM, you might run into this common issue during development:
Problem : Many developers see this warning while working with Next.js:
warn(prisma-client) There are already 10 instances of Prisma Client actively running.
When you run
next devin development mode, it restarts the app a lot. Every time this happens, it creates a new PrismaClient that connects to your database. If too many PrismaClients are created, it can overload your database with connections.How to Fix It
- To fix this, you should create only one PrismaClient and store it on
globalThis, which is like a global variable. Before creating a new PrismaClient, you can check if one already exists. If it does, use the existing one. This stops PrismaClient from creating extra connections every time the app reloads.
- To fix this, you should create only one PrismaClient and store it on
Create a
client.tsfile inside prisma folder:import { PrismaClient } from '@prisma/client' const prismaClientSingleton = () => { return new PrismaClient() } declare const globalThis: { prismaGlobal: ReturnType<typeof prismaClientSingleton>; } & typeof global; const prisma = globalThis.prismaGlobal ?? prismaClientSingleton() export default prisma if (process.env.NODE_ENV !== 'production') globalThis.prismaGlobal = prisma- Now we can use the
prismavariable for performing database queries:
- Now we can use the
now instead of old approach we can use the newly created file prisma inside prisma/client.ts
Adding users to database:
import prisma from "@/prisma/client";

export default async function AddUser() {
 const user = await prisma.user.create({
    data: {
      name: 'Ayush',
      email: 'ayush@example.com',
    },
  })
  console.log(user);
});
- Get all users:
import prisma from "@/prisma/client";

export default async function AddUser() {
 const users = await prisma.user.findMany();
  console.log(user);
});

   <section>
      <ul>
        {
          users.map((user) => (
            <li>
               {user.name} - {user.email}
            </li>
          ))
        }
      </ul>
   </section>
Conclusion
Using Prisma and PostgreSQL with Next.js makes building a strong backend much easier. By following best practices, like properly setting up the Prisma Client, you can avoid common problems and ensure your app runs smoothly. With this setup, you’re ready to create powerful, efficient applications.
Thanks for reading❣️Happy coding!
Subscribe to my newsletter
Read articles from Ayush Khatri directly inside your inbox. Subscribe to the newsletter, and don't miss out.
Written by

Ayush Khatri
Ayush Khatri
👋Hey there! I am Ayush . Passionate about web development! Exploring development, creating cool websites, and sharing the journey!