Cloud DevOps - Building an Web App and IDE in AWS.
 yyounos shaik
DIFFICULTY : EASY TIME : 1 HOUR COST : 0$
WHAT YOU’LL NEED :
An AWS account - Create one here!
Visual Studio Code - Download Here!
AWS SERVICES :
AWS IAM
Amazon EC2
AWS Command Line Interface
Overview
Hello and welcome to the exciting start of the DevOps x AWS Cloud series! 🎉🚀
In this series of projects, we're going to create web applications, set up repositories, and build a full CI/CD pipeline! We'll use Git commands to pull and push files and integrate the application step by step. So, gear up and let's jump into this thrilling series.
Let’s Get Started…
What is DevOps?
In the real world, developers often work together in teams on complex software projects. Without the right systems, managing all these changes can get pretty chaotic.
DevOps engineers are here to bridge the gap between developers (Dev), who create the software, and operations (Ops), who deploy and manage it. Every day, DevOps engineers work on automating and enhancing processes at every stage of software development, from integration and testing to release and deployment. In a nutshell, they make building software faster, less error-prone, and more secure.
What is CI/CD Pipeline?
A CI/CD pipeline is a handy tool that automates the journey software takes from being developed (coded by engineers) to being deployed (made available to users).
"CI" stands for continuous integration, where code changes are automatically updated and combined with what other developers are working on.
"CD" stands for continuous deployment, which automates the process of releasing new software to users.
Teams use CI/CD to make their workflow smoother and reduce manual tasks. This helps them deliver new features to users, fix bugs faster, and work with fewer errors.
CI/CD is a key concept in DevOps. It's all about improving the speed and quality of software delivery through automation and streamlined workflows!
Step 1 : Setting up an IAM user
If you don't already have an IAM user, here's how to set one up:
Head to your AWS Account as the root user.
Open the AWS IAM console.

From the left hand navigation panel, choose Users.
Choose Create user.
For your new user's User name, use
Yourname-IAM-Admin.
Yup, replace Yourname with your name!Make sure to select the checkbox next to Provide user access to the AWS Management Console - optional.
This does not apply to all accounts, but if you're prompted with a pop up panel that says Are you providing access to a person?, choose I want to create an IAM user.
For the console password, choose Custom password.
Type in a password that you will be able to remember/access in the future.
Deselect the checkbox for
Users must create a new password at next sign-in - Recommended.Choose Next.
In the permissions set up page, choose Attach policies directly.
From the list of Permissions policies, select
AdministratorAccess.Choose Next.
Choose Create user.
Voilà - you've just created your new user! Stay on this page.
Choose
Download .csvfile.Copy the
Console sign-in URL.Now you're ready to start using your IAM user.
Log out of your root user's AWS Account.
Paste and go to your copied console sign-in URL.
Open your downloaded .csv file containing your user's access instructions.
Log in using your IAM user's username and the password revealed in the
.csvfile.
Step 2 : Launch an EC2 instance.
In this Step you are going to :
Launch the EC2 instance.
Connecting EC2 using SSH.
In the AWS console search bar, search for EC2.

Select Instances in the left hand menu and choose Launch instances.
Choose the following settings in the Launch an instance page.
Under Name and tags, for Name, enter
webapp.Under Application and OS Images (Amazon Machine Image), choose Amazon Linux.
Choose the Amazon Linux 2023 AMI.
Keep the defaults for the other choices.
Under Instance type, choose t2.micro.
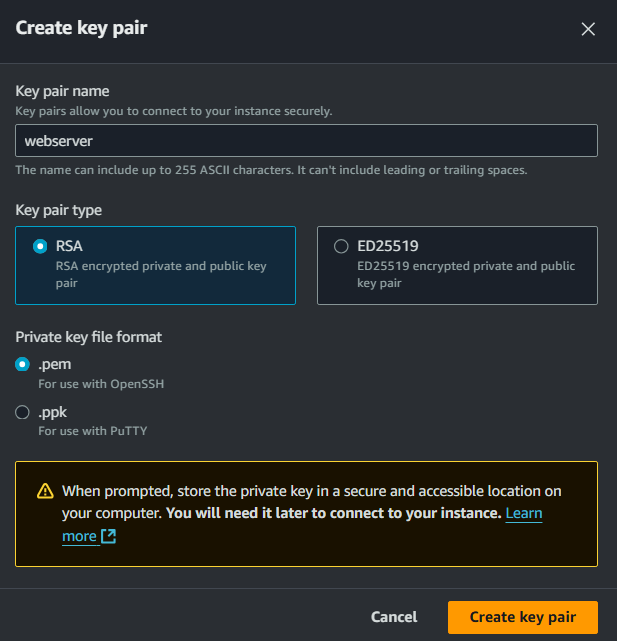
Under Key pair (login), choose a Create new key pair.
For your Key pair name, enter
webserver.
Leave your Key pair type as RSA.
Leave your Private key file format as .pem since we're using SSH later on to access our EC2 instance.
Select Create key pair.
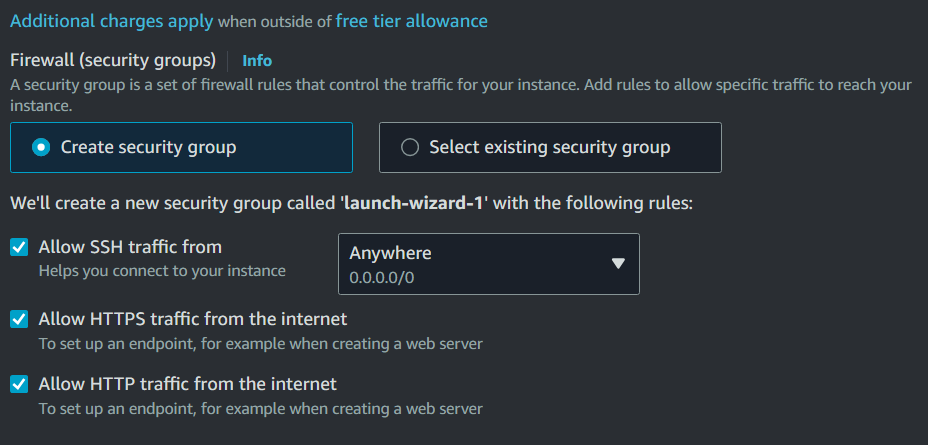
Back in our EC2 creation, under Network settings, set these values and keep the other values as their defaults
For Allow SSH traffic from, choose your IP address if it's correct (you can check your IP by clicking here). Otherwise select Anywhere.

Check the boxes for Allow HTTP traffic from the internet.
Leave the default values for the remaining sections.
Review the summary panel of your instance configuration.
When you're ready, choose Launch instance.
Navigate back to your list of EC2 instances, and then select the checkbox next to your new instance.
In the Details tab, note the following important details:
In Instance summary, note the Public IPv4 DNS.
Note the value for Key pair name.
Wait until Instance state for your instance is Running before continuing.
Connect to your instance using SSH:
Note: use git bash for connecting your EC2 instance as you don’t have to change the permissions of the .pem file.
Use the public DNS of your new instance. You can find it in the EC2 dashboard.
Connect to your instance using the following command, replacing /path/to/your-key-pair.pem with the path to your key pair file and your-ec2-instance-public-dns with the public DNS of your instance:
ssh -i /path/to/your-key-pair.pem ec2-user@your-ec2-instance-public-dns

Once you paste the URL you will be connected successfully.

Step 3 : Setting Up the Environment on the New EC2 Instance
Once connected to your EC2 instance, follow the steps below to set up your development environment .
Install Apache Maven:
What is Apache Maven?
Apache Maven is a powerful tool that automates the building of software.Building is an important multi-step process that transforms code written by developers (like you!) into a final product that is ready for computers to run. The key steps typically include:
1. Compiling: converting your code written in programming languages like Java into machine code that a computer can execute directly.
2. Linking: combining the compiled machine code with additional dependencies (i.e. external resources required for your application to function) to create a single program for the computer to run all together.
3. Packaging: assembling your file into a packaged form. For Java projects (which is what we're doing), this would be a JAR (Java Archive Resource) file that you'll learn more about in Project 3 of this DevOps Series. This JAR file makes your program easily distributed or deployed in other environments.
4. Testing: running automated tests to make sure your software works without bugs or issues.Each of these steps is absolutely crucial for producing a functioning software application. Tools like Apache Maven automate these processes for you!
 sudo wget https://repos.fedorapeople.org/repos/dchen/apache-maven/epel-apache-maven.repo -O /etc/yum.repos.d/epel-apache-maven.repo
 sudo sed -i s/\$releasever/6/g /etc/yum.repos.d/epel-apache-maven.repo
 sudo yum install -y apache-maven
Install Amazon Corretto 8:
What is Java? What is Amazon Correto 8?
Java is a popular programming language. It is used to build different types of applications, from mobile apps to large enterprise systems.Amazon Corretto 8 is a version of Java that we're using for this project. It's free, reliable and is provided by Amazon.
 sudo amazon-linux-extras enable corretto8
 sudo yum install -y java-1.8.0-amazon-corretto-devel
 export JAVA_HOME=/usr/lib/jvm/java-1.8.0-amazon-corretto.x86_64
 export PATH=/usr/lib/jvm/java-1.8.0-amazon-corretto.x86_64/jre/bin/:$PATH
Install Git into EC2 instance :
Why are we installing git into the instance? can’t we run normally?
We are installing Git on the instance because, by default, we can't run Git commands on it. To execute these commands in the upcoming steps, we need to install Git first.
These Git commands can run on your regular terminal or command prompt, but not on your launched instance.
 sudo yum update -y
 sudo yum install git -y
Verify the installation:
  java -version
  mvn -version
  git --version
Step 4 : Install Visual Studio Code and Remote - SSH Extension
Download and install Visual Studio Code from here if you haven't already.
Install the Remote - SSH extension in Visual Studio Code:
Open Visual Studio Code.
Go to the Extensions view by clicking on the Extensions icon in the Activity Bar or pressing
Ctrl+Shift+X.Search for "Remote - SSH" and install it.

Now, Click to remote explorers.
click on SSH settings and open the config file.

Now type this into the config file:
  Host <your EC2 public IP>
      HostName <ec2 instance name>
      User ec2-user
      IdentityFile <Path of your .pem file saved on your pc>
Save the config file.
Now Click on the
webappin the SSH.
Open a new terminal (connected to your EC2 instance).
Generate a new Maven project:
What is mvn?
When you run mvn commands, you're asking Maven to perform tasks (like creating a new project or building an existing one).The mvn archetype:generate command specifically tells Maven to create a new project from a template (which Maven calls an archetype). This command sets up a basic structure for your project, so you don't have to start from scratch
  mvn archetype:generate \
    -DgroupId=com.yourname.app \
    -DartifactId=yourname-web-project \
    -DarchetypeArtifactId=maven-archetype-webapp \
    -DinteractiveMode=false
Navigate to the project directory:
cd yourname-web-projectOnce connected to your EC2 instance, open the project folder (yourname-web-project).

Modify the index.jsp file:
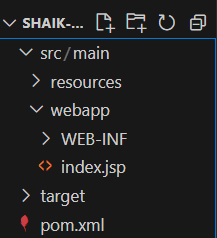
In the Explorer panel, navigate to src/main/webapp/index.jsp.
Replace the contents with the following code, and replace <YOUR NAME> with your actual name:
  <html>
  <body>
  <h2>Hello <YOUR NAME>!</h2>
  <p>This is my Project web application working!</p>
  </body>
  </html>
Save the changes by pressing CTRL+S.
Summary
Congrats! You've taken the first step in setting up your CI/CD Pipeline. You're all set for the next part of the series, so stay tuned!
Subscribe to my newsletter
Read articles from yyounos shaik directly inside your inbox. Subscribe to the newsletter, and don't miss out.
Written by

yyounos shaik
yyounos shaik
An Aspring Cloud Engineer