Cloud DevOps - Setting up Git repository with AWS CodeCommit.
 yyounos shaik
DIFFICULTY : EASY TIME : 1 HOUR COST : 0$
WHAT YOU’LL NEED :
An AWS account - Create one here!
Visual Studio Code - Download Here!
part-1 : Building an WebApp and IDE in AWS
AWS SERVICES :
AWS CodeCommit
AWS IAM
Amazon EC2
AWS CLI
Overview
Hi there, let's dive into our DevOps x AWS Project Series with excitement!
In this part of the project, we're going to set up the repository using AWS CodeCommit and push the files into it—let's get started!.
Let’s Get Started…
Step 1 : Setting up your Web App in the cloud
Login with IAM user credential
If you still have your IAM user from the Web App with the previous project, log in to your IAM Admin User.
Don't have an IAM user set up yet, or it's been deleted? Let's set up a newIAM user!
Head to your AWS Account as the root user.
Create a new IAM user called
Yourname-IAM-Admin.Make sure to select the checkbox next to P
rovide user access to the AWS Management Console - optional.This does not apply to all accounts, but if you're prompted with a pop-up panel that says
Are you providing access to a person?, choose I want to create an IAM user.Provide
AdministratorAccessto your user.
Make sure to download the CSV file containing your user's sign-in details.
Log in to your AWS account as your IAM user.
Launch EC2 Instance
In the AWS console search bar, search for EC2.
Select Instances in the left hand menu and choose Launch instances.
Choose the following settings in the Launch an instance page.
Under Name and tags, for Name, enter
webapp.Under Application and OS Images (Amazon Machine Image), choose Amazon Linux.
Choose the Amazon Linux 2023 AMI.
Under Instance type, choose t2.micro.
Under Key pair (login), choose a Create new key pair.
For your Key pair name, enter
webserver.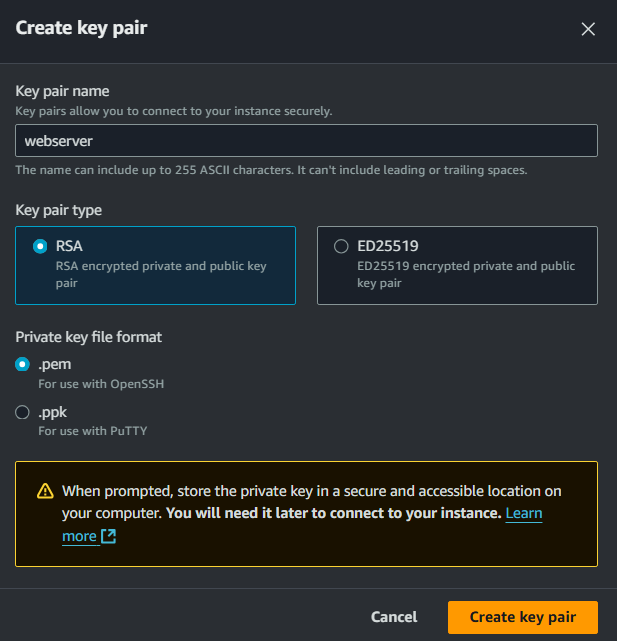
Leave your Private key file format as .pem since we're using SSH later on to access our EC2 instance.
Select Create key pair.
For Allow SSH traffic from, choose your IP address if it's correct (you can check your IP by clicking here). Otherwise select Anywhere.
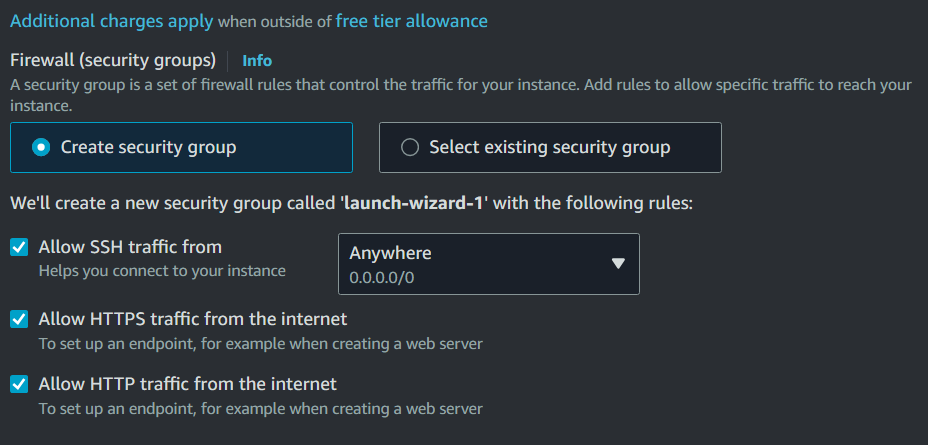
Check the boxes for Allow HTTP traffic from the internet.
Leave the default values for the remaining sections.
When you're ready, choose Launch instance.
Wait until Instance state for your instance is Running before continuing.
Connect to your instance using SSH:
Note: use git bash for connecting your EC2 instance as you don’t have to change the permissions of the .pem file.
Use the public DNS of your new instance. You can find it in the EC2 dashboard.
Connect to your instance using the following command, replacing /path/to/your-key-pair.pem with the path to your key pair file and your-ec2-instance-public-dns with the public DNS of your instance:
ssh -i /path/to/your-key-pair.pem ec2-user@your-ec2-instance-public-dns

Once you paste the URL you will be connected successfully.

Setting Up the Environment on the New EC2 Instance
Once connected to your EC2 instance, follow the steps below to set up your development environment .
Install Apache Maven:
 sudo wget https://repos.fedorapeople.org/repos/dchen/apache-maven/epel-apache-maven.repo -O /etc/yum.repos.d/epel-apache-maven.repo
 sudo sed -i s/\$releasever/6/g /etc/yum.repos.d/epel-apache-maven.repo
 sudo yum install -y apache-maven
Install Amazon Corretto 8:
 sudo amazon-linux-extras enable corretto8
 sudo yum install -y java-1.8.0-amazon-corretto-devel
 export JAVA_HOME=/usr/lib/jvm/java-1.8.0-amazon-corretto.x86_64
 export PATH=/usr/lib/jvm/java-1.8.0-amazon-corretto.x86_64/jre/bin/:$PATH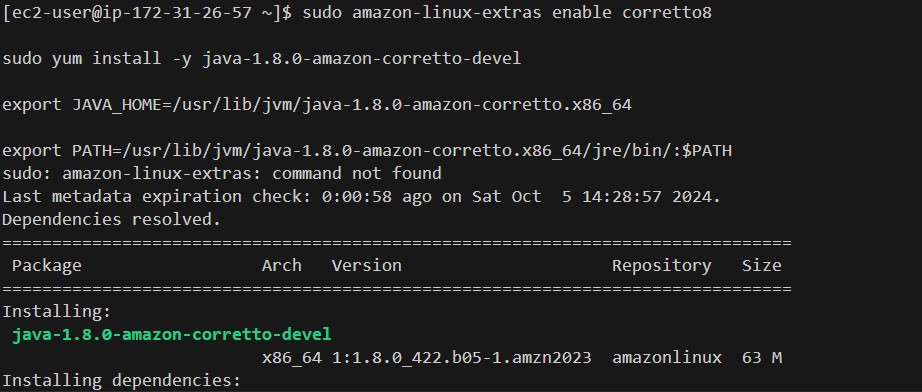
Install Git into EC2 instance :
Why are we installing git into the instance? can’t we run normally?
We are installing Git on the instance because, by default, we can't run Git commands on it. To execute these commands in the upcoming steps, we need to install Git first.
These Git commands can run on your regular terminal or command prompt, but not on your launched instance.
 sudo yum update -y
 sudo yum install git -y
Verify the installation:
  java -version
  mvn -version
  git --version
Install Visual Studio Code and Remote - SSH Extension
Download and install Visual Studio Code from here if you haven't already.
Install the Remote - SSH extension in Visual Studio Code:
Open Visual Studio Code.
Go to the Extensions view by clicking on the Extensions icon in the Activity Bar or pressing
Ctrl+Shift+X.Search for "Remote - SSH" and install it.

Now, Click to remote explorers.
click on SSH settings icon and open the config file.

Now type this into the config file:
  Host <your EC2 public IP>
      HostName <ec2 instance name>
      User ec2-user
      IdentityFile <Path of your .pem file saved on your pc>
Save the config file.
Now Click on the
webappin the SSH.
Open a new terminal (connected to your EC2 instance).
Generate a new Maven project:
What is mvn?
When you run mvn commands, you're asking Maven to perform tasks (like creating a new project or building an existing one).The mvn archetype:generate command specifically tells Maven to create a new project from a template (which Maven calls an archetype). This command sets up a basic structure for your project, so you don't have to start from scratch
  mvn archetype:generate \
    -DgroupId=com.yourname.app \
    -DartifactId=yourname-web-project \
    -DarchetypeArtifactId=maven-archetype-webapp \
    -DinteractiveMode=false
Navigate to the project directory:
cd yourname-web-projectOnce connected to your EC2 instance, open the project folder (my-web-project).
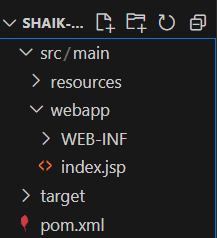
Modify the index.jsp file:
In the Explorer panel, navigate to src/main/webapp/index.jsp.
Replace the contents with the following code, and replace <YOUR NAME> with your actual name:
  <html>
  <body>
  <h2>Hello <YOUR NAME>!</h2>
  <p>This is my Project web application working!</p>
  </body>
  </html>
Save the changes to
“index.jsp”.
Step 2 : Create a repository in AWS CodeCommit
Note : AWS CodeCommit is now not available for new users, so If your are an old user it’s good or else I would suggest create github repository and try pushing files into it.
If you try switching the location, you are lucky enough that aws codecommit might run and you can create repositories.
What is CodeCommit?
AWS CodeCommit is a service that helps you host Git repositories securely in the cloud. A cloud Git repository setup lets multiple developers work together online by updating the repository while still being able to work on their local computers simultaneously.In this lab we will set up a CodeCommit repository to store our Java code!
Head to your CodeCommit console.
Don't forget to use the same Region as the one you used to create EC2 Instance.
Create a new repository:
Name:
yourname-repository.Description:
A repository for the web application.Add tag with key
AWSand valueDevOps.
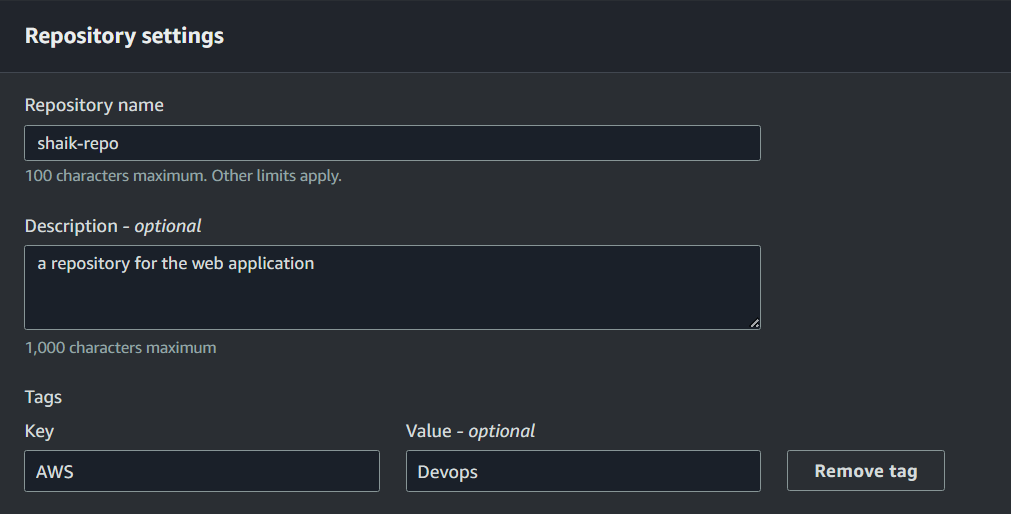
Click create.
Now, your repository is successfully created.
Step 3 : Your First Commit
Head back to Visual Studio Code.
Open a new terminal - connected to your EC2 Instance.
Set up your Git identity (replace your name and your email, but don't delete the "" quote marks) by running these commands:
  git config --global user.name "your name"

  git config --global user.email "your email"
What’s an Git Identity?
Think of it like a user profile! A Git identity is how Git recognizes who is making changes to a repository. When you set your user name and email in Git, every commit you make will include this information, letting others know who made which changes.
Next head to
yourname-web-projectby running this command:cd yourname-web-project.what is cd?
cd stands for "change directory." It's a widely used command for navigating your files, specifically to jump from one folder to another in your computer’s file system.When you run cd my-web-project, you're telling the system to go into the my-web-project folder.
Initiate the local repo by running this command:
git init -b main
Back in your CodeCommit console, select
Clone URL.Select Clone HTTPS. This will copy the repository's URL to your clipboard.
The URL should have the following format:
https://git-codecommit..amazonaws.com/v1/repos/.Set the remote origin to the CodeCommit URL you copied earlier (replace HTTPS CodeCommit repo URL with your own URL) by running this command:
git remote add origin<Https git codecommit repo URL>what is a remote origin?
Think of origin in Git as the main home for your project's files. It's where everyone's work comes together like a shared Google Drive folder.In this command, we're telling the terminal that the origin for our local repo is the CodeCommit repository. Because our origin is hosted online in the cloud, we tell the terminal git remote add origin.
What's the difference between my remote origin and my local repo that I just initialized?
Imagine you download a shared Google Drive folder and start editing the documents in your downloaded copy. Would others see your changes in the shared Google Drive folder? Nope! They wouldn't, because you've made your edits privately on your own copies of the documents. The local repository you set up in EC2 is just like that downloaded folder-it's a copy of the origin and lives in your EC2 instance. You use your local repository to save and work on your project files privately.
Now Check if your repository is intialized or not so run these command:
git remote -v
You can see that the origin is sucessfully added.
Now we can commit and push our code! Here are the commands for this:
  git add .

  git commit -m "Initial commit. Updated index.jsp."

  git push -u origin main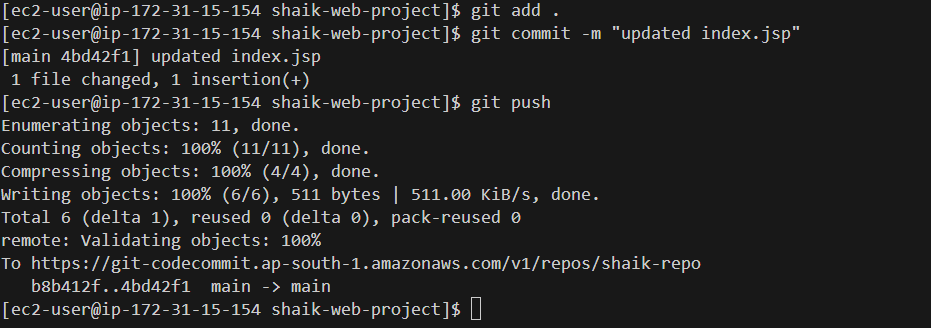
Let’s go through each of this commands:
git add . : This command adds all (represented by the .) your changed files to a staging area, which is a place where changes you've made in your working directory are prepared and organized before committing them to your project's history.git commit -m "Initial commit. Updated index.jsp." : commit essentially saves the changes you've made in your local repository. "-m" stands for message i.e. a short description or message you will leave about this commit, so other developers can understand the purpose of your changes or specific details. "Initial commit" is the iconic commit message developers leave when they first create their web app. We've added index.jsp to your message so you'll remember that you've also edited this file!
git push -u origin main : This command is really handy for your first upload of changes to your origin i.e. your CodeCommit repo.
-u stands for upstream and it means you're telling Git where you want to save your committed changes.
origin is the name of your main repository (i.e. the CodeCommit repository you've set up in the previous step).
main is the name of the folder that has been created in your main repository to store the new files. You won't need to state "-u origin main" in the next time you push your changes - your preferences are now saved, so just "git push" will be enough for future commits.
When you run these commands, you'll be prompted for a username and password. But hold on, we need to figure out what those are and where to generate them. Let's take a step back and create a username and password for AWS CodeCommit.
Head back to IAM management console.
On the left hand side panel open users.
Click on your IAM user profiles.
Head to security credentials. Scroll down to HTTPS Git credentials for AWS CodeCommit.
Click on
Generate Credentials.Download the
.excel filewhich contains the username and password.Why are we generating this credentials?
Whenever you try to push updated files to the repository, it will ask for your username and password to access the repository you created. These credentials are what you'll use to provide the username and password needed for pushing files into the repository.

Now copy the
username and passwordwhich you generated and paste it when it prompts for it.Well done! you have successfully pushed the project into your AWS CodeCommit repository.

What are these files in the repo?
You might've noticed that these files in Project 1 of this series - they were created in you IDE's file explorer when you set up the project with Maven.
src: src is short for "source" and it's where all your project's source code files are stored. In Java projects, source code files usually includes subdirectories for various types of code (like a subdirectory called main to store your application code).
pom.xml: pom stands for Project Object Model, and it gives Maven the instructions on how to put everything together when you're ready to build your project.You might've noticed that these files in Project 1 of this series - they were created in you IDE's file explorer when you set up the project with Maven.
Still in your CodeCommit console, click into the
src folder, then themainfolder, and finally thewebappfolder. Yourindex.jspfile will pop up!Now click into the
index.jspfile. Notice how it reflects the latest changes you've made when you added your name to the file.
Step 4 : Your Second Commit
Keep your CodeCommit open, and switch back to the tab with EC2 server open.
Let's try editing your
index.jspfile again. Find index.jsp in your file navigator on the left hand panel.. Find the line that says:<p>This is my web application working!</p>and add a line below:<p>write anything you want to add it into the repository</p>
Save your changes by pressing
Command/Ctrl + Son your keyboard.. Head back to your CodeCommit tab and refresh it - do you see your changes?it's still looking the same...?
You won't see your changes in the CodeCommit tab just yet because saving changes in your EC2 environment only updates your local repository.
Remember, the local repository on your EC2 server is like your private workspace, separate from the 'origin', which is your CodeCommit repository online.
To make your changes show up in CodeCommit (the 'origin'), you'll need to send (push) them from your local repository.
Go back to your connected EC2 Instance in the VS Code.
In the terminal, let's run the three commands to
add, commit and pushour changes to our remote origin:git add . git commit -m "Updated index.jsp" git pushHead back to your CodeCommit tab and refresh it - do you see your changes now?

What's the point of all this?
Using a Git repository is incredibly common among developers and it's essential for tracking the changes you make to software projects.Google Docs and other shared document writers have been important for teams to track who's written what, avoid conflicts while working together, and have version histories that you can roll back to. Git repositories bring the exact same benefits to a team working together.
How was this relevant to DevOps?
Git lets teams make rapid and frequent updates, and make changes that are safe and trackable. This makes software development faster and reduces mistakes, aligning perfectly with DevOps goals of efficiency and reliability.
Summary
You've just completed this project and set up your very own Git repository with AWS CodeCommit.
Well done! Now, let's move on to the next part of the series. Stay tuned...
Subscribe to my newsletter
Read articles from yyounos shaik directly inside your inbox. Subscribe to the newsletter, and don't miss out.
Written by

yyounos shaik
yyounos shaik
An Aspring Cloud Engineer