Mastering AKS and Kubernetes: A Step-by-Step Guide to Deploying and Exposing Applications
 Rabiatu Mohammed
Table of contents
- Log in to Azure CLI
- Create an SSH Directory
- Generate SSH Key Pair
- Create a Resource Group
- Create the AKS Cluster
- Verify AKS Cluster in the Azure Portal
- Review Resources in the Node Resource Group
- Start Minikube Cluster
- Verify Minikube Node
- Connect to the AKS Cluster
- Verify Kubernetes Deployments
- Verify Kubernetes Namespaces
- Create a New Namespace
- Verify the New Namespace
- Deploy an Nginx Application in the Backend Namespace
- Verify Nginx Deployment
- Describe Nginx Deployment
- Expose the Nginx Deployment as a Service
- Access Nginx Application via External IP

Azure Kubernetes Service (AKS) takes the complexity out of Kubernetes, making it easier to deploy, manage, and scale containerized applications. In this guide, I’ll walk you through creating an AKS cluster from scratch, deploying an Nginx app, and exposing it to the world. By the end, you'll have a solid understanding of how AKS simplifies Kubernetes while giving you the tools to manage your applications like a pro.
Log in to Azure CLI
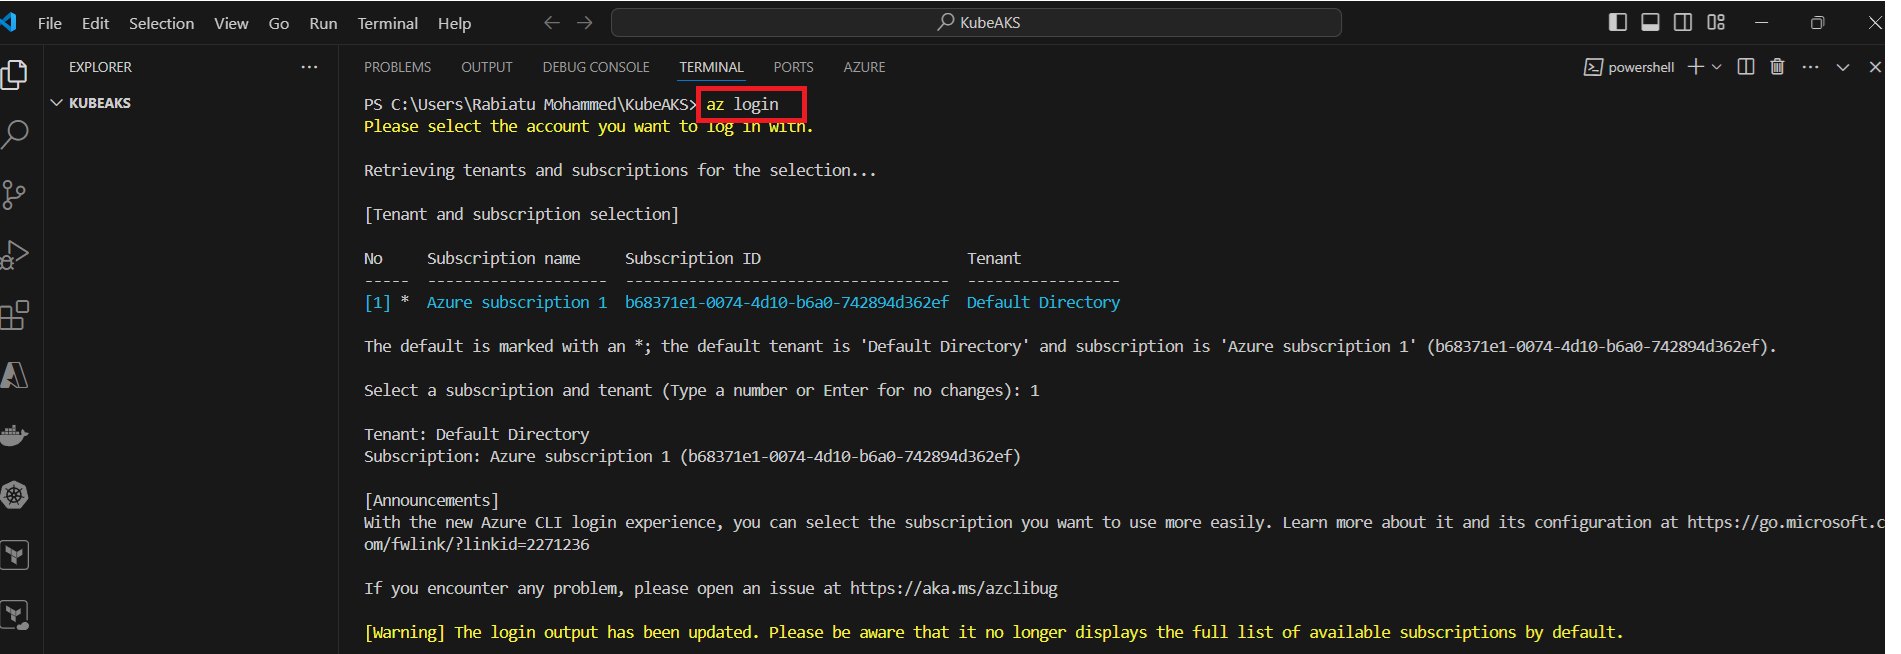
You’ll need to log in to Azure using the Azure CLI. This will allow you to manage your Azure resources from the command line.
Open a terminal (I’m using VS Code’s integrated terminal).
Run the following command:
Create an SSH Directory
To securely connect to the AKS cluster, you need to set up SSH keys, which will allow secure access to your Kubernetes nodes.
- Create an SSH directory
First, you need to create a hidden.sshdirectory in your working folder. In this case, I'm creating the directory in myKubeAKSfolder.

Generate SSH Key Pair
After creating the .ssh directory, the next step is to generate an SSH key pair. This key pair will be used to securely access your AKS cluster.
After running the command, you'll see the key fingerprint and randomart image, confirming the SSH key pair has been successfully generated.
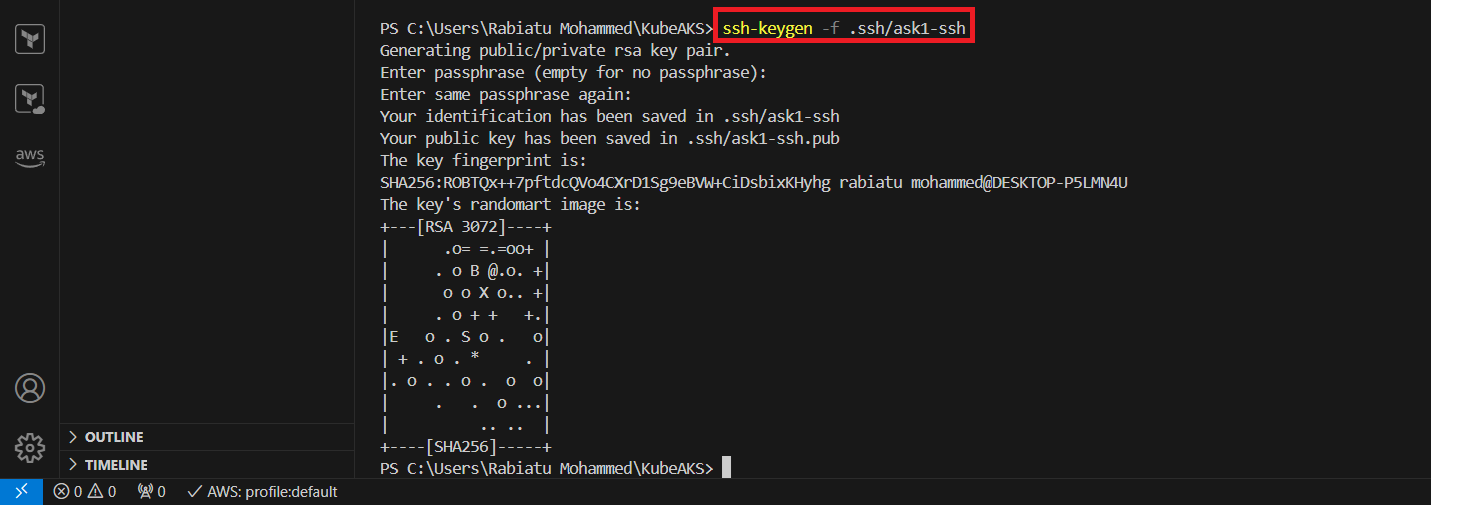
The
-fflag specifies the file name and location of the SSH key.You can choose to leave the passphrase empty (press Enter) for no passphrase, or set one for additional security.
Create a Resource Group
Before creating an AKS cluster, you need to create a resource group. This group acts as a container that holds related resources for your Azure solution.
Create a resource group:
Use the following command to create a new resource group. In this case, I’m naming the resource group cacao and setting the location to uksouth

Create the AKS Cluster
Now that your resource group is ready, it’s time to create the AKS cluster. This is the central part of your project where you will set up the Kubernetes cluster that can manage your containerized applications.
Create the AKS Cluster:
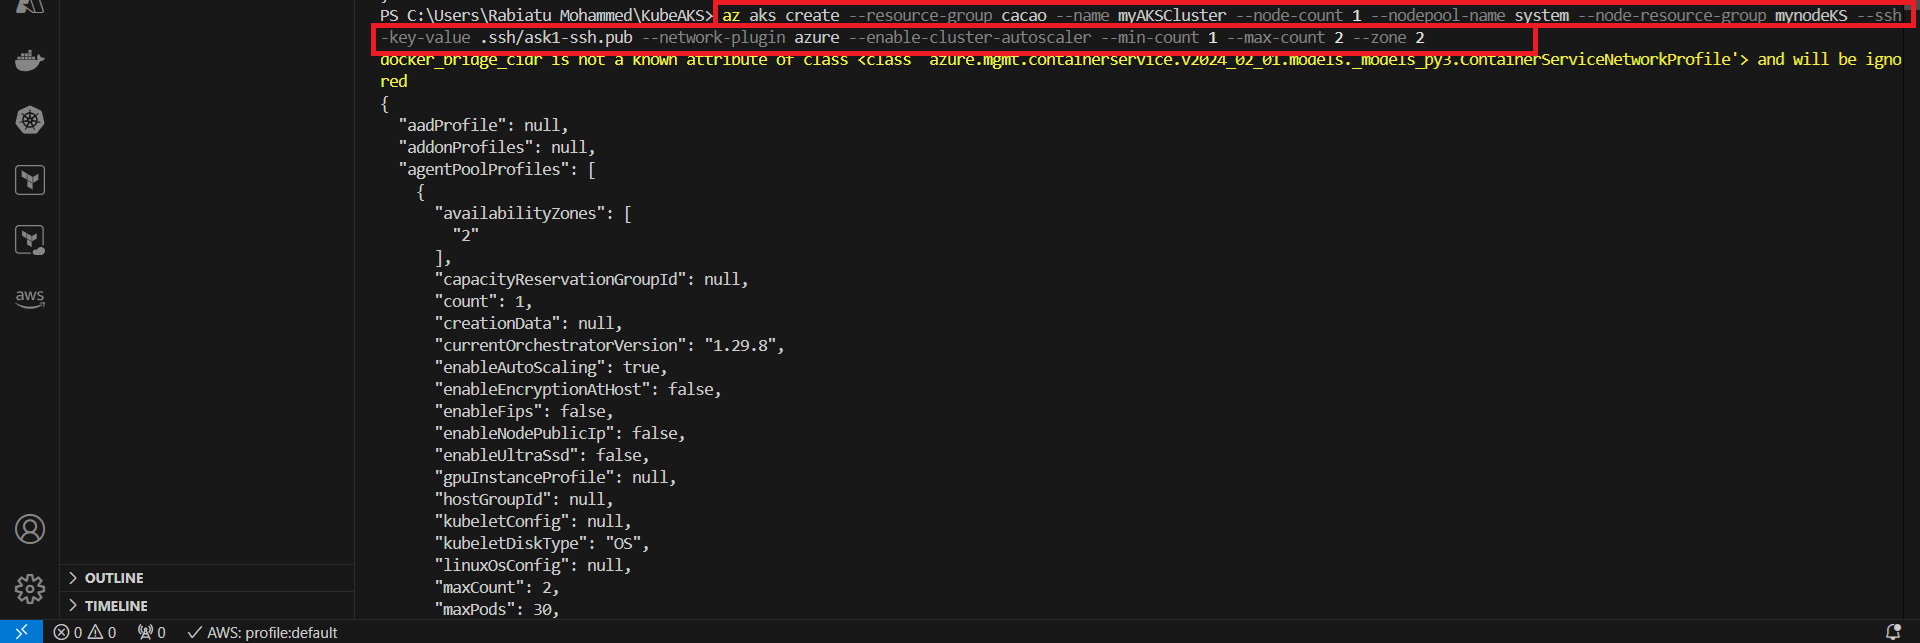
Use the following command to create the cluster. In this example, the cluster is named myAKSCluster, and I’ve specified several options, including SSH keys, node count, autoscaling, and availability zones:
The command includes:
--node-count 1: Initially, 1 node will be created in the cluster.--enable-cluster-autoscaler: Enables autoscaling for your AKS cluster, which will automatically adjust the number of nodes between 1 and 2.--ssh-key-value: Specifies the public SSH key for secure access to the nodes.--zone 2: Specifies the availability zone for redundancy and high availability.
Once the cluster is created, you’ll see a JSON output similar to this, confirming the cluster creation and configuration.
Verify AKS Cluster in the Azure Portal
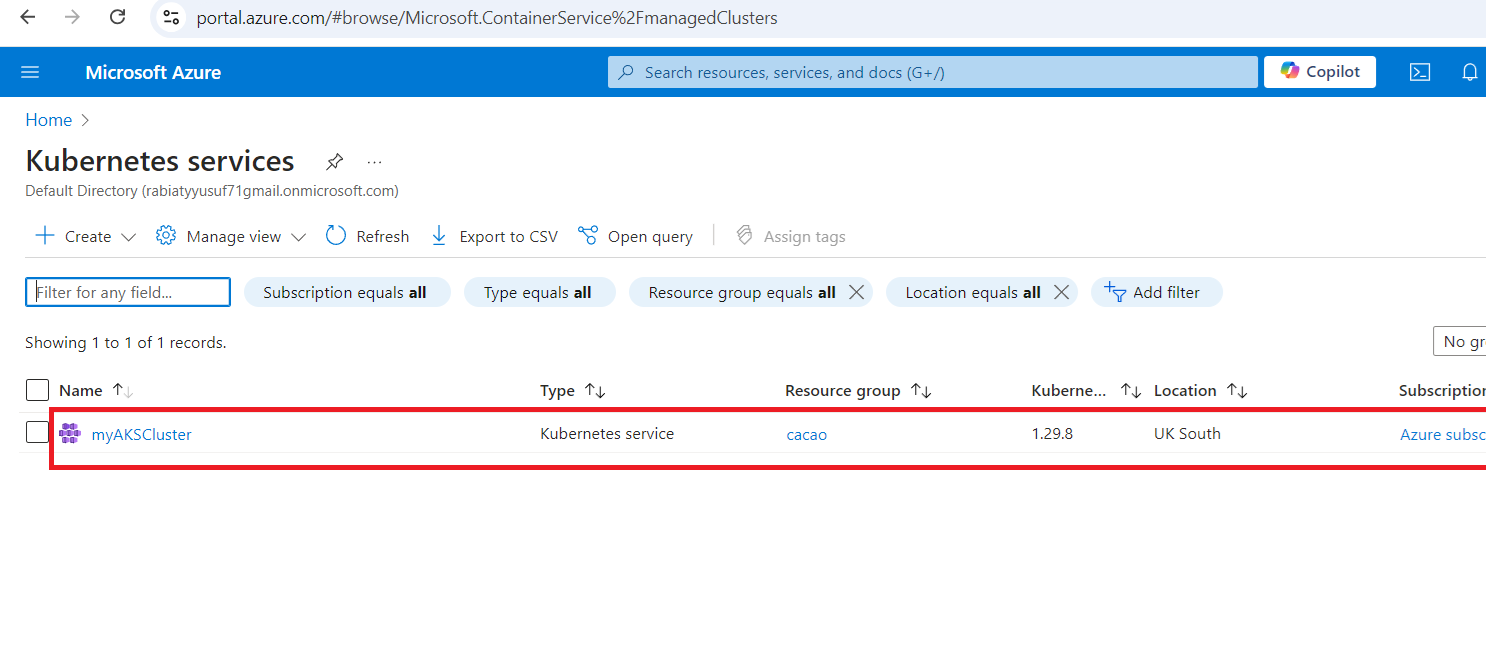
Once the AKS cluster has been created, you can verify its presence and configuration in the Azure portal. Here’s how you can do that:
Go to the Azure Portal and navigate to Kubernetes services.
You should now see your newly created AKS cluster listed under Kubernetes services. In this example, the cluster is named myAKSCluster, located in the UK South region, and is part of the cacao resource group.
Review Resources in the Node Resource Group
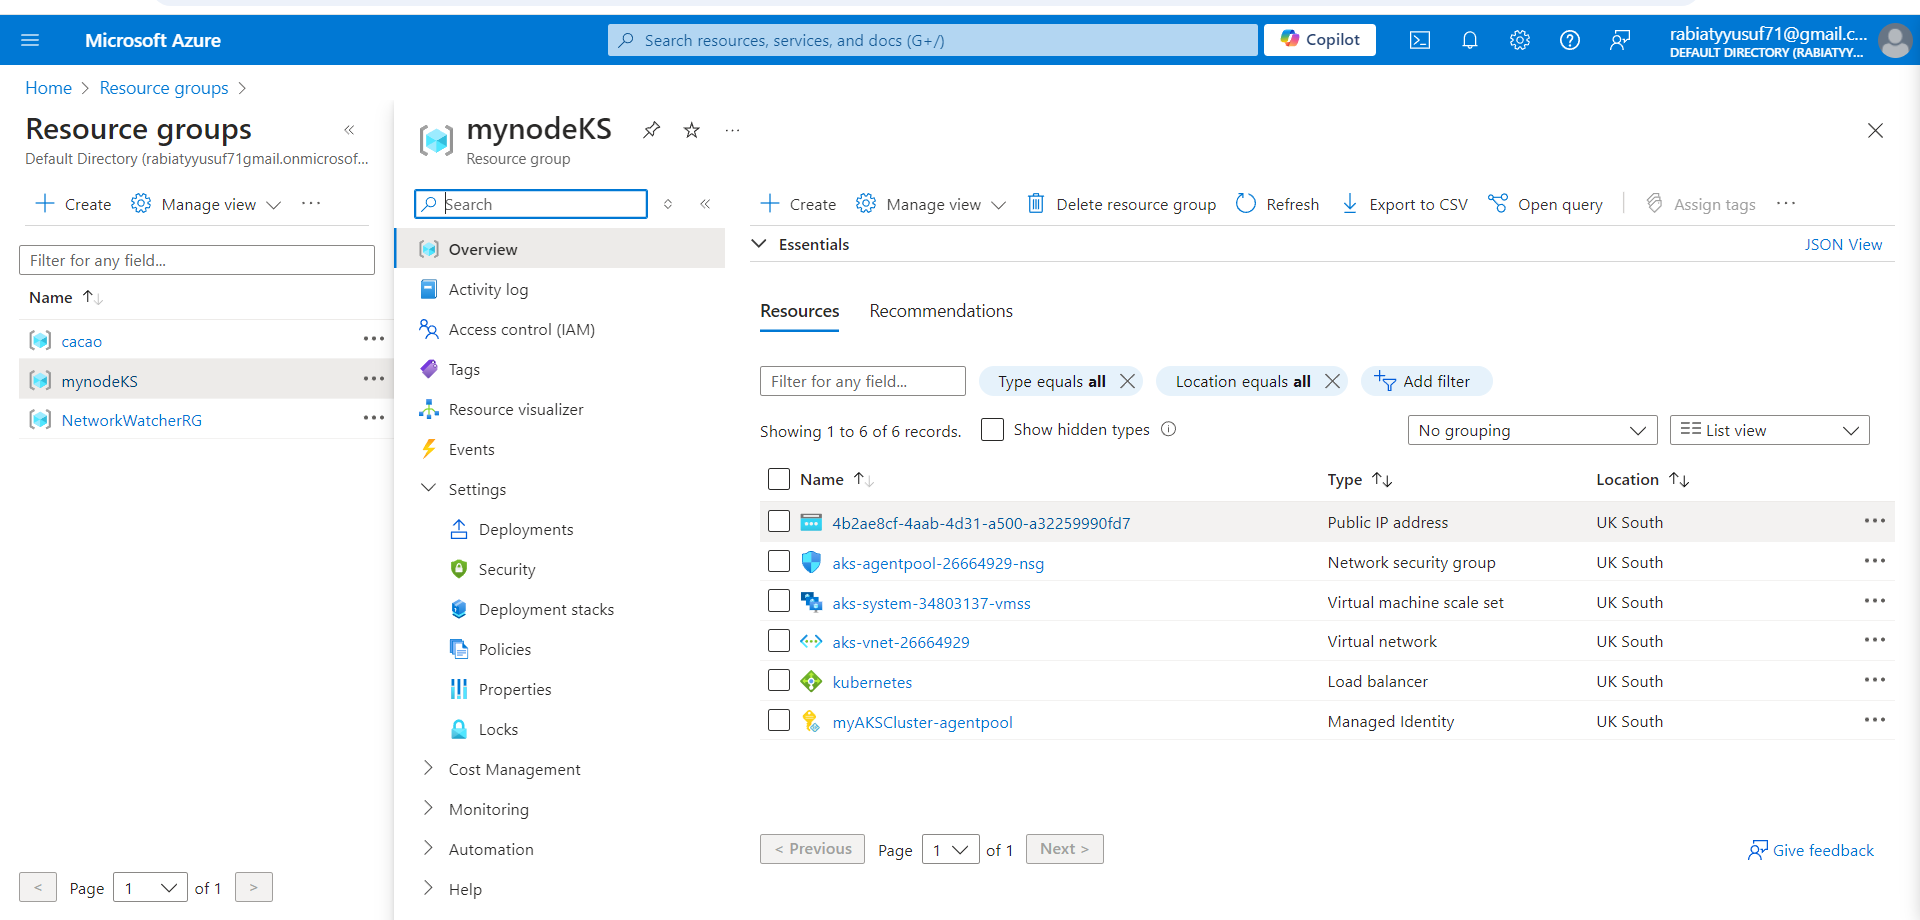
After creating the AKS cluster, Azure automatically generates a node resource group where it manages the underlying resources required for the AKS cluster to run. This includes virtual machines, load balancers, and network resources.
Navigate to the node resource group:
In the Azure portal, you can find the node resource group created as part of your AKS cluster. In this case, the node resource group is named mynodeKS.Overview of resources:
Once inside the node resource group, you’ll see a list of resources like:Virtual machine scale sets (VMSS): Used to run the Kubernetes nodes.
Network security groups (NSG): Controls the traffic flow in and out of the nodes.
Public IP addresses: Assigned for external communication.
Virtual networks: Used for communication between the cluster's resources.
Start Minikube Cluster
In addition to setting up the AKS cluster, you can also use Minikube to create a local Kubernetes cluster for development and testing purposes. Here’s how I started a Minikube cluster using Docker as the driver:
Start Minikube:
Use the following command to start Minikube with Docker as the container driver.Once the command is executed, Minikube will:
Start the Kubernetes control plane node within Minikube.
Use the Docker driver to run the Minikube cluster.
Pull the necessary base images for Kubernetes and set up the environment.
Enable default addons like the storage class and provisioner.
After successful execution,
kubectlwill be configured to use the Minikube cluster with the default namespace.

Verify Minikube Node
After starting Minikube, it’s essential to check the status of the nodes to ensure everything is running smoothly.
Check the Node Status:
Run the following command to verify the status of the nodes in your Minikube cluster.
Connect to the AKS Cluster
Once your AKS cluster is up and running, you need to configure
kubectlto interact with it. Here’s how to retrieve the credentials and verify the connection.- Get AKS Cluster Credentials:
Use the following command to retrieve the credentials for your AKS cluster and configurekubectlto use the cluster context:
- Get AKS Cluster Credentials:
This command merges the cluster credentials with your local kubectl configuration, enabling you to interact with the cluster.
- Verify the Node Status:
After retrieving the credentials, run the following command to check the status of the nodes in your AKS cluster:

Verify Kubernetes Deployments
Once you are connected to your AKS cluster, you can check the status of the running deployments in the cluster. Here's how to verify the default Kubernetes system components.
- List all Deployments:
Run the following command to see all deployments running in your cluster across all namespaces:

Verify Kubernetes Namespaces
In Kubernetes, namespaces provide a way to divide cluster resources between multiple users. By default, Kubernetes comes with several namespaces that organize system resources.
- List all Namespaces:
Run the following command to list all the namespaces in your Kubernetes cluster:

Create a New Namespace
Namespaces allow you to isolate resources within the same Kubernetes cluster, making it easier to manage complex environments. In this case, you created a new namespace called backend.
- Create a New Namespace:
Run the following command to create a new namespace namedbackend:

Verify the New Namespace
After creating the backend namespace, you can verify its existence and status by listing all namespaces in your Kubernetes cluster.
- List all Namespaces:
Run the following command to check the list of namespaces, including the newly createdbackendnamespace:

Deploy an Nginx Application in the Backend Namespace
Now that the backend namespace has been created, you can deploy an application within that namespace. In this step, you deployed an Nginx application with three replicas.
- Create the Nginx Deployment:
Use the following command to create an Nginx deployment with 3 replicas in thebackendnamespace:

Verify Nginx Deployment
After deploying the Nginx application in the backend namespace, it’s important to verify that the deployment is running as expected.
Create the Nginx Deployment with Port Specification:
In this case, you specified the port for the Nginx deployment using the following command.Check the Deployment Status:
After creating the deployment, run the following command to check the status of the deployment.

Describe Nginx Deployment
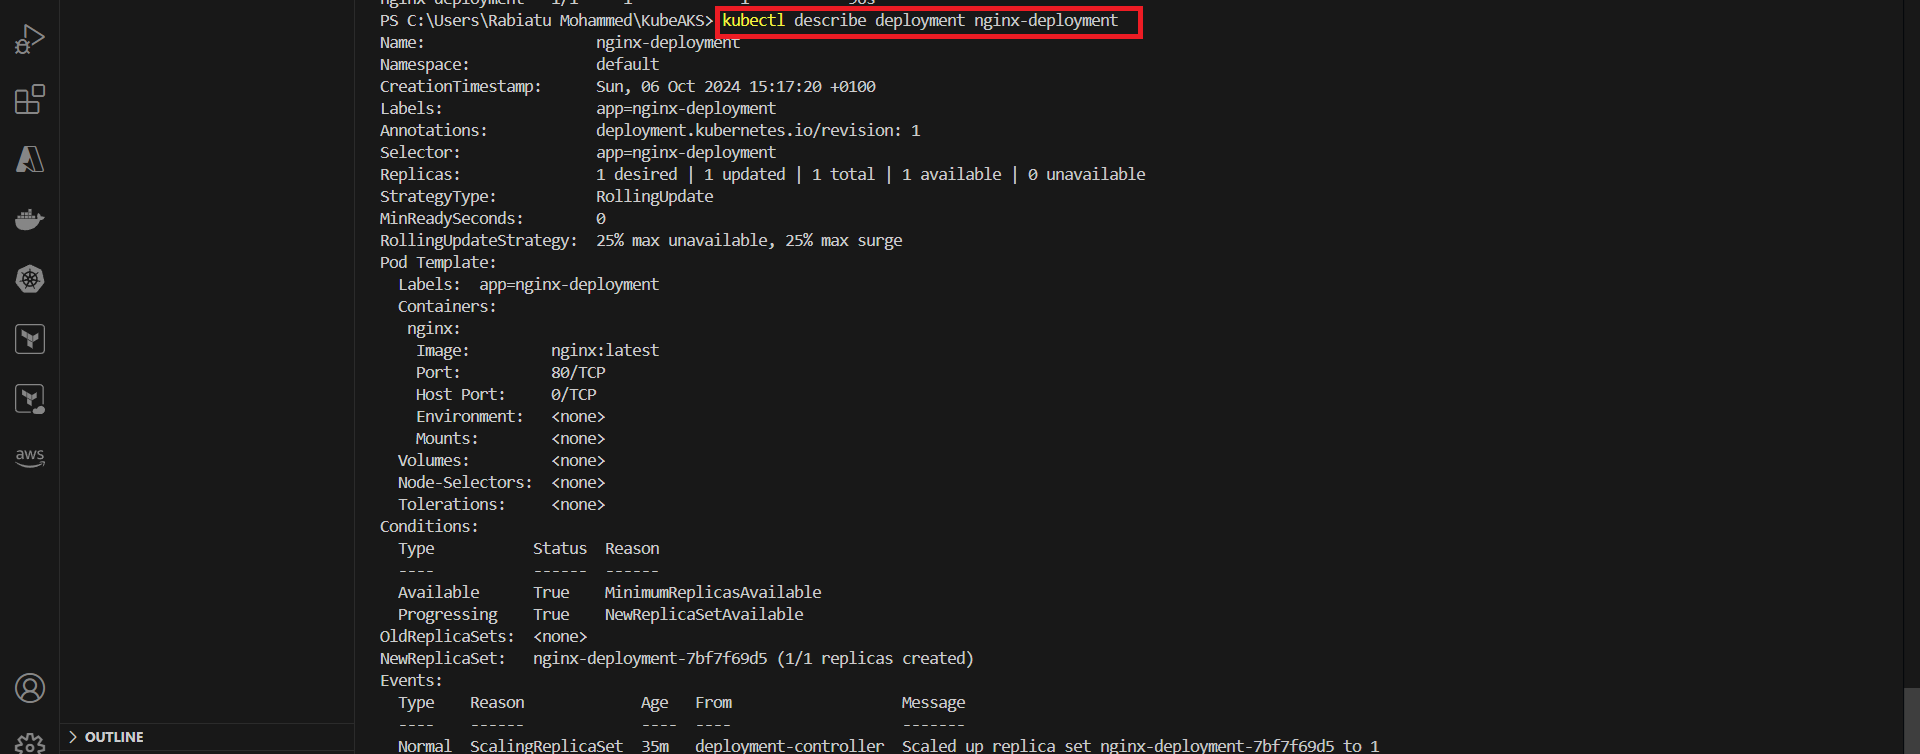
To get more detailed information about your deployment, including its configuration and status, you can use the kubectl describe command. This provides a comprehensive overview of the deployment and its resources.
- Describe the Nginx Deployment:
Run the following command to get detailed information about your Nginx deployment.
Expose the Nginx Deployment as a Service
After deploying the Nginx application, the next step is to expose it to external traffic by creating a LoadBalancer service. This allows external clients to access the application through a public IP address.
Expose the Nginx Deployment
Use the following command to expose the Nginx deployment as a LoadBalancer service.Verify the Service
After exposing the deployment, run the following command to check the services.

Access Nginx Application via External IP
After exposing your Nginx deployment as a LoadBalancer service, you can now access the application through the external IP address assigned by the service.
Access the Application:
Open your browser and enter the External IP address provided by the LoadBalancer. In this case, the IP address is 85.210.217.159.Nginx Welcome Page:
Once you enter the IP address in the browser, you should see the Nginx welcome page, confirming that the Nginx web server is running successfully.

Your Nginx application is now publicly accessible, and the deployment is working as expected. Congratulations on successfully setting up and exposing your Kubernetes deployment!
Subscribe to my newsletter
Read articles from Rabiatu Mohammed directly inside your inbox. Subscribe to the newsletter, and don't miss out.
Written by

Rabiatu Mohammed
Rabiatu Mohammed
I work on securing, automating, and improving cloud environments. Always exploring better ways to build reliable, secure infrastructure.