Configuration Management in GKE Enterprise
 Tim Berry
This is the fourth post in a series exploring the features of GKE Enterprise, formerly known as Anthos. GKE Enterprise is an additional subscription service for GKE that adds configuration and policy management, service mesh and other features to support running Kubernetes workloads in Google Cloud, on other clouds and even on-premises. If you missed the first post, you might want to start there.
In this series we have now covered some of the basics of building clusters in GKE Enterprise, and we can begin to explore some of its more useful features, starting in this post with configuration management. Before you drift off to sleep, let me tell you why this is important stuff.
For those of us who have worked in IT for a long time, the concept of configuration management may bring back memories of tools like Puppet and Chef, which were attempts at maintaining the state of systems by declaring their configuration with some sort of code. Their overall success was mixed, but they inspired new ways of thinking about automation and systems management, such as declarative infrastructure and GitOps – both topics we will explore in this post. There are many different reasons to consider implementing a configuration management system, but probably the two most relevant concepts are automation and drift.
As systems engineers, we always strive to automate manual tasks. If you successfully introduce Kubernetes to your organisation, you may soon find yourself managing multiple clusters for multiple teams, which could mean lots of repetitive work installing, upgrading, fixing, and securing. Wouldn’t it be better to automate this based on a standard template of what clusters should look like? And whether you complete this work manually or via automation, what happens next? Configurations are likely to drift over time due to small or accidental changes or even failures in resources. If the state of your clusters has drifted from what it should be, you’re going to have a much harder time maintaining it.
So, let’s learn about some of the configuration management tools GKE Enterprise gives us to solve these problems. By the end of this post, you will hopefully understand:
The concepts of declarative infrastructure and GitOps
How to use GKE’s Config Sync to manage cluster state with Git
How the Policy Controller can be used to create guardrails against unwanted behaviour in your clusters
How you can extend configuration management to other Google Cloud resources with the Config Controller
Let’s get started!
Understanding Declarative Infrastructure
The tools and technologies we will learn about in this post are all based on the concept of a declarative model of configuration management, so it’s important to understand this fundamental concept. In the history of DevOps, there have generally been two schools of thought about which model should be used in configuration management: declarative or imperative.
In a nutshell, the declarative model focuses on what you want, but the imperative model focuses more on how you should get it. To clarify that further, a declarative model is based on you declaring a desired state of configuration. If you’re familiar with Kubernetes but came to it years after systems like Puppet and Chef fell out of fashion, then you may never have considered that people did this any other way. Declarative models make the most sense because if the desired state of a system is declared in code, the code itself becomes living documentation of the state of a system. Further, if the software that applies this code is clever enough, it can maintain the state – in other words, guarantee that it remains true to what is declared, and thereby solve the problem of configuration drift.
The imperative model, by focusing on the steps required to reach a desired state, is a weaker approach. The administrator of an imperative system must be sure that each step is taken in the correct order and manage the dependencies and potential failure of each step. Because an imperative model does not declare the end-state of a system, it is harder to use this model to maintain a state once it is built, so it doesn’t help solve the drift problem.
A quick side note: You may absolutely disagree with me here 😀 My descriptions of declarative and imperative models are based on my own experience and opinion. You are perfectly entitled to disagree and may have experiences that are very different to my own! For example, some imperative systems claim to have solved the drift problem. For this post’s purposes however, all the tools we will discuss implement a declarative model.
Infrastructure as Code
While configuration management tools have existed in some form or another for over 20 years now, the concept of Infrastructure as Code emerged as we began to use these tools to manage the lifecycle of virtual machines and other virtualised resources in addition to software and services. The most successful of these tools is arguably Terraform, which has broad support for multiple providers allowing you to take a declarative approach to defining what virtual infrastructure you would like, what other services you need to support the infrastructure, how they should operate together, and ultimately what applications they should run.
GitOps
While Terraform can be used to declaratively manage almost anything, these days it is common to pick the best tool for each individual job and combine them with automation. This might mean using Terraform to declare Kubernetes infrastructure resources, then applying Kubernetes objects with kubectl. While we may use different tools to manage different parts of our systems, we still need a common way to automate them together, which brings us to GitOps.
The purpose of GitOps is to standardise a git repository as the single source of truth for all infrastructure as code and configuration management, and then automate the application of different tools as part of a continuous process. When code is committed to a repo, it can be checked and tested as part of a continuous integration (CI) process. When changes have passed tests and potentially a manual approval, a continuous delivery (CD) service will then invoke the necessary tooling to make the changes. The living documentation of our system now lives in this git repo, which means that all its changes are tracked and can be put through this rigorous testing and approval cycle, improving collaboration, security, and reliability.
The GKE Enterprise approach to configuration management means that artifacts like configuration and security policies now live in a git repo and are automatically synchronised across multiple clusters. This gives you a simplified, centralised approach to managing the configuration and policies of different clusters in different environments without having to worry about configuration drift.
But it’s important to understand where these tools sit within an overall GitOps approach:
The GKE Enterprise config management tools focus on configuration only (deploying shared configuration objects and policy controllers that we’ll learn about in this post)
They do not automate the creation of clusters (Terraform is recommended for this instead)
They are not recommended for the automation of workloads on clusters. Workloads are expected to be frequently changed and updated, so they lend themselves to different tooling and processes. I’ve got plans to write about CI/CD practices for workloads later in this series.
Now that we’ve clarified this position, let’s start learning about the individual tools themselves, starting with Config Sync.
Using GKE Config Sync
The purpose of the Config Sync tool is to deploy consistent configurations and policies across multiple clusters, directly from a git repository. This gives us the benefits of using git such as accountability, collaboration, and traceability for changes, but it also guards against configuration drift with options for self-healing and periodic re-syncs. Clusters are enrolled in Config Sync via fleet management, and it is recommended to enroll all clusters in a fleet to ensure a consistent approach across every cluster.
To set up Config Sync, we must first create a git repo containing the desired state of our cluster configurations. When we enable Config Sync, a Kubernetes operator is used to deploy a Config Sync controller to our clusters. The controller will pull the configuration from the git rep, apply it to the cluster, and then continue to watch for any changes so that it can reconcile its current state with the desired state declared in the repo.
By default, these checks happen every hour. If we optionally enable drift prevention, every single request to the Kubernetes API server to modify an object that is managed by the Config Sync controller will be intercepted. The controller will validate that the change will not conflict with the state defined in the repo before allowing the change. Even with drift prevention enabled, the controller will continue its regular re-syncs and self-healing activity.
Config repos
Config Sync supports two different approaches to laying out files in a git repo for configuration management. Hierarchical repositories use the filesystem-like structure of the repo itself to determine which namespaces and clusters to apply a configuration to. If you choose the hierarchical option, you must structure your repo this way. An example structure is shown below, where we have configurations that apply to all clusters, and some that are specific to namespaces owned by two different teams.
.
├── README.md
├── cluster
│   ├── clusterrole-ns-reader.yaml
│   └── clusterrolebinding-ns-reader.yaml
├── namespaces
│   ├── blue-team
│   │   ├── namespace.yaml
│   │   └── network-policy.yaml
│   ├── limits.yaml
│   └── red-team
│       ├── namespace.yaml
│       └── network-policy.yaml
└── system
    └── repo.yaml
The cluster/ directory contains configurations that will apply to entire clusters and are not namespaced. In this example, we create a ClusterRole and a ClusterRoleBinding. We could also optionally use a ClusterSelector object to limit the scope of these to specific clusters.
The namespaces/ directory contains configurations that will apply to specific namespaces – although again these could be on any cluster or a scoped subset of clusters. In this example, we define the namespace itself in the namespace.yaml file and then apply a specific network policy with the network-policy.yaml file. We could include any other additional namespace-specific configuration we want, in each namespace’s own sub-directory. Note the name of the sub-directory must match the name of the namespace object that is defined.
Also in this example, the namespaces/ directory also contains a standalone file, limits.yaml, that will be applied to all namespaces. Because this repo is hierarchical, we can take advantage of this sort of inheritance.
Finally, the system/ directory contains the configuration for the Config Sync operator itself. A valid structured repository must contain the cluster, namespaces and system directories.
The alternative to a hierarchical repo is unstructured, and these are recommended for most users, giving you the most flexibility. In an unstructured repo, you are free to organise your files as you see fit. When you configure Config Sync, you tell it where to look in your repo, which means your repo could theoretically contain other data such as Helm charts. Which configurations are applied where can be determined by the use of ClusterSelector objects, NamespaceSelector objects, or just namespace annotations in metadata.
Enabling Config Sync on a cluster
Let’s walk through a quick demonstration of adding Config Sync to a GKE cluster. We’ll assume that we have already built a GKE Enterprise autopilot cluster running in Google Cloud, and that the cluster is registered to your project’s fleet (take a look at previous posts in this series if you need help getting set up - and always be mindful of the costs of playing with these features!)
We’ll set up the Config Sync components and get them to apply the demo configurations from Google’s quick start repo, which you can find here: https://github.com/GoogleCloudPlatform/anthos-config-management-samples/tree/main/config-sync-quickstart
If we take a quick look through the multirepo/ directory of this repo, we’ll find a further namespaces/gamestore directory containing two Kubernetes objects to deploy to the gamestore namespace. There is also a root/ directory containing objects that will be deployed to the entire cluster, including cluster roles, role bindings and custom resource definitions. Take a look at the YAML code and familiarize yourself with these objects.
In the GKE Enterprise section of the Google Cloud console, you should be able to find the Config Sync section in the left-hand menu, under Features.
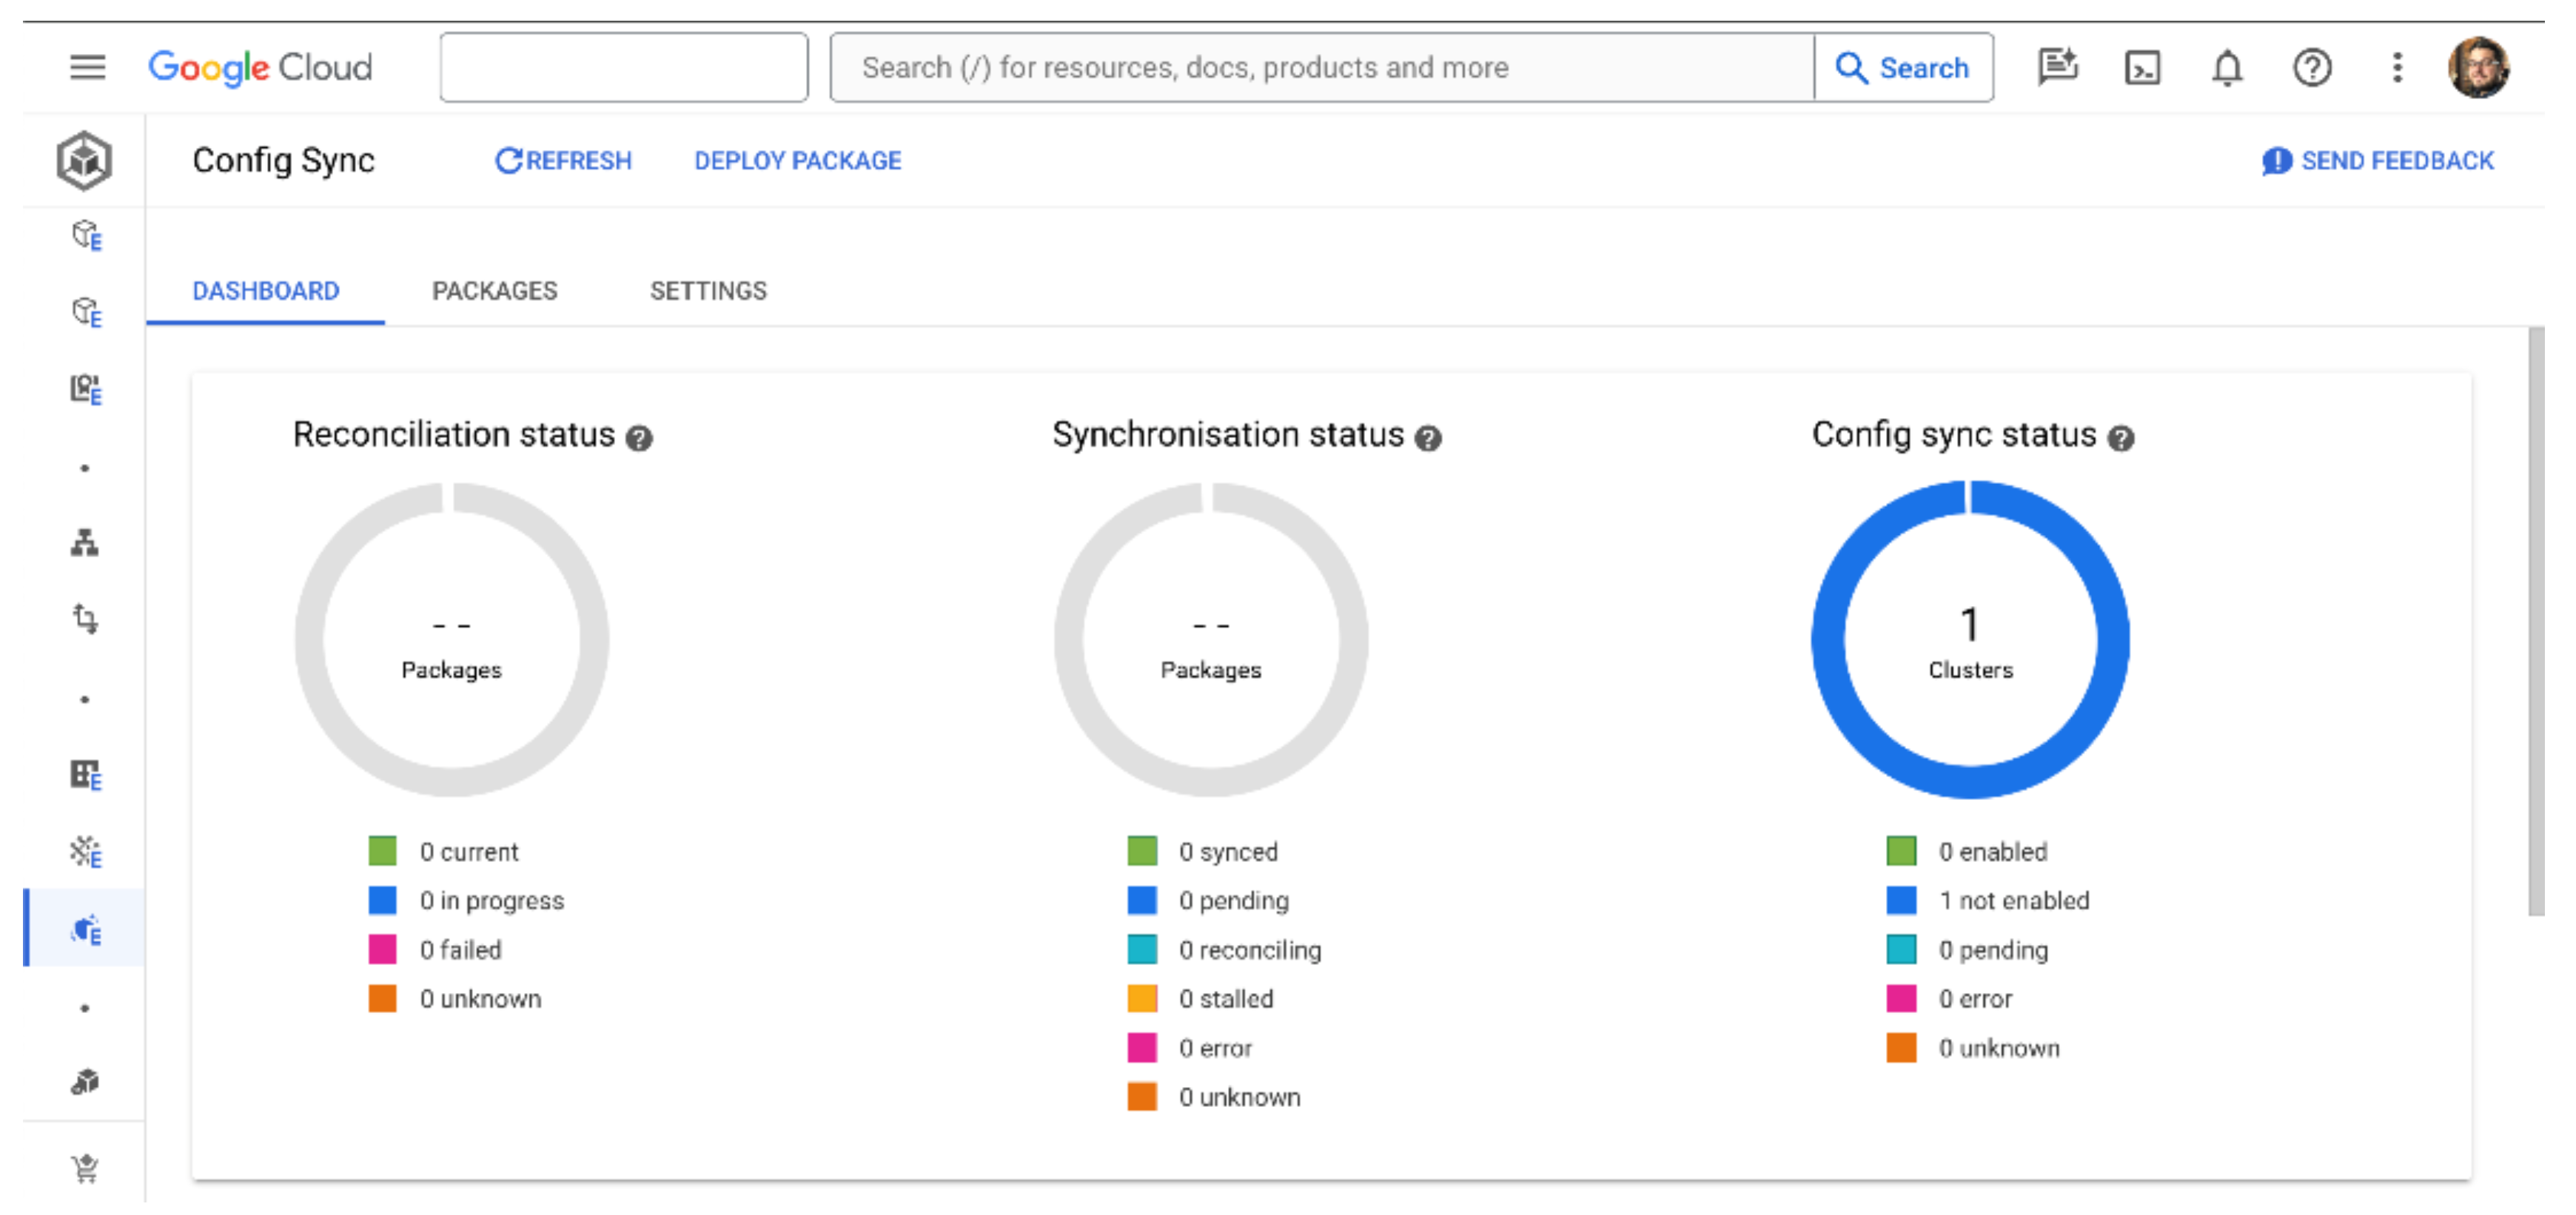
On this page, we can select Install Config Sync which will bring up an installation dialog box. Here we can choose which clusters to target for the installation, and which version of Config Sync to use. The recommended course of action is to install Config Sync across all clusters in the fleet. For this demonstration, we’ll just select the cluster we have available and the latest version.
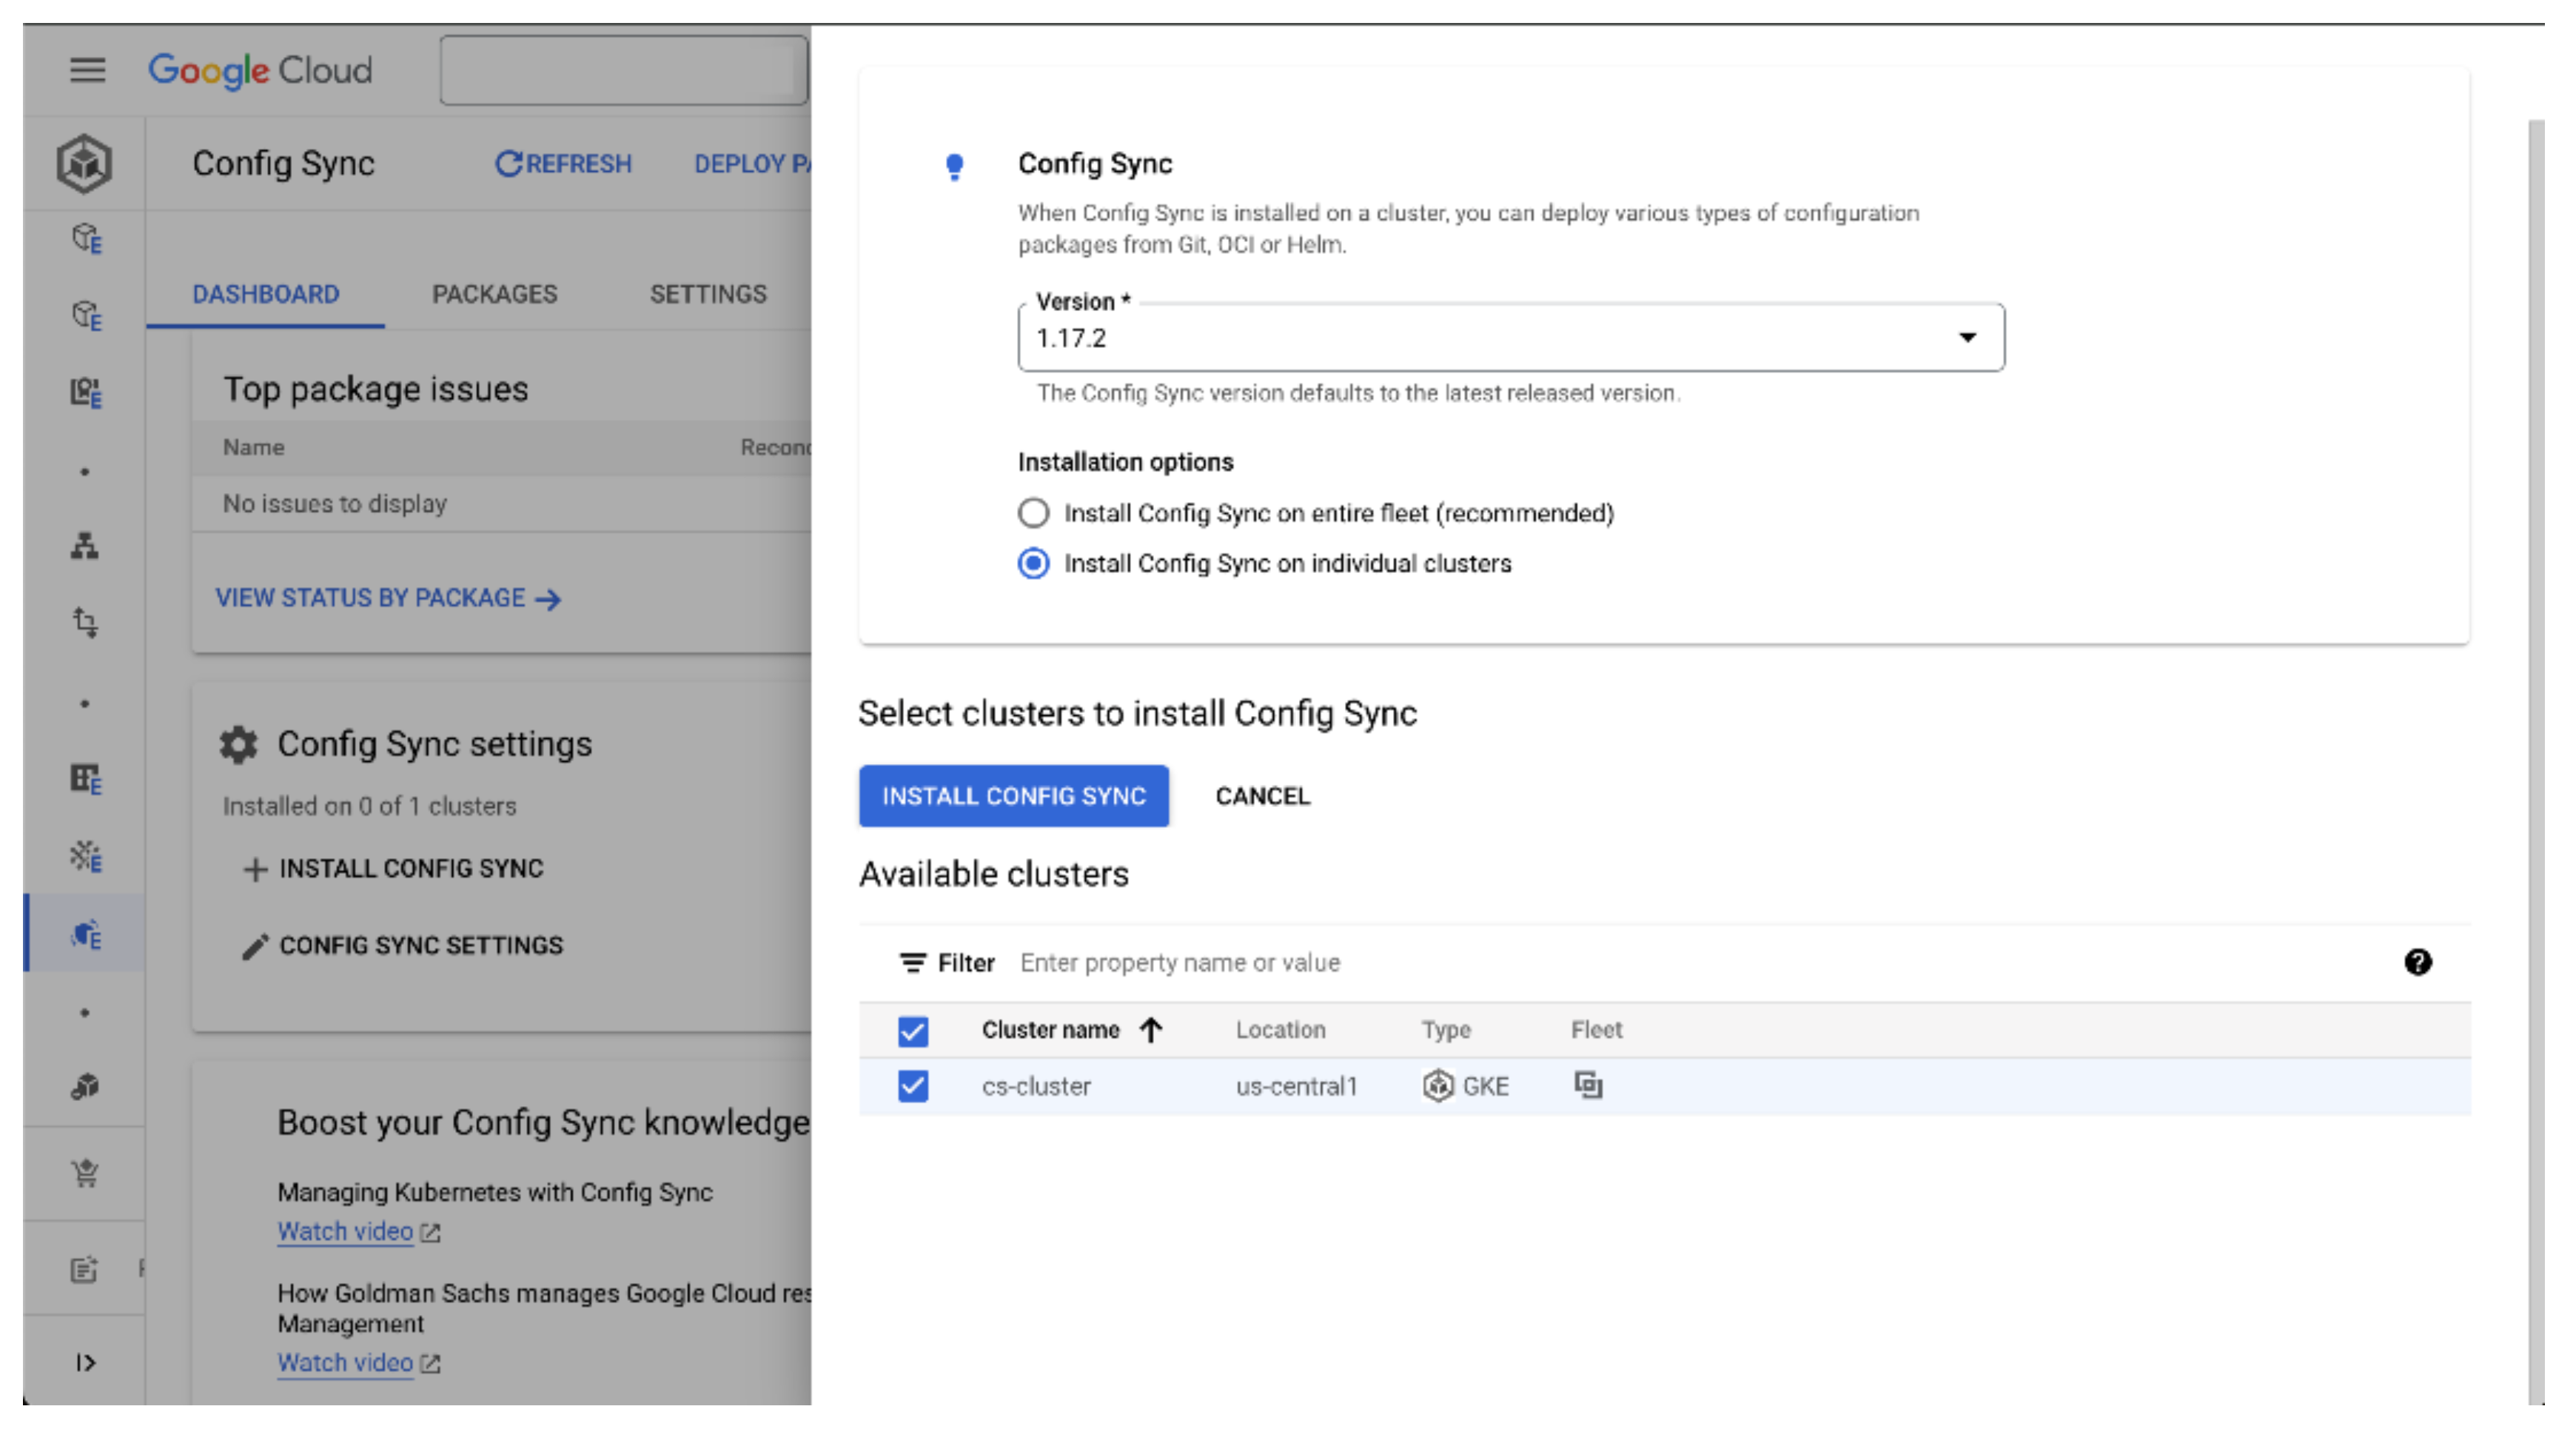
While the dashboard won’t update straight away, in the background GKE is now prepared to initialize the installation of Config Sync. After a few minutes, the Config Sync status should show that you have one cluster in a pending state, and after a few more minutes this state should change to Enabled. At this point, Config Sync has installed its operator on your cluster, but it still doesn’t have any actual configuration to synchronise.
Config Sync requires a source of truth that it can use to obtain configurations and other objects that it should deploy and manage to your clusters. The most common approach to creating a source of truth is to use a git repository as we have already discussed, but it’s also possible to use OCI container repositories for synchronising container images to your clusters.
Config Sync refers to these sources as Packages, so to set one up we will go to the Packages section of the Config Sync page and select Deploy Package. We will choose the git repository option and select our cluster. Now we need to enter a few details about the package:
Package name: This will be the name of the configuration object created to match this package. We’ll use
sample-repositoryfor now, as we’re using Google’s sample repo.Repository URL: The git repo URL we mentioned earlier, which is: https://github.com/GoogleCloudPlatform/anthos-config-management-samples
Path: We need to point to the correct part of our repo that contains the objects we wish to synchronise, which is
config-sync-quickstart/multirepo/root
We can now click Deploy Package and let Config Sync do its work. Specifically, Config Sync will now look at the objects declared in the repo and make sure that they exist on our cluster. In its current state, these objects have never been created, so Config Sync will reconcile that by creating them. The overall package is defined as a RootSync object, one of the Config Sync custom resource definitions, which holds all of the setup information you just entered. This object gets created in the config-management-system namespace.
You’ll see from the dashboard that your cluster has entered a reconciling synchronisation status. Once everything has been created, and the cluster state matches your declared state in the repo, the status should change to synced. The job of Config Sync then becomes to maintain these objects, so that the actual state of the cluster never drifts from what is declared in the repo.
You may have noticed at this point that two packages have synchronised when we only created one. How did that happen? The root part of the package that we synchronised contained 28 resources, and one of these was a RepoSync object which contained a reference to the multirepo/namespaces/gamestore path in our repo, creating the gamestore namespaced resources. This object is represented as an additional package, even though technically the source of truth is the same git repo. We could optionally have used a RepoSync object to point to a completely different repo.
Examining synchronised objects
There are two useful ways we can check on the work that Config Sync has carried out. Assuming we have configured authentication for kubectl, we can query for objects that contain the app.kubernetes.io/managed-by=configmanagement.gke.io label annotation. This will tell us which objects are managed by Config Sync. For example, we can list all namespaces that contain this label:
kubectl get ns -l app.kubernetes.io/managed-by=configmanagement.gke.io
You should see the gamestore and monitoring namespaces. Google also provides a command line tool called nomos as part of the Google Cloud CLI. We can use the nomos status command to view the state of synchronisation. For more information about this command, see https://cloud.google.com/kubernetes-engine/enterprise/config-sync/docs/how-to/nomos-command
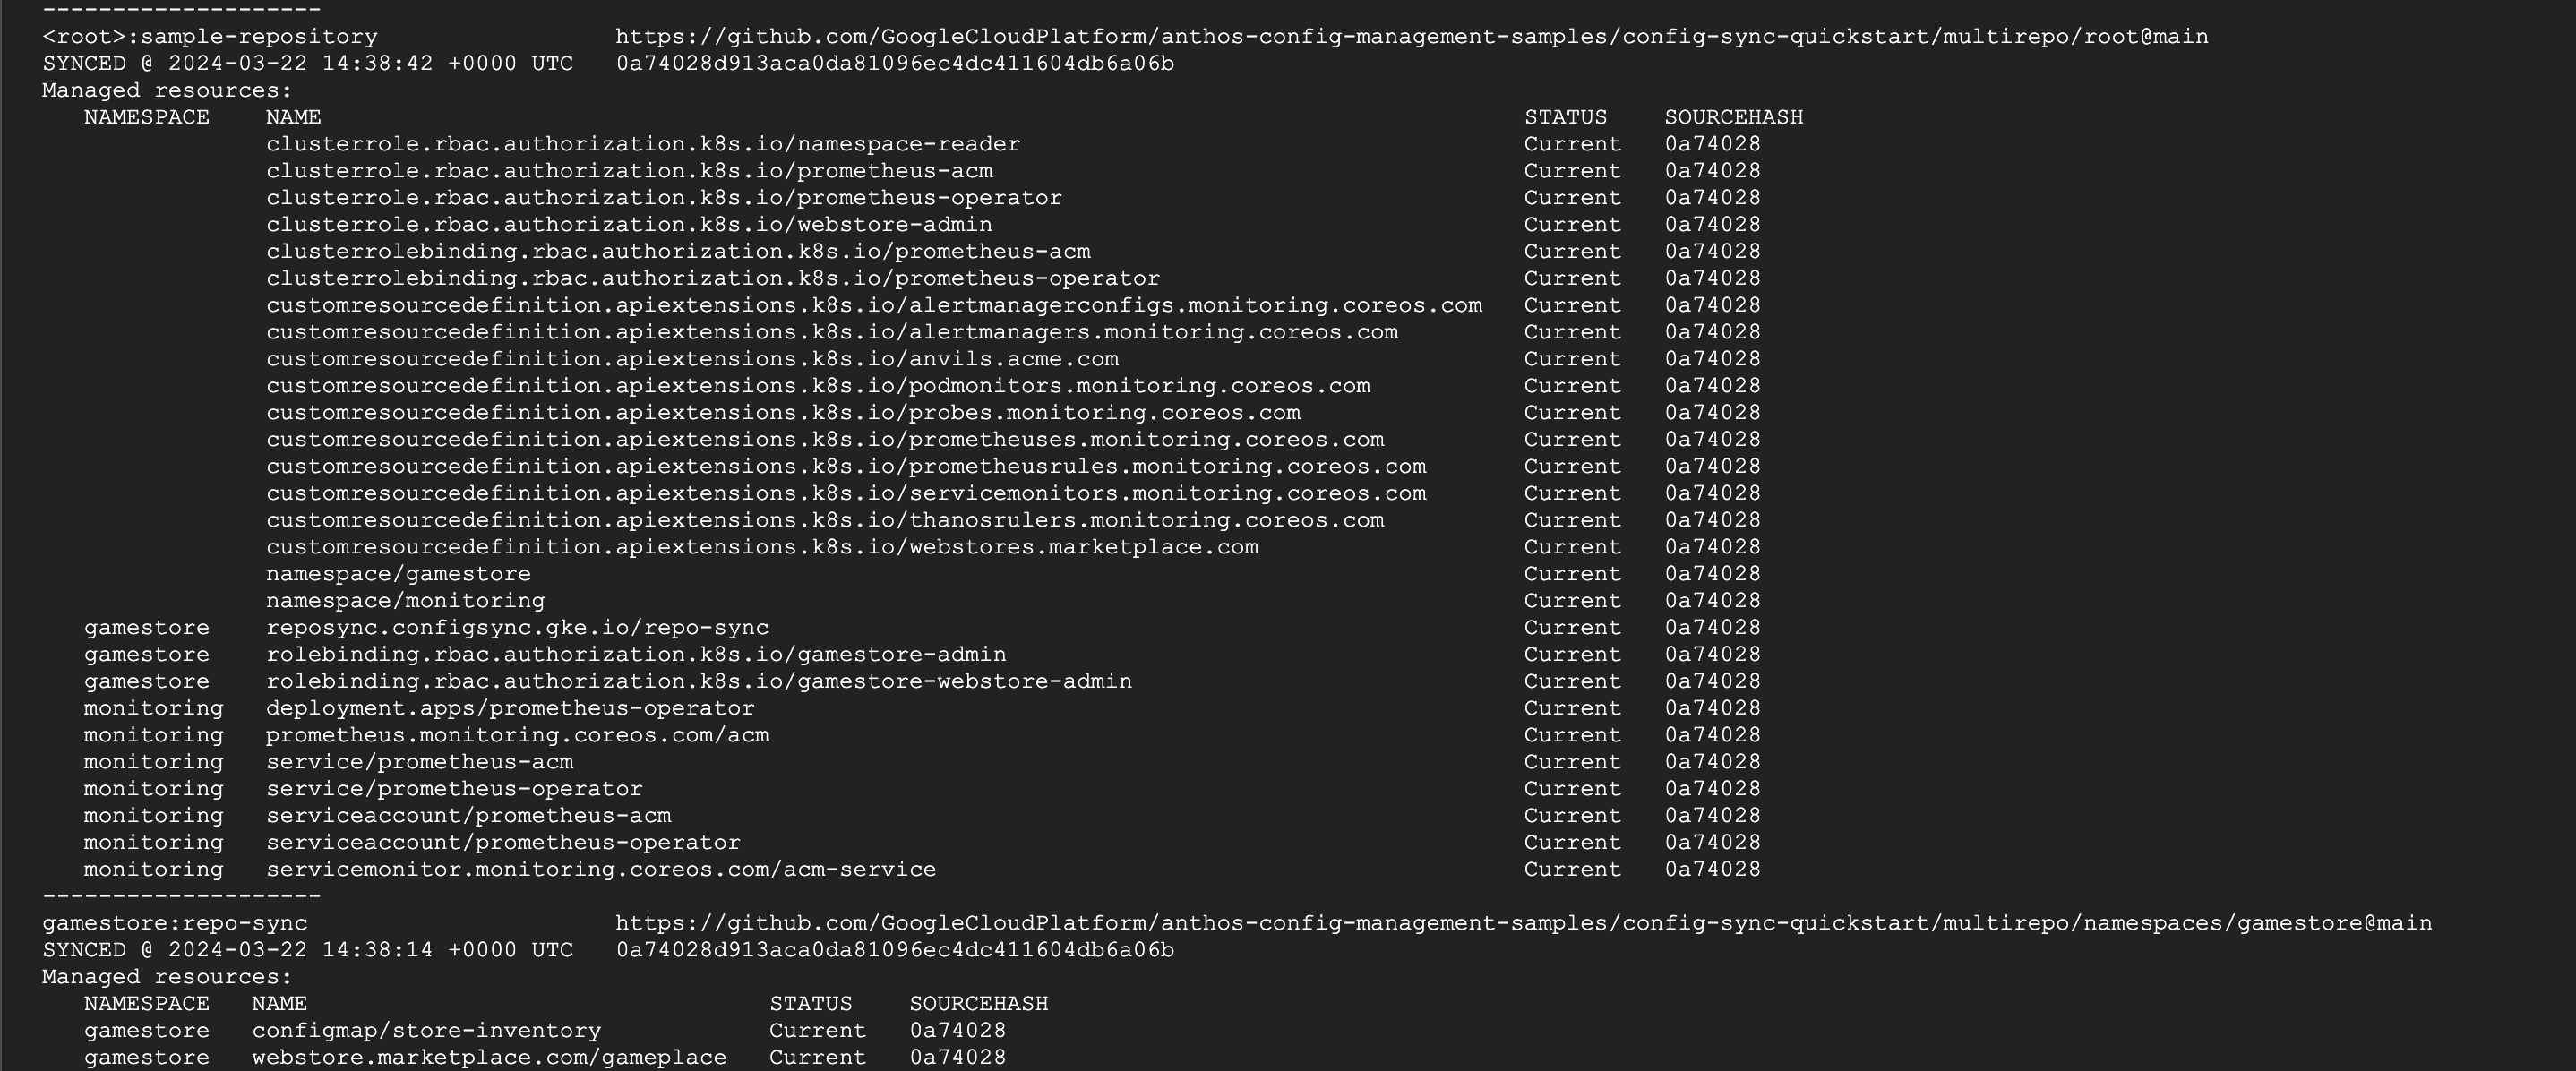
Let’s recap what we’ve just achieved and why it would be useful in a real environment. We’ve set up Config Sync for our cluster, but as we previously stated, it would be normal to enable Config Sync across an entire fleet of clusters. We’ve then deployed a Config Sync package, creating a code-based deployment of all the configuration we want across our clusters.
In this example repository, objects are defined for role-based access control, custom resource definitions, service accounts, namespaces, and monitoring services. These are the sort of supporting services that are normally configured as part of “Day 2” operations, but using Config Sync we’ve entirely automated them. Using git as our source of truth, we can now maintain a single code base that contains all the structural support our cluster needs, and as our fleet grows, Config Sync will ensure that these objects remain deployed and in their desired state across all our clusters no matter where they are running. We’ve seen how Config Sync can make sure that certain desirable objects are deployed to every cluster in your fleet. What other workloads and objects are then deployed on top of this baseline will be up to your developers and other teams who have access to your clusters. So how do you control what gets deployed?
Using the GKE Policy Controller
The Policy Controller is another tool that falls under the banner of configuration management for GKE Enterprise, and its job is to apply programmable policies that can act as guardrails. This allows you to set your own best practices for security and compliance and ensure that those policies are being applied uniformly across your entire fleet.
Under the hood, Policy Controller is built on the open-source Open Policy Agent (OPA) Gatekeeper project, which you can read more about at https://open-policy-agent.github.io/gatekeeper/website/docs/. The Policy Controller in GKE Enterprise extends the OPA Gatekeeper project by also providing an observability dashboard, audit logging, custom validation, and a library of pre-built policies for best practice security and compliance. In this way, you can view the GKE Policy Controller as a managed and opinionated version of the OPA Gatekeeper service. If you prefer, you can simply install and configure OPA Gatekeeper on its own. This will give you greater flexibility, but of course it will require more work on your part. If you wish to do this, you could consider automating its installation via Config Sync.
Constraints
Policy Controller works at a low level by leveraging the validating admission controller provided by the OPA Gatekeeper project. This means that all requests to the Kubernetes API on a given cluster are intercepted by this admission controller and validated against predefined policies.
These policies are made of constraint objects. Each constraint can either actively block non-compliant API requests, or it can audit a request and report a violation. By default, constraints will audit or mutate requests (more on that later), and report violations which you can view in the Policy dashboard.
GKE provides dozens of constraint templates in a library which you can use to build policies that suit your own security and compliance requirements. To give you a feel for the type of constraints these templates can implement, here are just a few examples:
The
AsmSidecarInjectiontemplate ensures that the Istio proxy sidecar is always injected into workload Pods.The
K8sAllowedRepostemplate will only allow container images to be used where the source URL starts with an approved string.K8sContainerLimitsandK8sContainerRequestswill only allow containers to be deployed that have resource limits and requests set, and only if those limits are requests are within a specified threshold.The
K8sRequiredProbestemplate requires Pods to have readiness and/or liveness probes defined, or they cannot be scheduled.
These are just a small sample from the available list, but they should give you an idea of the sort of compliance you can enforce on your cluster. The full list is available at: https://cloud.google.com/kubernetes-engine/enterprise/policy-controller/docs/latest/reference/constraint-template-library
If you have a requirement to constrain an object that is not covered by one of these templates, you can create your own custom constraint template. This should be an outlier case however, as templates to cover most common situations are provided in the Policy Controller library, and writing custom templates requires an advanced knowledge of the OPA Constraint Framework and the Rego language that it uses.
Policy Bundles
While you can easily apply constraint templates individually, GKE Enterprise also gives you the option of applying pre-prepared policy bundles. These are sets of policies prepared by Google Cloud to apply best practices or to meet specific compliance or regulatory requirements.
For example, the Center for Internet Security (CIS) maintains a benchmark for hardening and securing Kubernetes. This benchmark contains dozens of requirements to ensure the security of the control plane, workers nodes, policies and the implementation of GKE by managed services. A CIS GKE Benchmark Policy Bundle is maintained by Google Cloud and made available in GKE Enterprise to allow you to apply these requirements across clusters in your fleet.
Alternatively, other bundles are available that are based on requirements from the (NIST), PCI-DSS requirements the National Security Agency National Institute of Standards and Technology from the PCI Security Standards Council, and even a set of hardening requirements from (NSA).
Applying Policy Control to a Cluster
Let’s walk through a simple demonstration of setting up the Policy Controller for a GKE cluster and then applying some constraints from the template library. Just like before, we’ll assume that we have already built a GKE Enterprise autopilot cluster running in Google Cloud, and that the cluster is registered to your project’s fleet.
To install the Policy controller, go to the Policy page in the GKE section of the Google Cloud console. This page provides a dashboard for compliance with industry standards and best practices. With no clusters yet configured, you’ll just see some greyed-out example insights.
Select Configure Policy Controller. You will now see an overview of the Policy Controller feature for your fleet. This page will also inform you that some essential policy settings will now be applied to all clusters in your fleet.
You can choose to view or customise these settings by scrolling down and selecting Customize Fleet Settings, as shown below. The Policy Bundle pop-up will give you a choice of policy bundles to apply, but by default, the template library is enabled and so is the latest version of the Policy Essentials bundle. This bundle of best practices enforces policies for role-based access control, service accounts, and pod security policies.
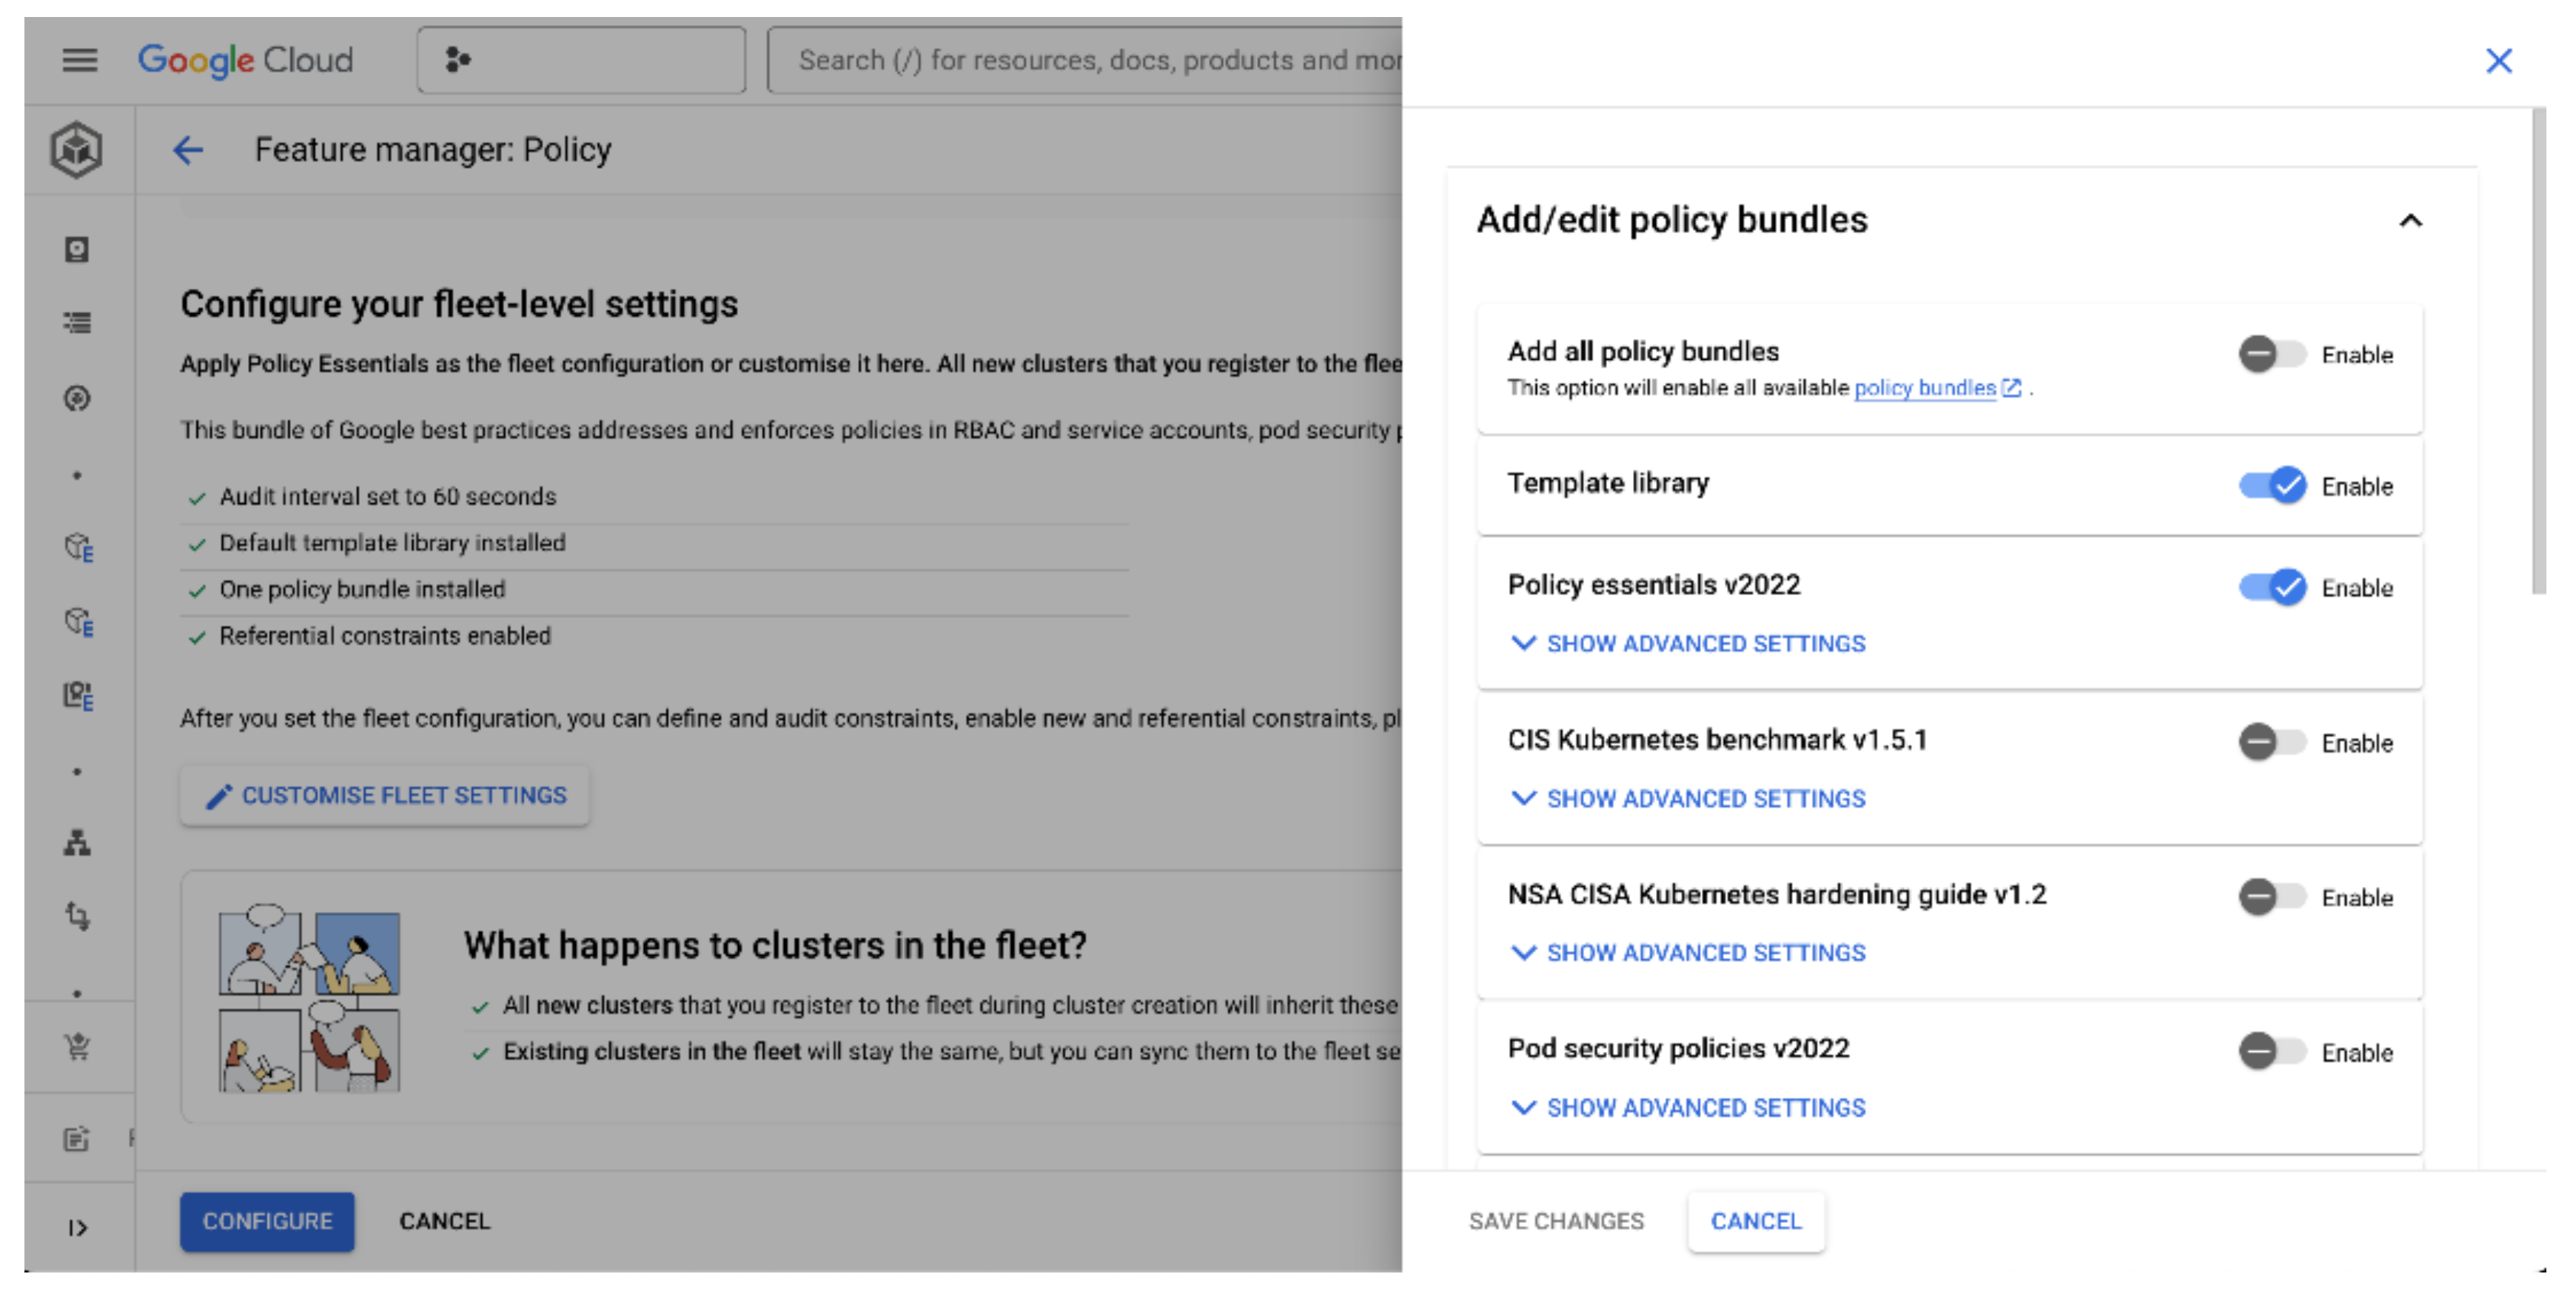
You can cancel this customisation pop-up and select Configure at the bottom of the page. You will then have to confirm that you are happy to apply your new Policy settings to your fleet.
It will take several minutes for GKE to install all necessary components to enable the Policy Controller. This includes the gatekeeper-controller-manager deployment in a dedicated namespace which performs the key actions of the OPA Gatekeeper admission controller, such as managing the webhook that intercepts requests to the Kubernetes API. The controller also evaluates policies and enforcement decisions.
Our Policy dashboard should now show that our cluster is compliant with the Policy Essentials policy bundle that we enabled across our fleet, as shown below:

Next, let’s test how the Policy Controller audits and reports on best practices. The Policy Essentials bundle that we already applied is surprisingly permissive, so let’s add a new policy bundle to our fleet that will flag up some more risky behaviour:
From the Policy page, select the Settings tab.
Select Edit Fleet Settings.
Scroll down and select Customize Fleet Settings.
Look for NSA CISA Kubernetes hardening guide and select Enable.
Click Save Changes.
At the bottom of the page, click Configure, then Confirm.
It can take a few minutes for new fleet settings to be synchronised with your cluster, but if you don’t want to wait for you can click the Sync with Fleet Settings button to start the process now. After a few minutes, the additional policy bundle will be synchronised with your cluster, and your dashboard should show that you are now compliant with the NSA Kubernetes standards.
Just like we have done many times now, let’s create a deployment for a Hello World application:
kubectl create deployment hello-server --image=us-docker.pkg.dev/google-samples/containers/gke/hello-app:1.0
You’ll notice that even though the deployment is created successfully, the admission controller has mutated our request. Admission controllers, in addition to validating and potentially declining a request, can also modify them to suit a set of policies. In this case, we did not specify CPU and memory resources for our container, but we have a policy that states that they are required. So, in this case the admission controller modified the request for us and added them.
Next, let’s create a Cluster IP service and an Ingress to map to it. Don’t worry that we don’t actually have an Ingress Controller to use right now, as we’re not really trying to set up a proper service. We just want to see what the Policy Controller will do.
kubectl expose deployment hello-server --type ClusterIP --port 80 --target-port 8080
kubectl create ingress hello-ingress --rule="example.com/=hello-server:80"
If you investigated the details of the policy bundle before we applied it, you may be surprised that these commands returned successfully. The NSA policy bundle specifically contains a constraint called nsa-cisa-k8s-v1.2-block-all-ingress, so shouldn’t that previous command have failed?
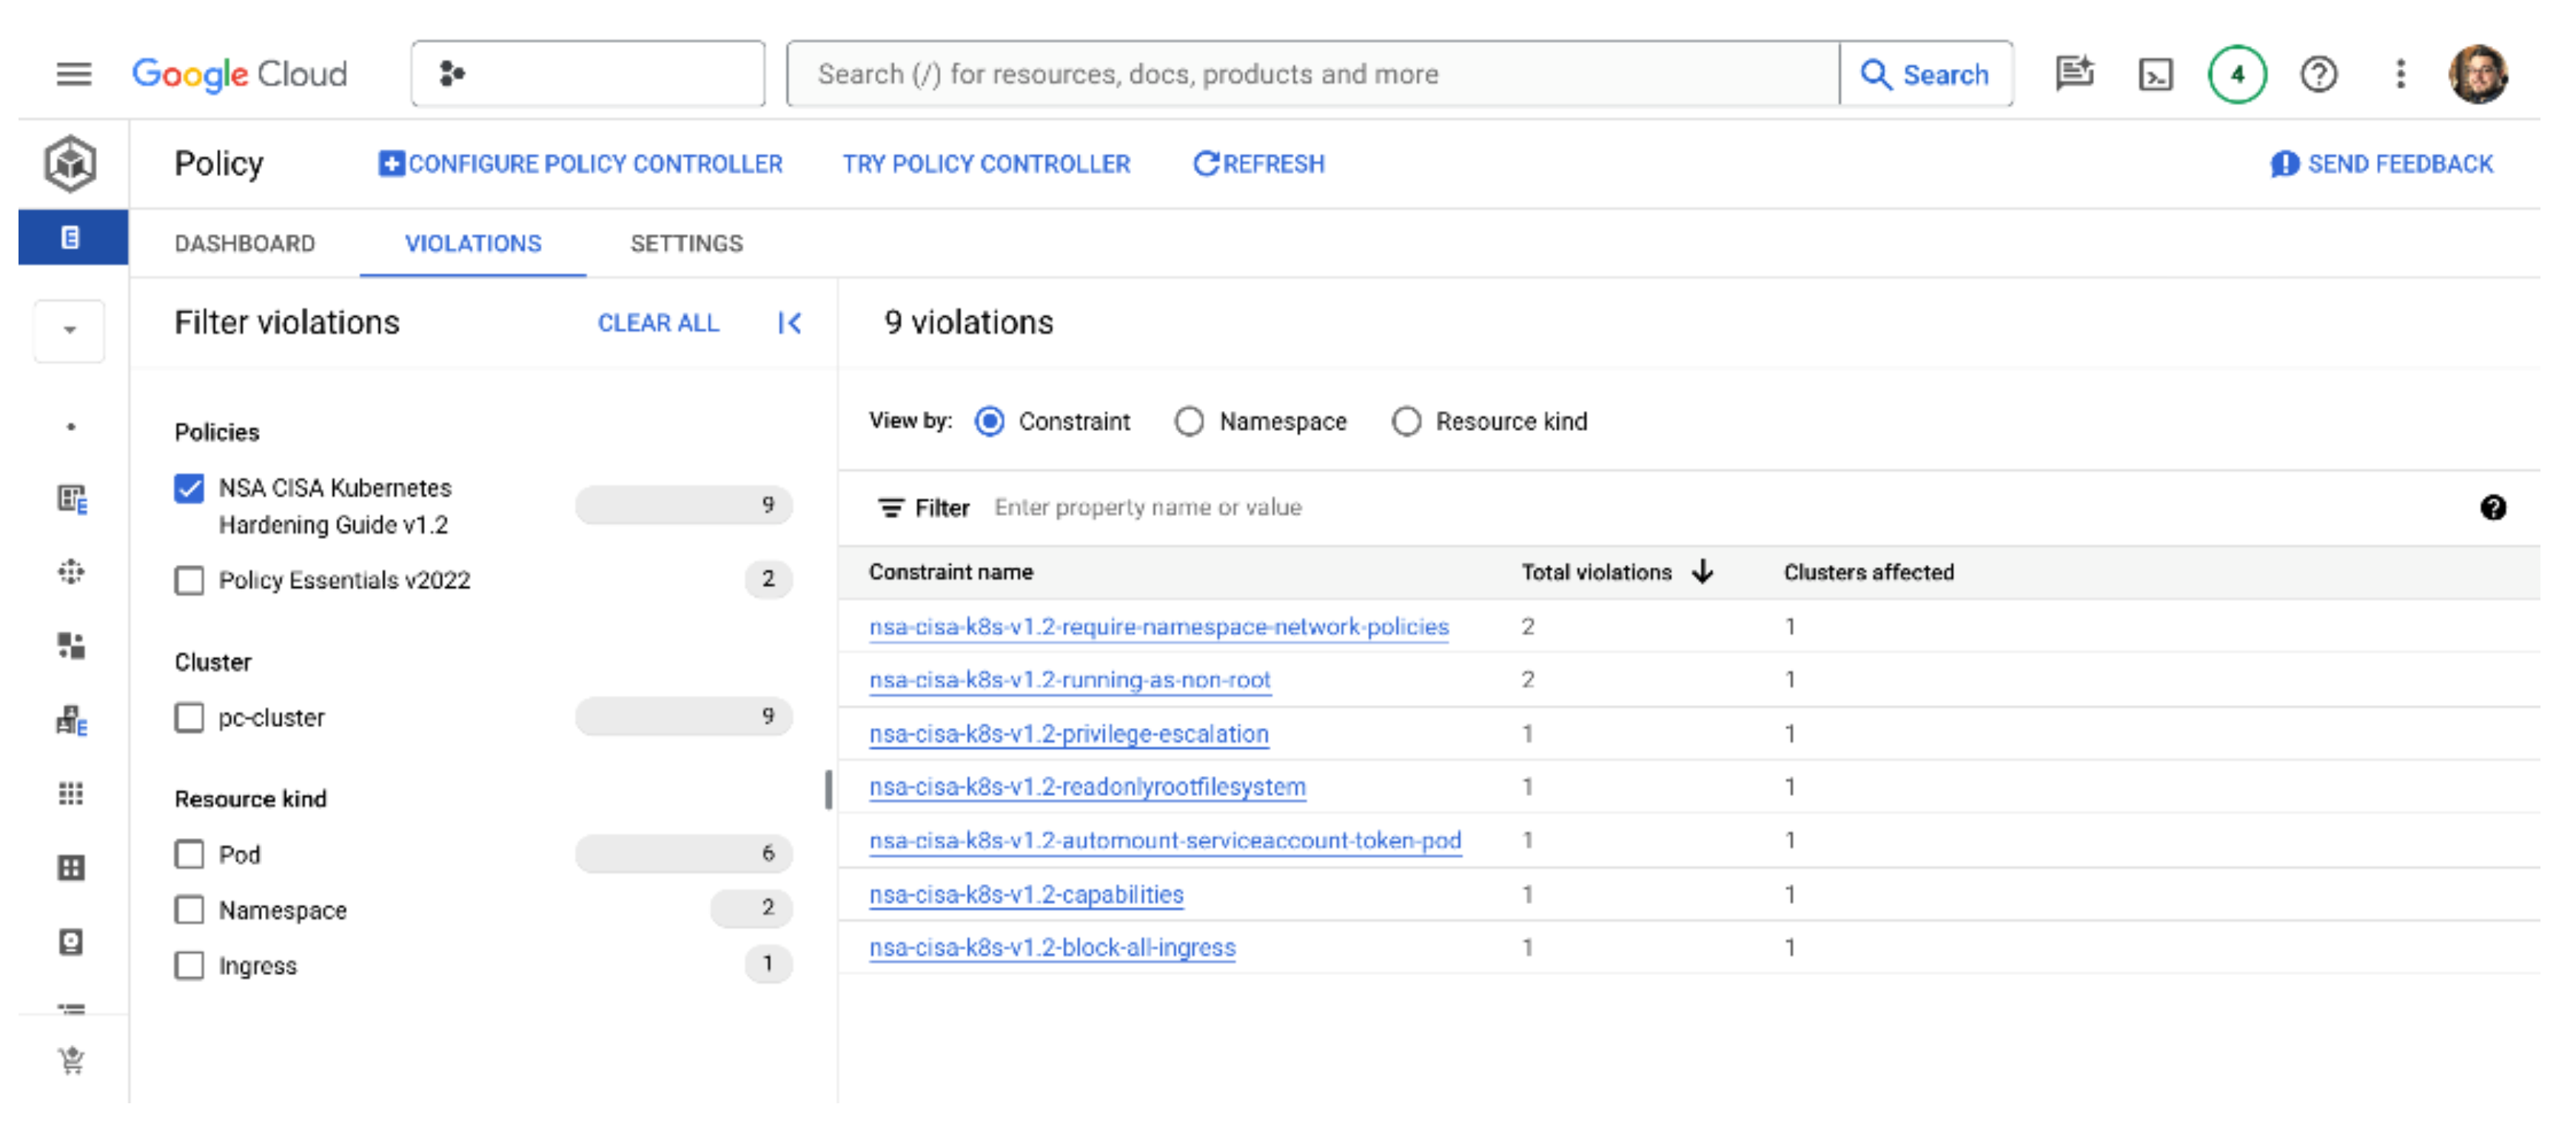
As we mentioned earlier, policies are applied, by default, in a dry-run mode. If we go back to our Policy dashboard, we can see that the policies are active because we are now showing multiple violations, as shown in the screenshot below. Google’s recommended best practice is to review all policy violations in the dashboard before taking any automated corrective action. This makes sense from the point of view of changing security requirements in existing production environments; you don’t want your security team to make an arbitrary decision, update the fleet policy, and suddenly disable a bunch of production workloads!
If you really want to, it is possible to change the enforcement mode of specific policies and policy bundles by patching the constraint objects directly in Kubernetes. Just look for the enforcementAction parameter and change it from dryrun to warn or deny. However, this approach is not recommended.
We’ve now seen how the Policy Controller can help us monitor the compliance of the clusters in our fleet to a set of security and best practices principles. Automating and visualizing this cluster intelligence makes the job of maintaining our fleet much easier. We can work with developers and teams to ensure that any violating workloads are fixed and rest easy knowing that our infrastructure is meeting some rigorous standards. These tools leverage the power of Kubernetes’ declarative approach to configuration and make the task of setting up clusters for developers easy and repeatable. Wouldn’t it be great if we could apply the same tooling to managing other resources in Google Cloud?
Leveraging the Config Controller
The final tool that falls under the umbrella of GKE Config Management is the Config Controller. This service extends the declarative GitOps approach of GKE Enterprise and Config Sync to create and manage objects that are Google Cloud resources outside of your GKE clusters, such as storage buckets, Pub/Sub topics, or any other Google Cloud resource you need. Using Config Controller allows you to continue using your familiar Kubernetes-based approach to declaring your resources and gives you a consistent approach if you are already using Config Sync and GitOps processes. You can combine these tools to apply policy guardrails, auditing, and automatic drift detection and repair for all your deployments, inside of Kubernetes or anywhere else in Google Cloud.
Choosing the right tools
Before we jump in to look at an example of the Config Controller in action, let’s just take a step back and consider this tool in the context of other infrastructure as code tools. It’s fair to say that Terraform is the industry’s leading platform-agnostic tool for infrastructure as code. Most organisations with at least a moderate number of developers and a good understanding of DevOps will be using Terraform to deploy infrastructure, including virtualised infrastructure on cloud platforms. For Kubernetes users, this of course will include Kubernetes clusters, either configured manually on virtual machines or by using managed services like GKE, but again, declared and maintained via Terraform.
Once clusters are built, we move on to the right tooling to deploy workloads to those clusters. In this post, we’ve looked at some of the tools that are unique to GKE Enterprise, and later in the series I’m planning to look at other Google Cloud recommended CI/CD best practices for deploying and maintaining workloads. Many teams will continue to use Terraform to manage Kubernetes objects, but many may adopt a templating approach such as using Helm or Kustomize.
Given that these are industry norms (if not standards), how would you choose to deploy additional cloud resources external to Kubernetes at this point? Again, most teams use Terraform if this is their primary tool for declaring the state of their infrastructure. However, it might be that you don’t want your teams to have to context-switch between the Terraform configuration language and Kubernetes APIs. You may have additional tools in the mix, and any increase in complexity normally means a reduction in developer velocity or an increased chance of making mistakes.
So, in answer to this, Google Cloud created an open-source project called the GCP Config Connector, which declares a set of custom resource definitions for Google Cloud. Using this add-on for Kubernetes, anyone can now declare resources in Google Cloud using Kubernetes objects.
Now if you don’t want to create or maintain a Kubernetes cluster just to use the Config Connector, you can instead choose to use the Config Controller, which is a fully managed and hosted service for the Config Connector. For the rest of this post, we’ll continue to explore the Config Controller as a feature of GKE Enterprise, but bear in mind that similar outcomes can be achieved simply by adding the open-source Config Connector to an existing Kubernetes cluster. The names are very similar and can be confusing, but hopefully this has clarified things for you!
Setting up the Config Controller
So for our final walkthrough/demo in this post, let’s create a Config Controller instance and use it to deploy a non-Kubernetes Google Cloud resource!
A Config Controller instance is a fully managed service, so we don’t need to configure or create the infrastructure required to run it, we just request the service with this command:
gcloud anthos config controller create cc-example --location=us-central1 --full-management
This command can take up to 15 minutes to complete because in the background a new GKE cluster is being provisioned just to run the Config Controller components for you. When the command completes it will also generate a kubeconfig entry for you, just like when you create a GKE cluster from the command line. This will allow you to use kubectl to create your Google Cloud resources.
Wait a minute, why are we running an Anthos command? That name got deprecated surely! Well at the time of writing, the commands we use for Config Controller still reference Anthos. While the product name is now officially deprecated, it can take a long time to rewrite command line tools to reflect this. If the commands don’t work in this section when you try them, please refer to the documentation here: https://cloud.google.com/sdk/gcloud/reference/anthos/config/controller
Back to our demo, and when the instance has been created, it will show up as a GKE cluster in the cloud console cluster list. You can also confirm its state from the command line:
gcloud anthos config controller list --location=us-central1
Before we can ask our new Config Controller to create resources for us, we still need to give it the necessary IAM permissions in our project. As part of setting up the Config Controller instance, a service account for Config Controller has also been created. We will grant this service account the Project Owner IAM role so that it can have full control over project resources for us. Note that this is a rather “broad brush” approach. If you only want to use Config Controller for a subset of your project resources, you may want to consider a different IAM role.
First we’ll get the value of the service account email address and store it in an environment variable that we’ll use in a moment:
export SA_EMAIL="$(kubectl get ConfigConnectorContext -n config-control -o jsonpath='{.items[0].spec.googleServiceAccount}' 2> /dev/null)"
Now we’ll use that service account email to add an IAM policy binding. In the following command, replace my-project-id with the ID of your own Google Cloud project:
gcloud projects add-iam-policy-binding my-project-id \
  --member "serviceAccount:${SA_EMAIL}" \
  --role "roles/owner" \
  --project my-project-id
Our Config Controller instance is now authorised to manage resources in our project, and we can go ahead and start using it! Google Cloud resources are created by declaring them as Kubernetes objects, in much the same way as if we were creating Kubernetes resources. We can do this simply by writing the necessary YAML files, or of course using Config Sync or other GitOps-based options.
As a simple test, let’s say we want to enable the Pub/Sub API in our project and create a Pub/Sub topic. If you’re not familiar with Pub/Sub, it’s a serverless distributed messaging service, often used in big data pipelines. We’re not going to do anything with Pub/Sub right now, however, other than to demonstrate how we can set it up with the Config Controller.
So first, we’ll create a YAML declaration that states that the Pub/Sub API should be enabled. We’ll create a file called enable-pubsub.yaml and copy in the code below (make sure to once again replace any occurrences of my-project-id with your own Google Cloud project ID if you’re following along):
apiVersion: serviceusage.cnrm.cloud.google.com/v1beta1
kind: Service
metadata:
  name: pubsub.googleapis.com
  namespace: config-control
spec:
  projectRef:
    external: projects/my-project-id
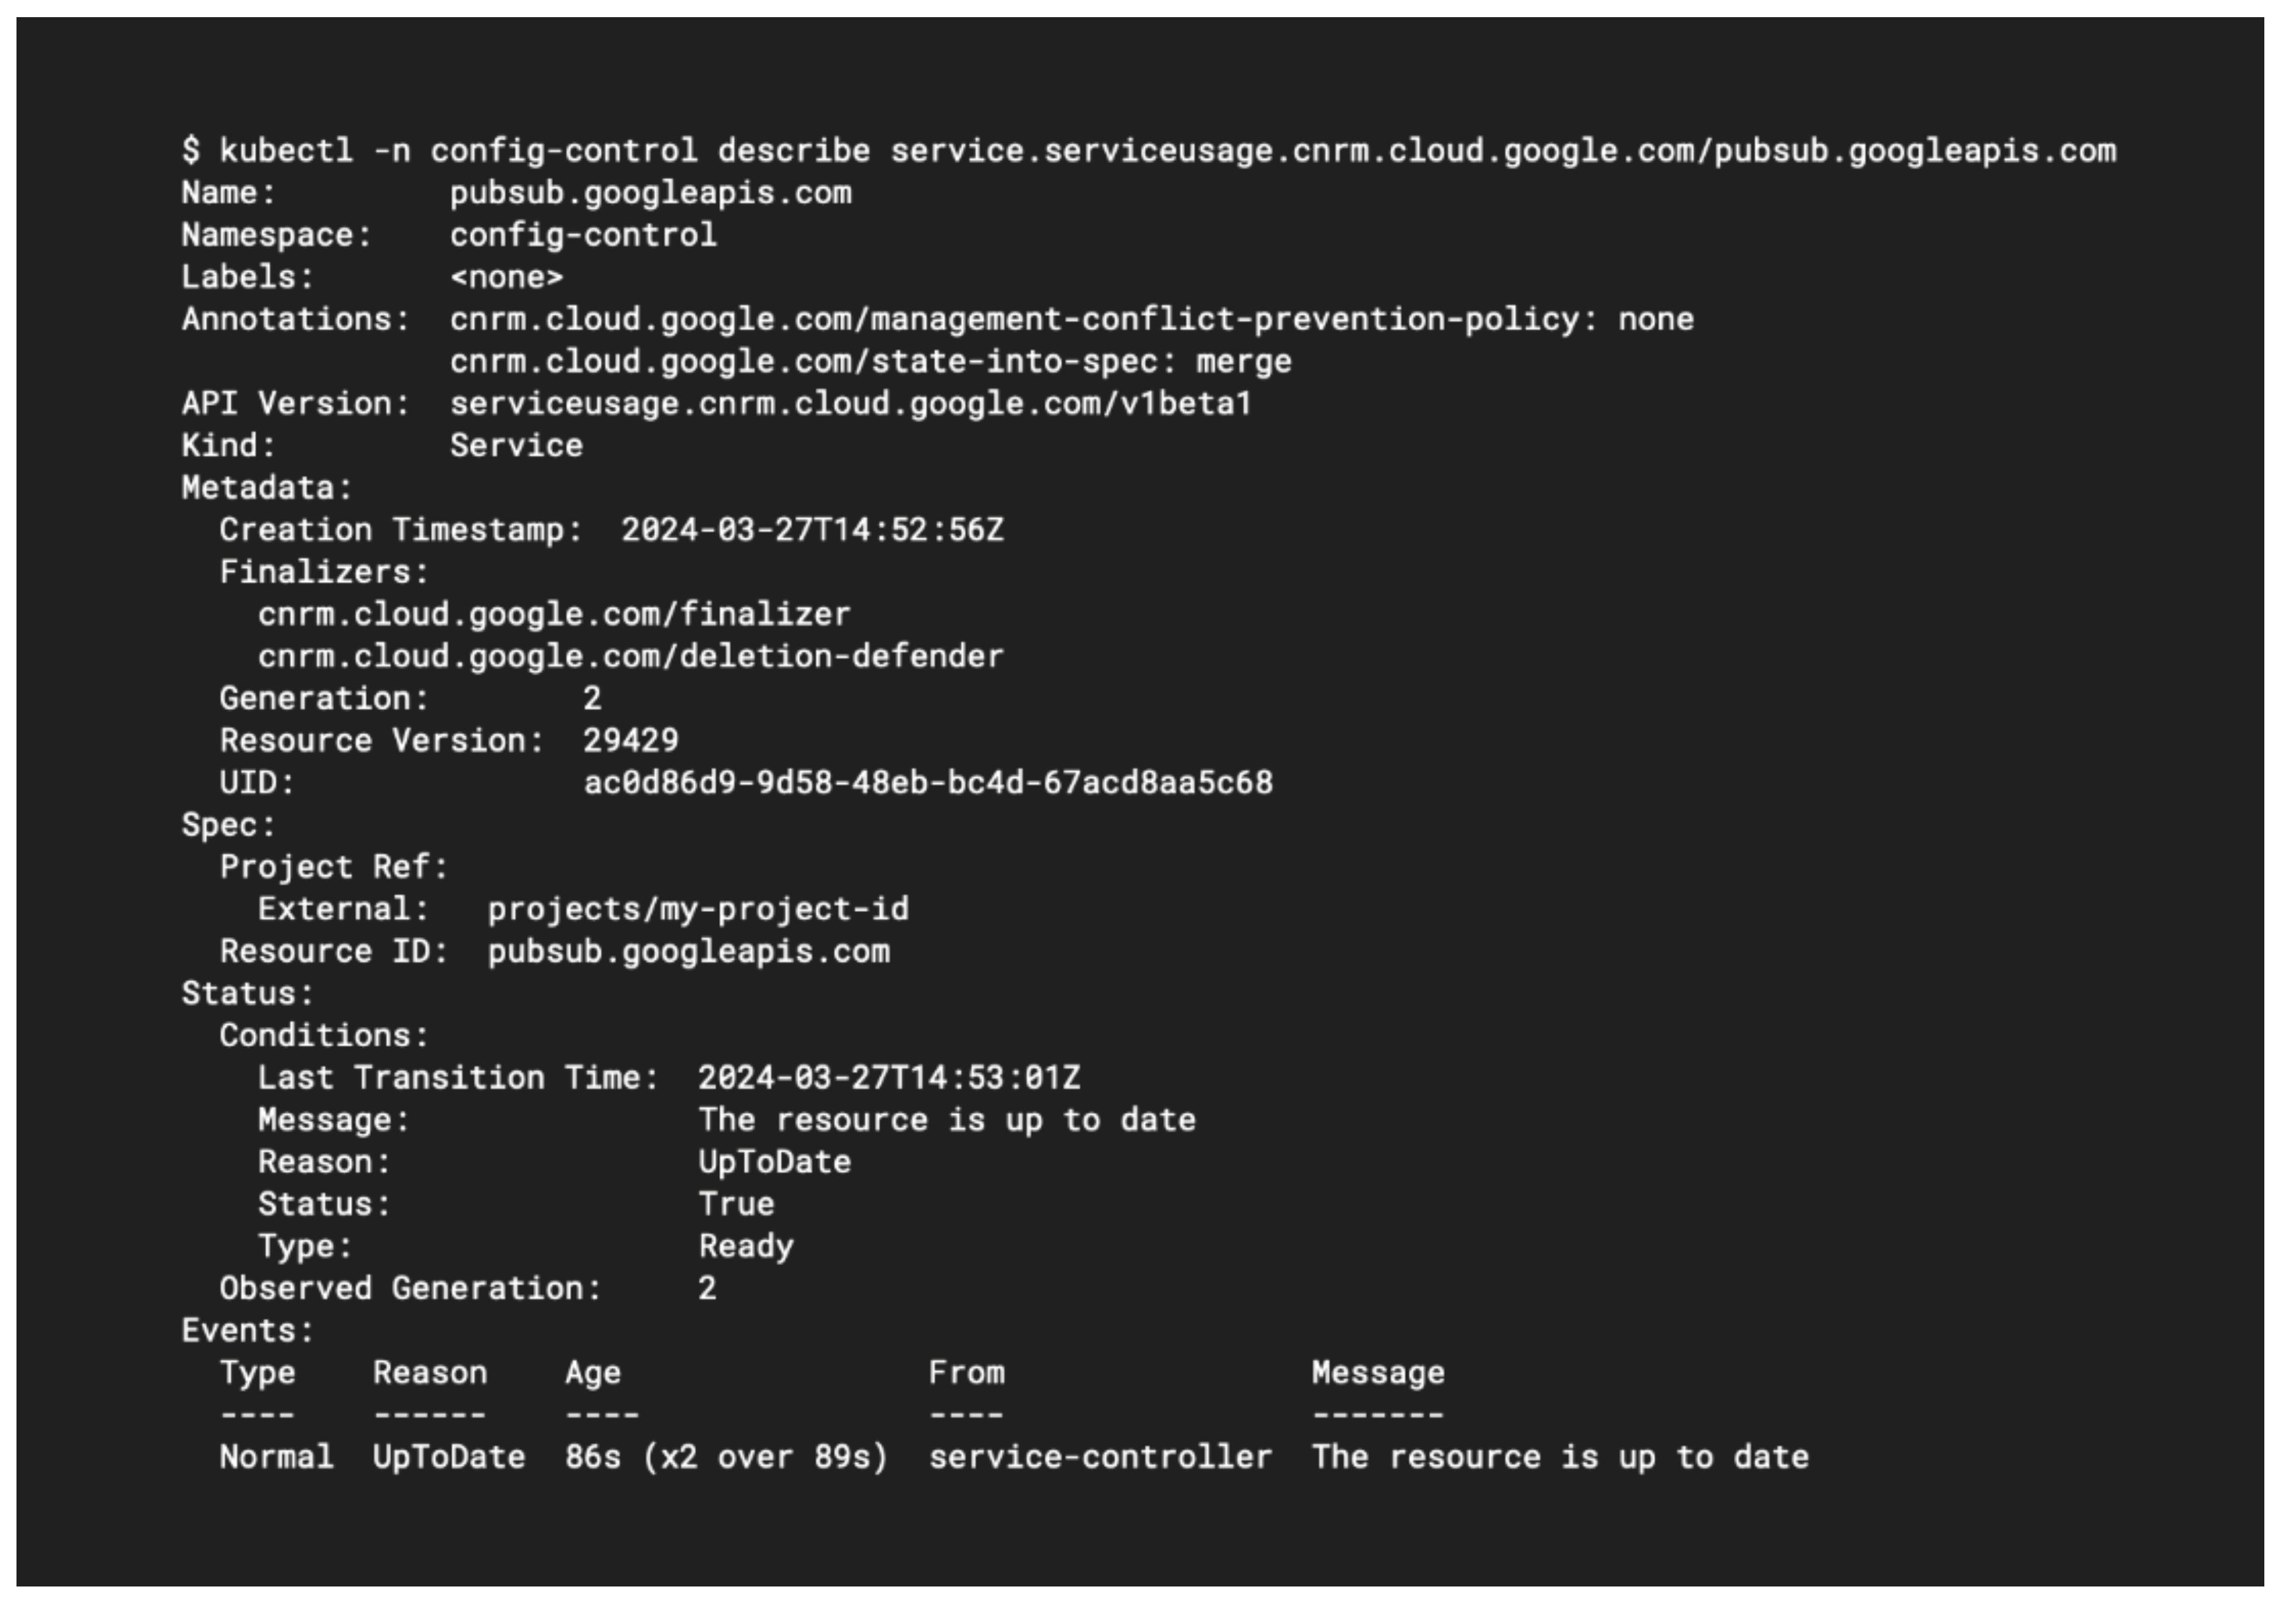
You can now apply the YAML declaration with kubectl apply, just as you would with any other Kubernetes object. This creates an object of the type serviceusage.cnrm.cloud.google.com in the config-control namespace on the Config Connector instance. This object represents the resource configuration you have requested in your project; namely, that the Pub/Sub API should be enabled. If you query the object, you should see that the object’s state represents whether the desired resource has been created, as shown below:
Next, let’s create a Pub/Sub topic by writing a new YAML file called pubsub- topic.yaml. Don’t forget to substitute your own project ID again:
apiVersion: pubsub.cnrm.cloud.google.com/v1beta1
kind: PubSubTopic
metadata:
  annotations:
    cnrm.cloud.google.com/project-id: my-project-id
  name: example-topic
  namespace: config-control
Once again you can query the configuration object with kubectl. To confirm the resource has been created, we can also use gcloud to list all Pub/Sub topics:
gcloud pubsub topics list
You’ll notice that your topic contains a label identifying that it is managed by the Config Controller.
Combining Policy Controller and Config Controller
The Config Controller instance also provides us with a built-in Policy Controller, although at the time of writing only a handful of non-Kubernetes, general Google Cloud resource constraints were available. One example is the GCPStorageLocationConstraintV1 constraint, which can be used to restrict the allowed locations for Cloud Storage buckets. Outside of the supported templates, other non-Kubernetes constraints could theoretically be created by applying constraint logic to the configuration objects used by the Config Controller, but this isn’t a solution that’s officially supported by Google.
We can demonstrate a constraint that would restrict all Cloud Storage buckets to being created in the us-central1 region by creating a bucket-constraint.yaml file like this:
apiVersion: constraints.gatekeeper.sh/v1beta1
kind: GCPStorageLocationConstraintV1
metadata:
  name: storage-only-in-us-central1
spec:
  match:
    kinds:
    - apiGroups:
    - storage.cnrm.cloud.google.com
      kinds:
      - StorageBucket
  parameters:
    locations:
    - us-central1
Once we apply this object to the cluster, we can try to create a definition for a bucket in a location that should not be allowed:
apiVersion: storage.cnrm.cloud.google.com/v1beta1
kind: StorageBucket
metadata:
  name: my-bucket
  namespace: config-control
spec:
  location: asia-southeast1
When we try to apply this configuration, we should hopefully receive an error from the API server. The Gatekeeper admission controller has denied the request, because the location was disallowed!
To fully leverage the Config Controller, you may also wish to combine it with Config Sync, allowing you to benefit from all the features of Config Sync we discussed earlier in this post. Conceptually, in addition to applying Config Sync to clusters in our fleet, we also apply it to the Config Controller instance, allowing us to use centralised repositories for configuration and policy for Kubernetes objects and Google Cloud resources.
To set this up, all we need to do is manually create a RootSync object and apply it to the Config Controller instance. A sample YAML declaration might look like this:
apiVersion: configsync.gke.io/v1beta1
kind: RootSync
metadata:
  name: root-sync
  namespace: config-management-system
spec:
  sourceFormat: unstructured
  git:
    repo: https://github.com/mygithub/myrepo
    branch: main
    dir: config-dir
    auth: none
It’s worth keeping an eye on how Google develops the constraints available for other cloud resources. If there is broad enough support, it could help reduce the overall number of tools that you end up using to secure your environments. Fewer tools means fewer things to go wrong!
Summary
In this post, I’ve introduced the three main tools used by GKE Enterprise for configuration management: Config Sync, Policy Controller and Config Controller. I started by making the case for declarative configuration management and learned how this could be applied with the modern approach of GitOps. Each of these tools performs a specific function, and I would recommend that you consider which of them is relevant to you and your organisation, and in what combination.
You don’t have to use all of them, or any of them if they don’t solve a relevant problem for you. Of the three tools, Config Controller is probably the least well-known because of the prevalence of Terraform for managing infrastructure, and Helm for managing Kubernetes-based workloads. As always, you should experiment to find the right fit for your team based on your own skillsets and other tools you may be using. Whichever tools you choose, declarative infrastructure as code, a single source of truth, and the automation of drift-reconciliation are recommended best practices.
So what’s next in this series? Exploring some of the fundamentals of GKE Enterprise has meant discussing some of the most niche topics and products I’ve ever dabbled in! But next time I’ll get into some more practical uses cases, looking at design patterns for multiple clusters and concepts like north-south and east-west routing. After that, we’ll be ready to embark on an epic Service Mesh quest!
Subscribe to my newsletter
Read articles from Tim Berry directly inside your inbox. Subscribe to the newsletter, and don't miss out.
Written by
