A Beginner's Guide to Git and GitHub
 Prabakaran
What is Git?
Git is a distributed version control system (VCS) that helps developers manage changes to their codebase over time. It allows multiple people to collaborate on a project by tracking modifications, managing different versions of files, and enabling team members to work simultaneously without overwriting each other's work.
What is a Version Control System (VCS)?
A Version Control System (VCS) is a tool that helps track changes made to files over time, allowing developers to manage versions of a project, collaborate with others, and recover older versions if needed. It is crucial in software development and project management.
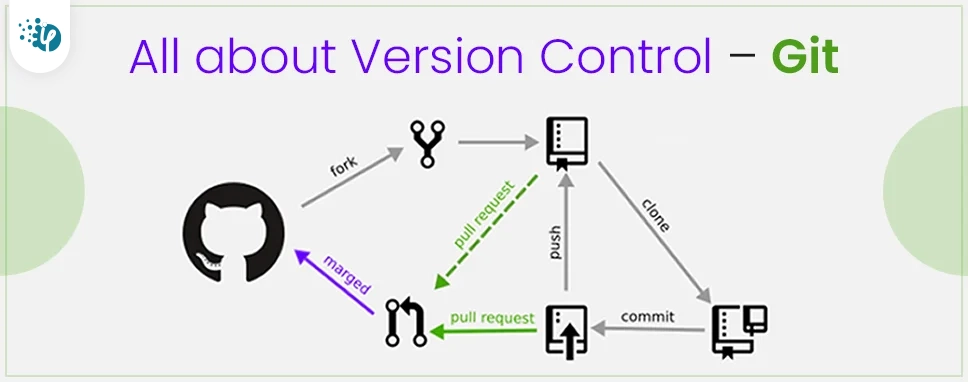
There are two main types of VCS:
Centralized Version Control System (CVCS):
In this system, a central server stores all the file versions, and developers check out (download) files from the server.
Examples: Subversion (SVN), Perforce.
Advantage: Simple model, central point of control.
Disadvantage: If the server goes down, no one can access the latest version or commit changes.
Distributed Version Control System (DVCS):
Every developer has a full copy of the project’s history locally, allowing them to work independently.
Examples: Git, Mercurial.
Advantage: No need for constant internet access, more flexibility for branching and merging, and more resilience as every local copy is a backup.
Disadvantage: Can be more complex for beginners.
Key Features of a VCS:
Version Tracking: Keeps track of every change made to the files, including who made the changes and when.
Collaboration: Multiple developers can work on a project simultaneously, and their changes can be merged efficiently.
Branching and Merging: Developers can work on separate features or fixes in isolation and later merge their work into the main project.
History and Rollback: Enables the ability to view the history of changes and roll back to previous versions if necessary.
VCS helps prevent conflicts and lost work, making it a foundational tool in modern software development practices.
How Git Works?
To understand how Git works, it’s important to grasp the different "areas" where changes to your code are stored and tracked. Here's a breakdown of the key areas in Git: working directory, staging area, local repository, and remote repository.
1. Working Directory (or Working Tree)
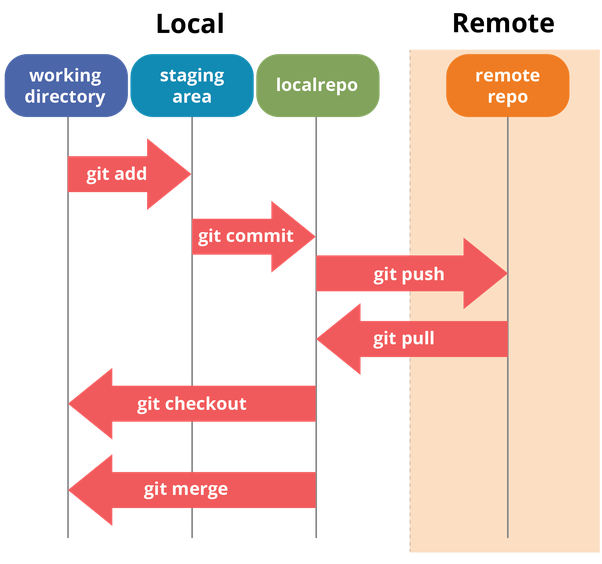
What It Is: The working directory is the actual directory on your computer where you edit, add, and delete files. It contains your project files and is the place where you make changes.
Changes Here: When you modify files in your project, they are in the working directory. However, Git will untrack these changes until you stage them.
Command to Check Status:
git status
This command shows changes made in the working directory that have not been staged or committed.
2. Staging Area (or Index)
What It Is: The staging area is where you prepare changes before committing them. Think of it as a “waiting room” for changes you want to save in your next commit.
How to Move Changes Here: When you are happy with changes made in your working directory, you use the
git addcommand to move them to the staging area. Changes must be staged before they can be committed to the repository.
Commands:
git add <file>    # Adds specific file to the staging area
git add .         # Adds all modified files to the staging area
- View Staged Changes:
git status # Shows changes in the staging area and the working directory
3. Local Repository
What It Is: The local repository is the
.gitdirectory created when you initialize a Git repository. It stores all your project’s commits, branches, and history. This is a hidden directory in your project folder, and it’s where Git stores all the metadata and objects, including commits and configuration.When Changes Are Saved Here: When you commit changes, they move from the staging area into the local repository. These changes are now part of your Git history but only exist locally.
Commands:
git commit -m "Message"   # Commits staged changes to the local repository
git log                   # Shows the commit history of the local repository
- Local Repository vs Remote: Your local repository only exists on your machine. To share or collaborate, you need to push it to a remote repository.
4. Remote Repository
What It Is: A remote repository is a version of your project hosted on a server (like GitHub, GitLab, or Bitbucket) that you can share with others. This repository can be accessed by other developers for collaboration.
How to Sync Local and Remote: After committing your changes to the local repository, you can push them to the remote repository. Similarly, you can pull changes from the remote repository to keep your local repository up to date with others' work.
Commands:
git push origin <branch>   # Push local changes to the remote repository
git pull origin <branch>   # Fetch and merge changes from the remote repository to your local repository
Example Workflow:
Working Directory: You modify a file, say
index.html.Staging Area: You add the changes to the staging area:
git add index.htmlLocal Repository: You commit the staged changes to the local repository:
git commit -m "Updated index.html with new header"Remote Repository: You push the committed changes to the remote repository:
git push origin main
This workflow allows you to control which changes are tracked and shared, ensuring smooth version control and collaboration.
Summary Table:
| Area | Description | Command Example |
| Working Directory | Where you edit files (untracked changes) | git status |
| Staging Area | Where you prepare changes for commit (tracked but not saved) | git add <file>, git status |
| Local Repository | Where committed changes are stored locally | git commit -m "Message", git log |
| Remote Repository | A version of your repository hosted on a server | git push, git pull, git remote |
Understanding these areas is essential for controlling the flow of changes in Git. Each step ensures a smooth progression from editing, to saving locally, to finally sharing your changes with others through the remote repository.
What is GitHub?
GitHub is a web-based platform that provides hosting for software development using Git, the version control system. It allows developers to store, manage, and collaborate on code from anywhere. GitHub offers additional tools like issue tracking, project management, and code review features, making it a hub for open-source and private development.

Key features of GitHub include:
Repositories: A project’s code and its version history.
Pull Requests: A way to propose changes to a project and collaborate on those changes with others before integrating them.
Forking: Creating a personal copy of someone else’s project to modify it independently.
Collaboration: GitHub facilitates team collaboration through features like comments, pull request reviews, and issue tracking.
Some Other types of cloud-based git tools?
GitLab
Bitbucket
Azure Repos
SourceForge
AWS CodeCommit
Google Cloud Source Repositories
GitKraken (Git GUI with cloud integrations)
Gitea (Self-hosted option with cloud capabilities)
Phabricator
Beanstalk
Let’s Begin with Git Comments
git init
The git init command is used to initialize a new Git repository. It creates a hidden .git directory in the current working directory, which contains all the metadata and history necessary for version control.
Usage:
Initialize a new repository:
git initThis creates an empty Git repository in the current directory. You can now start tracking changes and versioning files using Git.
Initialize a bare repository: A bare repository is typically used on a server or as a central repository to collaborate with others. It doesn’t contain a working directory (no actual project files, just Git data).
git init --bareThis is useful when setting up a remote repository for collaboration.
Example:
mkdir my-project
cd my-project
git init
This initializes a new Git repository inside the my-project directory. Afterwards, you can start adding files, committing changes, and using other Git commands to manage the project.
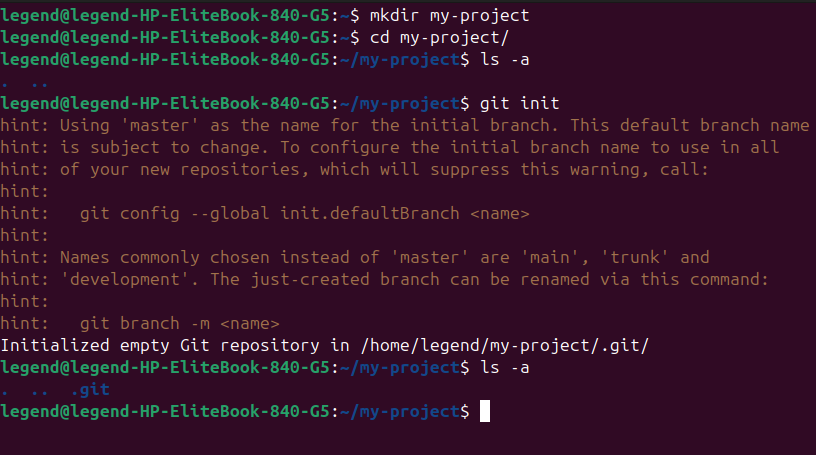
"After running git init, you will see a folder called .git, where all the commits and changes will occur."
git clone
The git clone command is used to create a local copy of a remote Git repository. This command downloads all the project files, along with the complete history of the project (all commits, branches, and tags).
Usage:
Basic Clone:
git clone <repository-url>This clones the repository from the provided URL to your local machine. The default directory name will be the same as the repository name.
Example:
git clone git@git.selfmade.ninja:prabakaranabcabc/prabakaran-git-blogs.git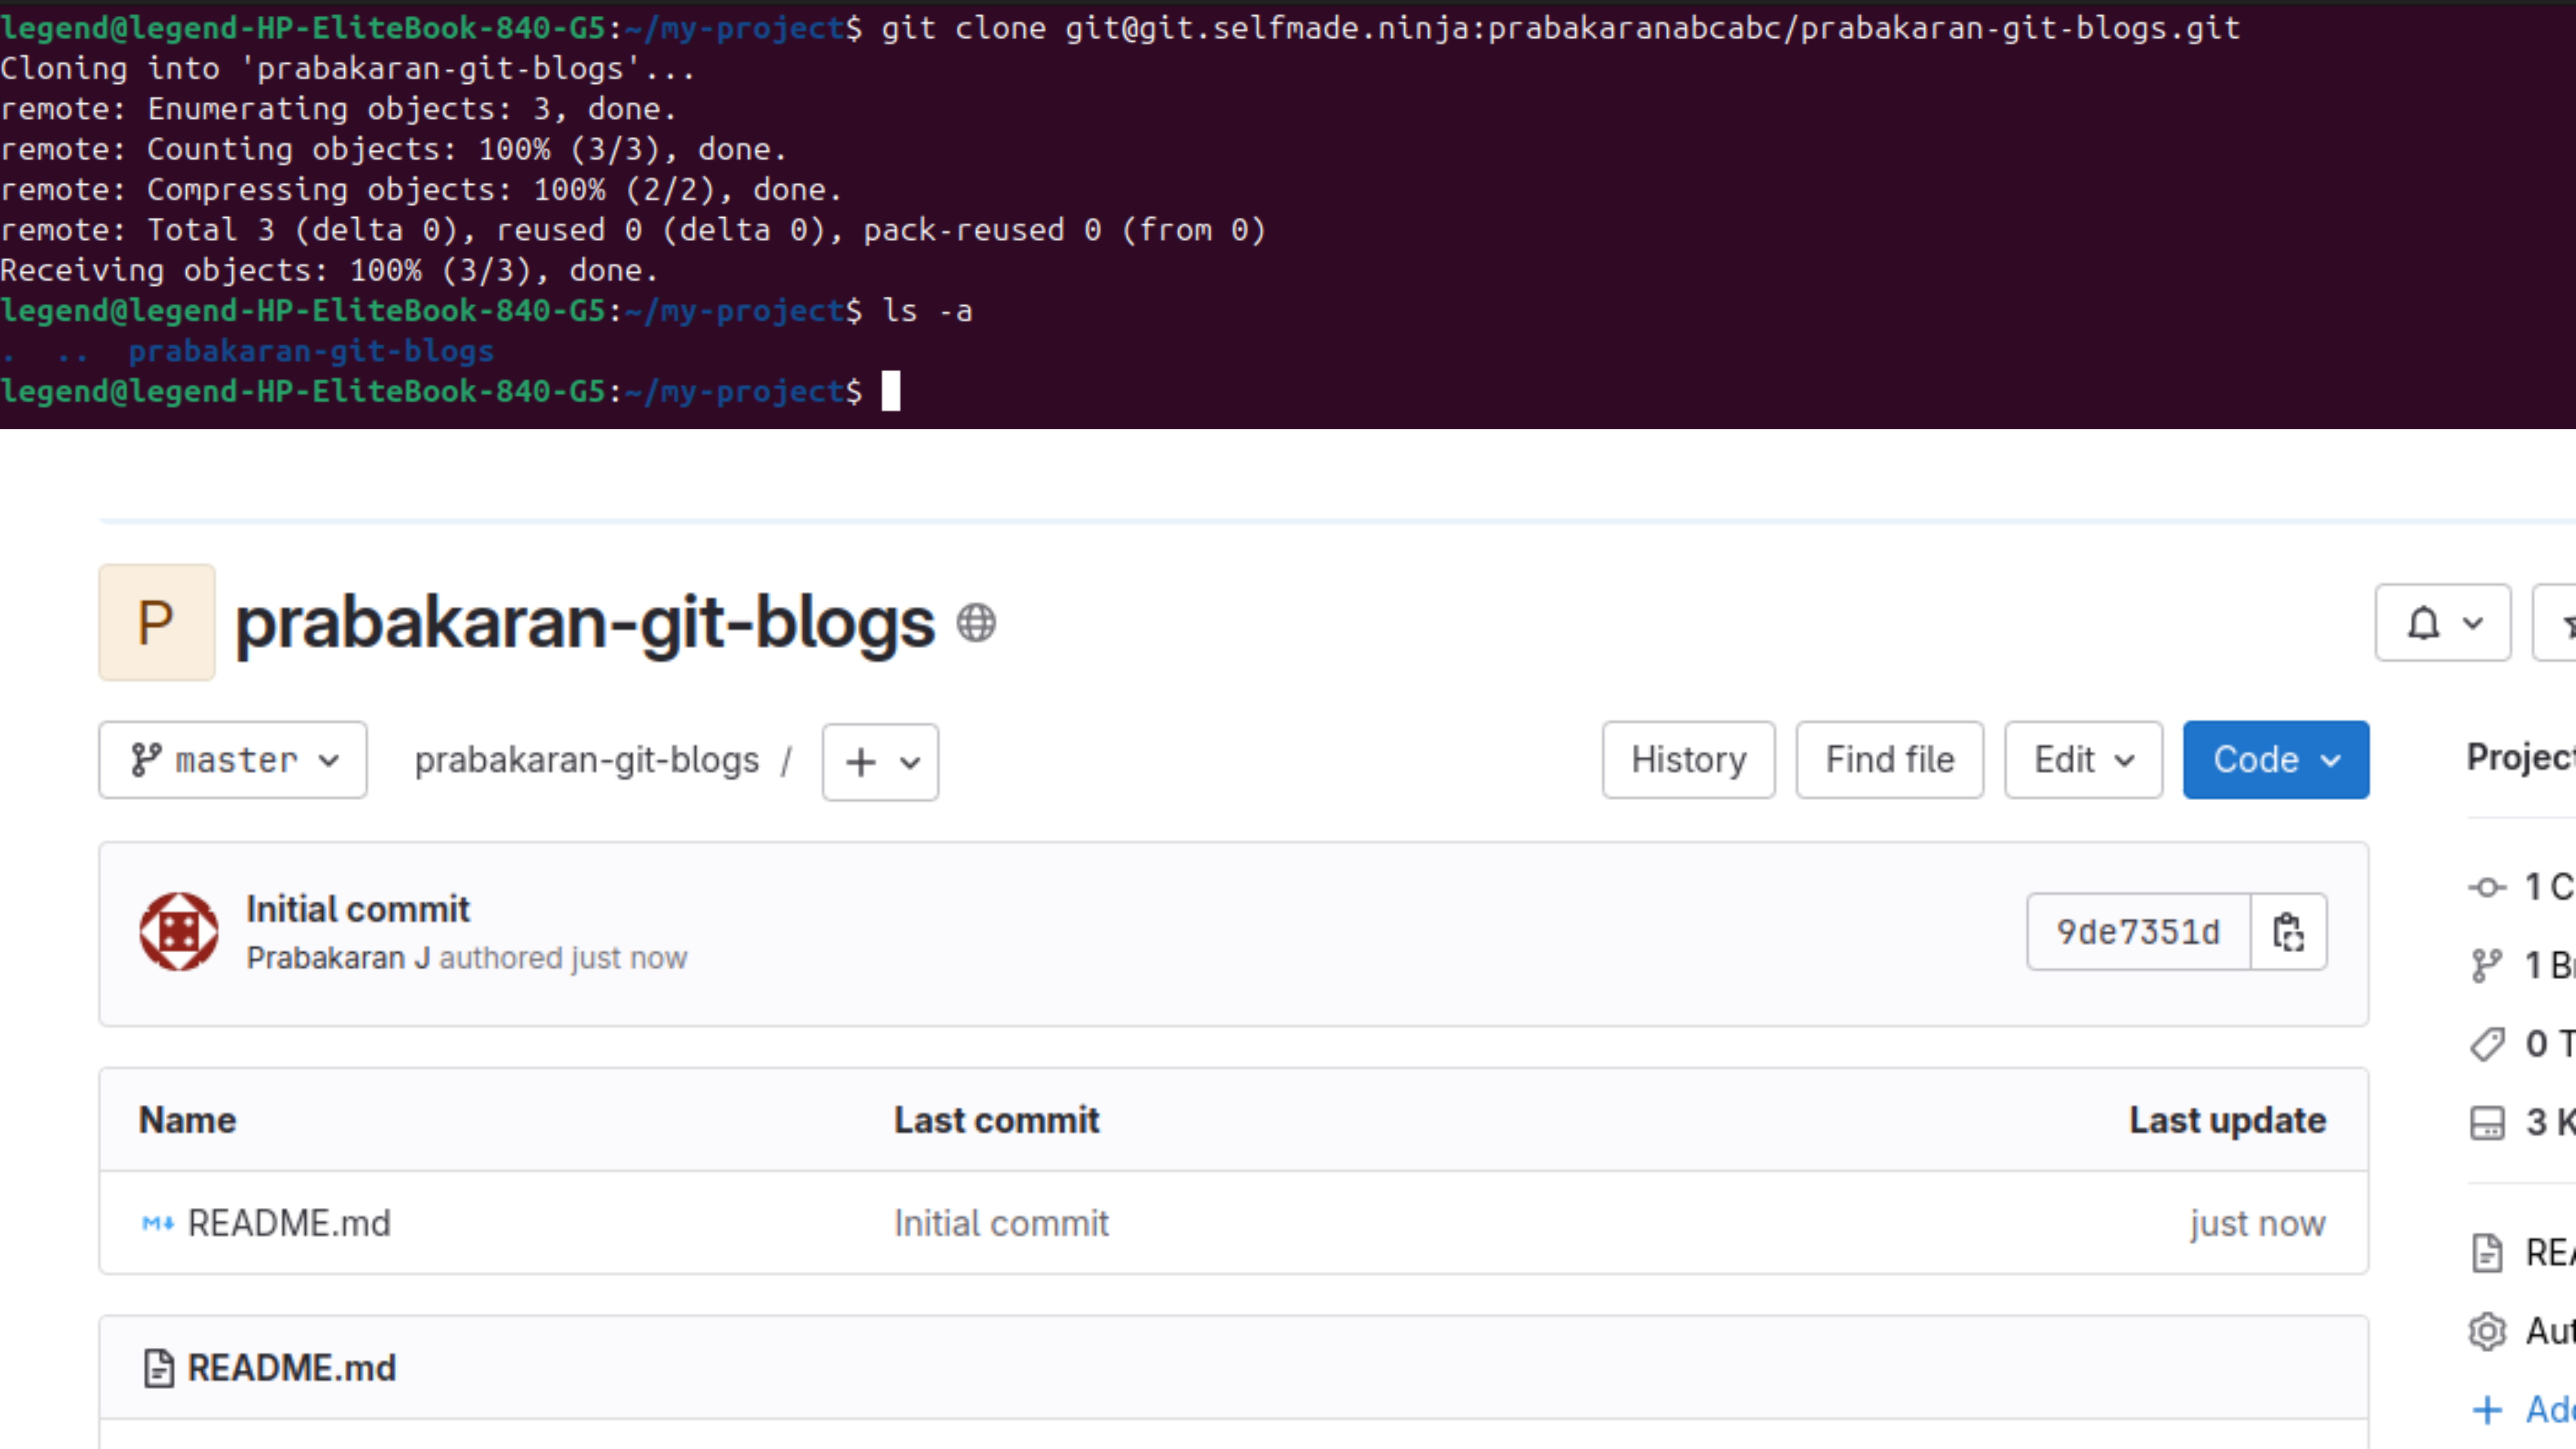
Cloning into a Specific Directory: You can specify a custom directory name after the repository URL.
git clone <repository-url> <custom-directory>Example:
git clone git@git.selfmade.ninja:prabakaranabcabc/prabakaran-git-blogs.git /home/legend/my-project/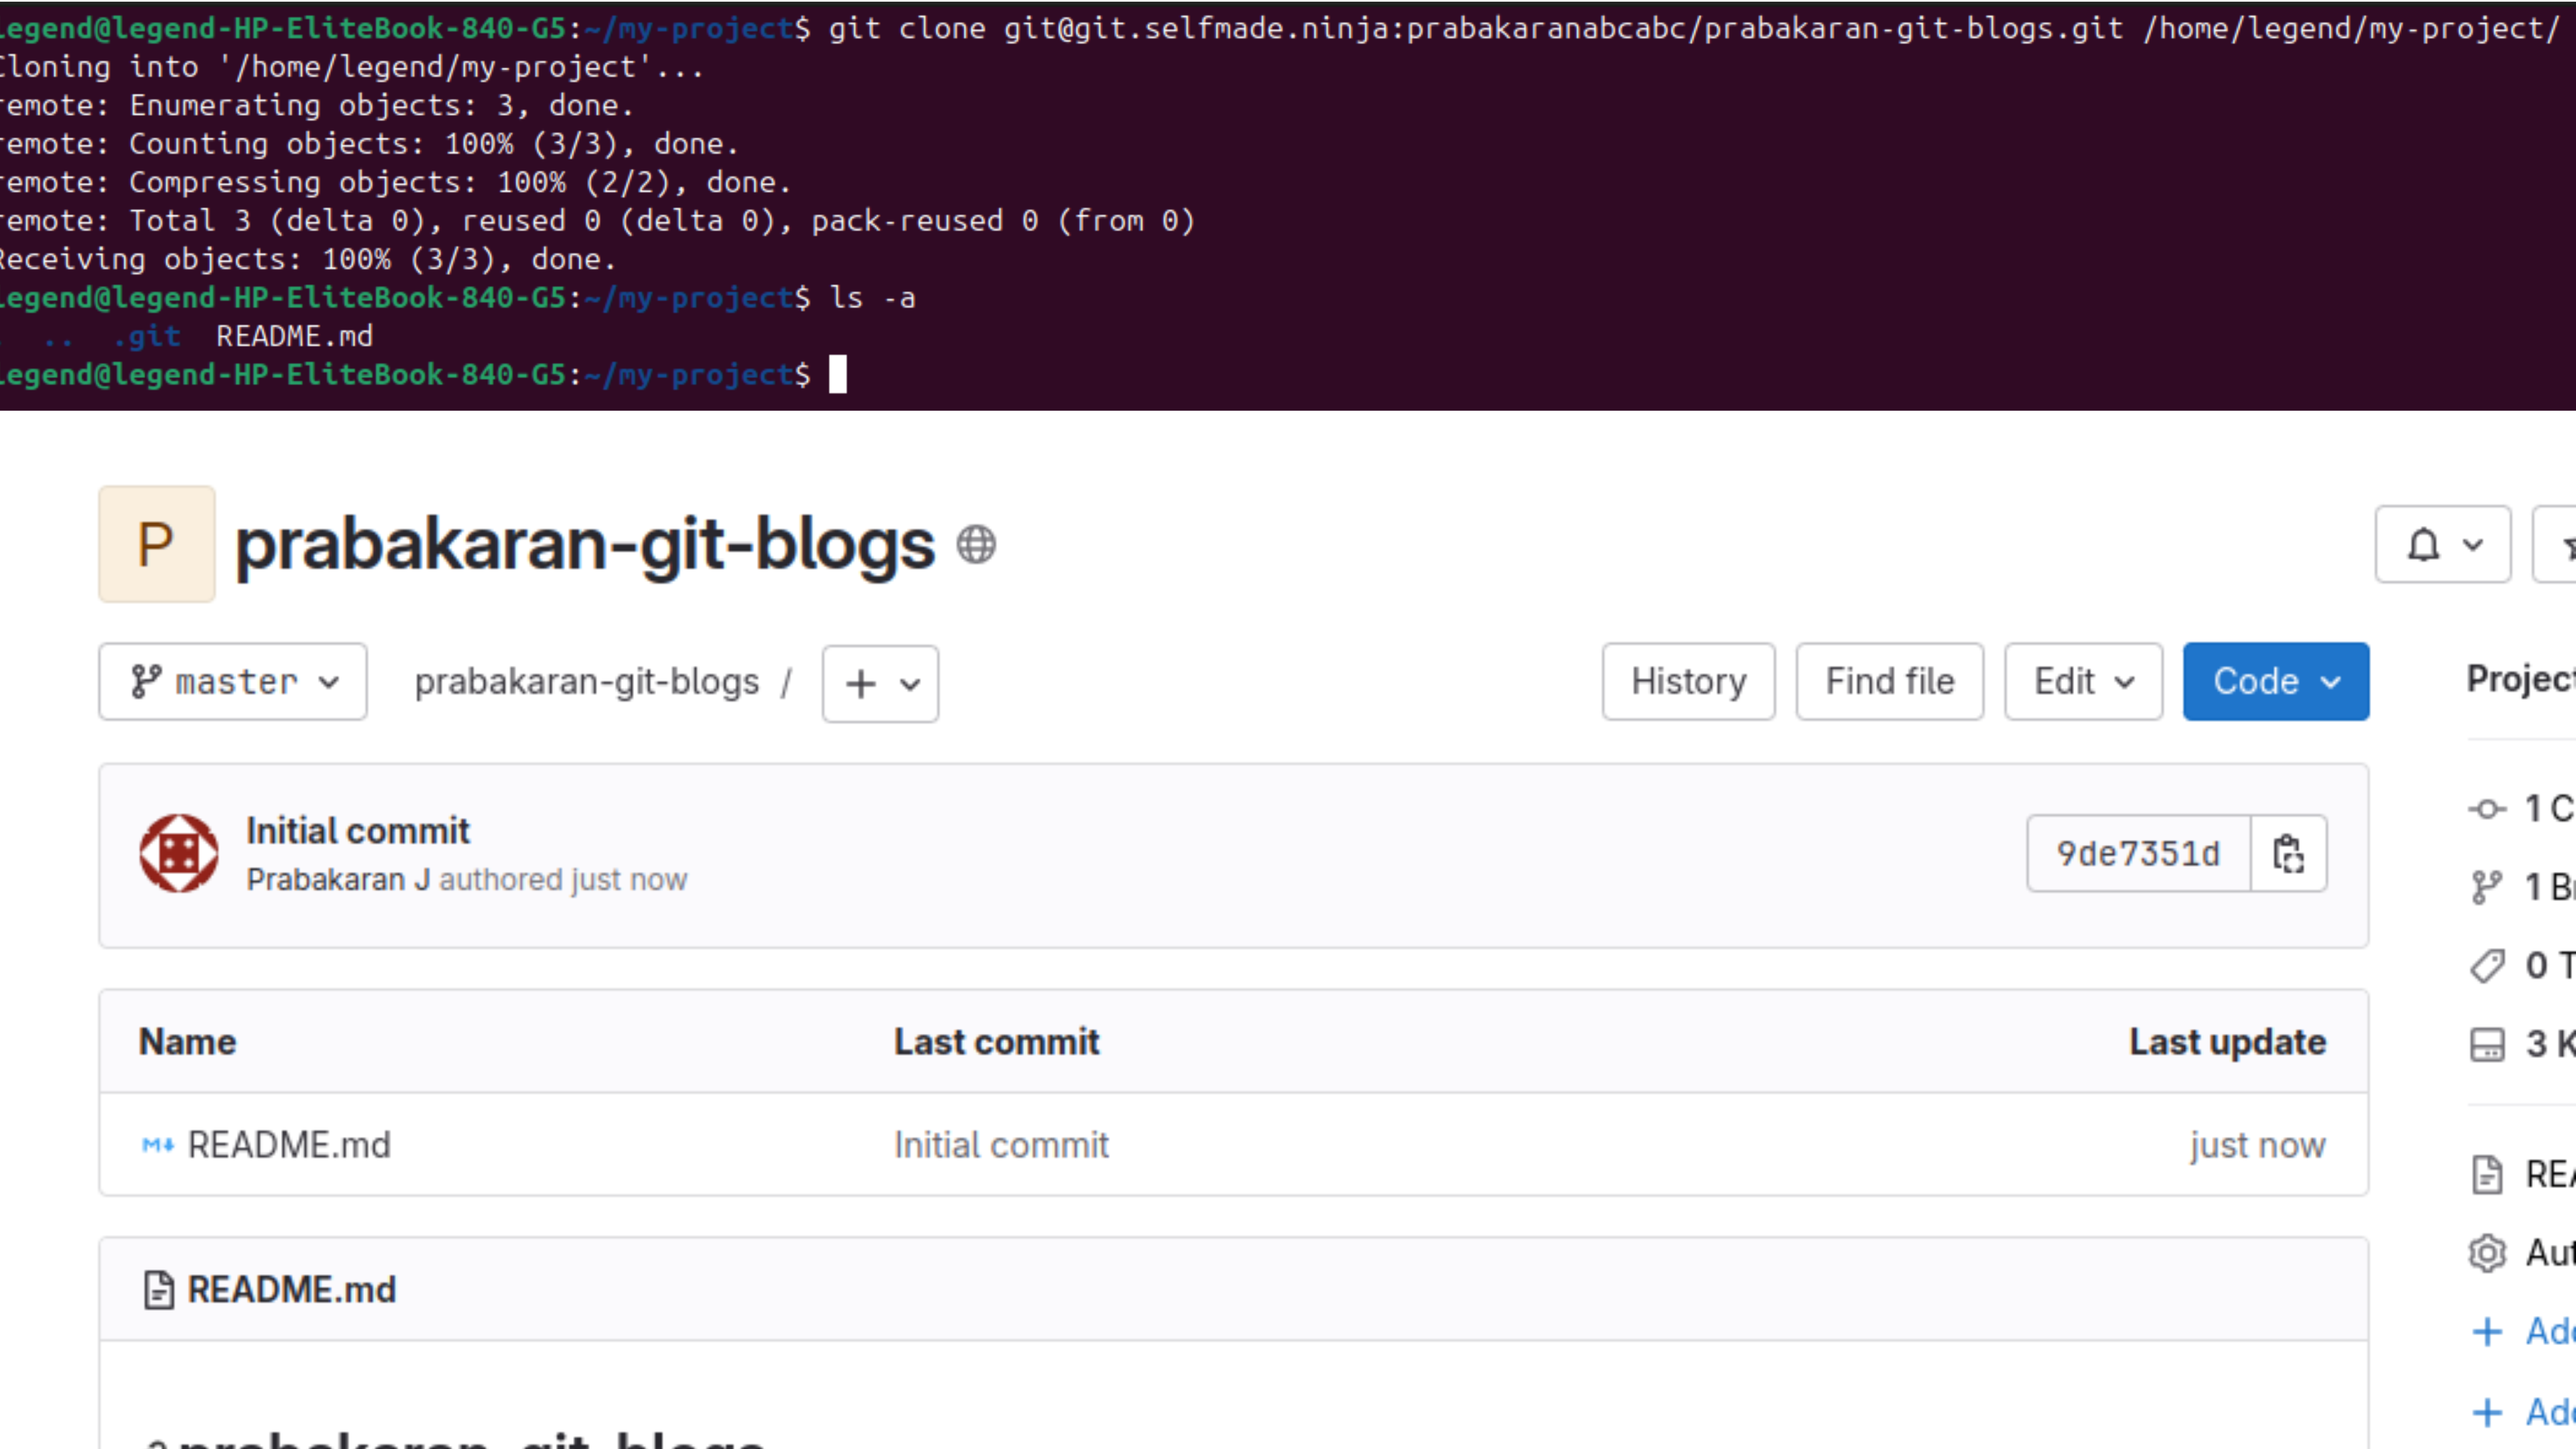
Clone a Specific Branch: If you only want to clone a specific branch (not the entire repository), use the
-boption.git clone -b <branch-name> <repository-url>Example:
git clone -b develop https://github.com/username/my-repo.gitKey Points:
git clonecreates a complete copy of the remote repository, including the.gitdirectory (the version history).After cloning, the local repository is connected to the remote repository, allowing you to fetch updates, push changes, and collaborate with others.
git add
The git add is commend used to push the code from the “present git repository“ to the “staging area”.
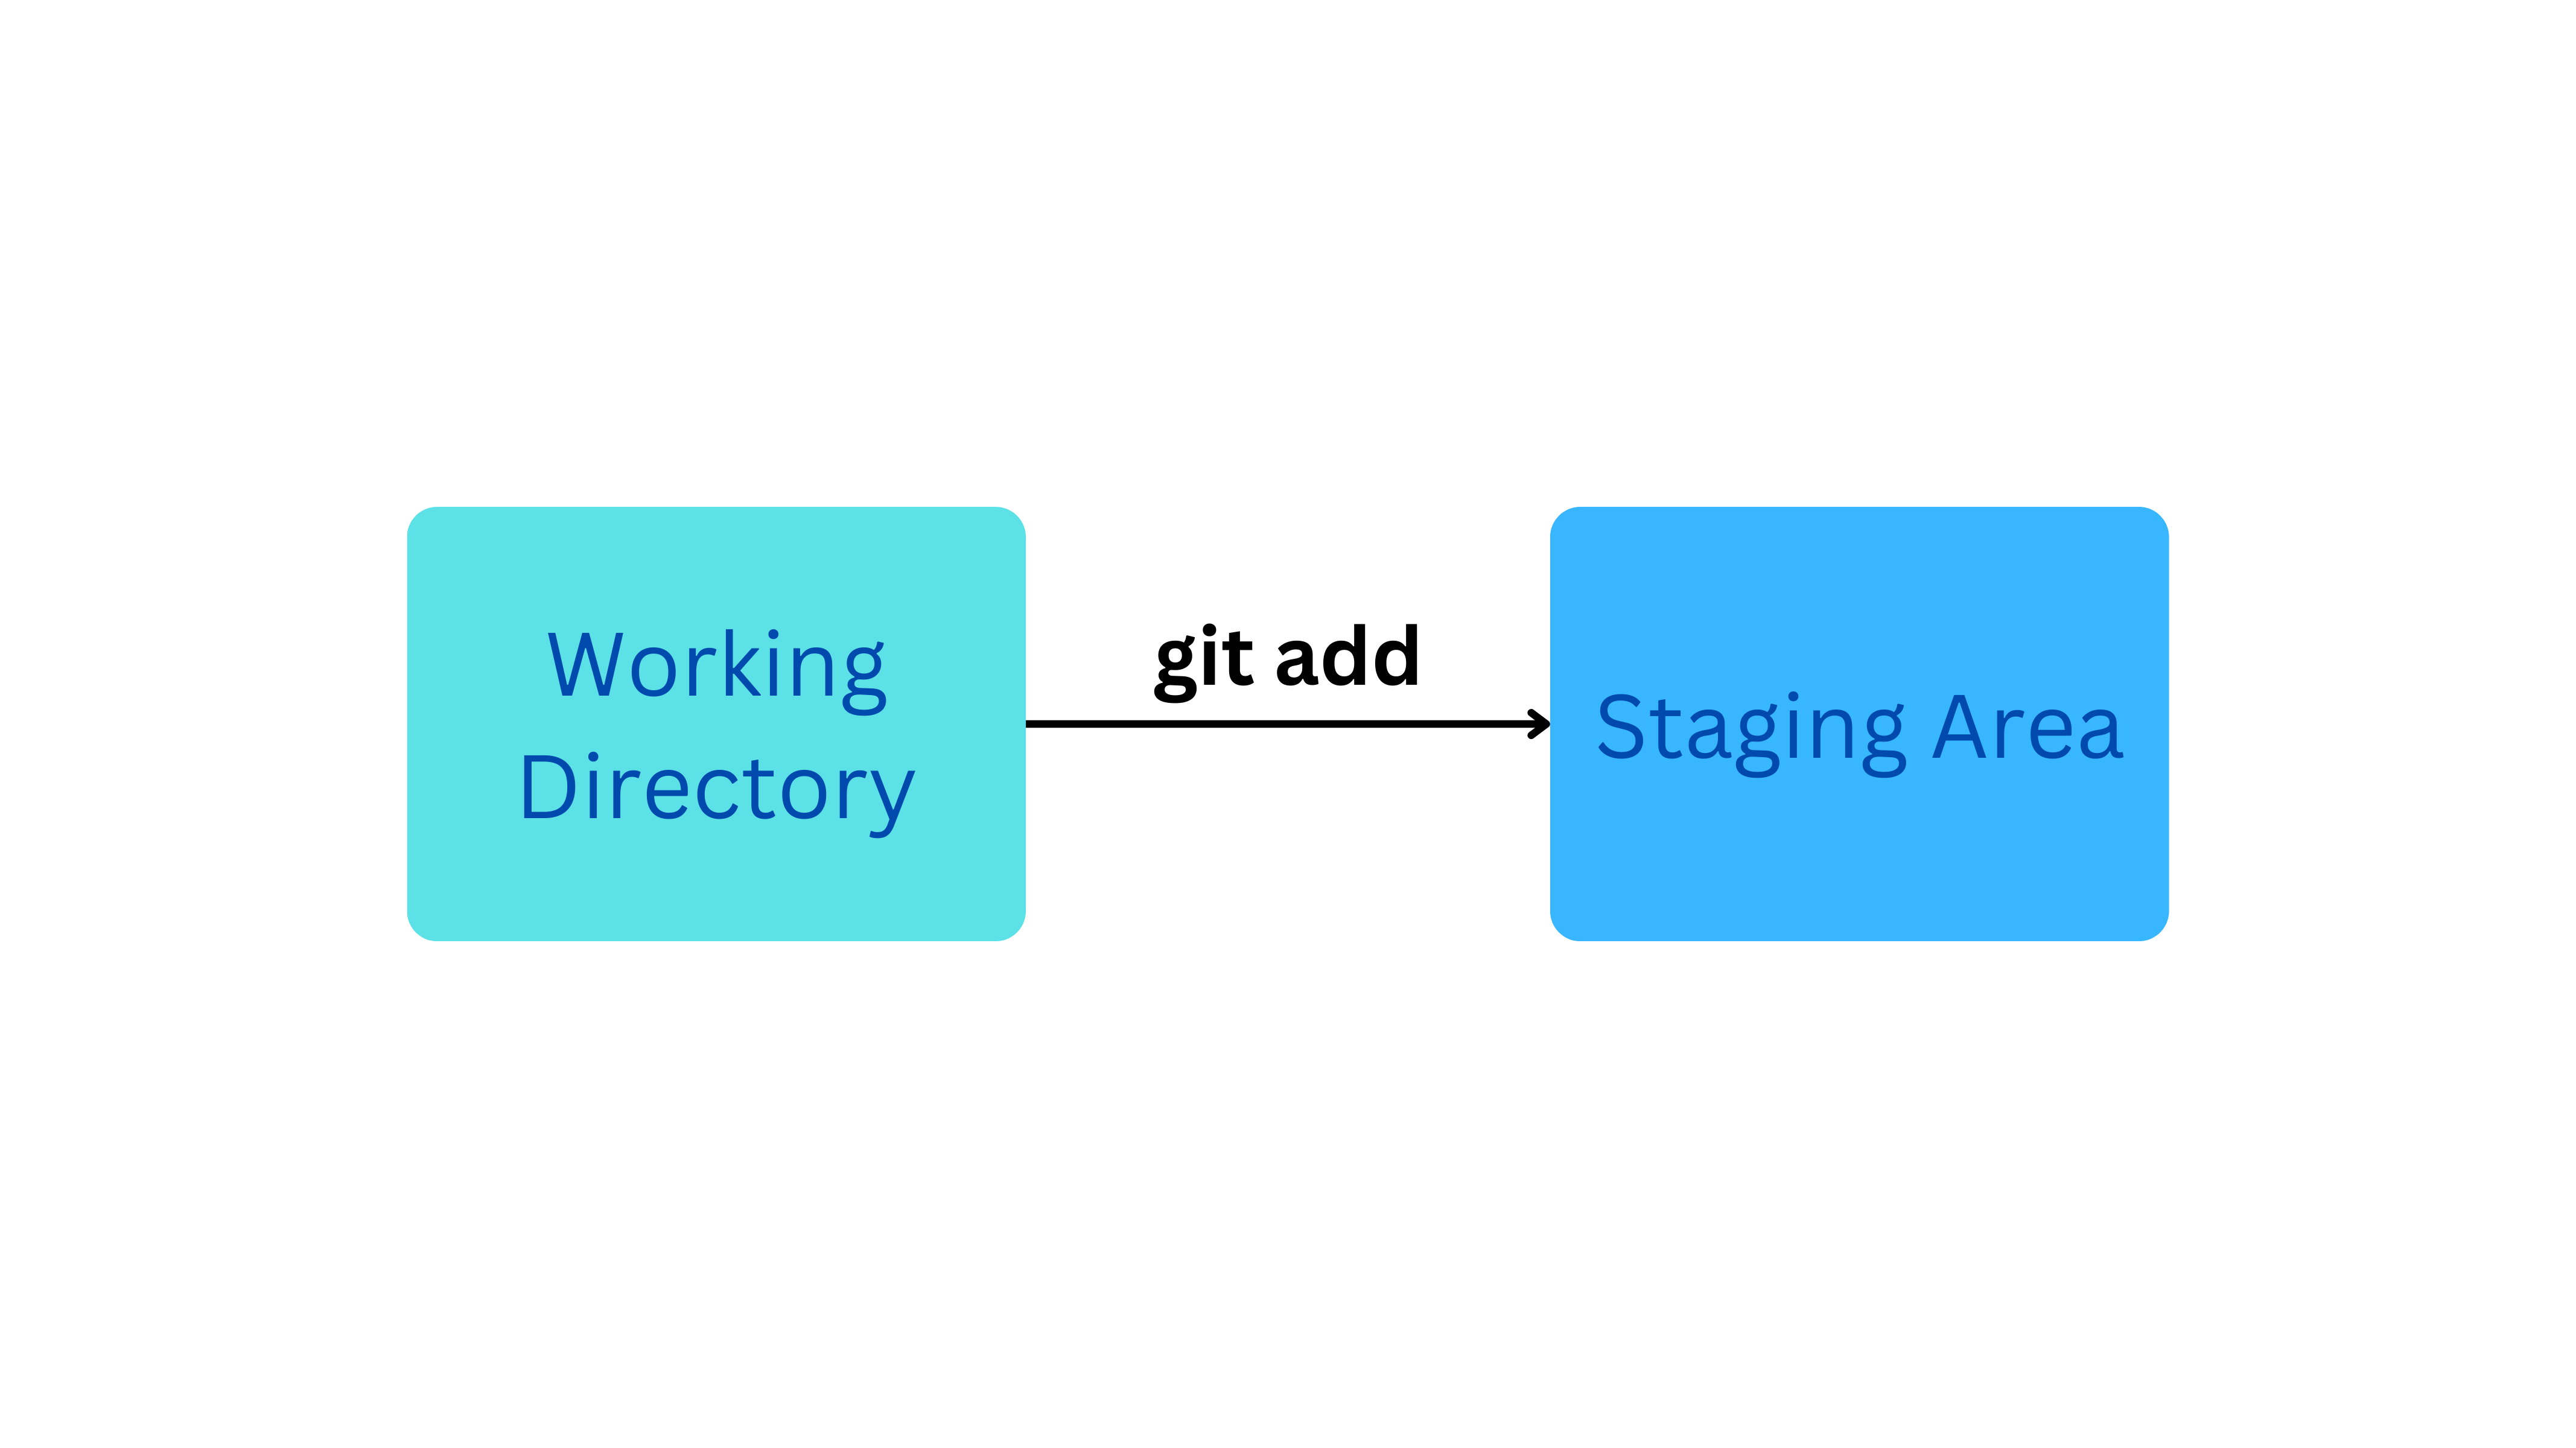
Let us create a dummy file in our local repository.
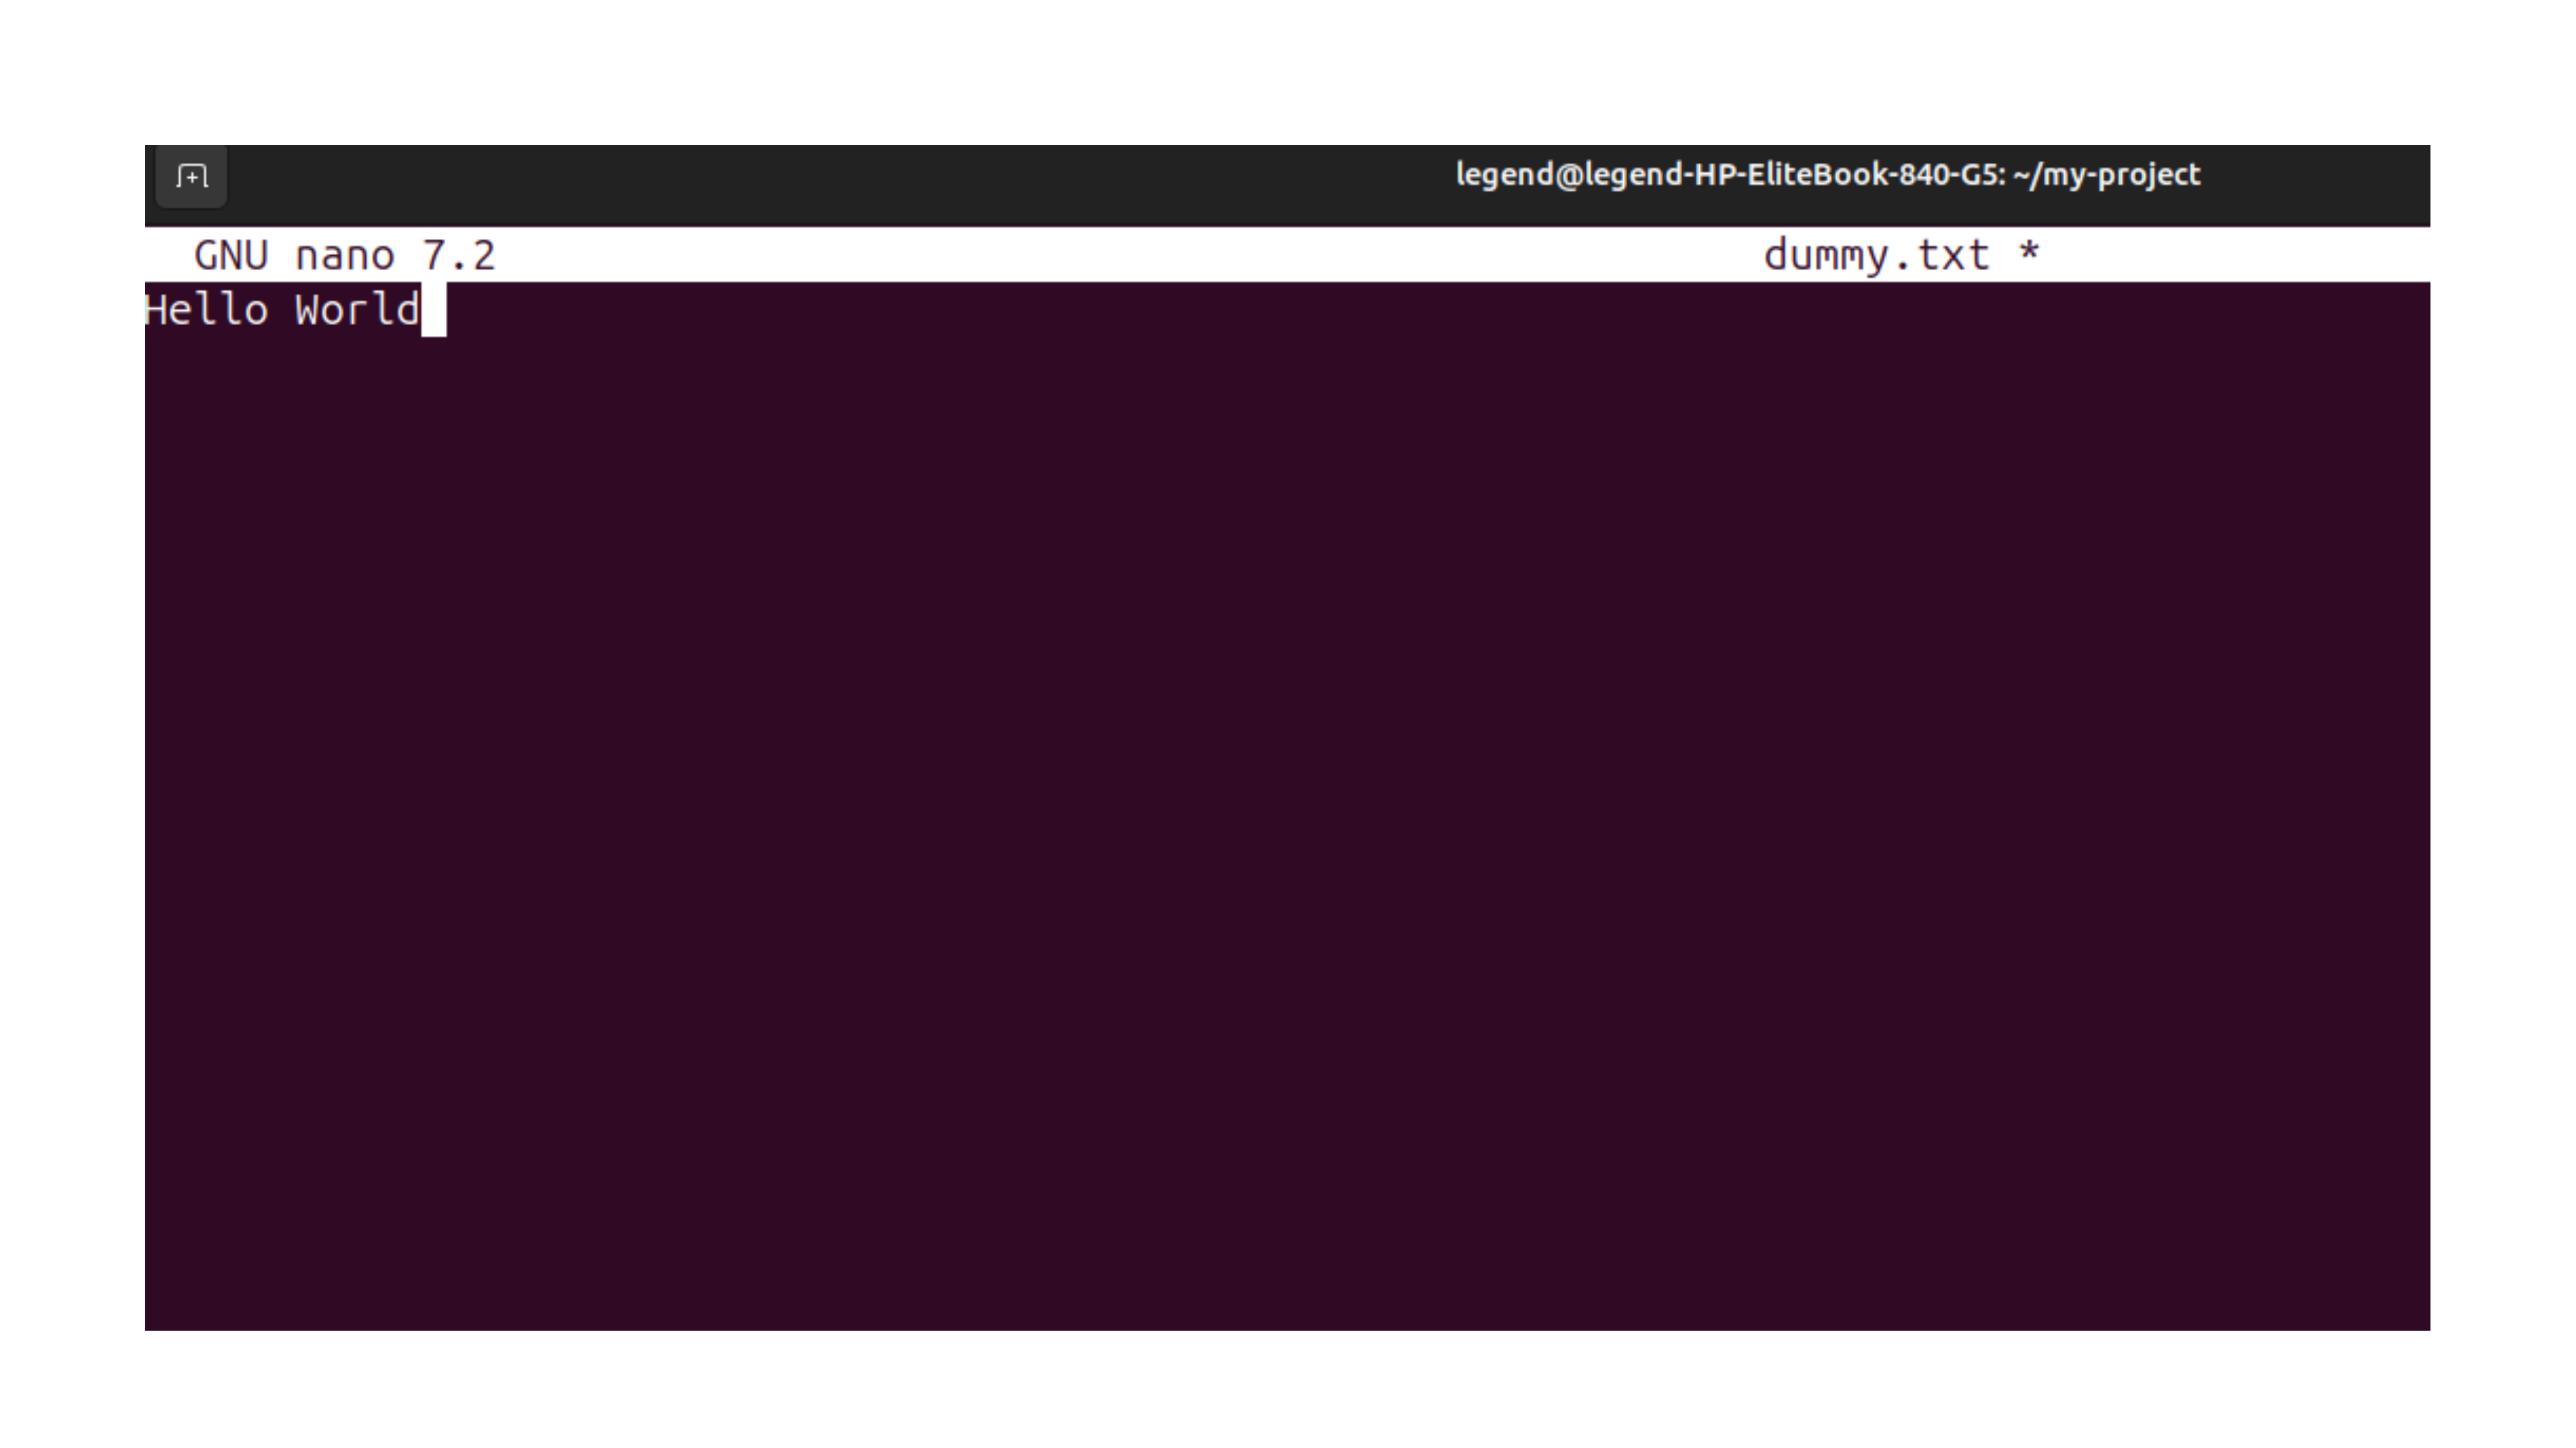
nano dummy.txt # add "Hello World" in the dummy.txt file
adding the “Hello World” text within the dummy.txt file.
check the git status
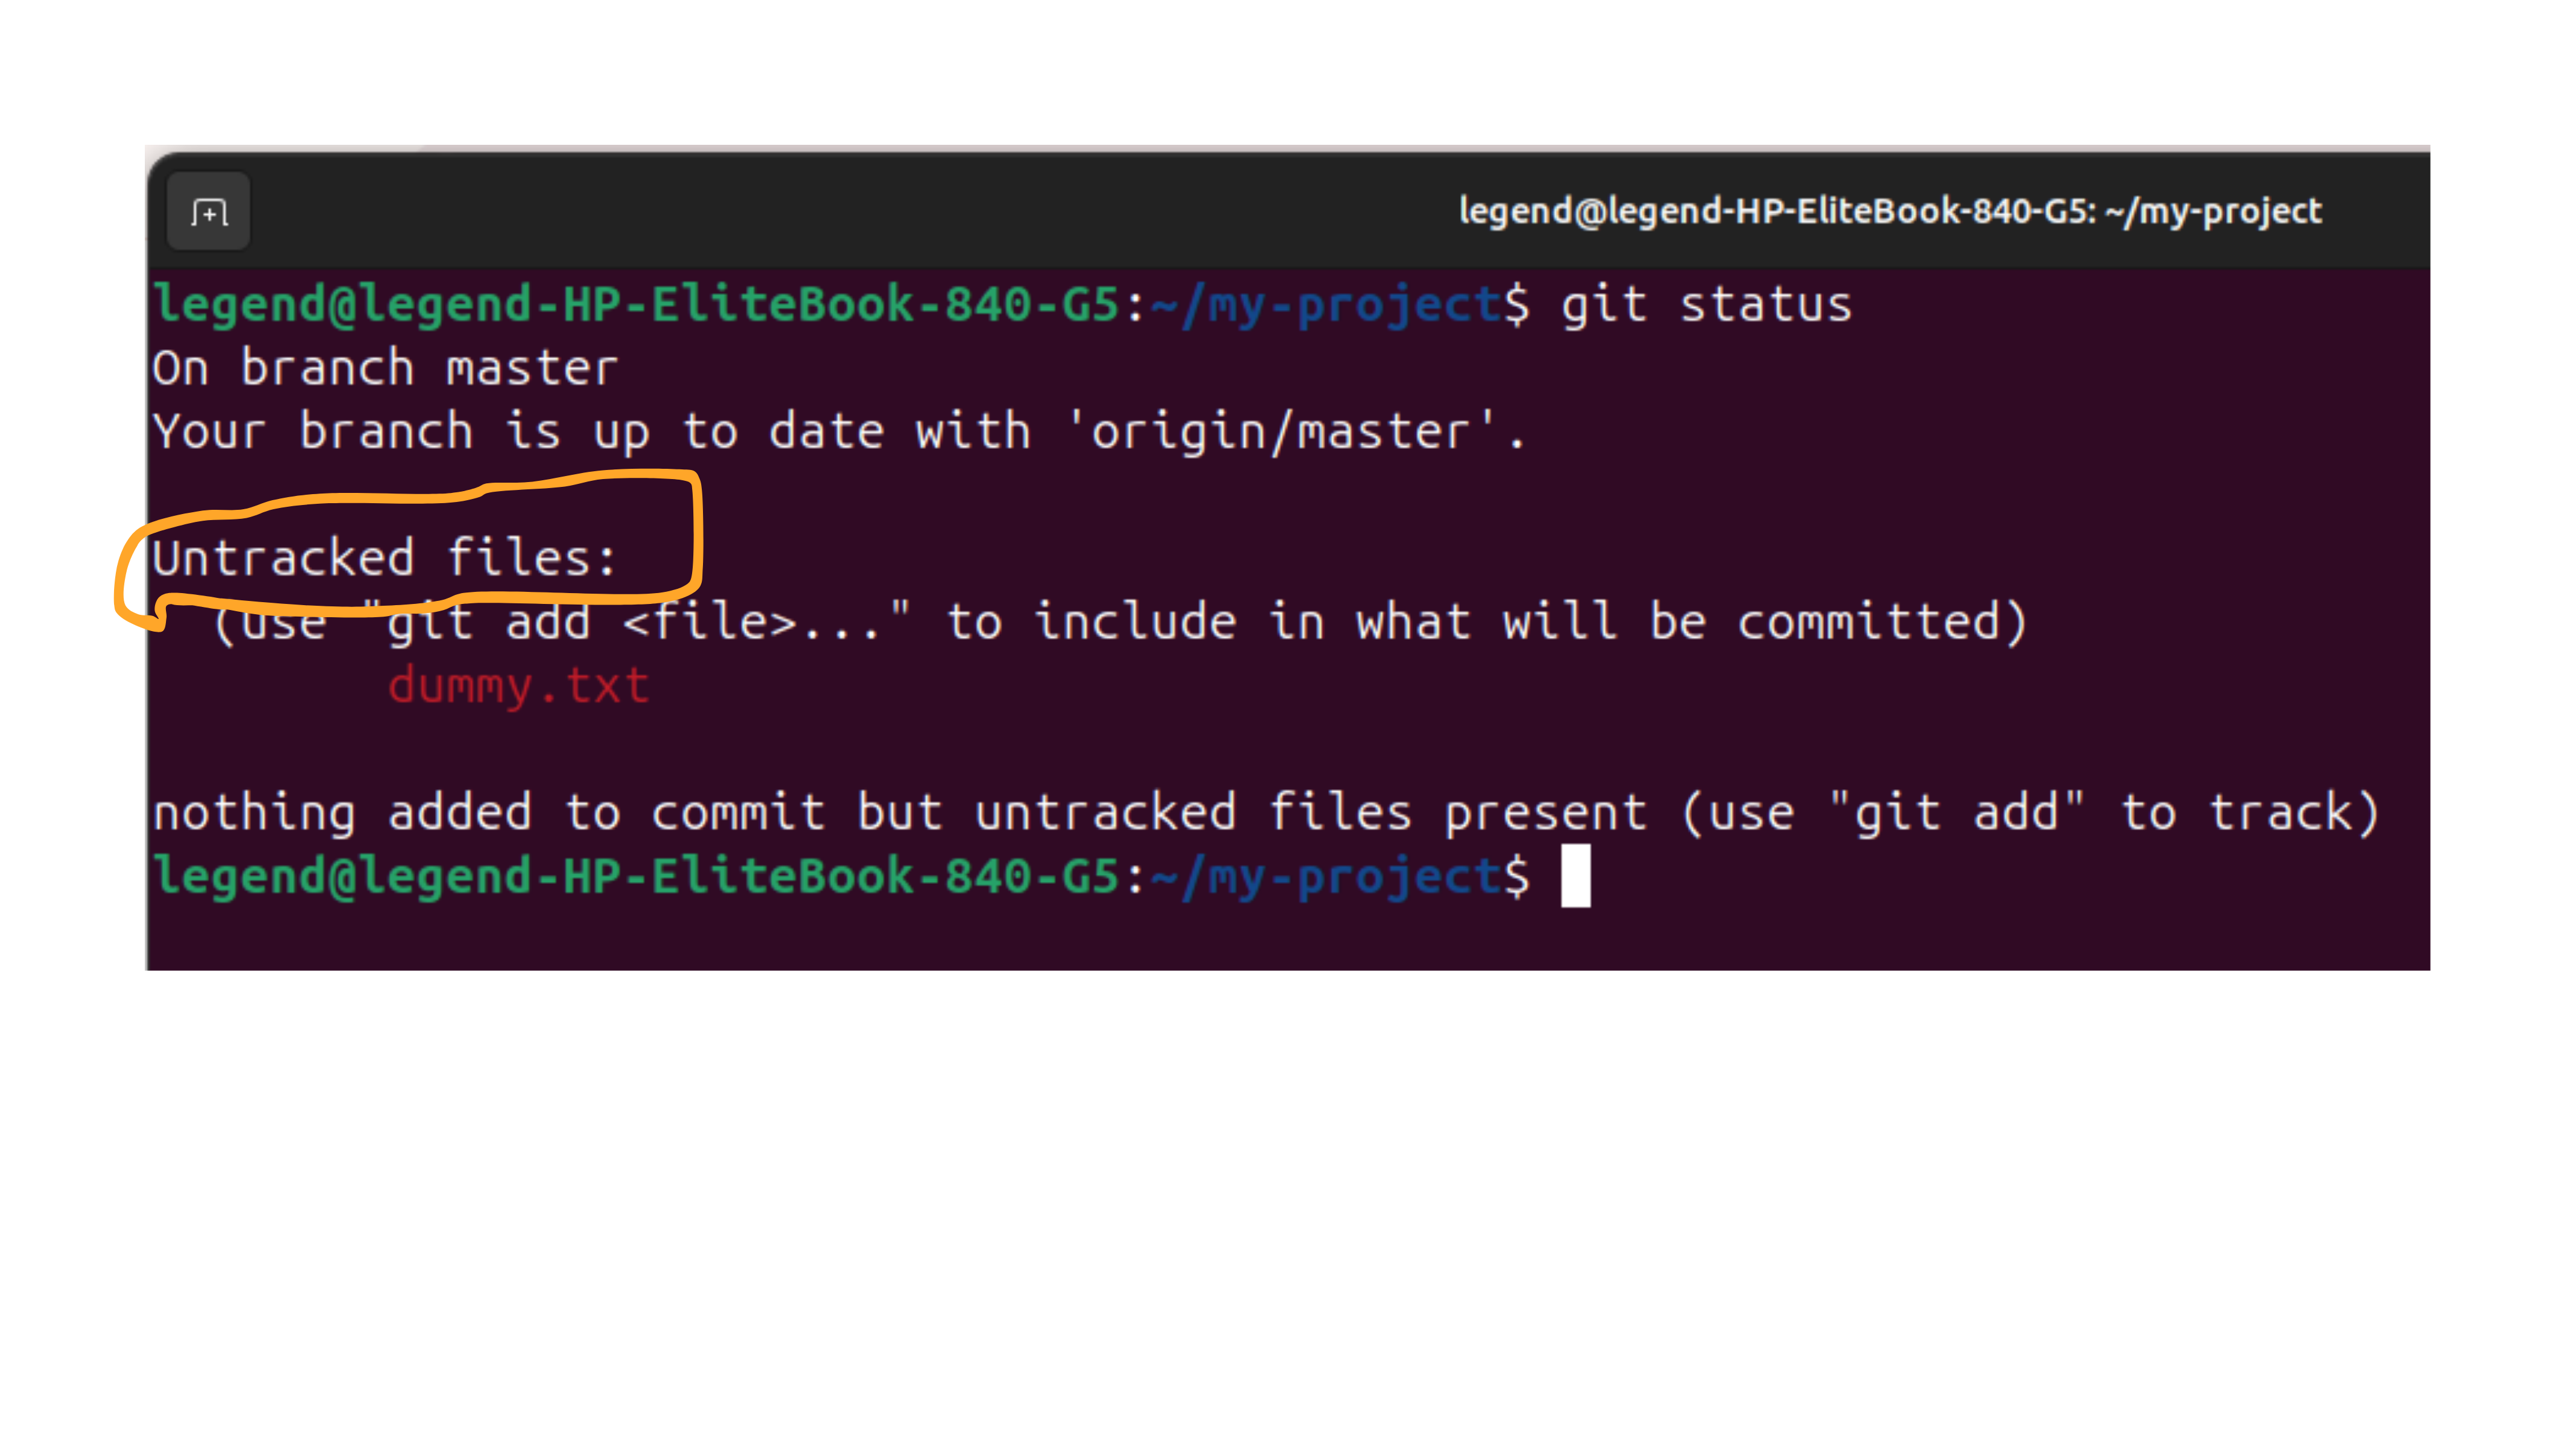
Now you can see that, there is a file called dummy.txt and it is Untracked file. Now, the file dummy.txt is in the local working directory and it has not moved to staging area.
So, we use the git addcommand to move the file from the working directory to the staging area.
git add <file-name> # git add dummy.txt
Now, You can see that the file moved to the staging area (or) the file is tracked by git.
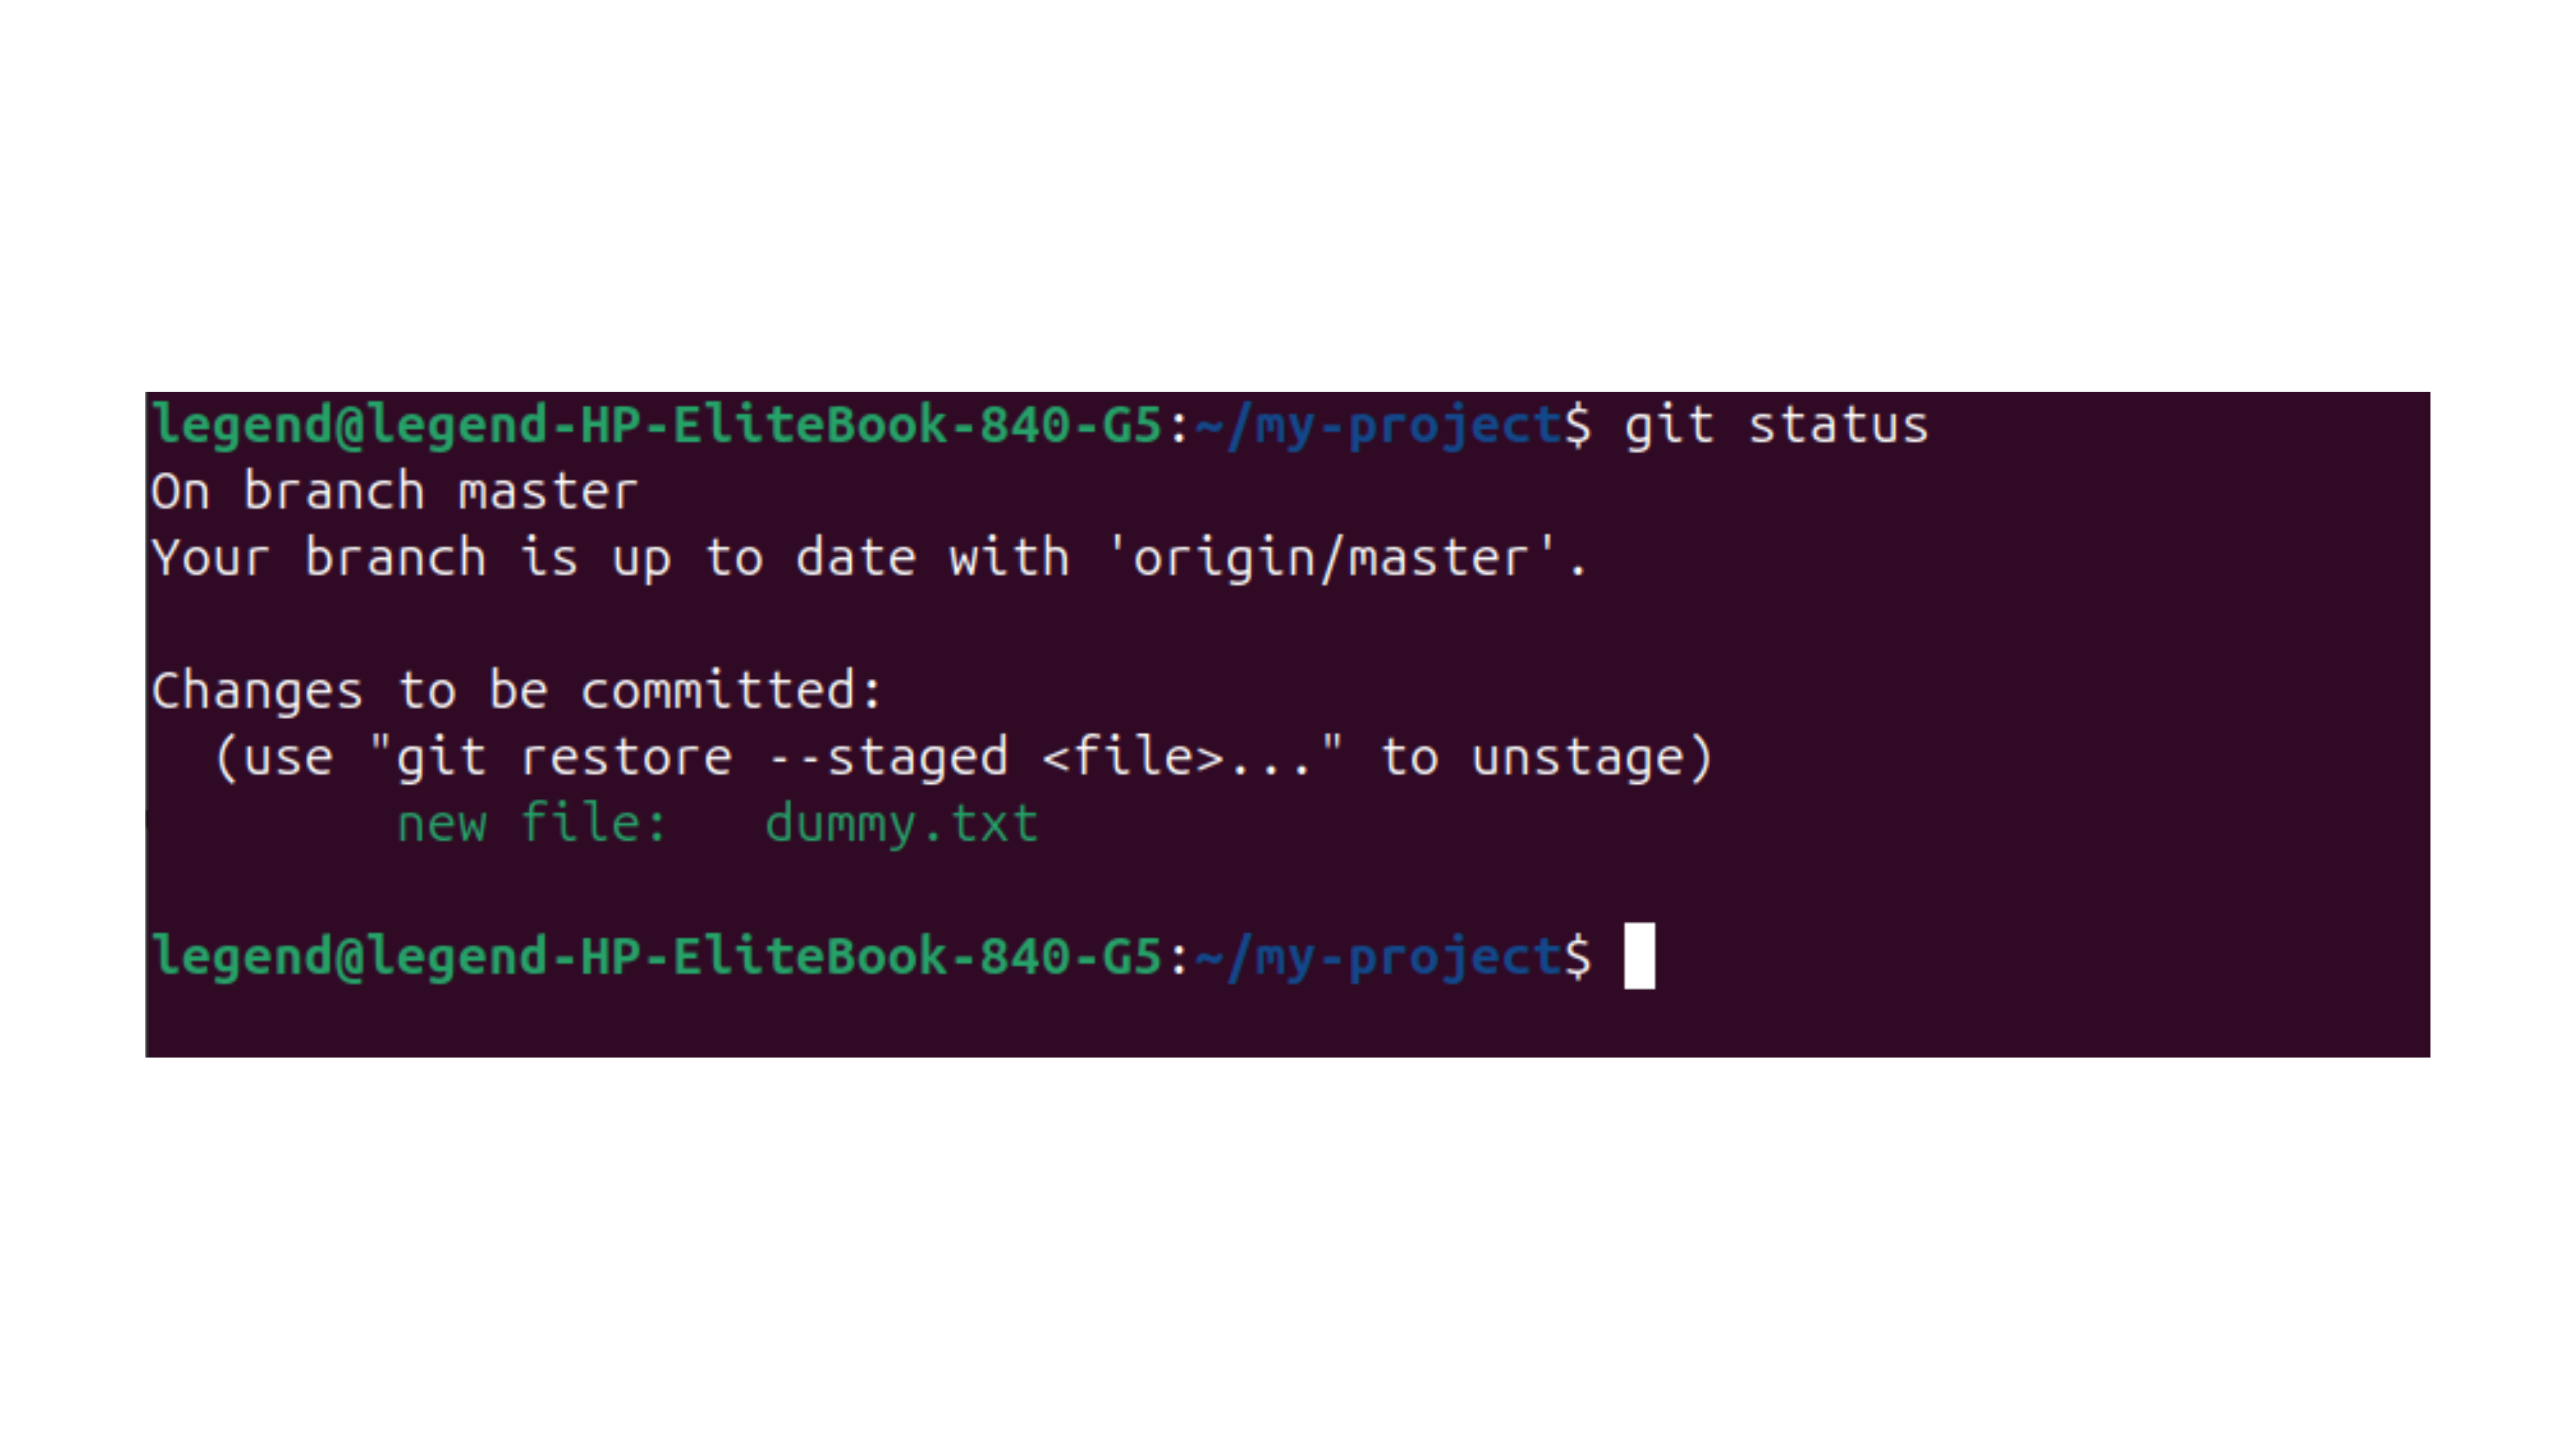
Now, Let us Track (or) Move multiple files to the staging area.
Example: Let us create 3 files dummy1.txt, dummy2.txt, dummy3.txt files.
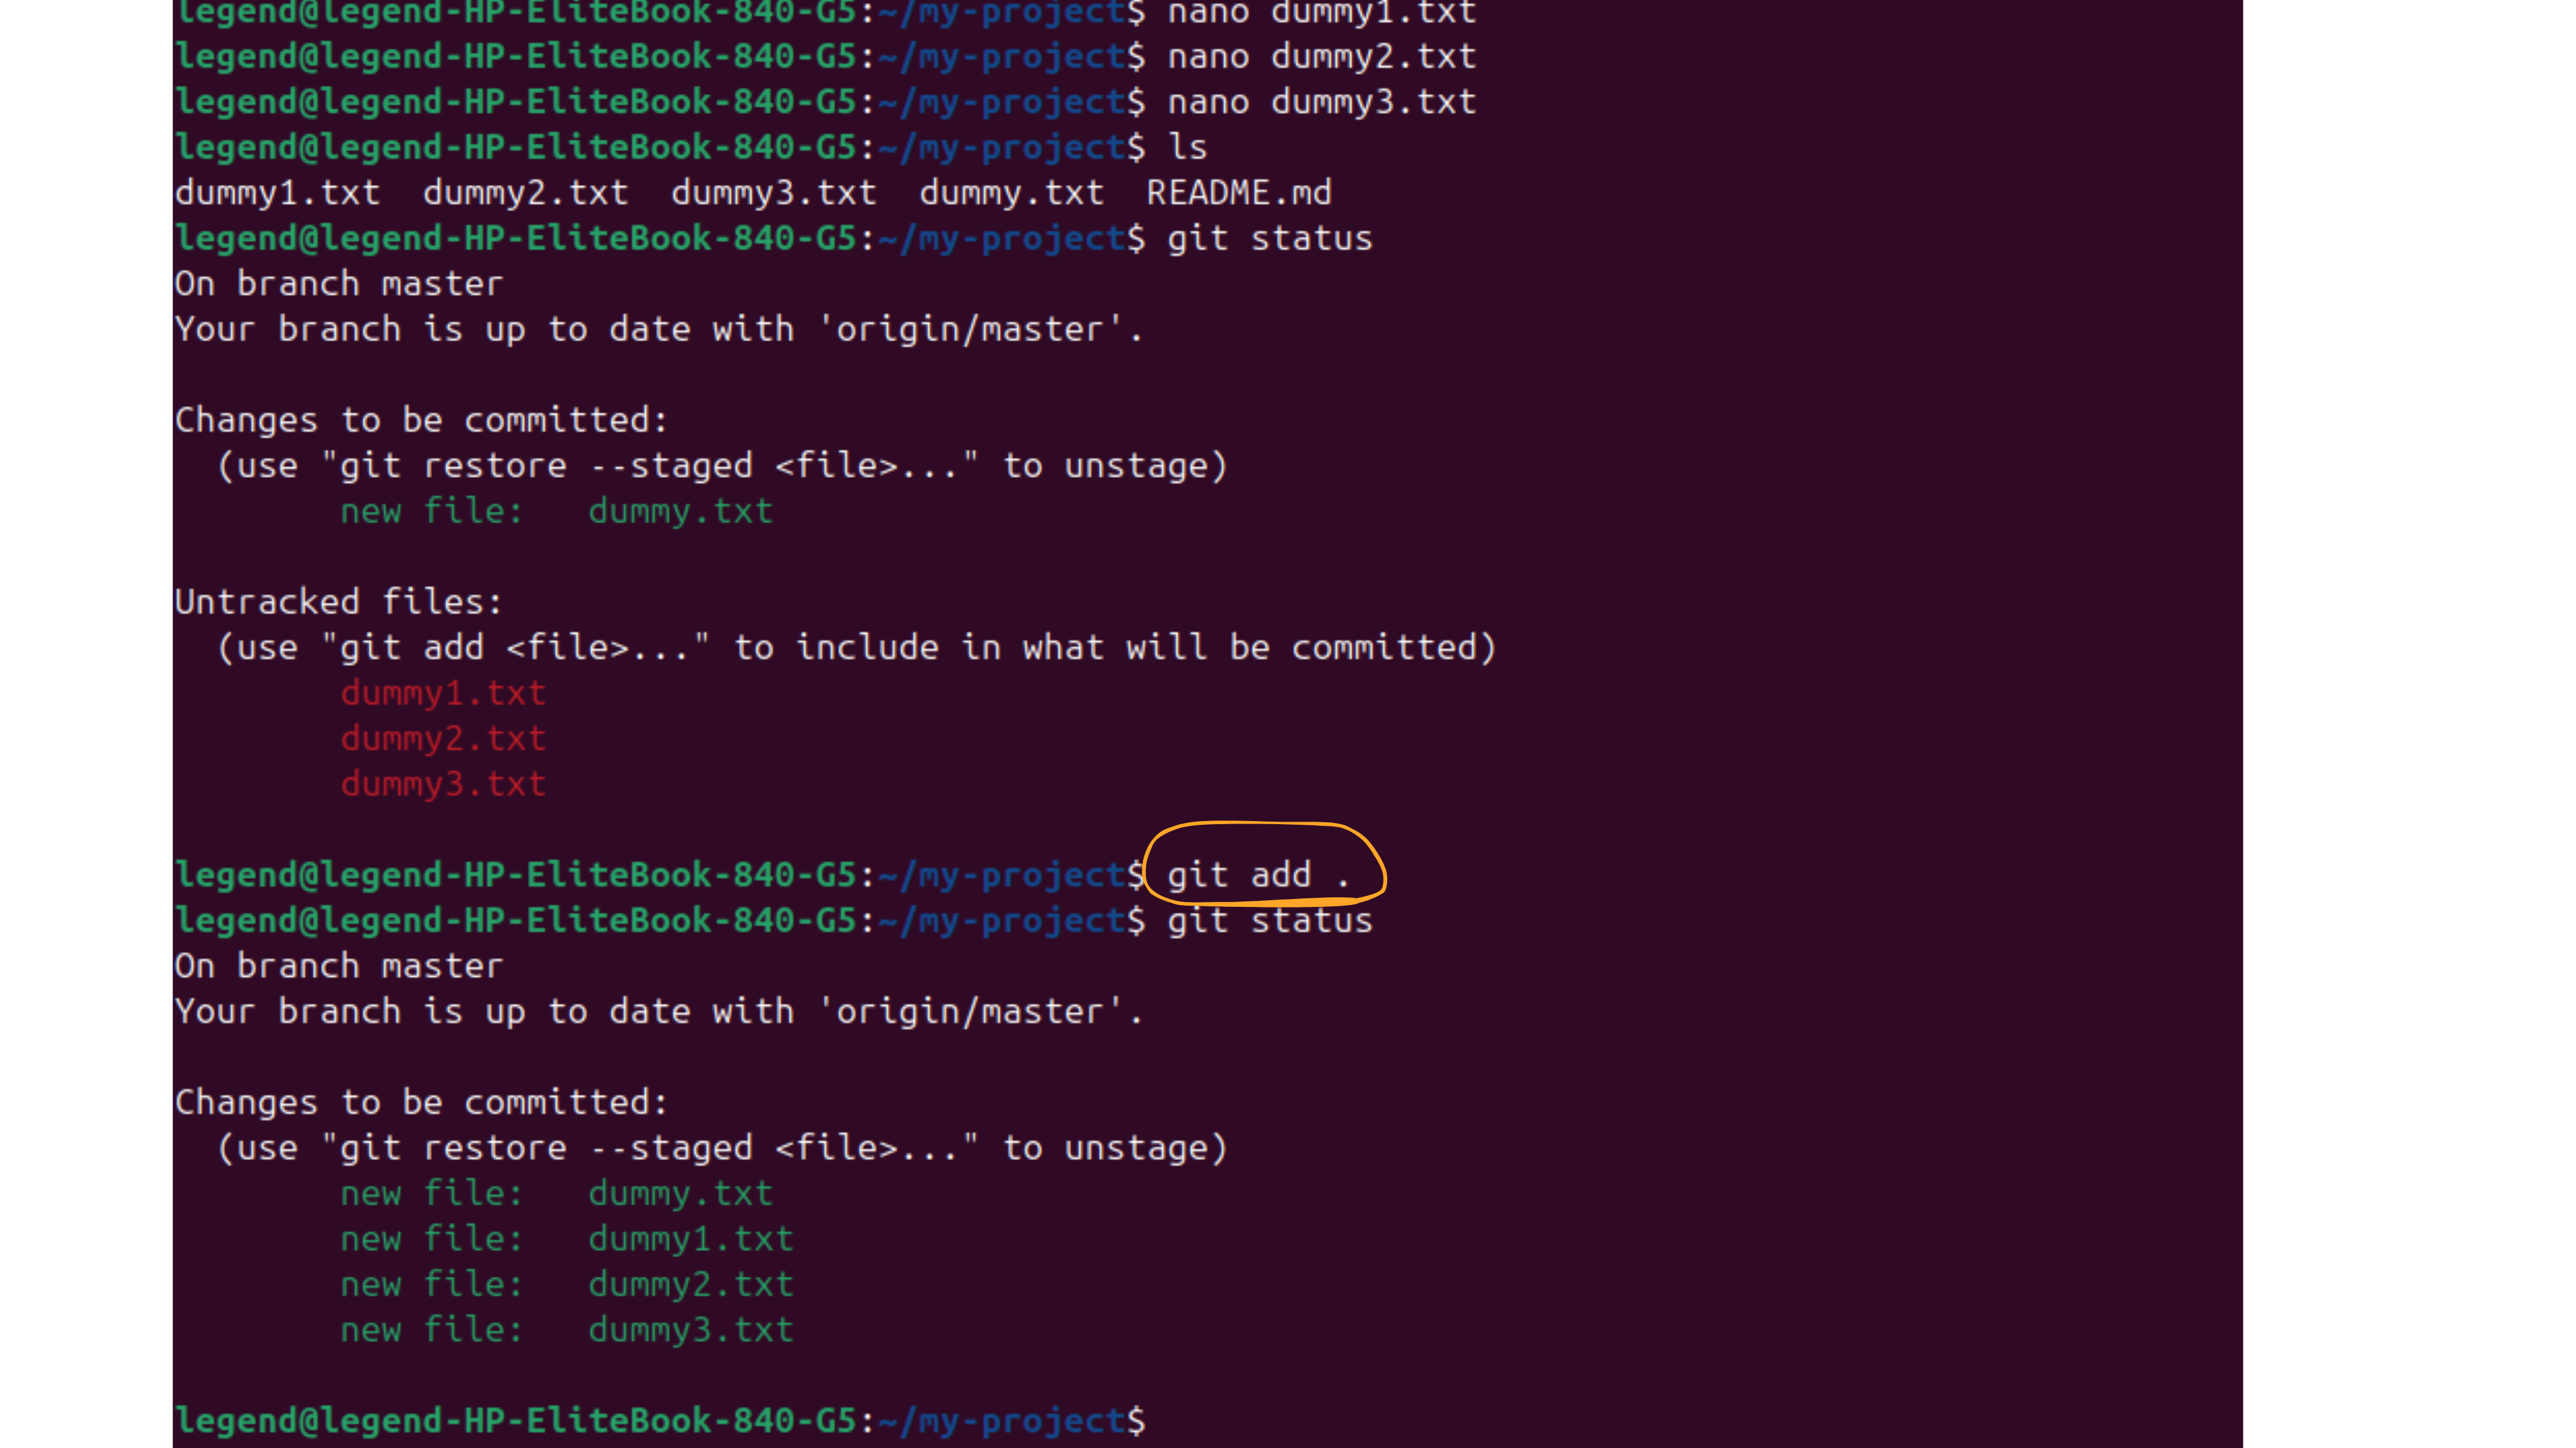
Now, you can see that the files are created and their status is untracked.
git add .
git add . command is used to track everything i.e. both “Files and Folders“ at a time.
Now, Let us remove (or) make the file untrack the file from the Staging area.
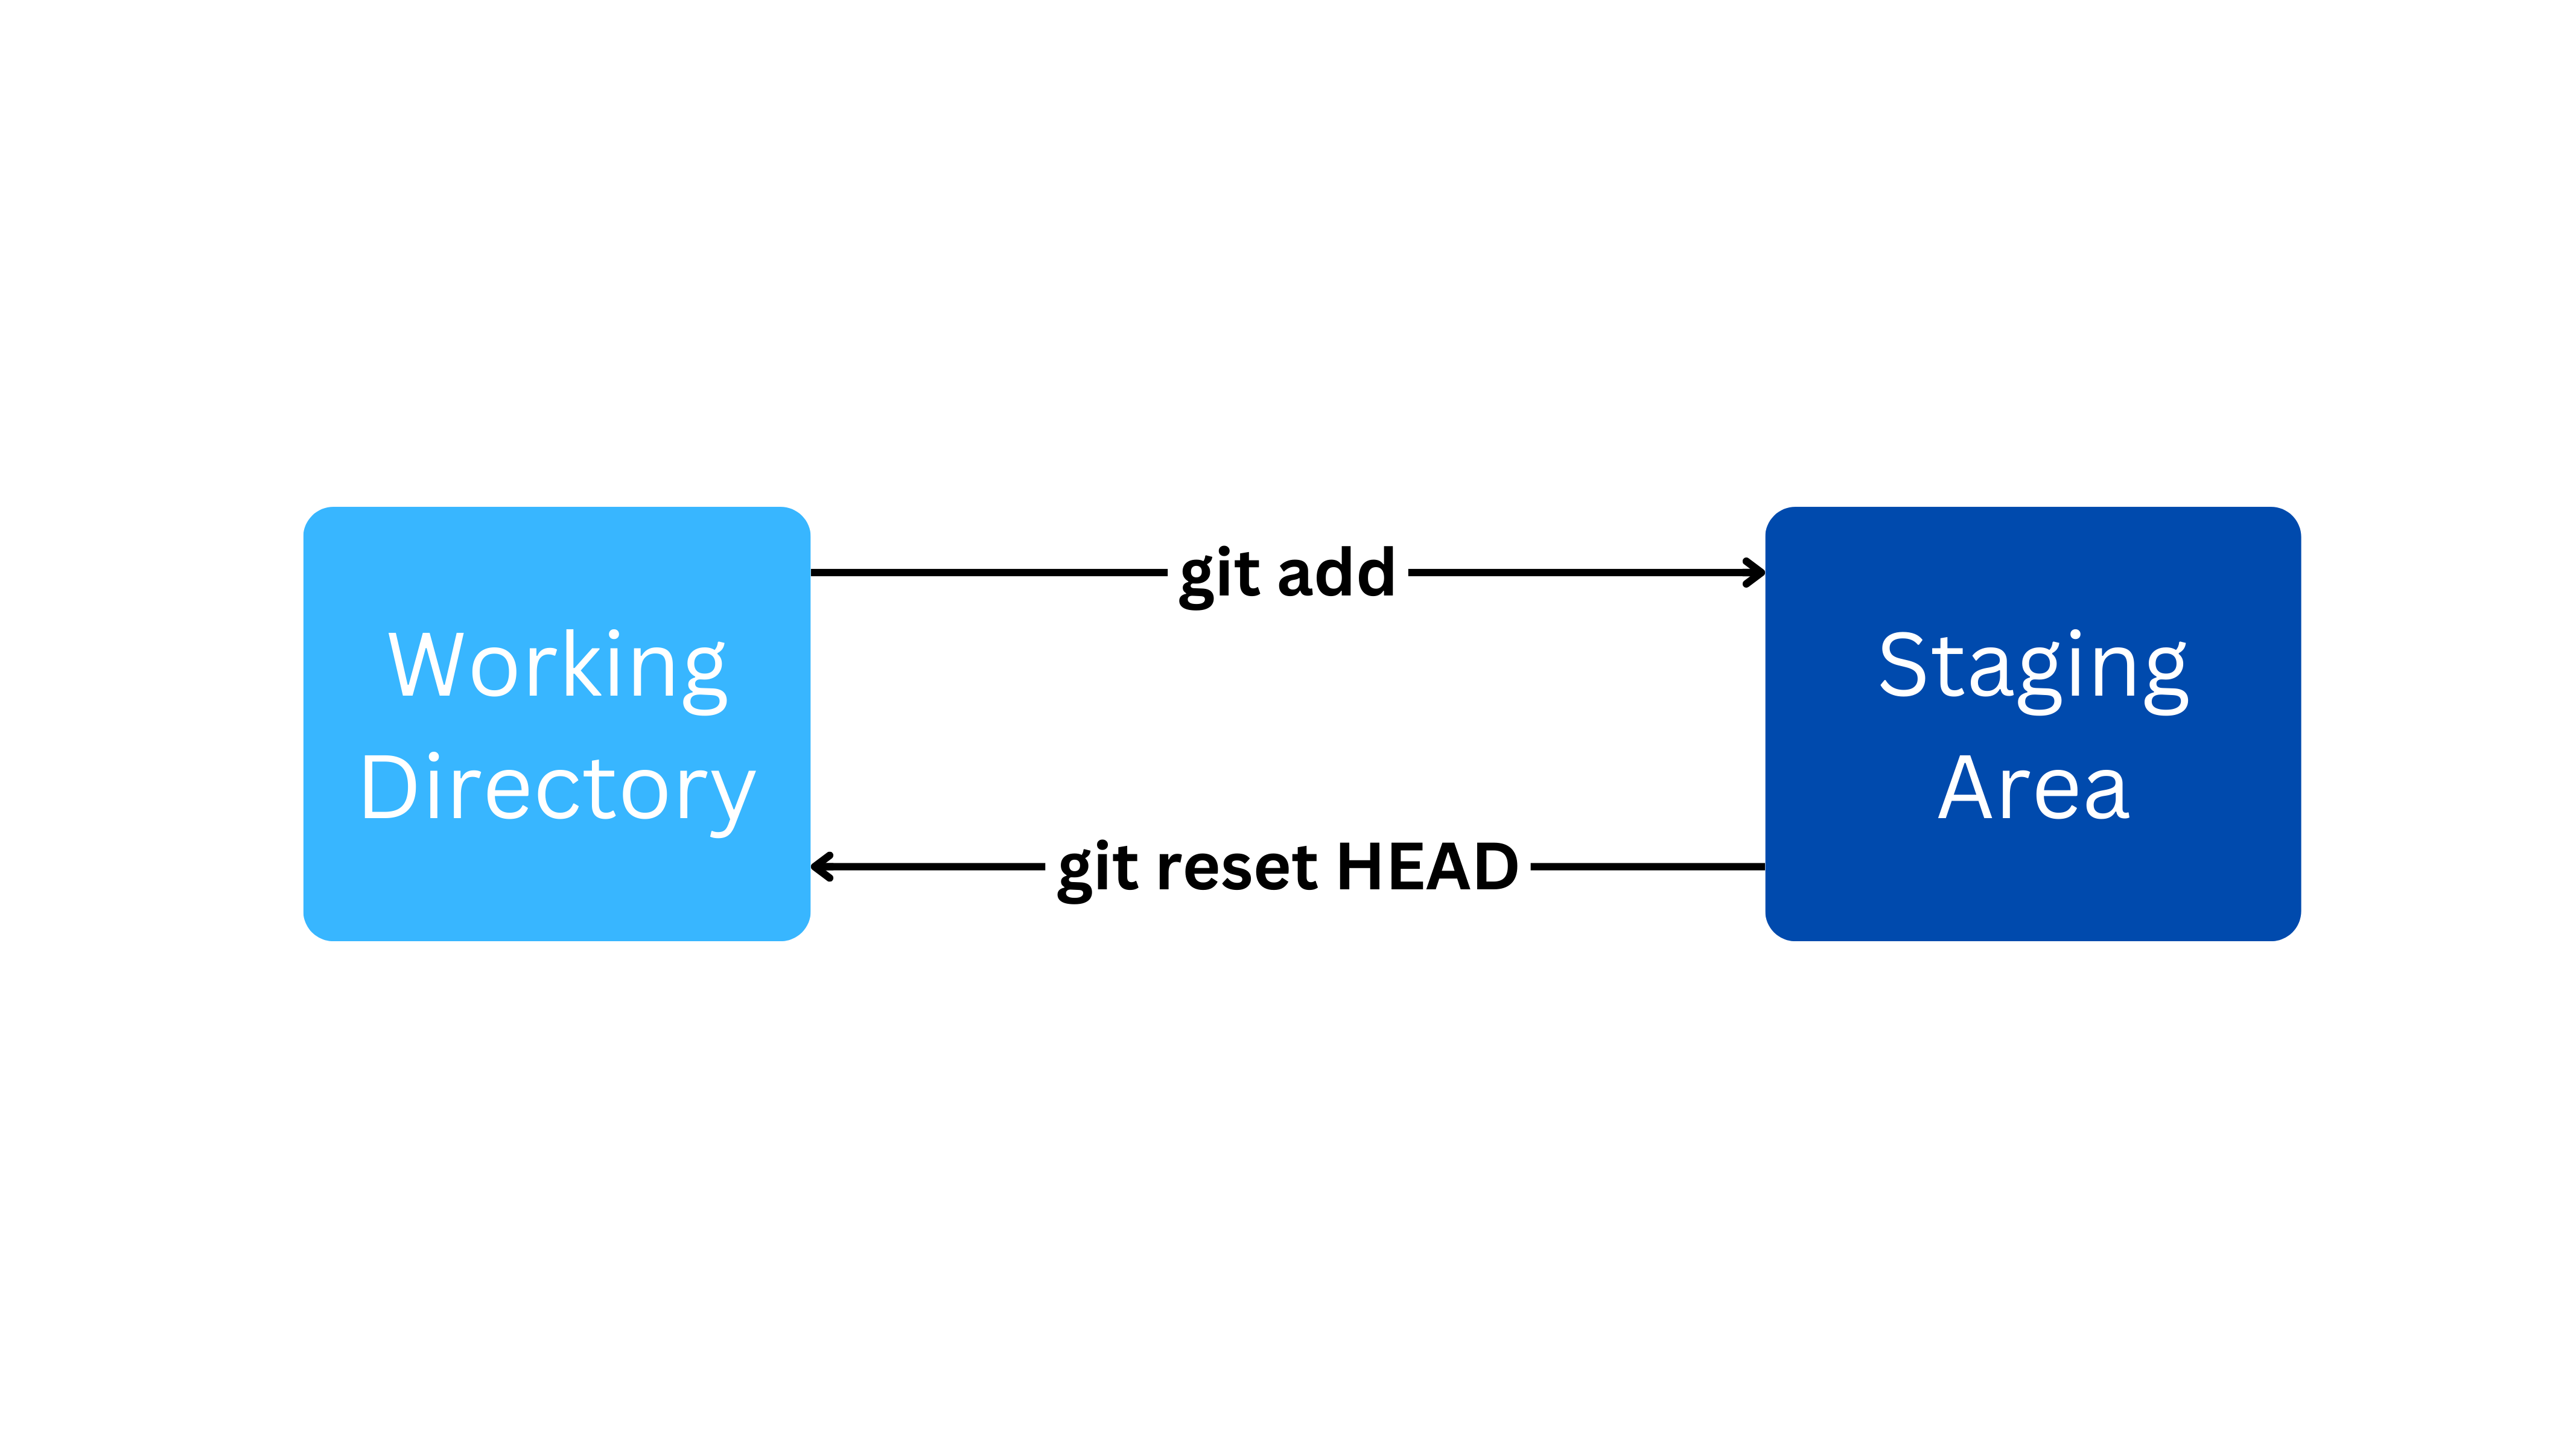
git reset HEAD is a command that is used to untrack the file from the staging area.
git reset HEAD <file-name> # used to remove one file
git reset HEAD # used to remove all the file in staging area.
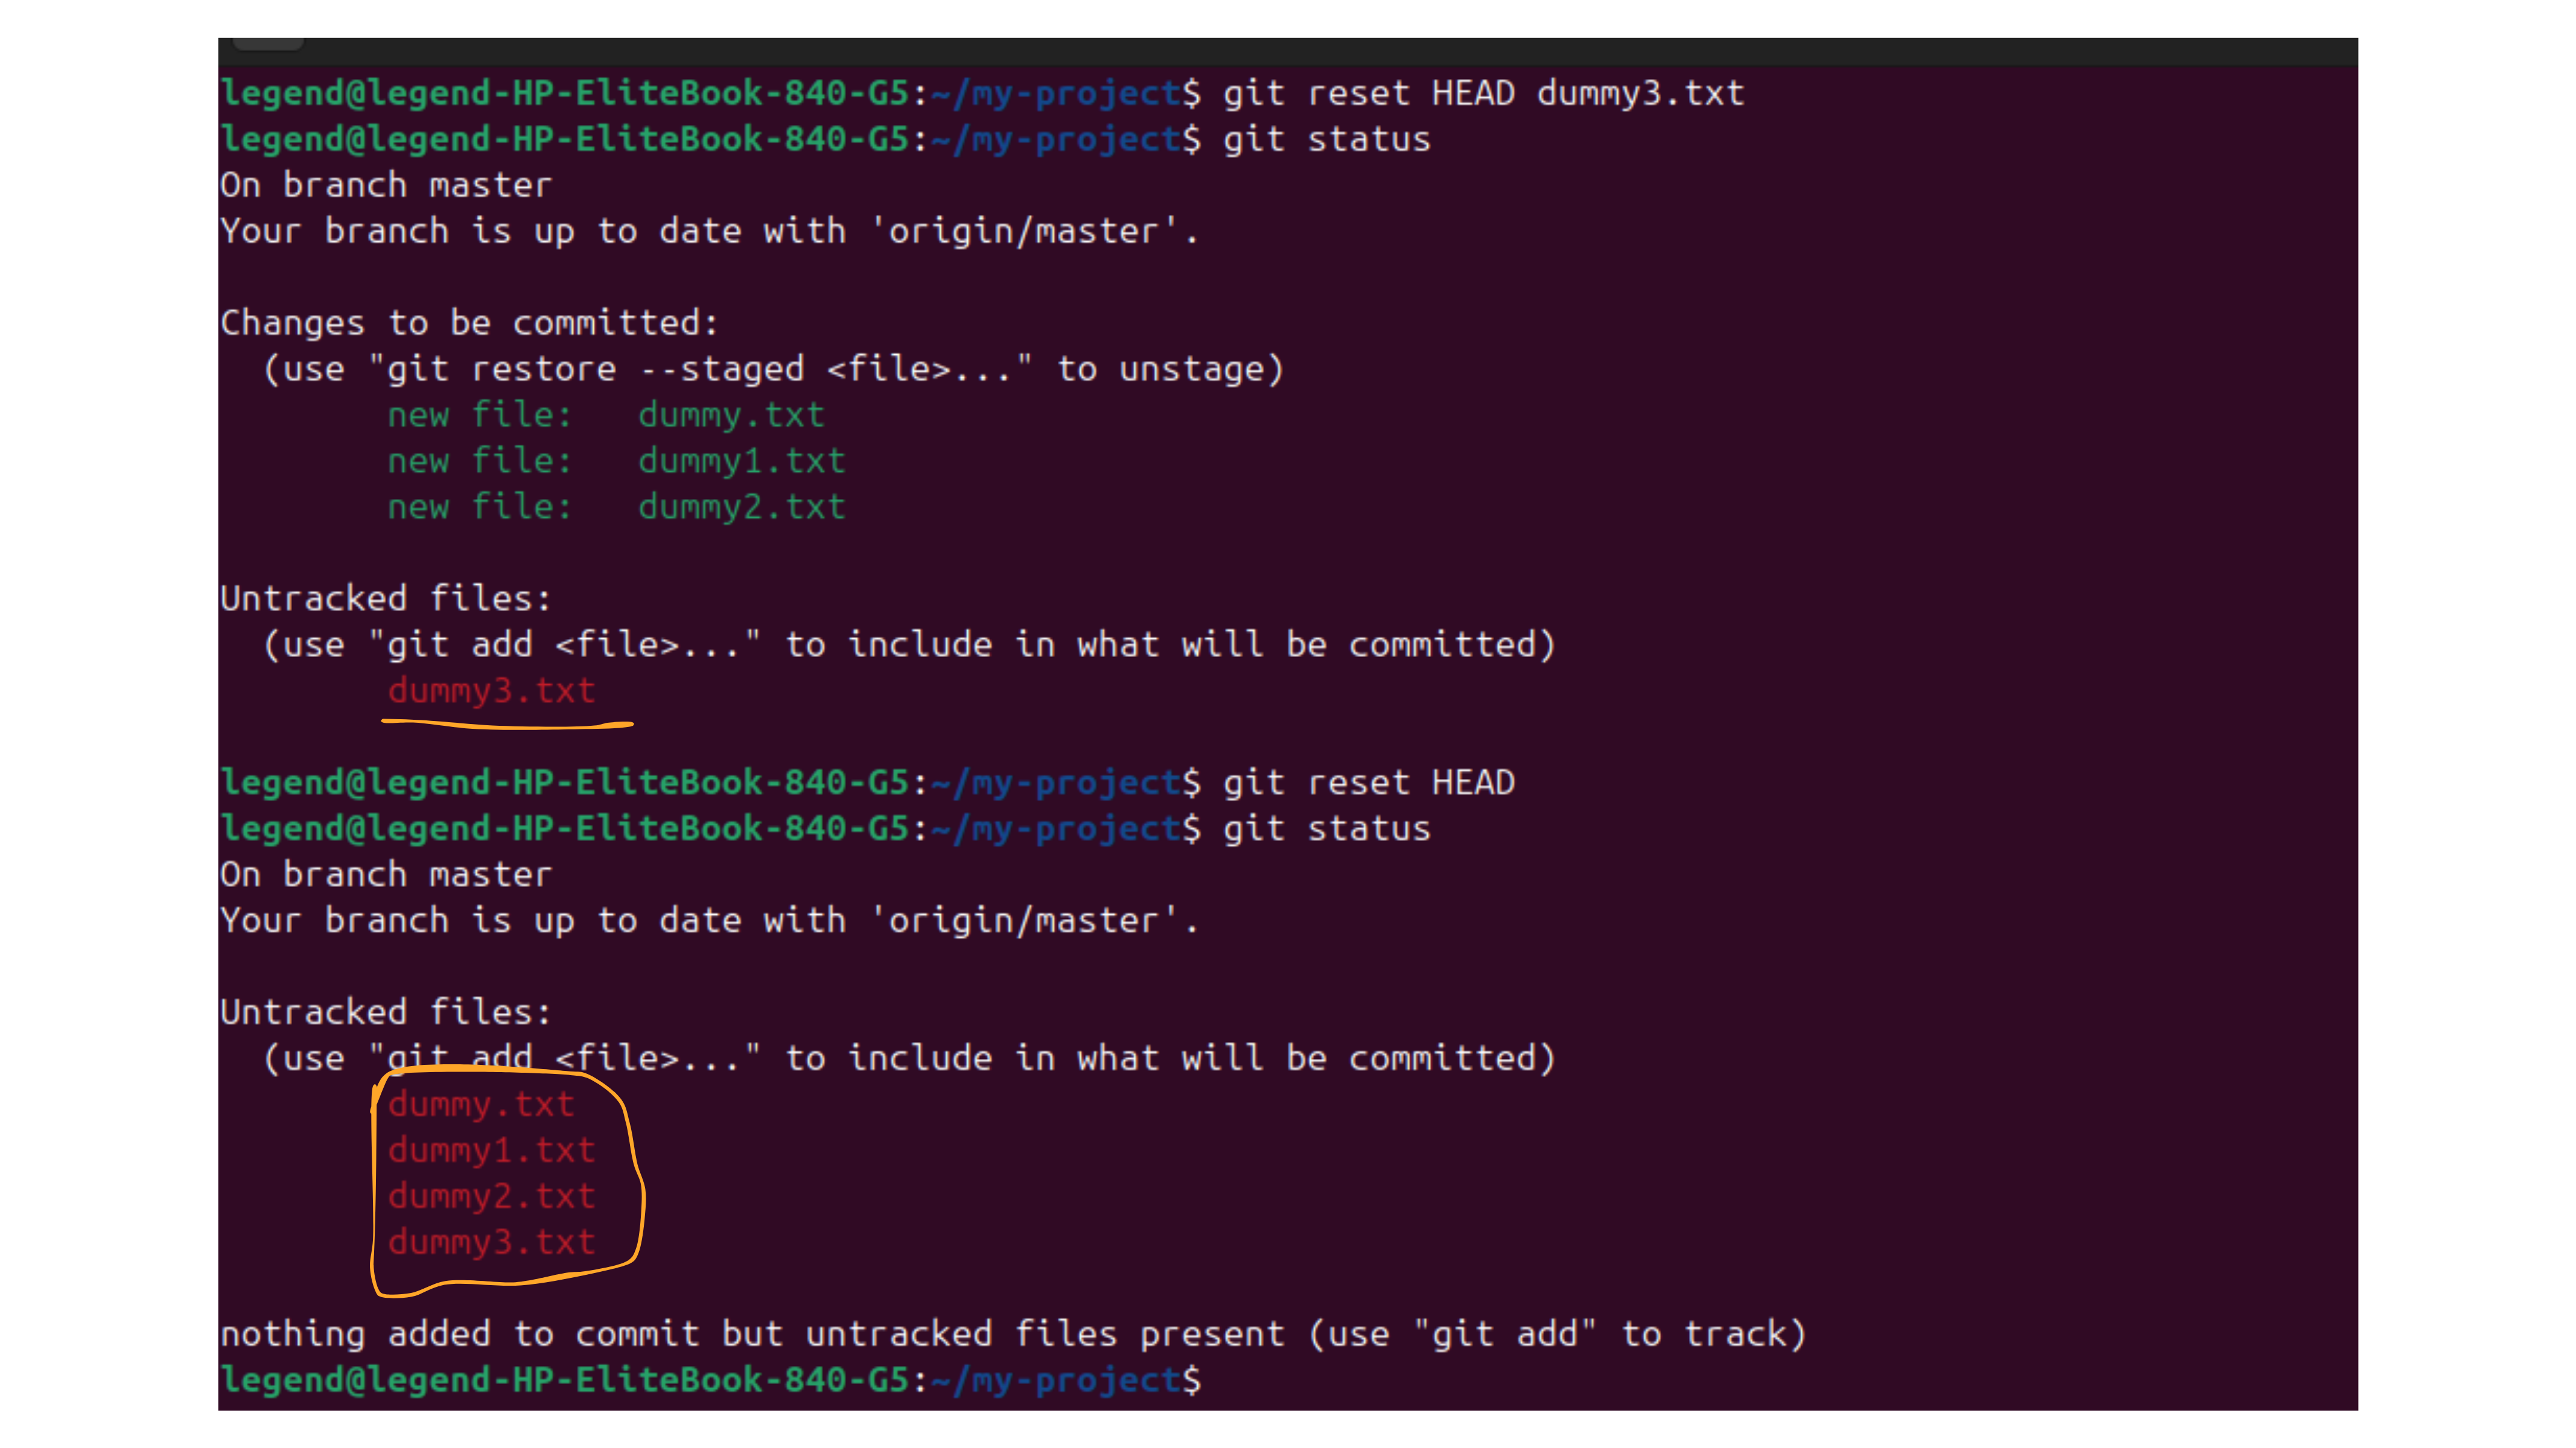
Now, You can see that all files are untracked. if needed use the git add <file-name>(or) git add . command to track the files.
git commit
The git commit command is one of the core primary functions of Git. Prior use of the git add command is required to select the changes that will be staged for the next commit.
The git commit is used to create a snapshot of the staged changes along a timeline of a Git project’s history.
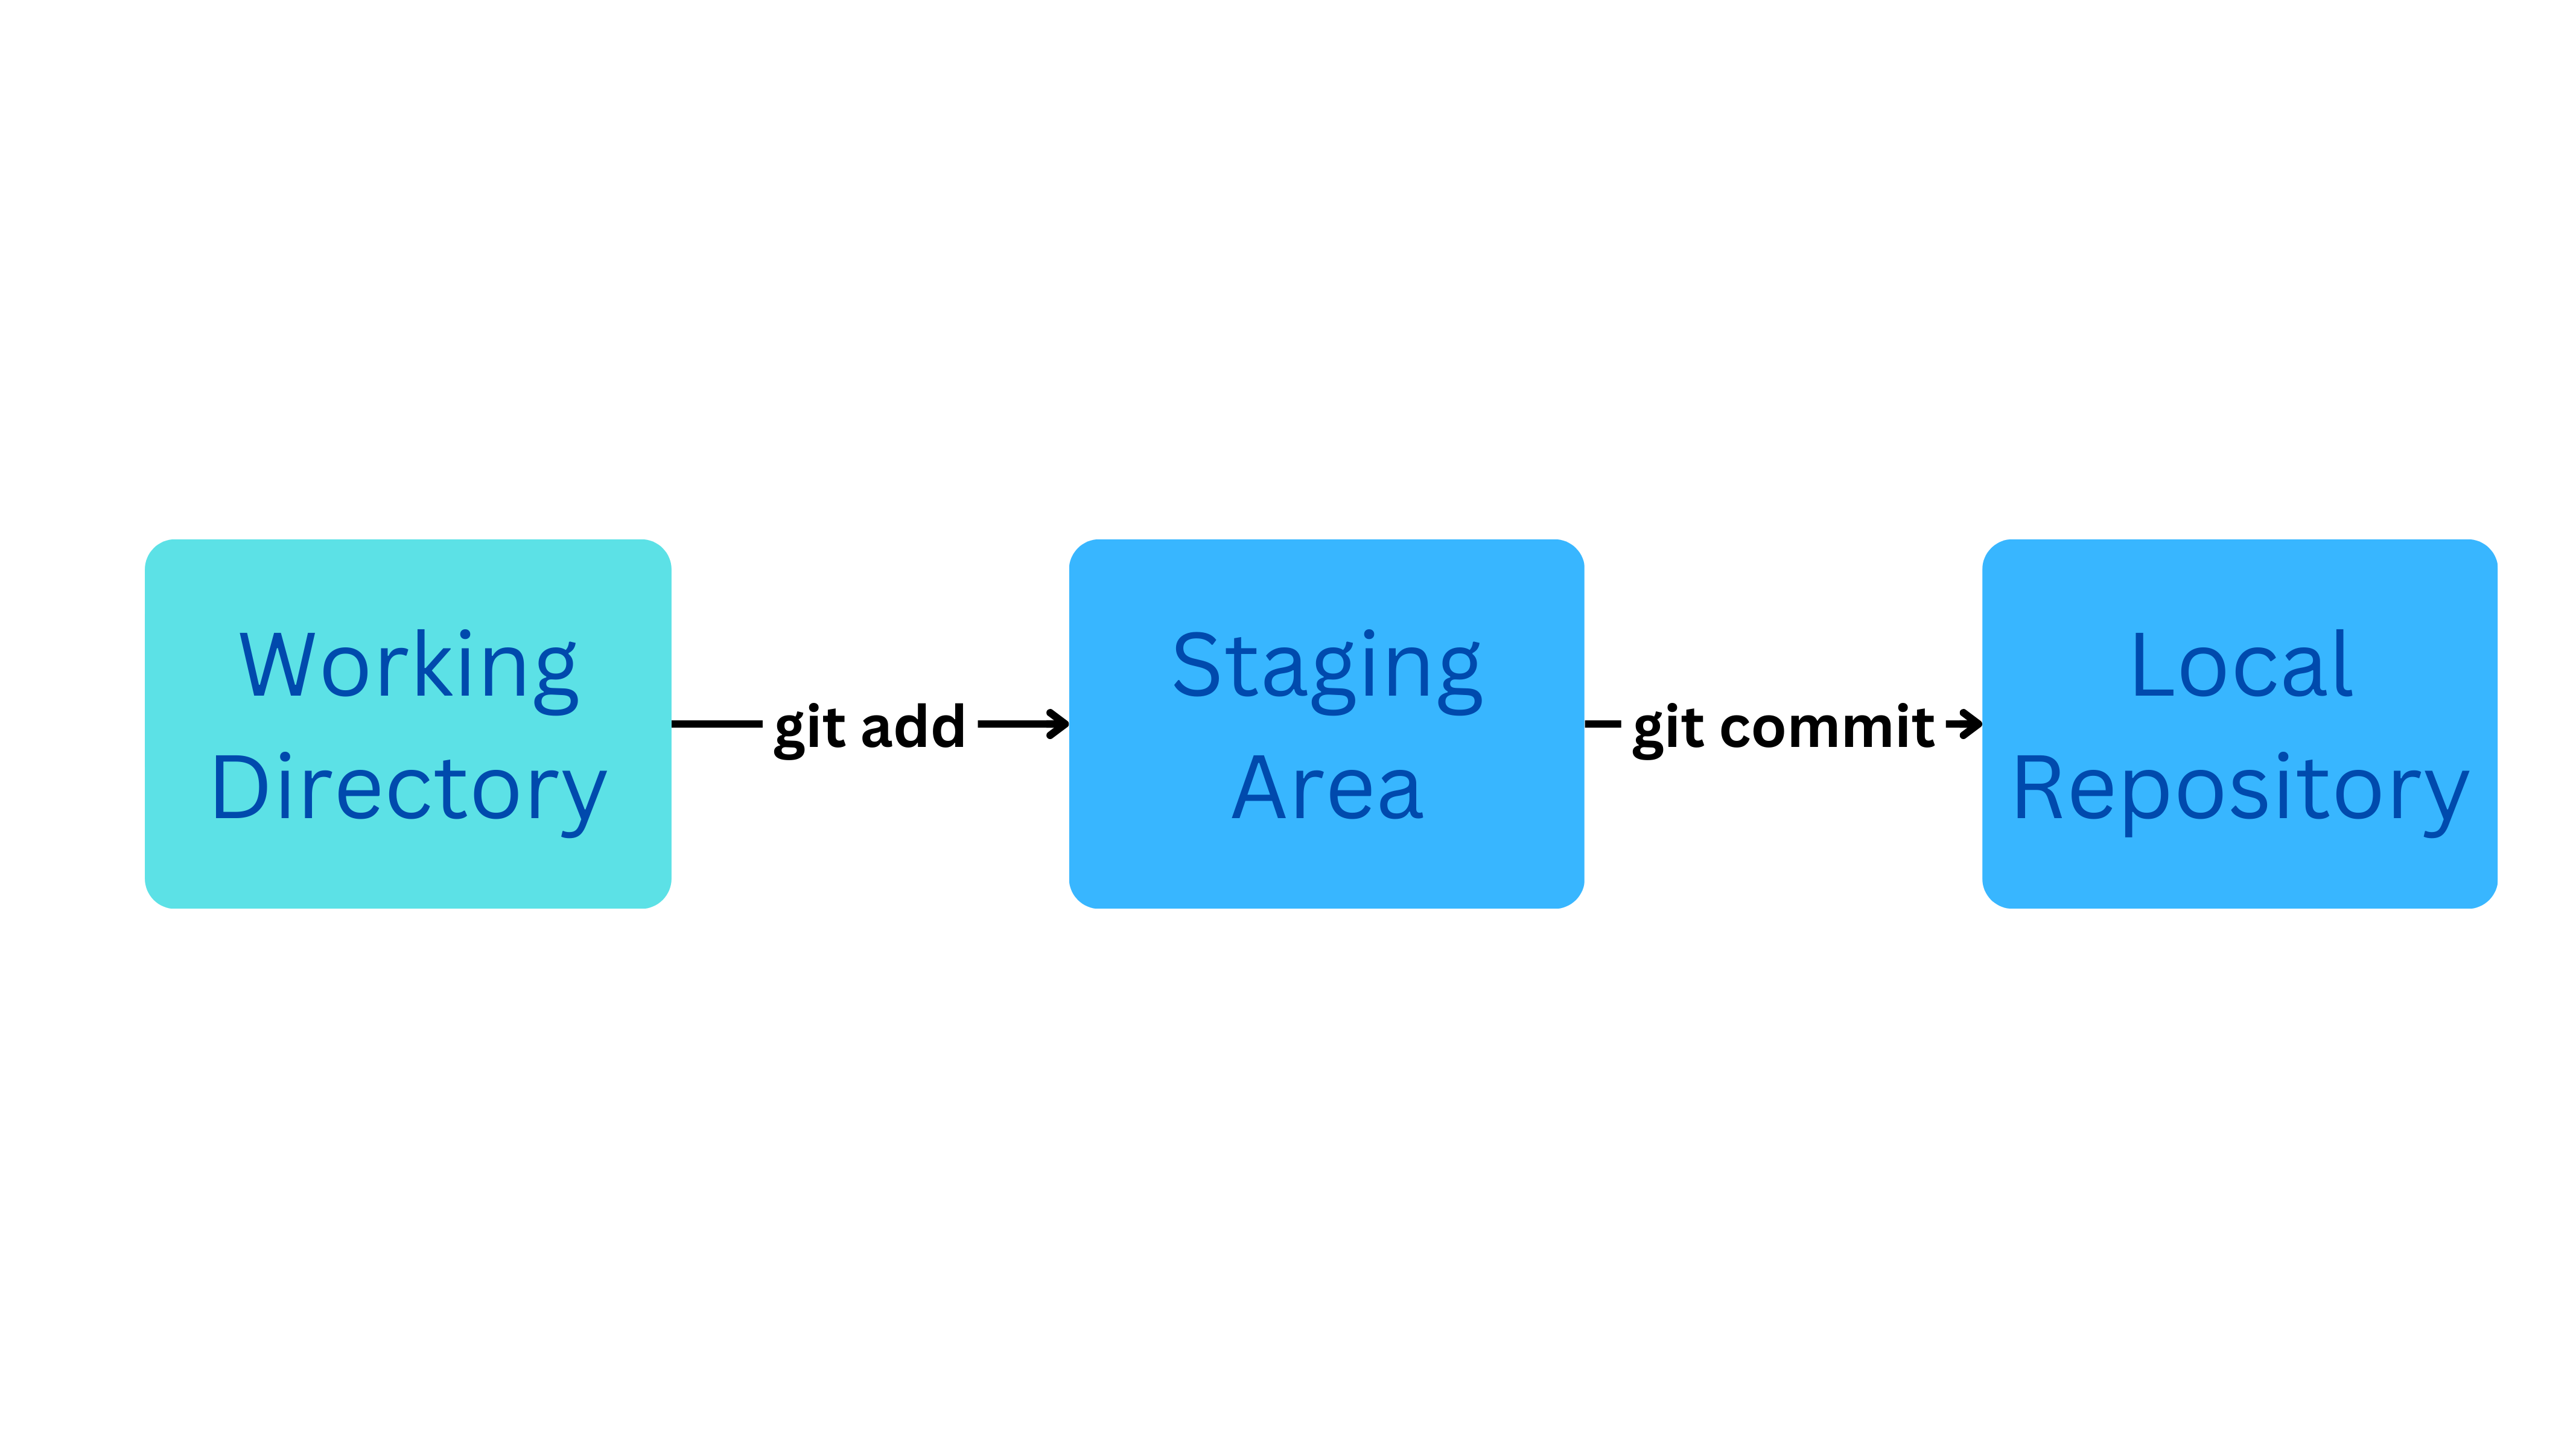
Example:
Let us create the 4 files called file1.txt, file2.txt, file3.txt, file4.txt and one folder called “folder_1“ and let us add all of these files from the working directory to staging area by using git add . command.
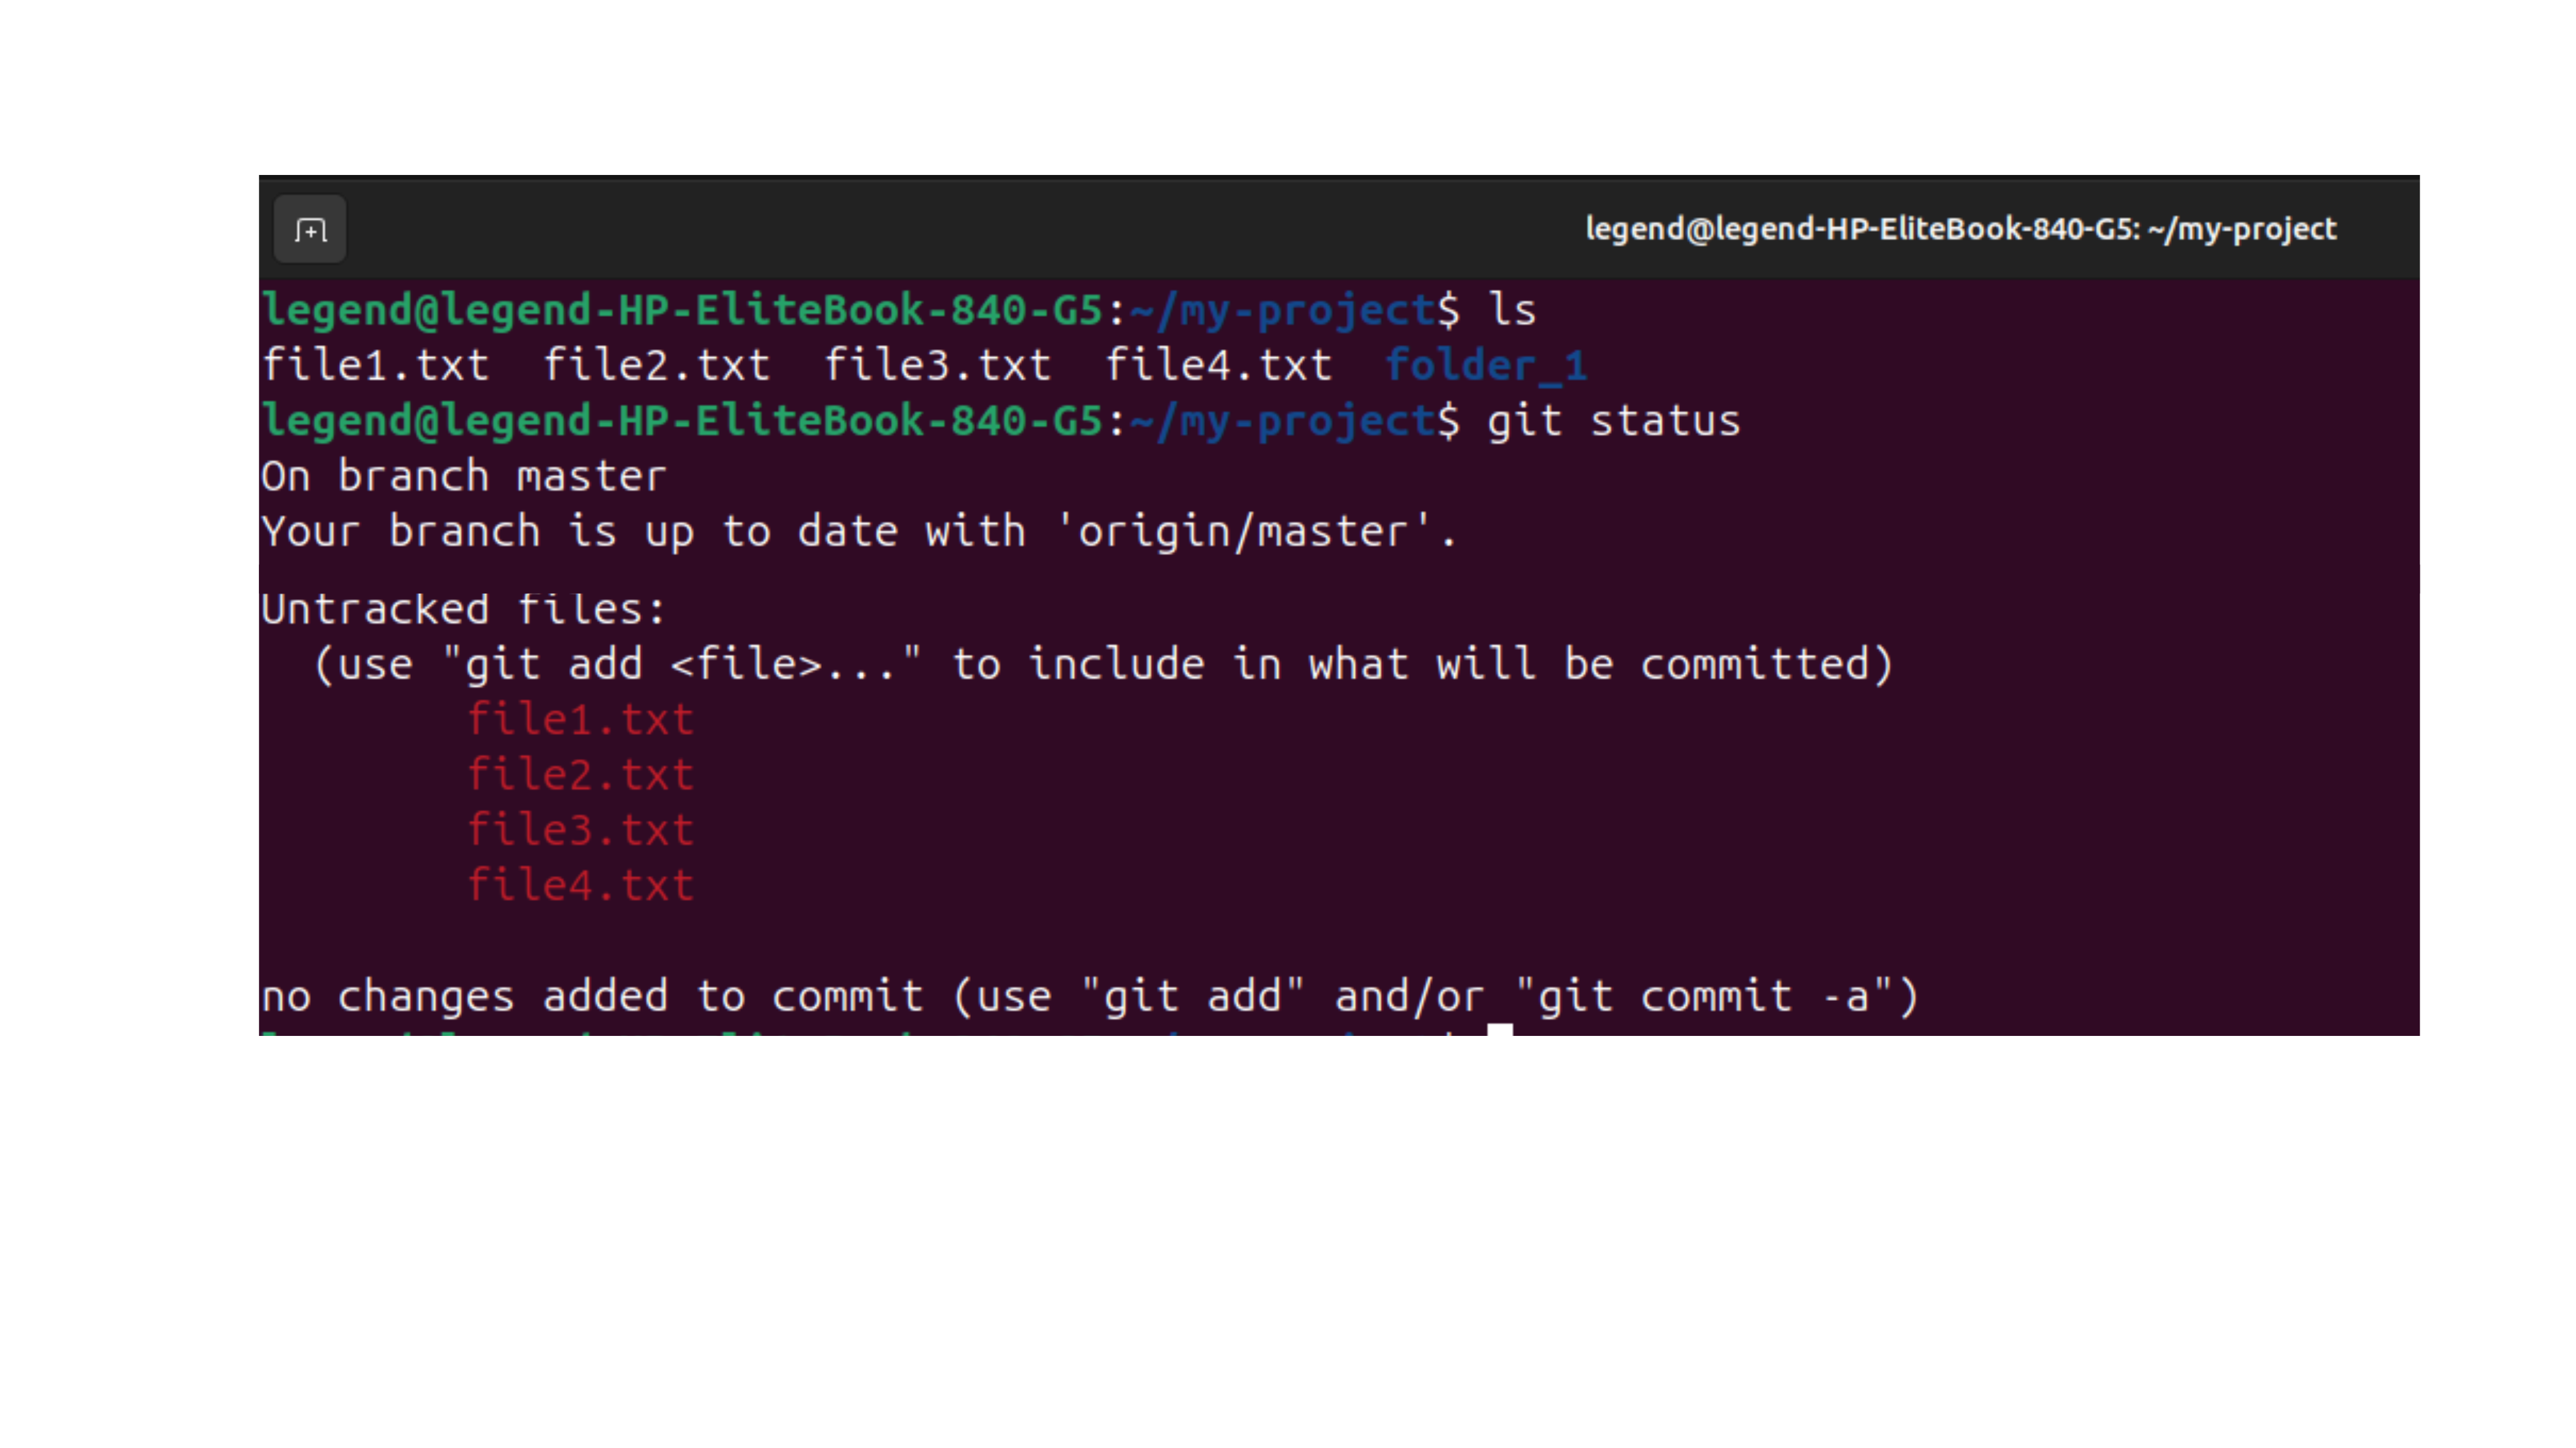
Next, the files (or) folder in the staging area can be moved to the Local Repository by using the command git commit -m “<some-commit-message>“.

Let us check the status of the git by using git status,
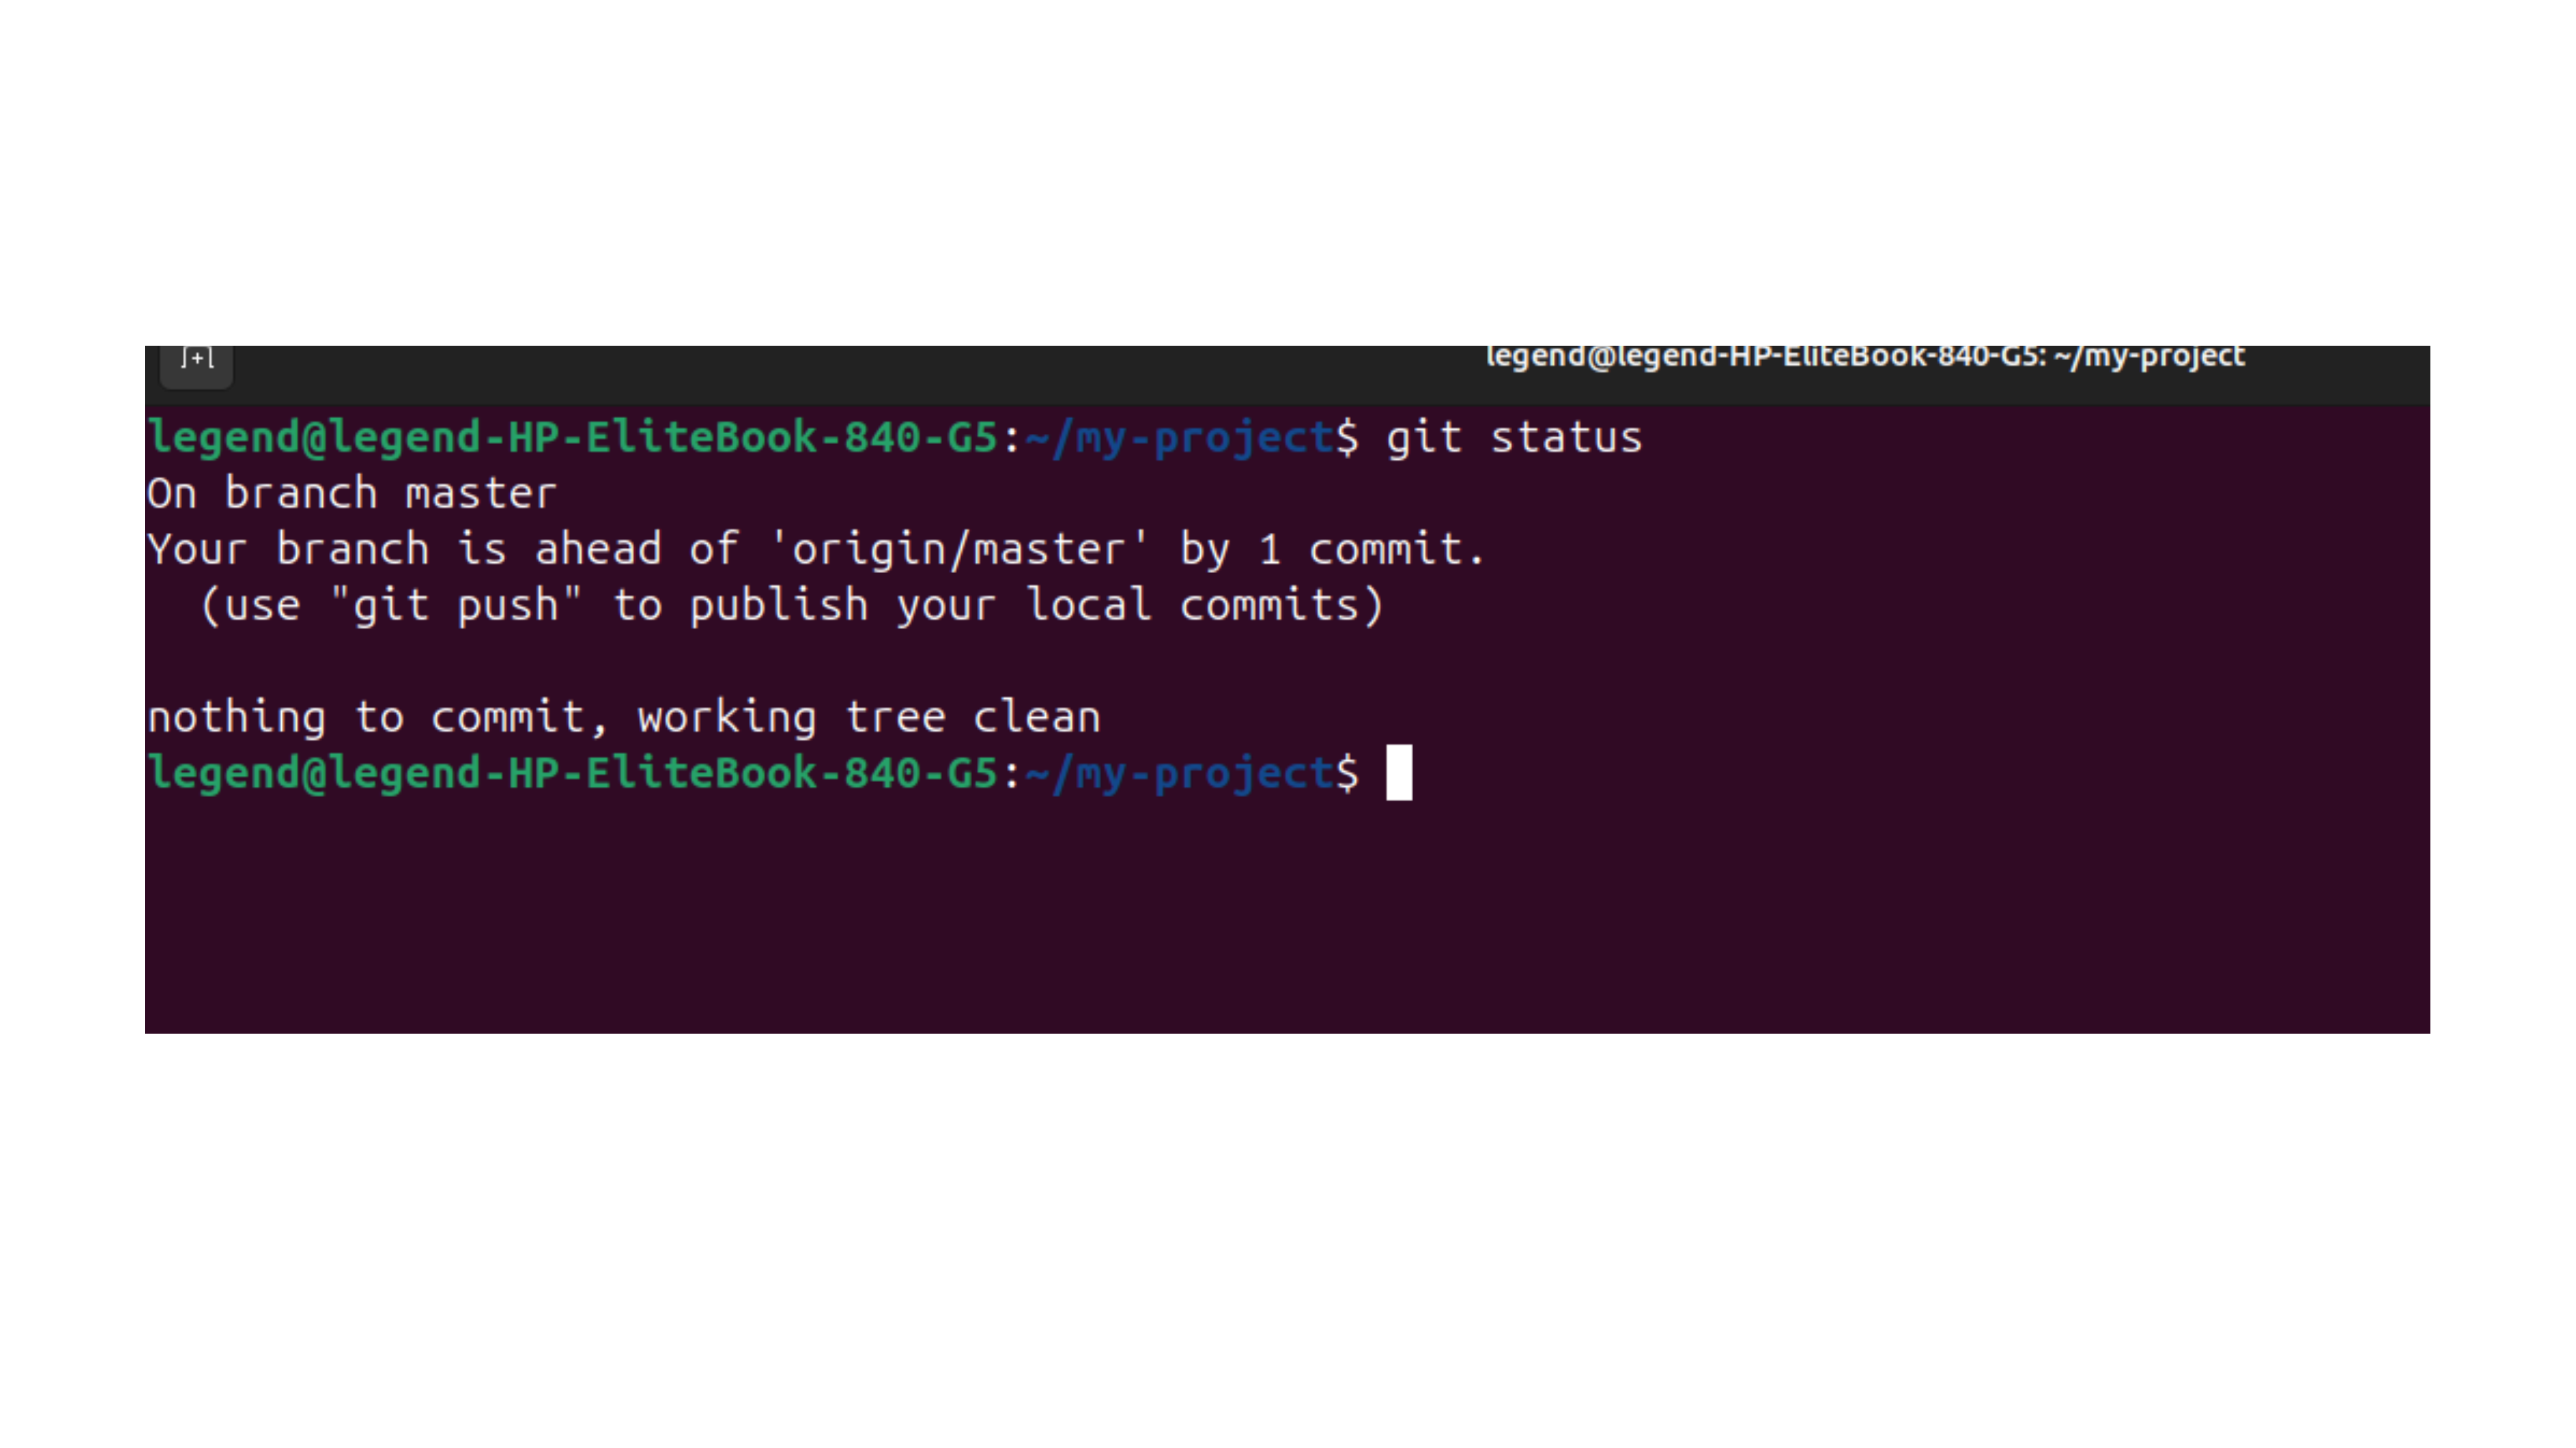
Now, the snapshot is committed to the local Git repository.
git reset
git reset is commend used to un_commit the changes in the local repository it will work if the code is not pushed into the "remort repository".
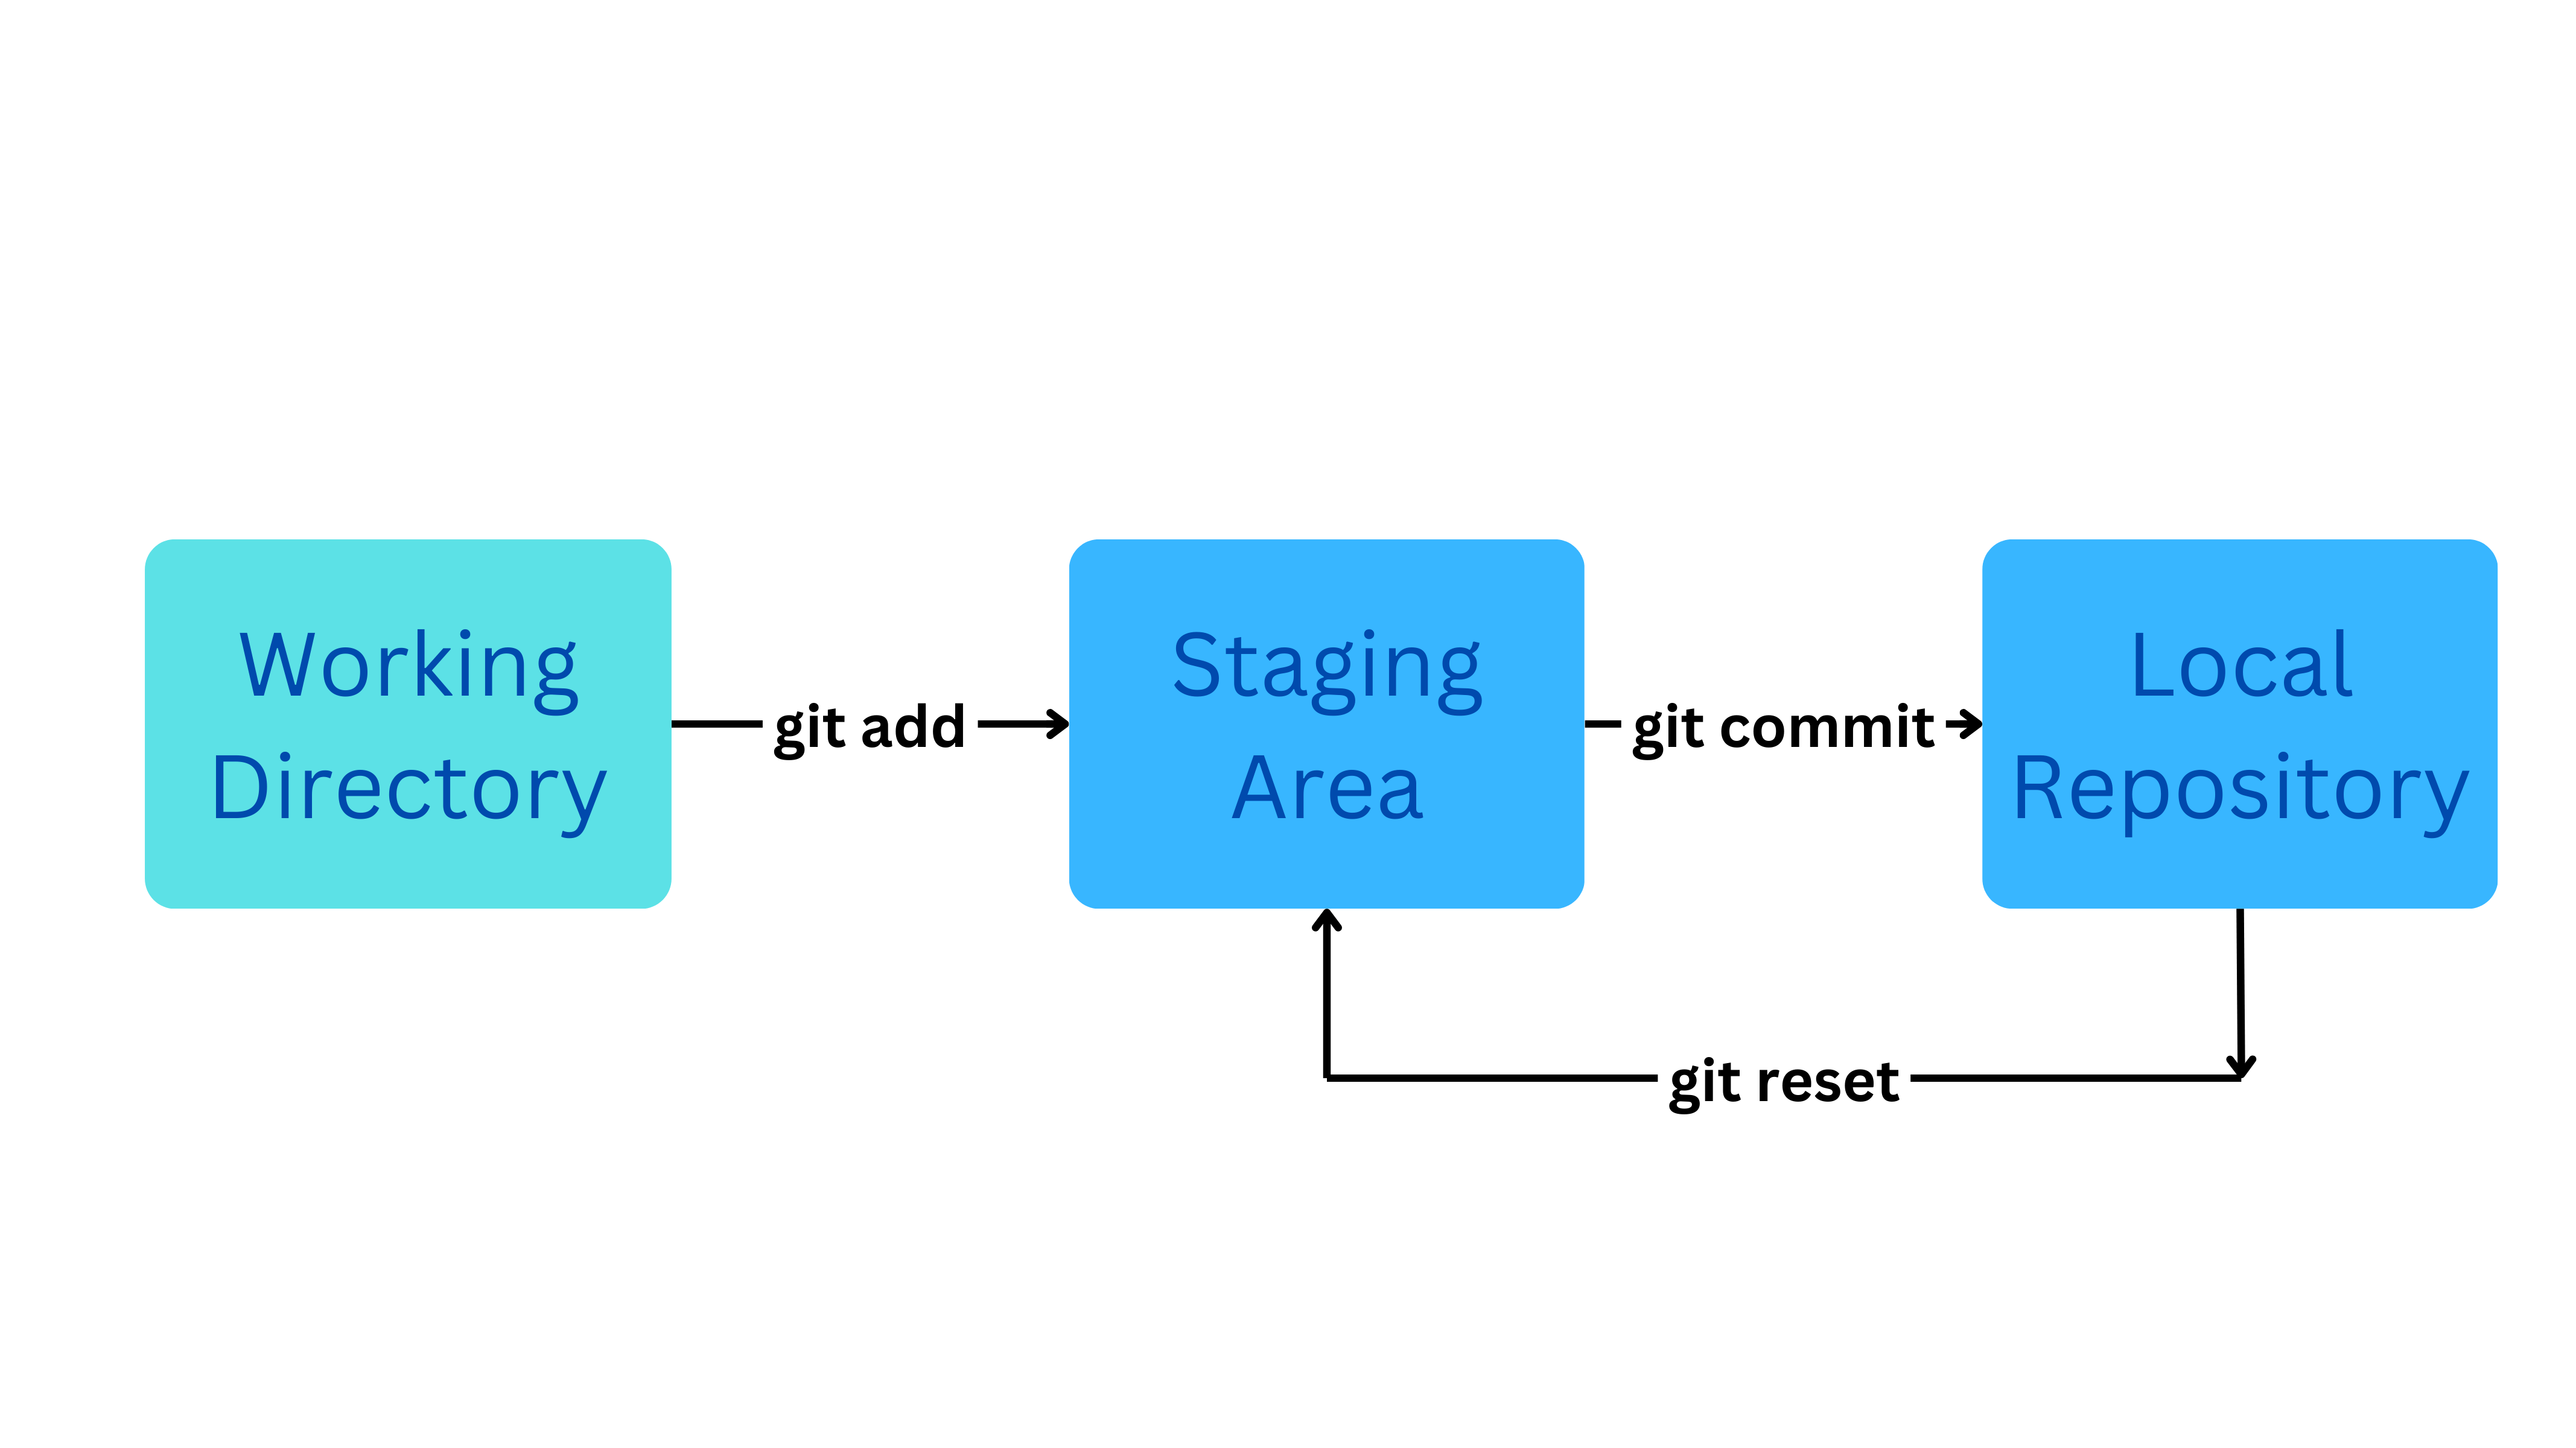
Example:
git reset <file-name> # single file
git reset # entire commited file
Let us move the file1.txt from the Local Repository to the Staging area.

Here, we moved only the file1.txt from Local Repository to the Staging area.
Let us move all the files and folders from the Local Repository to the Staging area.
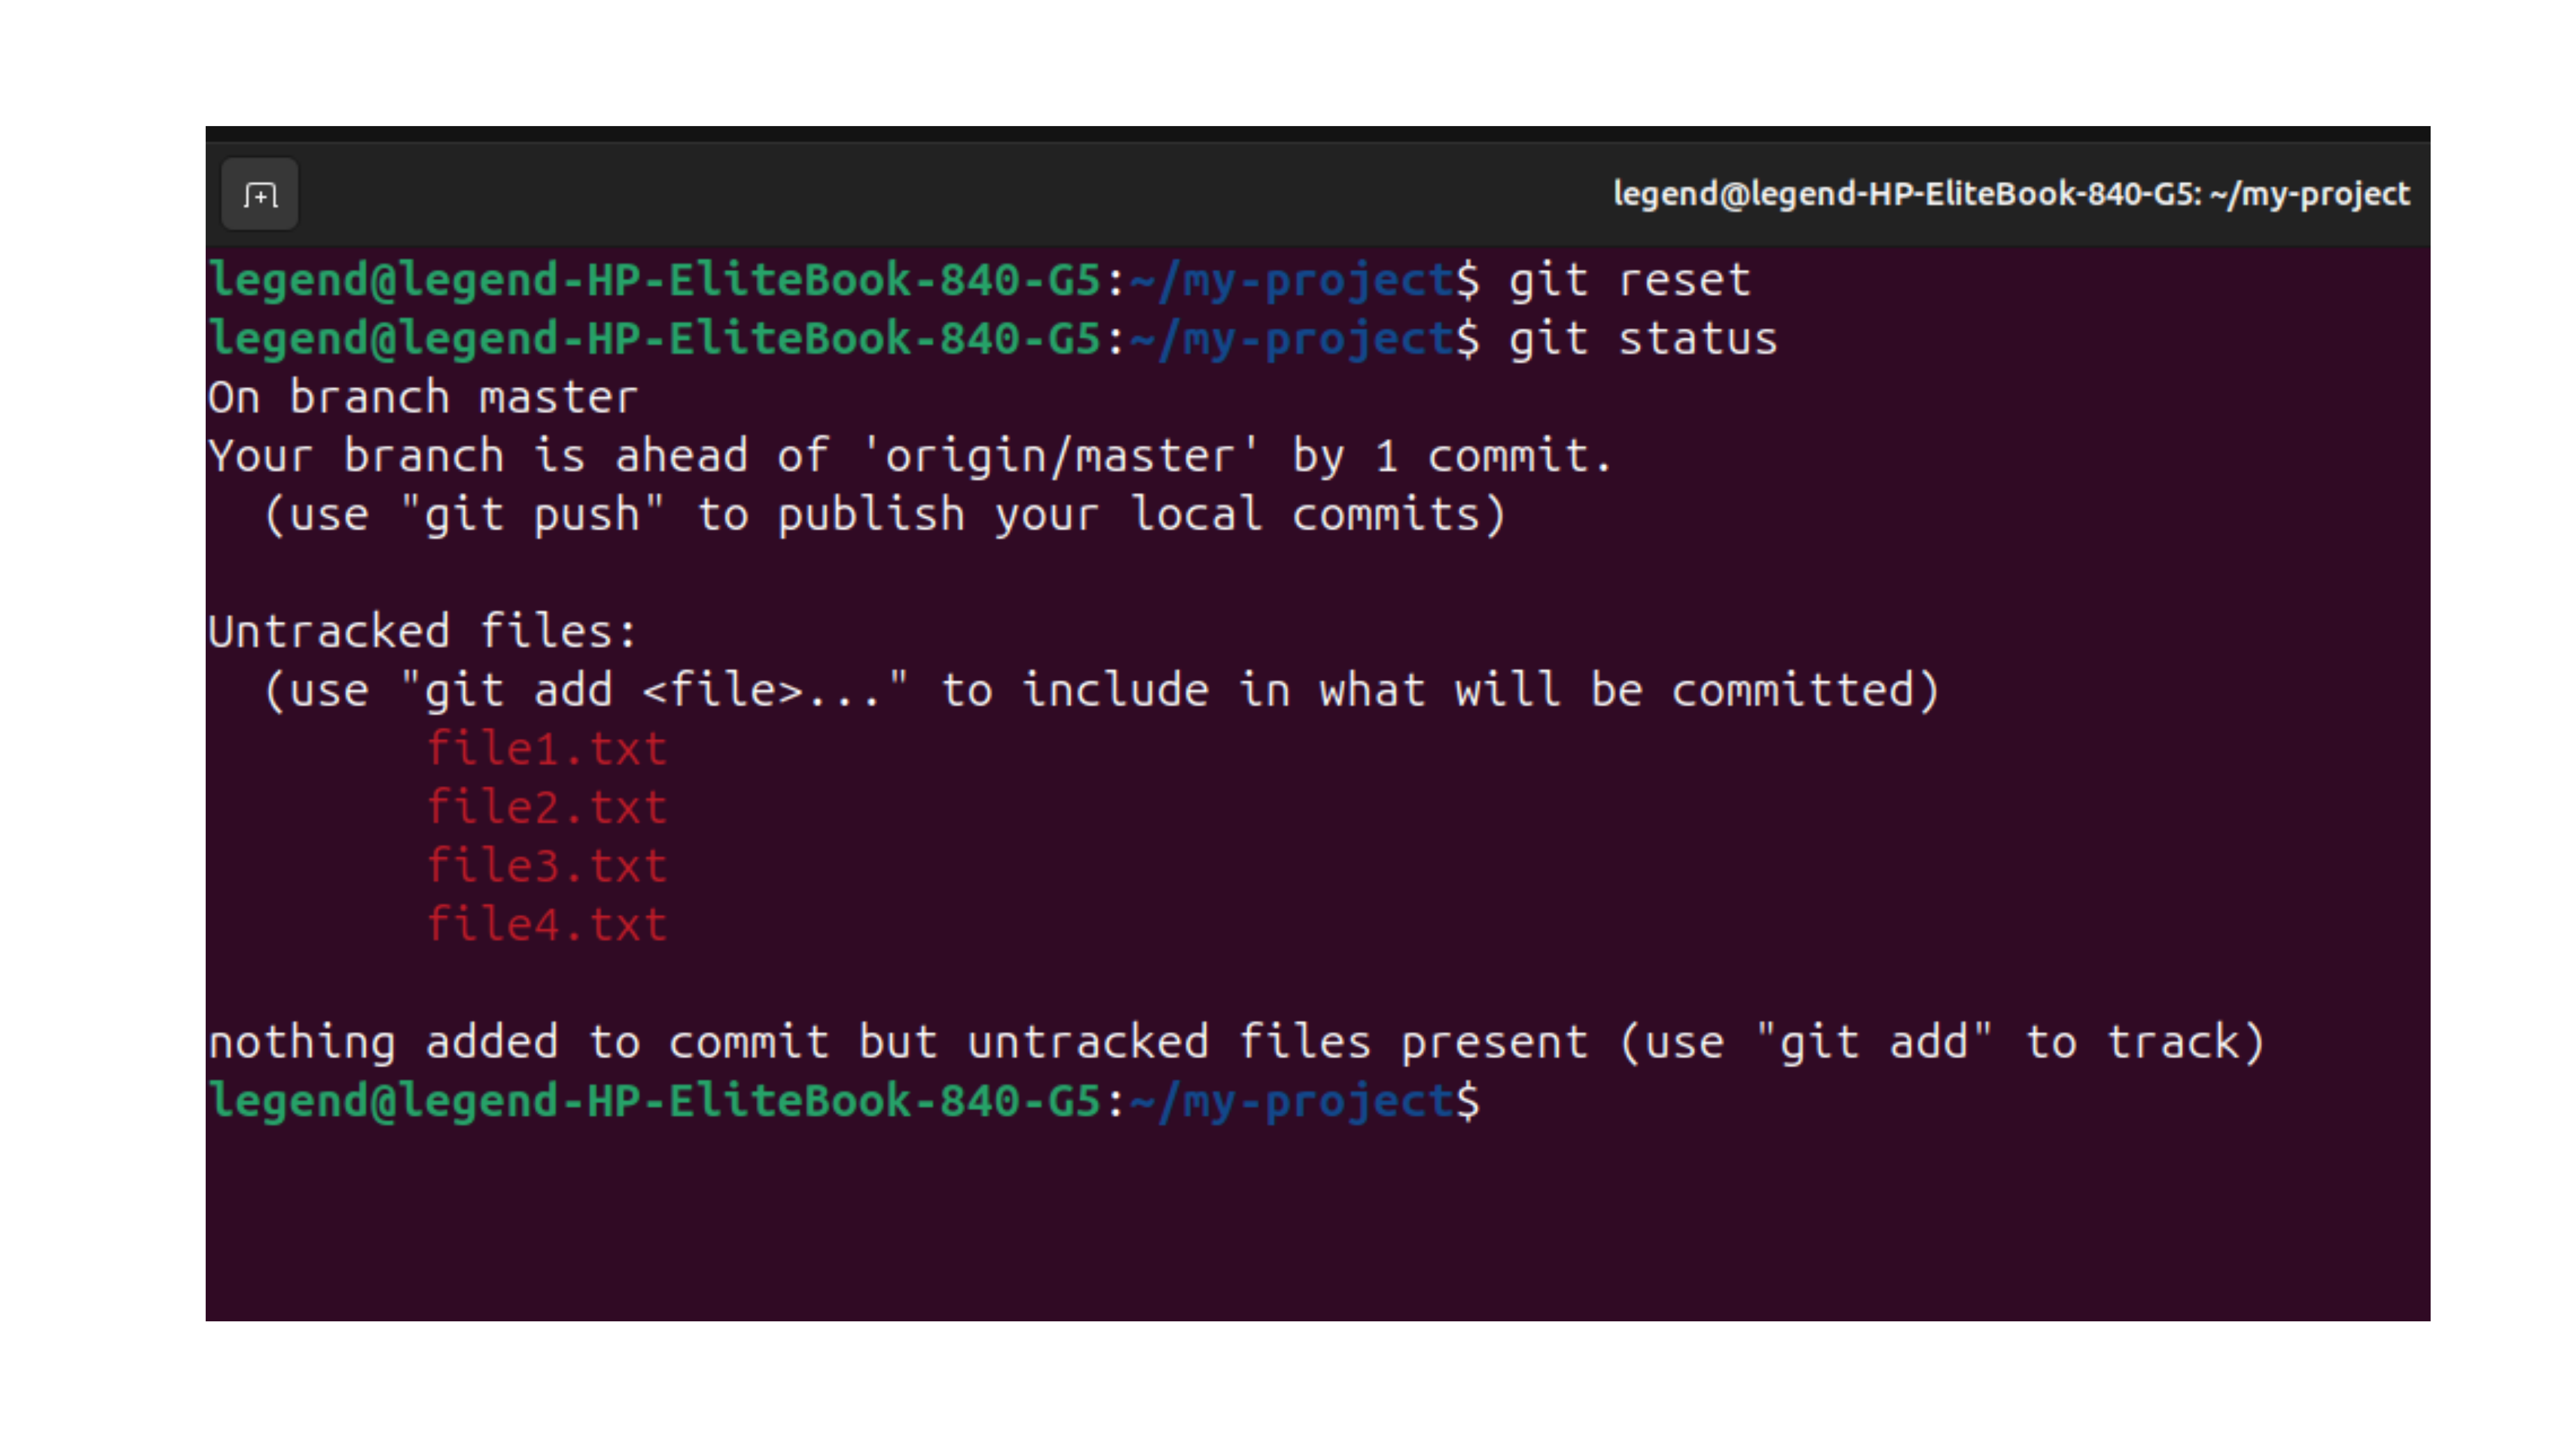
Here, we moved all the files and folders from Local Repository to the Staging area.
Let us Start with Remote Repository i.e pushing our git files and folder to the Remote Repository

Example: Let us use the GitHub
Follow the Steps to create the new repository in git hub,
Create a Repository :
Step 1 : Open github.com and signing with your Email
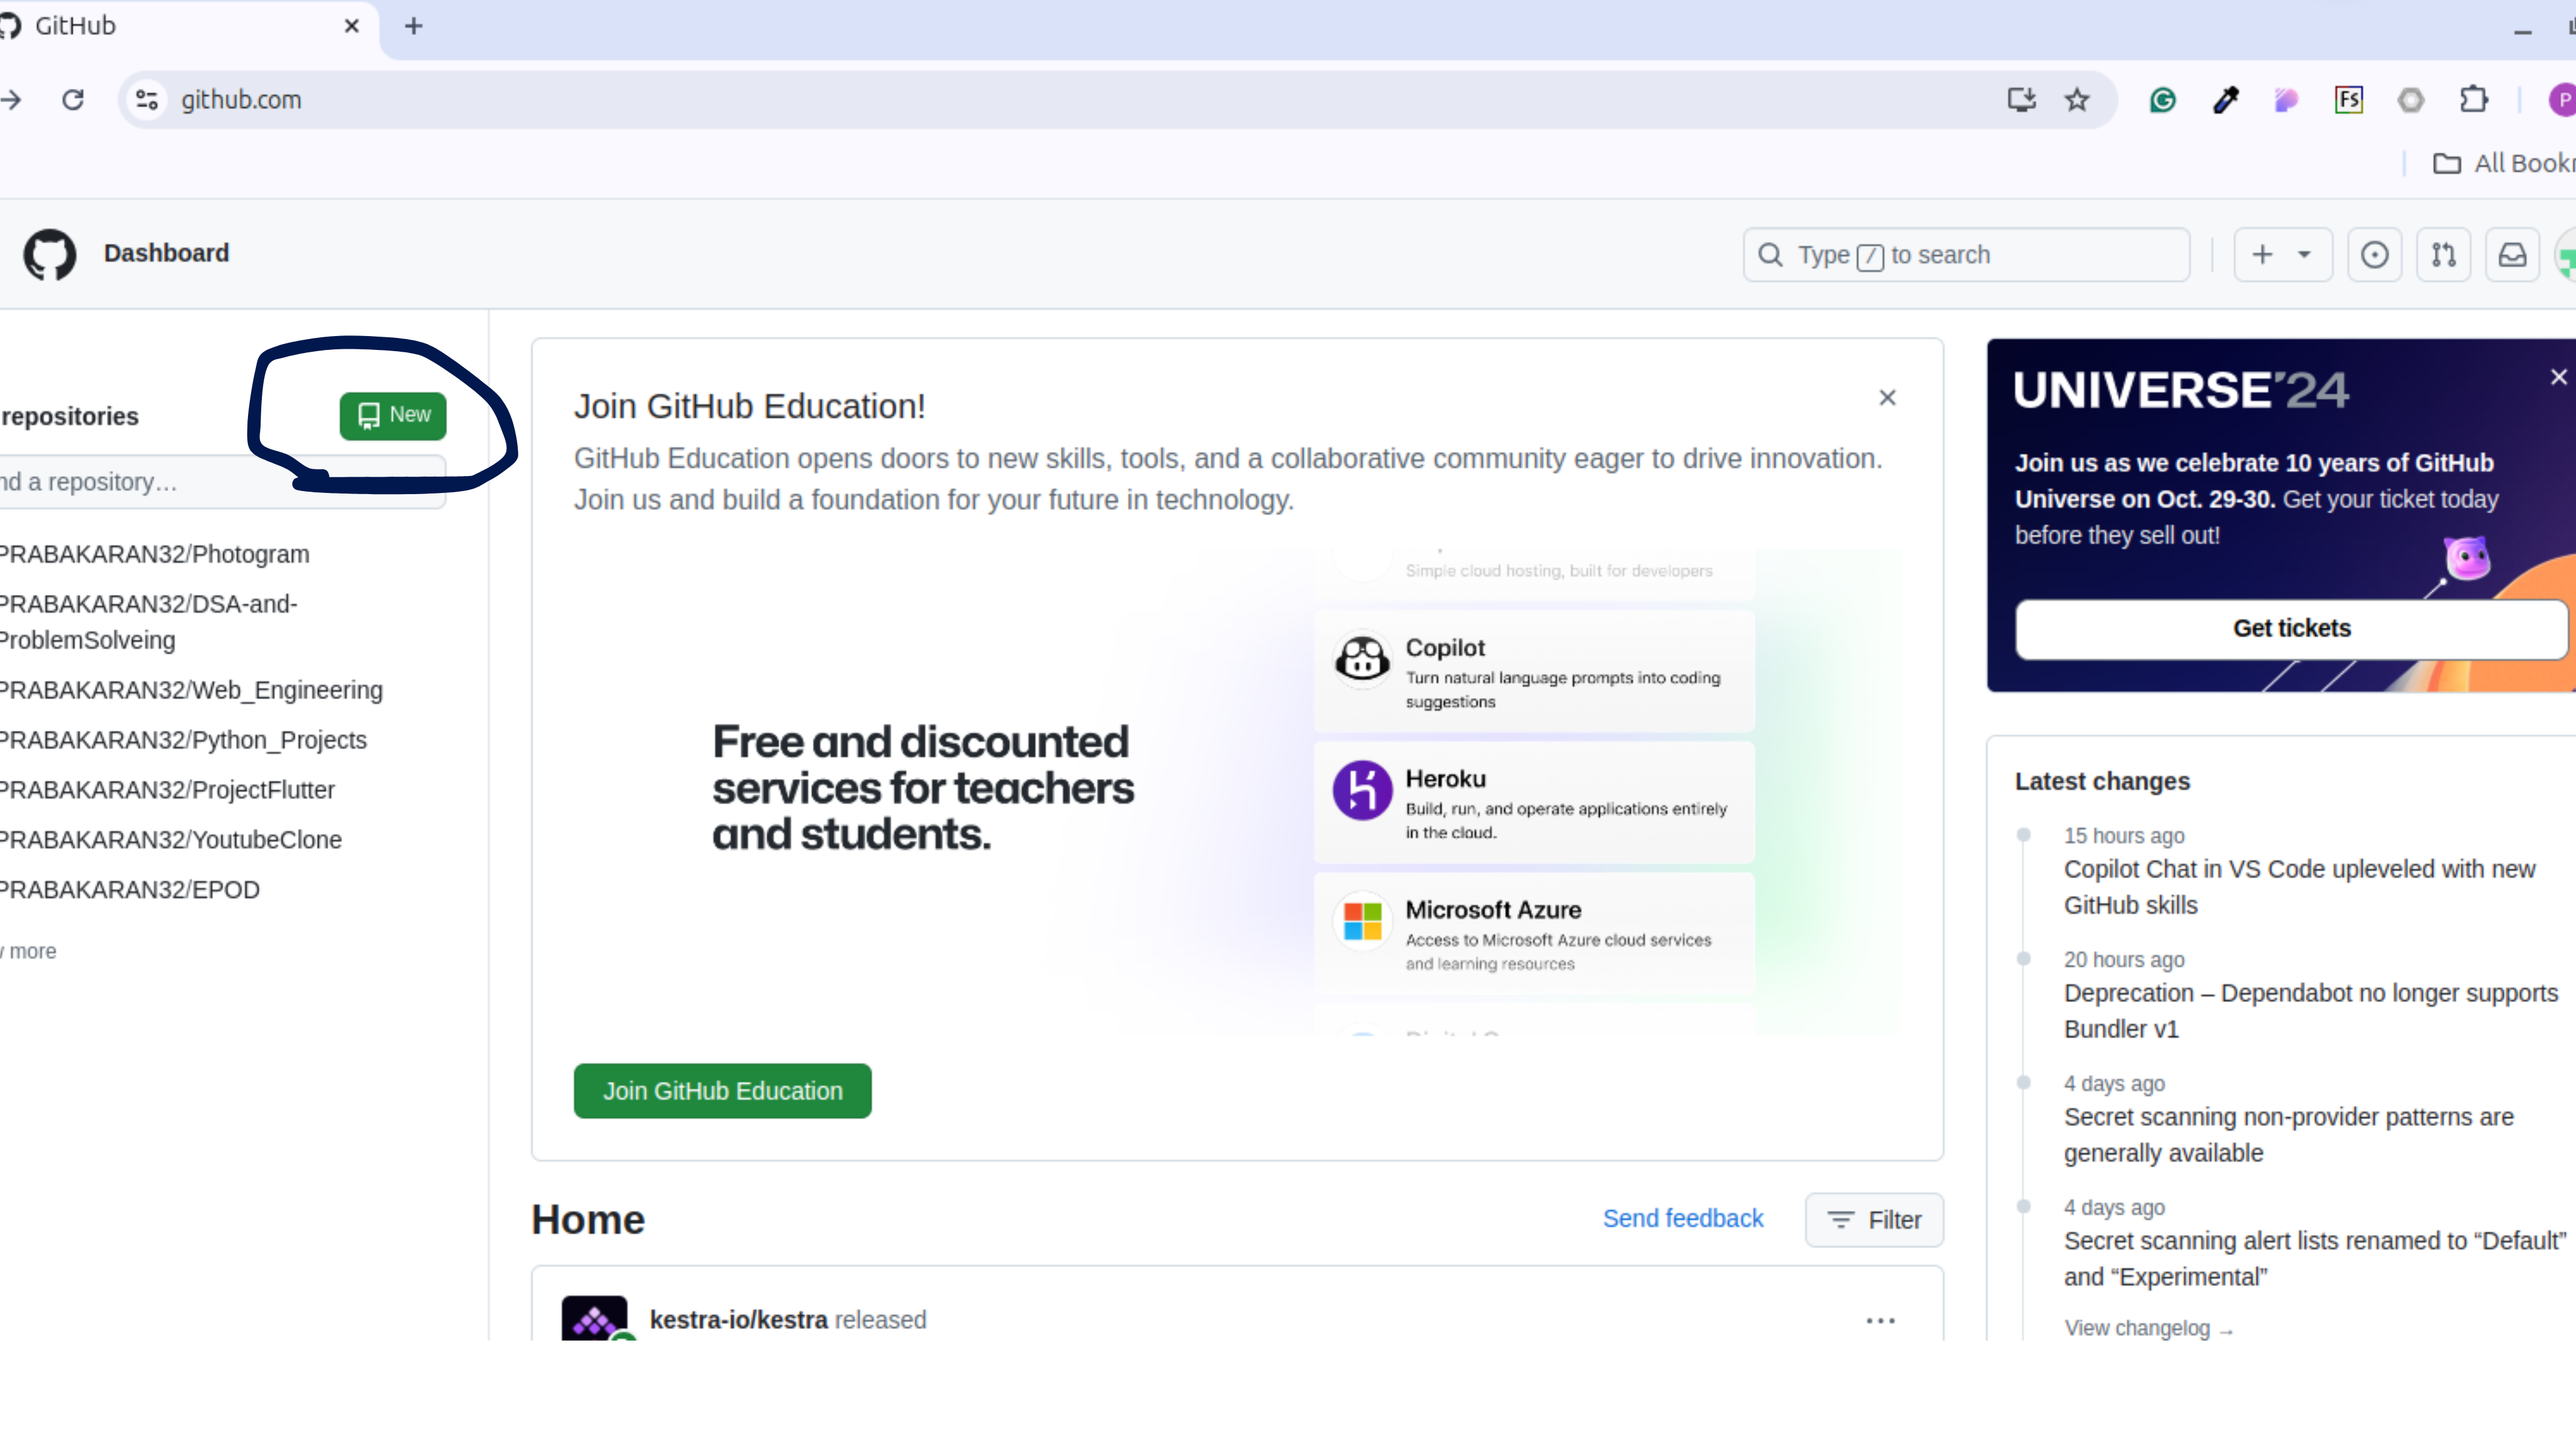
Step 2: On the home page you can see the green button called New,
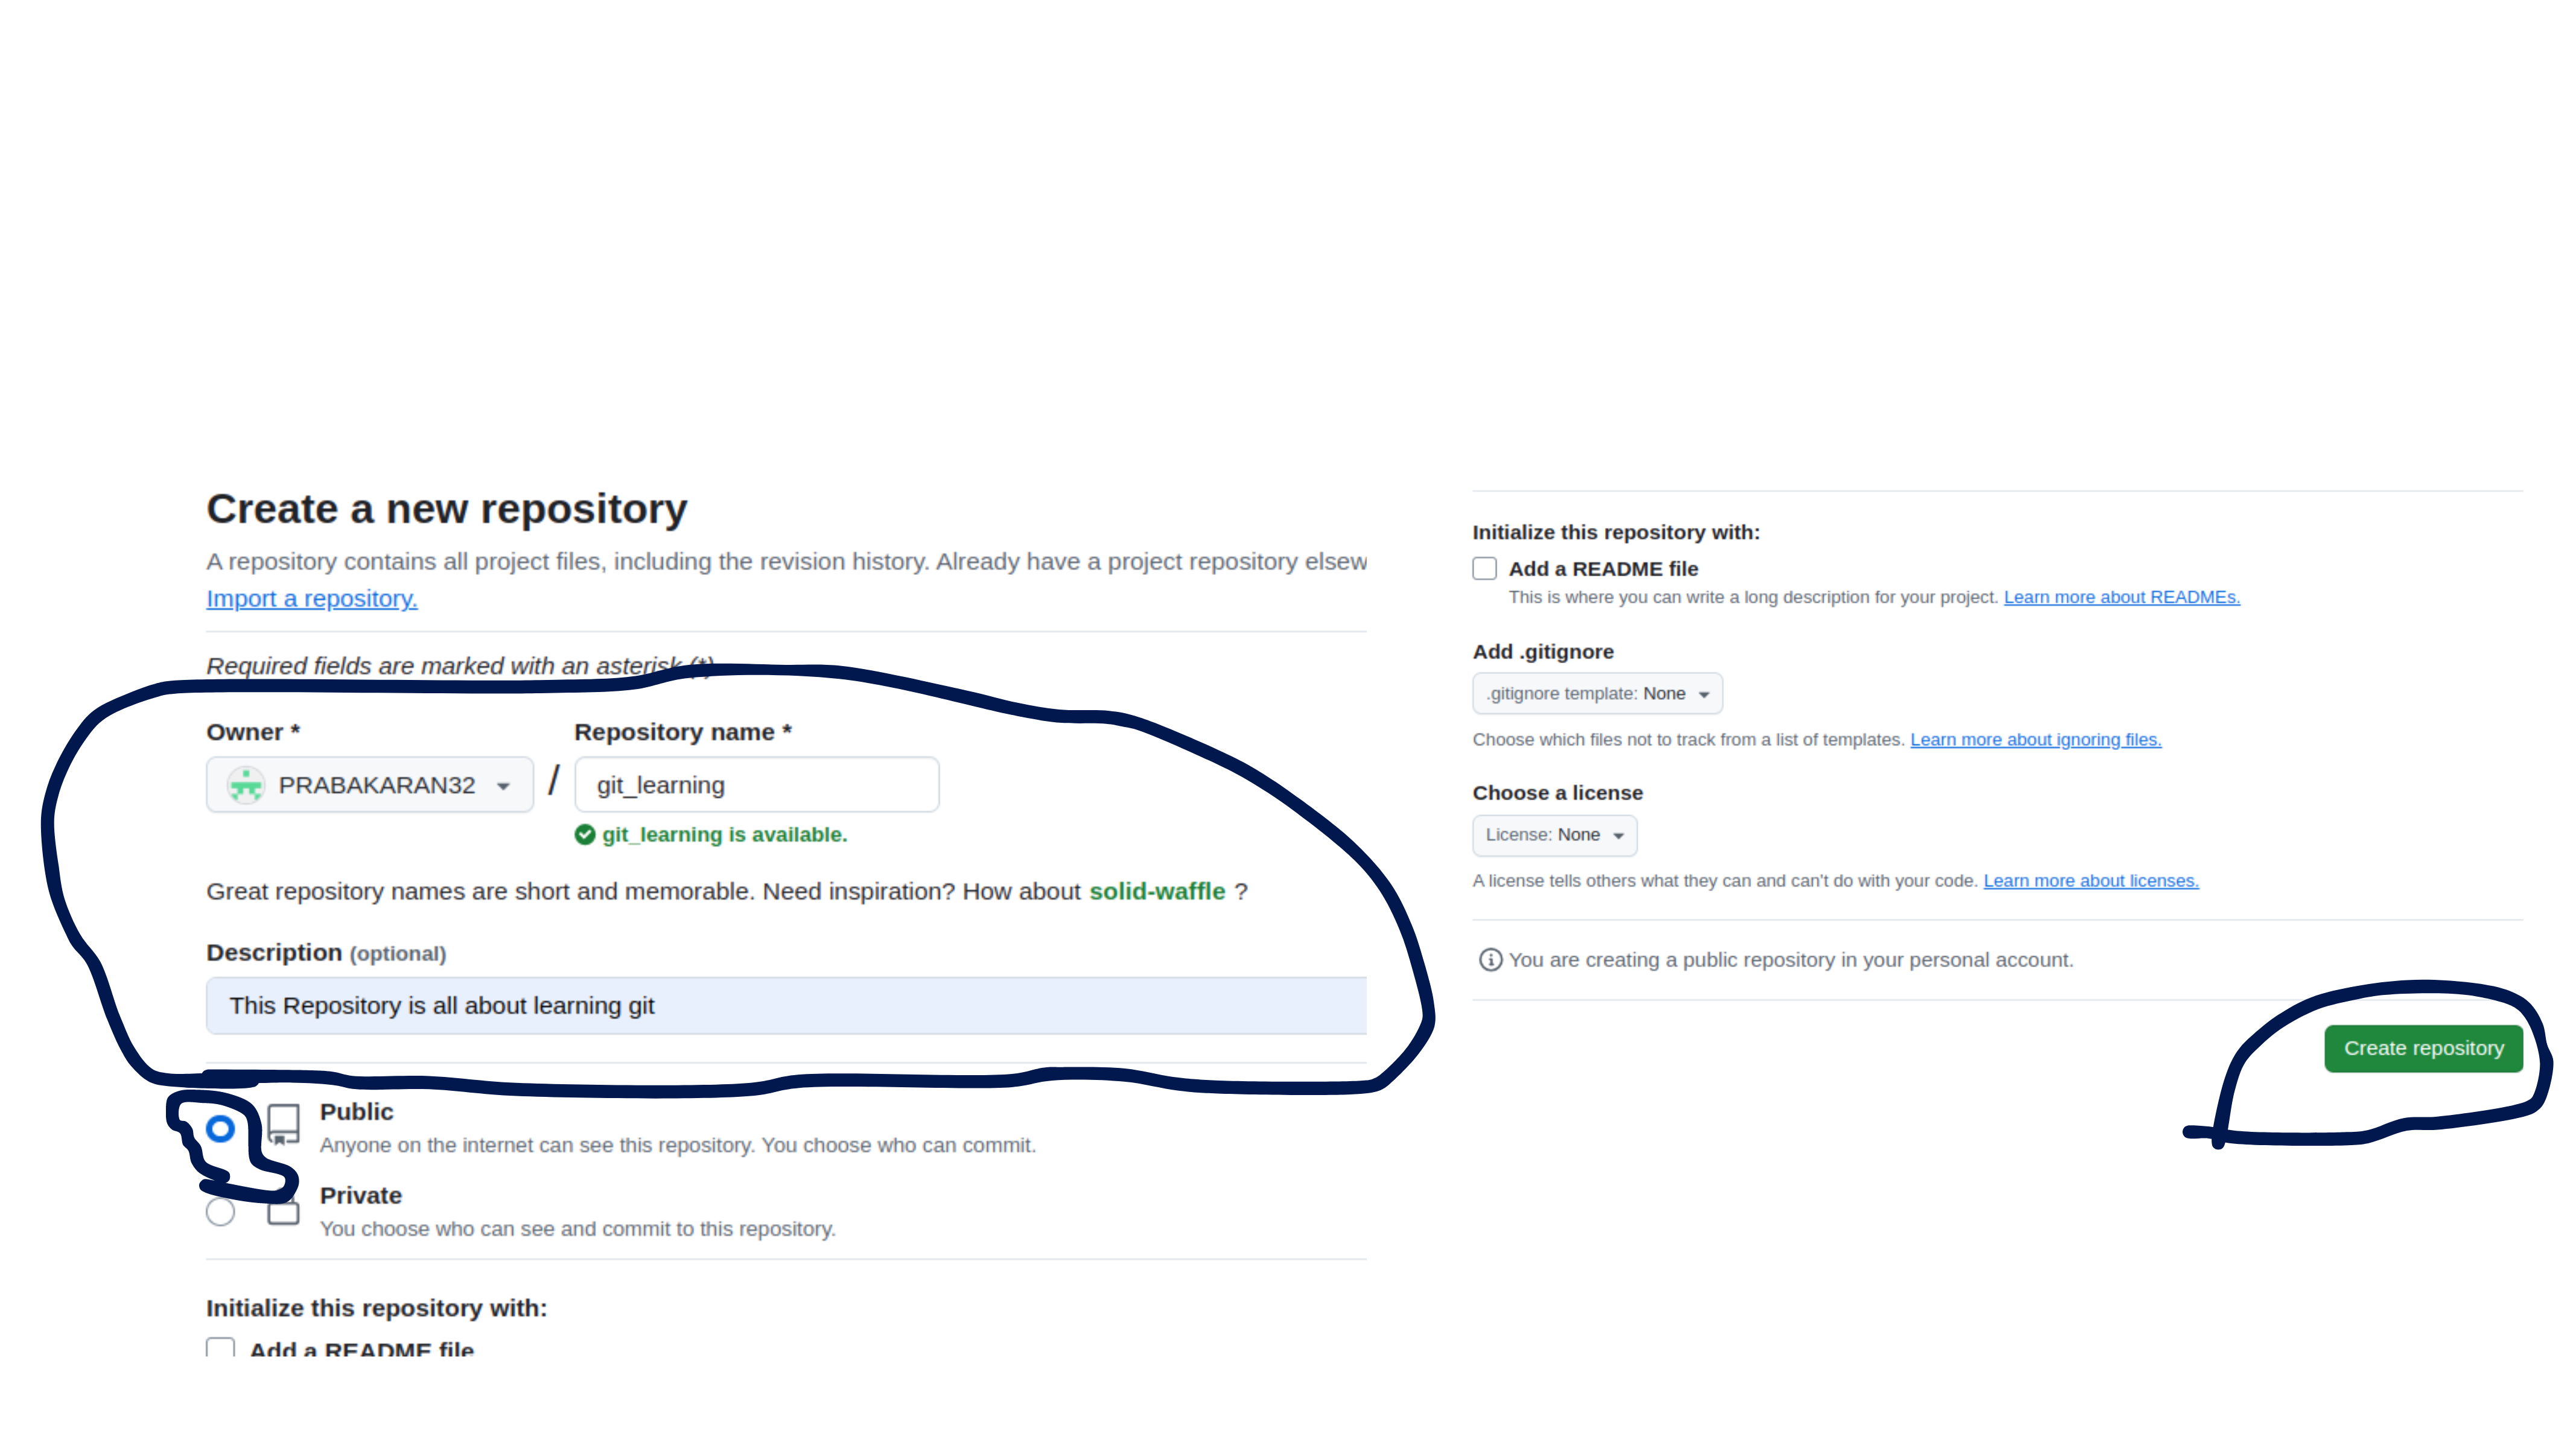
Step 3: Name the Repository and the description (optional). We are creating the Public Repository so click the Public radio box. Then click Create Repository.
Step 4: Now you are redirected to the git remote repository page.
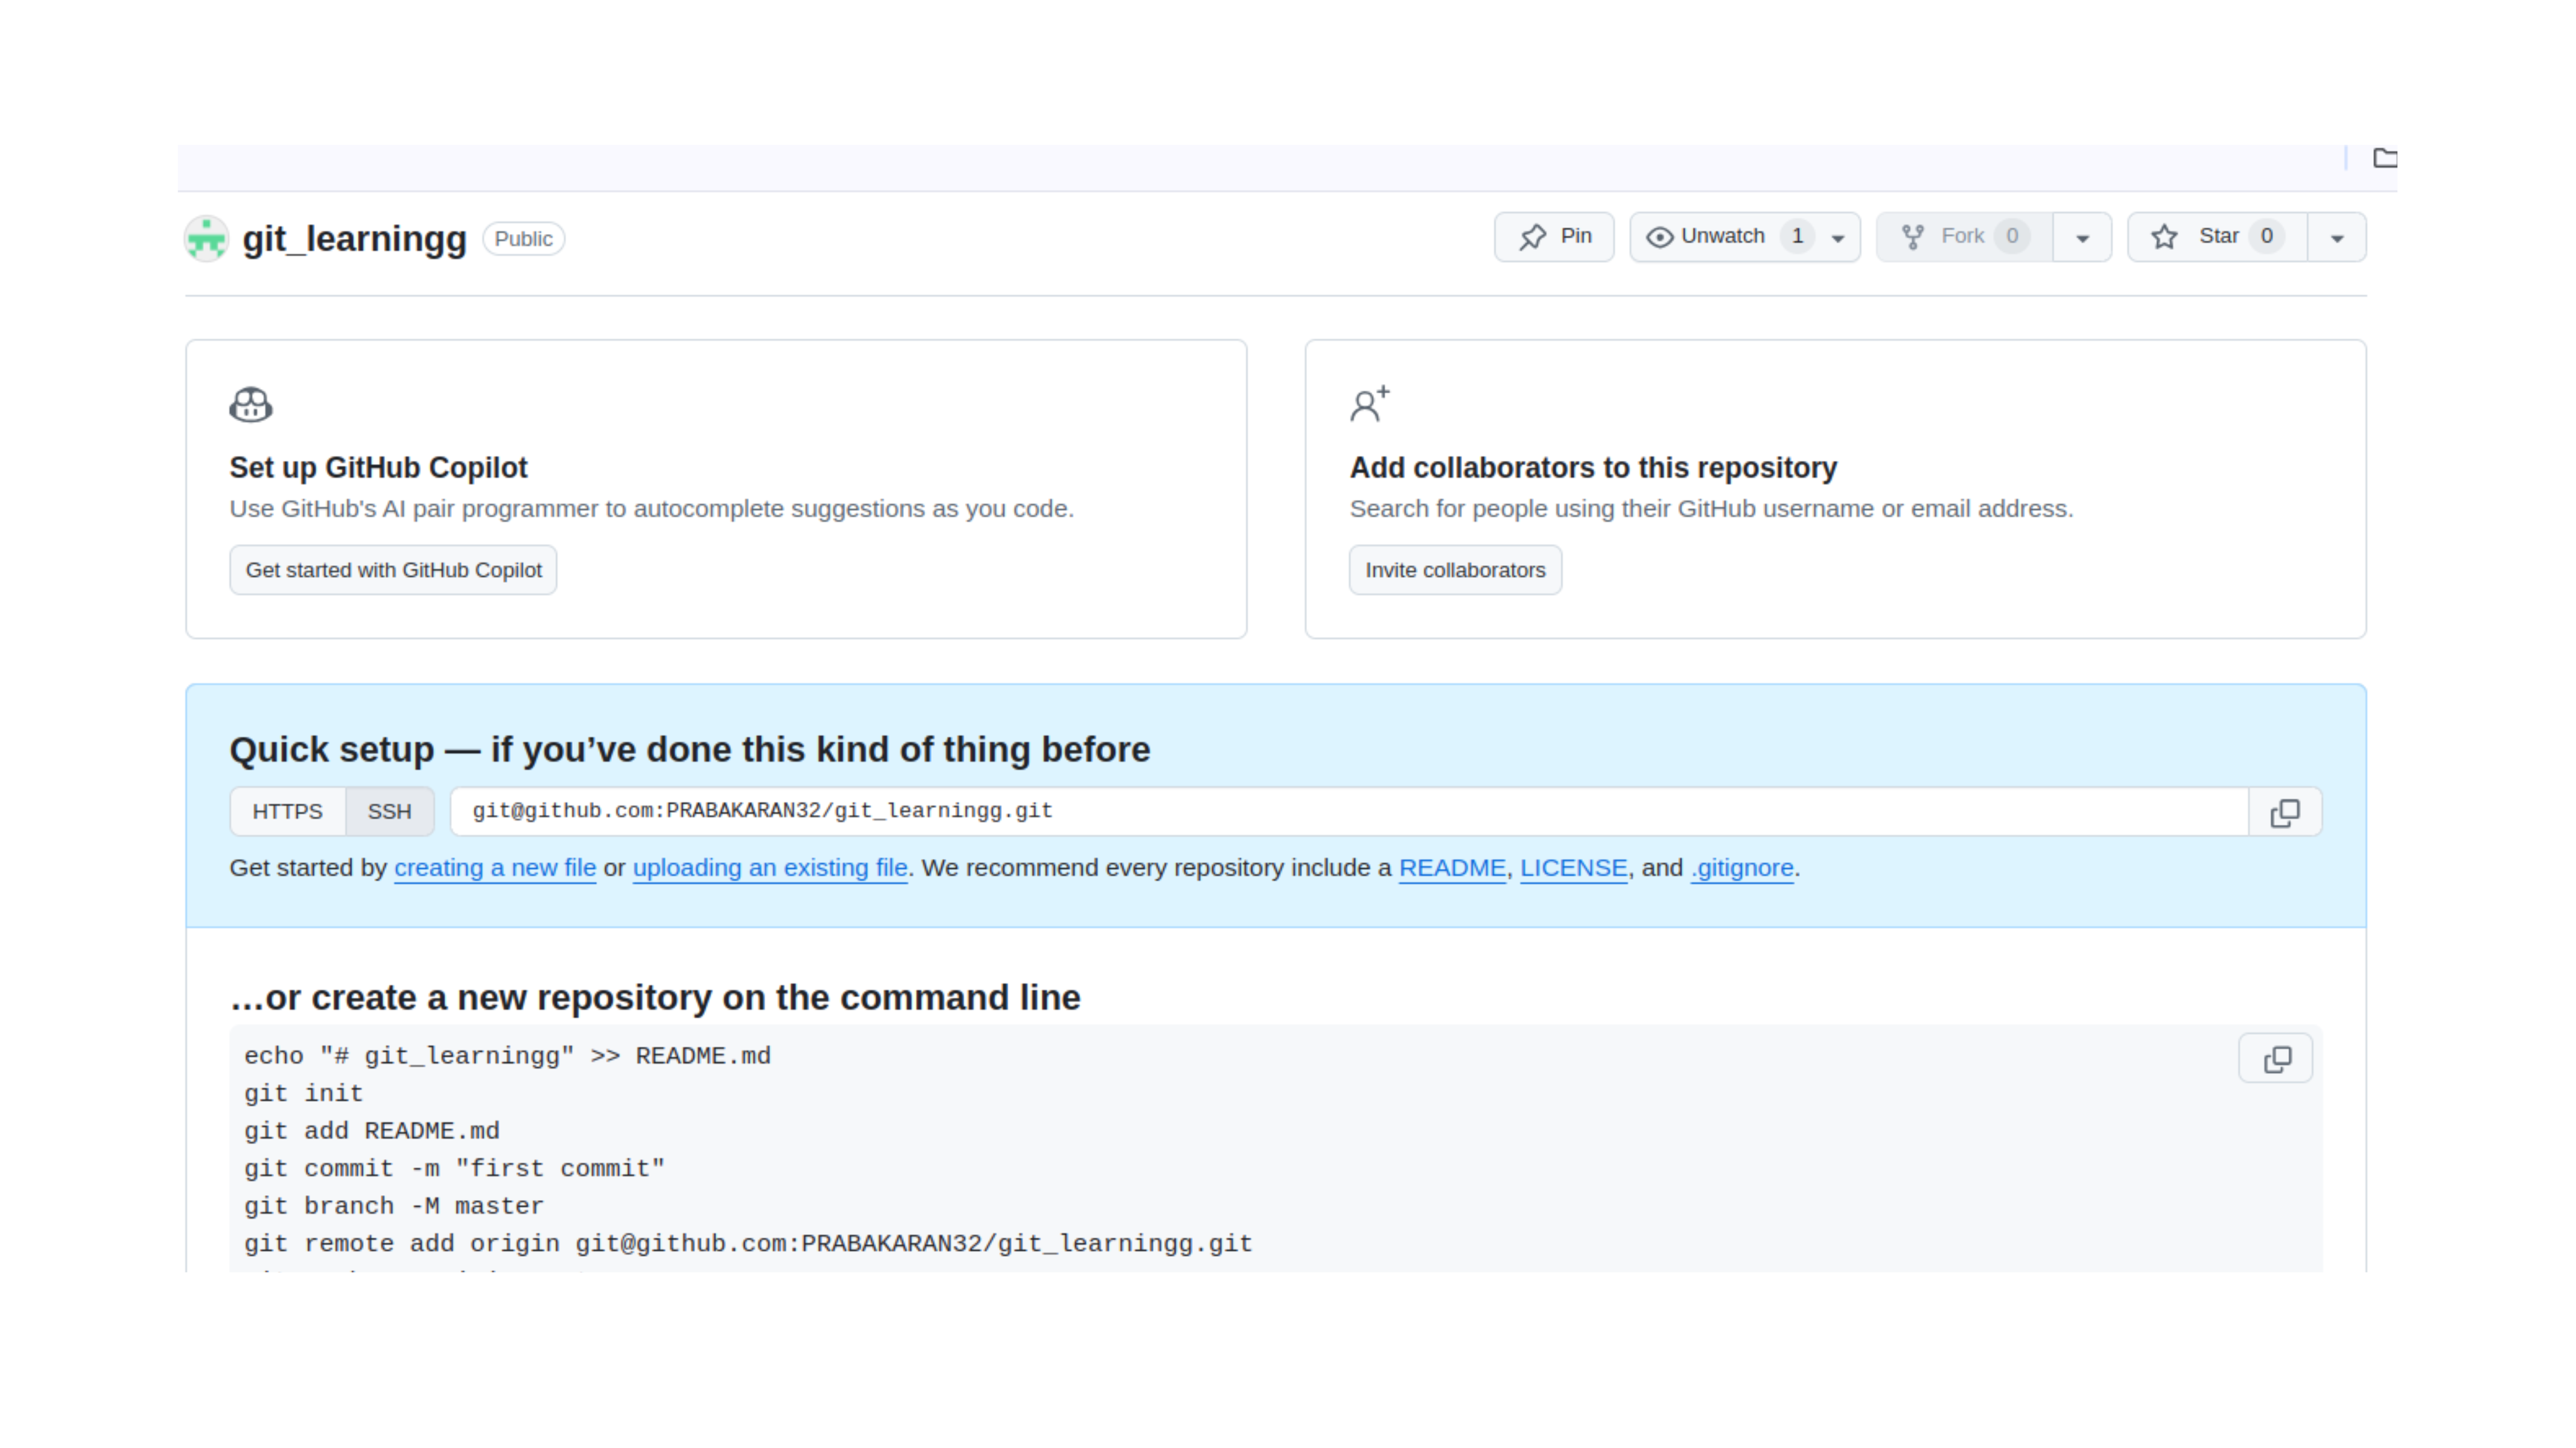
You can see the Empty Remote repository on GitHub.
Now You Need to add the SSH key to the GitHub.
Step 1: Open the terminal and use the following command.
ssh-keygen -t rsa
Then you need to set the path where you need to store the SSH key in your local system. In my case, I used “/home/legend/.ssh/git_rsa“.
ls /home/legend/.ssh/
Now you can see the git_rsa and git_rsa.pub inside the .ssh folder.
NOTE: You should not share your git_rsa(private key) to anybody. You should only share the git_rsa.pub(public key)
cat /home/legend/.ssh/git_rsa.pub
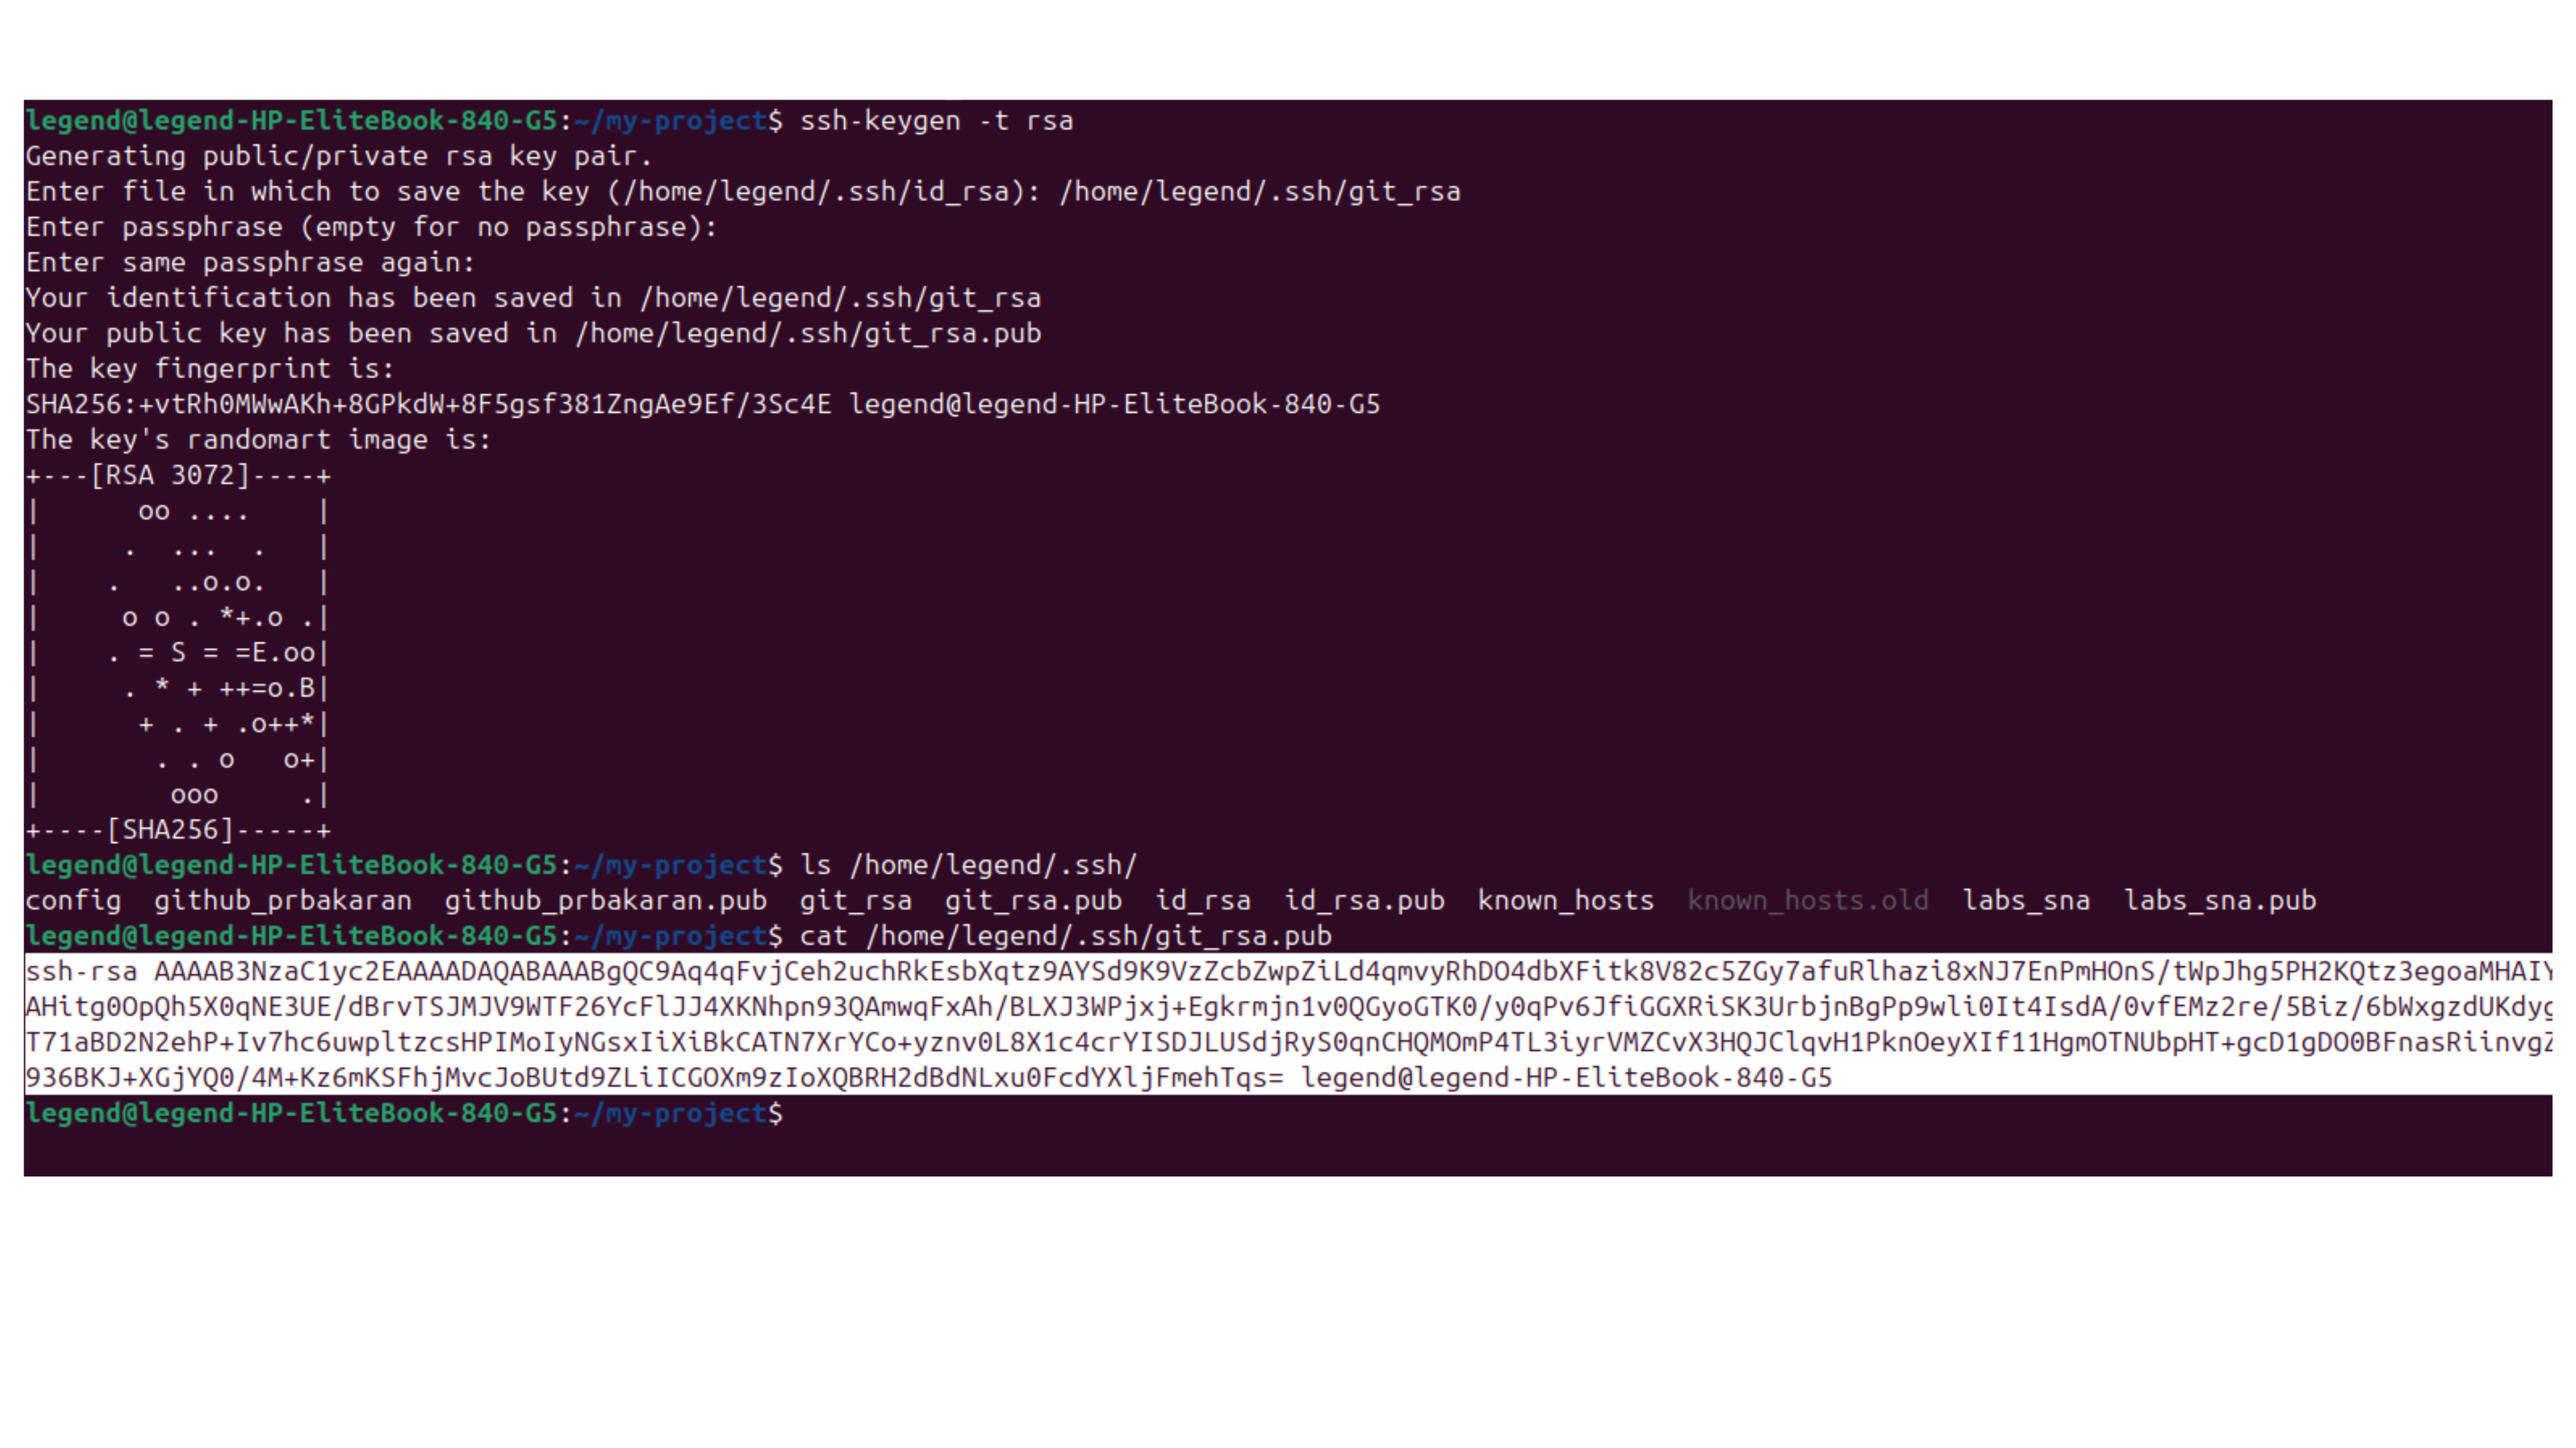
Now Copy the git_rsa.pub file.
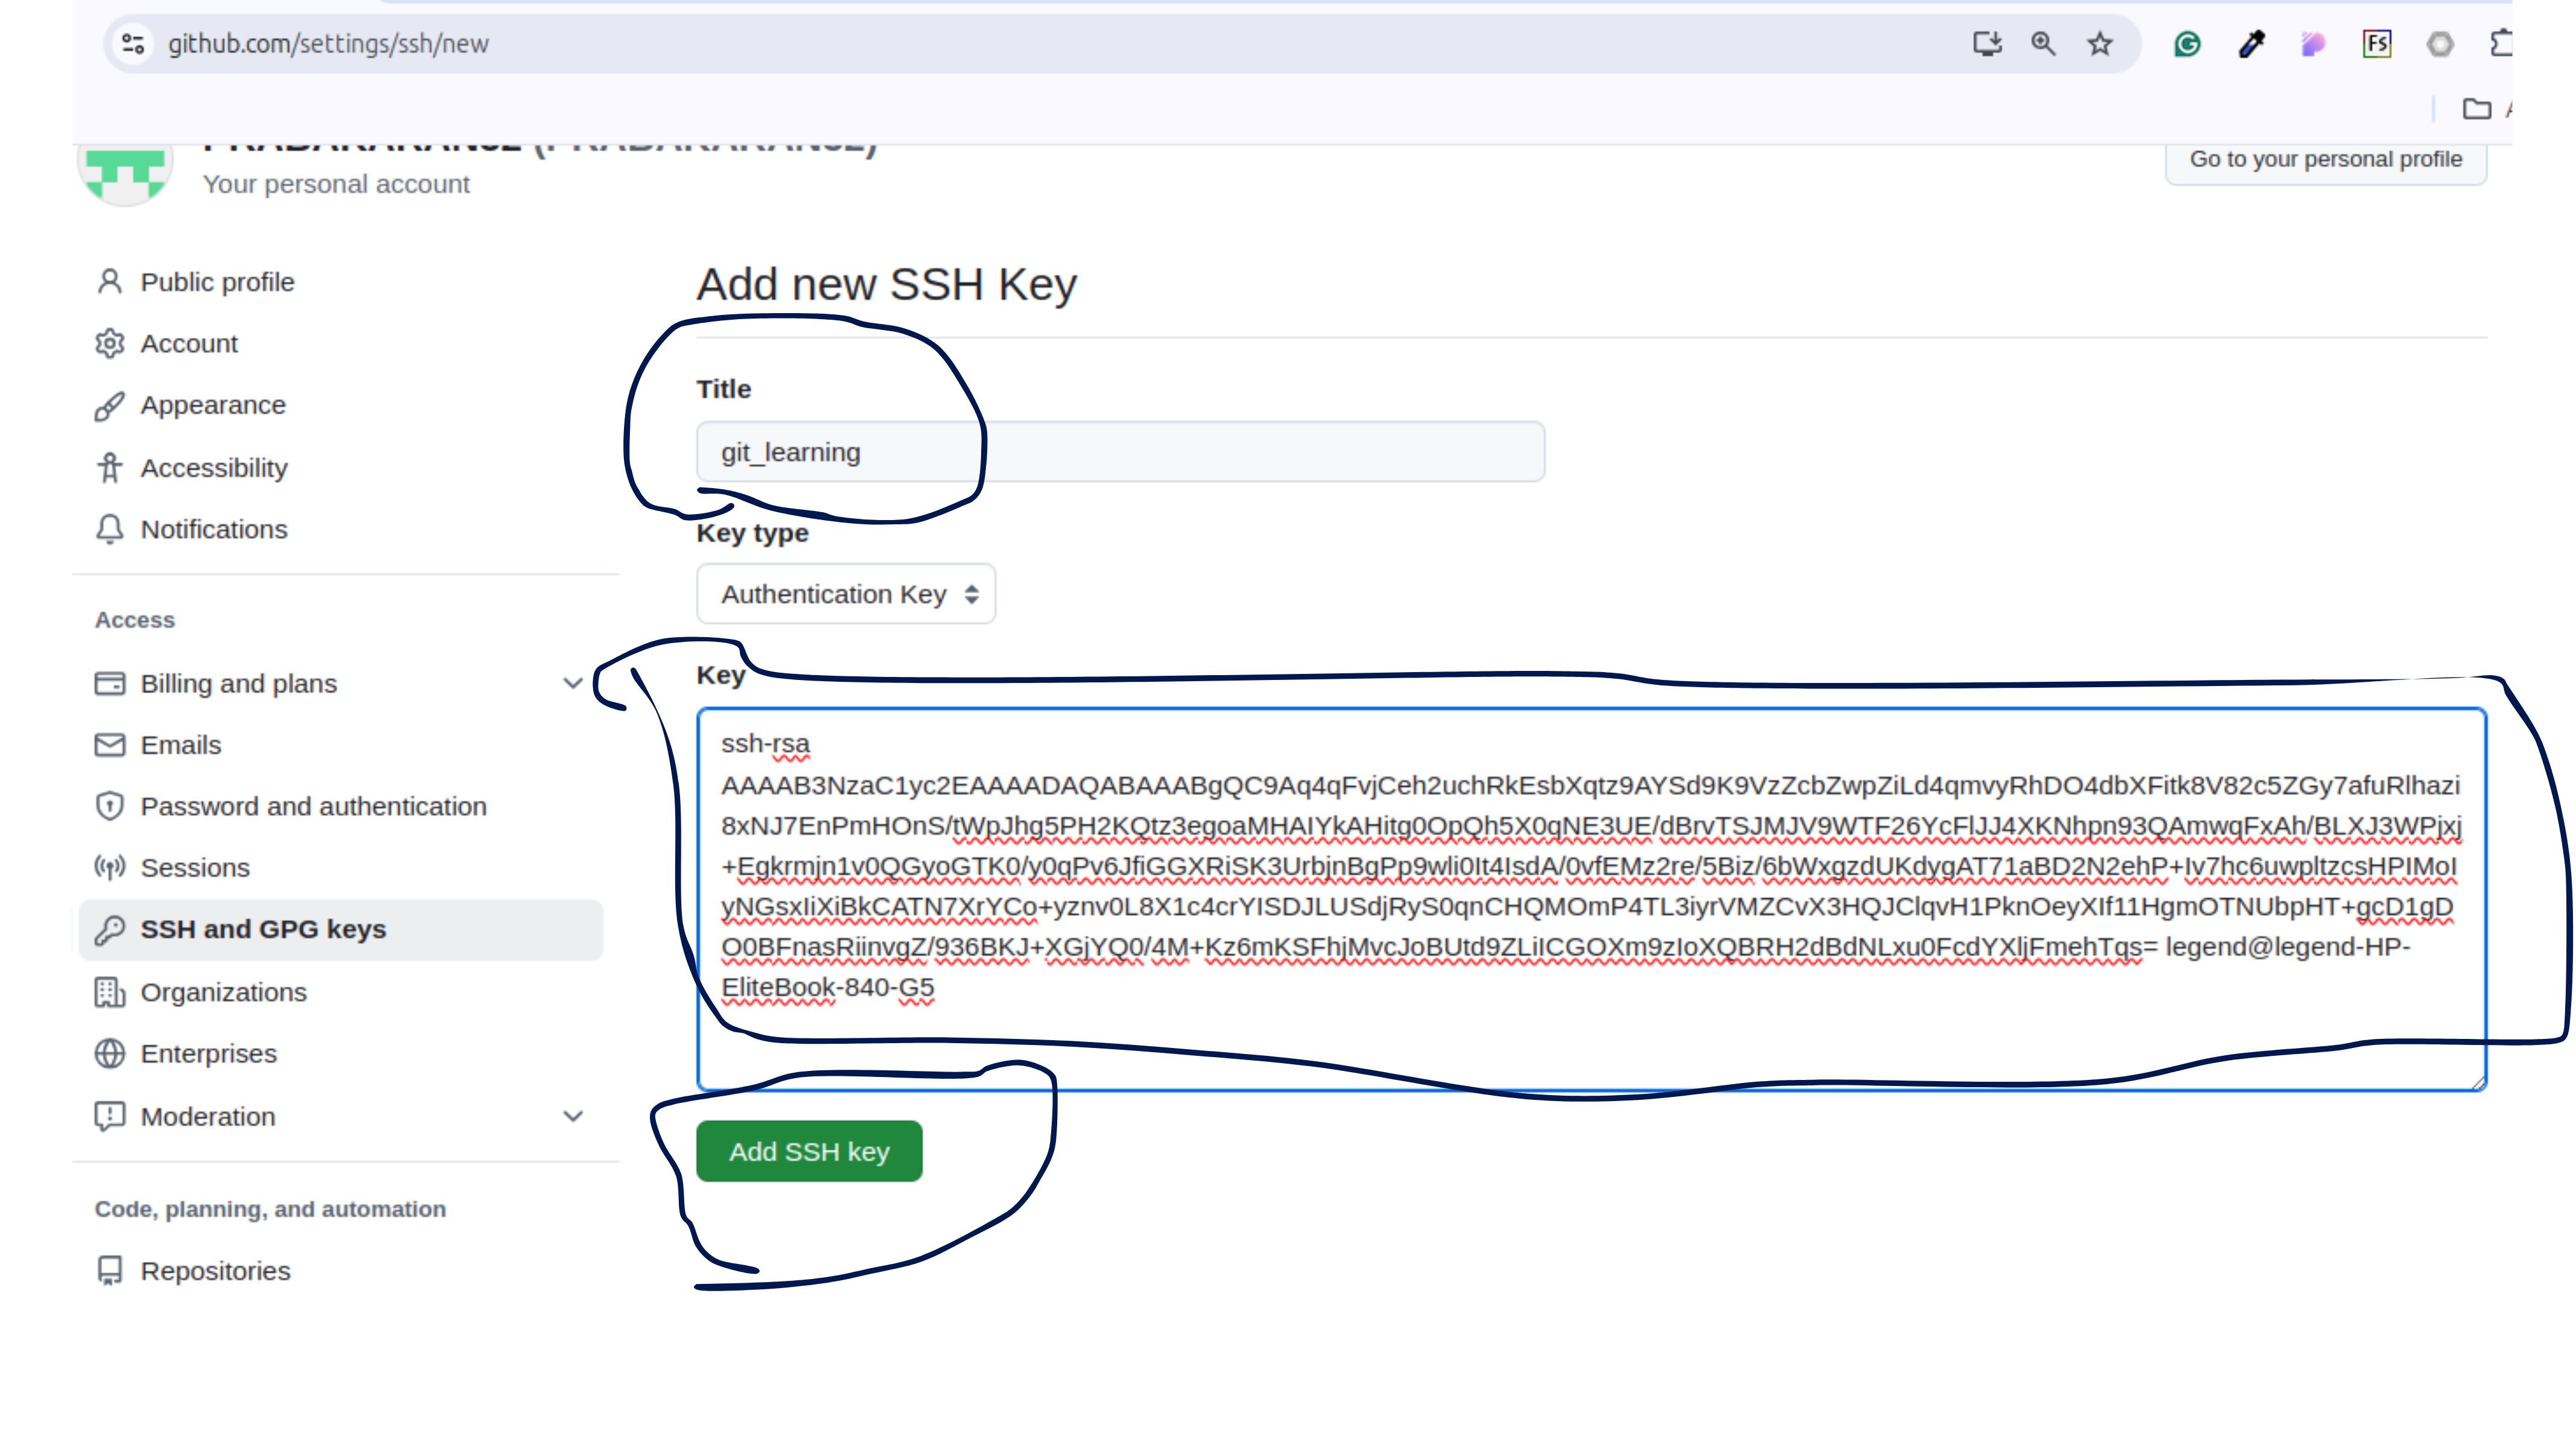
Step 2: In GitHub open settings, and click the SSH and GPG key button and click the New SHH key green button on the next page.
Give the title_name of the key and past the copied git_rsa.pub file to the Key field.
Finally, click the Add Key button at the bottom.
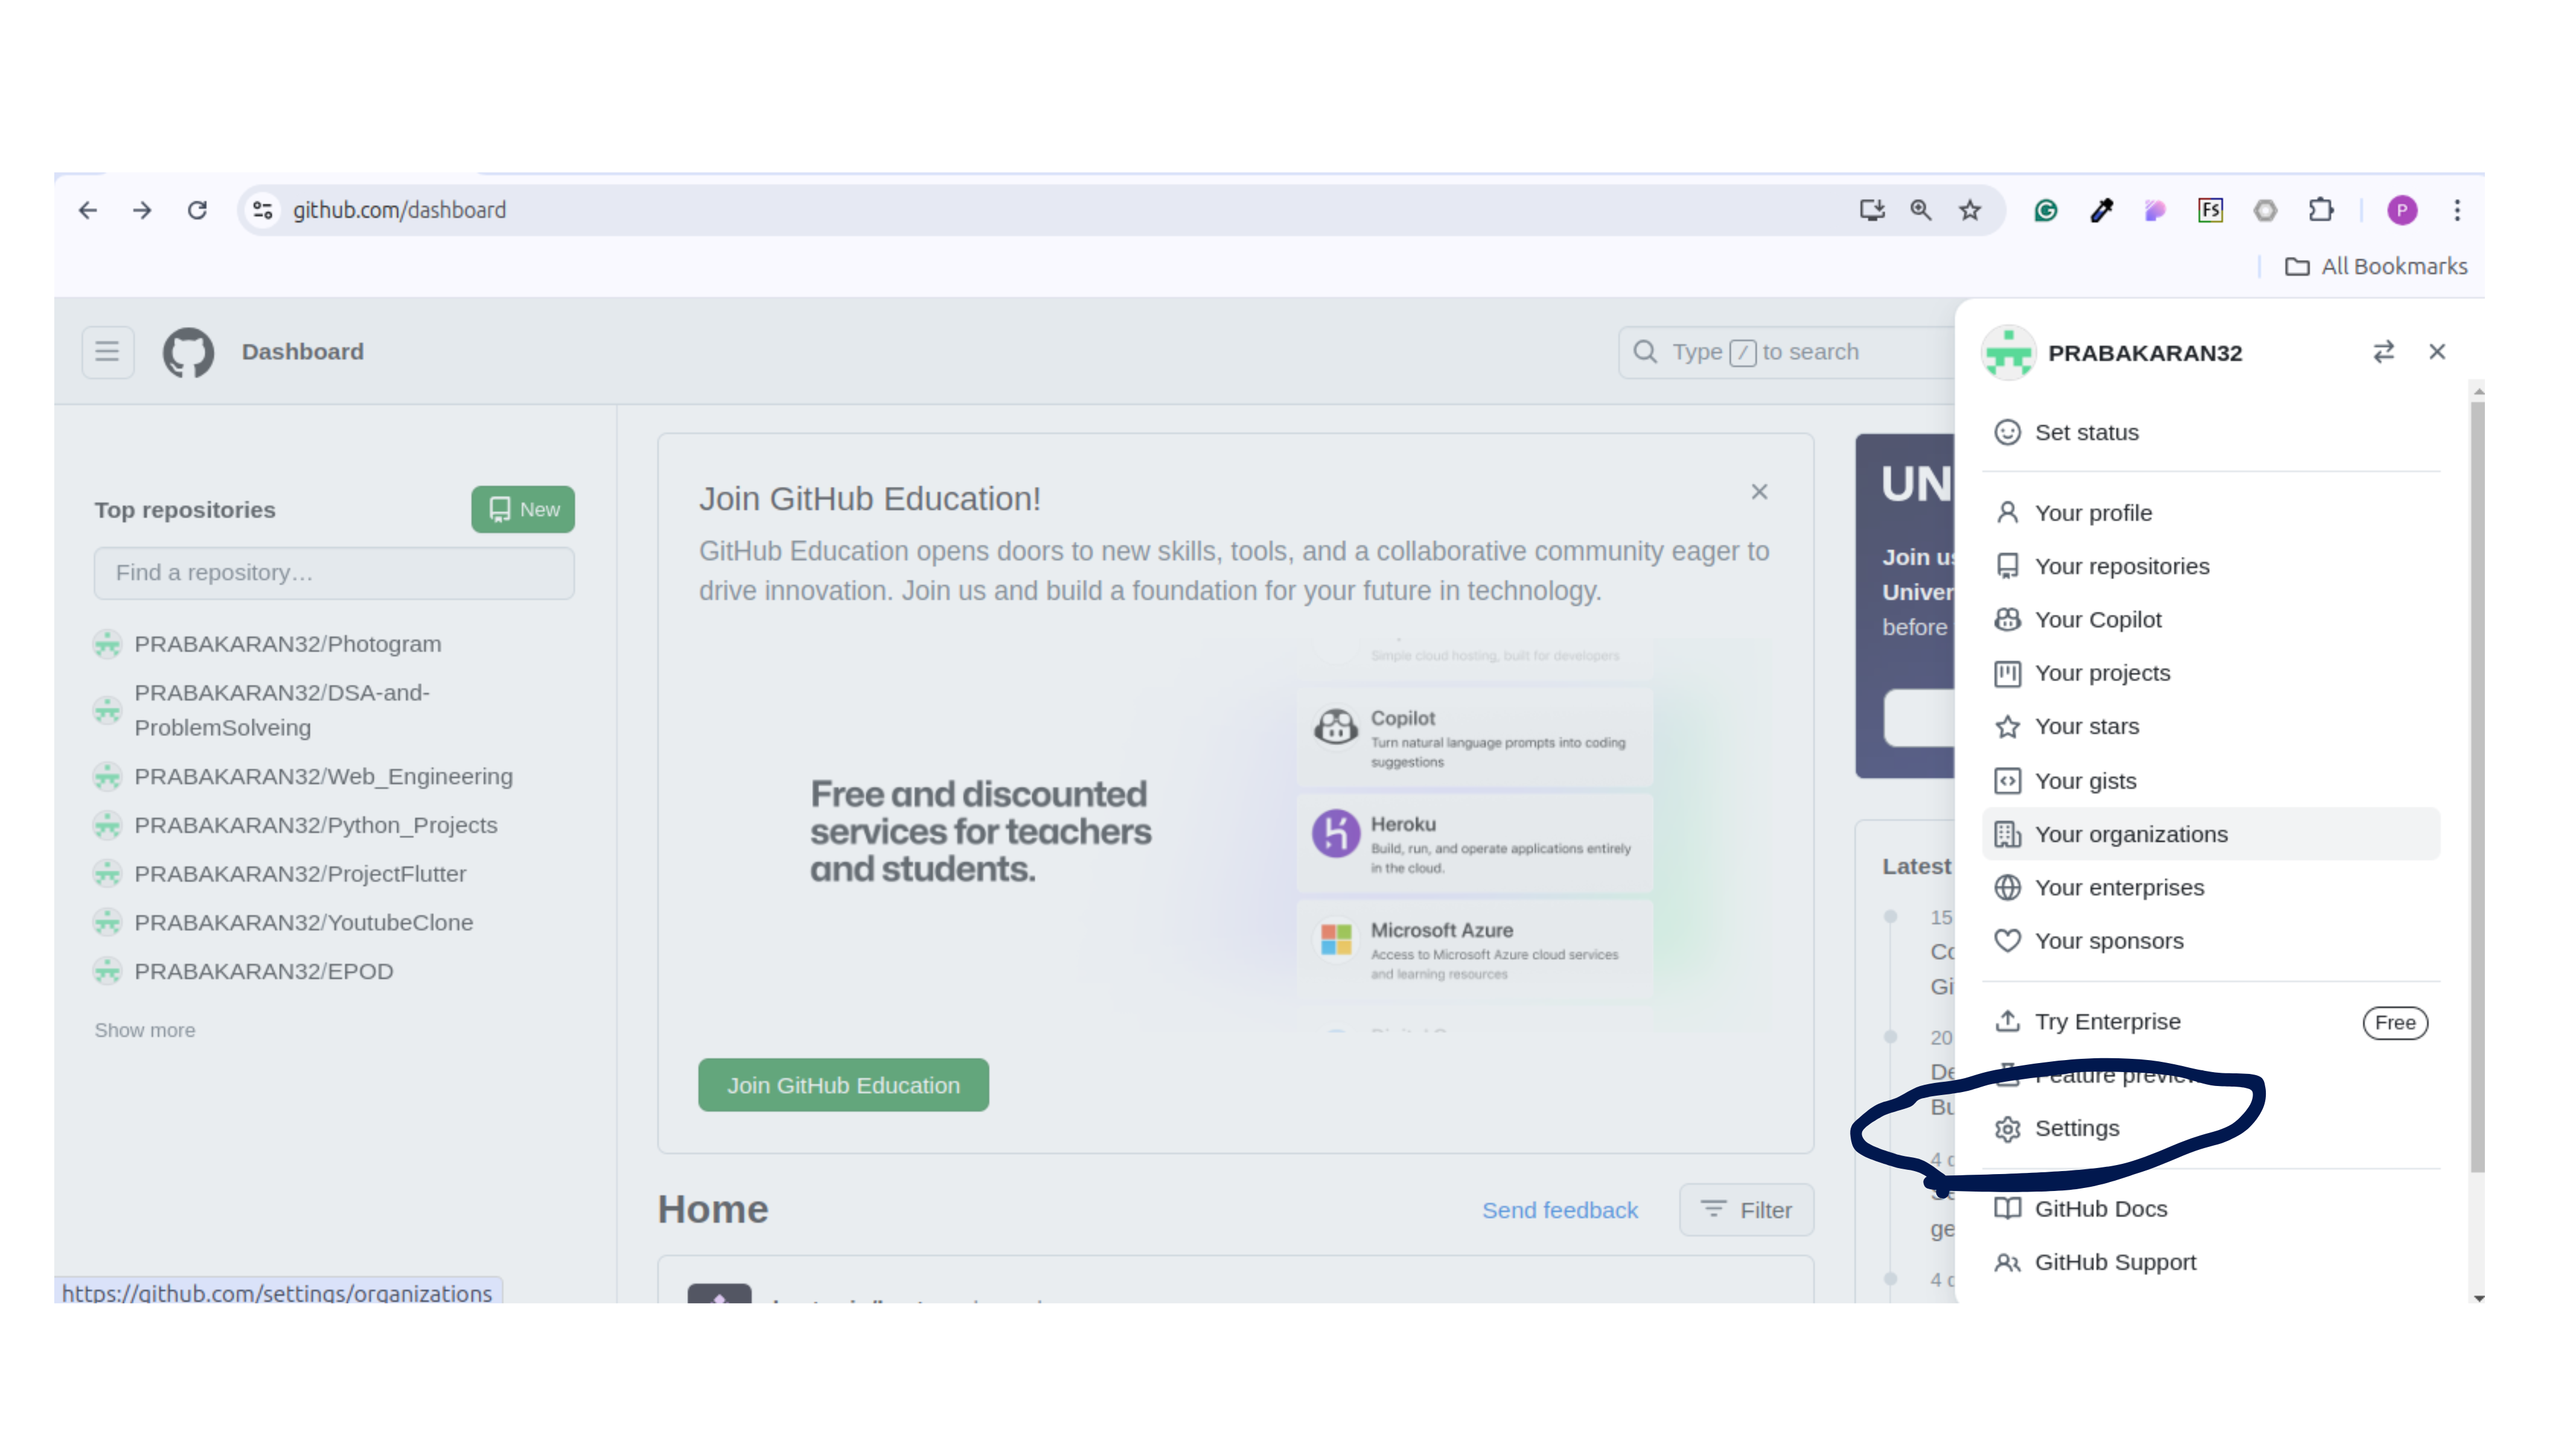
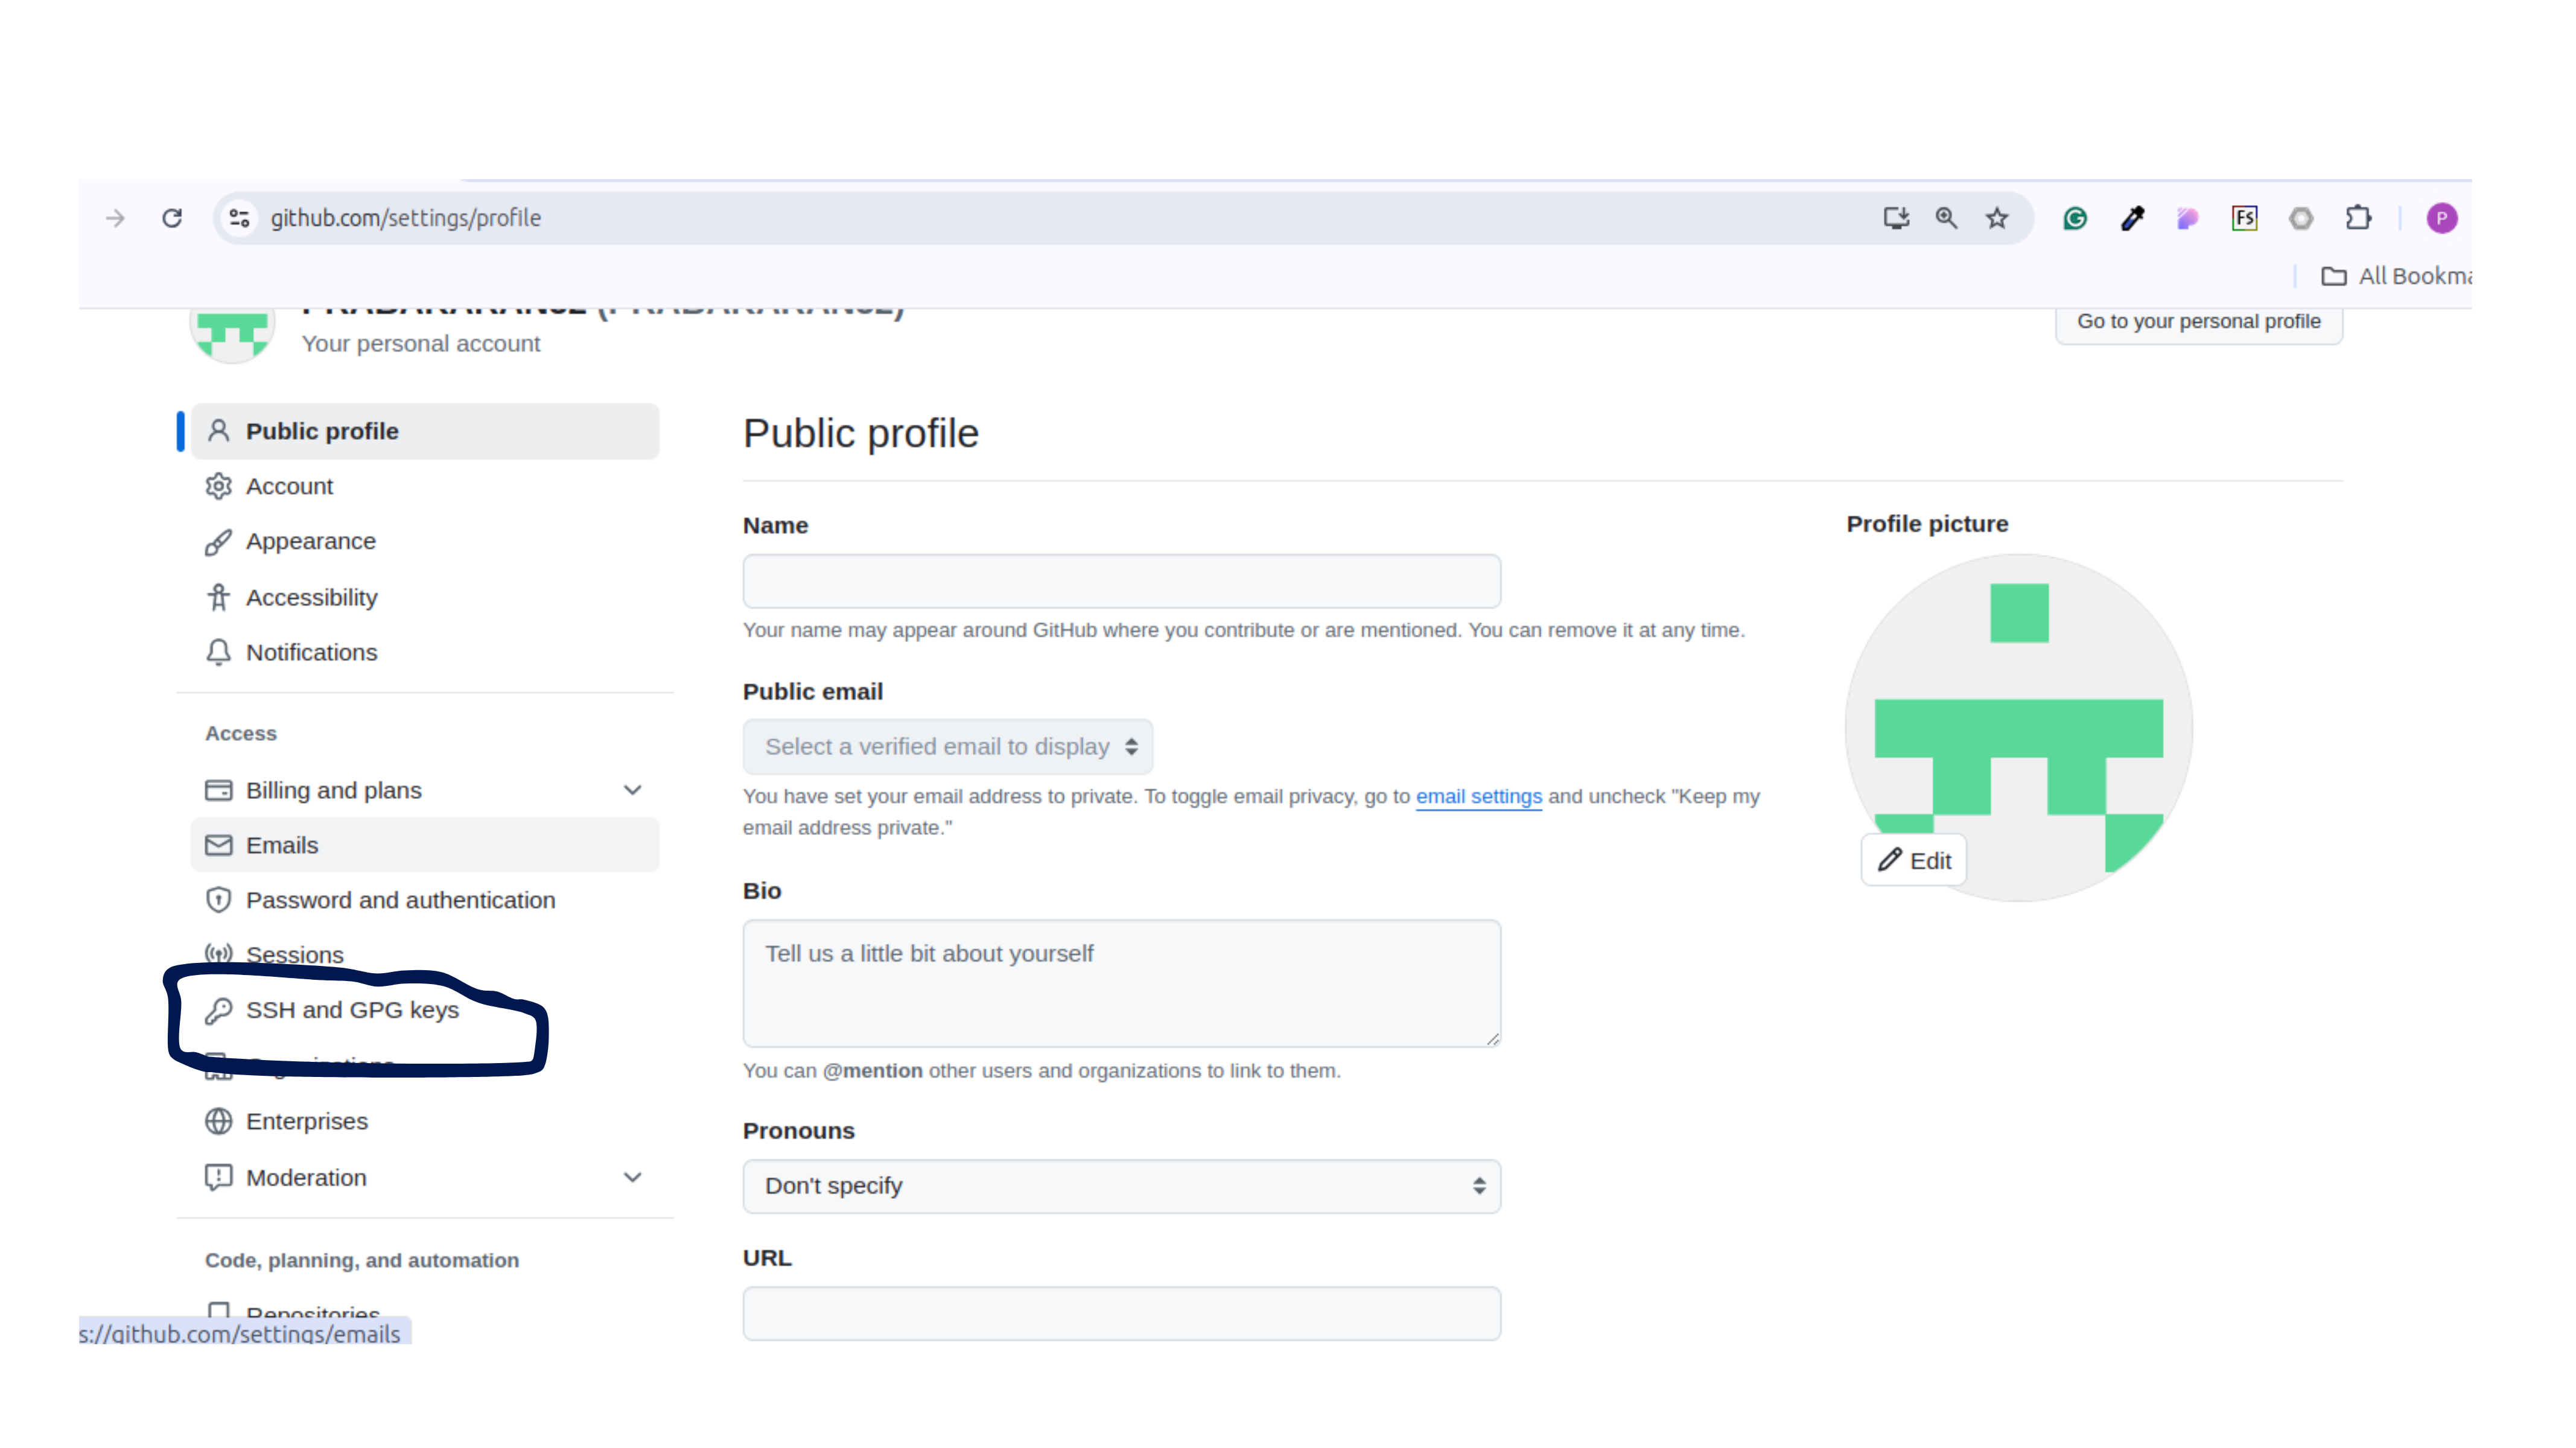
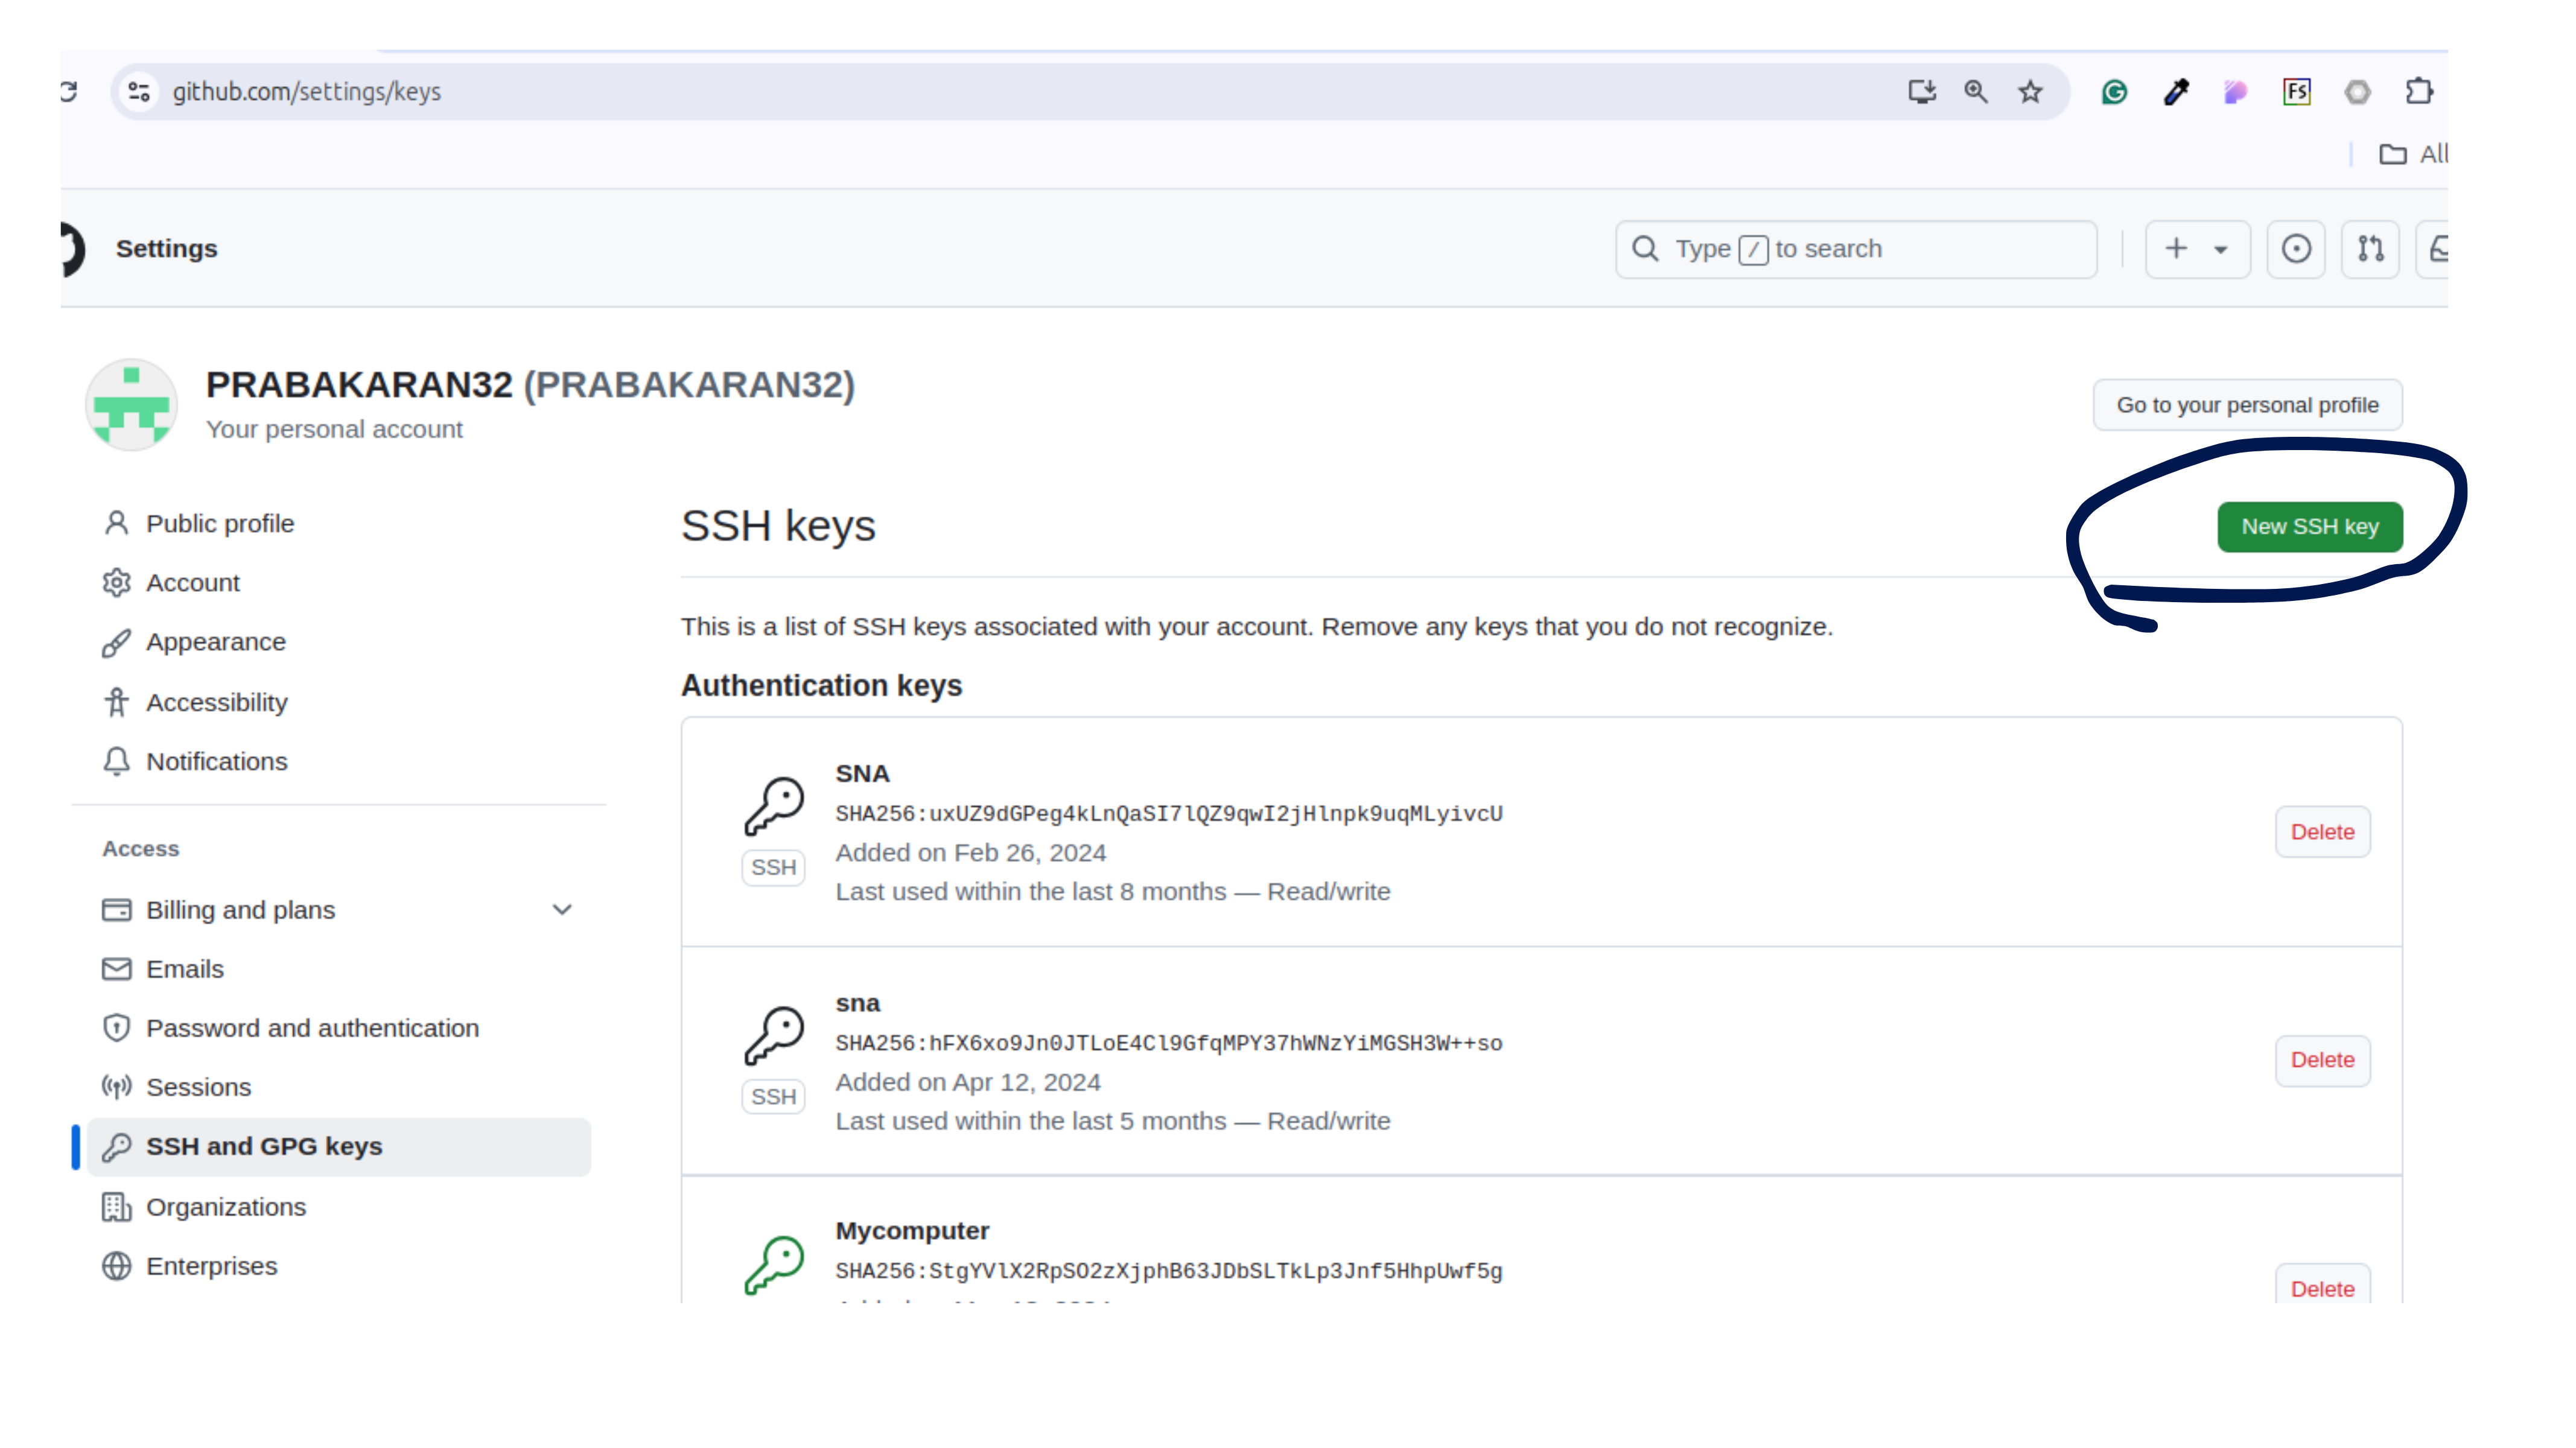
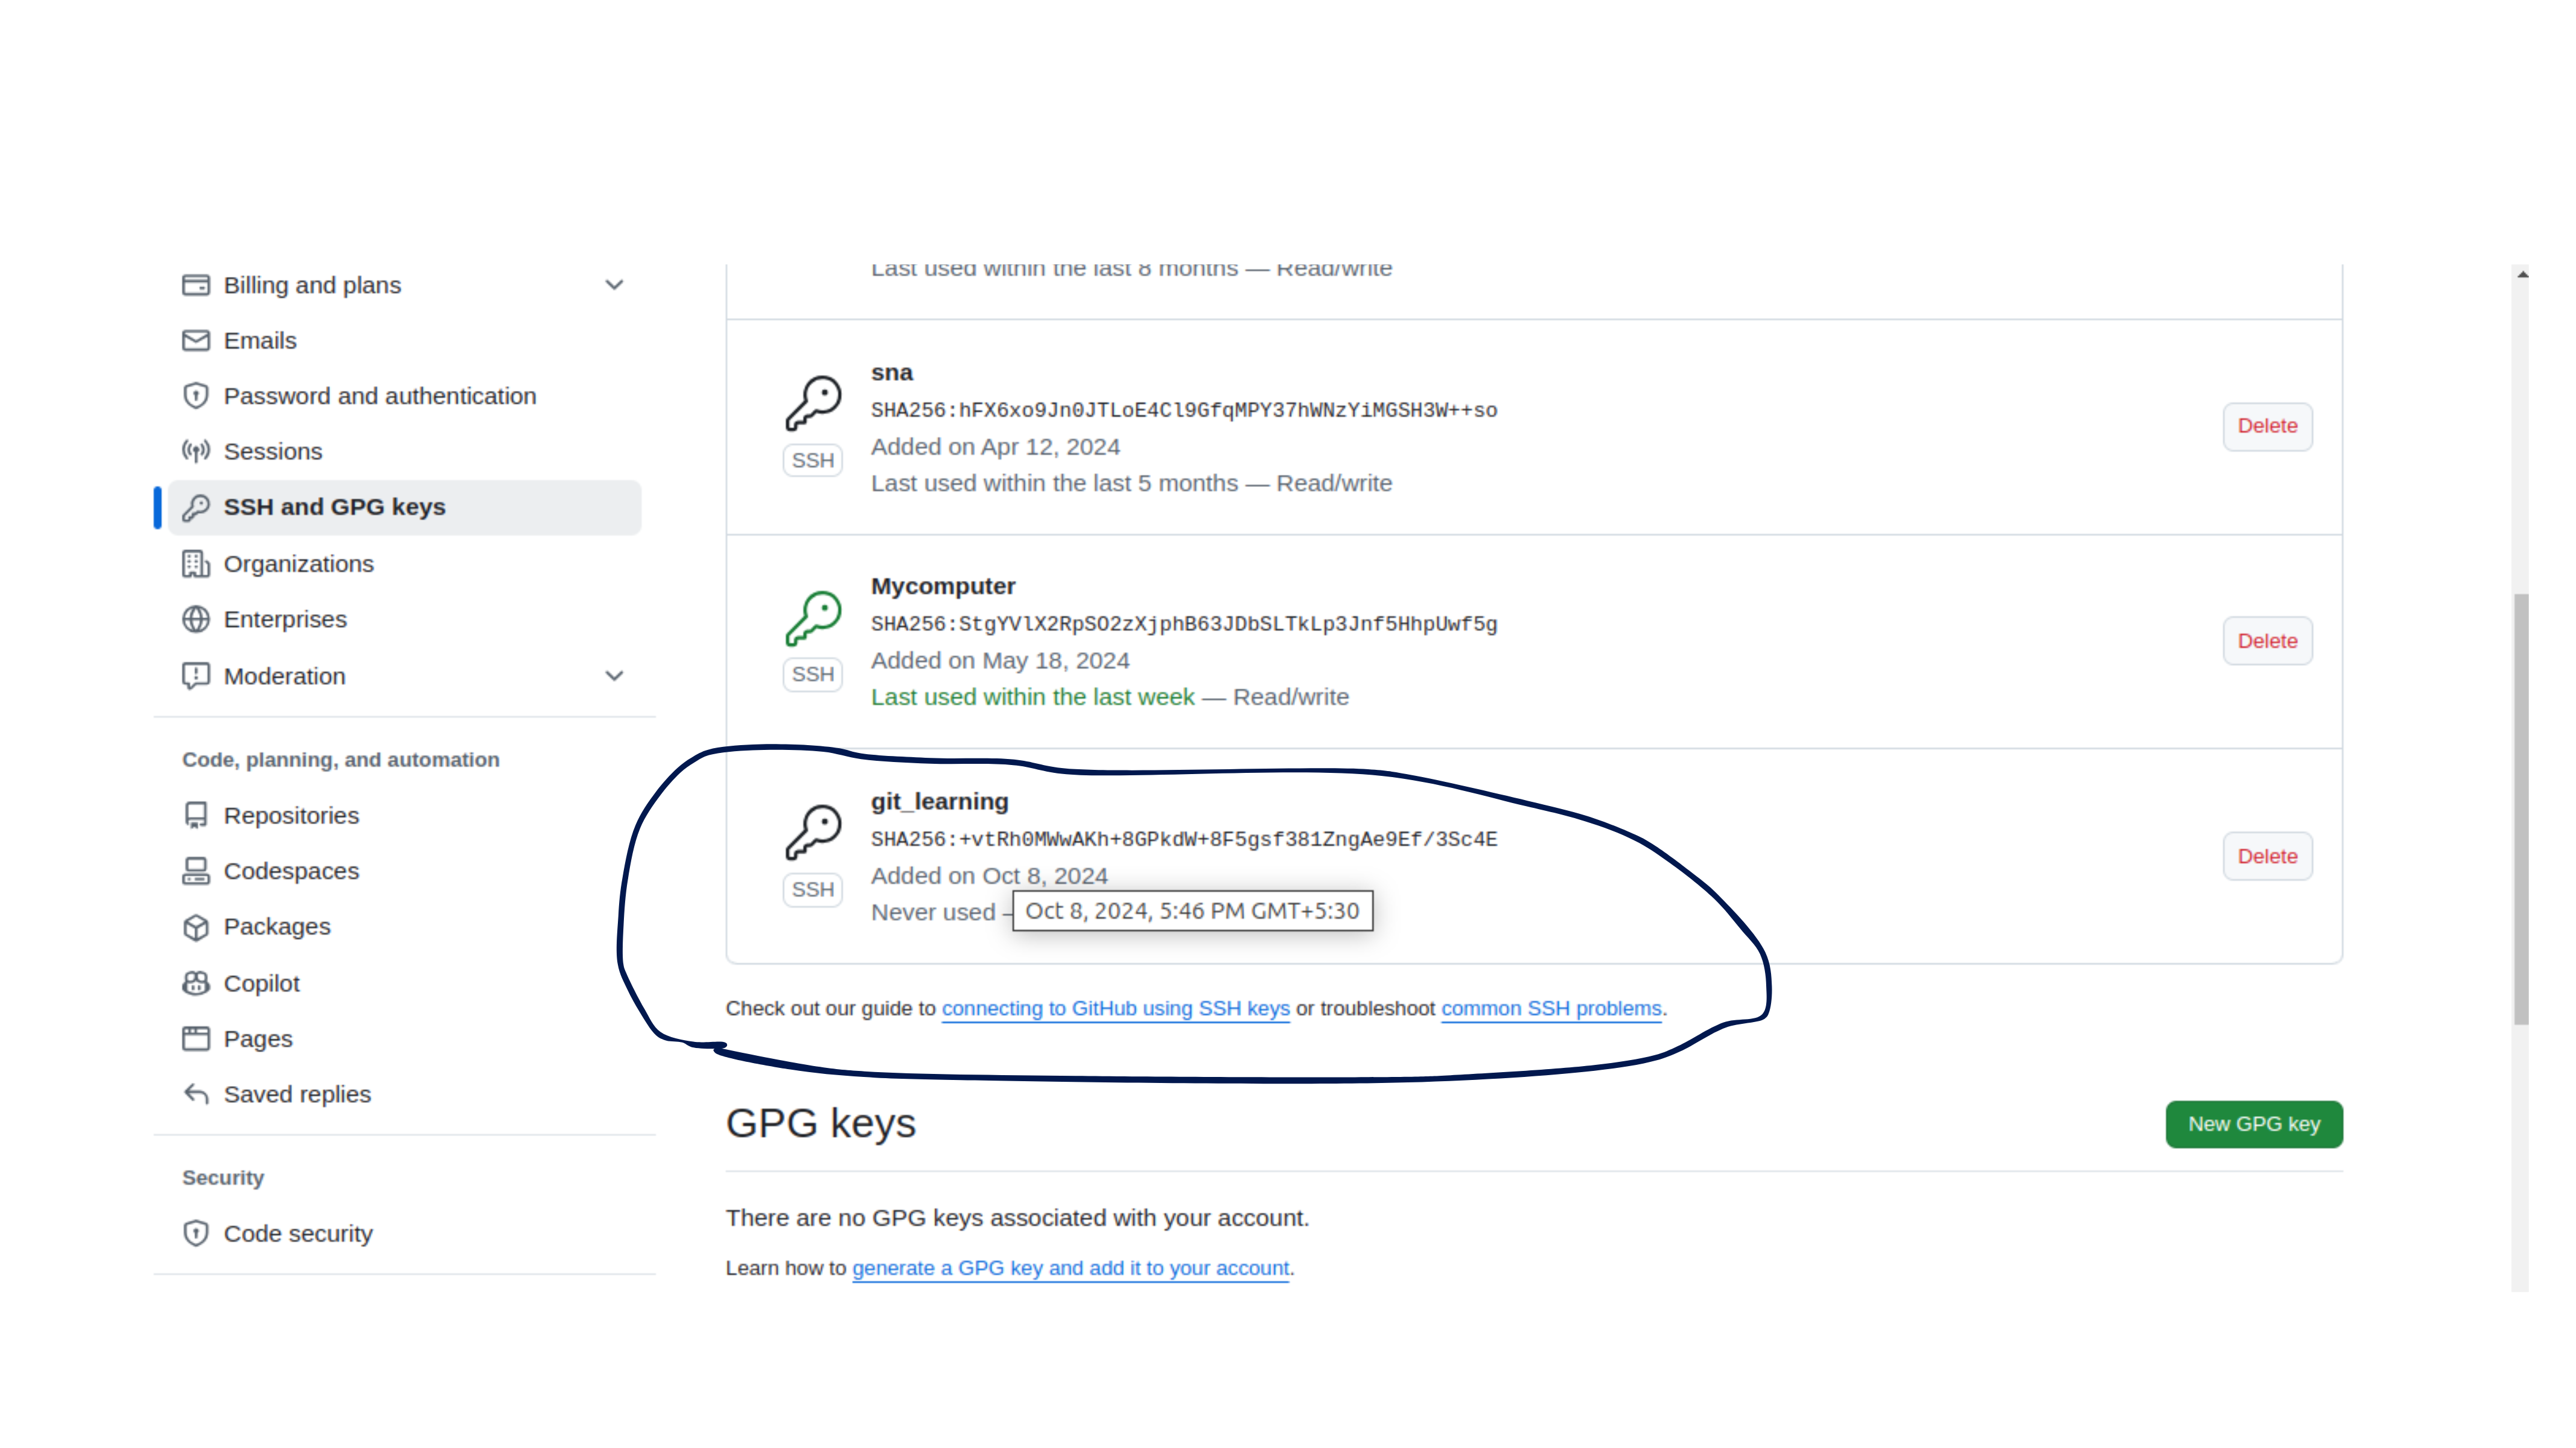
Now you can see the key is added.
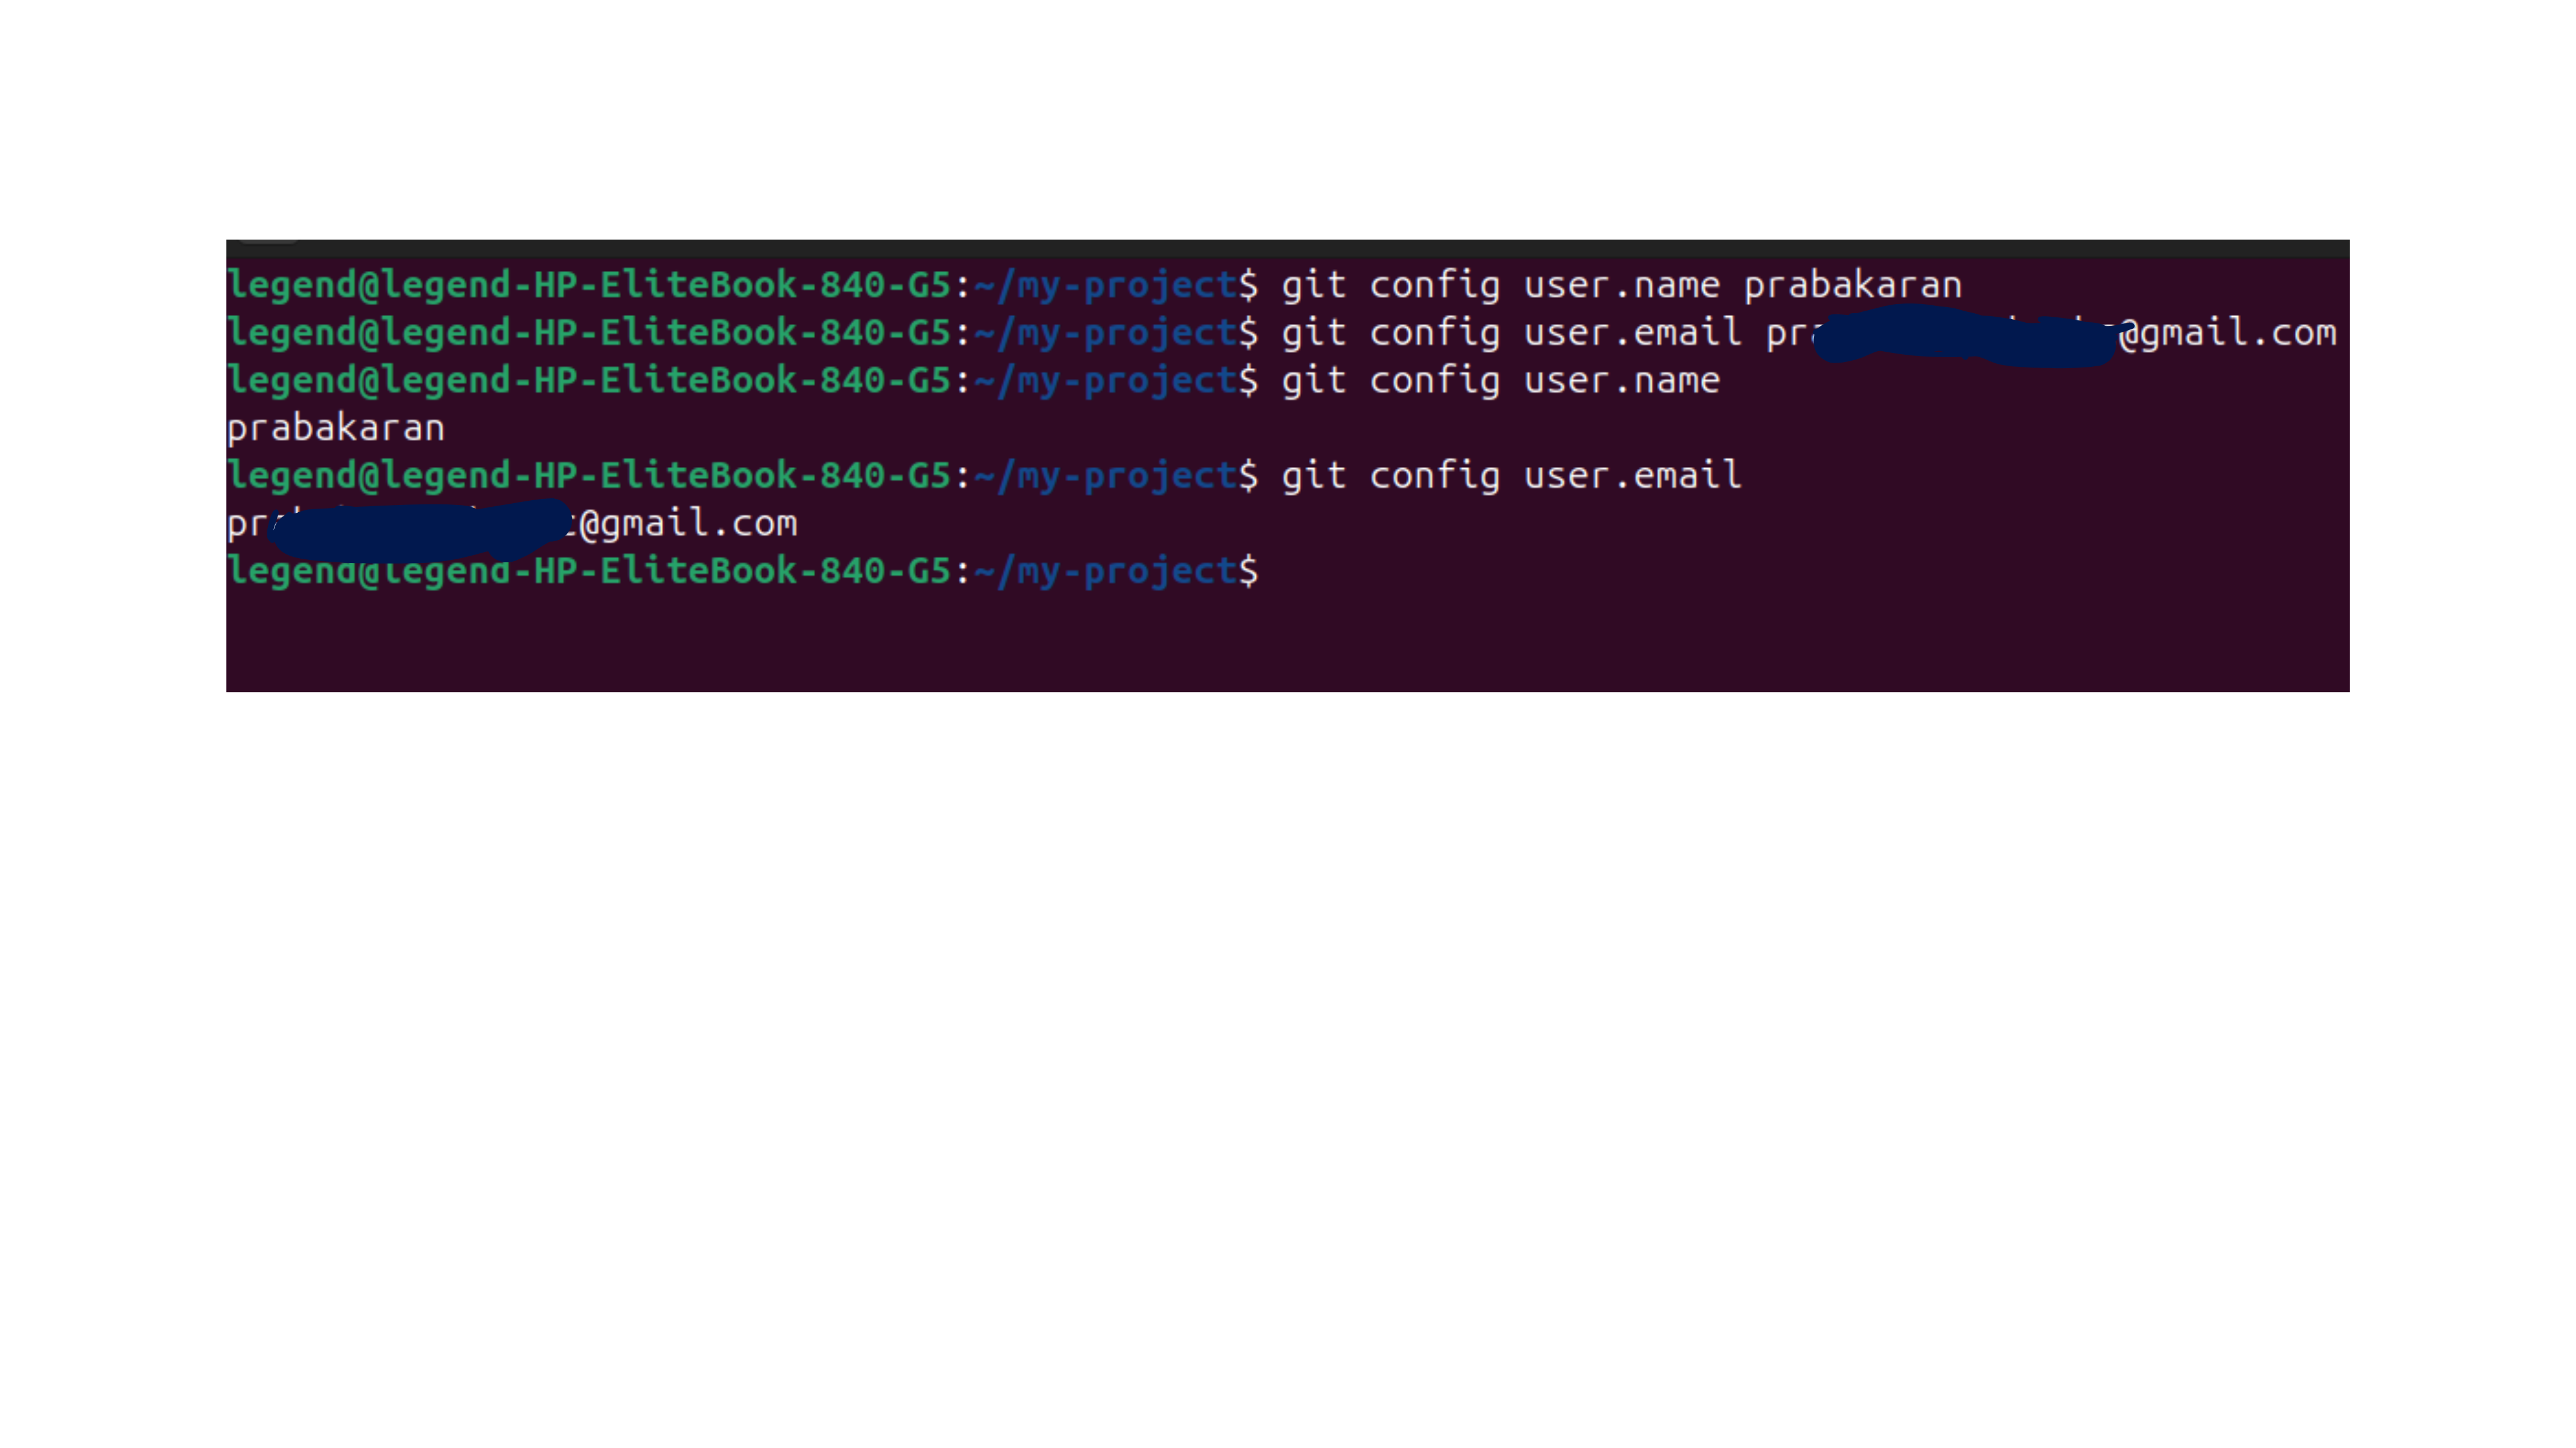
Step 3: Now you need to set the User_Name and User_Email in the Local Repository.
git config user.name <user-name>
git config user.email <user-email>
We can confirm whether the User_Name and User_Email are set or not by using the following command,
git config user.name
git config user.email
Git Commands to Push to remote Repository.
After all this is done, Now it’s time to push our code to GitHub,
Step 1: Initialize the git in the local Working Directory.
git init
Step 2:(Optional) Create the files named file1.txt, file2.txt, file3.txt and folder called folder_1.
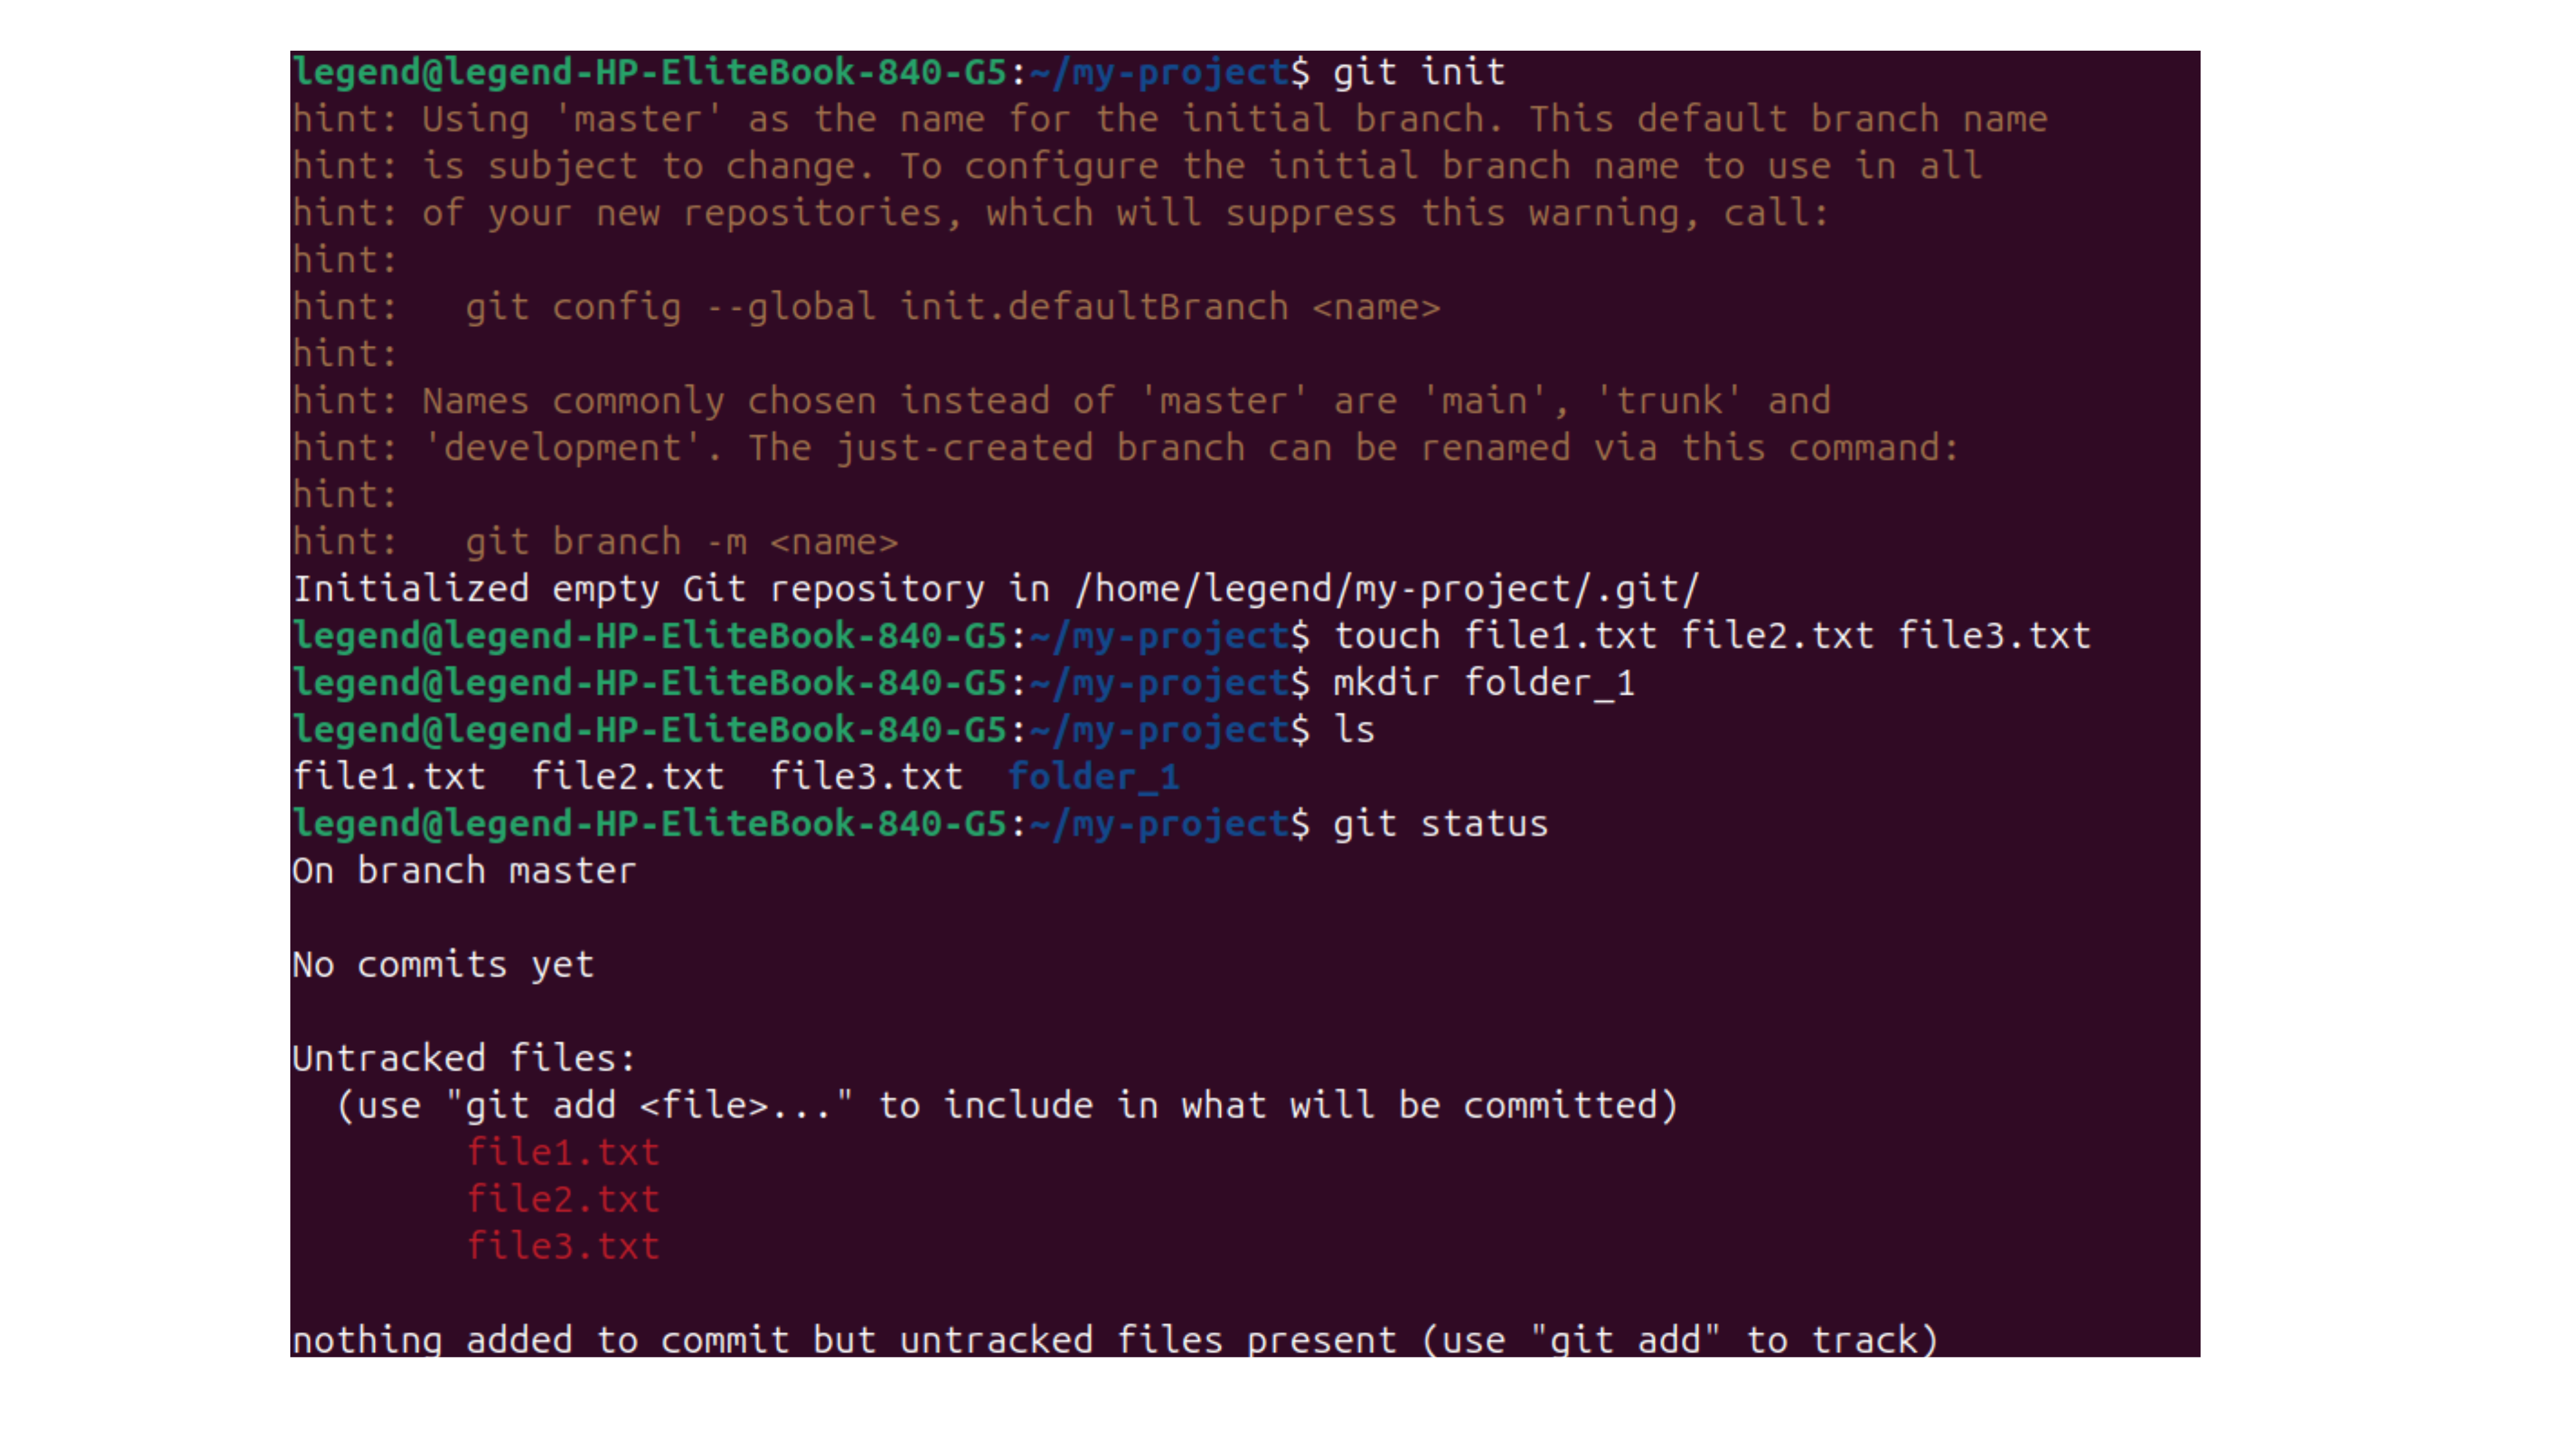
Step 3: Add all the files to the Staging Area.
git add .
Step 4: Commit the Changes,
git commit -m "Initial Commit"
Unit this all the things are same,
Step 4: Now, You need to add the Remote Repository, to the Local Repository by using the following Command,
git remote add <branche-name> <repository>
git remote addis a command used to add the remote repository to the local repository.<branch-name> — you need to give the branch name and it need not be the same name in the git remote repository. Most people use the origin.
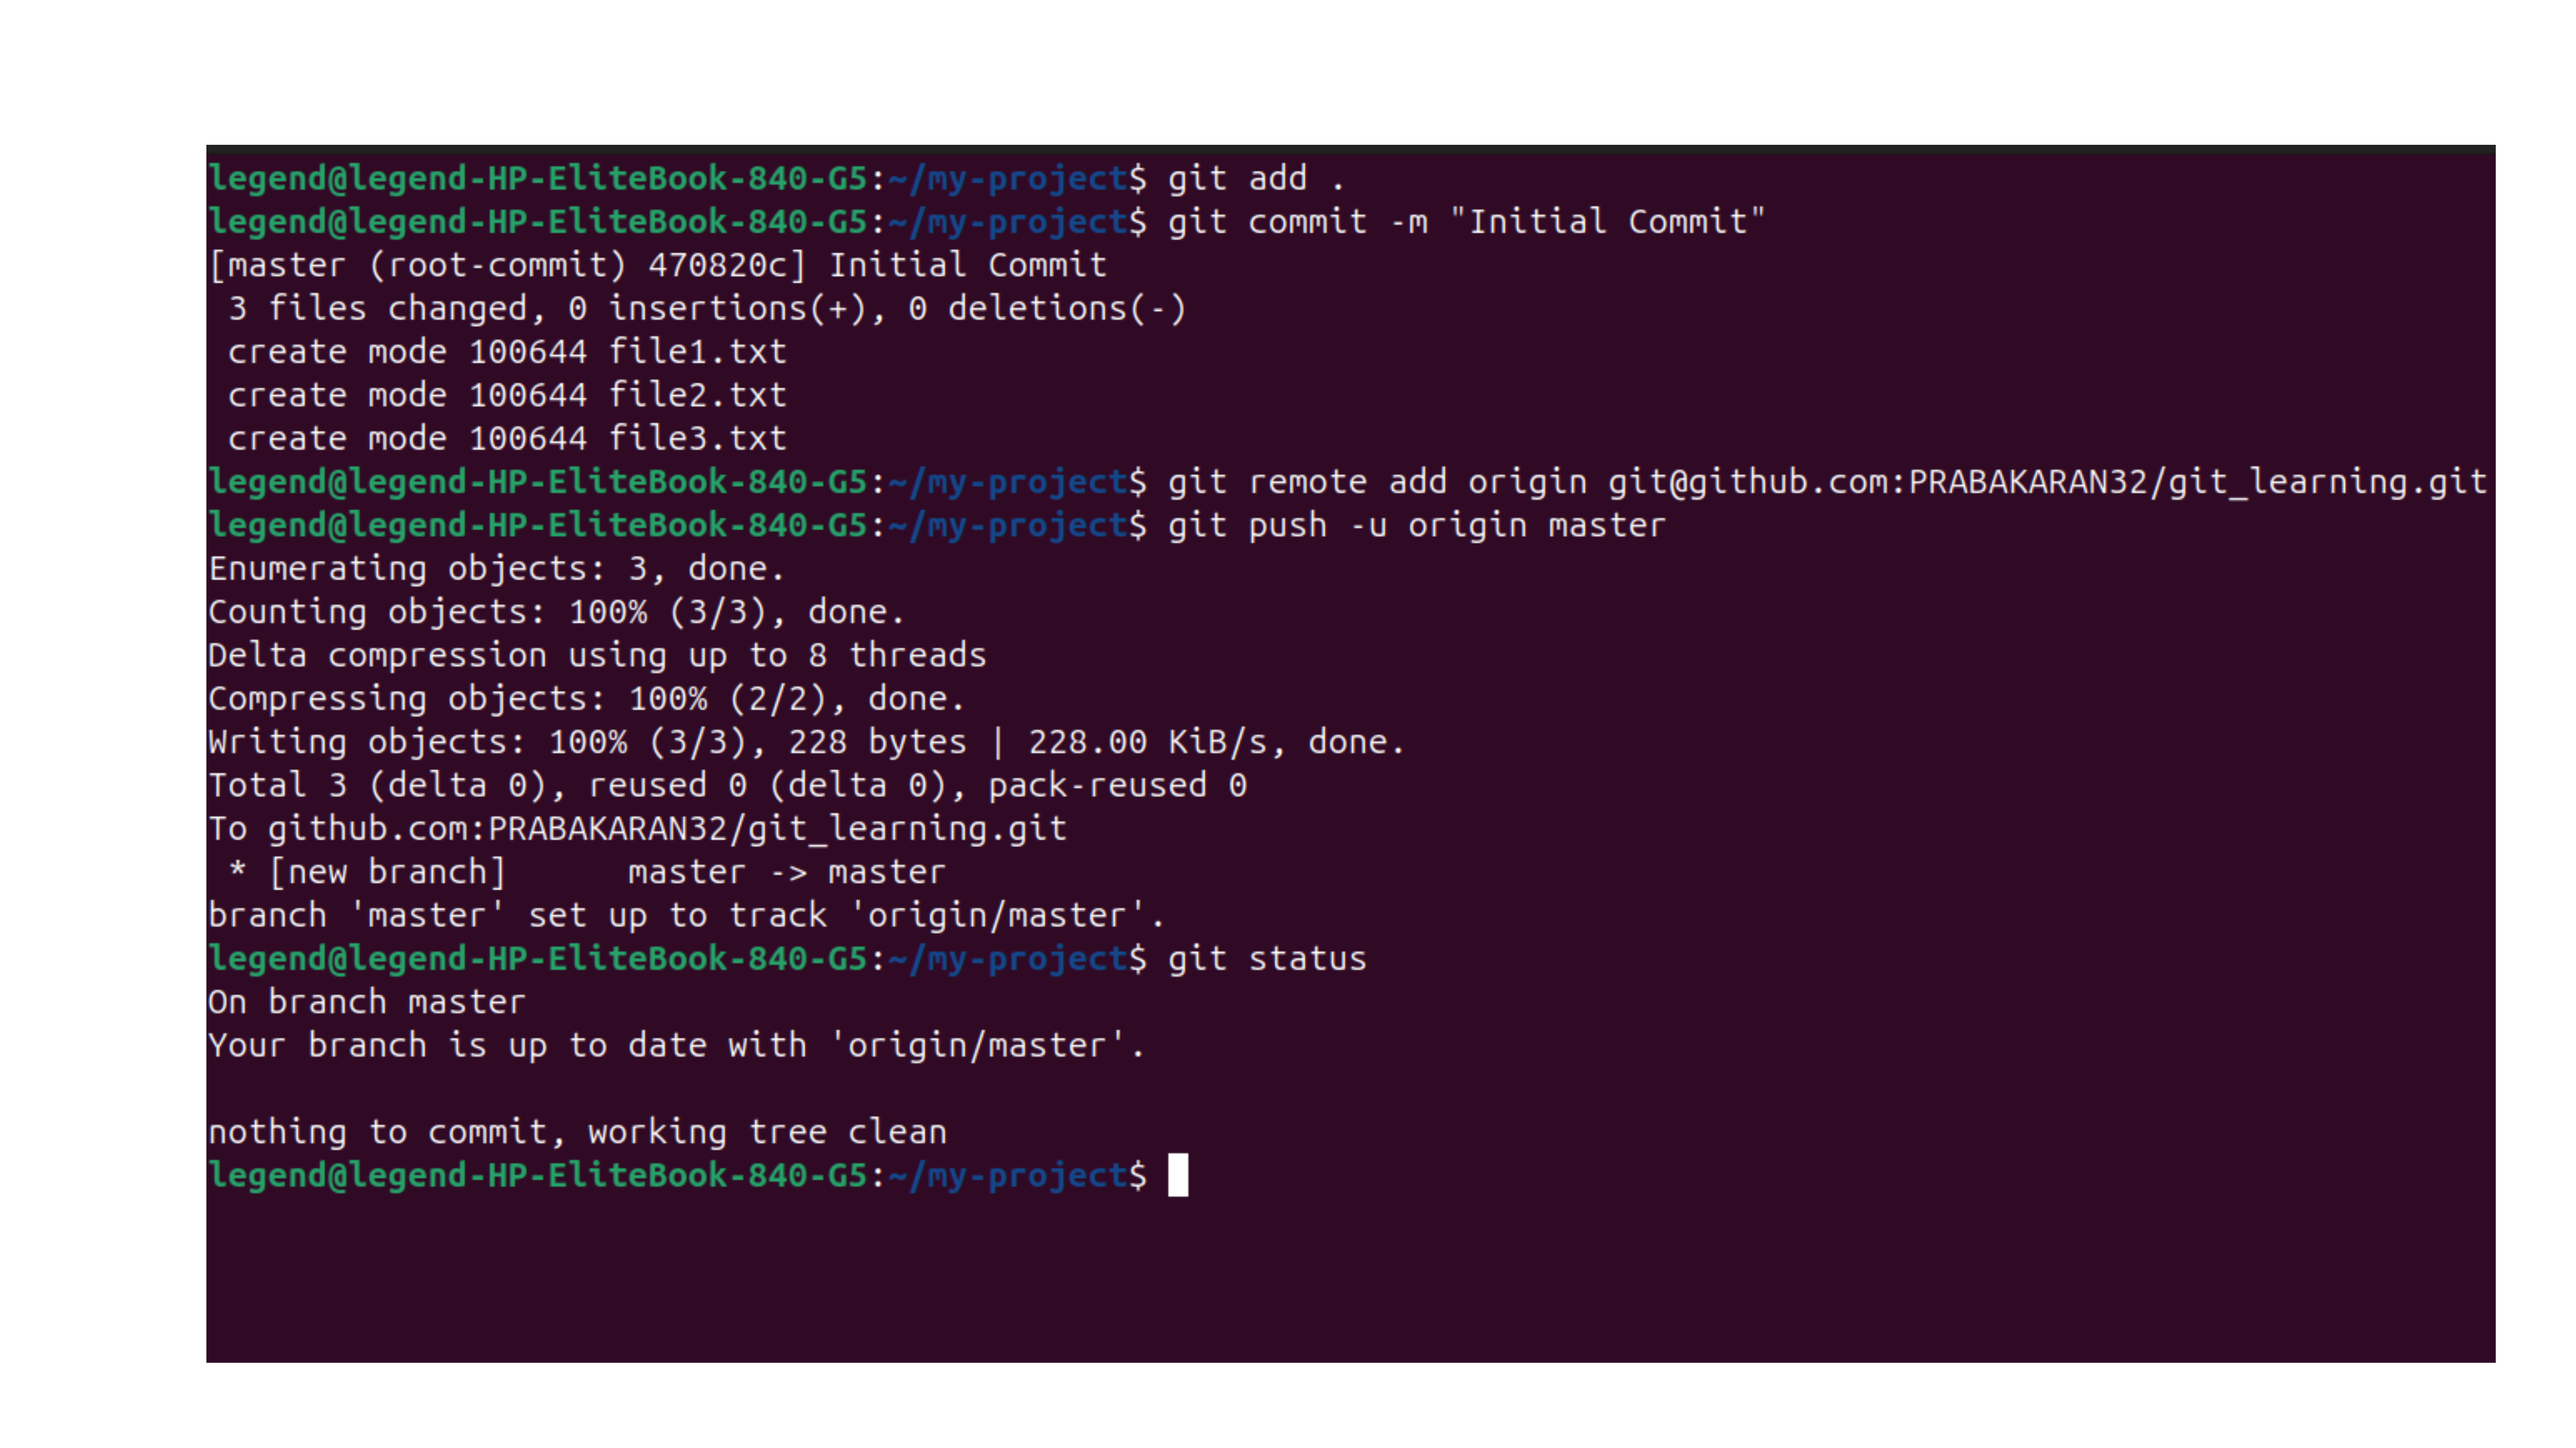
<repository> — you need to pass the remote URL.
Step 5: Push the changes to the remote repository, by using the following command,
git push -u <branch-name> master
git push -u origin master #In our case
git pushwhich is a command used to push the changes from the local repository to the remote repository.-uis used as the short tag instead of--set-upstreamand the option in Git is used with thegit pushcommand to set upstream tracking between your local branch and a remote branch.<branch-name> — used in the local repository. In our case
originmaster — in the remote repository we need to push these changes to the master branch.
Example:
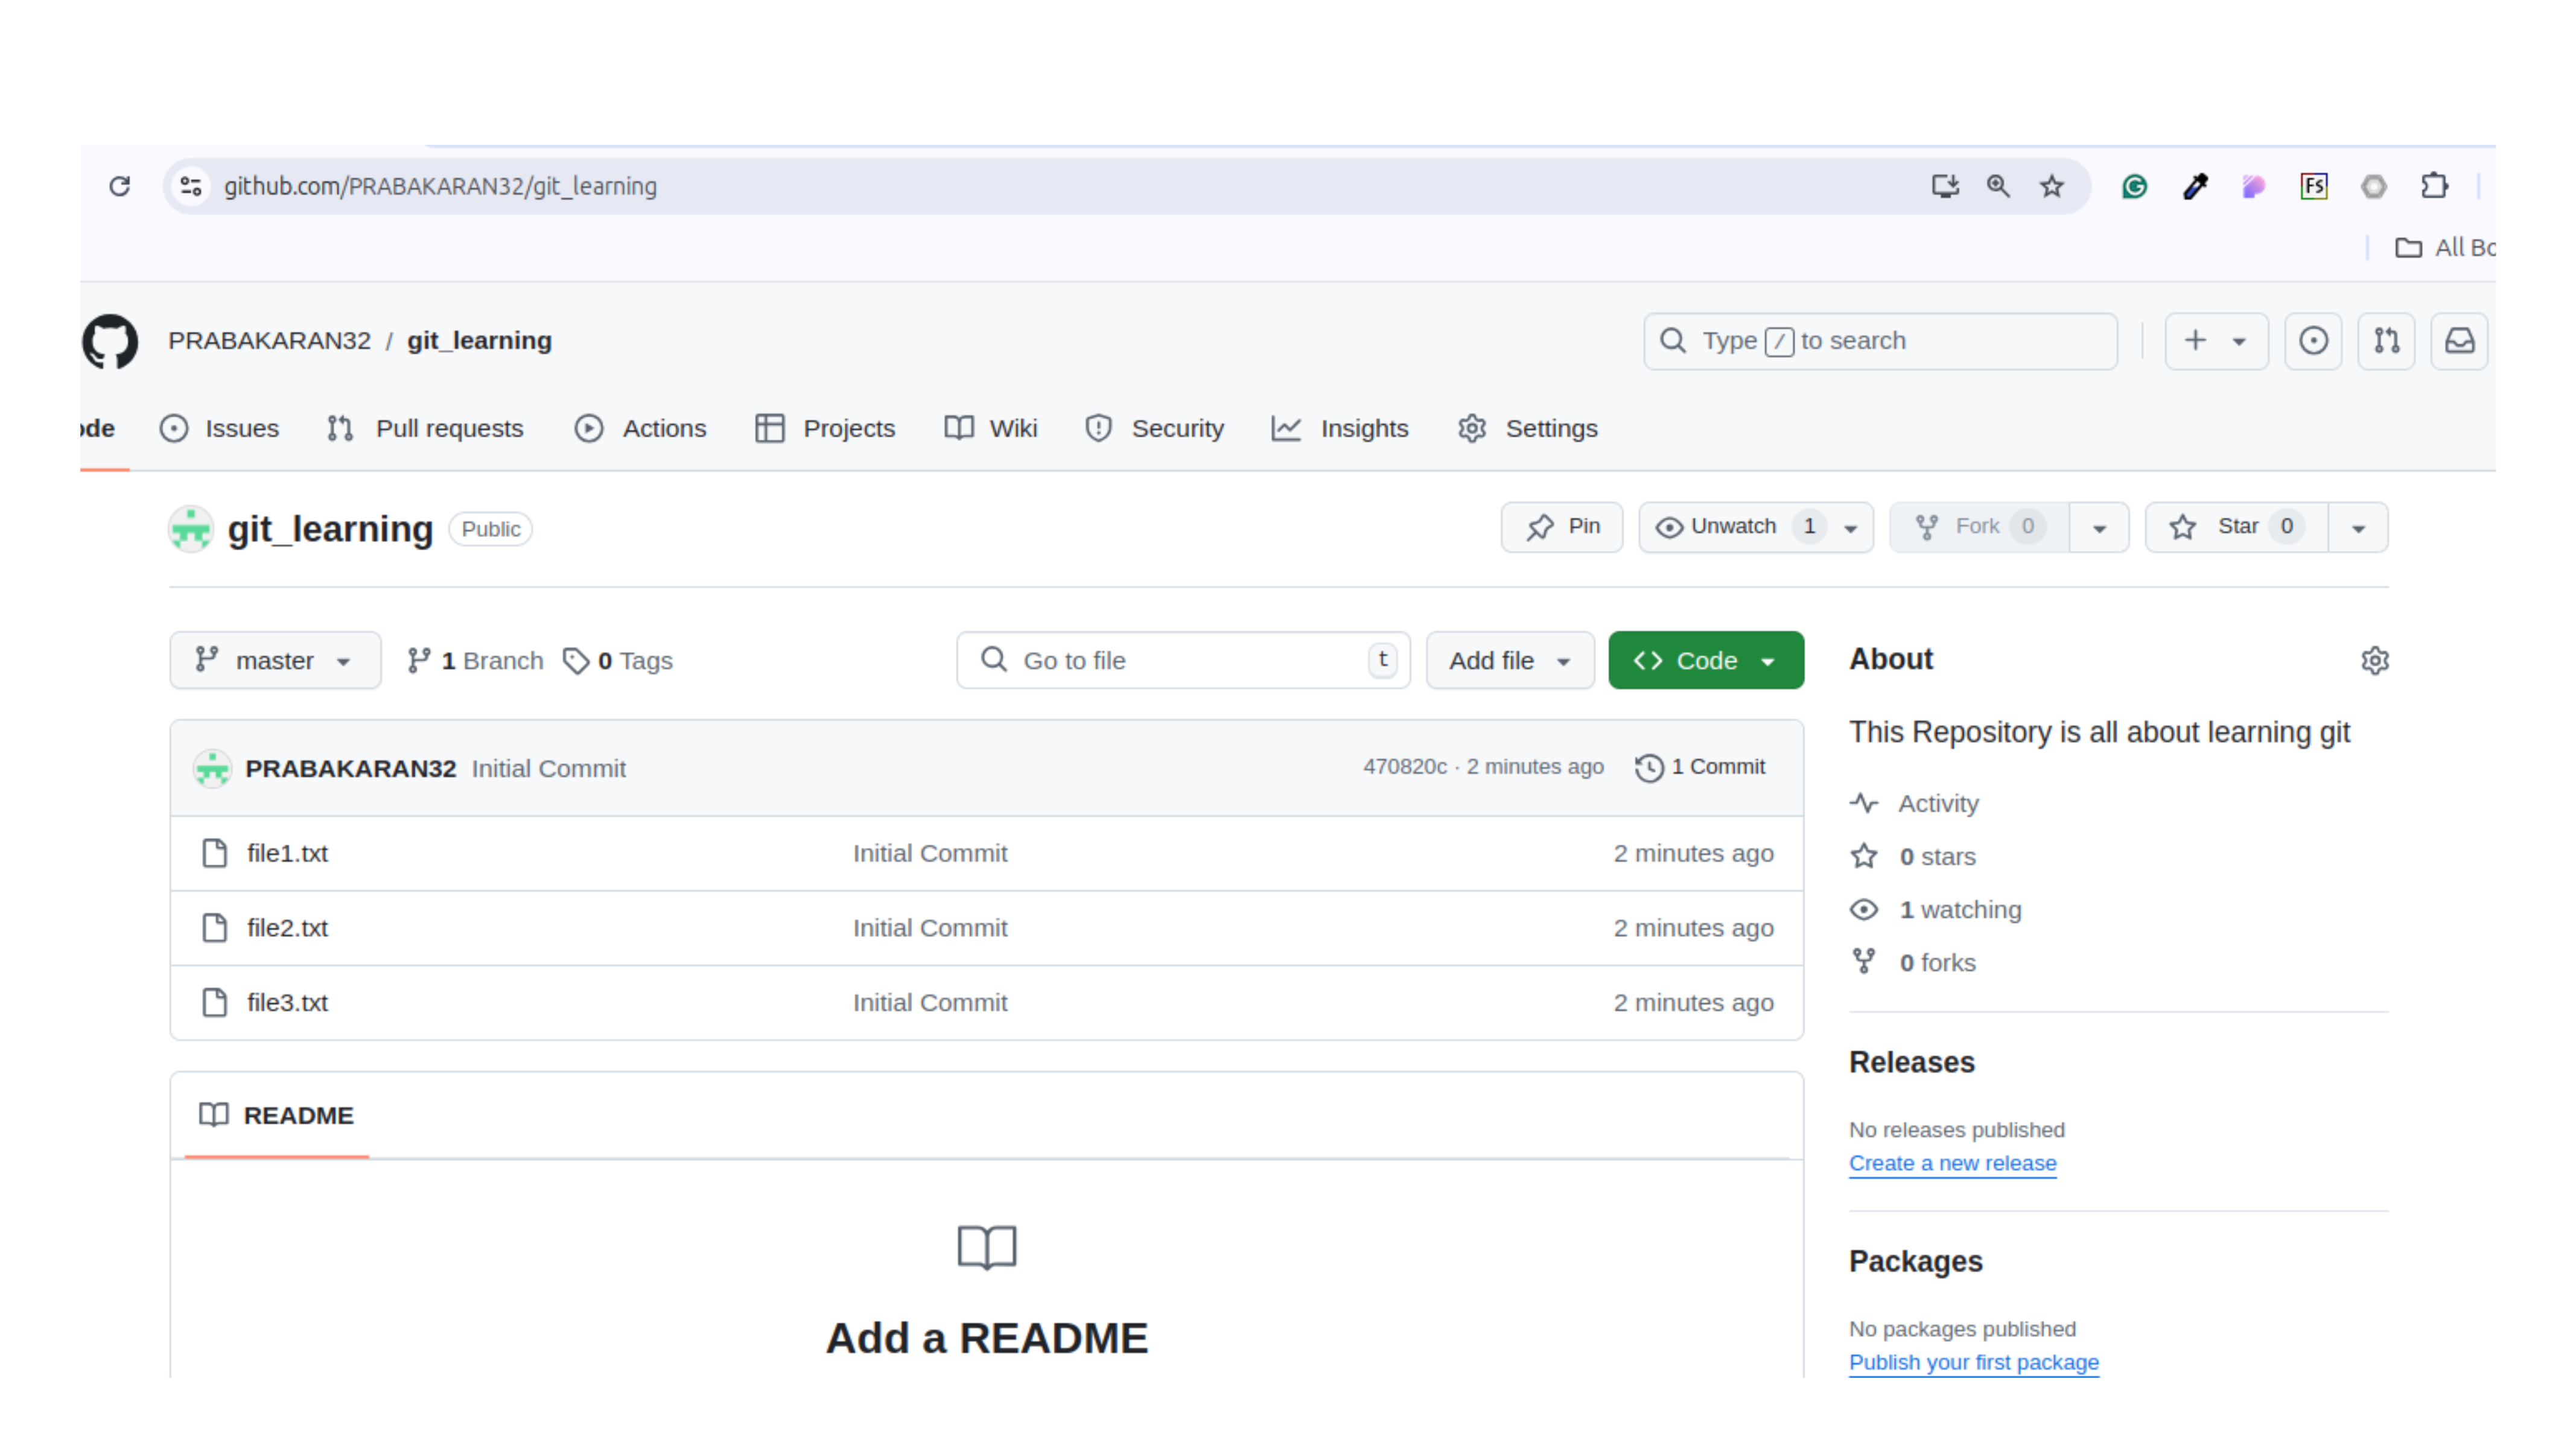
Now you can see the files in the remote repository.
Note: The empty folder i.e. filder_1 is not present in GitHub because the empty folder is not added to the git. So, only you were not able to see the folder_1 folder.
git clone
It is the command used to clone the remote repository
git clone <repository-url>
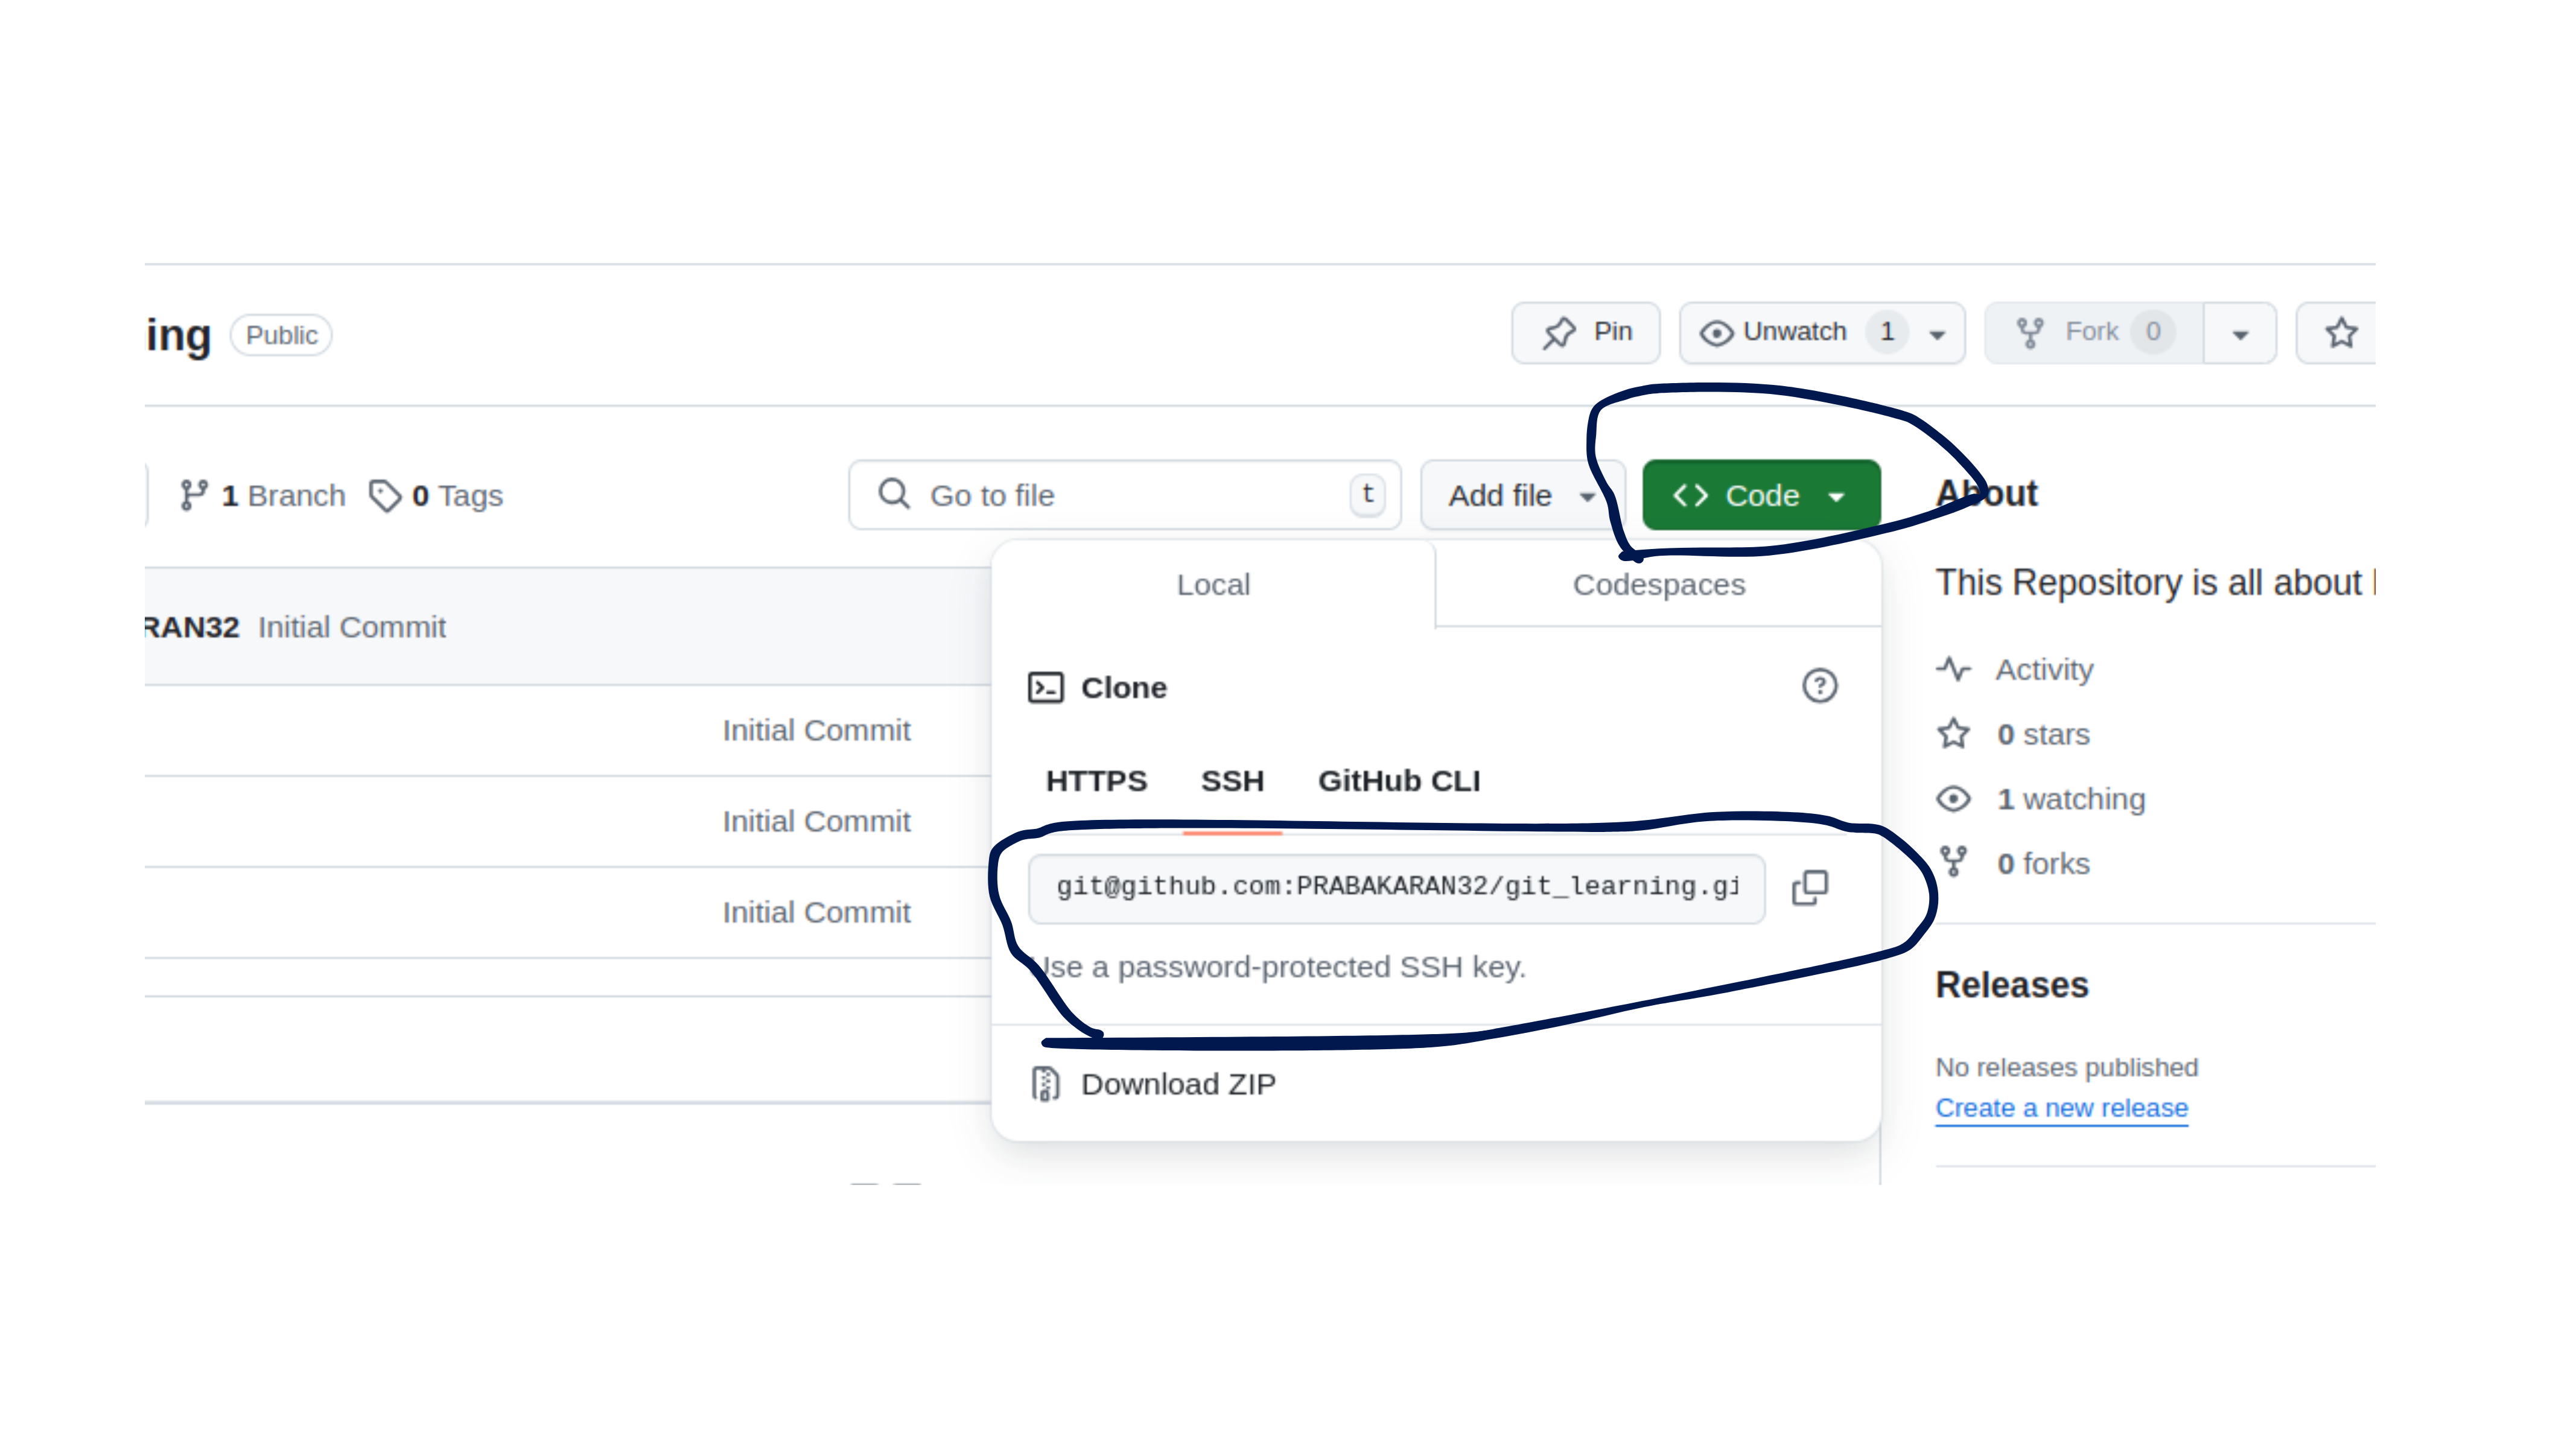
You may use the HTTPS (or) SSH and these two are mostly used.
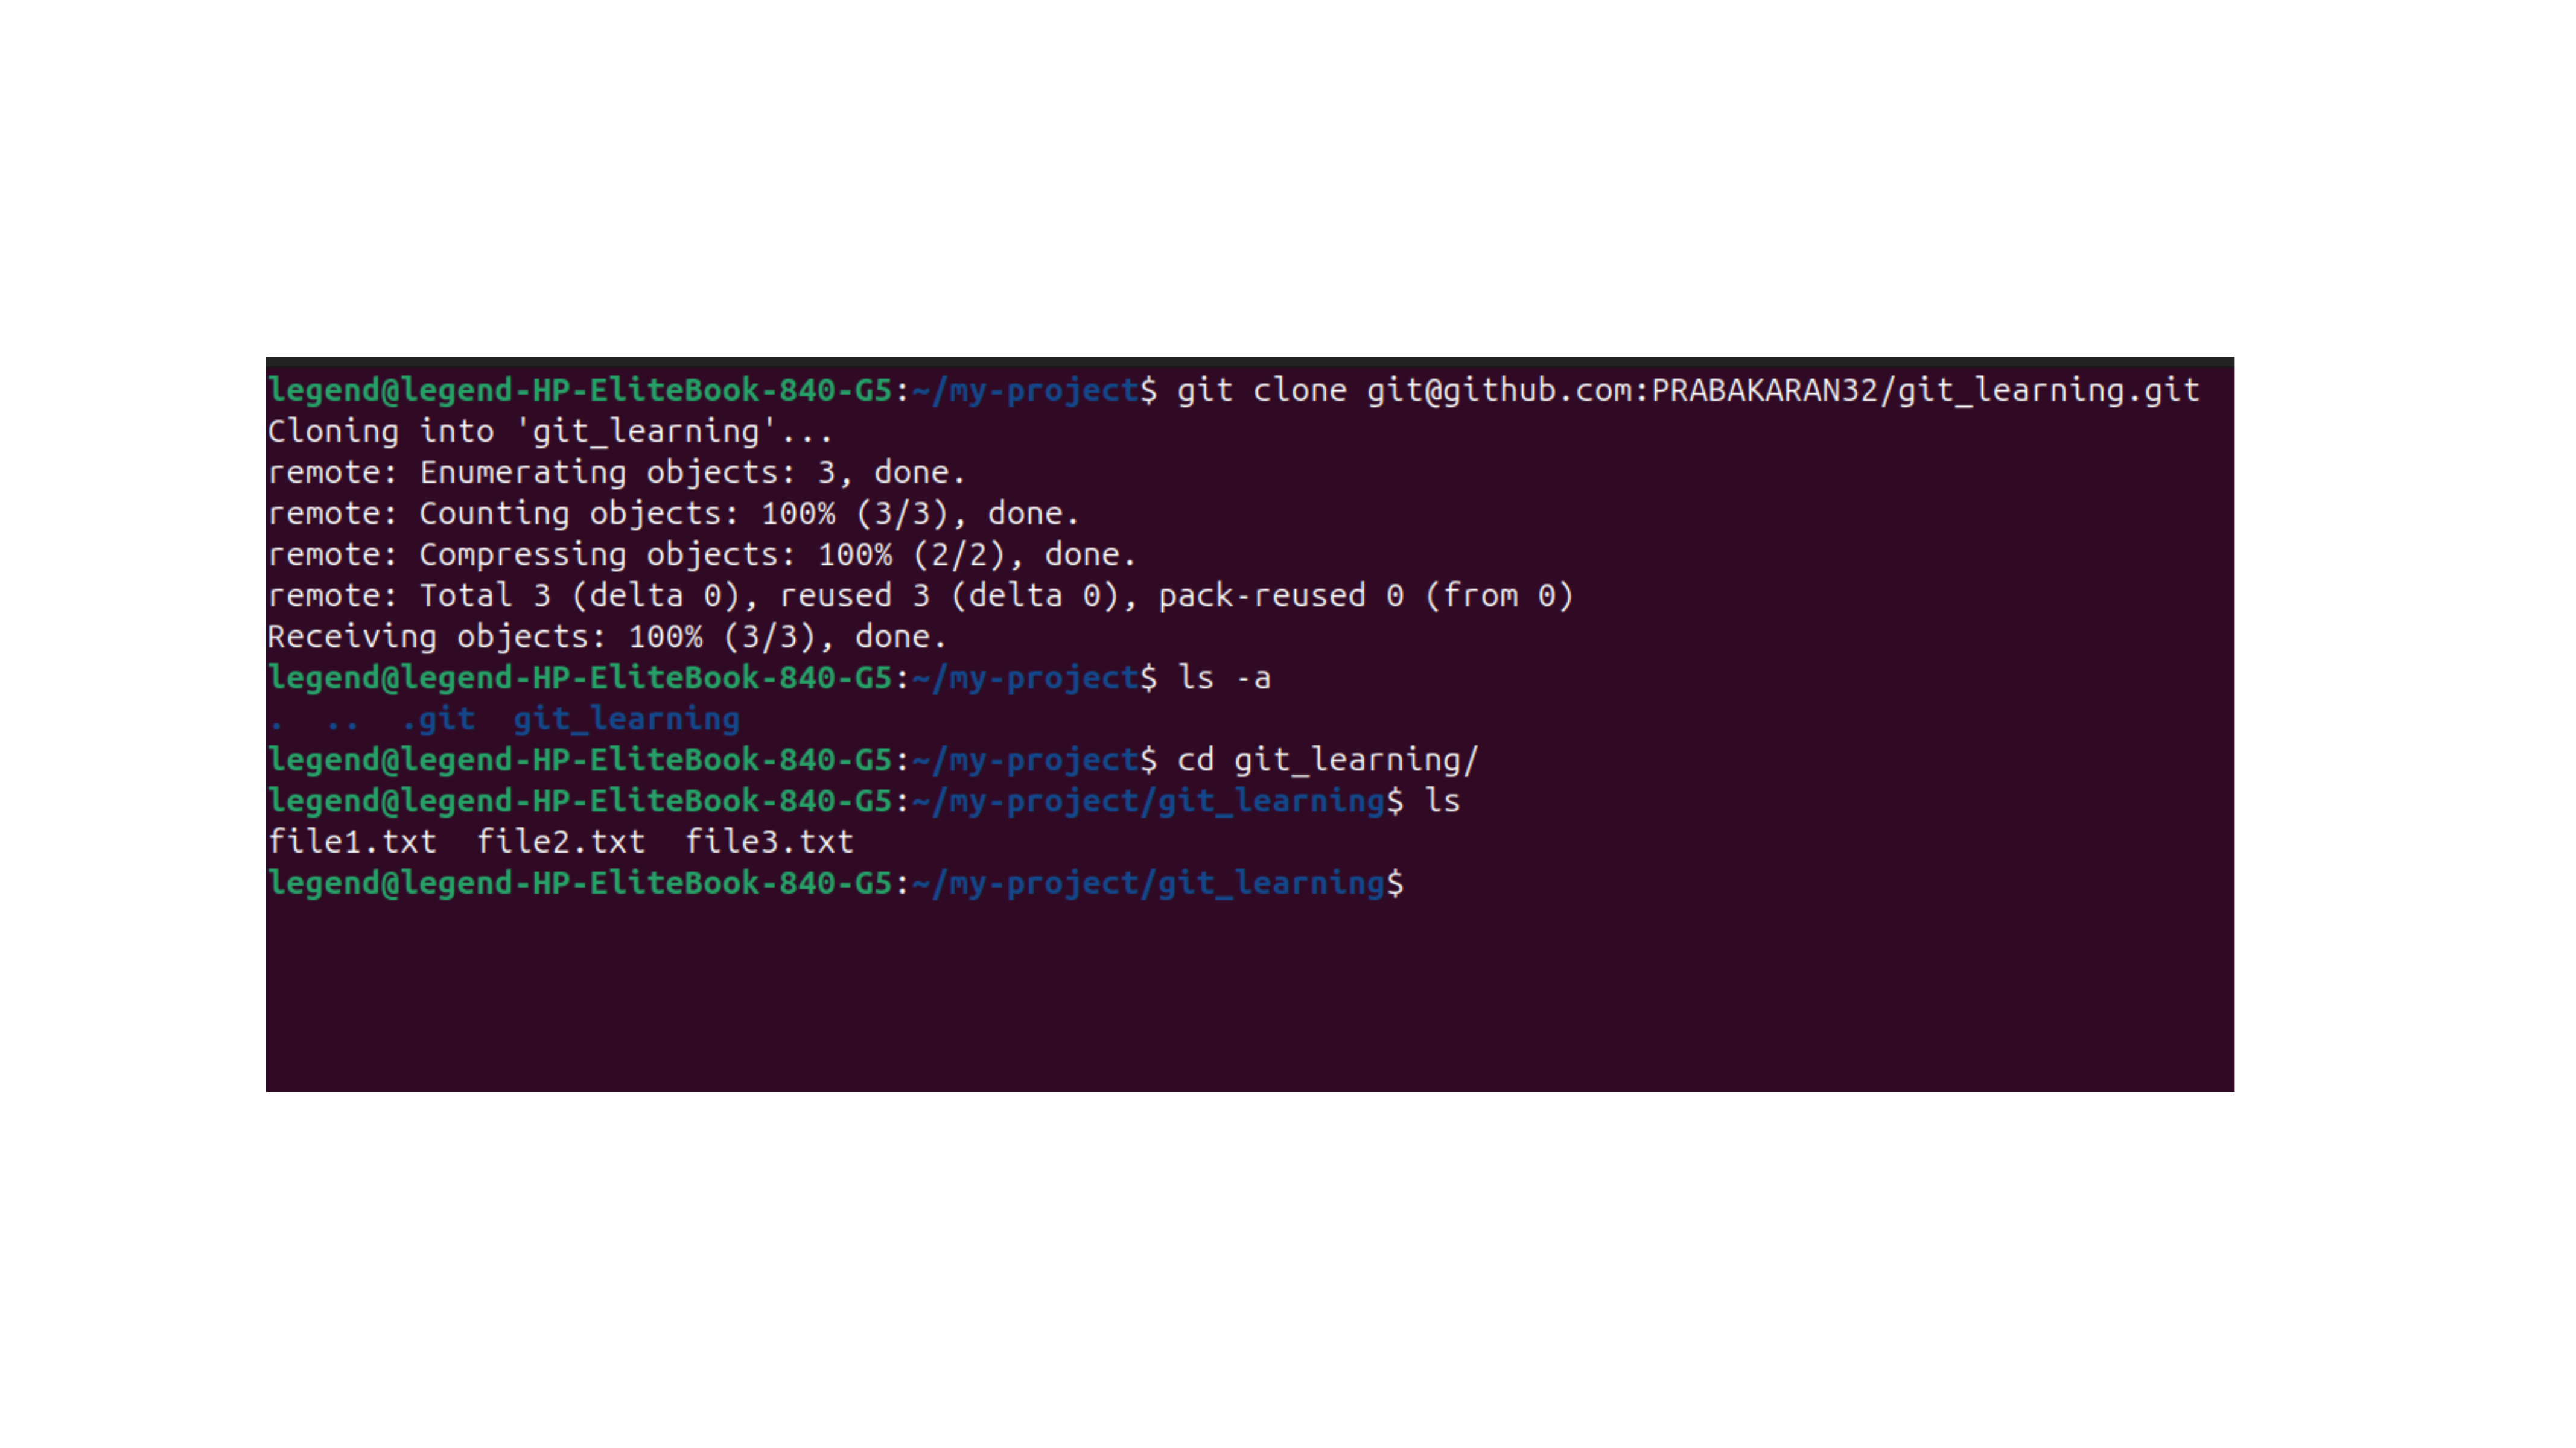
In the .git folder, all the commits and history of records are present.
You can see that there is a folder called git_learning and inside the folder the files are present.
Subscribe to my newsletter
Read articles from Prabakaran directly inside your inbox. Subscribe to the newsletter, and don't miss out.
Written by

Prabakaran
Prabakaran
I'm a pre-final year computer Science and Design student.