Deploy & Visualize
 Brayden Wilmoth
StarbaseDB is the quickest way to deploy a database and begin visualizing it in a user interface where you can query data, add records, modify the structure and more. This article is going to walk through how to deploy your own instance of StarbaseDB and then access the built-in Outerbase Studio, an open-source database UI, that comes with every database.
Deploying to Cloudflare
For those who don’t already know, StarbaseDB is a database offering that sits on top of Cloudflare’s Durable Objects and interfaced via Workers. In order for you to deploy an instance at this time you’ll need to have a Cloudflare account.
Before we run our deploy script you’ll need to login to your Cloudflare account and get your Account ID. This tells the wrangler deployment which account we should create a new Durable Object and Worker for. Locate your account ID by clicking “Workers & Pages” on the left hand pane and then you should see the copyable identifier on the right hand side of your page.
Now we have everything required to run our script. Open up your command line tool and run the following script:
curl https://starbasedb.com/install.sh | bash
After the Github repository has cloned to your machine you will be prompted to enter in your Cloudflare Account ID we just retrieved moments ago. Paste it into your command line and hit Enter to continue the deployment process.

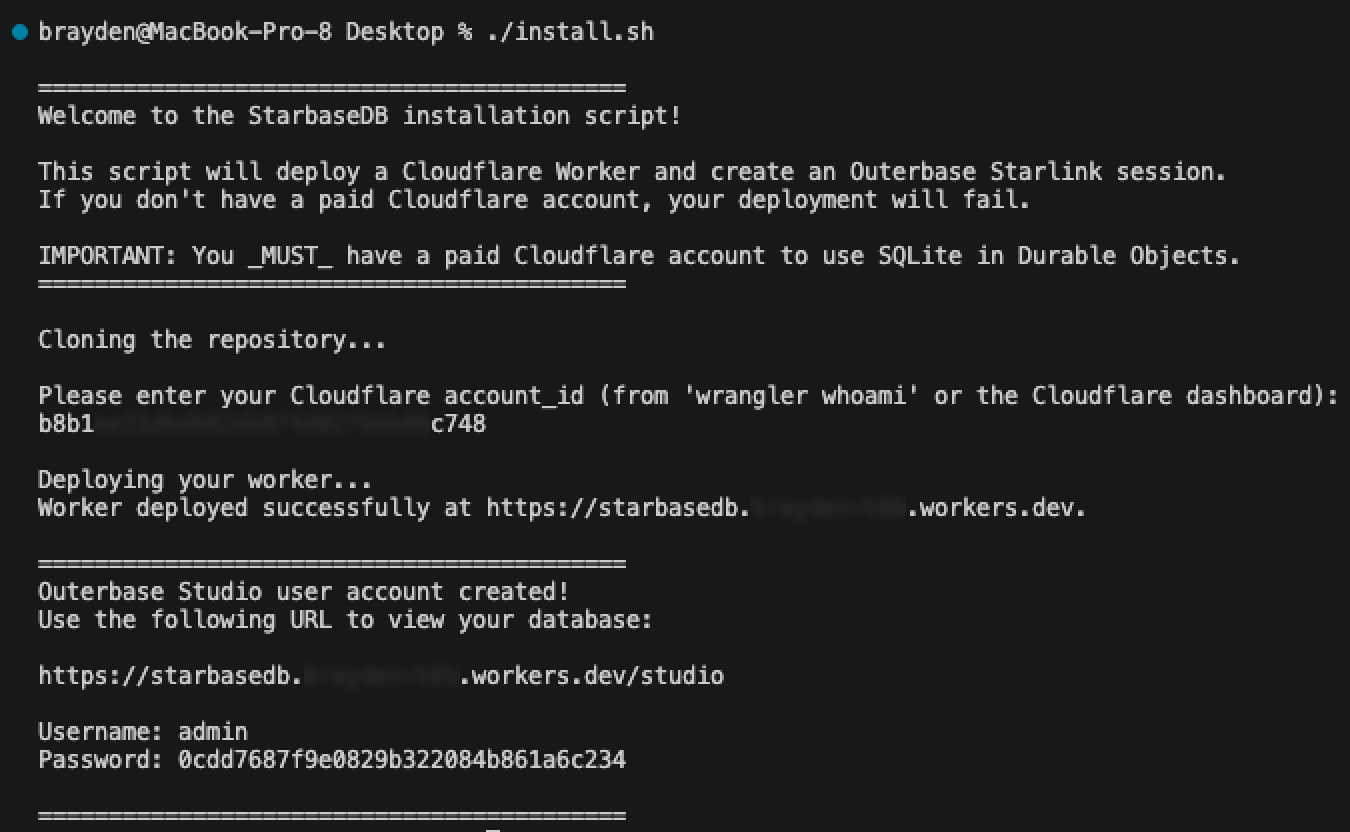
Once the deployment has succeeded you will receive the URL where your new database has been deployed to. In addition to that you will also see a URL with /studio appended to it – this is where you can interact with your database directly where your database is deployed without having to take it into any other tools!
Congratulations. That’s all you needed to do to deploy your database. Run a single script, and it’s live.
Enable Outerbase Studio
With our database deployed, being able to manage it and visualize our data is an important next step. With every StarbaseDB instance we provide a built-in user interface for you to access your data.
Viewing the output of our script execution above you may have noticed at the bottom there is a block of text that includes a URL, username and a randomly generated password. By default Outerbase Studio is enabled automatically and you can immediately access that URL with the generated username/password combination to begin accessing your database with a user interface.
https://starbasedb.{YOUR-IDENTIFIER}.workers.dev/studio
What can you do inside Outerbase Studio?
Run SQL statements
Modify your database schema
Add, update or remove table entries
Disabling Outerbase Studio
Don’t want to have the user interface accessible to the internet? Not a problem.
Open up the cloned repository of starbasedb from your command you executed earlier. Within the project at the root level you will see a wrangler.toml file and inside of it at the bottom are the generated credentials.
# Uncomment the section below to create a user for logging into your database UI.
# You can access the Studio UI at: https://your_endpoint/studio
STUDIO_USER = "admin"
STUDIO_PASS = "123456"
To disable Studio just comment out both the STUDIO_USER and STUDIO_PASS lines by prefixing a # character to each line. With those credentials commented out you can run the following command within the project again to deploy your changes. Any changes you made to the database will not be altered, this will only deploy over your Worker which interfaces with your SQLite instance.
npm run deploy
Executing SQL
To test out our deployment we can open up our user interface and start executing some SQL statements to give us some tables and data to play around with. Start by going to your Outerbase Studio URL
https://starbasedb.{YOUR-IDENTIFIER}.workers.dev/studio
By default once you visit the site you should already be within a Query tab where you can start writing SQL statements. To get us jumpstarted quickly you can copy & paste the SQL code below to generate some tables and populate them with data.
-- Step 1: Drop existing tables if they exist
DROP TABLE IF EXISTS users;
DROP TABLE IF EXISTS orders;

-- Step 2: Create new tables
CREATE TABLE users (
    user_id INTEGER PRIMARY KEY AUTOINCREMENT,
    name TEXT NOT NULL,
    email TEXT UNIQUE NOT NULL
);

CREATE TABLE orders (
    order_id INTEGER PRIMARY KEY AUTOINCREMENT,
    user_id INTEGER,
    order_date TEXT NOT NULL,
    amount REAL NOT NULL,
    FOREIGN KEY (user_id) REFERENCES users (user_id)
);

-- Step 3: Seed the tables with data
-- Insert data into the users table
INSERT INTO users (name, email)
VALUES
    ('Alice', 'alice@example.com'),
    ('Bob', 'bob@example.com'),
    ('Charlie', 'charlie@example.com');

-- Insert data into the orders table
INSERT INTO orders (user_id, order_date, amount)
VALUES
    (1, '2024-10-01', 50.75),
    (1, '2024-10-03', 30.00),
    (2, '2024-10-05', 99.99),
    (3, '2024-10-06', 20.49);
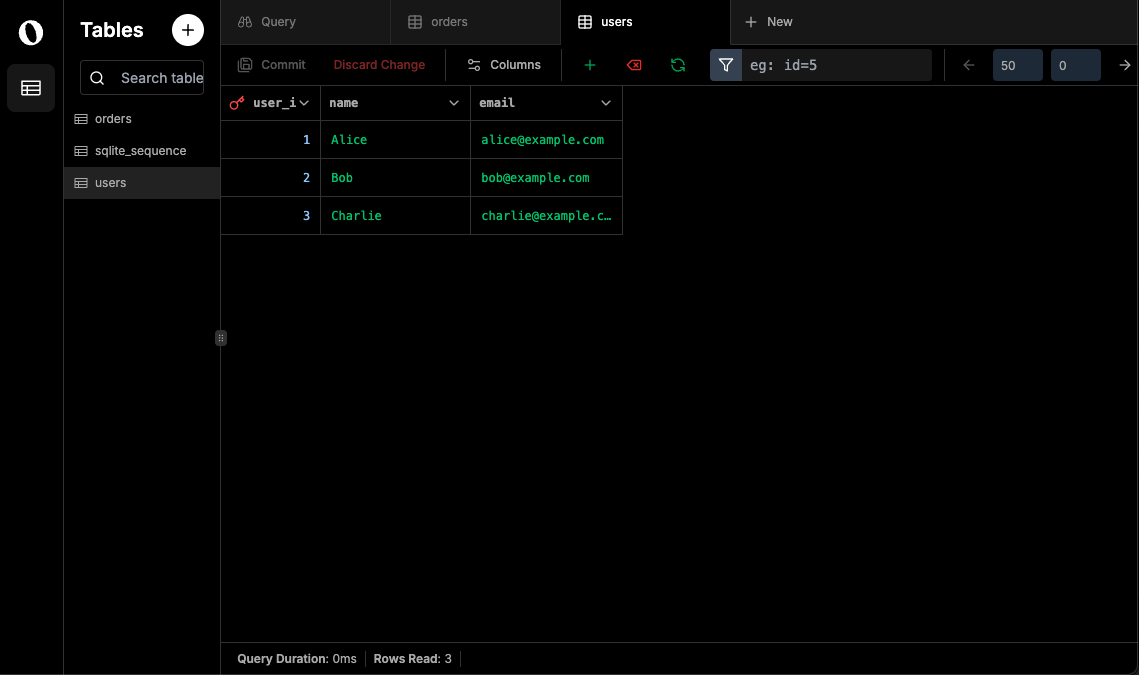
Now you can open the tables up on the left hand pane and see the data that was inserted by the SQL statements! With the user interface you can quickly add rows, update values, delete entries and so much more.

Making HTTP Requests
With our database deployed, tables created, and data populated – the next step is to access that data from our application. We will save implementation details into your project for another post but we can quickly test to verify our database is queryable from our machine by using your command line tool and pasting the below block into it.
NOTE: Replace {YOUR-IDENTIFIER} with the part of the URL that was generated for your deployment.
curl --location --request POST 'https://starbasedb.{YOUR-IDENTIFIER}.workers.dev/query' \
--header 'Content-Type: application/json' \
--header 'Authorization: Bearer ABC123' \
--data-raw '{
    "sql": "SELECT * FROM users WHERE user_id=$1 OR name=$2;",
    "params": [1, "Bob"]
}'
You should see the following response:
{
    "result": [
        {
            "user_id": 1,
            "name": "Alice",
            "email": "alice@example.com"
        },
        {
            "user_id": 2,
            "name": "Bob",
            "email": "bob@example.com"
        }
    ]
}
And that’s all it takes! To recap, we’ve been able to deploy a brand new SQLite database, visualize it in an interface provided directly from our database, and then send a network request from our machine to query data from our database without dealing with any of the traditional hassles of spinning up a database.
Time to build.
Pull Requests
Want to see the code that was contributed alongside this article? Check the contributions out below!
https://github.com/Brayden/starbasedb/pull/16
Join the Adventure
We’re working on building an open-source database offering described with the basic building blocks we talked about above. When we get to join compute with storage the way we can with durable objects, we think there’s a lot more that can be offered to users than what some other providers are capable of.
Twitter: https://twitter.com/BraydenWilmoth
Github Repo: https://github.com/Brayden/starbasedb
Outerbase: https://outerbase.com
Subscribe to my newsletter
Read articles from Brayden Wilmoth directly inside your inbox. Subscribe to the newsletter, and don't miss out.
Written by
