☑️Day 37: Exploring ClusterIP and NodePort Services in Kubernetes🚀
 Kedar Pattanshetti
🔹Table of Contents :
Introduction
ClusterIP Service
NodePort Service
Real-Time Scenario
Hands-on Task 1: Exposing a Service using ClusterIP
Hands-on Task 2: Exposing a Service using NodePort
Real-World DevOps Use Cases
Additional Commands for Managing Services
✅Introduction
I dove deep into ClusterIP and NodePort services in Kubernetes. These are essential types of services used for exposing applications running in a Kubernetes cluster. The knowledge of both is critical in DevOps roles, as they enable seamless networking and accessibility of applications within and outside the cluster.
✅What are ClusterIP and NodePort Services?
1. ClusterIP:
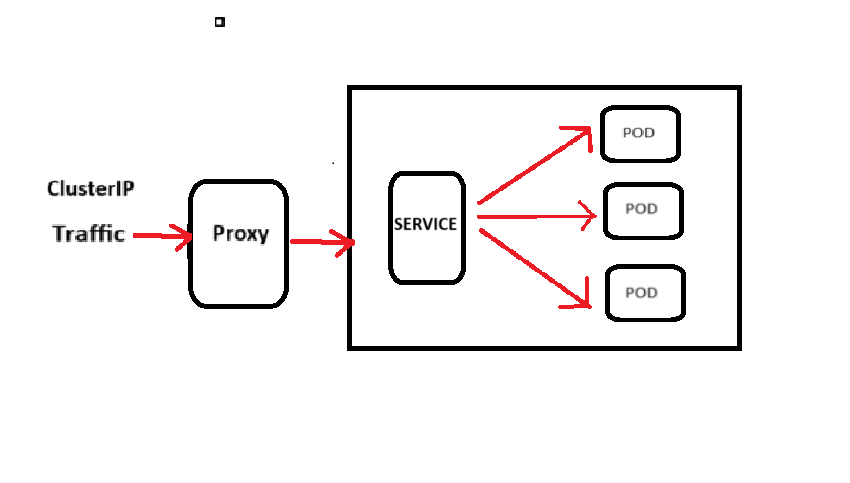
Definition: The default service type in Kubernetes that exposes the service within the cluster. It's internally accessible and not available outside the cluster.
Use Case: Perfect when you want services to communicate internally, e.g., microservices inside the cluster talking to each other.
Key Feature: ClusterIP assigns an internal IP address, making the service only reachable within the Kubernetes cluster.
2. NodePort:
Definition: A service type that exposes the service on each node’s IP at a static port. It allows access to the service from outside the Kubernetes cluster.
Use Case: Useful when you need external access to services running inside your cluster, such as when testing your application from external systems.
Key Feature: NodePort exposes the service on a specific port on all the nodes of the cluster, allowing external users to access the service by using the node’s IP and the NodePort number.
✅Real-Time Scenario
Scenario: Let's say you have a web application running in your Kubernetes cluster, and it's used internally by your team. For internal communication, you'd use ClusterIP. Now, if your clients or external users need access to this app, you'd expose it using NodePort.
This way, internal microservices interact through ClusterIP, but external traffic is managed via NodePort.
✅Hands-on Tasks: ClusterIP and NodePort in Action
Task 1: Expose a Service Using ClusterIP
Steps:
Deploy a simple application:
kubectl run myapp --image=nginx --port=80Create a ClusterIP service: Create a YAML file (
clusterip-service.yaml) with the following content:apiVersion: v1 kind: Service metadata: name: myapp-clusterip spec: type: ClusterIP selector: run: myapp ports: - port: 80 targetPort: 80Apply the service:
kubectl apply -f clusterip-service.yamlCheck the service details:
kubectl get svc myapp-clusteripYou will see an internal ClusterIP assigned.
Access the service from within the cluster:
kubectl exec -it <pod_name> -- curl <ClusterIP>:80
Task 2: Expose a Service Using NodePort
Steps:
Create a NodePort service: Create a YAML file (
nodeport-service.yaml) with the following content:apiVersion: v1 kind: Service metadata: name: myapp-nodeport spec: type: NodePort selector: run: myapp ports: - port: 80 targetPort: 80 nodePort: 30007Apply the service:
kubectl apply -f nodeport-service.yamlCheck the service details:
kubectl get svc myapp-nodeportThe service will now be accessible via any of the node’s IP on port 30007.
Access the service externally: Get the node’s external IP:
kubectl get nodes -o wideNow, access the service:
curl http://<NodeIP>:30007
✅Understanding the Concepts in Real-World DevOps
ClusterIP: This service type is commonly used for internal communication between microservices. For example, if your organization has multiple interconnected services such as an authentication service and a database service, they would use ClusterIP to talk to each other.
NodePort: In real-world scenarios, you would use NodePort when you want your development or testing team to access services from outside the cluster. This could also be useful in a staging environment, where external stakeholders need to access the application for review or testing purposes.
✅Additional Commands for Managing Services
View running services:
kubectl get svcDescribe a service:
kubectl describe svc <service_name>Delete a service:
kubectl delete svc <service_name>Port forward a service (useful for debugging):
kubectl port-forward svc/<service_name> 8080:80
🚀Thanks for joining me on Day 37! Let’s keep learning and growing together!
Happy Learning! 😊
#90DaysOfDevOps
Subscribe to my newsletter
Read articles from Kedar Pattanshetti directly inside your inbox. Subscribe to the newsletter, and don't miss out.
Written by
