How to Create a Local LLM Application with Streamlit and GPT4All: Step-by-Step Guide
 David Marquis
Everyone in the technology field (and beyond) will quickly need to understand how the world of Large Language Models (LLMs), like ChatGPT, will change the way we think and work. I wrote this post as I wanted to understand how to get a local LLM working on my local machine without being internet connected.
I wanted to do this for 2 reasons. Firstly, to write some more Python using Streamlit, as it has been a while. Secondly, I wanted to know what is involved in using an LLM locally, this was to get a deeper understanding of running an LLM that isn't internet or vendor enabled and having it live isolated on my computer.
Luckily the team at Nomic AI created GPT4ALL. You can use their client from their site if you like: GPT4All (nomic.ai).
Or follow this guide where I use their Python SDK to create my own app. Their Github repo is here: GPT4All: Run Local LLMs on Any Device.
This guide walks you through setting up a Streamlit app that uses GPT4All to answer questions. We’ll cover set up and the Streamlit code, and a couple of details to watch out for.
Prerequisites
Before you begin, make sure you have the following (I am using a Windows machine):
Basic Python Knowledge: Familiarity with Python is essential.
Python Installed: Python should be installed on your Windows system. You can download it from python.org.
Visual C++ Redistributable: Ensure that the Visual C++ Redistributable for Visual Studio is installed, which is required by many Python packages.
Step 1: Set Up Your Development Environment
First, create a dedicated directory for your project and set up a virtual environment to keep your dependencies isolated.
You can find a detailed post on how to set up a Python environment in one of my previous posts:
Installing, Creating Virtual Environments, and Freezing Requirements Made EasyInstall the Required Packages: With the virtual environment activated, install Streamlit and GPT4All:
pip install streamlit gpt4all
Step 2: Download a LLM Model
To run GPT4All locally, you’ll need to download a model.
Download the Model: You can download the appropriate GPT4All model (e.g.,
"Meta-LLaMA-3-8B-Instruct.Q4_0.gguf") directly from the GPT4All repository.LEARNING - If you don't have an NVIDIA GPU, make sure to download a model optimized for CPU use. The model mentioned above can be set up to run on CPU only. Below you will see the parameter for “device=cpu”.
Configure the Model in Your Script: Once downloaded, configure your script to load this model:
 from gpt4all import GPT4All

 # Path to the downloaded model
 model_path = "<<PATHTOYOURMODEL>>
     /Meta-LLaMA-3-8B-Instruct.Q4_0.gguf"

 # Load the GPT4All model
 gpt_model = GPT4All(model_name=model_path, device="cpu")
Replace <<PATHYOUSAVEDYOURMODEL>> with the actual path where your model is stored.
Step 3: Create the Streamlit App
Now, let's create a Streamlit app that interacts with GPT4All to answer questions.
Create the
app.pyFile: In your project directory,Add the following code:
 import streamlit as st
 from gpt4all import GPT4All

 # Path to the downloaded model
 model_path = "<<PATHYOUSAVEDYOURMODEL>>/Meta-LLaMA-3-8B-Instruct.Q4_0.gguf"

 # Load the GPT4All model
 gpt_model = GPT4All(model_name=model_path, device="cpu")

 # Streamlit app setup
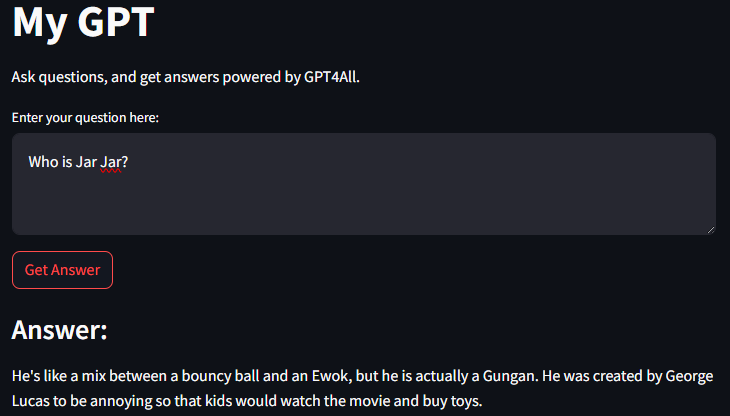
 st.title("My GPT")
 st.write("Ask questions, and get answers powered by GPT4All.")

 # User input
 user_input = st.text_area("Enter your question here:")

 if st.button("Get Answer"):
     if user_input:
         with gpt_model.chat_session():
             response = gpt_model.generate(user_input, max_tokens=1024)
             st.write("### Answer:")
             st.write(response)
     else:
         st.write("Please enter a question.")
Run the Streamlit App: Run the app by executing the following command in your Command Prompt:
streamlit run app.pyThis command will start a local web server and open the app in your default web browser. Here, users can type questions and receive answers generated by the GPT4All model.

Adding Prompts
You can also guide the model by using prompts either explicitly as a user, or implicitly as an engineer.
When you ask a question as a user, you can add guidance like “make the answer funny”.
Using context prompts within the code the engineer can also guide the answer, as an example, below I have asked the answer to be provided like a comedian would.
import streamlit as st
from gpt4all import GPT4All

# Path to the downloaded model
model_path = "<<PATHYOUSAVEDYOURMODEL>>/Meta-LLaMA-3-8B-Instruct.Q4_0.gguf"

# Load the GPT4All model
gpt_model = GPT4All(model_name=model_path, device="cpu")

# Streamlit app setup
st.title("My GPT")
st.write("Ask questions, and get answers powered by GPT4All.")

# Context Prompt
context_prompt = "Answer the following question as if you are a comedian: "
# User input
user_input = st.text_area("Enter your question here:")
# Combined question with context
combined_input = context_prompt + user_input

if st.button("Get Answer"):
    if user_input:
        with gpt_model.chat_session():
            response = gpt_model.generate(combined_input , max_tokens=1024)
            st.write("### Answer:")
            st.write(response)
    else:
        st.write("Please enter a question.")

Conclusion
Building a Streamlit app that uses a large language model locally was fun and educational. With basic Python knowledge and the tools outlined in this guide, you can create powerful applications that answer questions and guide the outcome by using prompts.
This project is just the beginning. Happy coding!
Subscribe to my newsletter
Read articles from David Marquis directly inside your inbox. Subscribe to the newsletter, and don't miss out.
Written by

David Marquis
David Marquis
I am a people leader in the area of data & analytics. I enjoy all things data, cloud & board game related.