Pyppeteer: How to Use Puppeteer in Python with Browserless?
 nstbrowser
What Is Pyppeteer in Python?
Pyppeteer is a Python port of the popular Node.js library Puppeteer, which is used to control headless Chrome or Chromium browsers programmatically.
Essentially, Pyppeteer allows Python developers to automate tasks within a web browser, such as scraping web pages, testing web applications, or interacting with websites as if a real user were doing so, but without a graphical interface.
What is Browserless?
Browserless is a cloud-based browser solution that allows for efficient browser automation, site scraping, and testing.
It makes use of Nstbrowser's fingerprint library to enable random fingerprint switching, resulting in seamless data collecting and automation. Browserless' robust cloud infrastructure makes it easier to manage automated activities by allowing access to several browser instances simultaneously.
Do you have any wonderful ideas and doubts about web scraping and Browserless? Let's see what other developers are sharing on Discord and Telegram!
What Can Pyppeteer Be used to Do?
Screenshot using Pyppeteer
When using Browserless, you cannot see any screen, so when we need to know the specific screen of the browser in some links, it is recommended that you use the screenshot API to obtain the screenshot.
Executing the following script will generate a screenshot named youtube_screenshot.png in the current script path:
import asyncio
from pyppeteer import connect

async def main():
    # Connect to the browser
    browser = await connect(browserWSEndpoint=browser_ws_endpoint)
    print("Connected!")

    # Create a new page
    page = await browser.newPage()

    # Visit youtube
    await page.goto("https://www.youtube.com/")
    # take a screenshot
    await page.screenshot({"path": "youtube_screenshot.png"})
    await page.close()

asyncio.run(main())
Interact with dynamic pages
On modern websites, JavaScript is relied upon to dynamically update content. For example, social media platforms often use infinite scrolling on their posts, and the loading of page data also requires waiting for the response of the backend, as well as a variety of form operations and various browser events.
Yes, Pyppeteer can also do the same: waiting for loading, clicking buttons, entering forms, and other browser operations.
1. Waiting for the page to load
The commonly used APIs for waiting for page loading are waitForSelector and waitFor.
waitForSelectoris mainly used to ensure that a certain element in the page is loaded normallywaitForsimply waits for a specified time.
import asyncio
from pyppeteer import connect

async def main():
    # Connect to the browser
    browser = await connect(browserWSEndpoint=browser_ws_endpoint)
    print("Connected!")

    # Visit nasa
    page = await browser.newPage()
    await page.goto("https://www.disney.com/")

    # Wait for news to load
    await page.waitForSelector('.content-body')
    # wait another 2 seconds
    await page.waitFor(2000)
    # take a screenshot
    await page.screenshot({"path": "disney.png"})
    await page.close()

asyncio.run(main())
2. Scrolling the page
On page.evaluate, you can set the position of the scroll bar by calling the window API, which is very convenient.
import asyncio
from pyppeteer import connect

async def main():
    # Connect to the browser
    browser = await connect(browserWSEndpoint=browser_ws_endpoint)
    print("Connected!")

    # Visit HBO Max
    page = await browser.newPage()
    await page.goto('https://www.max.com/');

    # Scroll to the bottom
    await page.evaluate("window.scrollTo(0, document.documentElement.scrollHeight)");
    # take a screenshot
    await page.screenshot({"path": "HBOMax.png"})
    await page.close()

asyncio.run(main())
3. Click the button
In Python Pyppeteer, we can use page.click to click a button or hyperlink. Setting the input delay makes it more like a real user's operation.
The following is a simple example.
import asyncio
from pyppeteer import connect

async def main():
    # Connect to the browser
    browser = await connect(browserWSEndpoint=browser_ws_endpoint)
    print("Connected!")

    page = await browser.newPage()
    await page.goto("https://example.com/")

    # click link
    await page.click("p > a", {"delay": 200})
    # take a screenshot
    await page.screenshot({"path": "example.png"})
    await page.close()

asyncio.run(main())
4. Form input
How to input data using Python Pyppeteer? Please use the page.type to enter content in the specified input box.
import asyncio
from pyppeteer import connect

async def main():
    # Connect to the browser
    browser = await connect(browserWSEndpoint=browser_ws_endpoint)
    print("Connected!")

    # Create a new page
    page = await browser.newPage()
    # Visit chrome developer
    await page.goto("https://developer.chrome.com/")
    await page.setViewport({"width": 1920, "height": 1080})

    # Input content in the search box
    await page.type(".devsite-search-field", "headless", {"delay": 200})

    # take a screenshot
    await page.screenshot({"path": "developer.png"})
    await page.close()

asyncio.run(main())
Login using Pyppeteer
After the above examples, we can easily think of the interactions involved in login, such as the input type operation and the button click operation.
So, in the following example, let's change the writing method. We will try to log in to the Nstbrowser Client. After logging in, I will take a screenshot to verify whether it is successful.
import asyncio
from pyppeteer import connect

async def main():
    # Connect to the browser
    browser = await connect(browserWSEndpoint=browser_ws_endpoint)
    print("Connected!")

    # Visit Nstbrowser Client
    page = await browser.newPage()
    await page.goto("https://app.nstbrowser.io/account/login")

    await page.waitForSelector("input")
    inputs = await page.querySelectorAll("input")
    # Enter your email address in the first input box
    await inputs[0].type("18552540330@163.com", delay=100)
    # Enter your password in the second input box
    await inputs[1].type("9KLYUWn3GmrzHPRGQl0EZ1QP3OWPFwcB", delay=100)

    buttons = await page.querySelectorAll("button")
    # Click the login button
    await buttons[1].click()

    # Waiting for login request response
    login_url = "https://api.nstbrowser.io/api/v1/passport/login"
    await page.waitForResponse(lambda res: res.url == login_url)
    await page.waitFor(2000)

    # take a screenshot
    await page.screenshot({"fullPage": True, "path": "./nstbrowser.png"})
    await page.close()

asyncio.run(main())
- Running result:
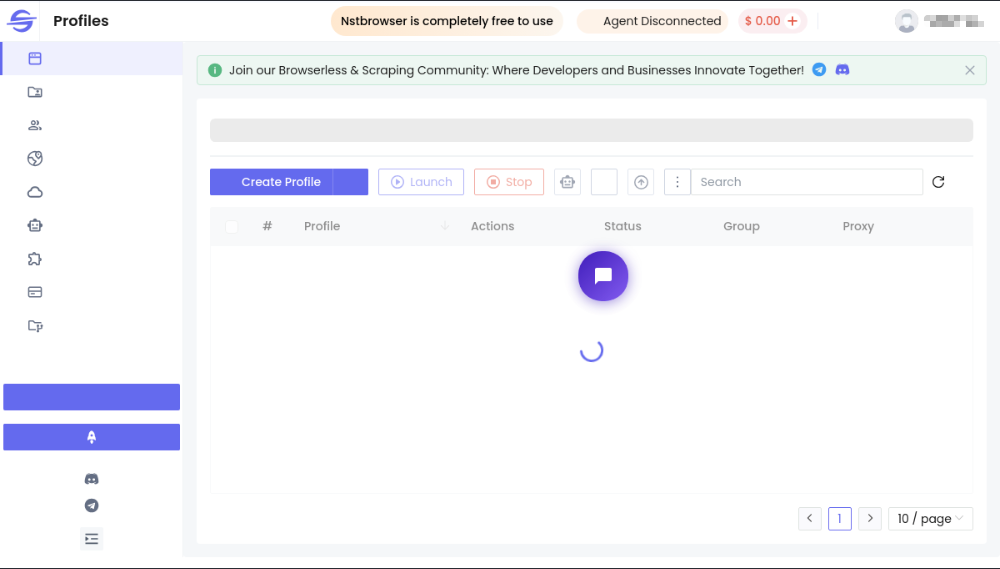
We can see that our project has been redirected to the home page, which indicates that we have logged in to Nstbrowser successfully!
How to Use Pyppeteer in Browserless?
Could Pyppeteer work with Browserless?
Definitely, you can find the specific steps to integrate Pyppeteer into Browserless!
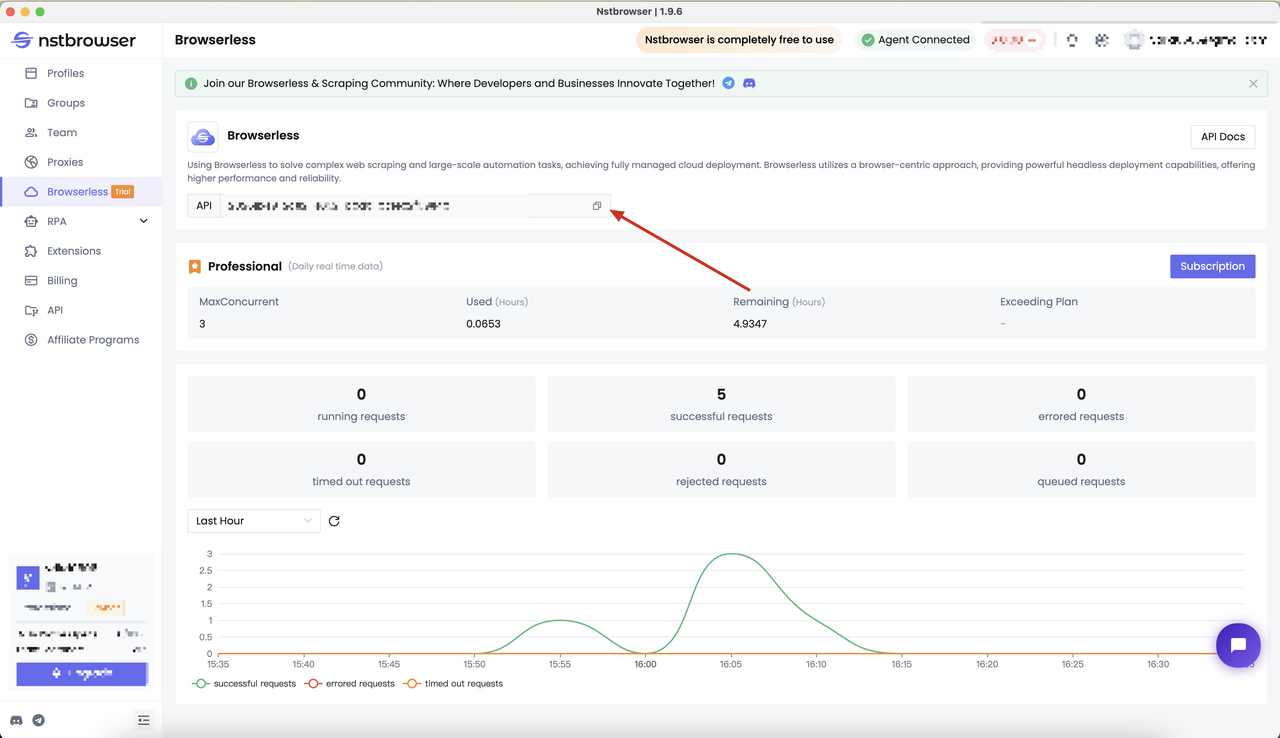
Step1: Get the API KEY
Before we start, we need to have a Browserless service. Using Browserless can solve complex web crawling and large-scale automation tasks, and it has now achieved fully managed cloud deployment.
Browserless adopts a browser-centric approach, provides powerful headless deployment capabilities, and provides higher performance and reliability. For more information about Browserless, you can read the document to learn more.
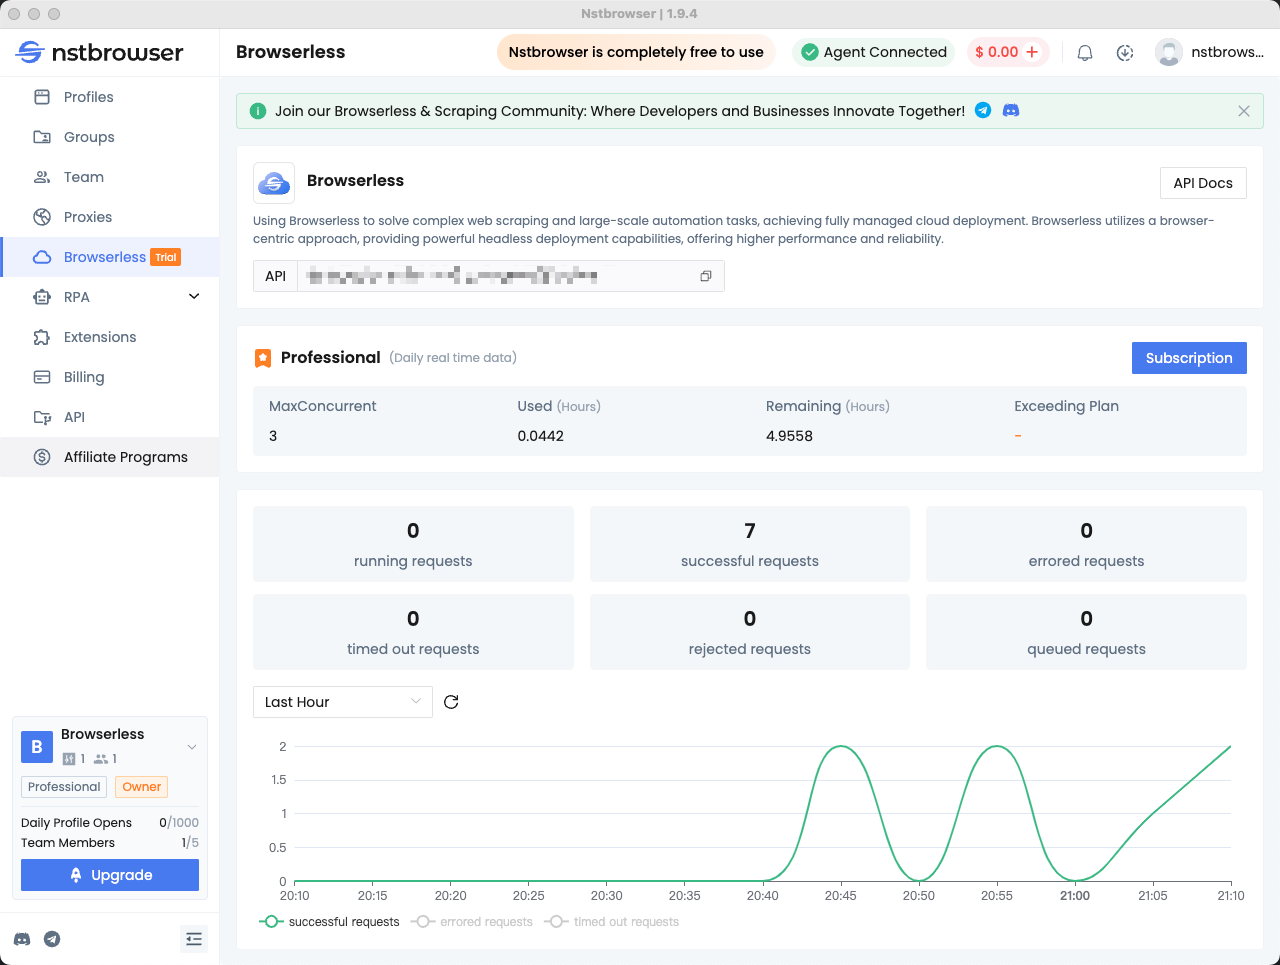
Get the API KEY and go to the Browserless menu page of the Nstbrowser client, or you can open the Browserless panel to access:
Step2: Install Pyppeteer
Pyppeteer is the Python version of Puppeteer, which provides similar functionality and allows developers to control headless browsers using Python scripts. It enables developers to automate interactions with web pages through Python code and is very commonly used in scenarios such as crawlers, testing, and data capture.
```Plain Text pip install pyppeteer
### Step3: Connect Pyppeteer to Browserless
We need to prepare the following code. Just fill in your **API key** and **proxy** to connect to Browserless.

```Python
from urllib.parse import urlencode
import json

token = "your api key" # 'required'
config = {
    "proxy": "your proxy",  # required; input format: schema://user:password@host:port eg: http://user:password@localhost:8080
    # "platform": "windows",  # support: windows, mac, linux
    # "kernel": 'chromium', # only support: chromium
    # "kernelMilestone": '128', # support: 128
    # "args": {
    #     "--proxy-bypass-list": "detect.nstbrowser.io"
    # }, # browser args
    # "fingerprint": {
    #     userAgent: 'Mozilla/5.0 (Windows NT 10.0; Win64; x64) AppleWebKit/537.36 (KHTML, like Gecko) Chrome/128.0.6613.85 Safari/537.36', # userAgent supportted since v0.15.0
    # },
}
query = urlencode({"token": token, "config": json.dumps(config)})
browser_ws_endpoint = f"ws://less.nstbrowser.io/connect?{query}"
Connected and let's start scraping!
import asyncio
from pyppeteer import connect

async def main():
    # Connect to the browser
    browser = await connect(browserWSEndpoint=browser_ws_endpoint)
    print("Connected!")

asyncio.run(main())
Step4: Using Pyppeteer in the Browserless
In this blog, we will go into a simple case to help you quickly get started with Browserless - crawling Books to Scrape.
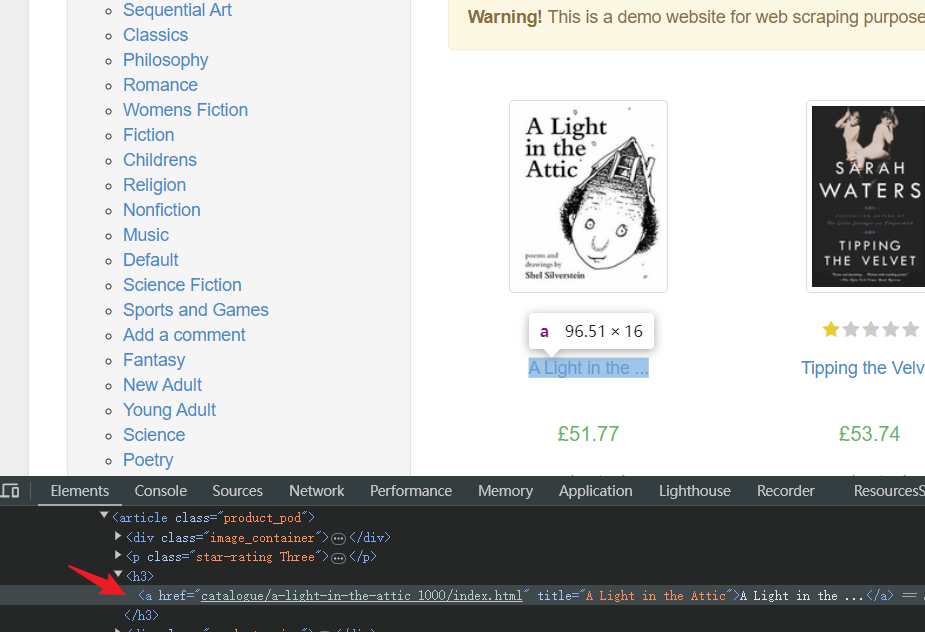
In the following example, we try to crawl all the book titles on the current page:
- Open the page
- Wait for the page to load normally
- Open the debug console
- Determine the HTML element corresponding to the book title at any location:
- Scripts:
import asyncio
from pyppeteer import connect

async def main():
    # Connect to the browser
    browser = await connect(browserWSEndpoint=browser_ws_endpoint)
    print("Connected!")

    # Create a new page
    page = await browser.newPage()

    # Visit Books to Scrape
    await page.goto("http://books.toscrape.com/")

    # Wait for book list to load
    await page.waitForSelector("section")

    # Select all book title elements
    books = await page.querySelectorAll("article.product_pod > h3 > a")

    # loop through all elements to extract titles
    for book in books:
        title_element = await book.getProperty("textContent")
        title = await title_element.jsonValue()
        print(f"[{title}]")

    await page.close()

# Run the script
asyncio.run(main())
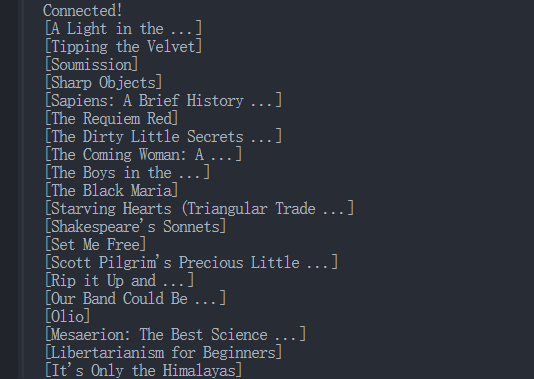
- Results:
Running the above script will output all captured data in the console:
Step5: Check the data in the Browserless Dashboard
You can view statistics for recent requests and remaining session time in the Browserless menu of the Nstbrowser client.
Common Errors When Using Pyppeteer
Most developers may encounter some errors while setting up and using Pyppeteer. Don't worry! You can find out how to fix them here.
Error 1: Pyppeteer cannot be installed
While installing Pyppeteer, you may encounter the error "Unable to install Pyppeteer".
Please check the Python version on your system. Pyppeteer only supports Python 3.6+. Therefore, please try to upgrade Python and reinstall Pyppeteer.
Error 2: Pyppeteer browser closed unexpectedly
You may encounter this error: pyppeteer.errors.BrowserError: Browser closed unexpectedly when you execute a Pyppeteer Python script for the first time after installation.
This means that all Chromium dependencies are not fully installed. Please install the Chrome driver manually using the following command:
Plain Text
pyppeteer-install
Take Away Notes
Pyppeteer is an unofficial Python port of the classic Node.js Puppeteer library. It is an easy-to-install, lightweight, and fast package for web automation and dynamic website scraping.
In this blog, you have learned:
- What is Pyppeteer?
- Specific steps to integrate Pyppeteer with Browserless.
- Other use cases of Pyppeteer.
If you want to know more about the features of Browserless, please check out the official manual. Nstbrowser provides you with the best cloud browser to solve the local limitations of automation work.
Subscribe to my newsletter
Read articles from nstbrowser directly inside your inbox. Subscribe to the newsletter, and don't miss out.
Written by
