Terraform IAC: Setting Up Azure Virtual Machine in Web-Tier
 Ritesh Kumar Nayak
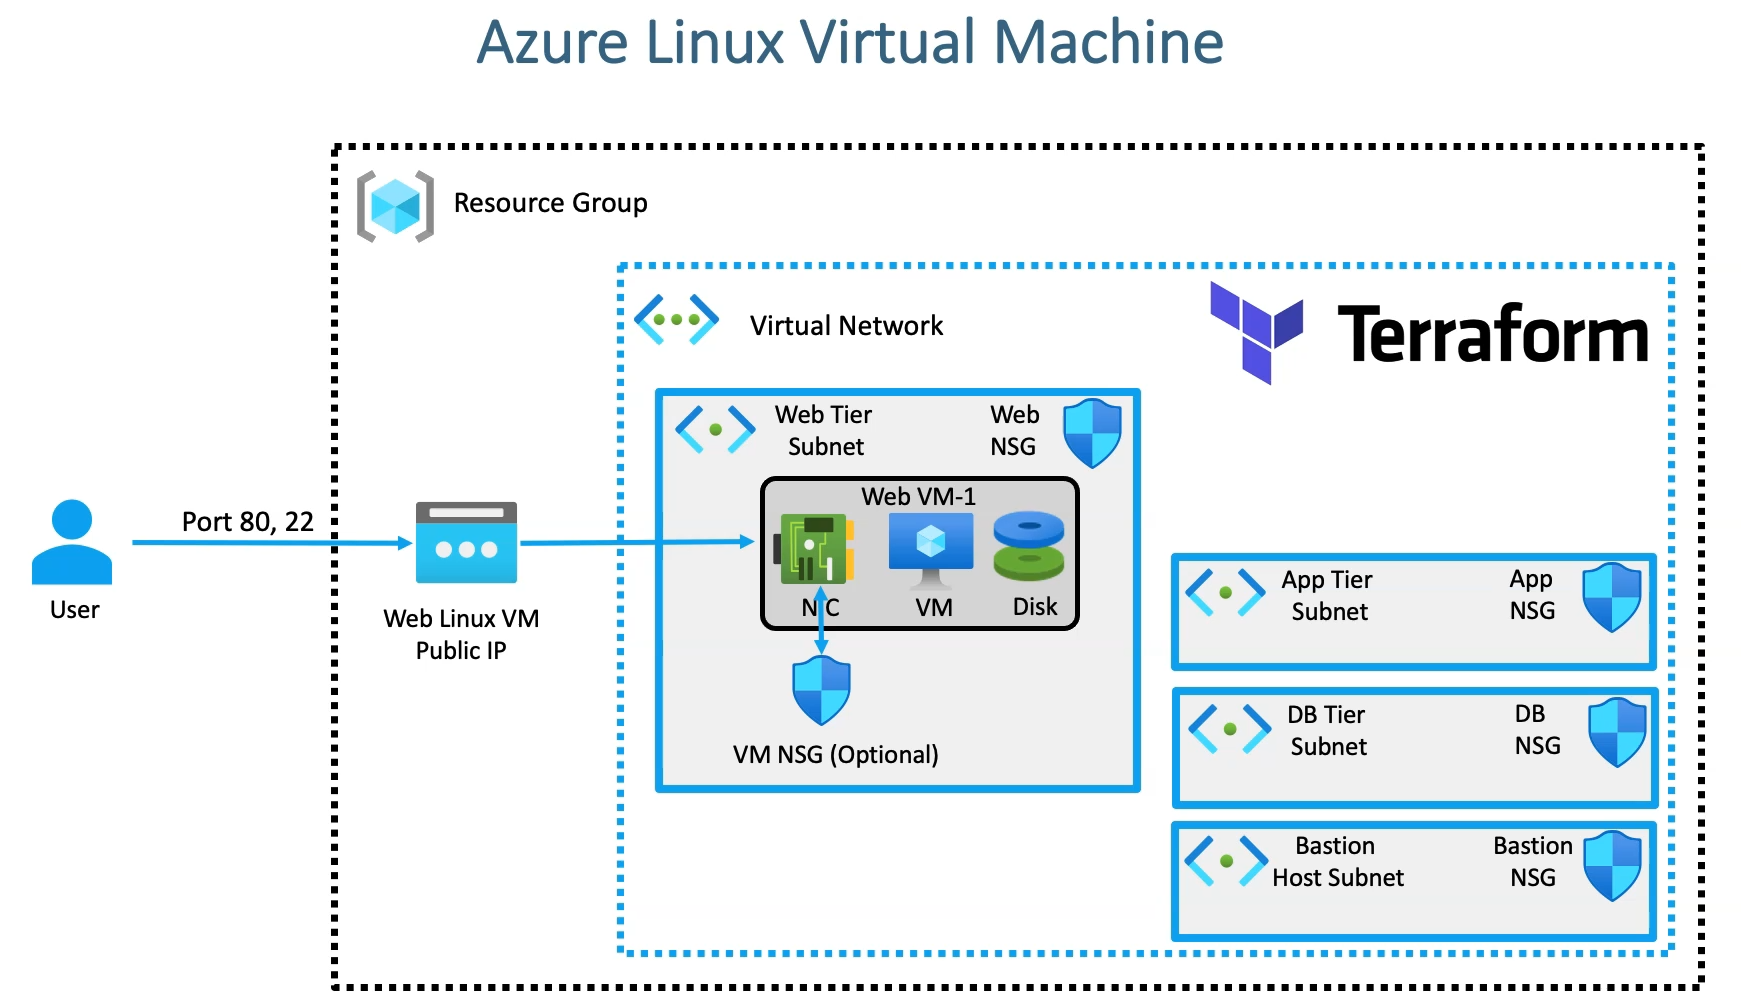
As part of a 4-tier networking setup, we have already demonstrated the complete networking setup using Terraform. This time, we will extend the architecture by deploying virtual machines into the respective subnets and hosting a static website. This will showcase how the network configuration integrates with the virtual machines, ensuring the proper functionality of each tier while maintaining security and isolation.
Components Involved
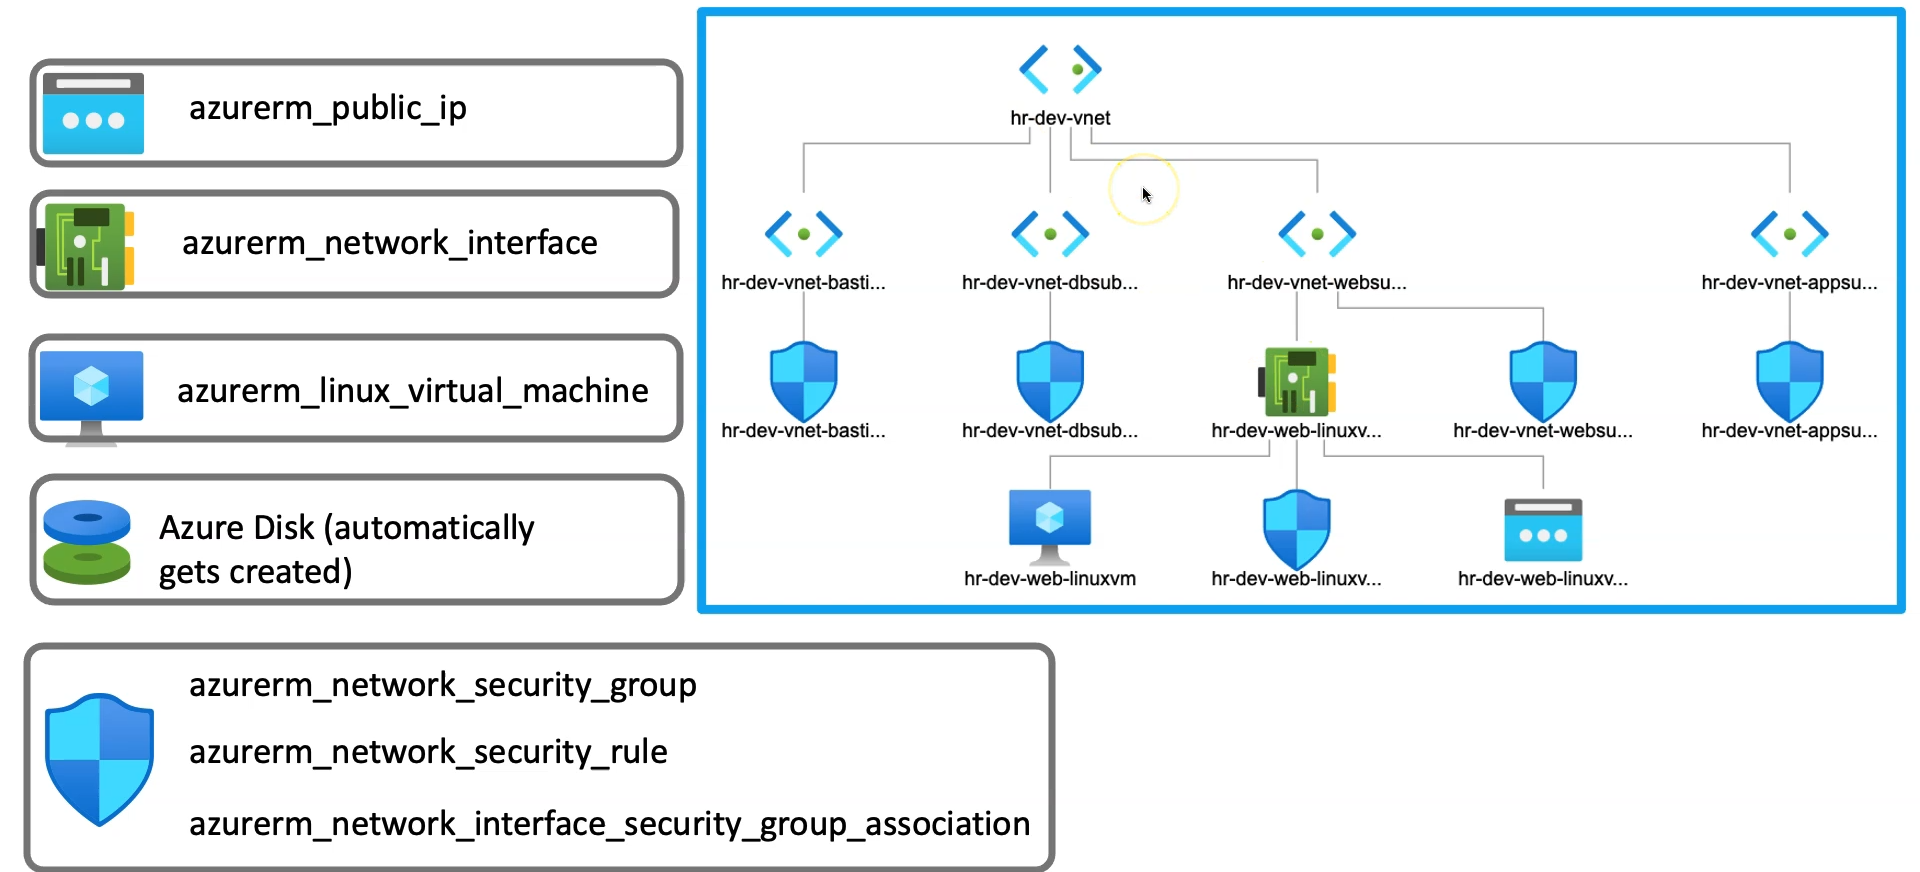
In this extended article, we are going add additional resources below to make the networking setup consumed
Public IP
Azure Linux Virtual Machine
Network Interface
Azure Disk
Generate SSH Keys for VM (Pre-requisite)

SSH keys are crucial for securely provisioning Azure Linux VMs and will be helpful when establishing a Bastion connection. To generate an SSH key pair for use in Terraform while provisioning an Azure Linux VM, execute the following command:
ssh-keygen -m PEM -t rsa -b 4096 -C "azureuser@myserver" -f terraform-azure.pem
This command generates two key files:
terraform-azure.pem: The private key file used to securely log into the VM.terraform-azure.pem.pub: The public key that will be injected into the VM during provisioning for authentication.
Ensure that the private key has restricted permissions by running:
chmod 400 terraform-azure.pem
The .pem file allows secure SSH access to the VM, while the .pub The file ensures authentication via Terraform during the VM provisioning. This setup is essential for enabling a secure and functional SSH connection.
Create Public IP Resource
In this section, we are creating an Azure Public IP resource for the Linux VM that will be deployed in the Web Subnet. The azurerm_public_ip resource is used to allocate a public IP that allows the VM to be accessible from the internet. The name of the public IP is dynamically constructed using the defined resource name prefix and a variable for the public IP name.
We specify the allocation_method, which determines if the IP is static or dynamic, and set the sku (Standard or Basic) based on the requirements. The domain_name_label is generated using a random string for uniqueness and combined with a predefined domain name, ensuring a unique DNS name for accessing the VM. This public IP will be linked to the Linux VM during deployment, enabling external access.
resource "azurerm_public_ip" "web_linuxvm_publicip" {


    name = "${local.resource_name_prefix}-${var.web_linuxvm_publicip_name}"

    allocation_method = var.allocation_type
    location = azurerm_resource_group.rg.location
    resource_group_name = azurerm_resource_group.rg.name

    sku = var.sku_type
    domain_name_label = "${random_string.random_name.id}-${var.domain_name}"

}
Public IP Resource - Input Variables
The below input variables are being referenced in the main resource block shown above
variable "web_linuxvm_publicip_name" {
    type = string
    default = "web-linuxvm-publicip"
}

variable "allocation_type" {
    default = "Static"
    type = string

}

variable "sku_type" {
    default = "Standard"
    type = string

}

variable "domain_name" {
    default = "devopswithritesh.in"
    type = string

}
Create Network Interface Card(NIC)
A Network Interface Card (NIC) is a crucial component in Azure Virtual Machines (VMs) that allows them to communicate with other resources within your network or the internet. Each Azure VM requires at least one NIC, which connects it to a virtual network (VNet) and enables network traffic flow. NICs facilitate both inbound and outbound traffic by associating with an IP address, typically through public and private IPs, and optionally linking to a Network Security Group (NSG) to manage traffic rules.
resource "azurerm_network_interface" "web_linuxvm_NIC" {
    name = "${local.resource_name_prefix}-${var.nic_name}"

    location = azurerm_resource_group.rg.location
    resource_group_name = azurerm_resource_group.rg.name

   # We can add multiple IP configuration for a single VM. We can keep adding multiple ip_configuration blocks
    ip_configuration {

      name = var.ip_config_1
      private_ip_address_allocation = var.ip_allocation_type
      subnet_id = azurerm_subnet.web_subnet.id
      public_ip_address_id = azurerm_public_ip.web_linuxvm_publicip.id

     # primary = true # this needs to be flagged explicitly when you are having multiple ip_configuration blocks
    }

}
In this section, we will provision a Network Interface Card (NIC) resource in Azure, which is essential for establishing network connectivity for the Azure Linux VM within the web subnet.
The NIC resource is defined using the following parameters:
Dynamic Naming: The resource name is constructed dynamically, incorporating a prefix based on the business unit and environment variables. This ensures a consistent and clear naming convention across all resources, facilitating better management and identification.
IP Configuration: Within the
ip_configurationblock, we define the network settings for the NIC. This configuration assigns a private IP address dynamically from the specified web subnet, ensuring that the VM has the necessary private network connectivity.Public IP Association: The
public_ip_address_idparameter links the NIC to the previously created public IP resource. This association allows external connectivity to the VM, enabling it to be accessed from the internet or other external networks.Multiple IP Configurations: It is noteworthy that you can enhance the NIC by adding multiple IP configurations. By including additional
ip_configurationblocks, you can manage advanced networking scenarios that may require multiple private or public IP addresses for a single NIC.
Network Interface Resource - Input Variables
These variables are being referenced in the above resource block
variable "nic_name" {
  default = "linuxvm-nic"
  type = string
}

variable "ip_allocation_type" {
    default = "Dynamic"
    type = string
}

variable "ip_config_1" {
    default = "web_linuxvm_ip_1"
    type = string

}
Create NSG at the NIC Level
Configuring a Network Security Group (NSG) at the Virtual Machine (VM) Network Interface Card (NIC) level is crucial for enhancing the security and management of individual VMs, even when a subnet-level NSG is in place. An NSG at the NIC level allows for specific and granular control over traffic rules for that particular VM, enabling customized security measures tailored to its unique requirements. While a subnet-level NSG provides a baseline security configuration, individual VMs may require distinct access controls, and the NIC-level NSG adds an additional layer of security to enforce these tailored rules. Furthermore, rules defined at the NIC level can take precedence over broader subnet-level rules, ensuring critical services on the VM remain accessible while adhering to overall network security policies.
resource "azurerm_network_security_group" "weblinuxvm_nsg" {
    name = "${local.resource_name_prefix}-wbelinux_nsg"
    resource_group_name = azurerm_resource_group.rg.name
    location = azurerm_resource_group.rg.location

}

# Locals block for security rules
locals {
  weblinux_inbound_port_map = {
    # priority:port
    "100" : "80"
    "110" : "443"
    "120" : "22"

  }
}
# Create Network Security Rule
resource "azurerm_network_security_rule" "weblinuxvm_nsg_rules" {
    for_each = local.weblinux_inbound_port_map
    access = "Allow"
    resource_group_name = azurerm_resource_group.rg.name
    direction = "Inbound"
    name = "-weblinux_rule-port-${each.value}"
    network_security_group_name = azurerm_network_security_group.weblinuxvm_nsg.name
    priority = each.key
    protocol = "Tcp"
    source_port_range           = "*"
    destination_port_range      = each.value
    source_address_prefix       = "*"
    destination_address_prefix = "*"
}

# NSG and VM NIC
resource "azurerm_network_interface_security_group_association" "associate_weblinux_nsg_nic" {
    depends_on = [ azurerm_network_security_rule.weblinuxvm_nsg_rules ]
    network_interface_id = azurerm_network_interface.web_linuxvm_NIC.id
    network_security_group_id = azurerm_network_security_group.weblinuxvm_nsg.id

}
In this section, we create an explicit Network Security Group (NSG) at the Network Interface Card (NIC) level for our web Linux virtual machine (VM). First, the NSG is defined using the azurerm_network_security_group resource, specifying the location and resource group. A locals block is introduced to define the inbound port rules for the VM, including common ports like 80 (HTTP), 443 (HTTPS), and 22 (SSH). The azurerm_network_security_rule resource applies these rules, ensuring that only allowed traffic reaches the VM. Lastly, the azurerm_network_interface_security_group_association resource is used to associate the NSG with the VM's NIC. This setup allows for granular control over traffic specific to this VM, enhancing its security by applying custom inbound rules.
Deploying Azure Linux Virtual Machine with NIC and Webpage Hosting
In this section, we’ll be deploying an Azure Linux Virtual Machine (VM) that is configured with a Network Interface Card (NIC) and a custom script for hosting a webpage. The key components of this deployment include setting up the Linux VM, attaching it to the appropriate network interface, configuring SSH key-based access, and running custom initialization scripts for hosting a webpage.
VM Configuration
We define the Azure Linux VM using the azurerm_linux_virtual_machine resource. The VM is created in the specified resource group and location, with parameters such as size, admin_username, and computer_name defined by variables. Notably, password authentication is disabled, and SSH key-based authentication is enforced for security, with the admin_ssh_key block defining the public SSH key that is placed on the VM for secure login.
Network Configuration
The VM is attached to the previously created NIC, which connects the VM to the web subnet. The network_interface_ids field links the NIC to the VM, ensuring that the machine can communicate with the network and be accessed through the public IP associated with the NIC.
OS Disk and Image
The operating system for the VM is defined using the source_image_reference block, specifying RedHat Enterprise Linux (RHEL) with the latest version as the base image. The OS disk configuration uses Standard_LRS for storage, which is sufficient for typical web hosting use cases.
Custom Script for Webpage Hosting
The custom_data block is used to pass a custom script (webvm.sh) that will be executed when the VM is provisioned. This script, encoded using filebase64(), will automate the deployment of a simple webpage on the VM. This approach ensures that the VM is initialized with the necessary software and configurations right after provisioning, simplifying the process of setting up a web server on the Linux VM.
By using a combination of predefined VM configurations and a custom script, this setup enables a fully automated deployment of a web-hosting environment in Azure. This is ideal for environments that require scalable and easily reproducible infrastructure.
# Resource: Azure linux Virtual Machine
resource "azurerm_linux_virtual_machine" "web_linuxvm" {

    name = "${local.resource_name_prefix}-${var.vm_name}"
    computer_name = var.host_name
    admin_username = var.linux_admin_username
    size = var.vm_size
    resource_group_name = azurerm_resource_group.rg.name
    location = azurerm_resource_group.rg.location
    disable_password_authentication = true

    network_interface_ids =[
        azurerm_network_interface.web_linuxvm_NIC.id
    ]

    admin_ssh_key {
      username = var.linux_admin_username
      public_key = file("${path.module}ssh-keys/terraform-azure.pub")
    }
    os_disk {
      caching = "ReadWrite"
      storage_account_type = "Standard_LRS"
    }

    source_image_reference {
      publisher = "RedHat"
      offer = "RHEL"
      sku = "83-gen2"
      version = "latest"
    }

/* custom_data accepts only encoded sensitive content that should be base64 encoded. To achieve that we need to use filebase64() function. In this approach we can not refer to any resouce attribute inside the script. We can also use locals block with custom data which we'll be using in other advanced resource creations*/

    custom_data = filebase64("${path.module}/app-script/webvm.sh") # One way of passing custom script

}
Output Values of Virtual Machine
output "weblinux_publicip" {
    value = azurerm_public_ip.web_linuxvm_publicip.ip_address
    description = "Public Ip of the VM"

}

#Network interface id
output "weblinux_networkinterface_id" {
    value = azurerm_network_interface.web_linuxvm_NIC.id
    description = "Interface id of NIC"

}
output "weblinux_networkinterface_privateip" {
    value = [azurerm_network_interface.web_linuxvm_NIC.private_ip_addresses]
    description = "Interface private IPs"
}

output "weblinux_vm_id" {
    value = azurerm_linux_virtual_machine.web_linuxvm.id
    description = "VM Id"

}
output "weblinux_vm_publicip" {
    value = azurerm_linux_virtual_machine.web_linuxvm.public_ip_address
    description = "VM Public IP address"

}
Resources on Azure Portal
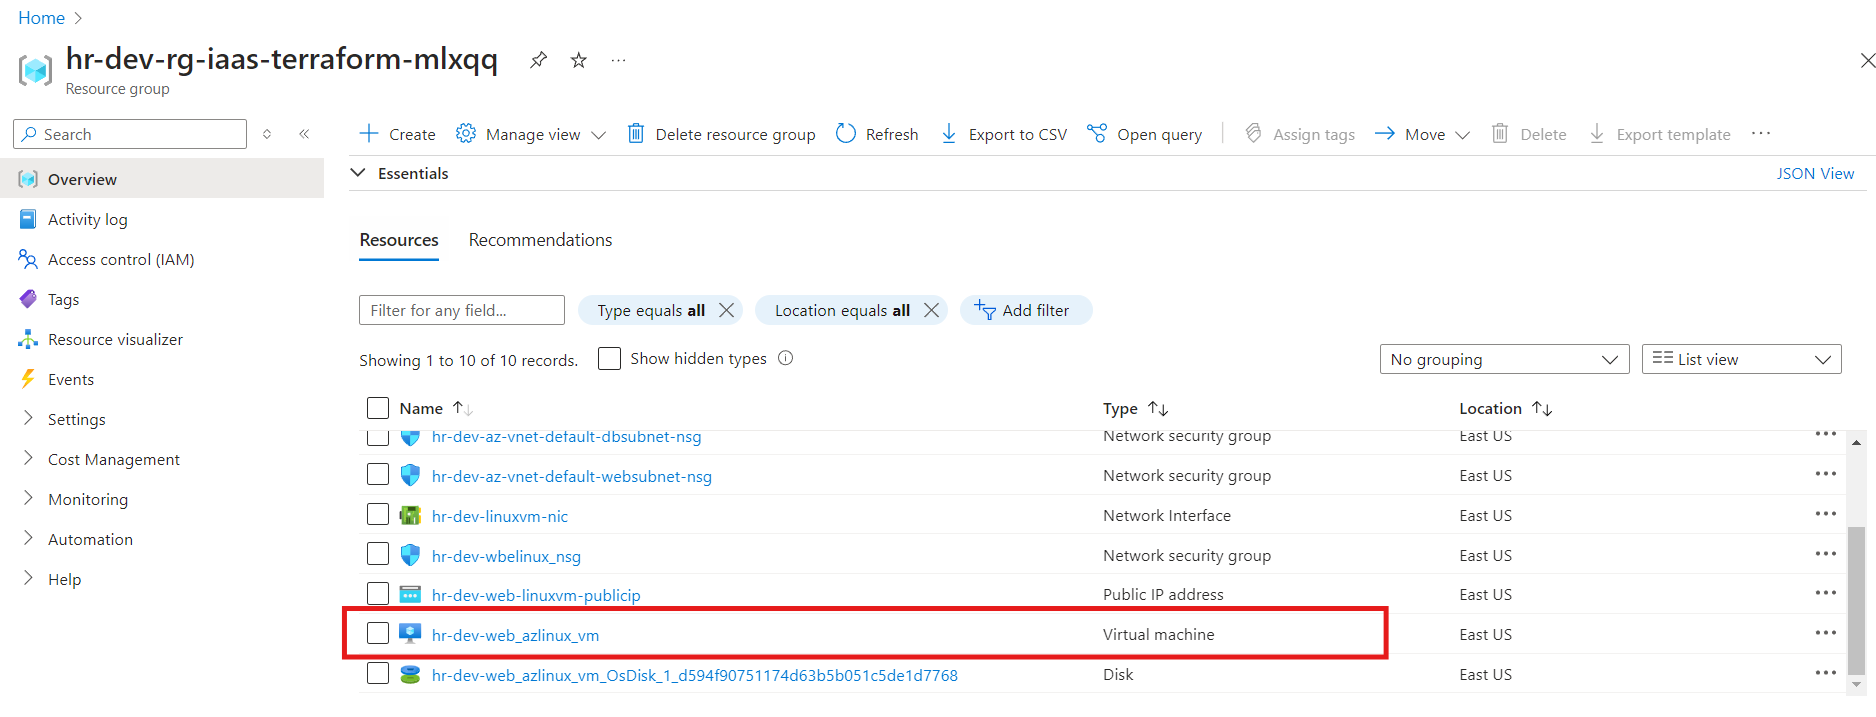
The desired resources have been deployed successfully in the web subnet with respective configurations.
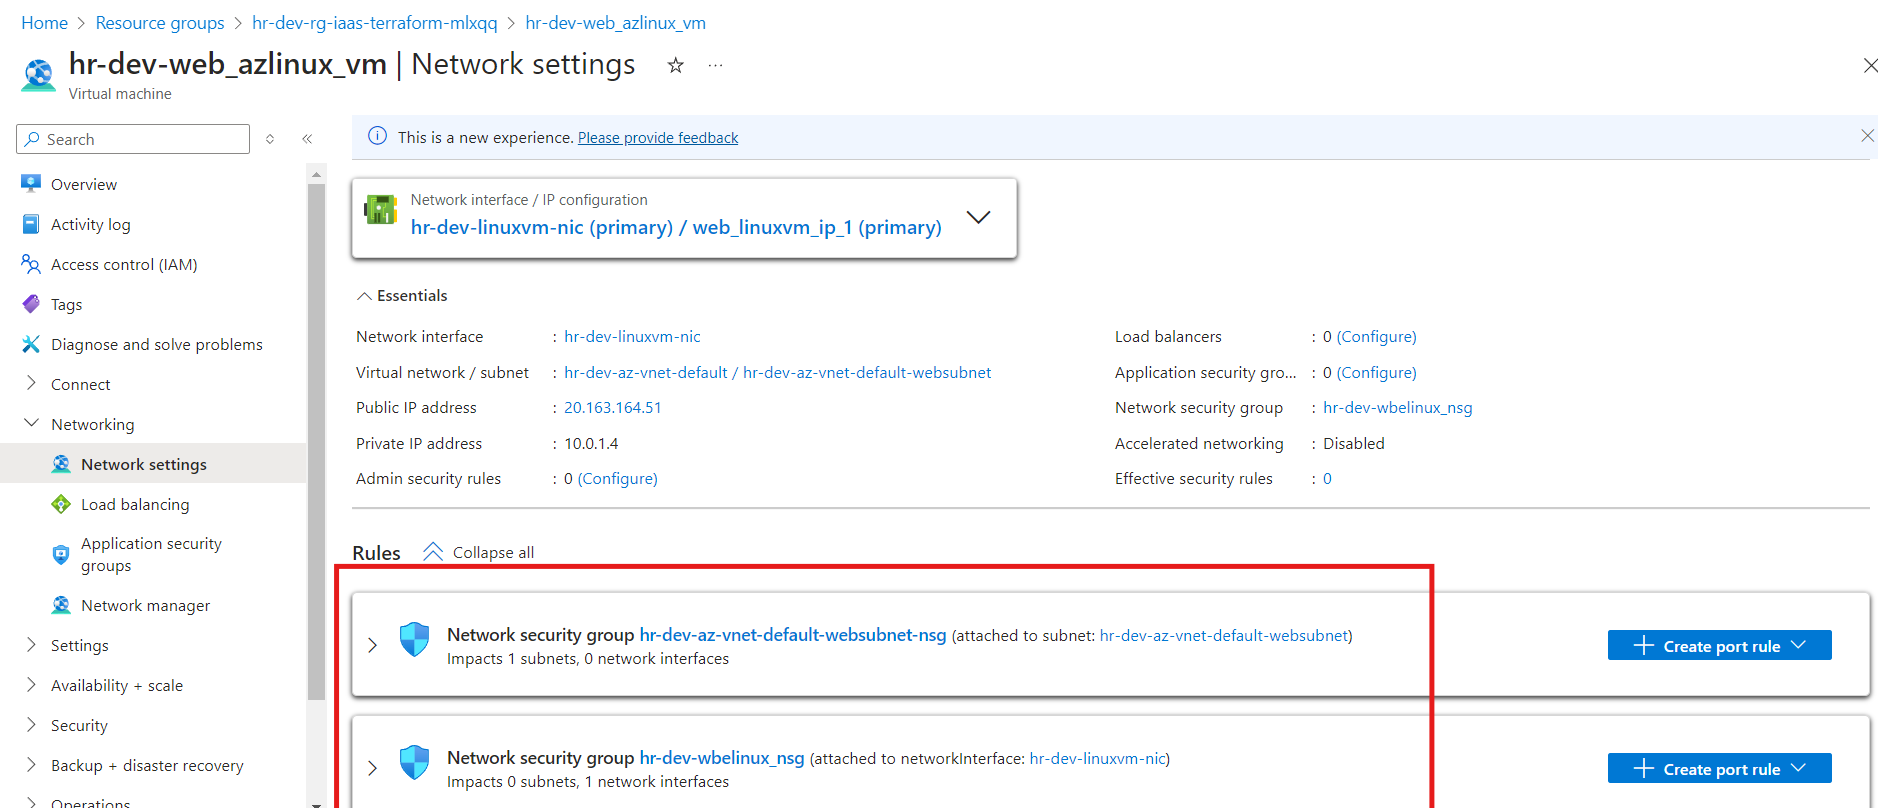
In conclusion, we successfully established an SSH connection to the Azure Linux Virtual Machine using SSH-key based password-less authentication.


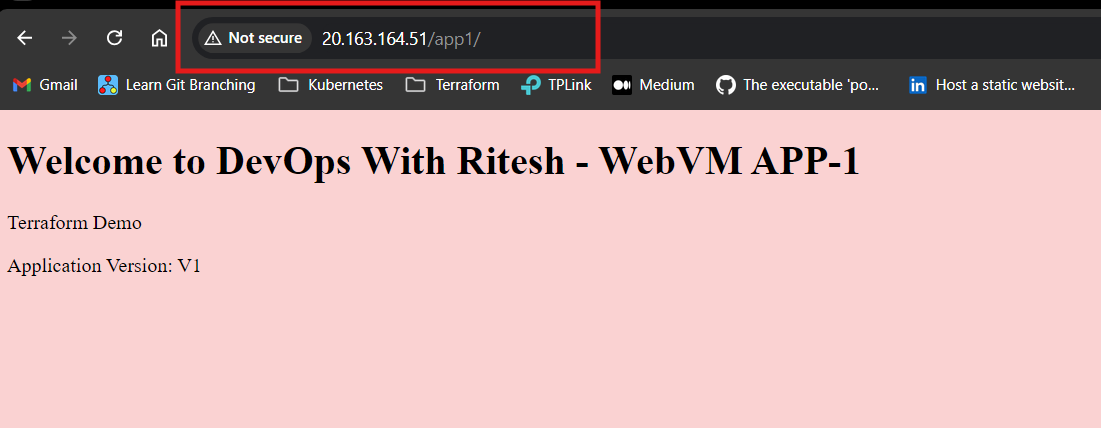
Additionally, the custom data script executed flawlessly during the VM provisioning process. With the HTTP server properly configured, we were able to access the hosted webpage through the VM's public IP. All necessary resources were deployed as planned, completing the infrastructure setup.
Subscribe to my newsletter
Read articles from Ritesh Kumar Nayak directly inside your inbox. Subscribe to the newsletter, and don't miss out.
Written by

Ritesh Kumar Nayak
Ritesh Kumar Nayak
Passionate about helping organizations build scalable infrastructure and DevOps solutions with cloud technologies. Experienced in designing robust systems, automating processes, and driving efficiency through innovative cloud solutions. Advocate for best practices in DevOps and cloud computing, committed to enabling teams to achieve their full potential.