Multichain RWA Lending with Axelar GMP
 Idris Olubisi
Table of contents
- What is a Real-world Asset (RWA)?
- Prerequisites
- Create a Mock RWA Token
- Create a Mock RWA Oracle
- Create the Lending Pool Contract
- Import Necessary Contracts
- Add State Variables, Structs, and Events
- Implement the Constructor
- Create a Multichain Loan Function
- Create Repay Cross-Chain Loan Function
- Implement Interest Calculation Function
- Create the _executeWithToken Function
- Implement _createLoanInternal Function
- Implement _execute Function for Incoming Cross-chain Message
- Testing the Lending Pool Contract
- Deploy Mock RWA Token
- Mint RWA tokens
- Deploy RWAOracle Contract
- Set RWA Token Value
- Deploy the Lending Pool Contract on the Fantom Testnet
- Deploy the Lending Pool Contract on the Celo Testnet
- Approve the Lending Pool Contract Address on MockRWAToken on the Fantom Testnet
- Approve Lending Pool Contract to Spend the Asset to Be Borrowed
- Fund the Destination Contract with the Asset to be Borrowed
- Call initiateCrossChainLoan on the Lending Pool Contract on Fantom Network
- Call repayCrossChainLoan on Lending Pool Contract on Celo Tesnet
- Conclusion
- References
Today, we see many different networks, each with its own strengths and limitations. This has created significant challenges, leading to scattered liquidity and complicated user experiences, especially in Real World Asset (RWA) lending.
To tackle these challenges, Axelar, the leading Web3 interoperability platform, has a feature called Axelar's General Message Passing (GMP), which offers an effective and scalable solution. It enables secure and efficient communication between blockchains beyond simple asset transfers.
To understand how Axelar's GMP can impact real-world scenarios, let's consider an example of how blockchain technology is already changing lives.
A farmer named Amani lives in a small village with acres of fertile land but can't get a loan from local banks because he lacks a traditional credit score. Now, think of Sarah, a tech entrepreneur in New York working on blockchain solutions. Their worlds seem far apart, but blockchain technology could connect them. Consider Goldfinch, a real-world example in the DeFi space. It allows borrowers from emerging markets to secure loans using real-world assets as collateral, funded by global investors who trust in blockchain's transparency. This system opens doors for people previously excluded from the financial system.
Now, imagine scaling this idea across multiple blockchains, each optimized for different strengths like speed, security, or low fees. A multichain platform could tap into the best of each world, creating a truly global lending ecosystem that operates 24/7, without borders, and with minimal friction.
In this guide, we'll explore how to build a multichain real-world asset lending platform using Axelar GMP. If you want to see the complete code, you can find it on GitHub here.
What is a Real-world Asset (RWA)?
A Real-World Asset (RWA) is a digital representation of a tangible or intangible asset that exists outside the blockchain ecosystem. These digital tokens symbolize ownership or rights to various types of assets, such as:
Real estate.
Commodities (e.g., gold, oil).
Fine art.
Intellectual property.
Financial instruments (e.g., stocks, bonds).
The process of creating these digital representations is called tokenization. This involves converting real-world assets into blockchain-based tokens. The following are the advantages of tokenization:
Increased liquidity: Assets previously difficult to divide or trade can now be easily bought and sold in smaller fractions.
Broader accessibility: Investors can access a wider range of assets with lower capital requirements.
Improved transparency: Blockchain technology provides a clear, immutable record of ownership and transactions.
Enhanced efficiency: Tokenization can streamline various processes by reducing administrative overhead and costs.
Prerequisites
A good understanding of Solidity.
A MetaMask wallet with FTM and Celo funds for testing. If you don’t have these funds, you can get FTM from the Fantom faucet and Celo from the Celo faucets.
aUSDCfaucet.Familiarity with the remix.ethereum.org portal.
Before we get started, let's outline what we'll be doing and why each component is important for our multichain RWA lending platform:
MockRWAToken: This contract will simulate a tokenized real-world asset. For our demonstration, we'll create a simplified version that allows us to mint and transfer tokens.RWAOracle: This contract will act as a price feed for our RWA tokens. For our purposes, we'll create a simple oracle that allows us to set and update asset values manually.LendingPool: This is the core contract of our platform. It will handle the creation of loans, manage collateral, and facilitate cross-chain interactions using Axelar GMP.
By creating these contracts, we can simulate a simple RWA lending platform that works across different blockchains. This setup will let users, like our example farmer Amani, use their tokenized real-world assets as collateral, even if the lender is on another blockchain network.
Next, we'll start by creating the MockRWAToken. This will serve as the foundation for our platform, representing the tokenized real-world assets that can be used as collateral.
Create a Mock RWA Token
To begin your implementation, you’ll start by creating a MockRWAToken contract. This will serve as a representation of tokenized real-world assets.
Navigate to remix.ethereum.org.
Create a new folder named "contracts".
Inside this folder, create a new file called
MockRWAToken.sol.

Add the following code snippet to the file:
// SPDX-License-Identifier: MIT
pragma solidity ^0.8.0;

import "@openzeppelin/contracts/token/ERC721/ERC721.sol";
import "@openzeppelin/contracts/access/Ownable.sol";

contract MockRWAToken is ERC721, Ownable {
    uint256 private _nextTokenId;

    constructor(
        address initialOwner
    ) ERC721("Mock RWA", "MRWA") Ownable(initialOwner) {}

    function safeMint(address to) public onlyOwner {
        uint256 tokenId = _nextTokenId++;
        _safeMint(to, tokenId);
    }
}
In the code snippet above, you:
Created an ERC721 token contract named "Mock RWA" with the symbol "MRWA"
Implemented a
safeMintfunction that allows the contract owner to create new tokensUsed OpenZeppelin's ERC721 and Ownable contracts for standard functionality and access control
In the next step, you will create the RWAOracle contract, which will provide price information for your tokenized assets. This oracle will help determine the value of the assets used as collateral in your lending platform.
Create a Mock RWA Oracle
In your contracts folder, create a new file named RWAOracle.sol add the following code snippet:
// SPDX-License-Identifier: MIT
pragma solidity ^0.8.0;

import "@openzeppelin/contracts/access/Ownable.sol";

// RWA Oracle
contract RWAOracle is Ownable {
    constructor(address initialOwner) Ownable(initialOwner) {}

    mapping(uint256 => uint256) private rwaValues;

    event RWAValueUpdated(uint256 indexed tokenId, uint256 value);

    function updateRWAValue(
        uint256 _tokenId,
        uint256 _value
    ) external onlyOwner {
        rwaValues[_tokenId] = _value;
        emit RWAValueUpdated(_tokenId, _value);
    }

    function getRWAValue(uint256 _tokenId) external view returns (uint256) {
        return rwaValues[_tokenId];
    }
}
This contract provides two key functions:
updateRWAValue: Allows the contract owner to set or update the value of an RWA token.getRWAValue: Retrieves the current value of a specific RWA token
In a production environment, this oracle would connect with real-world data sources to provide accurate, up-to-date asset valuations. For our demonstration, this simplified version is enough to show the main features of our lending platform.
Next, you'll create the LendingPool contract, which will connect the MockRWAToken and RWAOracle to enable cross-chain lending operations.
Create the Lending Pool Contract
Now that you have your MockRWAToken and RWAOracle ready, you can move on to creating the LendingPool contract. In your contracts folder, create a new file named LendingPool.sol.
Import Necessary Contracts
Add the following code snippet to import the necessary contracts.
// SPDX-License-Identifier: MIT
pragma solidity ^0.8.0;

// Import required OpenZeppelin contracts
import "@openzeppelin/contracts/token/ERC721/ERC721.sol";
import "@openzeppelin/contracts/security/ReentrancyGuard.sol";
import "@openzeppelin/contracts/access/Ownable.sol";
import "@openzeppelin/contracts/token/ERC20/extensions/IERC20Metadata.sol";

// Import Axelar contracts for cross-chain functionality
import "@axelar-network/axelar-gmp-sdk-solidity/contracts/executable/AxelarExecutable.sol";
import "@axelar-network/axelar-gmp-sdk-solidity/contracts/interfaces/IAxelarGasService.sol";

// Import our custom RWAOracle contract
import "./RWAOracle.sol";

contract LendingPool is AxelarExecutable, ReentrancyGuard, Ownable {

    // Contract code here

}
Add State Variables, Structs, and Events
//...

contract LendingPool is AxelarExecutable, ReentrancyGuard, Ownable {

        // Main contract interfaces
        IERC20Metadata public lendingToken;
        ERC721 public rwaToken;
        RWAOracle public rwaOracle;
        IAxelarGasService public immutable gasService;

        // Constants for loan parameters
        uint256 public constant LIQUIDATION_THRESHOLD = 150;
        uint256 public constant INTEREST_RATE = 5;

        // Cross-chain source information
        string public sourceAddress;
        string public sourceChain;

        // Loan struct to store loan information
        struct Loan {
            uint256 amount;
            uint256 collateralId;
            uint256 startTime;
            uint256 duration;
            address borrower;
            bool isActive;
        }

        // Mapping to store loans by ID
        mapping(uint256 => Loan) public loans;
        uint256 public nextLoanId;

        // Events for various loan actions
        event LoanCreated(uint256 loanId, address borrower, uint256 amount, uint256 collateralId);
        event LoanRepaid(uint256 loanId);
        event LoanLiquidated(uint256 loanId, address liquidator);
        event CrossChainLoanRepaid(uint256 loanId);
        event CollateralReleased(uint256 loanId, uint256 collateralId, address borrower);
}
In the code above, you:
Defined key contract components: tokens, oracle, loan parameters
Created Loan
structto store loan informationCreated events for contract actions like
LoanCreated,LoanRepaid,LoanLiquidated,CrossChainLoanRepaid,CollateralReleased
Ignore the red lines showing on your remix right now; you will fix it in a bit.
Implement the Constructor
//...
contract LendingPool is AxelarExecutable, ReentrancyGuard, Ownable {

    //...

    constructor(
        address _initialOwner,
        address _gateway,
        address _gasService,
        address _lendingToken,
        address _rwaToken,
        address _rwaOracle
    ) AxelarExecutable(_gateway) Ownable(_initialOwner) {
        // Initialize contract components
        gasService = IAxelarGasService(_gasService);
        lendingToken = IERC20Metadata(_lendingToken);
        rwaToken = ERC721(_rwaToken);
        rwaOracle = RWAOracle(_rwaOracle);
    }

}
In the code above, you implemented the constructor, set up the contract with the necessary addresses, and initialized the inherited contracts.
Next, you will proceed to implement the main functions, starting with a function to initiate a multichain loan.
Create a Multichain Loan Function
This function allows users to initiate a loan on a different blockchain using their RWA token as collateral. To do this, add the following code to your LendingPool contract:
//...
contract LendingPool is AxelarExecutable, ReentrancyGuard, Ownable {

    //...

    function initiateCrossChainLoan(
        string memory destinationChain,
        string memory destinationAddress,
        uint256 _amount,
        uint256 _collateralId,
        uint256 _duration
    ) external payable {
        // Ensure gas payment is provided
        require(msg.value > 0, "Gas payment is required");

        // Check if the sender owns the RWA token
        require(
            rwaToken.ownerOf(_collateralId) == msg.sender,
            "Not the owner of the RWA"
        );

        // Verify collateral value is sufficient
        uint256 collateralValue = rwaOracle.getRWAValue(_collateralId);
        require(
            (collateralValue * 100) / _amount >= LIQUIDATION_THRESHOLD,
            "Insufficient collateral"
        );

        // Prepare payload for cross-chain message
        bytes memory payload = abi.encode(
            msg.sender,
            _amount,
            _collateralId,
            _duration
        );

        // Pay for gas on the source/destination chain
        gasService.payNativeGasForContractCallWithToken{value: msg.value}(
            address(this),
            destinationChain,
            destinationAddress,
            payload,
            lendingToken.symbol(),
            _amount,
            msg.sender
        );

        // Transfer collateral to this contract
        rwaToken.transferFrom(msg.sender, address(this), _collateralId);

        // Transfer lending tokens to this contract
        lendingToken.transferFrom(msg.sender, address(this), _amount);

        // Approve gateway to spend lending tokens
        lendingToken.approve(address(gateway), _amount);

        // Initiate cross-chain call with token transfer
        gateway().callContractWithToken(
            destinationChain,
            destinationAddress,
            payload,
            lendingToken.symbol(),
            _amount
        );
    }
}
In the code snippet above, you:
Implemented verification of gas payment for cross-chain operation
Check ownership of the RWA token and ensure collateral value meets the liquidation threshold
Prepared the payload for cross-chain messages and paid for gas on the source/destination chain
Transferred RWA token (collateral) to the contract using the
transferFromTransferred lending tokens to the contract with the
transferFrommethod and approved the gateway to spending lending tokens by calling theapprovemethodFinally, Initiated the cross-chain call using
callContractWithToken
Create Repay Cross-Chain Loan Function
When a cross-chain loan is initiated and collateral is received, users need to repay the loan when they are ready. To achieve this, you will implement the loan repayment function.
In the contract, create a function named repayCrossChainLoan that accepts _loanId, destinationChain, and destinationAddress to repay the loan.
To do this, add the following code snippet below:
//...

contract LendingPool is AxelarExecutable, ReentrancyGuard, Ownable {

    //...
    function repayCrossChainLoan(
        uint256 _loanId,
        string memory destinationChain,
        string memory destinationAddress
    ) external payable nonReentrant {
        // Ensure gas payment is provided
        require(msg.value > 0, "Gas payment is required");

        // Retrieve loan details
        Loan storage loan = loans[_loanId];

        // Verify loan status and borrower
        require(loan.isActive, "Loan is not active");
        require(loan.borrower == msg.sender, "Not the borrower");

        // Calculate total repayment amount
        uint256 interest = calculateInterest(
            loan.amount,
            loan.startTime,
            loan.duration
        );
        uint256 totalRepayment = loan.amount + interest;

        // Transfer repayment amount from borrower
        require(
            lendingToken.transferFrom(
                msg.sender,
                address(this),
                totalRepayment
            ),
            "Transfer failed"
        );

        // Mark loan as inactive
        loan.isActive = false;

        // Prepare payload for cross-chain message
        bytes memory payload = abi.encode(
            _loanId,
            loan.collateralId,
            loan.borrower
        );

        // Pay for gas on the destination chain
        gasService.payNativeGasForContractCallWithToken{value: msg.value}(
            address(this),
            destinationChain,
            destinationAddress,
            payload,
            lendingToken.symbol(),
            loan.amount,
            msg.sender
        );

        // Initiate cross-chain call to release collateral
        gateway().callContract(sourceChain, sourceAddress, payload);

        // Emit event for cross-chain loan repayment
        emit CrossChainLoanRepaid(_loanId);
    }
}
In the code snippet above, you:
Implemented a check for gas payment to cover cross-chain operation costs
Retrieved and verified the loan details, ensuring the loan is active, and the caller is the borrower
Calculated the total repayment amount, including interest, using the
calculateInterestfunctionTransferred the repayment amount from the borrower to the contract using
transferFromMarked the loan as inactive after successful repayment
Prepared a payload for the cross-chain message, including loan ID, collateral ID, and borrower address
Utilized the
gasServiceto pay for gas on the source/destination chain, ensuring smooth cross-chain operationInitiated a cross-chain call using
gateway.callContractto trigger collateral release on the source chainEmitted a
CrossChainLoanRepaidevent to log the successful repayment
In the step above, you called the calculateInterest function, but it hasn't been implemented yet. Let’s do that in the following step.
Implement Interest Calculation Function
This function calculates the interest for a loan based on the loan amount, start time, and duration.
//...

contract LendingPool is AxelarExecutable, ReentrancyGuard, Ownable {

    //...

    function repayCrossChainLoan(){
    //...
    }

    function calculateInterest(
        uint256 _amount,
        uint256 _startTime,
        uint256 _duration
    ) public view returns (uint256) {
        uint256 timeElapsed = block.timestamp - _startTime;

        // Cap the time elapsed to the loan duration
        if (timeElapsed > _duration) {
            timeElapsed = _duration;
        }

        // Calculate interest: (amount * rate * time) / (365 days * 100 * 10^decimals)
        // For a 5% annual rate
        uint256 interest = (_amount * 5 * timeElapsed) / (365 days * 100);

        // Adjust for token decimals (assuming 6 decimals for USDC)
        return interest / 1e6;
    }
}
In the code snippet above, you:
Calculated the time elapsed since the loan started using
block.timestampImplemented a cap on the elapsed time to ensure it doesn't exceed the loan duration
Computed the interest using a formula that accounts for a 5% annual rate:
(amount * rate * time) / (365 days * 100)Adjusted the calculated interest for token decimals, assuming 6 decimal places for USDC
Returned the final interest amount
Next, you will implement the _executeWithToken to handle transferring the loan amount to the borrower.
Create the _executeWithToken Function
In this step, you'll implement the _executeWithToken function that manages cross-chain token transfers and loan creation on the destination chain. This function is essential for completing the cross-chain loan process.
//...

contract LendingPool is AxelarExecutable, ReentrancyGuard, Ownable {

    //...
    function _executeWithToken(
        bytes32 commandId,
        string calldata _sourceChain,
        string calldata _sourceAddress,
        bytes calldata payload,
        string calldata tokenSymbol,
        uint256
    ) internal override {
        // Verify that the received token matches the lending token
        require(
            keccak256(bytes(tokenSymbol)) ==
                keccak256(bytes(lendingToken.symbol())),
            "Invalid token"
        );

        // Store the source chain and address
        sourceAddress = _sourceAddress;
        sourceChain = _sourceChain;

        // Decode the payload to extract loan details
        (
            address borrower,
            uint256 _amount,
            uint256 _collateralId,
            uint256 _duration
        ) = abi.decode(payload, (address, uint256, uint256, uint256));

        // Create a new loan internally
        uint256 loanId = _createLoanInternal(
            borrower,
            _amount,
            _collateralId,
            _duration
        );

        // Transfer the loan amount to the borrower
        require(lendingToken.transfer(borrower, _amount), "Transfer failed");

        // Emit an event for the created loan
        emit LoanCreated(loanId, borrower, _amount, _collateralId);
    }
}
In the code snippet above, you:
Verified that the received token symbol matches the lending token symbol using
keccak256hash comparisonStored the source chain and address for future reference
Decoded the payload to extract loan details, including borrower address, loan amount, collateral ID, and loan duration
Created a new loan internally by calling the
_createLoanInternalfunction with the extracted detailsTransferred the loan amount to the borrower using the
transfermethod of the lending tokenEmitted a
LoanCreatedevent with the new loan's details
In the implementation above, you called the _createLoanInternal function, but it hasn't been implemented yet. Let’s do that in the following step.
Implement _createLoanInternal Function
The _createLoanInternal function is a helper function used to create a new loan with the internal type that returns the loan ID.
//...

contract LendingPool is AxelarExecutable, ReentrancyGuard, Ownable {

    //...
    function _createLoanInternal(
        address borrower,
        uint256 _amount,
        uint256 _collateralId,
        uint256 _duration
        ) internal returns (uint256) {
            // Generate a new unique loan ID
            uint256 loanId = nextLoanId++;

            // Create a new Loan struct and store it in the loans mapping
            loans[loanId] = Loan({
                amount: _amount,          // The amount of the loan
                collateralId: _collateralId,  // ID of the collateral RWA token
                startTime: block.timestamp,   // Current time as the loan start time
                duration: _duration,      // Duration of the loan
                borrower: borrower,       // Address of the borrower
                isActive: true            // Mark the loan as active
            });

            // Return the newly created loan ID
            return loanId;
    }
}
In the code snippet above, you:
Generated a new loan ID by incrementing the
nextLoanIdcounterCreated a new
LoanStruct with the provided parameters and additional details:Set the loan amount, collateral ID, and duration as provided
Recorded the current timestamp as the loan's start time
Set the borrower's address
Marked the loan as active
Stored the new loan in the
loansmapping using the generated loan IDReturned the new loan ID
You're almost done! It's great to see you've made it this far in the tutorial.
Implement _execute Function for Incoming Cross-chain Message
This _execute function is automatically called by the Axelar relayers. It decodes the incoming payload and releases the collateral to the borrower on the source chain. Add the following code snippet to your contract.
//...

contract LendingPool is AxelarExecutable, ReentrancyGuard, Ownable {

    //...
    function _execute(
        bytes32,
        string calldata,
        string calldata,
        bytes calldata payload
    ) internal override {
        (uint256 loanId, uint256 collateralId, address borrower) = abi.decode(
            payload,
            (uint256, uint256, address)
        );

        // Release the collateral
        rwaToken.transferFrom(address(this), borrower, collateralId);

        emit CollateralReleased(loanId, collateralId, borrower);
    }
}
In the next step, you will test the contract using Fantom and Celo in this tutorial. However, feel free to use any network you prefer.
Testing the Lending Pool Contract
You will test all the contracts you have built during this tutorial. To proceed, deploy and mint mock RWA tokens to the specified address.
Deploy Mock RWA Token
You will deploy the mock RWA Token on the Fantom network. Click on the MockRWAToken.sol file and go to the deploy section, as shown below.

Next, click Transact and specify your address.
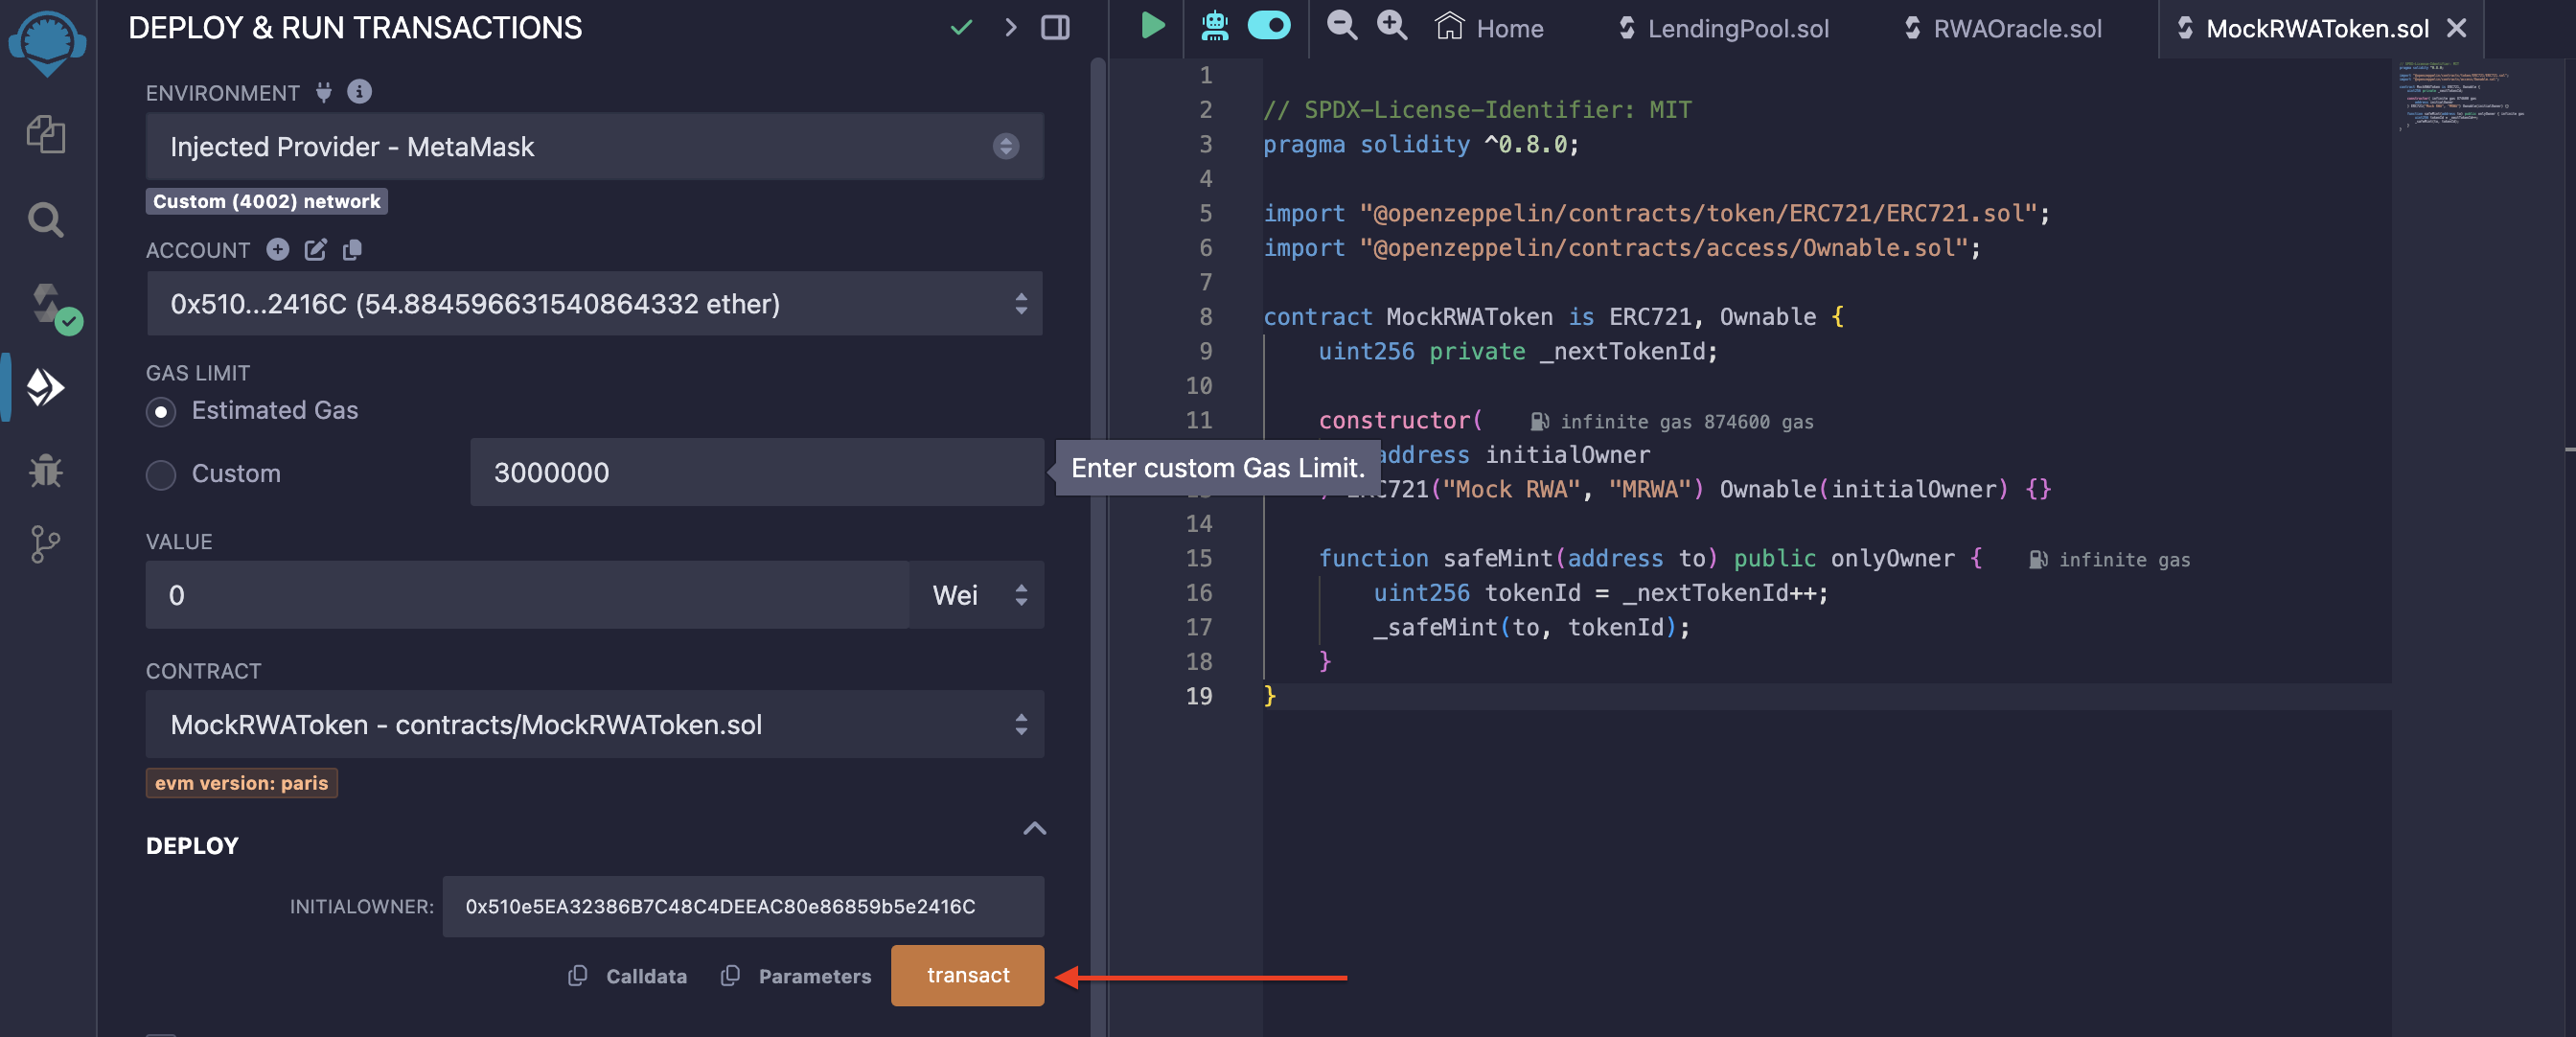
After deployment, you should be able to see the transaction chain similar to this. in the next step you will mint tokens to your preferred address.
Mint RWA tokens
Scroll down to the deploy section on Remix, as shown below, to use the safeMint method. Mint the token to the specified address and click on transact.

Check out the transaction here. Your transaction should look similar. To confirm, you can use the balanceOf method to verify, as shown below, where you can see the specified address has a balance of 1.
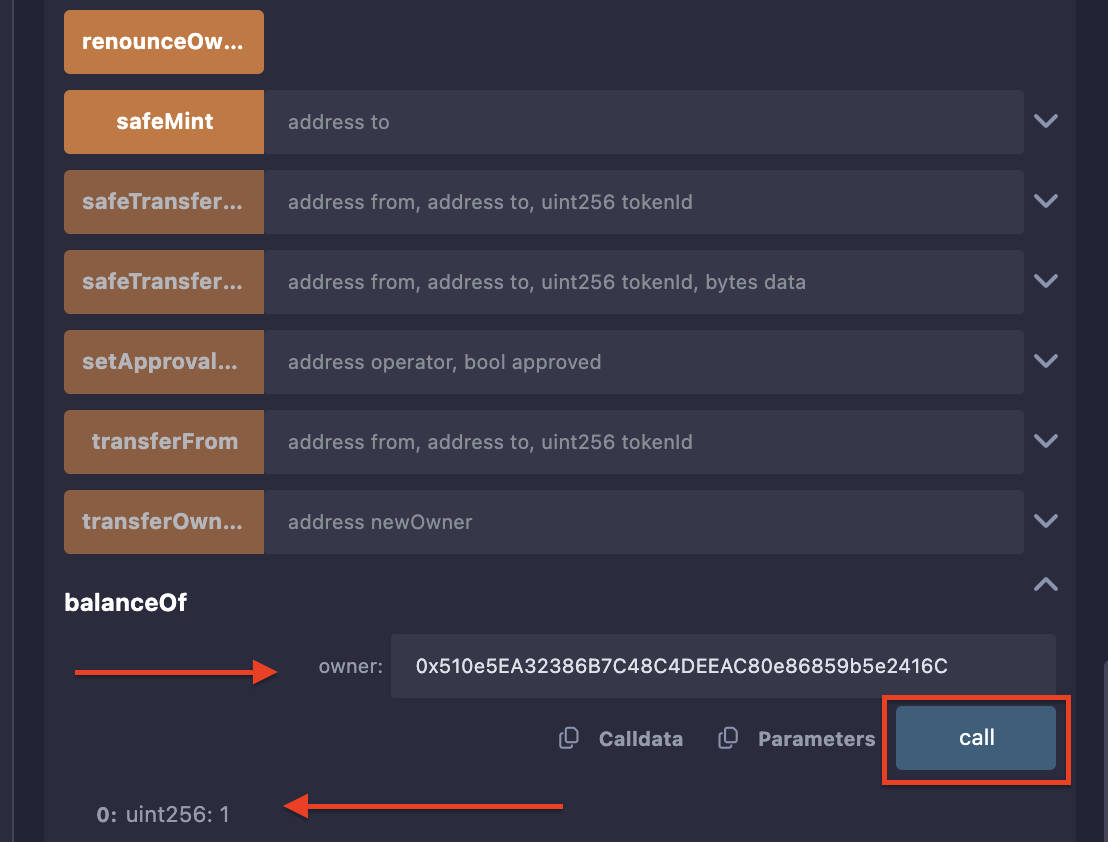
Next, you will deploy the RWAOracle contract, which simulates the Oracle price feed flow.
Deploy RWAOracle Contract
To deploy the RWAOracle contract, navigate to the RWAOracle.sol file on the Fantom network and deploy the contract as shown below.
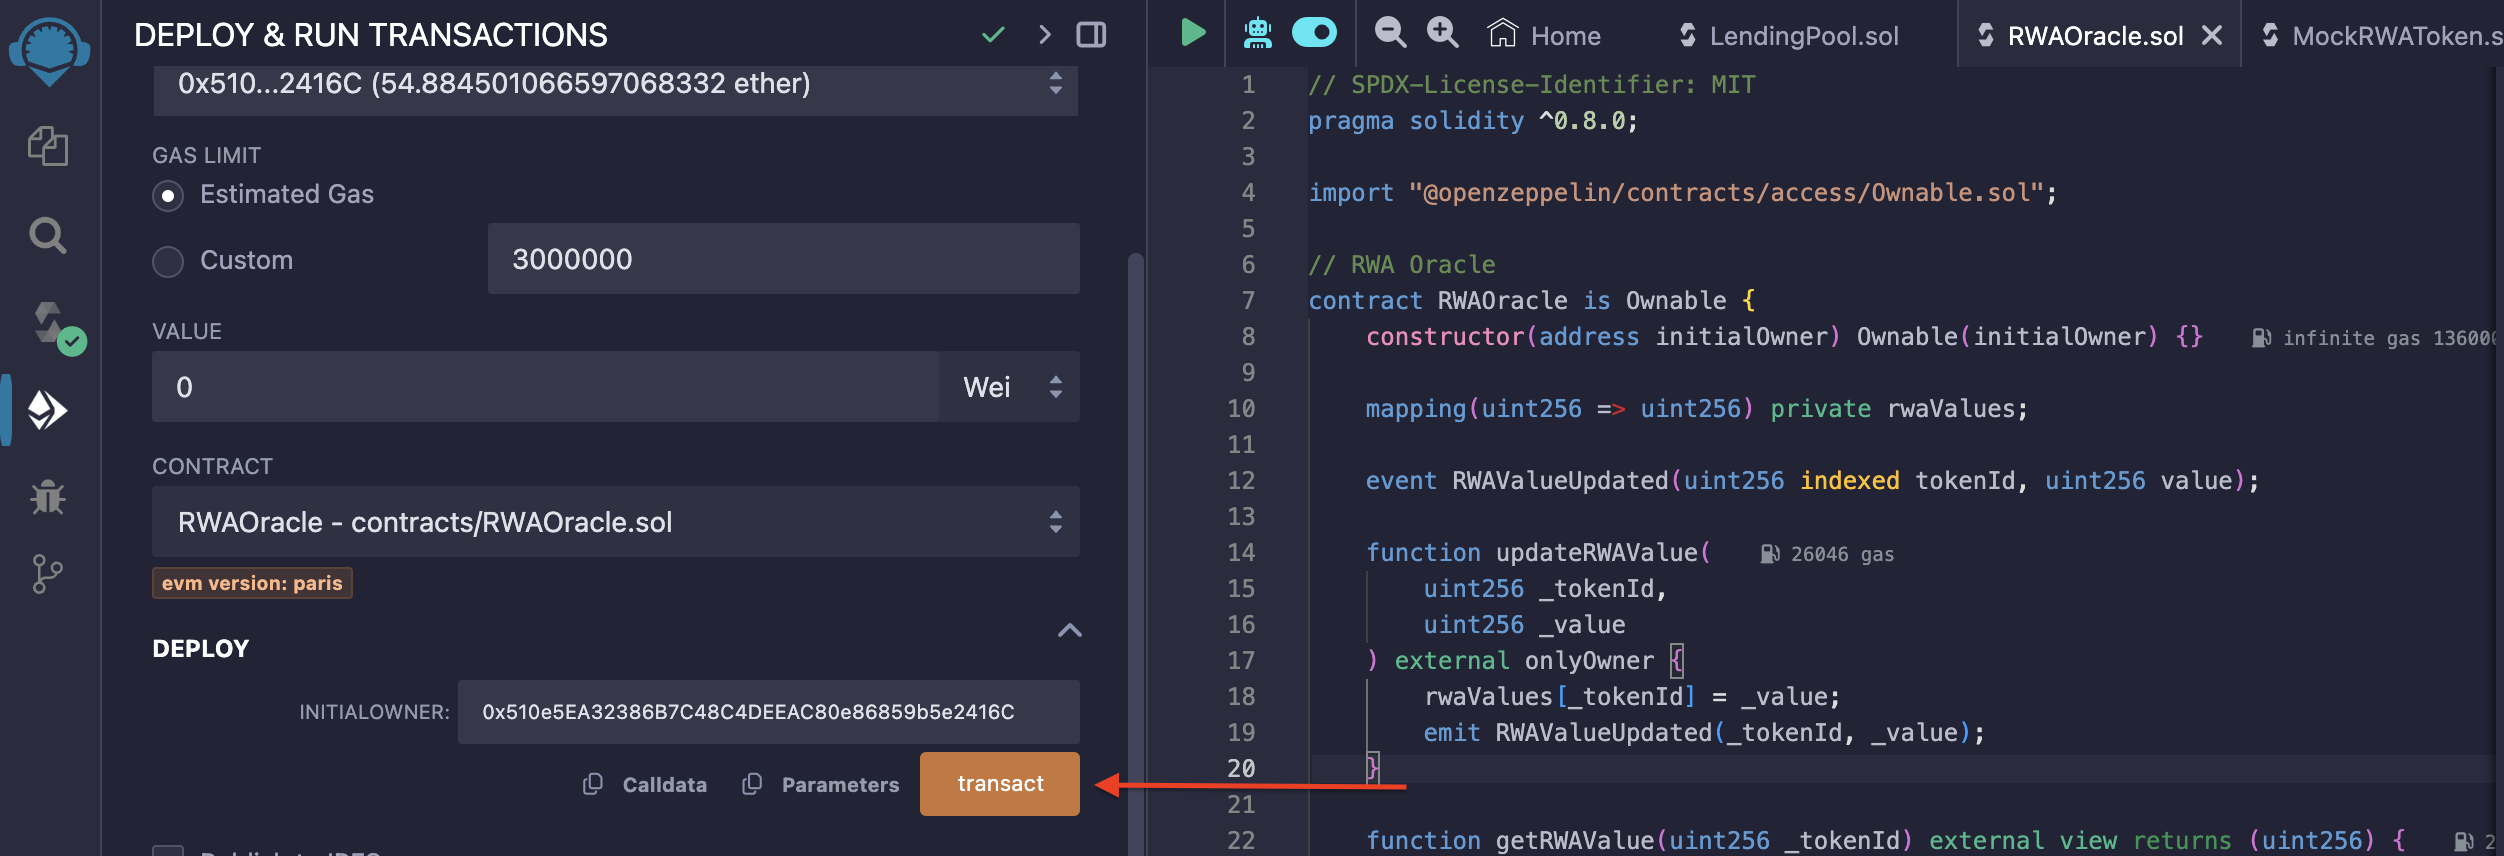
After deploying, you should have a transaction on-chain similar to this on the Fantom network.
Set RWA Token Value
Next, set the RWA token value of the token you minted in the previous step. as shown below. The _tokenId is 0 (this is the first token minted), _value should be set to 20000000 which is 20×10^6.
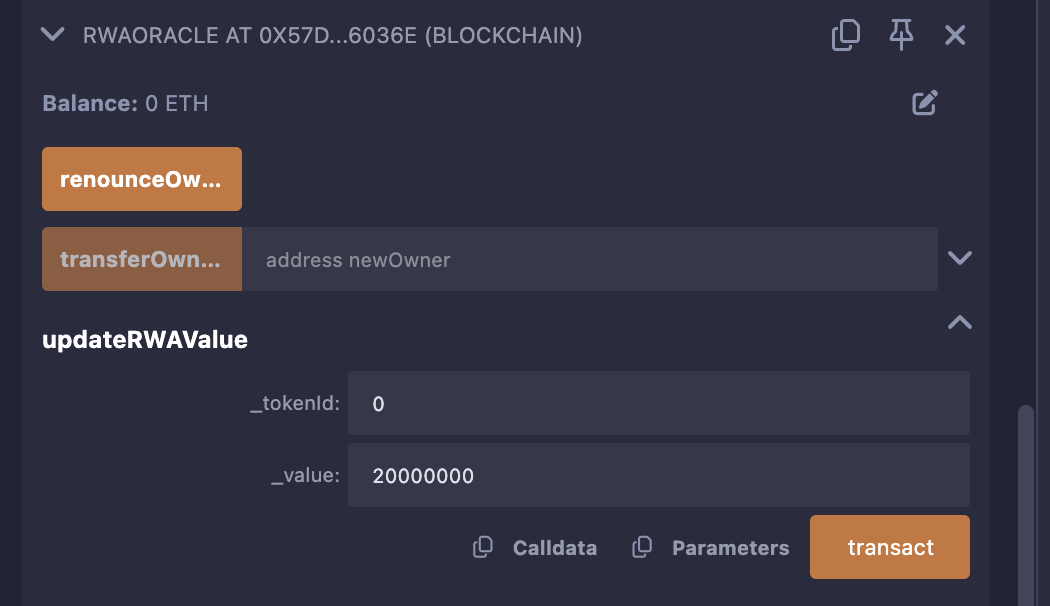
After updating the RWA token value, you should have a transaction on-chain similar to this.
Deploy the Lending Pool Contract on the Fantom Testnet
Deploying the LendingPool contract is similar to how you deployed the other contracts earlier in this tutorial. Go to the lending pool contract file, click on the deploy section, and enter the following details as arguments for the contract. Then, click transact to deploy the contract on the Fantom testnet.
_initialOwner: 0x510e5EA32386B7C48C4DEEAC80e86859b5e2416C // Replace with your address
_gateway: 0x97837985Ec0494E7b9C71f5D3f9250188477ae14
_gasService: 0xbE406F0189A0B4cf3A05C286473D23791Dd44Cc6
_lendingToken: 0x75Cc4fDf1ee3E781C1A3Ee9151D5c6Ce34Cf5C61
_rwaToken: 0x1C84e5556301202e6f6d4826Be5e13265E48ee17
_rwaOracle: 0x57d6A23A9cD2A719A8da3e47b402c0E88AB6036E
The _initialOwner is the address of the account that minted the token. You can find the _gateway and _gasService addresses in the Axelar documentation here. This lendingToken is the aUSDC asset that the user will lend. For the Fantom network, scroll down on this page to the Assets section and copy the aUSDC contract address on Fantom.
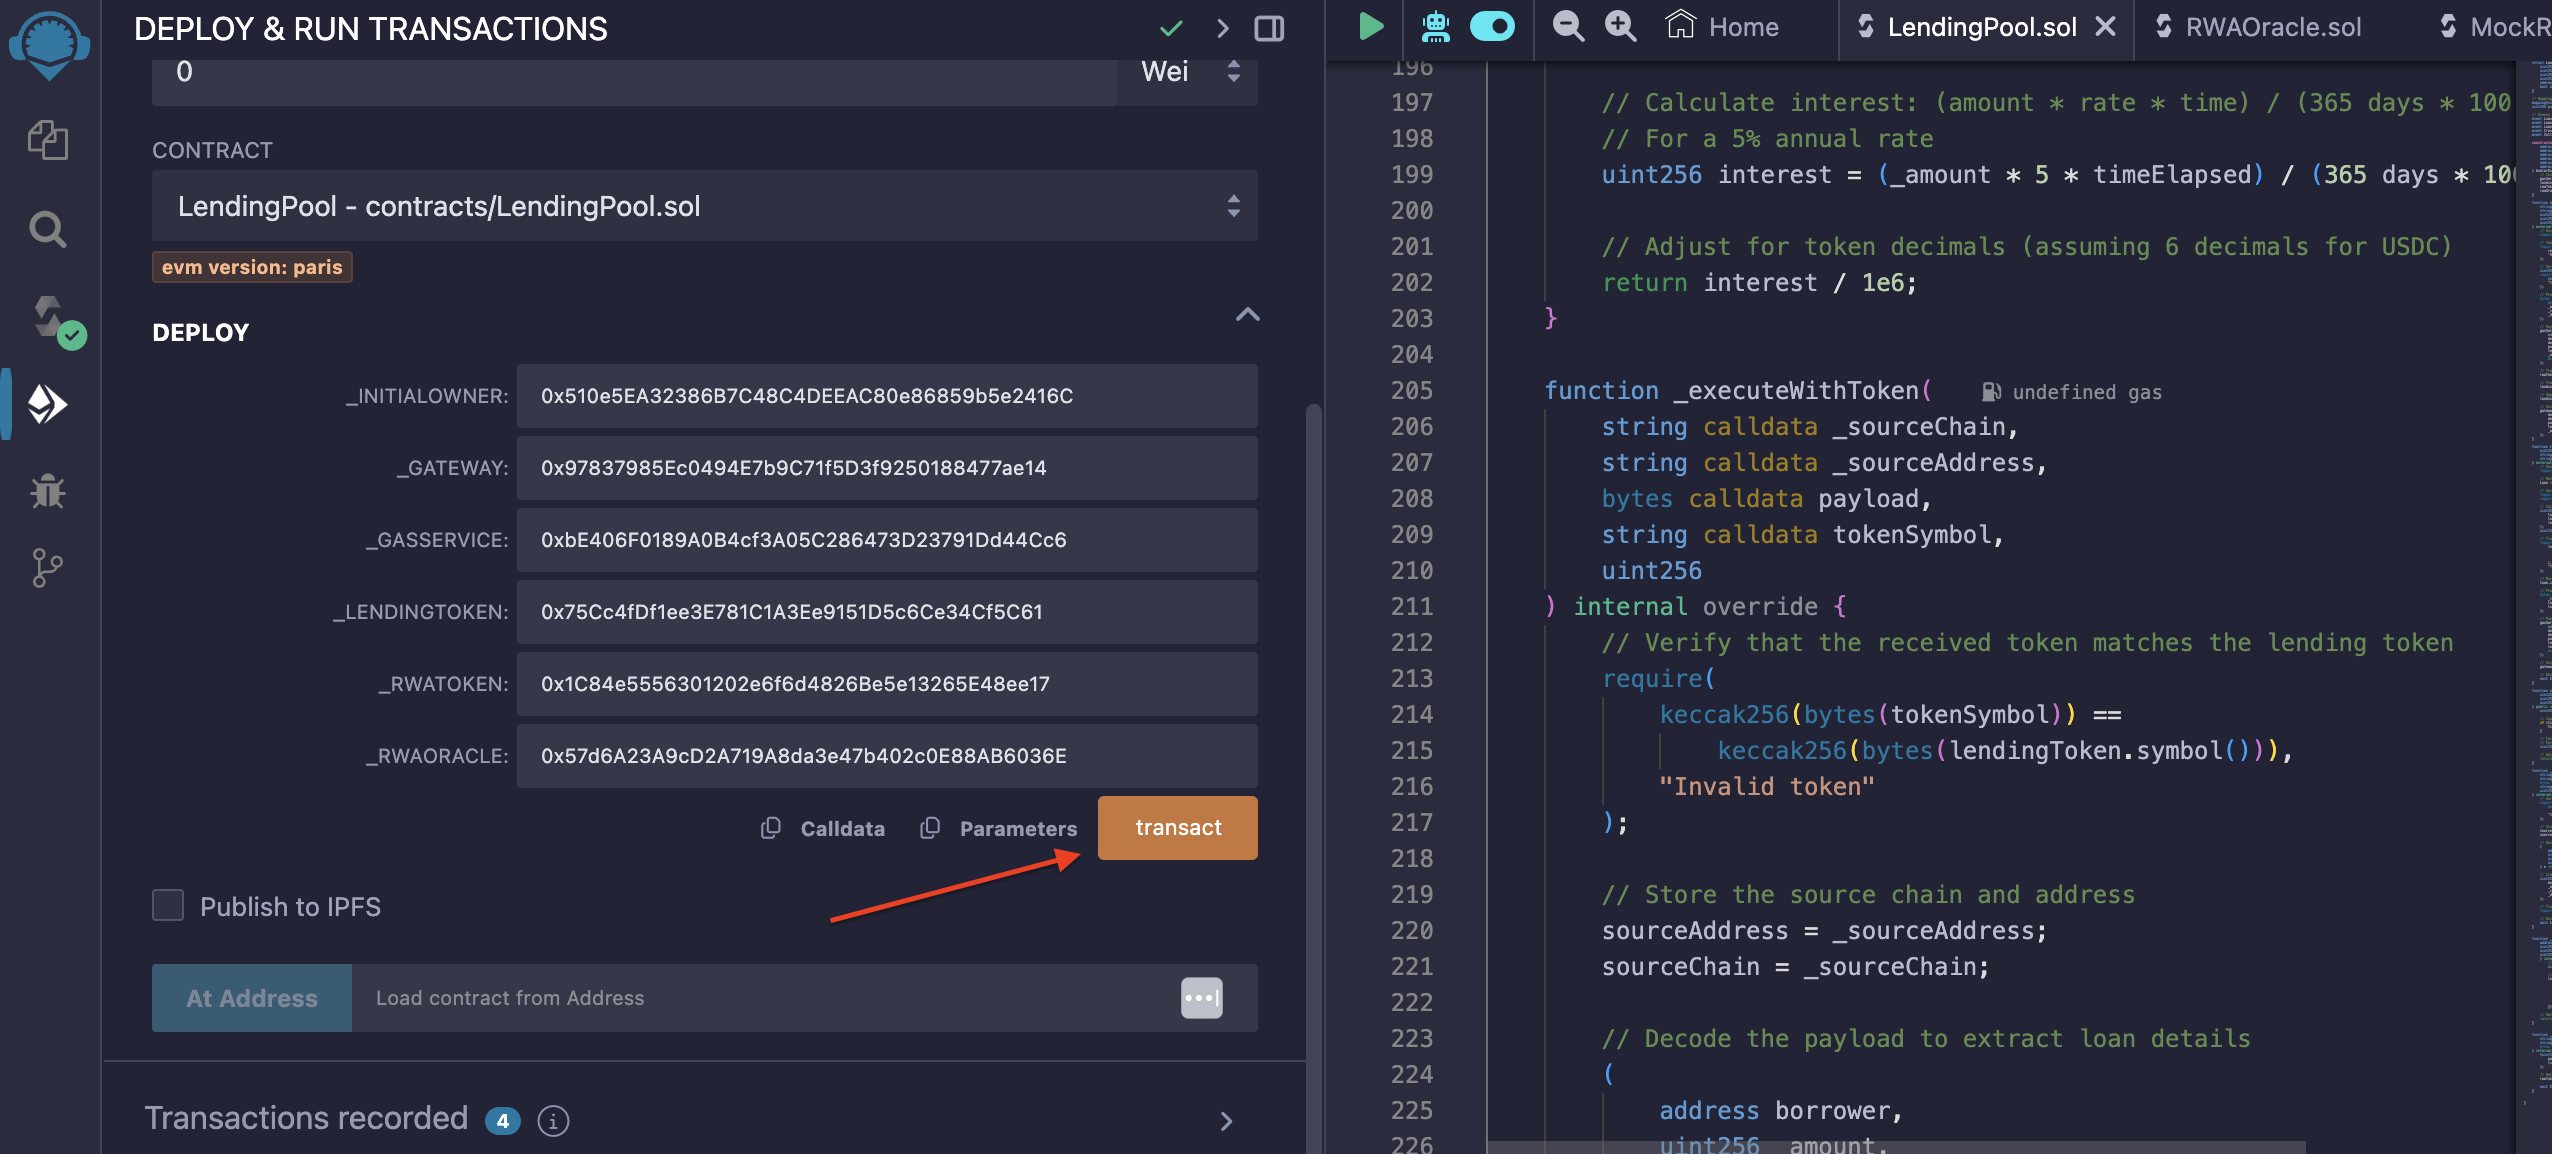
You can find the transaction link here.
Deploy the Lending Pool Contract on the Celo Testnet
Since this tutorial focuses on multichain lending, you will work with contracts on both the Fantom Testnet and the Celo Testnet. You will also deploy the contract on Celo before testing the cross-chain lending feature. Follow the same steps you used to deploy on the Fantom Testnet.
_initialOwner: 0x510e5EA32386B7C48C4DEEAC80e86859b5e2416C // Replace with your address
_gateway: 0xe432150cce91c13a887f7D836923d5597adD8E31
_gasService: 0xbE406F0189A0B4cf3A05C286473D23791Dd44Cc6
_lendingToken: 0x254d06f33bDc5b8ee05b2ea472107E300226659A
_rwaToken: 0x1C84e5556301202e6f6d4826Be5e13265E48ee17
_rwaOracle: 0x57d6A23A9cD2A719A8da3e47b402c0E88AB6036E
The _initialOwner is the address of the account that minted the token. You can find the _gateway and _gasService addresses in the Axelar documentation here. This lendingToken is the aUSDC asset that the user will lend. For the Celo test network, scroll down on this page to the Assets section and copy the aUSDC contract address on Celo.

You can find the transaction link here.
The next step is to initiate the cross-chain loan. Before doing that, you need to approve the lending pool contract address on the MockRWAToken contract on the Fantom testnet to allow the transfer of the asset from the user.
Approve the Lending Pool Contract Address on MockRWAToken on the Fantom Testnet
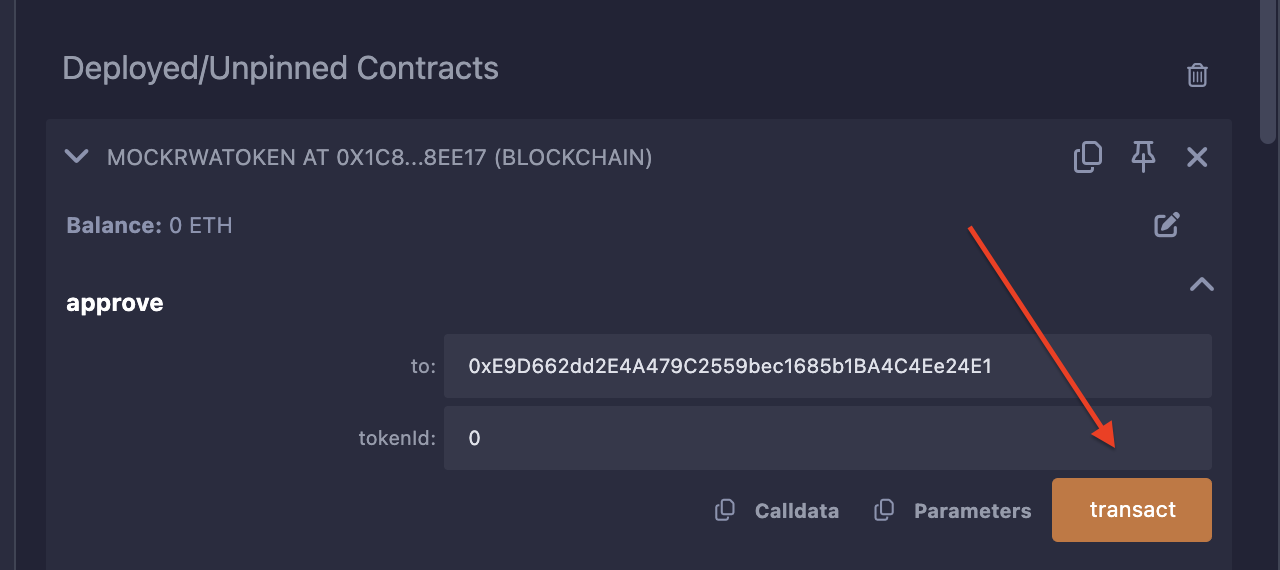
Navigate to the MockRWAToken Deployment as shown below and click on approve, then specify the contract address.
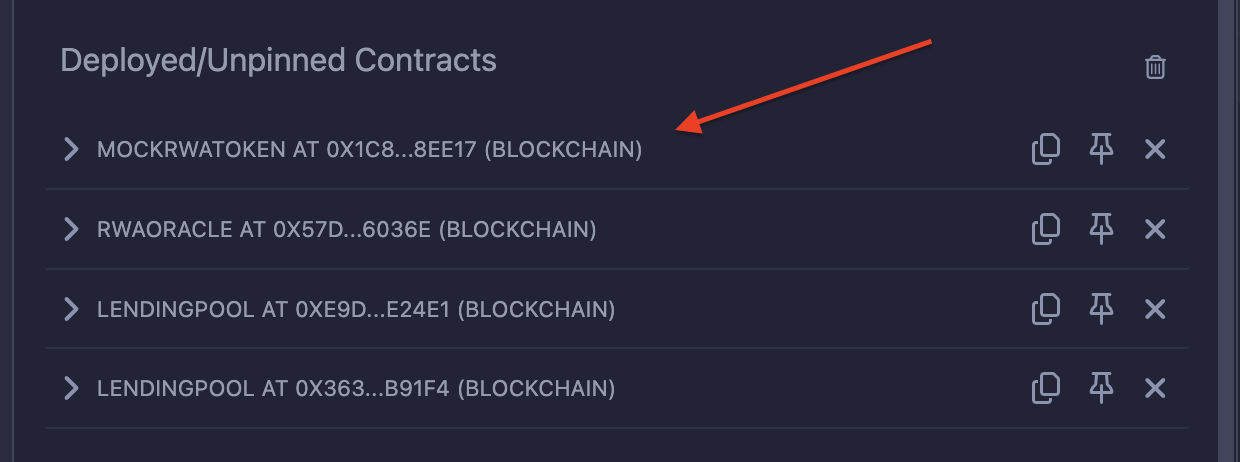
Please switch your network back to the Fantom testnet from Celo and then click the “transact” button.
After approval is successful, you should have the transaction onchain similar to this.
Approve Lending Pool Contract to Spend the Asset to Be Borrowed
In the lending pool contract, there is an implementation inside the initiateCrosschainLoan function. You must approve the LendingPool contract address on the lending token contract (the asset you want to lend out).
The asset you are using is aUSDC. If you don't have it, please request it on our Discord channel here by going to the faucet channel and asking for it for free.
//...

// Transfer lending tokens to this contract
lendingToken.transferFrom(msg.sender, address(this), _amount);
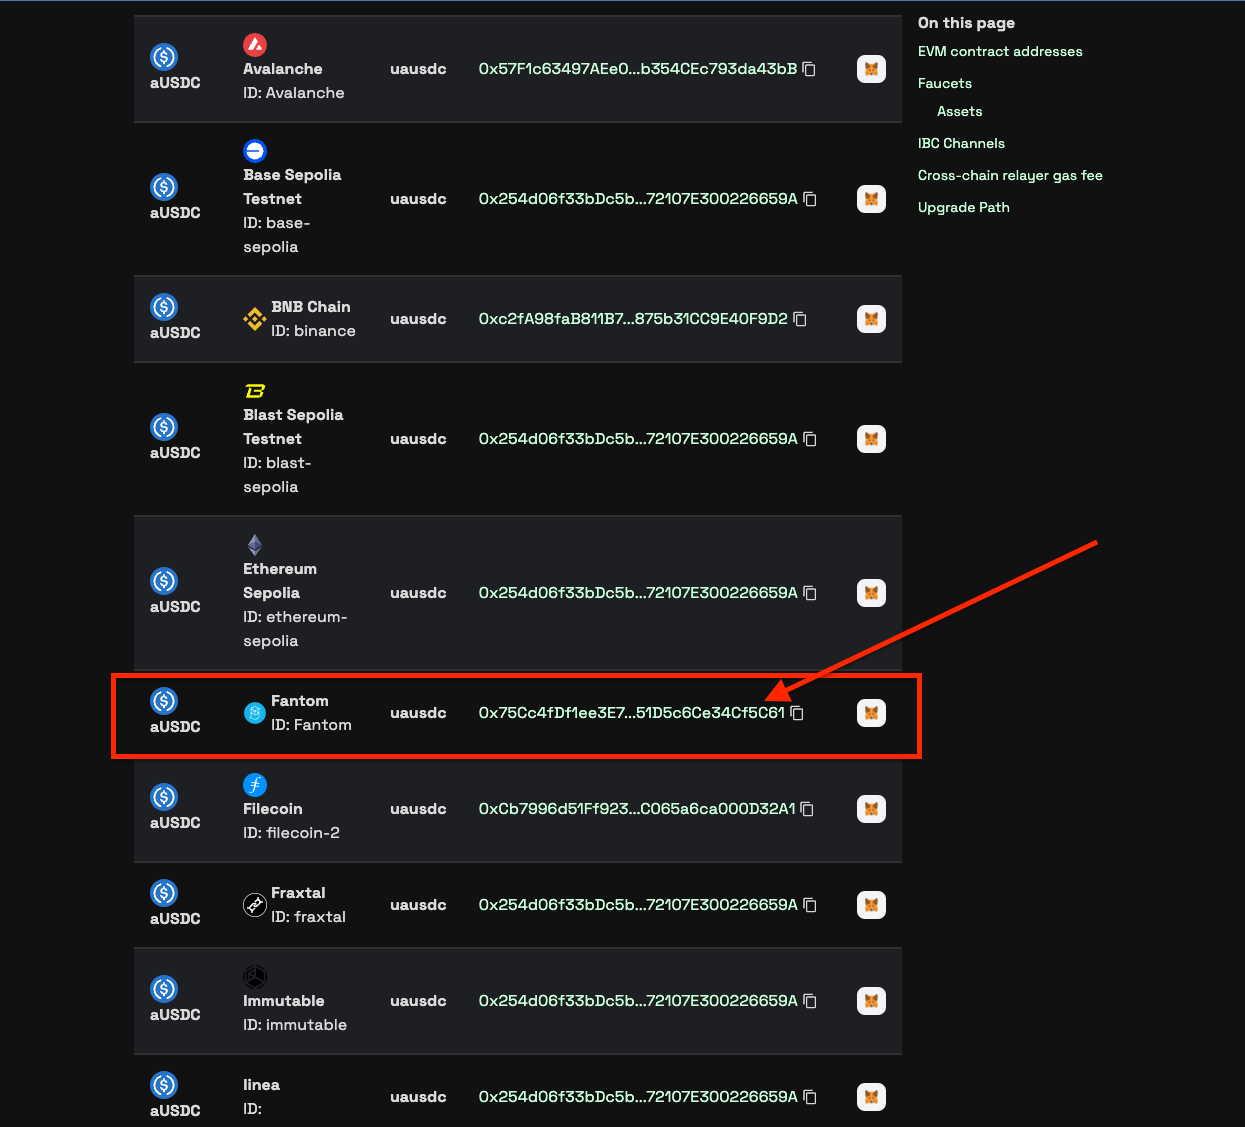
Go to the Axelar documentation here, scroll down to the asset section, and click on the aUSDC contract address on Fantom.
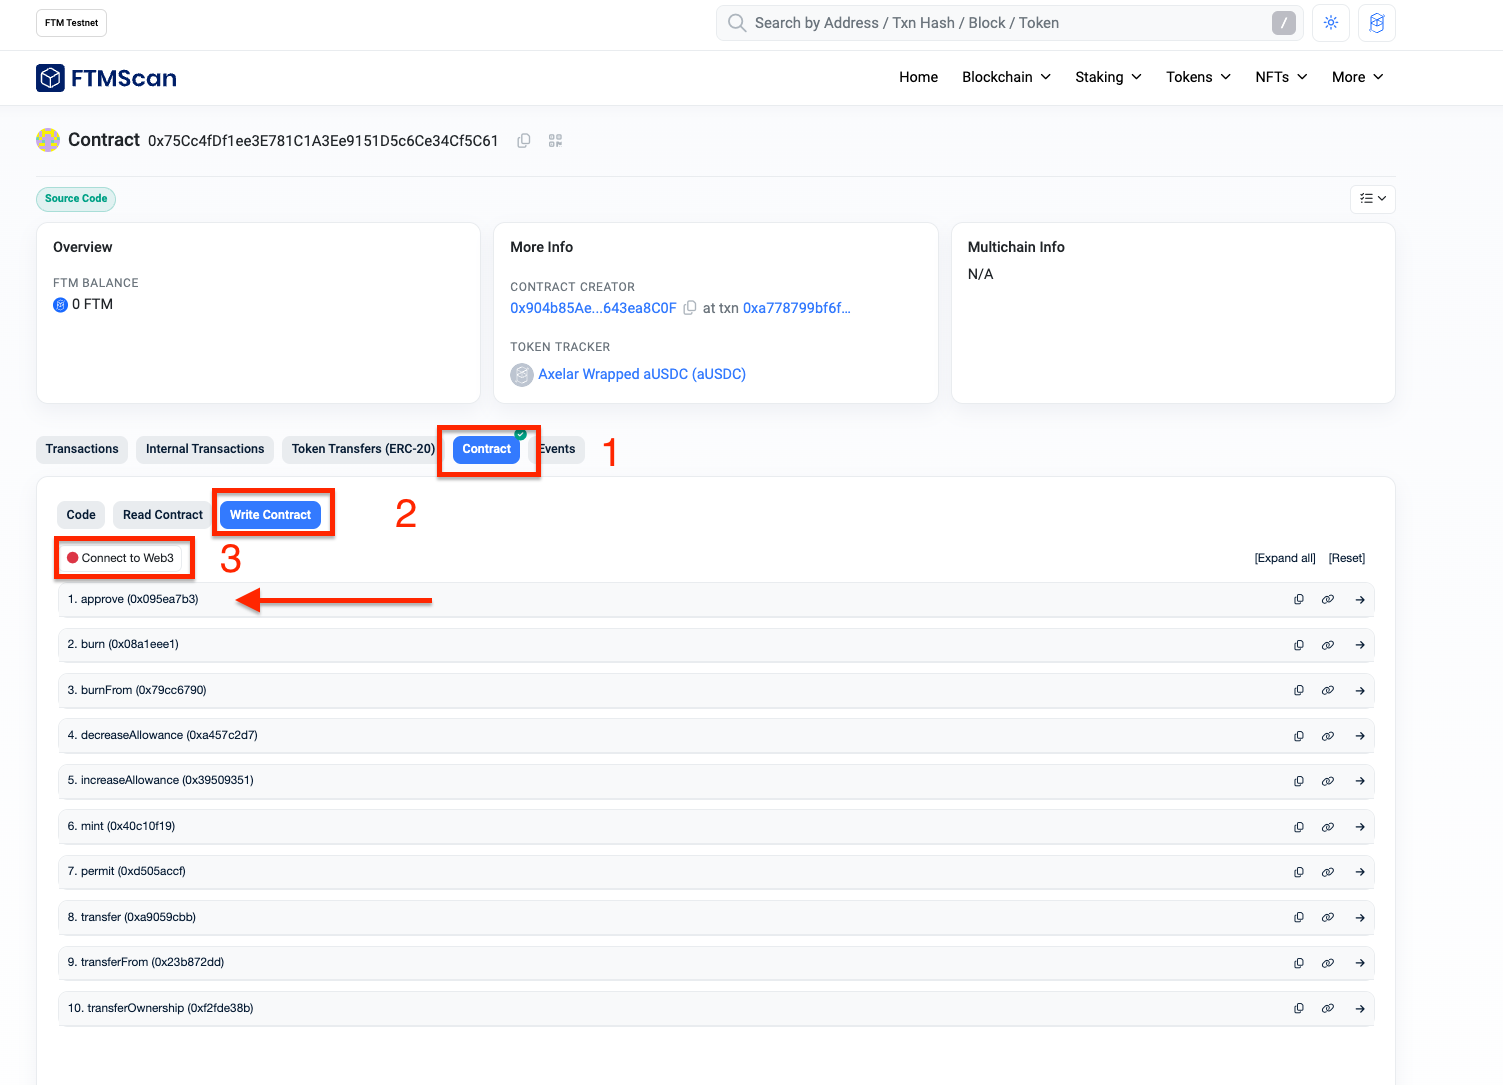
Go to the "Contract" tab, click on "Write Contract," and then connect your wallet by clicking on "Connect to Web3," as shown below.
Enter the lending pool contract address and the amount to be approved; for example, 0xE9D662dd2E4A479C2559bec1685b1BA4C4Ee24E1 and 50000000, which equals 50 × 10^6 since it is in aUSDC.

Link to the approval transaction here.
One last thing before you call the initiateCrosschain function, you need to fund the destination contract so it can loan the user the required asset.
Here's how it works: If the user triggers the initiate cross-chain loan function from the source chain (Fantom) and reaches the destination chain (Celo), the _executeWithToken function in the contract will be triggered automatically. This is where you implement sending the asset the user wants to lend and fund the contract with the asset in the following step.
Fund the Destination Contract with the Asset to be Borrowed
To fund the contract on the destination chain (Celo), you can either request the asset on Axelar Discord to be sent directly to the contract address or transfer it from your account. Let's transfer it from an account as shown below.
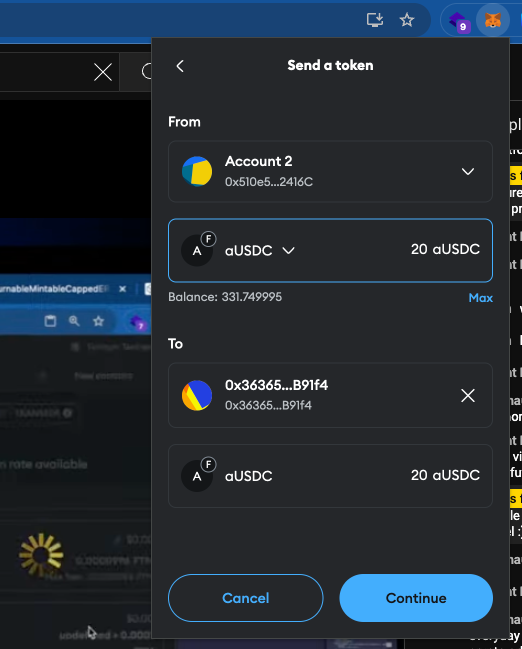
Next, proceed to initiate the cross-chain loan. Here is the transaction link.
Call initiateCrossChainLoan on the Lending Pool Contract on Fantom Network
To initiate the cross-chain loan request, navigate to the lending pool deployment on Remix as shown below and enter the following details.
destinationChain: celo
destinationAddress: 0x36365FbCB839E309226d4f488310CcA3feDB91f4
_amount: 5000000 // 5 aUSDC
_collateralId: 0
_duration: 3600
Next, click “transact”.
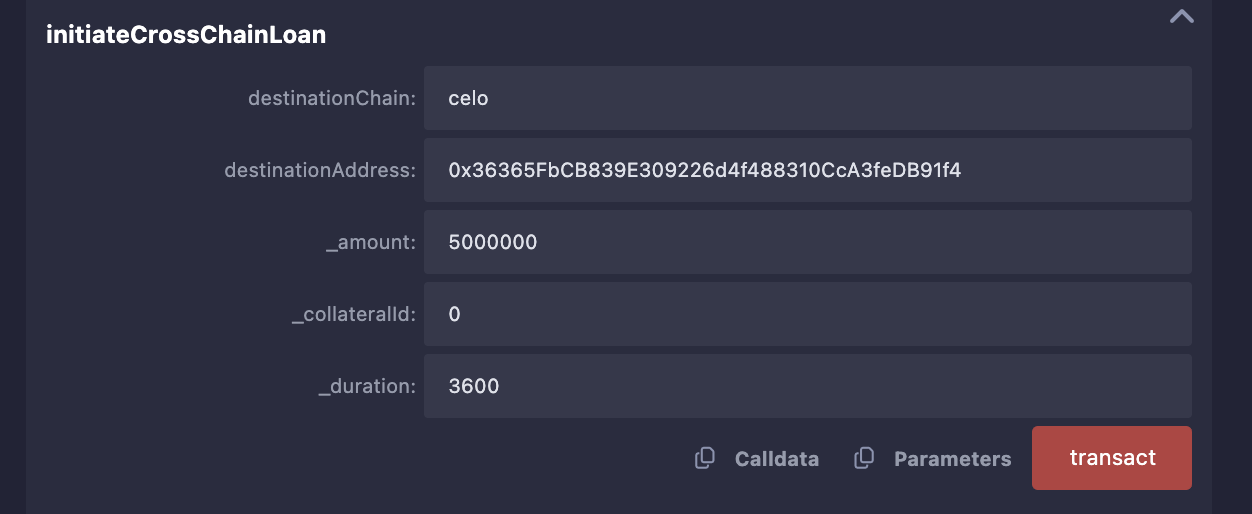
Next, add gas value.
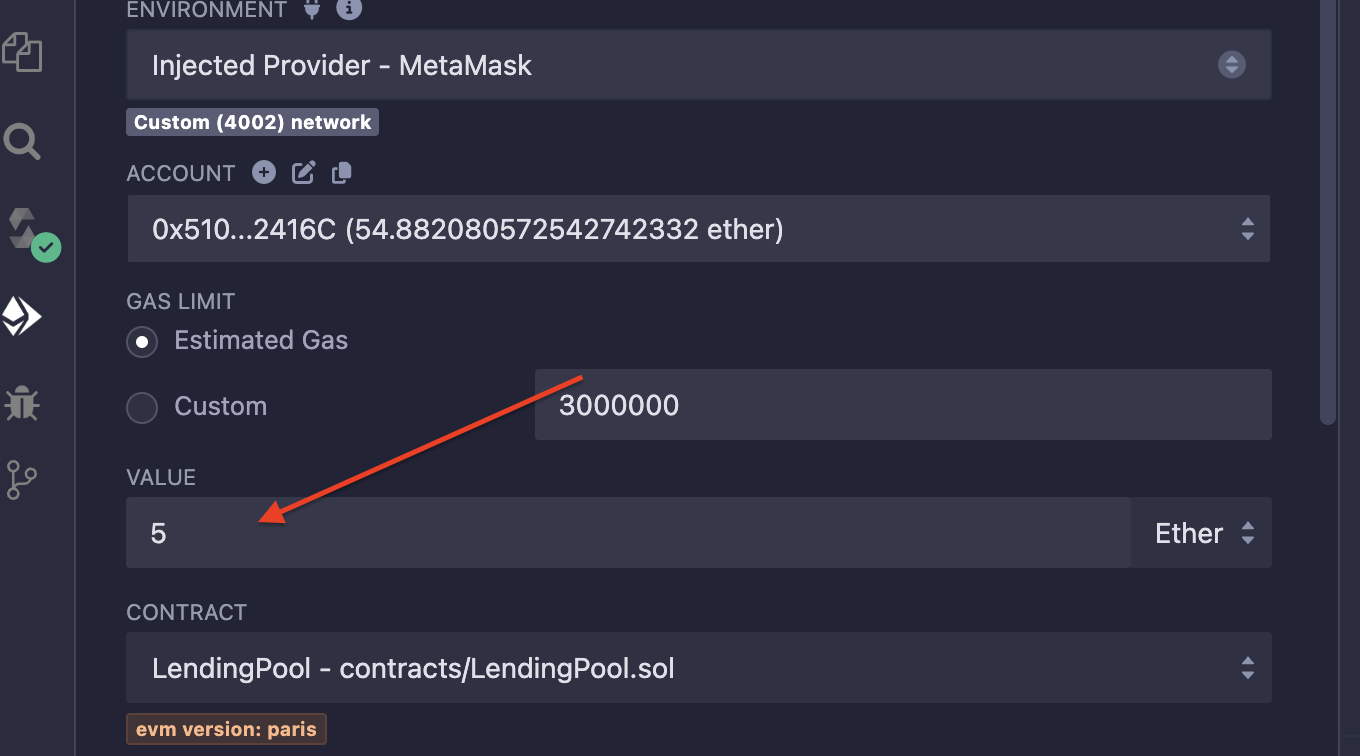
Transaction hash on the Fantom testnet is available here. You can also view it on Axelarscan here.
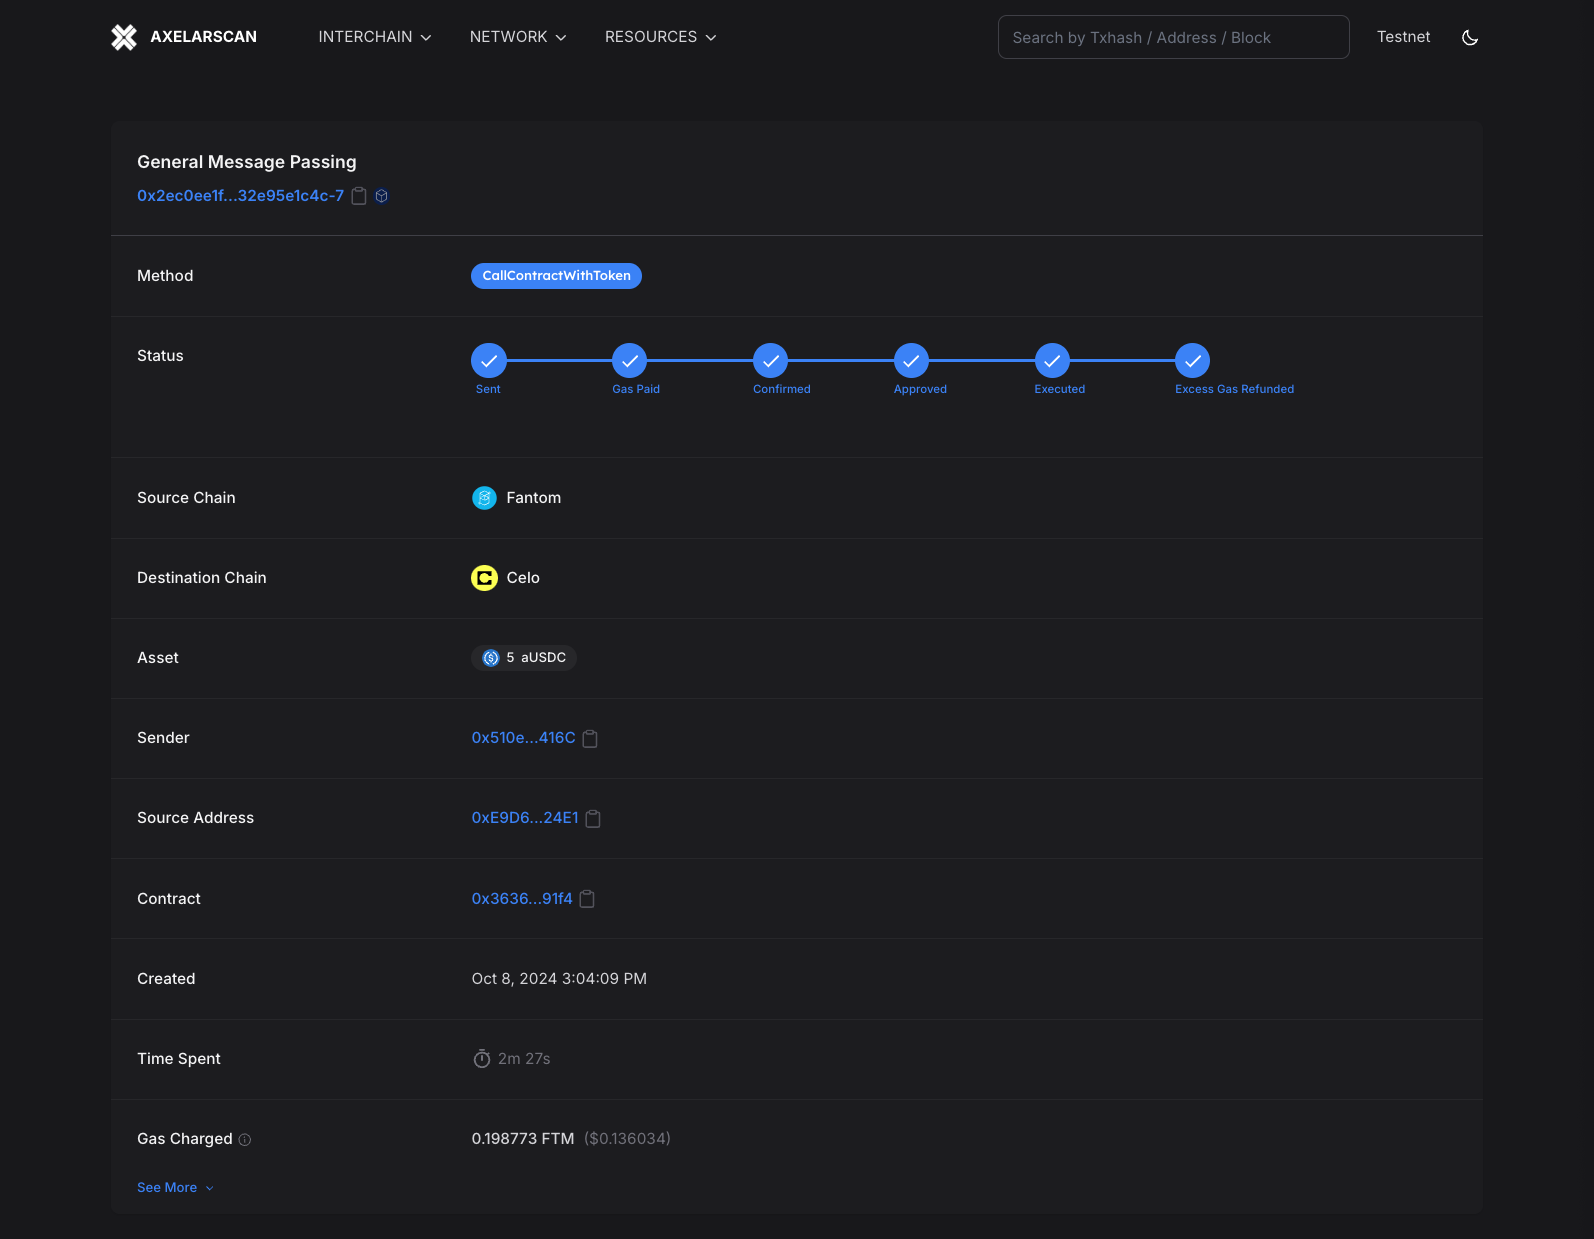
Congratulations! You have successfully initiated a cross-chain loan from the Fantom testnet to Celo. How does that feel? Great, right?
Next, you need to repay the loan, which is the typical process of lending.
Call repayCrossChainLoan on Lending Pool Contract on Celo Tesnet
One of the most interesting things about cross-chain activities or processes with Axelar GMP is that you can implement any custom functionality, like initiating a loan from one chain, repaying the loan from that same chain, or repaying the loan on the destination chain where the asset was used, and vice versa.
You must approve the LendingPool contract address to be able to transfer the amount the user wants to repay from the user's account to the address.
Go to the Axelar documentation here, scroll down to the asset section, and click on the aUSDC contract address on Celo.
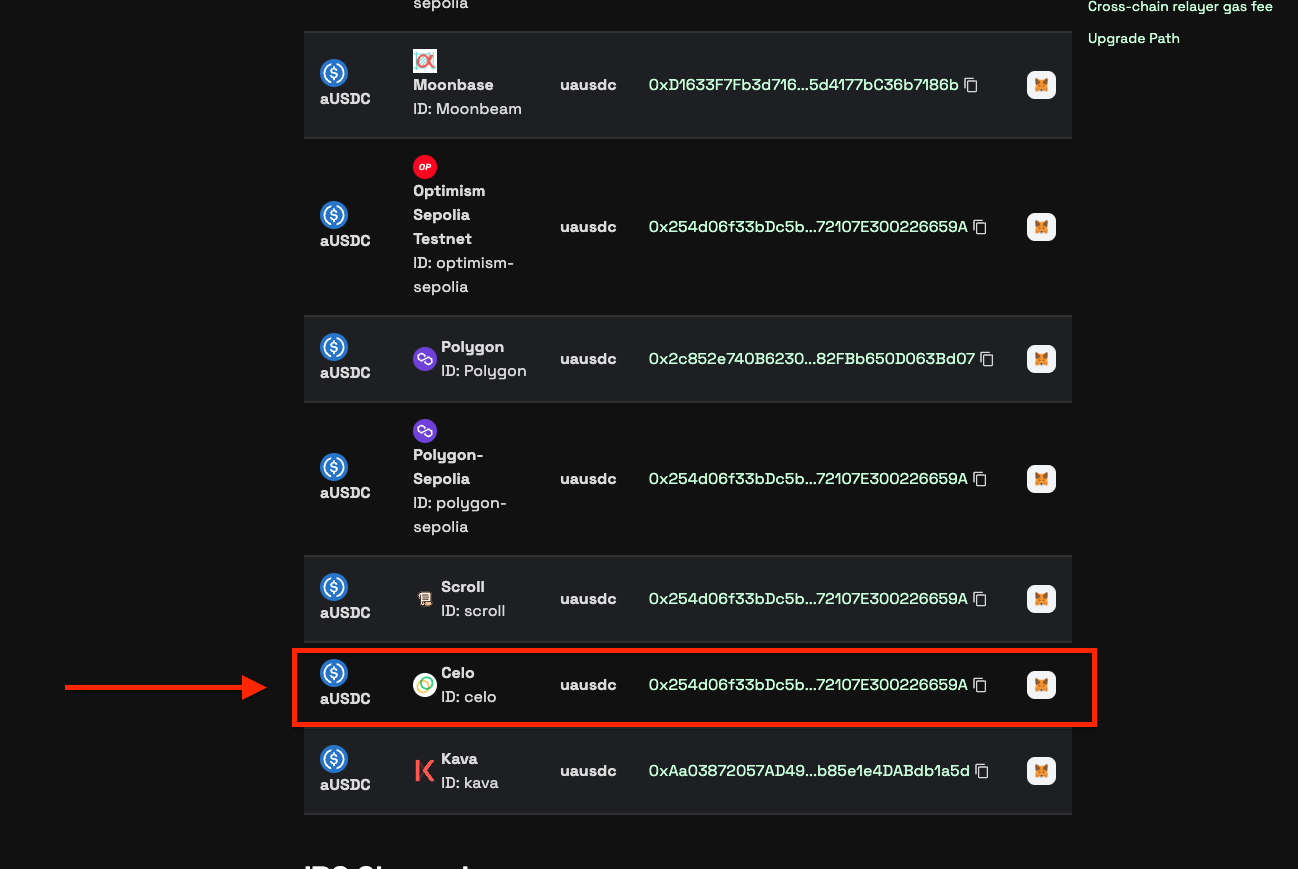
Go to the "Contract" tab, click on "Write Contract," and then connect your wallet by clicking on "Connect to Web3," as shown below.
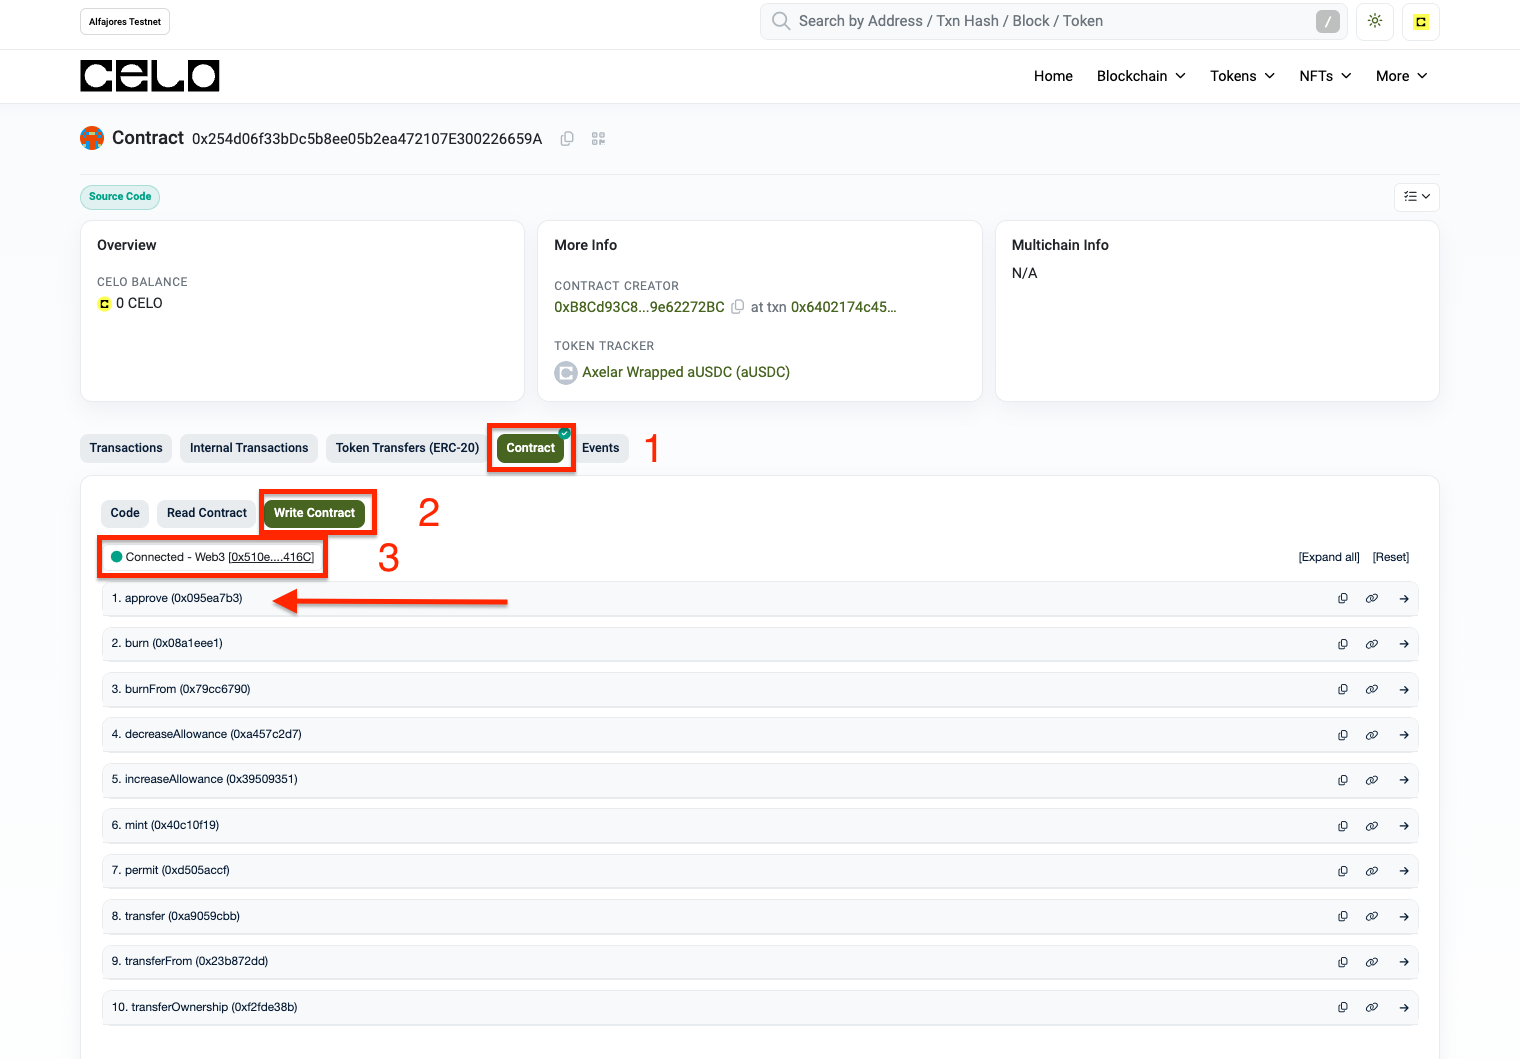
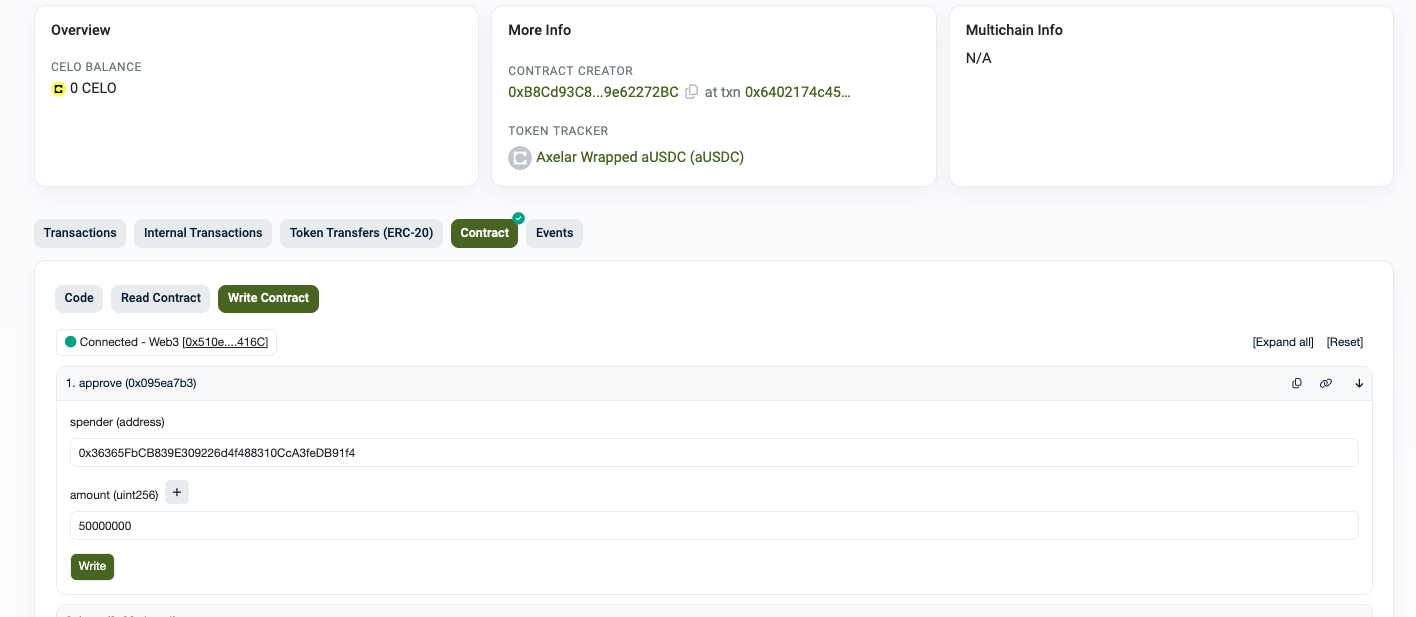
Link to the approval transaction.
To repay the loan, navigate to the lending pool deployment contract section on Celo Remix and add the following details.

_loadId: 0
destinationChain: Fantom
destinationAddress: 0xE9D662dd2E4A479C2559bec1685b1BA4C4Ee24E1
Next, add gas value.

Please switch your network back to the Fantom testnet from Celo and then click the “transact” button.

Transaction hash on the Celo testnet is available here. You can also view it on Axelarscan here.
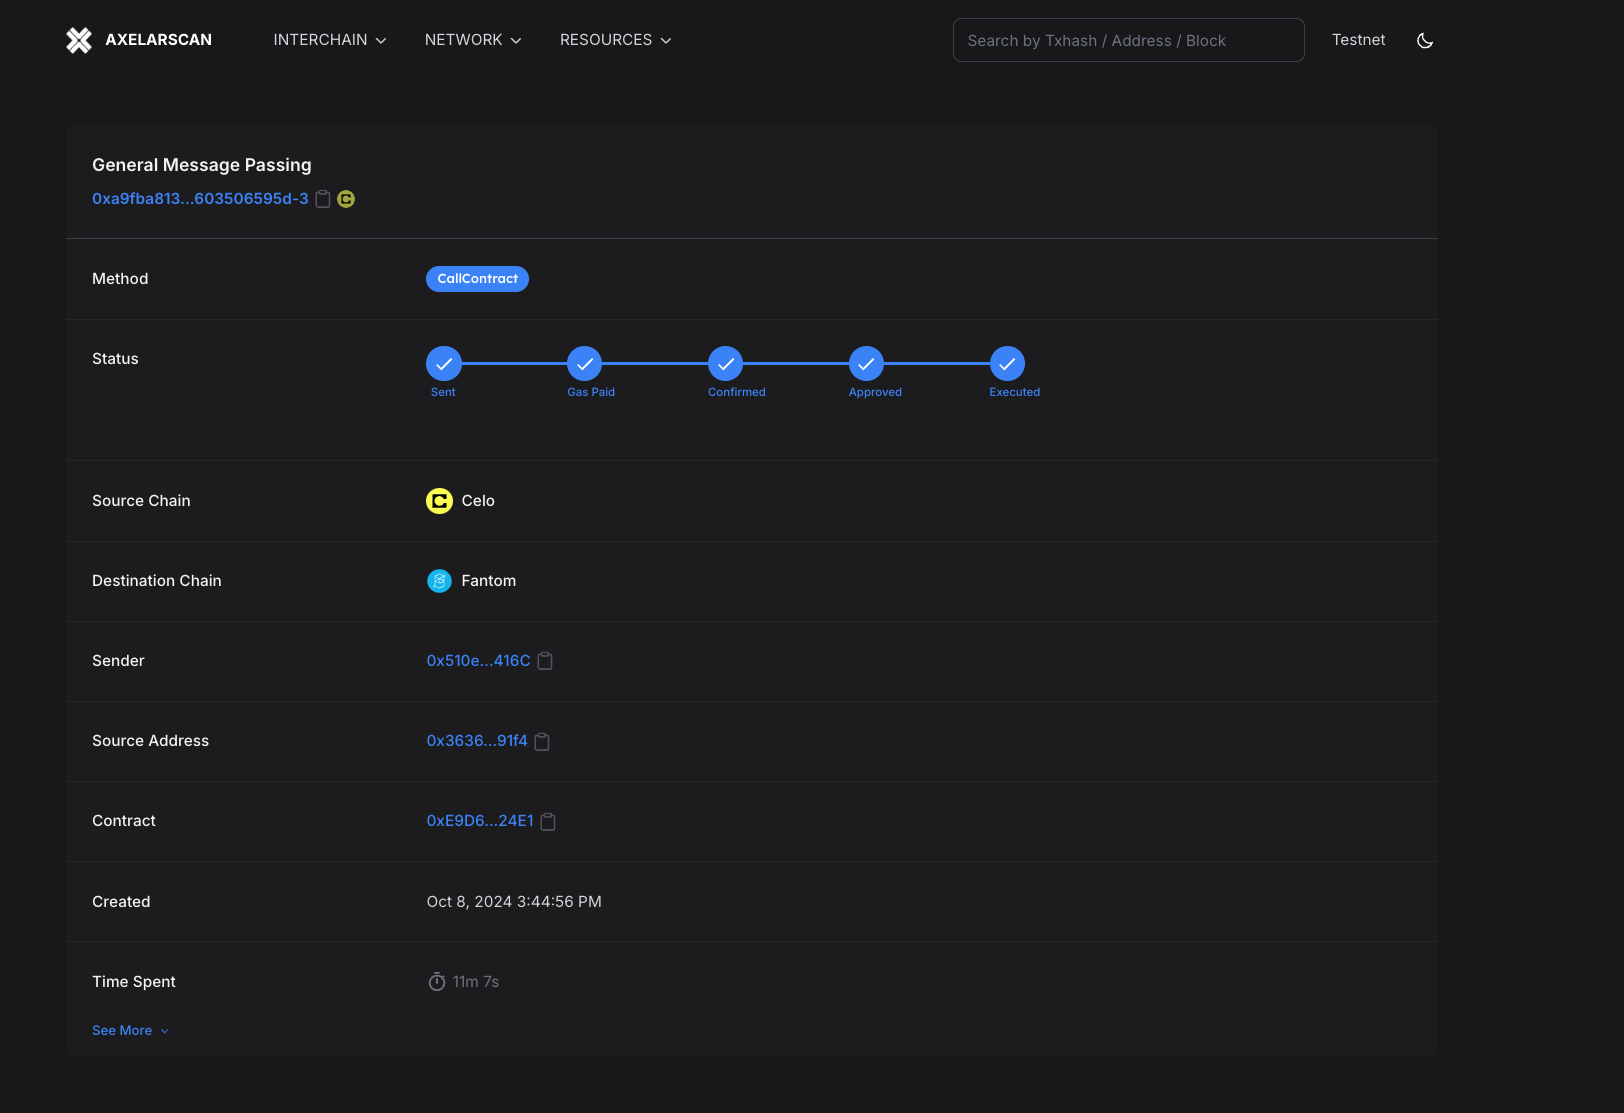
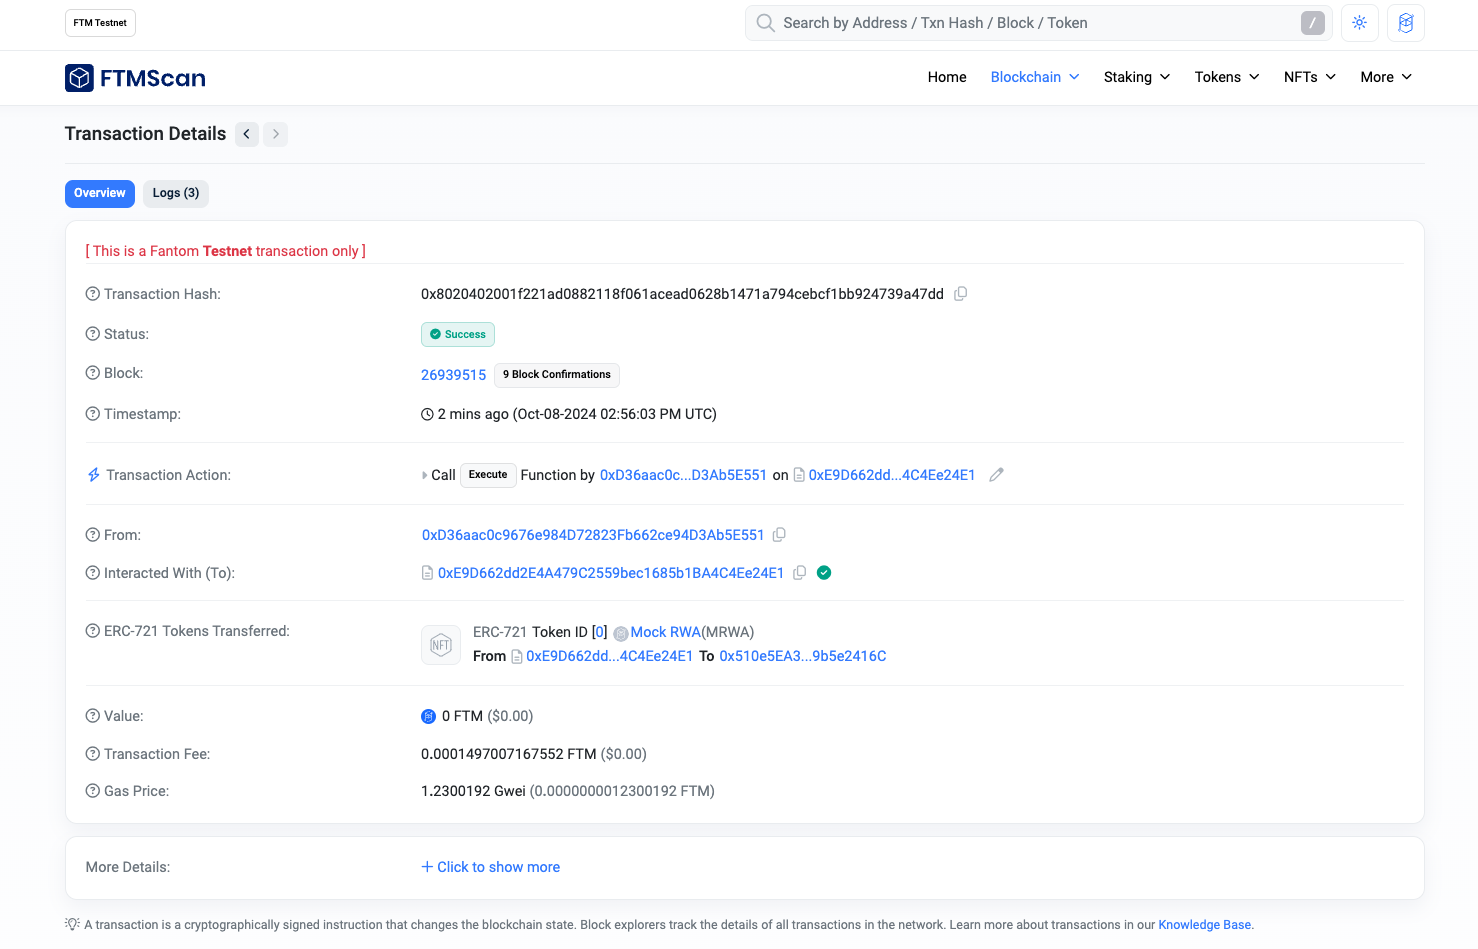
Woohoo! You have successfully repaid the loan and completed the entire process. If you check the transaction details page, you will notice the collateral has been released, as shown below.
Conclusion
In conclusion, integrating Axelar's General Message Passing (GMP) into a multichain Real-World Asset (RWA) lending platform offers a transformative approach to decentralized finance. The practical implementation of tokenized real-world assets, as demonstrated through the creation of smart contracts like MockRWAToken, RWAOracle, and LendingPool, showcases the potential for a more inclusive financial ecosystem.
This system empowers individuals, such as our hypothetical farmer Amani, to leverage their assets for financial growth, regardless of geographical or traditional banking limitations.
References
Subscribe to my newsletter
Read articles from Idris Olubisi directly inside your inbox. Subscribe to the newsletter, and don't miss out.
Written by

Idris Olubisi
Idris Olubisi
Software Engineer | Developer Advocate | Technical Writer | Content Creator