Day 5 Task: Advanced Linux Shell Scripting for DevOps Engineers with User Management
 Faizan Shaikh
1) Create Directories Using Shell Script:
Write a bash script
createDirectories.shthat, when executed with three arguments (directory name, start number of directories, and end number of directories), creates a specified number of directories with a dynamic directory name.Example 1: When executed as
./createDirectories.shday 1 90, it creates 90 directories asday1 day2 day3 ... day90.Example 2: When executed as
./createDirectories.shMovie 20 50, it creates 31 directories asMovie20 Movie21 Movie22 ... Movie50.#!/bin/bash for ((i=$2 ; i <=$3 ; i++)) do mkdir /home/ubuntu/shaikh/$1$i done$1 — First argument
$2 — Second argument
$3 — Third argument


2) Create a Script to Backup All Your Work:
Backups are an important part of a DevOps Engineer's day-to-day activities. The video in the references will help you understand how a DevOps Engineer takes backups (it can feel a bit difficult but keep trying, nothing is impossible).
#!/bin/bash # What you want to back here we qare giving folder path backup_files="/home/ubuntu/shaikh/*" # Where to backup dest="/home/ubuntu/backup" # Create filename with date day=$(date +"%d-%b-%y") mkdir $dest/$day # Backup the files cp -r $backup_files $dest/$day # Print message echo echo "Backup finished" [ Read 19 lines ] date%d: This represents the day of the month (two digits, zero-padded if necessary), such as09for the 9th day.%b: This gives the abbreviated month name (three letters), such asOctfor October.%y: This represents the last two digits of the year, such as24for the year 2024.

output : Allfiles folder get copied in /home/ubuntu/shaikh/* with that
09-Oct-24 folder
3) Read About Cron and Crontab to Automate the Backup Script:
Cron is the system's main scheduler for running jobs or tasks unattended. A command called crontab allows the user to submit, edit, or delete entries to cron. A crontab file is a user file that holds the scheduling information.
Cron is a job scheduler utility, In simple terms it executes described commands/script at a particular predefined interval.
crontab is basically a table in which we maintain all the cron jobs that we need to execute in our system.
command to check the crontab list:
crontab -l
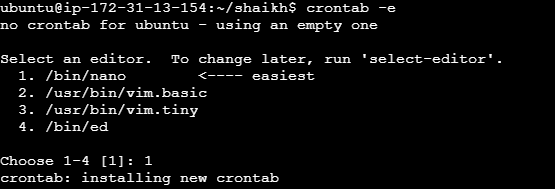
create a new cron job and when u run this command first time it will ask you to select editor like nano ,vim etc and then select editor as per you choice and add new line in file:
crontab -e

# In this u have to select a editor in starting.

u will see one file just easer all and write this statement according to this particular blog
0 2 * * * /home/ubuntu/shaikh/backup.sh

# 0 is minute
# 2 is for hour
# third * is for day of mounth (1-31)
# fourth * is for month (1-12)
# fifth * if for day of week (0-7)
# /home/ubuntu/shaikh/backup.sh where is your script file
4) Read About User Management:
A user is an entity in a Linux operating system that can manipulate files and perform several other operations. Each user is assigned an ID that is unique within the system. IDs 0 to 999 are assigned to system users, and local user IDs start from 1000 onwards.
Create 2 users and display their usernames.
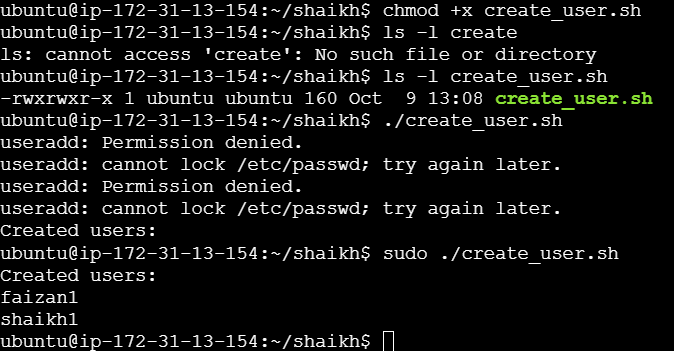
#!/bin/bash # Create users useradd faizan1 useradd shaikh1 # Display created users echo "Created users:" cut -d: -f1 /etc/passwd | grep -E 'faizan1|shaikh1'Shebang:
#!/bin/bashindicates that the script should be run using the Bash shell.Creating Users:
useradd faizan1: This command creates a user with the usernamefaizan1.useradd shaikh1: This command creates a user with the usernameshaikh1.
Displaying Created Users:
echo "Created users:": This line prints the message to indicate that the following output will be the created users.cut -d: -f1 /etc/passwd:This command reads the
/etc/passwdfile, which contains user account information.-d:sets the delimiter to:(the character that separates fields in/etc/passwd).-f1specifies that only the first field (the username) should be output.
grep -E 'faizan1|shaikh1':This filters the output of the
cutcommand to show only lines that match eitherfaizan1orshaikh1.The
-Eoption allows the use of extended regex syntax, enabling the use of the|operator to match multiple patterns.

so here we completed day5 #happylearning
Subscribe to my newsletter
Read articles from Faizan Shaikh directly inside your inbox. Subscribe to the newsletter, and don't miss out.
Written by
