Blue-Green Deployment Project: Zero-Downtime Deployments
 Balraj Singh
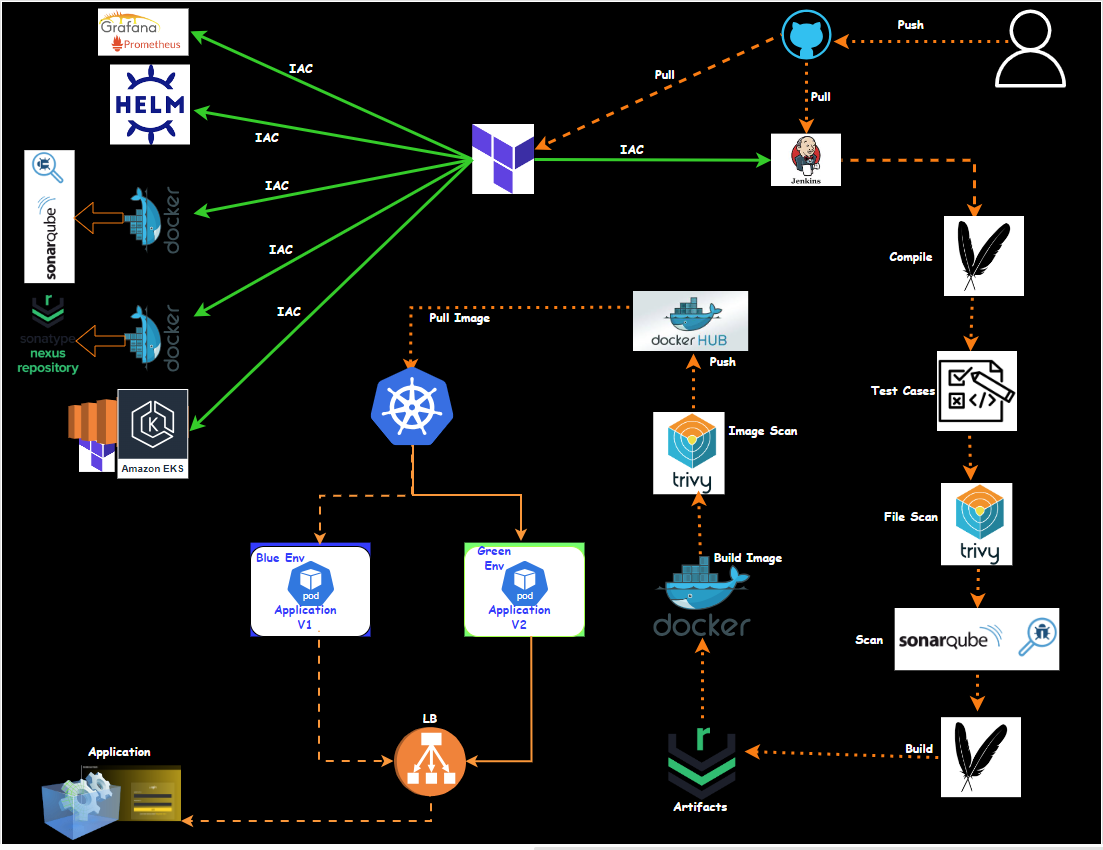
In this blog, we will explore how to set up a Blue-Green deployment pipeline using Jenkins and Kubernetes. This method helps minimize downtime and reduce risks during application updates. Let's dive into the details!
Prerequisites
Before diving into this project, here are some skills and tools you should be familiar with:
[x] Clone repository for terraform code
Note: Replace resource names and variables as per your requirement in terraform code[x] App Repo
[x] Git and GitHub: You'll need to know the basics of Git for version control and GitHub for managing your repository.
[x] Jenkins Installed: You need a running Jenkins instance for continuous integration and deployment.
[x] Docker: Familiarity with Docker is essential for building and managing container images.
[x] Kubernetes (AWS EKS): Set up a Kubernetes cluster where you will deploy your applications.
[x] SonarQube: Installed for code quality checks.
[x] Maven: Installed for building Java applications.
[x] Nexus Repository: Set up for storing artifacts.
Key Benefits of Using Blue-Green Deployment
Reduced Downtime: Users experience minimal disruption during updates.
Easy Rollbacks: In case of issues, you can quickly switch back to the previous version.
Improved Testing: New versions can be tested in production-like environments before fully switching traffic.
Steps to Set Up the Pipeline
Configure SonarQube: Use the Sonar scanner to analyze code quality. This involves setting up project keys and binary locations for Java applications.
Quality Gate Check: In Jenkins, create a stage for code quality checks using SonarQube. Set up webhooks in SonarQube for Jenkins integration.
Build Application:
Create a build stage in Jenkins using Maven.
Use mvn package to build the application, and skip tests if necessary.
Publish Artifacts: Deploy artifacts to Nexus using the mvn deploy command.
Docker Image Build:
Create Docker images for both blue and green environments.
Set up parameters to choose the environment before starting the pipeline.
Docker Image Scanning: Use a tool to scan the Docker images for vulnerabilities.
Push Docker Images: Push the images to Docker Hub.
Deploy MySQL Database: Use Kubernetes to deploy the MySQL database, which remains unchanged during the application updates.
Deploy Application: Deploy the application in either the blue or green environment based on the selected parameter.
Switch Traffic: Use Kubernetes commands to switch traffic between blue and green deployments based on the parameter selected.
Verify Deployment: Check the status of deployments and ensure everything is running smoothly.
Key Points
Blue-Green Deployment: A technique that reduces downtime and risk by running two identical environments, one active (blue) and one idle (green). Traffic is switched between the two environments.
Jenkins: Used as the CI/CD tool to automate the deployment process.
Docker: Facilitates the creation of container images for our application.
Kubernetes: Manages the deployment of applications in containers and helps in switching traffic between blue and green environments.
Quality Checks: Integration with SonarQube for continuous code quality analysis.
Nexus Repository: Used to store built artifacts for easy access and deployment.
Setting Up the Environment
I have created a Terraform code to set up the entire environment, including the installation of required applications, and tools, and the EKS cluster automatically created.
Note ⇒ EKS cluster creation will take approx. 10 to 15 minutes.
⇒ Four EC2 machines will be created and named as
"Jenkins", "Nexus", "SonarQube", "Terraform".⇒ Docker Install
⇒ Trivy Install
⇒ SonarQube install as in a container
⇒ EKS Cluster Setup
⇒ Nexus Install
EC2 Instances creation
First, we'll create the necessary virtual machines using terraform.
Below is a terraform configuration:
Once you clone repo then go to folder "15.Real-Time-DevOps-Project/Terraform_Code/Code_IAC_Terraform_box" and run the terraform command.
cd Terraform_Code/Code_IAC_Terraform_box

$ ls -l
da---l          07/10/24   4:43 PM                k8s_setup_file
da---l          07/10/24   4:01 PM                scripts
-a---l          29/09/24  10:44 AM            507 .gitignore
-a---l          09/10/24  10:57 AM           8351 main.tf
-a---l          16/07/21   4:53 PM           1696 MYLABKEY.pem
Note ⇒ Make sure to run main.tf from inside the folders.
13.Real-Time-DevOps-Project/Terraform_Code/Code_IAC_Terraform_box/

da---l          07/10/24   4:43 PM                k8s_setup_file
da---l          07/10/24   4:01 PM                scripts
-a---l          29/09/24  10:44 AM            507 .gitignore
-a---l          09/10/24  10:57 AM           8351 main.tf
-a---l          16/07/21   4:53 PM           1696 MYLABKEY.pem
You need to run main.tf file using the following terraform command.
Now, run the following command.
terraform init
terraform fmt
terraform validate
terraform plan
terraform apply
# Optional <terraform apply --auto-approve>
After running the Terraform command, we will check the following things to ensure everything is set up correctly with Terraform.
Inspect the Cloud-Init logs:
Once connected to EC2 instance then you can check the status of the user_data script by inspecting the log files.
# Primary log file for cloud-init
sudo tail -f /var/log/cloud-init-output.log
                    or
sudo cat /var/log/cloud-init-output.log | more
If the user_data script runs successfully, you will see output logs and any errors encountered during execution.
If there’s an error, this log will provide clues about what failed.
Outcome of "cloud-init-output.log"
From Terraform:
Verify the Installation
- [x] Docker version
ubuntu@ip-172-31-95-197:~$ docker --version
Docker version 24.0.7, build 24.0.7-0ubuntu4.1


docker ps -a
ubuntu@ip-172-31-94-25:~$ docker ps
- [x] Trivy version
ubuntu@ip-172-31-89-97:~$ trivy version
Version: 0.55.2
- [x] Helm version
ubuntu@ip-172-31-89-97:~$ helm version
version.BuildInfo{Version:"v3.16.1", GitCommit:"5a5449dc42be07001fd5771d56429132984ab3ab", GitTreeState:"clean", GoVersion:"go1.22.7"}
- [x] Terraform version
ubuntu@ip-172-31-89-97:~$ terraform version
Terraform v1.9.6
on linux_amd64
- [x] eksctl version
ubuntu@ip-172-31-89-97:~$ eksctl version
0.191.0
- [x] kubectl version
ubuntu@ip-172-31-89-97:~$ kubectl version
Client Version: v1.31.1
Kustomize Version: v5.4.2
- [x] AWS CLI version
ubuntu@ip-172-31-89-97:~$ aws version
usage: aws [options] <command> <subcommand> [<subcommand> ...] [parameters]
To see help text, you can run:
  aws help
  aws <command> help
  aws <command> <subcommand> help
- [x] Verify the EKS cluster
On the Terraform virtual machine, Go to the directory k8s_setup_file and open the file cat apply.log to verify whether the cluster is created or not.
ubuntu@ip-172-31-90-126:~/k8s_setup_file$ pwd
/home/ubuntu/k8s_setup_file
ubuntu@ip-172-31-90-126:~/k8s_setup_file$ cd ..
After Terraform deploys on the instance, now it's time to set up the cluster. You can SSH into the instance and run:
aws eks update-kubeconfig --name <cluster-name> --region
<region>
Once EKS cluster is set up then need to run the following command to make it interact with EKS.
aws eks update-kubeconfig --name balraj-cluster --region us-east-1
The aws eks update-kubeconfig a command is used to configure your local kubectl tool to interact with an Amazon EKS (Elastic Kubernetes Service) cluster. It updates or creates a kubeconfig file that contains the necessary authentication information to allow kubectl to communicate with your specified EKS cluster.
What happens when you run this command:
The AWS CLI retrieves the required connection information for the EKS cluster (such as the API server endpoint and certificate) and updates the kubeconfig file located at ~/.kube/config (by default). It configures the authentication details needed to connect kubectl to your EKS cluster using IAM roles. After running this command, you will be able to interact with your EKS cluster using kubectl commands, such as kubectl get nodes or kubectl get pods.
kubectl get nodes
kubectl cluster-info
kubectl config get-contexts
Change the hostname: (optional)
sudo terraform show
sudo hostnamectl set-hostname jenkins-svr
sudo hostnamectl set-hostname terraform
sudo hostnamectl set-hostname sonarqube
sudo hostnamectl set-hostname nexus- Update the /etc/hosts file:
- Open the file with a text editor, for example:
sudo vi /etc/hostsReplace the old hostname with the new one where it appears in the file.
Apply the new hostname without rebooting:
sudo systemctl restart systemd-logind.serviceVerify the change:
hostnamectlSetup the Jenkins
Go to Jenkins EC2 and run the following command Access Jenkins via http://<your-server-ip>:8080. Retrieve the initial admin password using:
sudo cat /var/lib/jenkins/secrets/initialAdminPassword
Install the plugin in Jenkins
Manage Jenkins > Plugins view> Under the Available tab, plugins available for download from the configured Update Center can be searched and considered:
Blue Ocean
Pipeline: Stage View
Docker
Docker Pipeline
Kubernetes
Kubernetes CLI
OWASP Dependency-Check
SonarQube Scanner
Config File Provider
Maven Integration
Pipeline Maven Integration
Run any job and verify that the job is executing successfully.
- Create a below pipeline and build it and verify the outcomes.
pipeline {
    agent any

    stages {
        stage('code') {
            steps {
                echo 'This is cloning the code'
                git branch: 'main', url: 'https://github.com/mrbalraj007/Blue-Green-Deployment.git'
                echo "This is cloning the code"
            }
        }
    }
}
Configure SonarQube
<public IP address: 9000>
default login: admin/admin
You have to change the password as per the below screenshot
Configure Nexus
<public IP address: 8180>
default login: admin
You have to change the password as per the below screenshot
login into the Nexus EC2 instance
ubuntu@ip-172-31-16-90:~$ sudo docker ps
CONTAINER ID   IMAGE             COMMAND                  CREATED          STATUS          PORTS                                       NAMES
515e835cd107   sonatype/nexus3   "/opt/sonatype/nexus…"   13 minutes ago   Up 13 minutes   0.0.0.0:8081->8081/tcp, :::8081->8081/tcp   Nexus-Server
ubuntu@ip-172-31-16-90:~$
We need to log in to the container to retrieve the admin password.
sudo docker exec -it <container ID> /bin/bash
ubuntu@ip-172-31-16-90:~$ sudo docker exec -it 515e835cd107 /bin/bash
bash-4.4$ ls
nexus  sonatype-work  start-nexus-repository-manager.sh
bash-4.4$ cd nexus/
bash-4.4$ ls
NOTICE.txt  OSS-LICENSE.txt  PRO-LICENSE.txt  bin  deploy  etc  lib  public  replicator  system
bash-4.4$ cd ..
bash-4.4$ ls
nexus  sonatype-work  start-nexus-repository-manager.sh
bash-4.4$ cd sonatype-work/
bash-4.4$ ls
nexus3
bash-4.4$ cd nexus3/
bash-4.4$ ls
admin.password  cache  elasticsearch  generated-bundles  javaprefs  keystores  log   restore-from-backup
blobs           db     etc            instances          karaf.pid  lock       port  tmp
bash-4.4$ cat admin.password
820af89c-cef2-472d-8ba8-3cf374bb1b20   # Default Password for Admin
bash-4.4$
Configure the RBAC
Go to Terraform EC2
kubectl create ns webapps
- Create a file svc.yml
apiVersion: v1
kind: ServiceAccount
metadata:
  name: jenkins
  namespace: webapps
kubectl apply -f svc.yml
serviceaccount/jenkins created
To create a role
- Create a file role.yml
apiVersion: rbac.authorization.k8s.io/v1
kind: Role
metadata:
  name: app-role
  namespace: webapps
rules:
  - apiGroups:
        - ""
        - apps
        - autoscaling
        - batch
        - extensions
        - policy
        - rbac.authorization.k8s.io
    resources:
      - pods
      - secrets
      - componentstatuses
      - configmaps
      - daemonsets
      - deployments
      - events
      - endpoints
      - horizontalpodautoscalers
      - ingress
      - jobs
      - limitranges
      - namespaces
      - nodes
      - pods
      - persistentvolumes
      - persistentvolumeclaims
      - resourcequotas
      - replicasets
      - replicationcontrollers
      - serviceaccounts
      - services
    verbs: ["get", "list", "watch", "create", "update", "patch", "delete"]
kubectl apply -f role.yml
role.rbac.authorization.k8s.io/app-role created
Bind the role to the service account
- Create a file bind.yml
apiVersion: rbac.authorization.k8s.io/v1
kind: RoleBinding
metadata:
  name: app-rolebinding
  namespace: webapps
roleRef:
  apiGroup: rbac.authorization.k8s.io
  kind: Role
  name: app-role
subjects:
- namespace: webapps
  kind: ServiceAccount
  name: jenkins
``
```sh
kubectl apply -f bind.yml
rolebinding.rbac.authorization.k8s.io/app-rolebinding created
To service account
- Create a file sec.yml
apiVersion: v1
kind: Secret
type: kubernetes.io/service-account-token
metadata:
  name: mysecretname
  annotations:
    kubernetes.io/service-account.name: jenkins
kubectl apply -f sec.yml -n webapps
secret/mysecretname created
- To get the token.
 kubectl get secret -n webapps
NAME           TYPE                                  DATA   AGE
mysecretname   kubernetes.io/service-account-token   3      63s
ubuntu@ip-172-31-93-220:~$ kubectl describe secret mysecretname -n webapps
Name:         mysecretname
Namespace:    webapps
Labels:       <none>
Annotations:  kubernetes.io/service-account.name: jenkins
              kubernetes.io/service-account.uid: afcdd665-2b33-4079-9905-736029df259b

Type:  kubernetes.io/service-account-token

Data
====
ca.crt:     1107 bytes
namespace:  7 bytes
token:      eyJhbGciOiJSUzI1NiIsImtpZCI6IjFBZE9BWDhYRGxFejlQVkdrSWJXRDBYdVdrWVRaSThxdU42eGdpdnEwTjAifQ.eyJpc3MiOiJrdWJlcm5ldGVzL3NlcnZpY2VhY2NvdW50Iiwia3ViZXJuZXRlcy5pby9zZXJ2aWNlYWNjb3VudC9uYW1lc3BhY2UiOiJ3ZWJhcHBzIiwia3ViZXJuZXRlcy5pby9zZXJ2aWNlYWNjb3VudC9zZWNyZXQubmFtZSI6Im15c2VjcmV0bmFtZSIsImt1YmVybmV0ZXMuaW8vc2VydmljZWFjY291bnQvc2VydmljZS1hY2NvdW50Lm5hbWUiOiJqZW5raW5zIiwia3ViZXJuZXRlcy5pby9zZXJ2aWNlYWNjb3VudC9zZXJ2aWNlLWFjY291bnQudWlkIjoiYWZjZGQ2NjUtMmIzMy00MDc5LTk5MDUtNzM2MDI5ZGYyNTliIiwic3ViIjoic3lzdGVtOnNlcnZpY2VhY2NvdW50OndlYmFwcHM6amVua2lucyJ9.gJvKqVY4fnLCeMKX8tNGt1LfM6yYkgrIEf0tmLH5Q8HOQJIfs0JLWMEIGLQkMJx-0qpFRoOgznHn9cYHh1o_tnbbkEQdi1VACGTMmjBXbK-cscPMGK-lTnw7-wV-Y-lmeTw3PMRczBX3IqAdsyzUVPlKaXRpDA1t48FV1SXvvkTArK0exy-524B8WJ7SADYwogHMj41PYfaY5uMIkQlfDYz45Kb93tfvnbxeO7YnZ2biIqMF4FNI24kw_WutDiE6tsURXyYJf5oOq6mrtzTolb0grRuWPgoFPxbD-eV_5I4cO_1QYlyqxlJt8cbQnK1f5SIHzDZyhp_JYRghG_cd4Q
Configure/Add the token into Jenkins, which will be used in the pipeline.
- Dashboard> Manage Jenkins> Credentials> System> Global credentials (unrestricted)
- build a pipeline.
Configure the tools
Maven
- Dashboard> Manage Jenkins> Tools
Configure Nexus
add credential to Nexus Server
Remove the comment from line 125 and paste it to line number after 118 as below-
for Java-based applications, we have to add the following two credentials.
    <server>
      <id>maven-releases</id>
      <username>admin</username>
      <password>password</password>
    </server>

    <server>
      <id>maven-snapshots</id>
      <username>admin</username>
      <password>password</password>
    </server>
How to get details, go to Nexus.
http://3.84.186.15:8081/repository/maven-releases/
http://3.84.186.15:8081/repository/maven-snapshots/
Go to Application Repo and select the pom.xml
Integrate SonarQube in Jenkins.
Go to Sonarqube and generate the token
Administration> Security> users>
Now, open Jenkins UI and create a credential for Sonarqube
Dashboard> Manage Jenkins> Credentials> System> Global credentials (unrestricted)
Configure the sonarqube scanner in Jenkins.
Dashboard> Manage Jenkins> Tools
Search for SonarQube Scanner installations
Configure the sonarqube server in Jenkins.
On Jenkins UI:
Dashboard> Manage Jenkins> System > Search for
SonarQube installations
Name: sonar server URL: <http:Sonarqube IP address:9000> Server authentication Token: select the sonarqube token from list.
Now, we will configure the webhook for code quality check in Sonarqube Open SonarQube UI:
http://jenkinsIPAddress:8080/sonarqube-webhook/
Configure the Github in Jenkins.
First, generate the token in GitHub and configure it in Jenkins
Now, open Jenkins UI
Dashboard> Manage Jenkins> Credentials> System> Global credentials (unrestricted)
Generate docker Token and update in Jenkins.
Dashboard> Manage Jenkins> Credentials> System> Global credentials (unrestricted)
- Configure the docker
Name- docker [x] install automatically
docker version: latest
Set docker cred in Jenkins
- Dashboard>Manage Jenkins > Credentials> System> Global credentials (unrestricted) ⇒ Click on "New credentials"
kind: "username with password" username: your docker login ID password: docker token Id: docker-cred #it would be used in pipeline Description:docker-cred
- Create a pipeline and build it
pipeline {
    agent any

    tools {
        maven 'maven3'
    }

     parameters {
        choice(name: 'DEPLOY_ENV', choices: ['blue', 'green'], description: 'Choose which environment to deploy: Blue or Green')
        choice(name: 'DOCKER_TAG', choices: ['blue', 'green'], description: 'Choose the Docker image tag for the deployment')
        booleanParam(name: 'SWITCH_TRAFFIC', defaultValue: false, description: 'Switch traffic between Blue and Green')
    }

     environment {
        IMAGE_NAME = "balrajsi/bankapp"
        TAG = "${params.DOCKER_TAG}"  // The image tag now comes from the parameter
        SCANNER_HOME= tool 'sonar-scanner'
    }


    stages {
        stage('Git Checkout') {
            steps {
                git branch: 'main', credentialsId: 'git-cred', url: 'https://github.com/mrbalraj007/Blue-Green-Deployment.git'
            }
        }
        stage('Compile') {
            steps {
                sh 'mvn compile'
            }
        }

        stage('tests') {
            steps {
                sh 'mvn test -DskipTests=true'
            }
        }
        stage('Trivy FS Scan') {
            steps {
                sh 'trivy fs --format table -o fs.html .'
            }
        }
        stage('sonarqube analysis') {
            steps {
            withSonarQubeEnv('sonar') {
                 sh "$SCANNER_HOME/bin/sonar-scanner -Dsonar.projectKey=nodejsmysql -Dsonar.projectName=nodejsmysql -Dsonar.java.binaries=target"
                }
            }
        }
         stage('Quality Gate Check') {
            steps {
                timeout(time: 1, unit: 'NANOSECONDS') {
                   waitForQualityGate abortPipeline: false
              }
            }
        }
        stage('Build') {
            steps {
                sh 'mvn test -DskipTests=true'
            }
        }
        stage('Publish Artifact to Nexus') {
            steps {
                withMaven(globalMavenSettingsConfig: 'meven-settings', jdk: '', maven: 'maven3', mavenSettingsConfig: '', traceability: true) {
                   sh 'mvn deploy -DskipTests=true'
              }
            }
        }
   }
}
Build failed 😢
Troubleshooting:
I encountered an error where the SonarScanner failed to connect to the SonarQube server due to an incorrectly specified server URL. Specifically, the error indicates that no URL scheme (http or https) was found for the SonarQube server's address. I have configured it as below; here, http was missing:
This is how it should be configured:
Now, I tried to build it again, but it keeps failing.
Note: The pipeline was aborted, and I noticed that I was using "NANOSECONDS" in the pipeline; however, it should be "HOURS.".
Here is the corrected pipeline.
pipeline {
    agent any

    tools {
        maven 'maven3'
    }

     parameters {
        choice(name: 'DEPLOY_ENV', choices: ['blue', 'green'], description: 'Choose which environment to deploy: Blue or Green')
        choice(name: 'DOCKER_TAG', choices: ['blue', 'green'], description: 'Choose the Docker image tag for the deployment')
        booleanParam(name: 'SWITCH_TRAFFIC', defaultValue: false, description: 'Switch traffic between Blue and Green')
    }

     environment {
        IMAGE_NAME = "balrajsi/bankapp"
        TAG = "${params.DOCKER_TAG}"  // The image tag now comes from the parameter
        SCANNER_HOME= tool 'sonar-scanner'
    }


    stages {
        stage('Git Checkout') {
            steps {
                git branch: 'main', credentialsId: 'git-cred', url: 'https://github.com/mrbalraj007/Blue-Green-Deployment.git'
            }
        }
        stage('Compile') {
            steps {
                sh 'mvn compile'
            }
        }

        stage('tests') {
            steps {
                sh 'mvn test -DskipTests=true'
            }
        }
        stage('Trivy FS Scan') {
            steps {
                sh 'trivy fs --format table -o fs.html .'
            }
        }
        stage('sonarqube analysis') {
            steps {
            withSonarQubeEnv('sonar') {
                 sh "$SCANNER_HOME/bin/sonar-scanner -Dsonar.projectKey=nodejsmysql -Dsonar.projectName=nodejsmysql -Dsonar.java.binaries=target"
                }
            }
        }
         stage('Quality Gate Check') {
            steps {
                timeout(time: 1, unit: 'HOURS') {
                   waitForQualityGate abortPipeline: false
              }
            }
        }
        stage('Build') {
            steps {
                sh 'mvn test -DskipTests=true'
            }
        }
        stage('Publish Artifact to Nexus') {
            steps {
                withMaven(globalMavenSettingsConfig: 'meven-settings', jdk: '', maven: 'maven3', mavenSettingsConfig: '', traceability: true) {
                   sh 'mvn deploy -DskipTests=true'
              }
            }
        }
   }
}
- add parameter for
blue and greenenvironment and below is the updated pipeline.
pipeline {
    agent any

    tools {
        maven 'maven3'
    }

     parameters {
        choice(name: 'DEPLOY_ENV', choices: ['blue', 'green'], description: 'Choose which environment to deploy: Blue or Green')
        choice(name: 'DOCKER_TAG', choices: ['blue', 'green'], description: 'Choose the Docker image tag for the deployment')
        booleanParam(name: 'SWITCH_TRAFFIC', defaultValue: false, description: 'Switch traffic between Blue and Green')
    }

     environment {
        IMAGE_NAME = "balrajsi/bankapp"
        TAG = "${params.DOCKER_TAG}"  // The image tag now comes from the parameter
        SCANNER_HOME= tool 'sonar-scanner'
    }


    stages {
        stage('Git Checkout') {
            steps {
                git branch: 'main', credentialsId: 'git-cred', url: 'https://github.com/mrbalraj007/Blue-Green-Deployment.git'
            }
        }
        stage('Compile') {
            steps {
                sh 'mvn compile'
            }
        }

        stage('tests') {
            steps {
                sh 'mvn test -DskipTests=true'
            }
        }
        stage('Trivy FS Scan') {
            steps {
                sh 'trivy fs --format table -o fs.html .'
            }
        }
        stage('sonarqube analysis') {
            steps {
            withSonarQubeEnv('sonar') {
                 sh "$SCANNER_HOME/bin/sonar-scanner -Dsonar.projectKey=nodejsmysql -Dsonar.projectName=nodejsmysql -Dsonar.java.binaries=target"
                }
            }
        }
         stage('Quality Gate Check') {
            steps {
                timeout(time: 1, unit: 'HOURS') {
                    waitForQualityGate abortPipeline: false
              }
            }
        }
        stage('Build') {
            steps {
                sh 'mvn test -DskipTests=true'
            }
        }
        stage('Publish Artifact to Nexus') {
            steps {
                withMaven(globalMavenSettingsConfig: 'meven-settings', jdk: '', maven: 'maven3', mavenSettingsConfig: '', traceability: true) {
                   sh 'mvn deploy -DskipTests=true'
              }
            }
        }
        stage('Docker Build and Tag') {
            steps {
               script{
                  withDockerRegistry(credentialsId: 'docker-cred') {
                      sh 'docker build -t ${IMAGE_NAME}:${TAG} .'
                 }
               }
            }
        }
         stage('Trivy Image Scan') {
            steps {
                sh 'trivy image --format table -o fs.html ${IMAGE_NAME}:${TAG}'
            }
        }
        stage('Docker push Image') {
            steps {
                script{
                withDockerRegistry(credentialsId: 'docker-cred') {
                      sh 'docker push ${IMAGE_NAME}:${TAG}'
              }
            }
            }
        }

   }
}
Again build failed ;-)
Troubleshooting and Solution:
Add the User to the Docker Group (Run the following command to add the Jenkins user (replace Jenkins if Jenkins is running under a different user) to the Docker group:)
sudo usermod -aG docker Jenkins
Restart Jenkins and Docker (After adding the Jenkins user to the docker group, restart Jenkins and Docker for the changes to take effect:)
  sudo systemctl restart jenkins
  sudo systemctl restart docker
Verify Membership (You can verify if the user has been added to the docker group by running:)
groups JenkinsVerify Permissions for /var/run/docker.sock (Check the permissions on the Docker socket to ensure it is accessible by the Docker group:)
ls -l /var/run/docker.sockIt should show something like:
srw-rw---- 1 root docker 0 Oct 9 09:42 /var/run/docker.sockIf the group is not docker, you may need to correct the ownership by running:
sudo chown root:docker /var/run/docker.sockEnsure that group members have read and write permissions:
sudo chmod 660 /var/run/docker.sockTest the Docker login connectivity: Once the above steps are complete, test the setup by running a simple Docker command in the Jenkins pipeline to verify that the issue is resolved:
  Copy code
  pipeline {
      agent any
      stages {
          stage('Test Docker') {
              steps {
                  sh 'docker ps'
              }
          }
      }
  }
Now, run the build again.
Image view from Docker Hub:

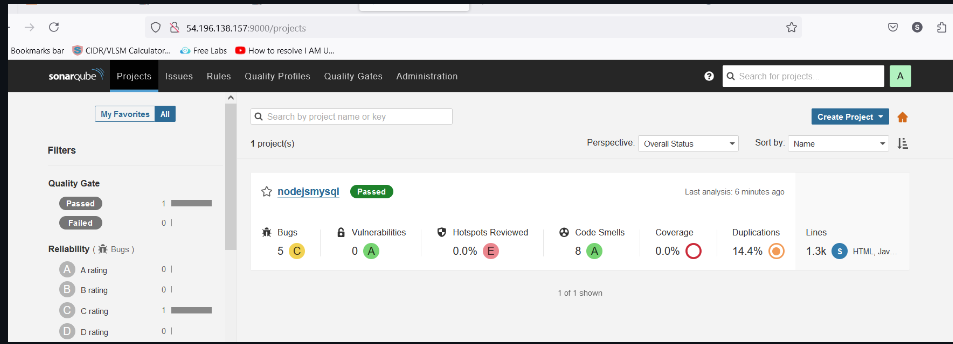
View from SonarQube:
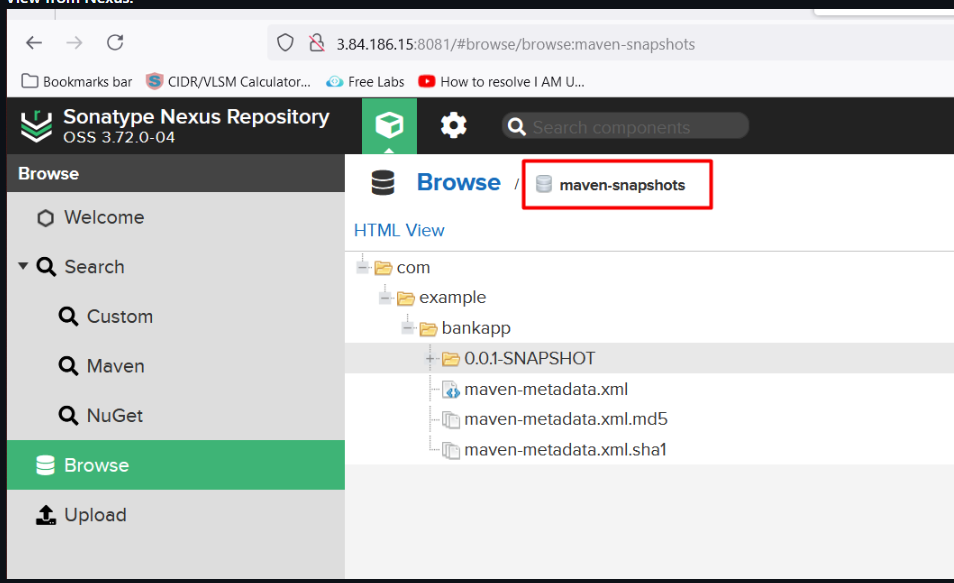
View from Nexus:
Add the
MySQL Deployment, Service and SVC-APPin pipeline
here is the complete pipeline.
pipeline {
    agent any

    tools {
        maven 'maven3'
    }

     parameters {
        choice(name: 'DEPLOY_ENV', choices: ['blue', 'green'], description: 'Choose which environment to deploy: Blue or Green')
        choice(name: 'DOCKER_TAG', choices: ['blue', 'green'], description: 'Choose the Docker image tag for the deployment')
        booleanParam(name: 'SWITCH_TRAFFIC', defaultValue: false, description: 'Switch traffic between Blue and Green')
    }

     environment {
        IMAGE_NAME = "balrajsi/bankapp"
        TAG = "${params.DOCKER_TAG}"  // The image tag now comes from the parameter
        KUBE_NAMESPACE = 'webapps'
        SCANNER_HOME= tool 'sonar-scanner'
    }


    stages {
        stage('Git Checkout') {
            steps {
                git branch: 'main', credentialsId: 'git-cred', url: 'https://github.com/mrbalraj007/Blue-Green-Deployment.git'
            }
        }
        stage('Compile') {
            steps {
                sh 'mvn compile'
            }
        }

        stage('tests') {
            steps {
                sh 'mvn test -DskipTests=true'
            }
        }
        stage('Trivy FS Scan') {
            steps {
                sh 'trivy fs --format table -o fs.html .'
            }
        }
        stage('sonarqube analysis') {
            steps {
            withSonarQubeEnv('sonar') {
                 sh "$SCANNER_HOME/bin/sonar-scanner -Dsonar.projectKey=nodejsmysql -Dsonar.projectName=nodejsmysql -Dsonar.java.binaries=target"
                }
            }
        }
         stage('Quality Gate Check') {
            steps {
                timeout(time: 1, unit: 'HOURS') {
                    waitForQualityGate abortPipeline: false
              }
            }
        }
        stage('Build') {
            steps {
                sh 'mvn test -DskipTests=true'
            }
        }
        stage('Publish Artifact to Nexus') {
            steps {
                withMaven(globalMavenSettingsConfig: 'meven-settings', jdk: '', maven: 'maven3', mavenSettingsConfig: '', traceability: true) {
                   sh 'mvn deploy -DskipTests=true'
              }
            }
        }
        stage('Docker Build and Tag') {
            steps {
               script{
                  withDockerRegistry(credentialsId: 'docker-cred') {
                      sh 'docker build -t ${IMAGE_NAME}:${TAG} .'
                 }
               }
            }
        }
         stage('Trivy Image Scan') {
            steps {
                sh 'trivy image --format table -o fs.html ${IMAGE_NAME}:${TAG}'
            }
        }
        stage('Docker push Image') {
            steps {
                script{
                withDockerRegistry(credentialsId: 'docker-cred') {
                      sh 'docker push ${IMAGE_NAME}:${TAG}'
              }
            }
            }
        }
        stage('Deploy MySQL Deployment and Service') {
            steps {
                script {
                    withKubeConfig(caCertificate: '', clusterName: 'balraj-cluster', contextName: '', credentialsId: 'k8-token', namespace: 'webapps', restrictKubeConfigAccess: false, serverUrl: 'https://46BCE22A20C7B7BD3991293F82452A40.gr7.us-east-1.eks.amazonaws.com') {
                        sh "kubectl apply -f mysql-ds.yml -n ${KUBE_NAMESPACE}"  // Ensure you have the MySQL deployment YAML ready
                    }
                }
            }
        }

        stage('Deploy SVC-APP') {
            steps {
                script {
                    withKubeConfig(caCertificate: '', clusterName: 'balraj-cluster', contextName: '', credentialsId: 'k8-token', namespace: 'webapps', restrictKubeConfigAccess: false, serverUrl: 'https://46BCE22A20C7B7BD3991293F82452A40.gr7.us-east-1.eks.amazonaws.com') {
                        sh """ if ! kubectl get svc bankapp-service -n ${KUBE_NAMESPACE}; then
                                kubectl apply -f bankapp-service.yml -n ${KUBE_NAMESPACE}
                              fi
                        """
                   }
                }
            }
        }

   }
}
From Terraform VM:
ubuntu@ip-172-31-93-220:~$ kubectl get pods -n webapps
NAME                   READY   STATUS    RESTARTS   AGE
mysql-f5c84b88-2jf6r   1/1     Running   0          24m
ubuntu@ip-172-31-93-220:~$ kubectl get svc -n webapps
NAME              TYPE           CLUSTER-IP      EXTERNAL-IP                                                             PORT(S)        AGE
bankapp-service   LoadBalancer   172.20.249.93   aba6848fca700468f834ff45be100a18-73608189.us-east-1.elb.amazonaws.com   80:32657/TCP   24m
mysql-service     ClusterIP      172.20.64.19    <none>                                                                  3306/TCP       24m
ubuntu@ip-172-31-93-220:~$
ubuntu@ip-172-31-93-220:~$ kubectl get nodes
NAME                         STATUS   ROLES    AGE     VERSION
ip-10-0-1-17.ec2.internal    Ready    <none>   4h15m   v1.30.4-eks-a737599
ip-10-0-2-201.ec2.internal   Ready    <none>   4h15m   v1.30.4-eks-a737599
ip-10-0-2-220.ec2.internal   Ready    <none>   4h15m   v1.30.4-eks-a737599
- Deploy to K8s
pipeline {
    agent any

    tools {
        maven 'maven3'
    }

     parameters {
        choice(name: 'DEPLOY_ENV', choices: ['blue', 'green'], description: 'Choose which environment to deploy: Blue or Green')
        choice(name: 'DOCKER_TAG', choices: ['blue', 'green'], description: 'Choose the Docker image tag for the deployment')
        booleanParam(name: 'SWITCH_TRAFFIC', defaultValue: false, description: 'Switch traffic between Blue and Green')
    }

     environment {
        IMAGE_NAME = "balrajsi/bankapp"
        TAG = "${params.DOCKER_TAG}"  // The image tag now comes from the parameter
        KUBE_NAMESPACE = 'webapps'
        SCANNER_HOME= tool 'sonar-scanner'
    }


    stages {
        stage('Git Checkout') {
            steps {
                git branch: 'main', credentialsId: 'git-cred', url: 'https://github.com/mrbalraj007/Blue-Green-Deployment.git'
            }
        }
        stage('Compile') {
            steps {
                sh 'mvn compile'
            }
        }

        stage('tests') {
            steps {
                sh 'mvn test -DskipTests=true'
            }
        }
        stage('Trivy FS Scan') {
            steps {
                sh 'trivy fs --format table -o fs.html .'
            }
        }
        stage('sonarqube analysis') {
            steps {
            withSonarQubeEnv('sonar') {
                 sh "$SCANNER_HOME/bin/sonar-scanner -Dsonar.projectKey=nodejsmysql -Dsonar.projectName=nodejsmysql -Dsonar.java.binaries=target"
                }
            }
        }
         stage('Quality Gate Check') {
            steps {
                timeout(time: 1, unit: 'HOURS') {
                    waitForQualityGate abortPipeline: false
              }
            }
        }
        stage('Build') {
            steps {
                sh 'mvn test -DskipTests=true'
            }
        }
        stage('Publish Artifact to Nexus') {
            steps {
                withMaven(globalMavenSettingsConfig: 'meven-settings', jdk: '', maven: 'maven3', mavenSettingsConfig: '', traceability: true) {
                   sh 'mvn deploy -DskipTests=true'
              }
            }
        }
        stage('Docker Build and Tag') {
            steps {
               script{
                  withDockerRegistry(credentialsId: 'docker-cred') {
                      sh 'docker build -t ${IMAGE_NAME}:${TAG} .'
                 }
               }
            }
        }
         stage('Trivy Image Scan') {
            steps {
                sh 'trivy image --format table -o fs.html ${IMAGE_NAME}:${TAG}'
            }
        }
        stage('Docker push Image') {
            steps {
                script{
                withDockerRegistry(credentialsId: 'docker-cred') {
                      sh 'docker push ${IMAGE_NAME}:${TAG}'
              }
            }
            }
        }
        stage('Deploy MySQL Deployment and Service') {
            steps {
                script {
                    withKubeConfig(caCertificate: '', clusterName: 'balraj-cluster', contextName: '', credentialsId: 'k8-token', namespace: 'webapps', restrictKubeConfigAccess: false, serverUrl: 'https://46BCE22A20C7B7BD3991293F82452A40.gr7.us-east-1.eks.amazonaws.com') {
                        sh "kubectl apply -f mysql-ds.yml -n ${KUBE_NAMESPACE}"  // Ensure you have the MySQL deployment YAML ready
                    }
                }
            }
        }

        stage('Deploy SVC-APP') {
            steps {
                script {
                    withKubeConfig(caCertificate: '', clusterName: 'balraj-cluster', contextName: '', credentialsId: 'k8-token', namespace: 'webapps', restrictKubeConfigAccess: false, serverUrl: 'https://46BCE22A20C7B7BD3991293F82452A40.gr7.us-east-1.eks.amazonaws.com') {
                        sh """ if ! kubectl get svc bankapp-service -n ${KUBE_NAMESPACE}; then
                                kubectl apply -f bankapp-service.yml -n ${KUBE_NAMESPACE}
                              fi
                        """
                   }
                }
            }
        }
         stage('Deploy to Kubernetes') {
            steps {
                script {
                    def deploymentFile = ""
                    if (params.DEPLOY_ENV == 'blue') {
                        deploymentFile = 'app-deployment-blue.yml'
                    } else {
                        deploymentFile = 'app-deployment-green.yml'
                    }

                    withKubeConfig(caCertificate: '', clusterName: 'balraj-cluster', contextName: '', credentialsId: 'k8-token', namespace: 'webapps', restrictKubeConfigAccess: false, serverUrl: 'https://46BCE22A20C7B7BD3991293F82452A40.gr7.us-east-1.eks.amazonaws.com') {
                        sh "kubectl apply -f ${deploymentFile} -n ${KUBE_NAMESPACE}"
                    }
                }
            }
        }

        stage('Switch Traffic Between Blue & Green Environment') {
            when {
                expression { return params.SWITCH_TRAFFIC }
            }
            steps {
                script {
                    def newEnv = params.DEPLOY_ENV

                    // Always switch traffic based on DEPLOY_ENV
                    withKubeConfig(caCertificate: '', clusterName: 'balraj-cluster', contextName: '', credentialsId: 'k8-token', namespace: 'webapps', restrictKubeConfigAccess: false, serverUrl: 'https://46BCE22A20C7B7BD3991293F82452A40.gr7.us-east-1.eks.amazonaws.com') {
                        sh '''
                            kubectl patch service bankapp-service -p "{\\"spec\\": {\\"selector\\": {\\"app\\": \\"bankapp\\", \\"version\\": \\"''' + newEnv + '''\\"}}}" -n ${KUBE_NAMESPACE}
                        '''
                    }
                    echo "Traffic has been switched to the ${newEnv} environment."
                }
            }
        }

        stage('Verify Deployment') {
            steps {
                script {
                    def verifyEnv = params.DEPLOY_ENV
                    withKubeConfig(caCertificate: '', clusterName: 'balraj-cluster', contextName: '', credentialsId: 'k8-token', namespace: 'webapps', restrictKubeConfigAccess: false, serverUrl: 'https://46BCE22A20C7B7BD3991293F82452A40.gr7.us-east-1.eks.amazonaws.com') {
                        sh """
                        kubectl get pods -l version=${verifyEnv} -n ${KUBE_NAMESPACE}
                        kubectl get svc bankapp-service -n ${KUBE_NAMESPACE}
                        """
                    }
                }
            }
        }
   }
}
Build Status
Verify application.
- Now, time to access the application
aba6848fca700468f834ff45be100a18-73608189.us-east-1.elb.amazonaws.com
Try to access the application through the URL (aba6848fca700468f834ff45be100a18-73608189.us-east-1.elb.amazonaws.com) in the browser.
ubuntu@ip-172-31-93-220:~$ kubectl get svc -n webapps
NAME              TYPE           CLUSTER-IP      EXTERNAL-IP                                                             PORT(S)        AGE
bankapp-service   LoadBalancer   172.20.249.93   aba6848fca700468f834ff45be100a18-73608189.us-east-1.elb.amazonaws.com   80:32657/TCP   33m
mysql-service     ClusterIP      172.20.64.19    <none>                                                                  3306/TCP       33m
Congratulations! :-) You have deployed the application successfully.
You have to run the pipeline for the Green environment as well.
Now run the pipeline again to switch traffic.
ubuntu@ip-172-31-93-220:~$ kubectl get all -n webapps
NAME                                 READY   STATUS    RESTARTS   AGE
pod/bankapp-blue-bcc84fb84-9mbsk     1/1     Running   0          7m16s
pod/bankapp-green-57bd8b8b58-45nrb   1/1     Running   0          5m10s
pod/mysql-f5c84b88-2jf6r             1/1     Running   0          38m

NAME                      TYPE           CLUSTER-IP      EXTERNAL-IP                                                             PORT(S)        AGE
service/bankapp-service   LoadBalancer   172.20.249.93   aba6848fca700468f834ff45be100a18-73608189.us-east-1.elb.amazonaws.com   80:32657/TCP   38m
service/mysql-service     ClusterIP      172.20.64.19    <none>                                                                  3306/TCP       38m

NAME                            READY   UP-TO-DATE   AVAILABLE   AGE
deployment.apps/bankapp-blue    1/1     1            1           7m16s
deployment.apps/bankapp-green   1/1     1            1           5m10s
deployment.apps/mysql           1/1     1            1           38m

NAME                                       DESIRED   CURRENT   READY   AGE
replicaset.apps/bankapp-blue-bcc84fb84     1         1         1       7m16s
replicaset.apps/bankapp-green-57bd8b8b58   1         1         1       5m10s
replicaset.apps/mysql-f5c84b88             1         1         1       38m
ubuntu@ip-172-31-93-220:~$
Pipeline Status:
I did the switch over to blue again and noticed there is no downtime
Every 2.0s: kubectl get all -n webapps                                                                                                                              ip-172-31-93-220: Wed Oct  9 04:52:24 2024

NAME                                 READY   STATUS    RESTARTS   AGE
pod/bankapp-blue-bcc84fb84-9mbsk     1/1     Running   0          11m
pod/bankapp-green-57bd8b8b58-45nrb   1/1     Running   0          9m38s
pod/mysql-f5c84b88-2jf6r             1/1     Running   0          43m

NAME                      TYPE           CLUSTER-IP      EXTERNAL-IP                                                             PORT(S)        AGE
service/bankapp-service   LoadBalancer   172.20.249.93   aba6848fca700468f834ff45be100a18-73608189.us-east-1.elb.amazonaws.com   80:32657/TCP   43m
service/mysql-service     ClusterIP      172.20.64.19    <none>                                                                  3306/TCP       43m

NAME                            READY   UP-TO-DATE   AVAILABLE   AGE
deployment.apps/bankapp-blue    1/1     1            1           11m
deployment.apps/bankapp-green   1/1     1            1           9m38s
deployment.apps/mysql           1/1     1            1           43m

NAME                                       DESIRED   CURRENT   READY   AGE
replicaset.apps/bankapp-blue-bcc84fb84     1         1         1       11m
replicaset.apps/bankapp-green-57bd8b8b58   1         1         1       9m38s
replicaset.apps/mysql-f5c84b88             1         1         1       43m
Nexus Status
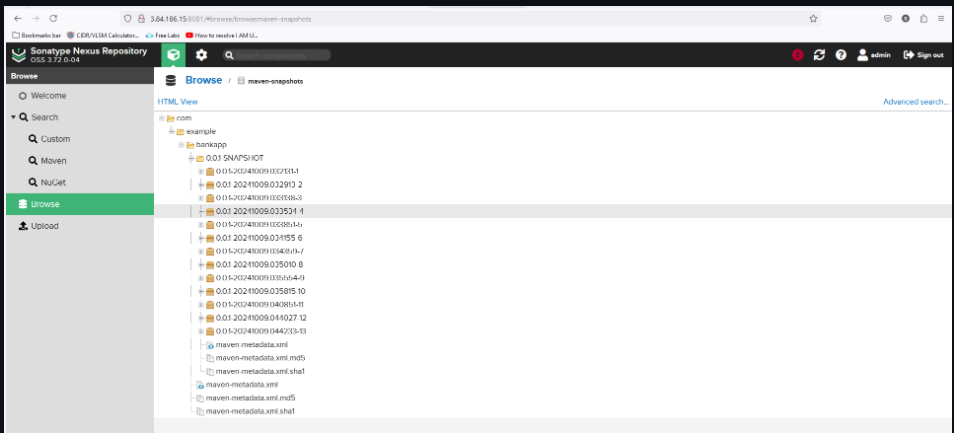
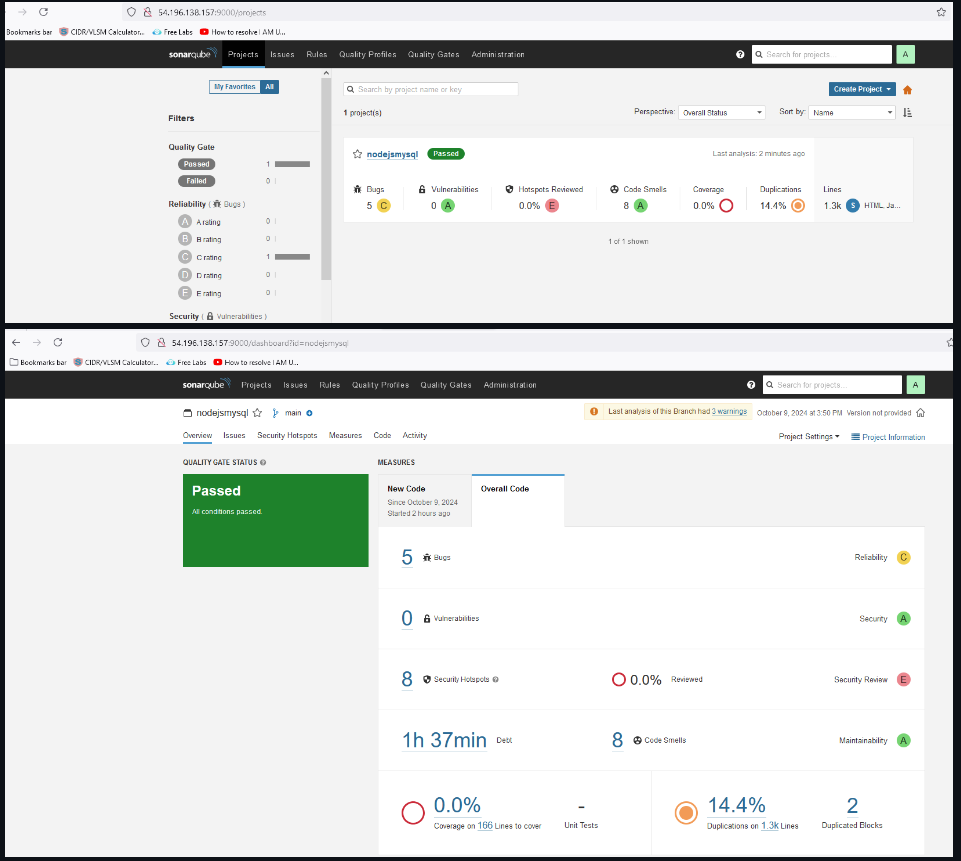
SonarQube Status
Resources used in AWS:
EC2 instance
EKS Cluster
Environment Cleanup:
As we are using Terraform, we will use the following command to delete
EKS clusterfirstthen delete the
virtual machine.
To delete AWS EKS cluster
- Login into the Terraform EC2 instance and change the directory to /k8s_setup_file, and run the following command to delete the cluster.
cd /k8s_setup_file
sudo terraform destroy --auto-approve
I was getting the below error message while deleting the EKS cluster
Solution:
I. I have deleted the load balancer manually from the AWS console.
II. Delete the VPC manually and try to rerun the Terraform command and it works :-)
Now, time to delete the Virtual machine.
Go to folder "15.Real-Time-DevOps-Project/Terraform_Code/Code_IAC_Terraform_box" and run the Terraform command.
cd Terraform_Code/

$ ls -l
Mode                 LastWriteTime         Length Name
----                 -------------         ------ ----
da---l          26/09/24   9:48 AM                Code_IAC_Terraform_box

Terraform destroy --auto-approve
Conclusion
Setting up a Blue-Green deployment pipeline with Jenkins and Kubernetes can greatly improve your application deployment process. This method not only reduces downtime but also offers a safety net for quick rollbacks.
References For a deeper understanding and detailed steps on similar setups, feel free to check the following technical blogs:
Ref Link
Subscribe to my newsletter
Read articles from Balraj Singh directly inside your inbox. Subscribe to the newsletter, and don't miss out.
Written by

Balraj Singh
Balraj Singh
Tech enthusiast with 15 years of experience in IT, specializing in server management, VMware, AWS, Azure, and automation. Passionate about DevOps, cloud, and modern infrastructure tools like Terraform, Ansible, Packer, Jenkins, Docker, Kubernetes, and Azure DevOps. Passionate about technology and continuous learning, I enjoy sharing my knowledge and insights through blogging and real-world experiences to help the tech community grow!