Cloud DevOps - Secure Project Dependencies with AWS CodeArtifact
 yyounos shaik
Table of contents
DIFFICULTY : mid-level TIME : 2 HOURS COST : 0$
WHAT YOU’LL NEED :
An AWS account - Create one here!
Visual Studio Code - Download Here!
part-1 : Building an WebApp and IDE in AWS
AWS SERVICES :
AWS CodeArtifact
AWS CodeCommit
AWS IAM
Amazon EC2
AWS CLI
Overview
Imagine AWS CodeArtifact as a secure closet where you store all the essential building blocks (or "packages") your web app needs to function. It's like keeping extra batteries or light bulbs at home so you're prepared if something runs out. CodeArtifact ensures you have safe copies of these packages. So, even if there's an issue with the public repositories on the internet where these packages are usually found, you'll still have everything you need to continue building your app.
Let’s Get Started…
Step 1 : Set Up Your Web App and Git Repo (Projects 1 and 2 of this series)
Log in to your IAM Admin User:
Open your IAM User's login instructions (the .csv file that you've downloaded after creating your user in Project 1).
Don't have an IAM user set up yet, or it's been deleted? Let's set up a new IAM user!
Head to your AWS Account as the root user.
Create a new IAM user called
Yourname-IAM-Admin.Make sure to select the checkbox next to
Provide user access to the AWS Management Console - optional.Provide
AdministratorAccessto your user.
Make sure to download the
.csvfile containing your user's sign-in details. . Log in to your AWS account as your IAM user.Log in using your IAM user's console sign-in URL, username and the password (provided in the .csv file).
Launch EC2 Instance:
In the AWS console search bar, search for EC2.
Select Instances in the left hand menu and choose Launch instances.
Choose the following settings in the Launch an instance page.
Under Name and tags, for Name, enter
webapp.Under Application and OS Images (Amazon Machine Image), choose Amazon Linux.
Choose the Amazon Linux 2023 AMI.
Under Instance type, choose t2.micro.
Under Key pair (login), choose a Create new key pair.
For your Key pair name, enter
webserver.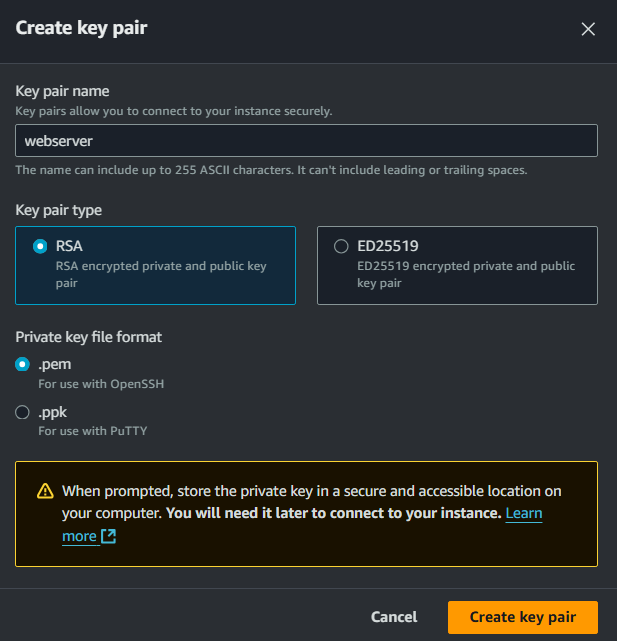
Leave your Private key file format as .pem since we're using SSH later on to access our EC2 instance.
Select Create key pair.
For Allow SSH traffic from, choose your IP address if it's correct (you can check your IP by clicking here). Otherwise select Anywhere.
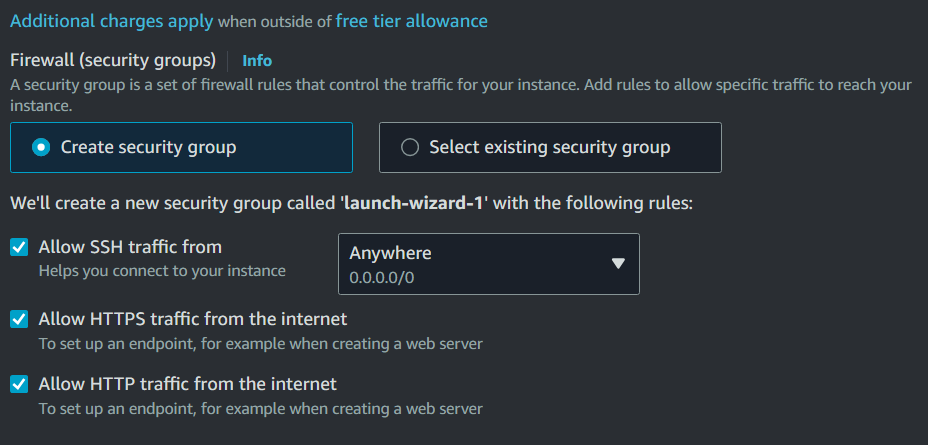
Check the boxes for Allow HTTP traffic from the internet.
Leave the default values for the remaining sections.
When you're ready, choose Launch instance.
Wait until Instance state for your instance is Running before continuing.
Connect to your instance using SSH:
- Open terminal/cmd onto your pc/mac laptop.
Note: use “git bash” for connecting your EC2 instance as you don’t have to change the permissions of the .pem file.
Use the public DNS of your new instance. You can find it in the EC2 dashboard.
Connect to your instance using the following command, replacing /path/to/your-key-pair.pem with the path to your key pair file and your-ec2-instance-public-dns with the public DNS of your instance:
ssh -i /path/to/your-key-pair.pem ec2-user@your-ec2-instance-public-dns

If permissions are denied run this command : chmod 400 .pem file.
Once you paste the URL you will be connected successfully.

Setting Up the Environment on the New EC2 Instance
Once connected to your EC2 instance, follow the steps below to set up your development environment .
Install Apache Maven:
  sudo wget https://repos.fedorapeople.org/repos/dchen/apache-maven/epel-apache-maven.repo -O /etc/yum.repos.d/epel-apache-maven.repo
  sudo sed -i s/\$releasever/6/g /etc/yum.repos.d/epel-apache-maven.repo
  sudo yum install -y apache-maven
Install Amazon Corretto 8:
  sudo amazon-linux-extras enable corretto8
  sudo yum install -y java-1.8.0-amazon-corretto-devel
  export JAVA_HOME=/usr/lib/jvm/java-1.8.0-amazon-corretto.x86_64
  export PATH=/usr/lib/jvm/java-1.8.0-amazon-corretto.x86_64/jre/bin/:$PATH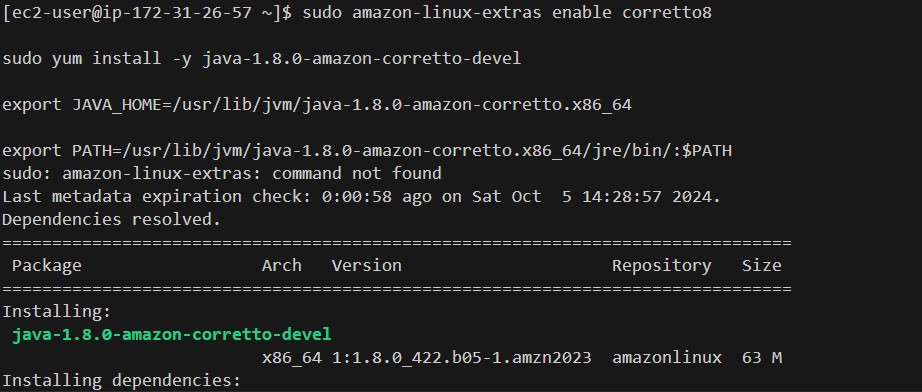
Install Git into EC2 instance :
Why are we installing git into the instance? can’t we run normally?
We are installing Git on the instance because, by default, we can't run Git commands on it. To execute these commands in the upcoming steps, we need to install Git first.
These Git commands can run on your regular terminal or command prompt, but not on your launched instance.
  sudo yum update -y
  sudo yum install git -y
Verify the installation:
  java -version
  mvn -version
  git --version
Install Visual Studio Code and Remote - SSH Extension
Download and install Visual Studio Code from here if you haven't already.
Install the Remote - SSH extension in Visual Studio Code:
Open Visual Studio Code.
Go to the Extensions view by clicking on the Extensions icon in the Activity Bar or pressing
Ctrl+Shift+X.Search for "Remote - SSH" and install it.

Now, Click to remote explorers.
click on SSH settings icon and open the config file.

Now type this into the config file:
  Host <your EC2 public IP>
      HostName <ec2 instance name>
      User ec2-user
      IdentityFile <Path of your .pem file saved on your pc>
Save the config file.
Now Click on the
webappin the SSH.
Open a new terminal (connected to your EC2 instance).
Generate a new Maven project:
What is mvn?
When you run mvn commands, you're asking Maven to perform tasks (like creating a new project or building an existing one).The mvn archetype:generate command specifically tells Maven to create a new project from a template (which Maven calls an archetype). This command sets up a basic structure for your project, so you don't have to start from scratch
  mvn archetype:generate \
    -DgroupId=com.yourname.app \
    -DartifactId=yourname-web-project \
    -DarchetypeArtifactId=maven-archetype-webapp \
    -DinteractiveMode=false
Navigate to the project directory:
cd yourname-web-projectOnce connected to your EC2 instance, open the project folder (my-web-project).
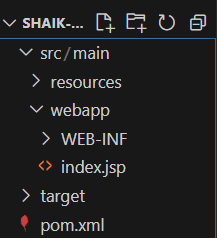
Modify the index.jsp file:
In the Explorer panel, navigate to src/main/webapp/index.jsp.
Replace the contents with the following code, and replace <YOUR NAME> with your actual name:
  <html>
  <body>
  <h2>Hello <YOUR NAME>!</h2>
  <p>This is my Project web application working!</p>
  </body>
  </html>
Save the changes to
“index.jsp”.
Create a Repository in AWS CodeCommit:
Create a new repository in the CodeCommit console.
Name:
yourname-repository.Description:
A web application for the project home page.
Your First Commit:
git config --global user.name "your name"
git config --global user.email "your email"
Navigate your terminal to the web app project by running this command:
cd yourname-web-projectInitiate the local repo by running this command:
git init -b mainCopy your CodeCommit repository's URL to your clipboard, which should follow this format:https://git-codecommit.<region>.amazonaws.com/v1/repos/<project-name>
Set the remote origin to the CodeCommit URL you copied earlier (replace HTTPS CodeCommit repo URL with your URL) by running this command:
git remote add origin<HTTPS codecommit URL>Now we can commit and push our code! Here are the commands for this:
  git add .

  git commit -m "Initial commit. Updated index.jsp."

  git push -u origin main
You have successfully added files into the AWS CodeCommit repository!!
Now we have a working CodeCommit repository to store and version control our code.
Step 2 : Create Your Domain and Repository
Head to your AWS CodeArtifact console.
What is AWS CodeArtifact?
Maven is fetching resources from the public internet to get your web app's packages. Just think about what could happen to your web app if these public resources suddenly become unavailable or are removed!
In the real world, if a dependency goes down, it can totally mess up your CI/CD pipeline. Maven won't be able to build your web app, which means testing and deploying your latest updates will have to stop too.
That's where AWS CodeArtifact comes in handy. Think of AWS CodeArtifact as your own private storage locker, where you can keep a backup copy of all your web app's dependencies. So, even if something goes wrong with a dependency in the public repository, you can still grab your backup from CodeArtifact and keep building your app without any problems.
You can see how CodeArtifact adds an extra layer of reliability and security, keeping your development process safe from outside disruptions—super important for anyone in a DevOps role!
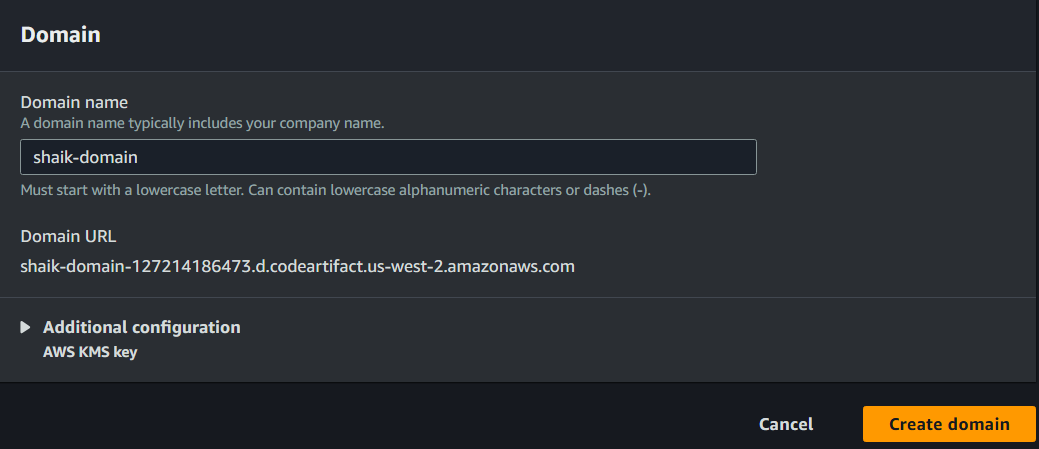
Create a new Domain: yourname-domain.
Why are we creating an domain?
A domain in AWS CodeArtifact is like a big folder where you can organize and store smaller folders of your project materials. Each of these smaller folders is called a repository.
You'll also see that your domain gets its own URL! This URL is the gateway your applications will use to fetch and store the dependencies inside your domain.
Usually, a developer will create one domain to keep all their artifacts in one spot. Larger organizations might use multiple domains if they have very different projects or need to separate resources for security or organizational purposes.
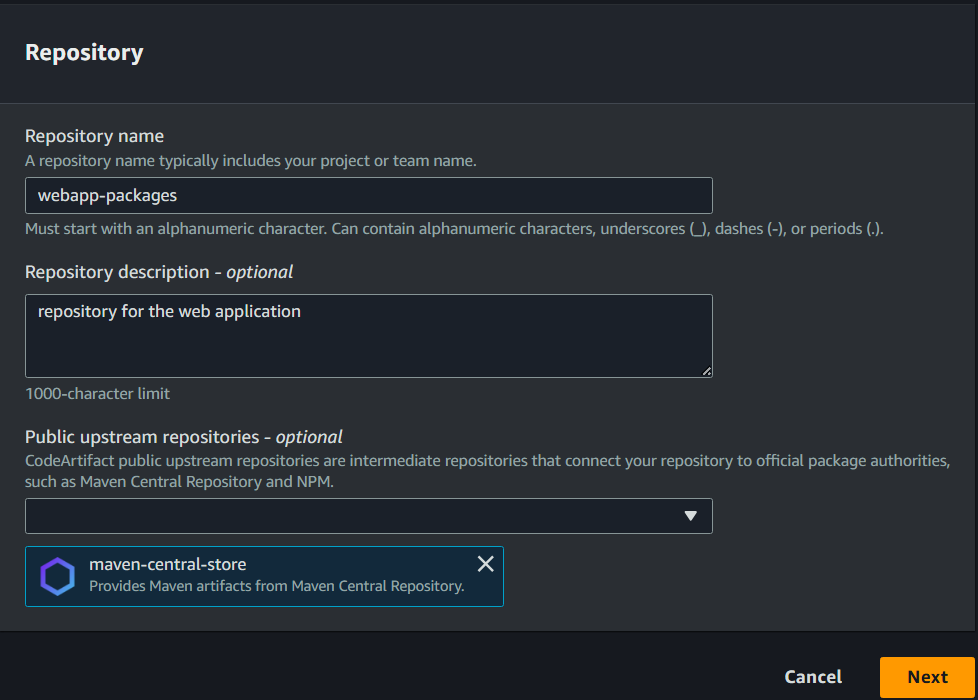
Create a new repository.
Name:
webapp-packages.Description:
Packages for the web app.Public upstream repository:
maven-central-store.
What is the public upstream repository?
Your public upstream repository isn't the same as the nextwork-packages repository you're setting up! Check out the brief description under "maven-central-store" - it provides artifacts from the "Maven Central Repository."
Let's simplify how these repositories work together:
- Your local repository (like nextwork-packages): Think of this as your personal toolbox where you store all the software packages you've downloaded to your computer (in this case, the local computer is the EC2 instance running your EC2 server environment). When Maven builds your project, it first looks in your local repository to see if the needed packages are already there.
2. Public upstream repository (i.e. maven-central-store): If the needed packages are not in your local repository, Maven then checks your upstream repository. This is like visiting a local hardware store that's set up closer to your home. It doesn't have everything, but it stores a lot of tools that developers often use. Instead of driving far to a big warehouse every time, you go to this local store because it's faster and more convenient. This store also gets its supply from the big warehouse (Maven Central Repository) and keeps a backup, so even if the warehouse has problems, you can still get your tools.
3. Maven Central Repository: This is the huge warehouse that stores a vast amount of tools and supplies. It's open to everyone across the world. While it has a comprehensive collection, it's not practical to go there for every single thing because it might be slower due to distance and high traffic. Maven would visit the Maven Central Repository if a required package is not available in maven-central-store.
Why do we select maven-central-store?
We choose maven-central-store as our upstream repository because it’s connected to the biggest and most reliable library for Java packages (Maven Central Repository). We want to link it to our CodeArtifact to make sure CodeArtifact will make backups of the packages there.
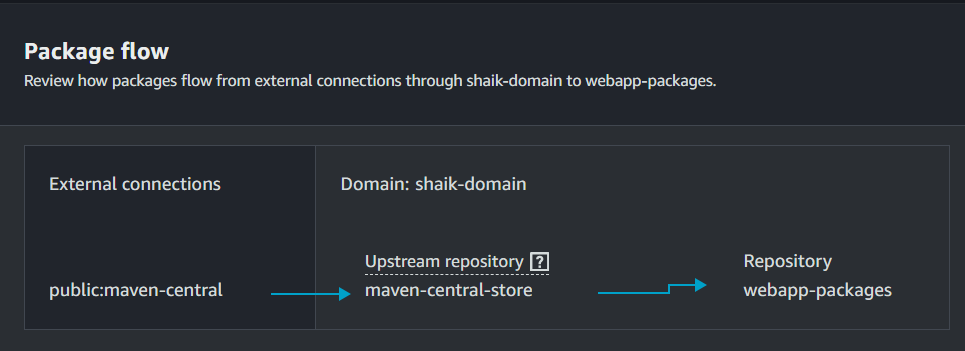
In the review page, keep note of the
Package flowsection that visualizes how there will be two repositories created as part of the process.What's in the package flow?
Notice how our package flow touches on the three repositories we covered just now:
1. public:maven-central: The vast package library on the internet where all sorts of Java tools and materials are kept. It’s the main hub that supplies packages to other repositories, like maven-central-store.
2. Upstream repository (maven-central-store): Your contact point to the big library (Maven Central), helping us get and store new tools when we need them for your toolbox.
3. Local repository (nextwork-packages): The personal toolbox where you keep all the specific tools and materials for your current project.
Create your repository to finish the process.
Step 3 : Connect the CodeArtifact repository
On the next page, click
View connection instructions.In the dialog, chooseMac & Linuxfor Operating system andmvnas package manager.Why are we viewing connection instructions - what are we connecting here?
TThe connection instructions will link your project environment (like your EC2 Instace) with the repositories in CodeArtifact. Without this, your development environment won't be able to fetch and store dependencies from CodeArtifact!
Why did we choose Mac & Linux for the operating system and mvn as the package manager?
Even if you're working on a Windows computer, remember that the EC2 instance we're using to run our server is using Amazon Linux 2 as its platform!
mvnstands for Maven, which is the tool we installed to manage the building process for our Java web app. This makes Maven our package manager, helping us install, update, and manage the external packages our web app uses.
Copy the command in Step 3. This will look similar to the below:

What is this command for?
"Export a CodeArtifact authorization token for authorization to your repository from your preferred shell" might sound a bit technical, but think of it as giving your Cloud9 IDE a key to unlock access to your repositories in CodeArtifact.
Run the command in your terminal connected to EC2 Instance.
You might notice that we still have a few steps left in the connection settings panel. We'll get to those in a minute, but we'll have to set up a
settings.xmlfile first.What is settings.xml? How is it different from pom.xml?
You might recall that pom.xml is a file created in your web app project that gives Maven instructions on how to build your web app. Think of it as a recipe that tells Maven the ingredients (i.e. dependencies) and how to put them together to build the app.
settings.xml is slightly different - now that Maven knows what dependencies to look for, settings.xml tells Maven where to find the dependencies and how to connect to the right repositories (e.g. the ones in CodeArtifact) to get access.
Where is my settings.xml file?
Your settings.xml file doesn't exist yet! Let's create it. Once it's created, it will pop up in your EC2 file navigator and sit underneath the pom.xml file.
Alternative way if an error appears stating no credentials found:
Note : I encountered this error during my setup, so I had to configure a few things to solve it. If you face the same issue, follow this method.Credit goes to the person who helped me with this problem solution.

You can find your AWS Access Key ID and AWS Secret Access Key in the AWS Management Console. Here are the steps to retrieve them:
Log in to the AWS Management Console: Go to AWS Management Console and log in with your AWS account credentials.
Navigate to the IAM (Identity and Access Management) service: You can find IAM under the "Security, Identity, & Compliance" section.
Select Users: In the IAM dashboard, click on "Users" in the left-hand navigation pane.
Select your user: Click on the username for which you want to retrieve the access keys.
Go to the Security credentials tab: Click on the "Security credentials" tab.
Create a new access key: If you don't already have an access key, click on the "Create access key" button. If you already have an access key, you can use it, but note that you can only have a maximum of two access keys per user.
Choose your Use Case: Given the context of the settings.xml file and the need to authenticate with AWS CodeArtifact, you should choose Command Line Interface. This is because you are configuring your local development environment to interact with AWS services via the AWS CLI.
View and download your credentials: After creating the access key, you will be shown the Access Key ID and Secret Access Key. Make sure to download the
.csvfile or copy the credentials to a secure location, as you won't be able to view the Secret Access Key again.
Once you have your AWS Access Key ID and AWS Secret Access Key, you can configure them using the aws configure command:
aws configure
Provide the required information when prompted:
  /*Example*/
  AWS Access Key ID [None]: YOUR_ACCESS_KEY_ID
  AWS Secret Access Key [None]: YOUR_SECRET_ACCESS_KEY
  Default region name [None]: YOUR_AWS_REGION
  Default output format [None]: json
Once you complete the setup of your credentials, retrieve the authorization token and set it as an environment variable:
  /*Example*/
  export CODEARTIFACT_AUTH_TOKEN=$(aws codeartifact get-authorization-token --domain domain-name --domain-owner 730335666744 --region us-east-1 --query authorizationToken --output text)
In the domain-owner field, enter your AWS account ID and the region where you created the domain.
Verify that the environment variable is set:
echo $CODEARTIFACT_AUTH_TOKENIn the EC2 Connected terminal run the following code:
  cd yourname-web-project
  echo $'<settings>\n</settings>' > settings.xml
What are these commands saying?
The first line, cd my-web-project, is telling your computer, "Go to the folder where my project files are stored.
"The second line, echo $'\n' > settings.xml, creates a new file called
settings.xmlin your project directory. If you click into your settings.xml file now, you'll notice that it already has these two lines in the file.<settings> </settings>That's because the echo command told your terminal to output the lines \n! The \n means there should be a new line in between the two brackets.
The last part of your command was > settings.xml, which tells your terminal to "take the text and put it into this new file called settings.xml."
Open the newly created
settings.xmlin your EC2 file explorer on the left hand panel.Switch tabs back to your CodeArtifact console, and follow the remaining steps in the Connection instructions dialog. i.e. copy the code in
Steps 4, 5, and 6. And add them in between the tags in settings.xml.The complete
settings.xmlfile will look like this: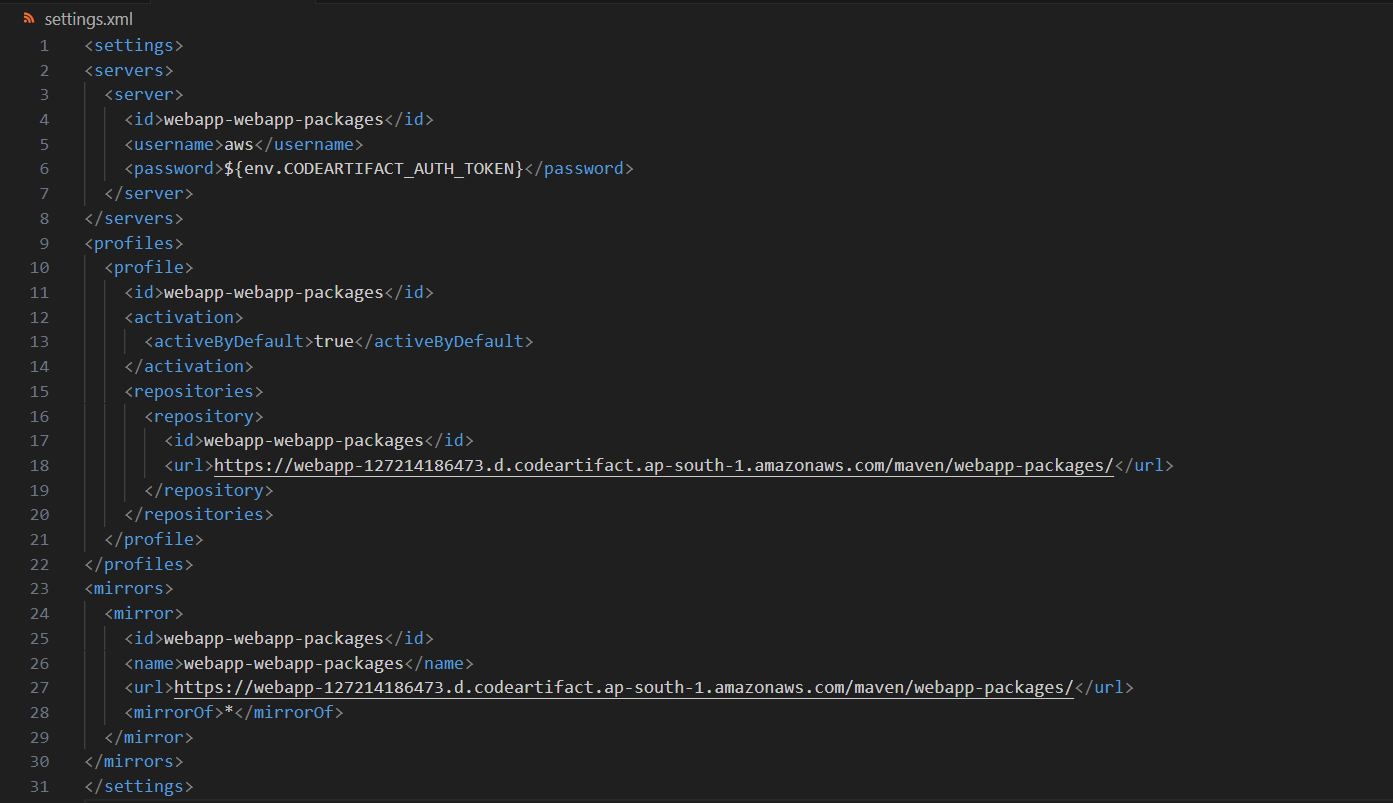
This setup ensures that your Maven build process can authenticate with AWS CodeArtifact using the token retrieved via the AWS CLI. Once there are no errors, you're good to go to the next step of the project!
Step 4 : Test Your CodeArtifact Connection via EC2
Next, compile your application using this command. Paste this in yourEC2 terminal:
mvn -s settings.xml compile.What does compiling mean?
Compiling is like translating your project's code into a language that computers can understand and execute. When you compile your project, you're ensuring everything is correctly set up and ready to become a working app.
Let’s break down this command :
mvn: Run the Maven tool.
-s settings.xml: Use the specific settings from settings.xml.
compile: Compile this project's code.

Note : If you encounter an error stating “build failure” run this command:
mvn clean install -x
// After running this even if you encounter an error run this command and again run the above command:
rm -rf ~/.m2/repository/org/yourproject
When you run
mvn clean install -X, you're asking Maven (a tool that helps manage Java projects) to do a few things:
clean: This step wipes out everything from the previous build, so you start fresh. Think of it like clearing the table before you begin a new project—it deletes old files so they don't mess with your new work.
install: This is the part where Maven builds your project. It compiles your code, runs any tests to make sure things are working, and then packages everything into a file (like a JAR). Finally, it "installs" this file into your local computer's Maven storage so other projects can use it later.
-X: This is like turning on "super details mode." It gives you a ton of extra information while Maven runs, which is helpful if something goes wrong and you need to figure out what happened.So, in short, the command cleans up old stuff, builds your project, and saves it locally, while showing you all the nitty-gritty details.
After running the above command, try using the “export command” above and start from that step again to see if everything is working smoothly!
Run the command :
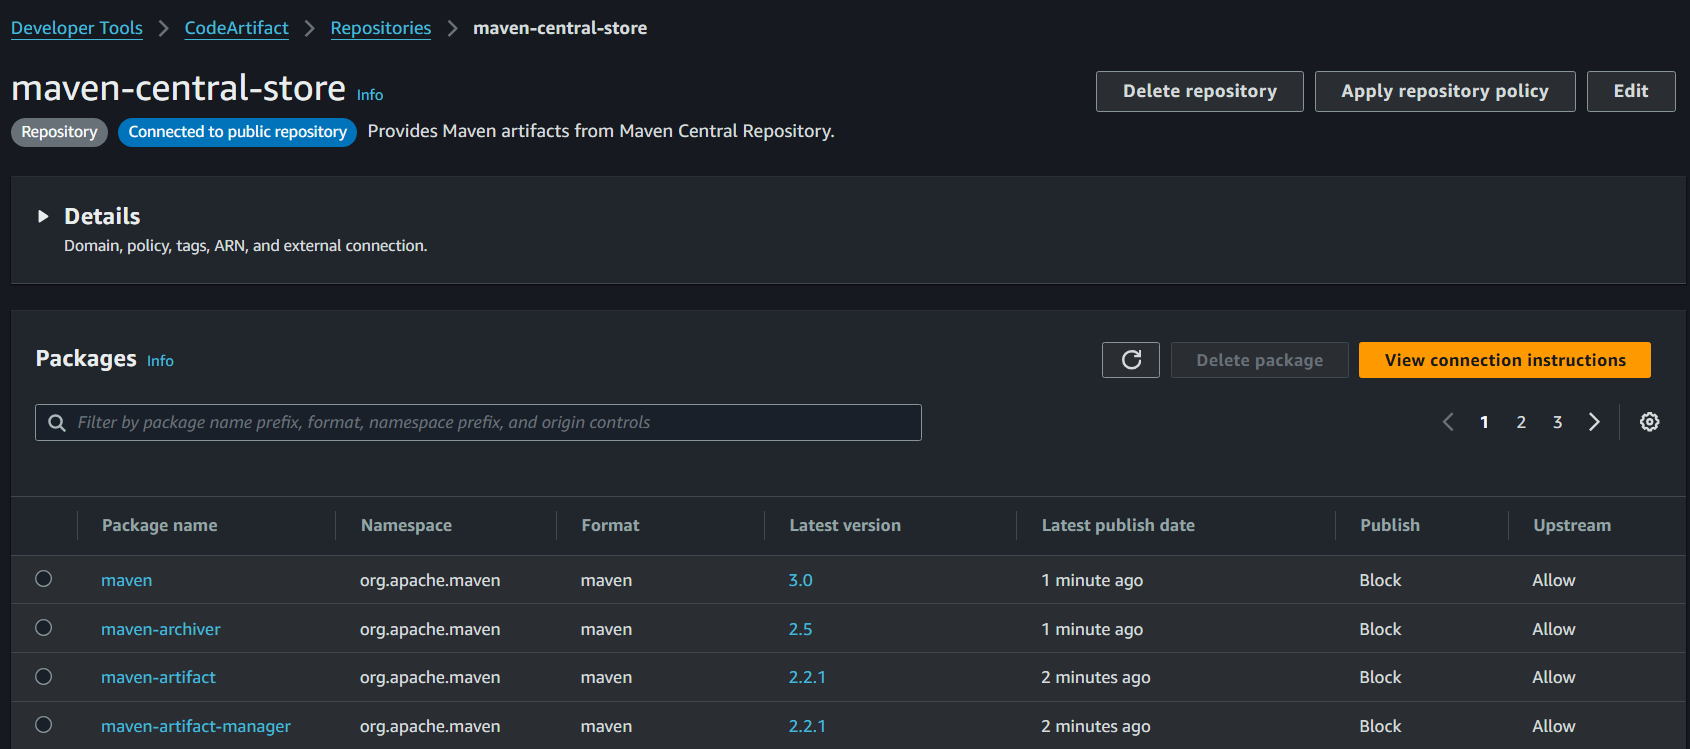
mvn -s settings.xml compile. This should be able to build successfully!!Head back to the CodeArtifact console and select your webapp-packages repository.
If your packages does not appear in the repository, changes need to me made in the
pom.xmlfile where the version should be changed from3.8.1 to 5.8.1and again try compiling the settings.xml file.For worst case scenario let’s say if the packages are still not in the repository make changes in the
pom.xmlfile:<project xmlns="http://maven.apache.org/POM/4.0.0" xmlns:xsi="http://www.w3.org/2001/XMLSchema-instance" xsi:schemaLocation="http://maven.apache.org/POM/4.0.0 http://maven.apache.org/maven-4.0.0.xsd"> <modelVersion>4.0.0</modelVersion> <groupId>com.yourname.app</groupId> <artifactId>yourname-web-project</artifactId> <packaging>war</packaging> <version>1.0-SNAPSHOT</version> <name>yourname-web-project Maven Webapp</name> <url>http://maven.apache.org</url> <dependencies> <dependency> <groupId>org.junit.jupiter</groupId> <artifactId>junit-jupiter-api</artifactId> <version>5.8.1</version> <scope>test</scope> </dependency> <dependency> <groupId>org.junit.jupiter</groupId> <artifactId>junit-jupiter-engine</artifactId> <version>5.8.1</version> <scope>test</scope> </dependency> </dependencies> <build> <plugins> <!-- Surefire plugin for running tests --> <plugin> <groupId>org.apache.maven.plugins</groupId> <artifactId>maven-surefire-plugin</artifactId> <version>3.0.0-M5</version> <!-- Replace with the latest stable version --> </plugin> </plugins> <finalName>yourname-web-project</finalName> </build> </project>Save it and run the compilation command again and voila there are packages in your repository now!!
Step 5 : Set up an IAM Policy for using CodeArtifact
In the AWS Console, search for the IAM console. Tip: Open this IAM console in a new tab! You'll be needing the CodeArtifact console again soon.
Click
Policiesin the left hand navigation panel.Click
Create policy.Select the
JSONtab.{ "Version": "2012-10-17", "Statement": [ { "Effect": "Allow", "Action": [ "codeartifact:GetAuthorizationToken", "codeartifact:GetRepositoryEndpoint", "codeartifact:ReadFromRepository" ], "Resource": "*" }, { "Effect": "Allow", "Action": "sts:GetServiceBearerToken", "Resource": "*", "Condition": { "StringEquals": { "sts:AWSServiceName": "codeartifact.amazonaws.com" } } } ] }
This policy will make sure that other DevOps services can use the packages we've just installed into our CodeArtifact repository."
“Version": "2012-10-17":This is a version number for the JSON language we're using to define this policy.
"Statement":All the lines that fall under Statement are where the rules get defined!
"Effect": "Allow":We are allowing the actions we define in the Actions section below this line. The alternative to this would've been denying the actions.
"Action": These are the specific things that we’re allowing the services to do:
"codeartifact:GetAuthorizationToken": i.e. the service get a special key to access CodeArtifact.
"codeartifact:GetRepositoryEndpoint" i.e. the service can find the exact location (URL) of the CodeArtifact repository.
"codeartifact:ReadFromRepository" i.e. the service can read or download packages from CodeArtifact.
"Resource": The asterisk () means these permissions apply to all resources. In this case, all CodeArtifact repositories.
Name the policy codeartifact- yourname-codeartifact-consumer-policy.
For the description, let's add: Provides permissions to read from CodeArtifact.
Click Create policy.
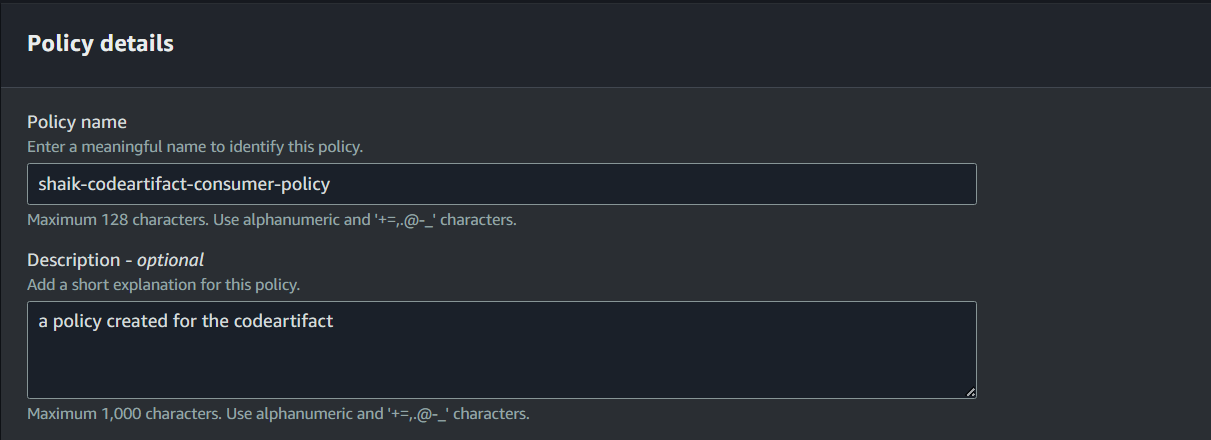
well the image description is different but it does not matter!!
Well done! we have successfully initiated the project with little difficulty but was so fun!!
Summary
We now have our working repositories which can be used by other services. Now let us move to the next part of the project so until then stay tuned..
Subscribe to my newsletter
Read articles from yyounos shaik directly inside your inbox. Subscribe to the newsletter, and don't miss out.
Written by

yyounos shaik
yyounos shaik
An Aspring Cloud Engineer