How to Deploy Sitecore XM Cloud Foundation Head to Vercel in Simple Steps
 Amit Kumar
Table of contents
- 🤯Understanding Sitecore XM Cloud Foundation Head GitHub Repo
- 🎢Prerequisites for Deployment
- 🪜Step-by-Step Guide to Deploy Sitecore XM Cloud Foundation Head Application to Vercel
- Step 1: Set Up Your Sitecore XM Cloud Application
- Step 2: Push Your Sitecore XM Cloud Application to Code Repository
- Step 3: Connect Your GitHub Repository to Vercel
- Step 4: Deploy your XM Cloud Front-end app to Vercel
- Step 5: Configure Environment Variables for Sitecore XM Cloud
- Step 6: Deploy Your Application
- Step 7: Configure Custom Domain (Optional)
- 🧠Setup Issues / Errors
- 💡Conclusion
- 🙏Credit/References
- 🏓Pingback

Deploying a Sitecore XM Cloud based front-end (Head) application to Vercel is a powerful way to leverage the performance, flexibility and scalability of Vercel’s cloud platform alongside Sitecore’s robust XM Cloud content management capabilities.
Vercel offers a seamless integration with Sitecore XM Cloud and Next.js, and its an ideal solution for deploying headless applications built on modern Jamstack architectures.
This guide will walk you through the process, ensuring a smooth deployment experience, and will be using the new restructured Sitecore XM Cloud Foundation Head GitHub Repo for deployment to Vercel.
🤯Understanding Sitecore XM Cloud Foundation Head GitHub Repo
The Sitecore XM Cloud Foundation Head (or) XM Cloud Next.js Starter Kit is a GitHub repository for Sitecore XM Cloud Development based on the Next.js framework. This repo accelerate the development and provide you the pre-built components and templates which you can use as a base to implement your functional requirements.
Recently, Sitecore restructured the XM Cloud Next.js Started Kit to make it more user friendly for Front-end development (FED) or you can say that FED-First development flow.
You can check more details about restructuring of the Sitecore XM Cloud Foundation Head at below resources:
Restructuring the Sitecore XM Cloud Foundation Head
⚒️Restructuring details of Sitecore XM Cloud Foundation Head
Below are the high-level folder structure changes made to the Sitecore XM Cloud Foundation Head (or XM Cloud Next.js Starter Kit) for a FED-First development flow.
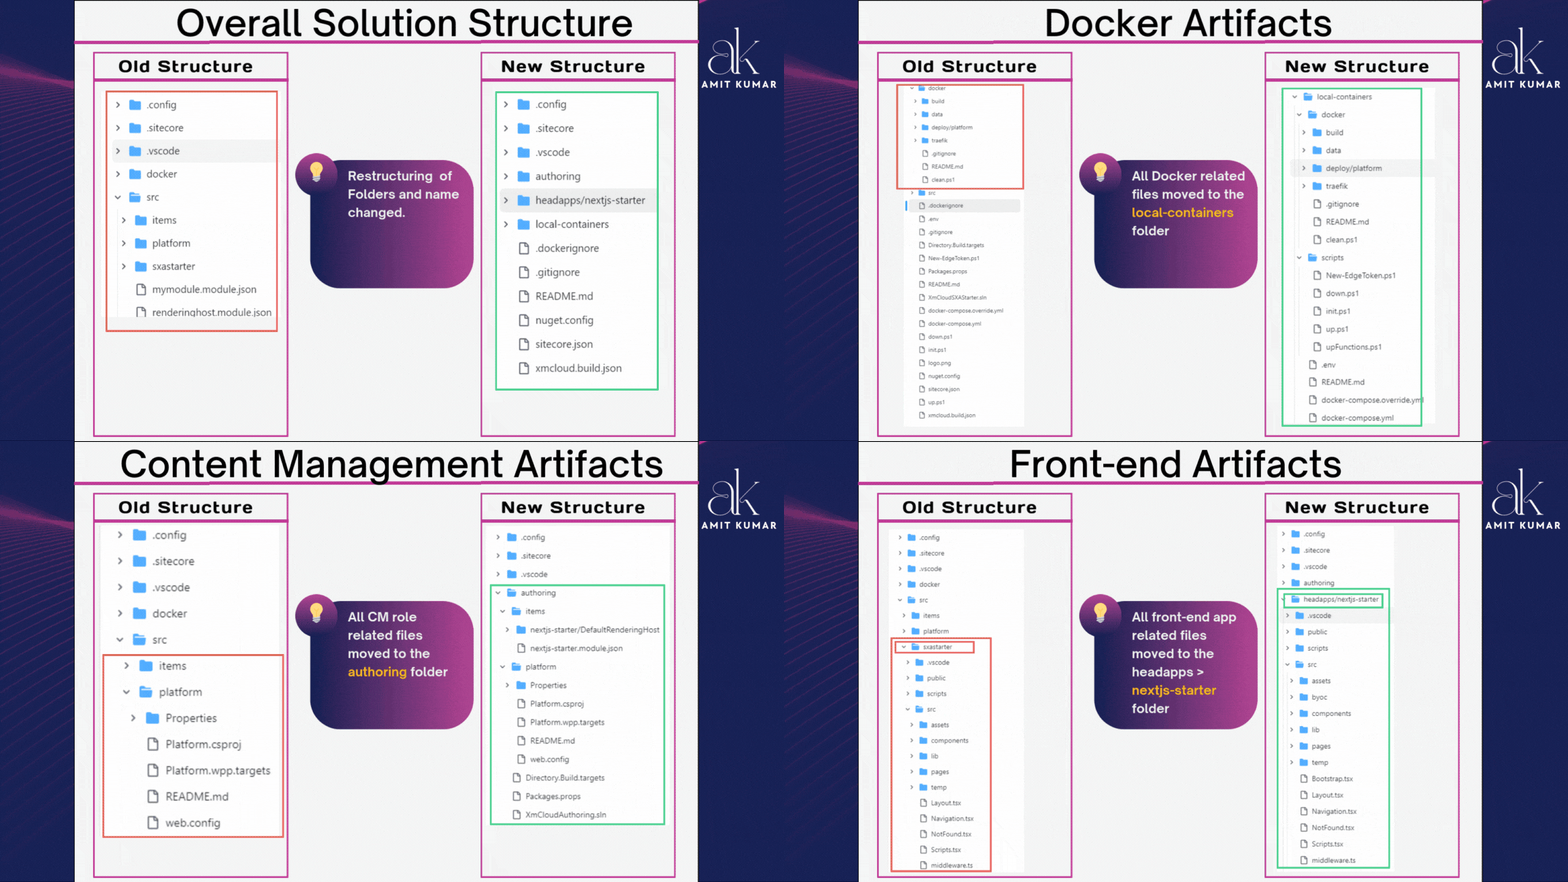
The name of the Next.js Front-end code base folder changed to nextjs-starter.
To learn more about XM Cloud, you can watch the video
🎢Prerequisites for Deployment
Before getting started with the deployment process, make sure you have the following:
Sitecore XM Cloud Instance with website setup
Sitecore XM Cloud codebase (I'm using the Sitecore’s XM Cloud Next.js Starter Kit)
Vercel account
Git repository (e.g., GitHub, GitLab)
🪜Step-by-Step Guide to Deploy Sitecore XM Cloud Foundation Head Application to Vercel
Step 1: Set Up Your Sitecore XM Cloud Application
If you already have a Sitecore XM Cloud Headless application, you can skip this step. Otherwise, follow the Sitecore documentation Getting Started with XM Cloud to create and configure your Sitecore XM Cloud Headless Front-end application. This is typically a Next.js app that communicates with the Sitecore Experience Manager (XM) through APIs and GraphQL for content retrieval.
Verify that your
next.config.jsfile is correctly set upCheck that all necessary environment variables are defined
Note: In this article, I am using the Sitecore-provided Sitecore’s XM Cloud Next.js Starter Kit.
Step 2: Push Your Sitecore XM Cloud Application to Code Repository
The easiest way to deploy your Sitecore XM Cloud Foundation Head application to Vercel is by connecting it to a your repository and in this article i am using the GitHub repository. If you haven’t already, create a GitHub repository and push your application code.
Step 3: Connect Your GitHub Repository to Vercel
Sign in to Vercel: Head over to vercel.com and sign in to your Vercel account.
Vercel Authentication with GitHub: Click on Profile icon > Account Settings > Authentication > To authenticate with GitHub
Install Vercel App on GitHub: After login to your GitHub account access the url https://github.com/apps/vercel and you need to install the Vercel to your GitHub Account and provide access to all repo https://github.com/apps/vercel
If you skip this step, you might face problems when setting up the site on Vercel
 System.Exception: Error creating a Vercel project:  {"error":{"code":"bad_request","message":"To link a GitHub repository, you need to install the GitHub integration first. Make sure there aren't any typos and that you have access to the repository if it's private.","action":"Install GitHub App","link":"https://github.com/apps/vercel","repo":"xxxxxxx"}}
  ---> Flurl.Http.FlurlHttpException: Call failed with status code 400 (Bad Request): POST https://api.vercel.com/v8/projects
    at Flurl.Http.FlurlRequest.HandleExceptionAsync(FlurlCall call, Exception ex, CancellationToken token)
    at Flurl.Http.FlurlRequest.SendAsync(HttpMethod verb, HttpContent content, CancellationToken cancellationToken, HttpCompletionOption completionOption)
    at Flurl.Http.FlurlRequest.SendAsync(HttpMethod verb, HttpContent content, CancellationToken cancellationToken, HttpCompletionOption completionOption)
    at Flurl.Http.ResponseExtensions.ReceiveJson[T](Task`1 response)
Step Details
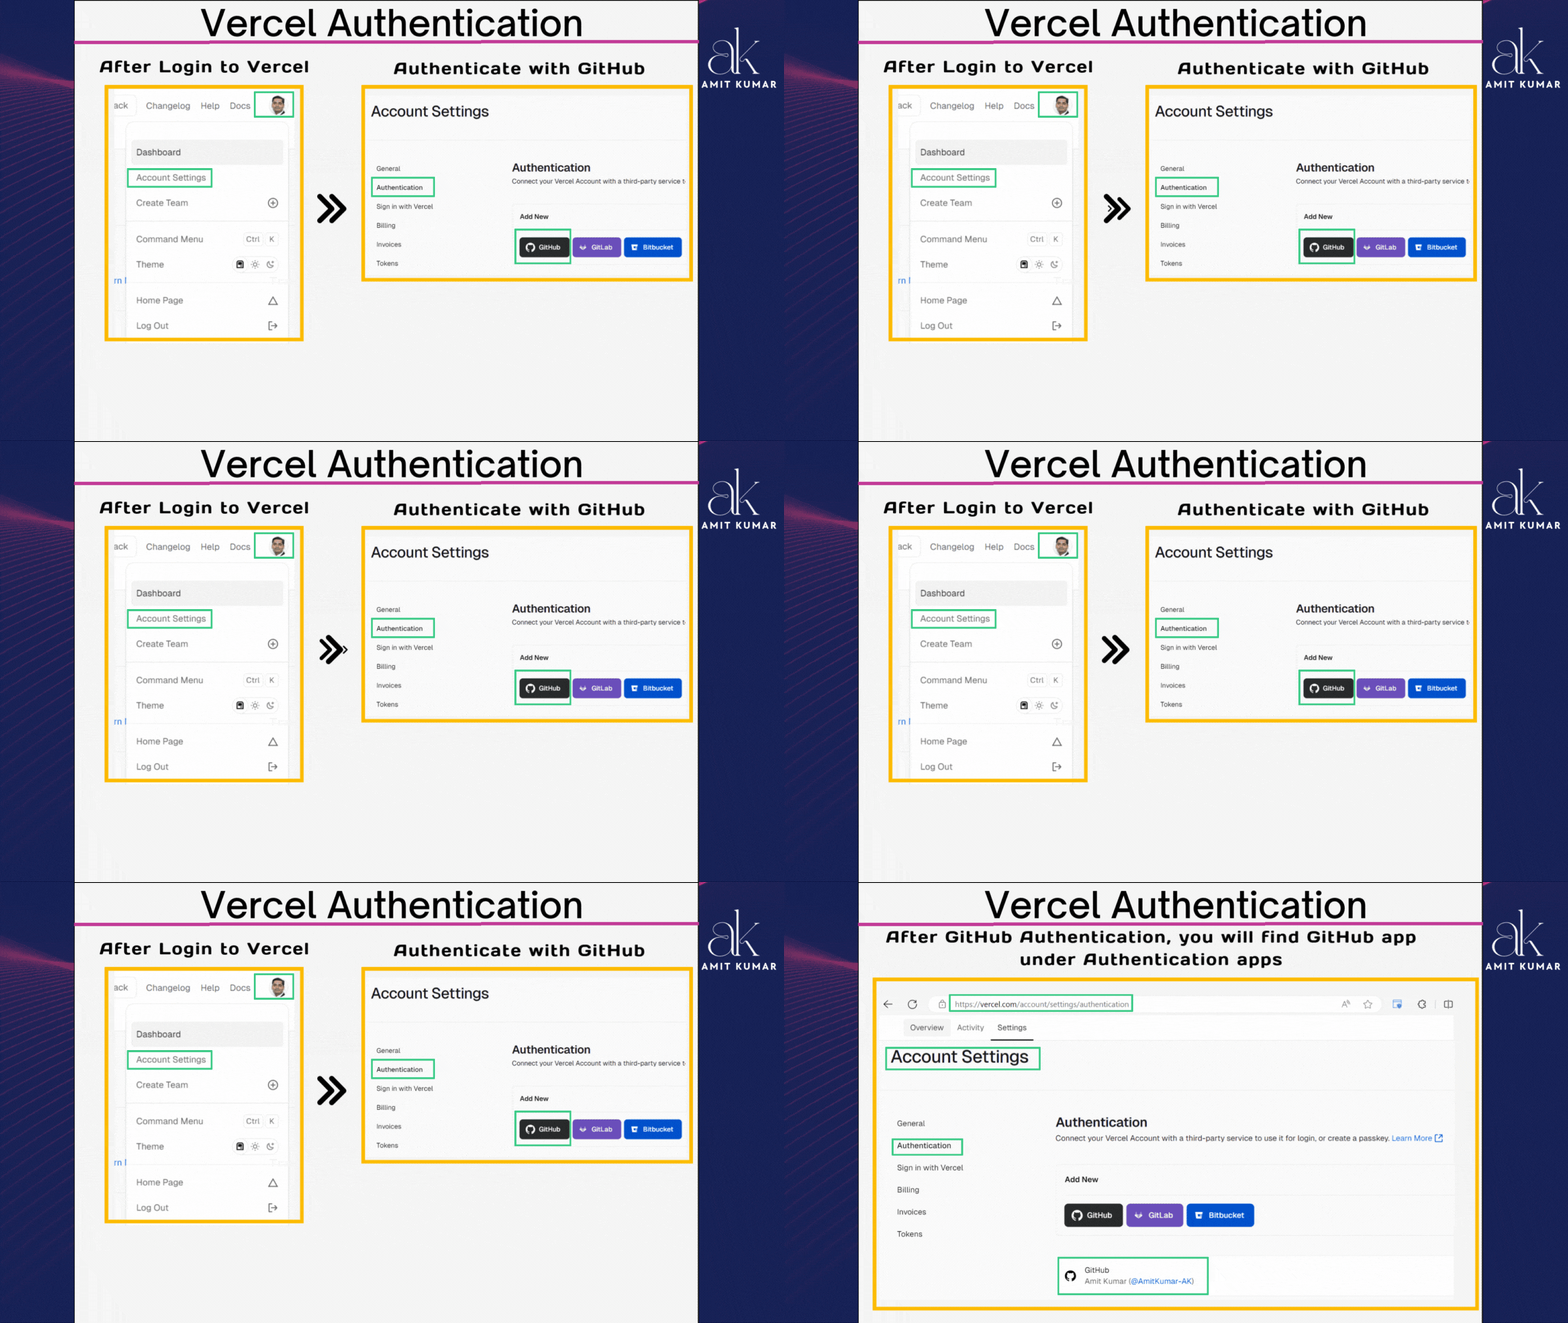
Step 4: Deploy your XM Cloud Front-end app to Vercel
Sign in to Vercel: Head over to vercel.com and sign in to your Vercel account.
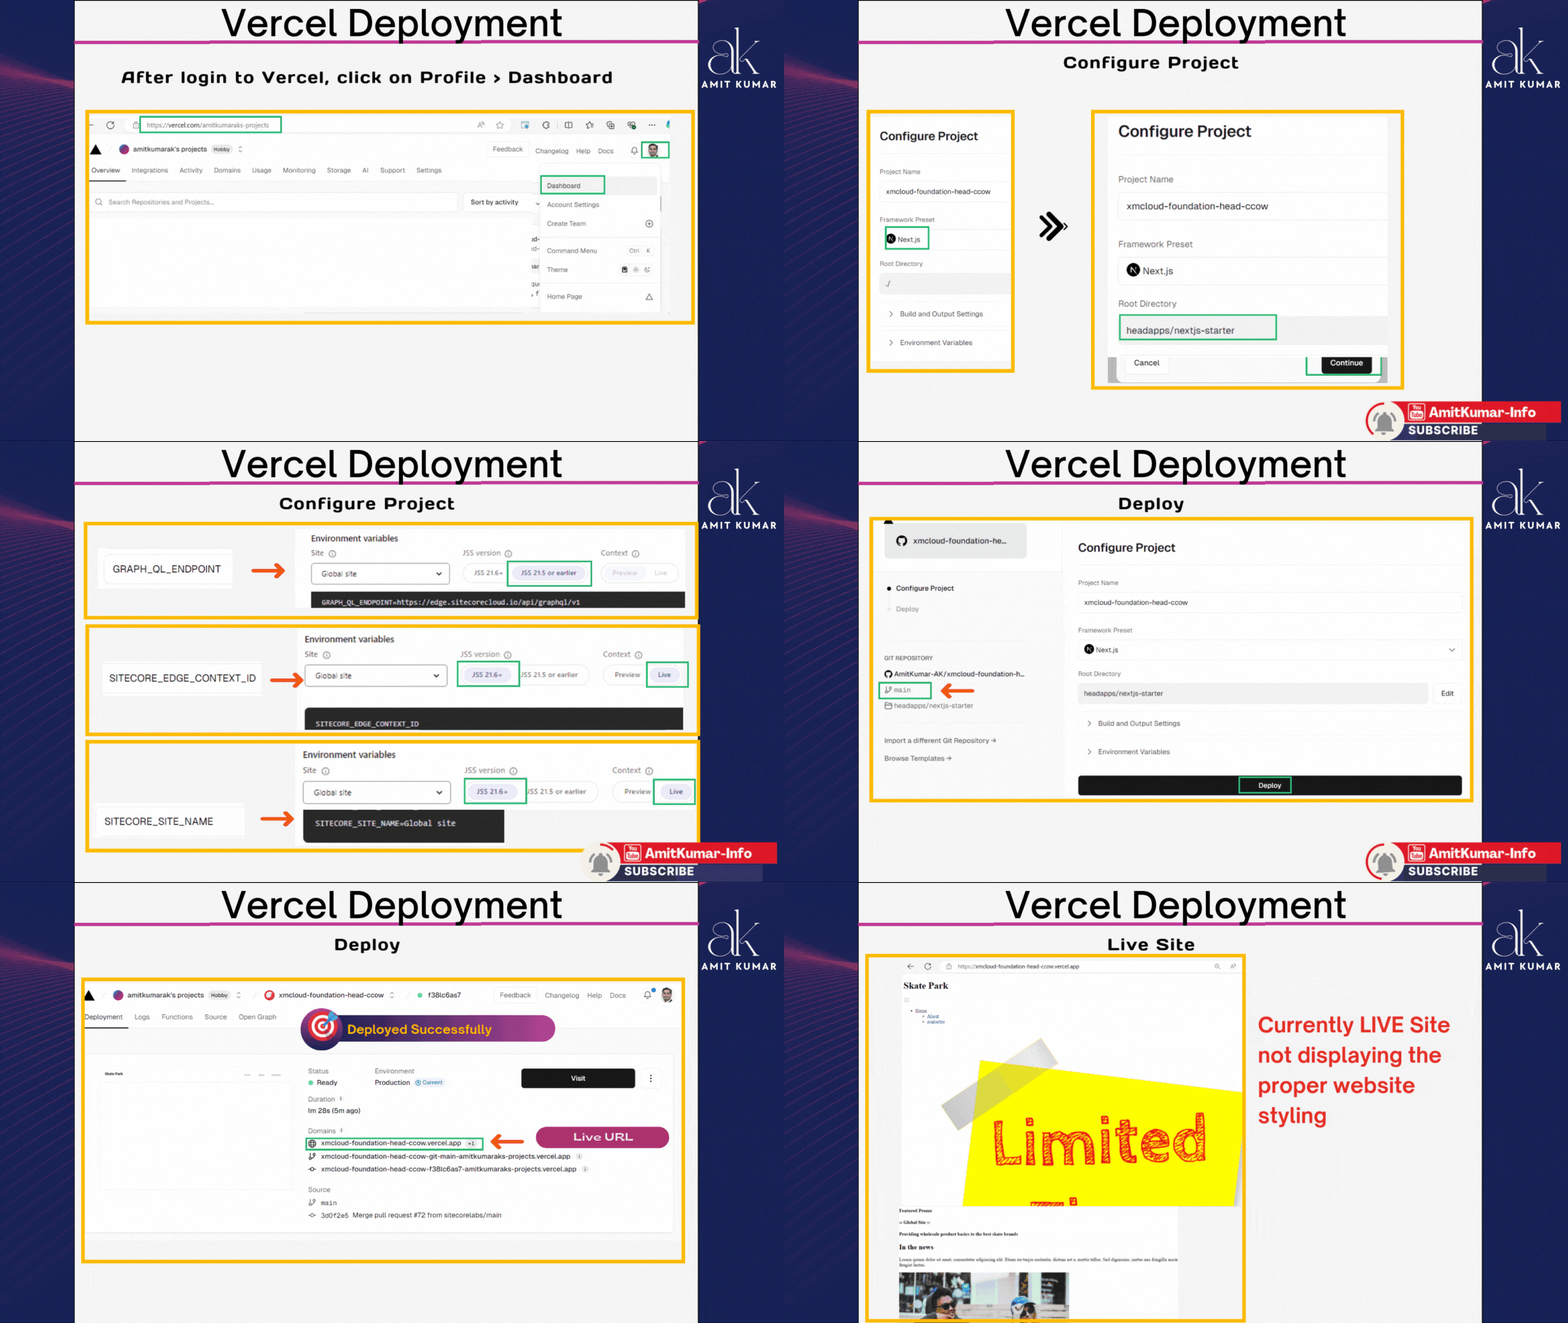
Import Your Project: Go to Dashboard > Add New > on “New Project” in your Vercel dashboard and select “Import Git Repository.” Vercel will ask to select your GitHub account > Code Repository (By default
mainbranch selected)Select Framework: Choose the framework used in your code base, in our case we are using Next.js so select the Next.js.
Select the Front-end app folder: From code repository folder structure select the folder where your Sitecore XM Cloud Foundation Head application is stored (
nextjs-starter).Configure Project Settings: You can customize the settings here, such as environment variables, branch, domain name and build output.
Step 5: Configure Environment Variables for Sitecore XM Cloud
Your Sitecore XM Cloud Head application needs to connect with the XM Cloud environment for content retrieval, which requires API keys, endpoint URLs, and other configuration details.
Add Environment Variables in Vercel:
Sitecore GraphQL Endpoint: Add the
GRAPH_QL_ENDPOINTfor your Sitecore XM Cloud instance.Sitecore Site Name: You may be having multiple sites in the XM Cloud and Vercel will be showing the SINGLE site per instance so you need to provide the site name, add the
SITECORE_SITE_NAME.Sitecore XM Cloud Context ID: Use the Context ID environment variable from your XM Cloud environment (
PREVIEWorLIVE) , add theSITECORE_EDGE_CONTEXT_ID.
In the Vercel dashboard, go to Settings > Environment Variables and add these variables.

Step 6: Deploy Your Application
Once the environment variables are set, you’re ready to deploy your application.
Trigger the Build: Vercel will automatically detect changes in the GitHub repository and start the build process. You can also manually trigger a deployment from the Vercel dashboard by clicking “Deploy.”
Monitor the Build: Vercel will show the progress of the deployment in real-time. The system automatically handles the optimization of your Next.js application, including static file generation and serverless function deployment.
View Your Deployed Application: Once the deployment is complete, Vercel provides a live URL where you can view your application. This URL is linked to your Vercel account and can be customized to use a
custom domainif needed.Look at the screenshots for steps 4 to 6: 👇
Step 7: Configure Custom Domain (Optional)
If you want to deploy your Sitecore XM Cloud Head application on a custom domain, Vercel allows for seamless domain management.
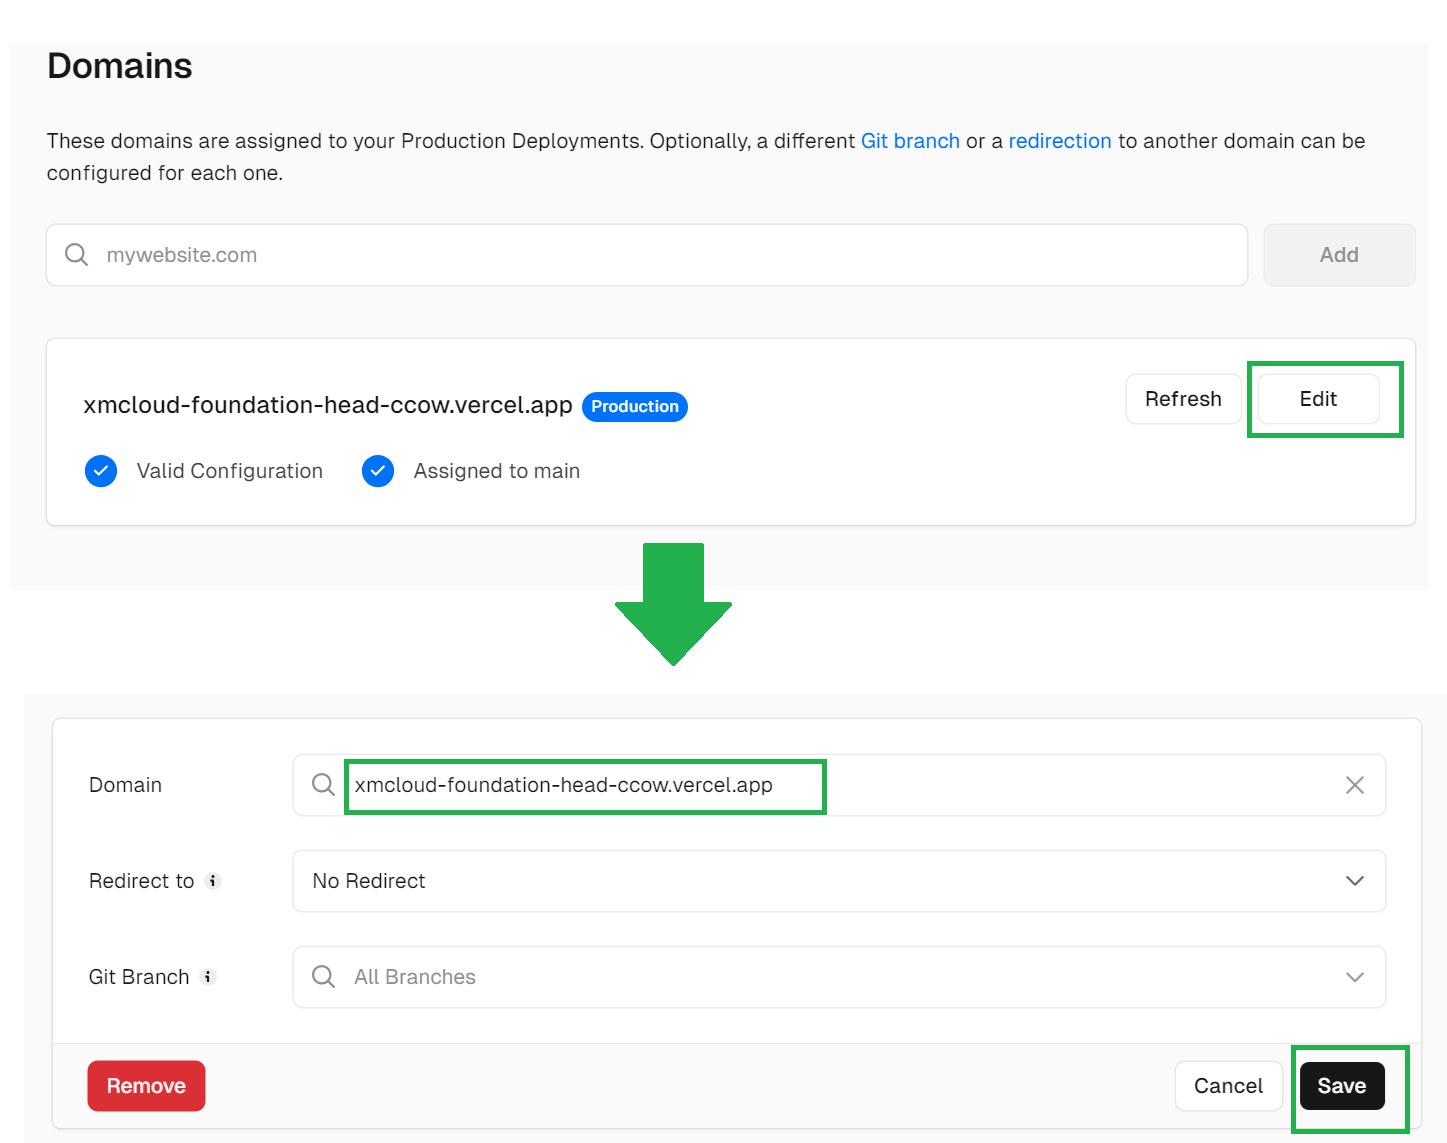
Add Custom Domain in Vercel: In the Vercel dashboard, go to the Domains section and add your custom domain.
Update DNS Settings: Update your DNS provider to point to Vercel’s nameservers, allowing your custom domain to route traffic to the deployed application.
🧠Setup Issues / Errors
When deploying a Sitecore XM Cloud application to Vercel, you might run into some problems. Here are a few issues I faced, which might help you when setting up your Sitecore XM Cloud application on Vercel.
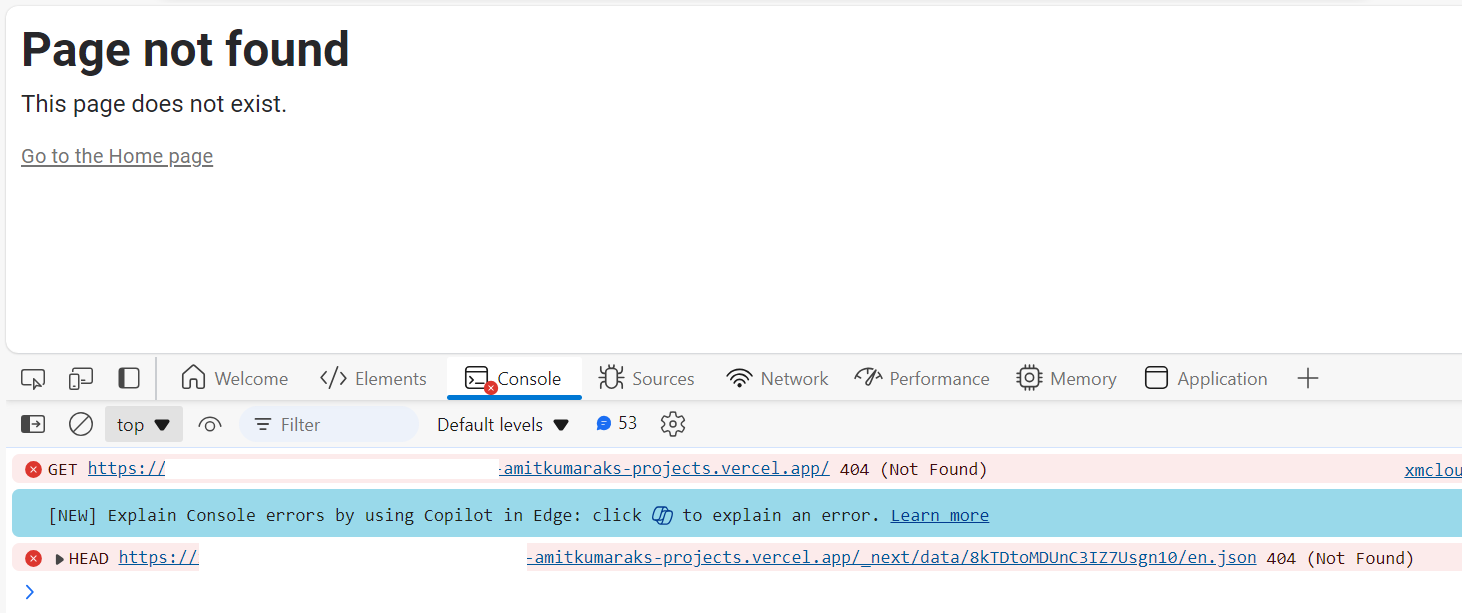
Sitecore XM Cloud Vercel - Page Not Found
If you only add the following environment variables to Vercel, you will encounter a Page Not Found error when trying to access the live URL of your XM Cloud website:
Environment Variables Added in Vercel:
SITECORE_API_KEY
GRAPH_QL_ENDPOINT
JSS_APP_NAME
To fix the XM Cloud Page Not Found error, add the SITECORE_EDGE_CONTEXT_ID environment variable.
Error:
Error occurred while fetching static paths
RangeError: Site "nextjs-starter" does not exist or site item tree is missing
    at MultisiteGraphQLSitemapService.<anonymous> (/vercel/path0/headapps/nextjs-starter/node_modules/@sitecore-jss/sitecore-jss-nextjs/dist/cjs/services/base-graphql-sitemap-service.js:180:27)
    at Generator.next (<anonymous>)
    at fulfilled (/vercel/path0/headapps/nextjs-starter/node_modules/@sitecore-jss/sitecore-jss-nextjs/dist/cjs/services/base-graphql-sitemap-service.js:5:58)
    at process.processTicksAndRejections (node:internal/process/task_queues:95:5)
   Generating static pages (0/2) ...
Sitecore XM Cloud Vercel - 500 Internal Server Error
If you only add the following environment variables to Vercel, you will encounter a 500 Internal Server Error when trying to access the live URL of your XM Cloud website:
Environment Variables Added in Vercel:
SITECORE_API_KEY
GRAPH_QL_ENDPOINT
JSS_APP_NAME
SITECORE_EDGE_CONTEXT_ID
To fix the XM Cloud Page Not Found error, add the SITECORE_SITE_NAME environment variable.
Error:

Sitecore XM Cloud Vercel - CSS and JS Loading Issues
If you only add these environment variables to Vercel, you will have a problem where static resources like CSS and JavaScript files don't load. This happens because it's not using your XM Cloud Application's DOMAIN name and is instead pointing to the deployment domain name.
Environment Variables Added in Vercel:
SITECORE_API_KEY
GRAPH_QL_ENDPOINT
JSS_APP_NAME
SITECORE_EDGE_CONTEXT_ID
SITECORE_SITE_NAME
To fix the XM Cloud not loading CSS and JavaScript files you have to add the PUBLIC_URL environment variable:
To load static resources from relative URL, set empty string for
PUBLIC_URL=environment variableTo load static resources from absolute URL, set head application domain name like
PUBLIC_URL=https://enlightenwithamit.hashnode.dev
To resolve this issue, I tried using the VERCEL_URL environment variable, but it didn’t work.
Sitecore: Also, if defined, PUBLIC_URL takes precedence over the Vercel/Netlify environment variables (used in Vercel/Netlify deployments).
Error:

💡Conclusion
Deploying a Sitecore XM Cloud Foundation Head application to Vercel is a straightforward process that allows you to take full advantage of modern cloud-based infrastructure. Vercel’s seamless integration with Next.js, automatic deployment capabilities, and global CDN ensure that your headless Sitecore application runs efficiently and scales effortlessly.
By following the steps outlined above, you can deploy your Sitecore XM Cloud application on Vercel, configure environment variables, set up preview mode, and manage custom domains. This powerful combination of Sitecore’s content management capabilities and Vercel’s modern deployment platform empowers you to deliver fast, scalable, and dynamic web experiences.
🙏Credit/References
🏓Pingback
| Maximizing Digital Experiences: Integrating XM Cloud Forms with Sitecore Composable Products | Search options in Sitecore XM Cloud | What is Sitecore XM Cloud? |
| What is XM Cloud? Part -1 Video | What is Sitecore Search? | Sitecore Search RSS Feed |
| Content Indexing with Sitecore Search | SXA Clone Rendering | Sitecore SXA Clone Rendering 🔝 |
| XM Cloud - Deploy your first Headless SXA site to Vercel | Deployments Sitecore Vercel Sitecore XM Cloud | Sitecore XM Cloud Next.js Starter |
| Deploying Next.js Rendering Host to Vercel | Controlling deployments into XM Cloud and Vercel | Vercel deployment sitecore xm cloud tutorial |
| Vercel deployment sitecore xm cloud download | Sitecore XM Cloud Vercel | Sitecore XM Cloud NextJS |
| Vercel deployment sitecore xm cloud github | sitecore 10 topology | Get started with XM Cloud Component 🔝 |
| Sitecore XM Cloud login | Sitecore XM Cloud Tutorial | Sitecore XM Cloud local setup |
| Migrating to XM Cloud | Sitecore XM Cloud Foundation Head | Migrating the XM Cloud Introduction Repository |
| sitecore headless | Sitecore GitHub | XM Cloud Starter Kit |
| create component in sitecore xm cloud | sitecore xm cloud | sitecore xm |
| sitecore xm architecture | sitecore xm vs xp | sitecore create component sitecore in azure |
| Sitecore XM Cloud Accelerator | Sitecore Experience Cloud | Sitecore-jss github 🔝 |
| Sitecore Pages local | Sitecore XM Cloud GitHub | Images are not getting displayed on Vercel site |
| How to deploy web to Vercel? | sitecore xm cloud certification | sitecore xm cloud developer certification exam |
| Can an API be deployed to Vercel? | What is Sitecore XM Cloud? | Does Vercel host frontend? |
| Sitecore xm cloud deployment to vercel tutorial | Vercel's Frontend Cloud - One-Click Deployments | xm cloud - images not loading in rendering host and vercel url 🔝 |
| Unable to access subpages in multisite NextJS+XM Cloud | Issue with XM Cloud Environment Variables in Next.js | Sitecore xm cloud deployment to vercel github |
| Rendering Host not opening in my local after taking latest XM | Vercel and Sitecore XM Cloud Integration | How to Create Custom Error Pages in Sitecore XM Cloud |
| Sitecore XM Cloud Pages Suddenly Stopped Rendering | NextJS deployed to Vercel: 404 page not found | Sitecore XM Cloud Basic – From Creating Project To Hosting |
| Sitecore xm cloud vercel page not found 404 error | Sitecore XM Cloud NextJS | Sitecore XM Cloud pricing |
| Sitecore XM Cloud local setup | XM Cloud documentation | Sitecore XM Cloud logo 🔝 |
Subscribe to my newsletter
Read articles from Amit Kumar directly inside your inbox. Subscribe to the newsletter, and don't miss out.
Written by

Amit Kumar
Amit Kumar
My name is Amit Kumar. I work as a hands-on Solution Architect. My experience allows me to provide valuable insights and guidance to organizations looking to leverage cutting edge technologies for their digital solutions.As a Solution Architect, I have extensive experience in designing and implementing robust and scalable solutions using server-side and client-side technologies. My expertise lies in architecting complex systems, integrating various modules, and optimizing performance to deliver exceptional user experiences. Additionally, I stay up-to-date with the latest industry trends and best practices to ensure that my solutions are always cutting-edge and aligned with business objectives.