Scaling Backend Servers with Messaging Queues: A Deep Dive Using BullMQ
 Shivang Yadav
Table of contents
- 1. Why Messaging Queues Are Essential for Backend Scalability
- 2. How Messaging Queues Work
- 3. Introducing BullMQ Concepts
- 4. Implementing a Messaging Queue System with BullMQ
- Job Options in BullMQ
- Common Queue Events in BullMQ
- 5. Using RedisInsight for Monitoring BullMQ Jobs
- 6. Where and When to Use Queues in Your Backend
- 7. Best Practices for Scaling with BullMQ
- Conclusion

Scaling backend infrastructure is one of the most critical steps in handling growing traffic and ensuring smooth operation under heavy loads. As systems grow, a single server processing all the tasks synchronously can become a bottleneck. This is where messaging queue systems like BullMQ come into play. By offloading tasks and distributing them across worker processes, you can make your application scalable, reliable, and fault-tolerant.
1. Why Messaging Queues Are Essential for Backend Scalability
In a typical backend system, certain operations—like sending emails, processing large data files, handling third-party API calls—can take significant time. If these operations are performed synchronously within the main server, they block other tasks, causing delays and reducing system throughput.
Key problems without queues:
Synchronous processing: Every request waits until the operation is completed, slowing down response time.
Resource overuse: Tasks like video processing or data-intensive computations consume CPU/memory, reducing the capacity to handle incoming requests.
No fault tolerance: If a task fails, the entire request might need to be retried, leading to inefficiencies.
Messaging queues solve these problems by enabling asynchronous task processing:
Decoupling: The main server can offload long-running tasks to a queue and focus on handling incoming requests.
Resiliency: Queued tasks can be retried, delayed, and processed independently by worker processes.
Scalability: You can add more workers to handle an increasing load without affecting the main application.
2. How Messaging Queues Work
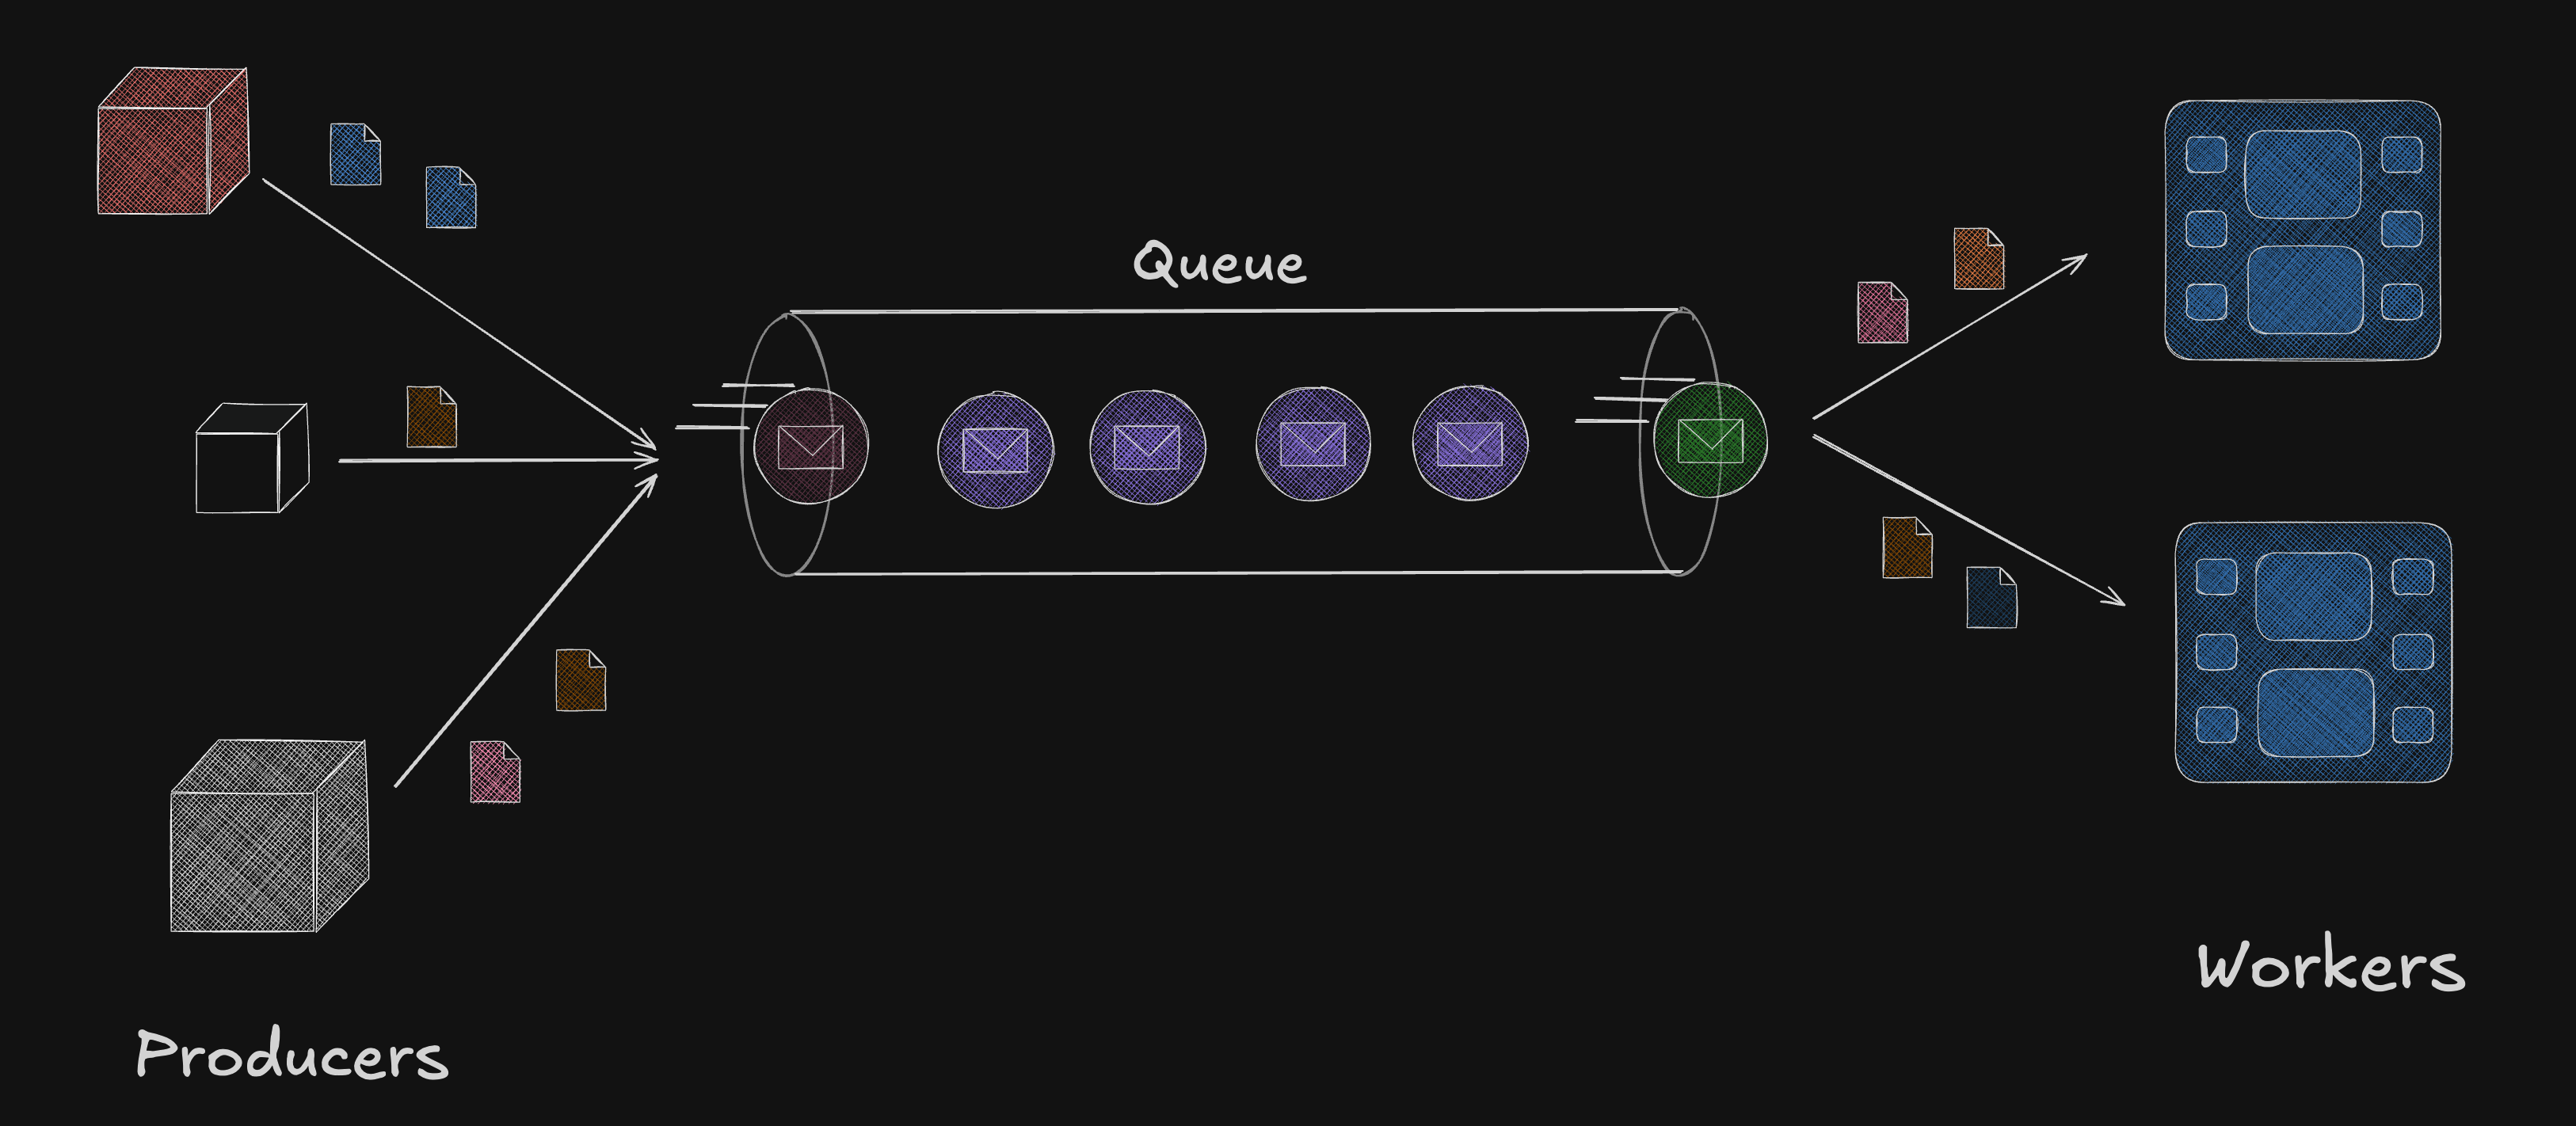
Messaging queues introduce a producer-consumer model:
Producer: The part of the system that generates tasks (e.g., API request handler).
Queue: A message broker that stores tasks until they are processed.
Consumer: Worker processes that consume tasks from the queue and process them independently.

BullMQ, a popular choice for Node.js, is built on top of Redis. It handles job queuing, retries, delays, and more. Let’s see how you can use BullMQ to implement a scalable architecture.
3. Introducing BullMQ Concepts
Before we dive into the implementation, let’s familiarize ourselves with some key concepts and terms in BullMQ:
Queue: The queue is the central point of interaction. It is where jobs are added (by producers) and where workers (consumers) process these jobs.
Job: A job is the actual unit of work added to the queue. It consists of:
Job Data: Custom data needed to process the job (e.g., email content, user details).
Job Options: Metadata like retries, delays, priority, and timeout settings.
Worker: A worker is a process that consumes jobs from a queue and executes them. It is responsible for processing jobs asynchronously.
Producer: Any part of your application that adds jobs to a queue. Typically, API requests or background tasks act as producers.
Consumer: The worker that processes jobs from the queue.
Job Lifecycle: Jobs in BullMQ go through various states like waiting, active, completed, failed, delayed, and more.
Redis: BullMQ uses Redis as the message broker to persist job data, manage job states, and allow communication between producers and consumers.
4. Implementing a Messaging Queue System with BullMQ
In this section, we'll build a task processing system using BullMQ to scale a Node.js backend.
Step 1: Install BullMQ and Redis
First, install BullMQ and Redis as dependencies in your project. Redis will act as the backend for our queue.
npm install bullmq redis
Ensure that Redis is installed and running on your system. You can install Redis using Docker:
docker run -d --name redis -p 6379:6379 redis
Step 2: Setting Up the Queue
Let’s create a queue for processing email notifications, a common use case in many applications.
import { Queue } from 'bullmq';
import Redis from 'ioredis';

// Set up a connection to Redis
const connection = new Redis();

// Create a queue
const emailQueue = new Queue('emailQueue', { connection });

export default emailQueue;
In this setup, emailQueue is a queue that will handle email notification jobs.
Step 3: Adding Jobs to the Queue
When a new user signs up or an event triggers an email, instead of sending the email directly, we can offload the task to the emailQueue.
// addJob.js
import emailQueue from './emailQueue';

async function sendEmailJob(data) {
  await emailQueue.add('sendEmail', {
    recipient: data.email,
    subject: 'Welcome to our platform',
    body: 'Thanks for signing up!'
  });
}

// Usage in API endpoint
app.post('/signup', async (req, res) => {
  const user = await createUser(req.body);

  // Add email sending task to the queue
  await sendEmailJob({ email: user.email });

  res.status(201).json({ message: 'User created. Email will be sent shortly.' });
});
Here, the user sign-up handler doesn’t wait for the email to be sent but offloads the task to the queue.
Step 4: Processing the Queue with Workers
Now, we need a worker to consume tasks from the emailQueue and send the emails. Workers run independently of the main server and can be scaled horizontally to handle high volumes of tasks.
// emailWorker.js
import { Worker } from 'bullmq';
import nodemailer from 'nodemailer';
import Redis from 'ioredis';

// Redis connection
const connection = new Redis();

// Nodemailer transport for sending emails
const transporter = nodemailer.createTransport({
  service: 'gmail',
  auth: {
    user: 'your-email@gmail.com',
    pass: 'your-password',
  },
});

// Worker to process email jobs with retry logic
const emailWorker = new Worker('emailQueue', async (job) => {
  const { recipient, subject, body } = job.data;

  try {
    // Send email
    await transporter.sendMail({
      from: '"Your App" <your-email@gmail.com>',
      to: recipient,
      subject,
      text: body,
    });
    console.log(`Email sent to ${recipient}`);
  } catch (error) {
    console.error(`Failed to send email to ${recipient}:`, error.message);
    throw error; // This will trigger a retry if attempts are configured
  }
}, {
  connection
});

// Event listener for failed jobs
emailWorker.on('failed', (job, err) => {
  console.error(`Job failed ${job.id} with error: ${err.message}`);
});
The worker listens to the queue, consumes jobs, and processes them asynchronously. If the email sending fails, BullMQ will retry the job based on the configuration.
Step 5: Scaling the Workers
When traffic increases, a single worker might not be enough. You can scale your application by simply adding more workers:
node emailWorker.js
node emailWorker.js
node emailWorker.js
Each worker will fetch and process jobs concurrently, allowing your system to handle higher loads.
Job Options in BullMQ
While adding jobs to a queue, you can pass job options to control how the job behaves during its lifecycle. These options allow you to fine-tune when and how jobs are processed, retried, delayed, or scheduled.
await queue.add(jobName, data, options);
Some commonly used job options include:
delay: Delay the job by
xmilliseconds before processing. For example, delay an email notification to be sent 1 minute after a user registers.await queue.add('sendEmail', jobData, { delay: 60000 }); // 60 seconds delayattempts: The number of times to retry the job if it fails. For example, retry sending an email up to 3 times.
await queue.add('sendEmail', jobData, { attempts: 3 });backoff: Set a backoff strategy for job retries. This can be either fixed or exponential, specifying the delay between retry attempts.
await queue.add('sendEmail', jobData, { attempts: 3, backoff: { type: 'exponential', delay: 5000 } });lifo: Use a LIFO (Last In, First Out) processing order instead of the default FIFO (First In, First Out). Newer jobs will be processed before older ones if this is set to true.
await queue.add('processData', jobData, { lifo: true });priority: Jobs with higher numeric priority values are processed before those with lower priority. Use this to prioritize critical tasks.
await queue.add('criticalTask', jobData, { priority: 1 });repeat: You can configure jobs to run on a recurring schedule (like cron jobs) using this option.
await queue.add('dailyReport', jobData, { repeat: { cron: '0 0 * * *' } }); // Runs daily at midnight
Common Queue Events in BullMQ
BullMQ provides a rich set of events that allow you to track the state and progress of jobs. These events are especially useful for logging, debugging, and monitoring the system. Some of the key events include:
waiting: This event is emitted when a job is added to the queue and is waiting to be processed.
active: Fired when a job has been started by a worker and is actively being processed.
completed: Emitted when a job is processed successfully by a worker.
failed: This event is fired when a job fails due to an error during processing.
paused: Triggered when a queue is paused, meaning no new jobs will be processed.
resumed: Fired when a paused queue is resumed.
cleaned: This event is triggered when jobs are cleaned up (e.g., old completed jobs are removed due to storage limits).
5. Using RedisInsight for Monitoring BullMQ Jobs
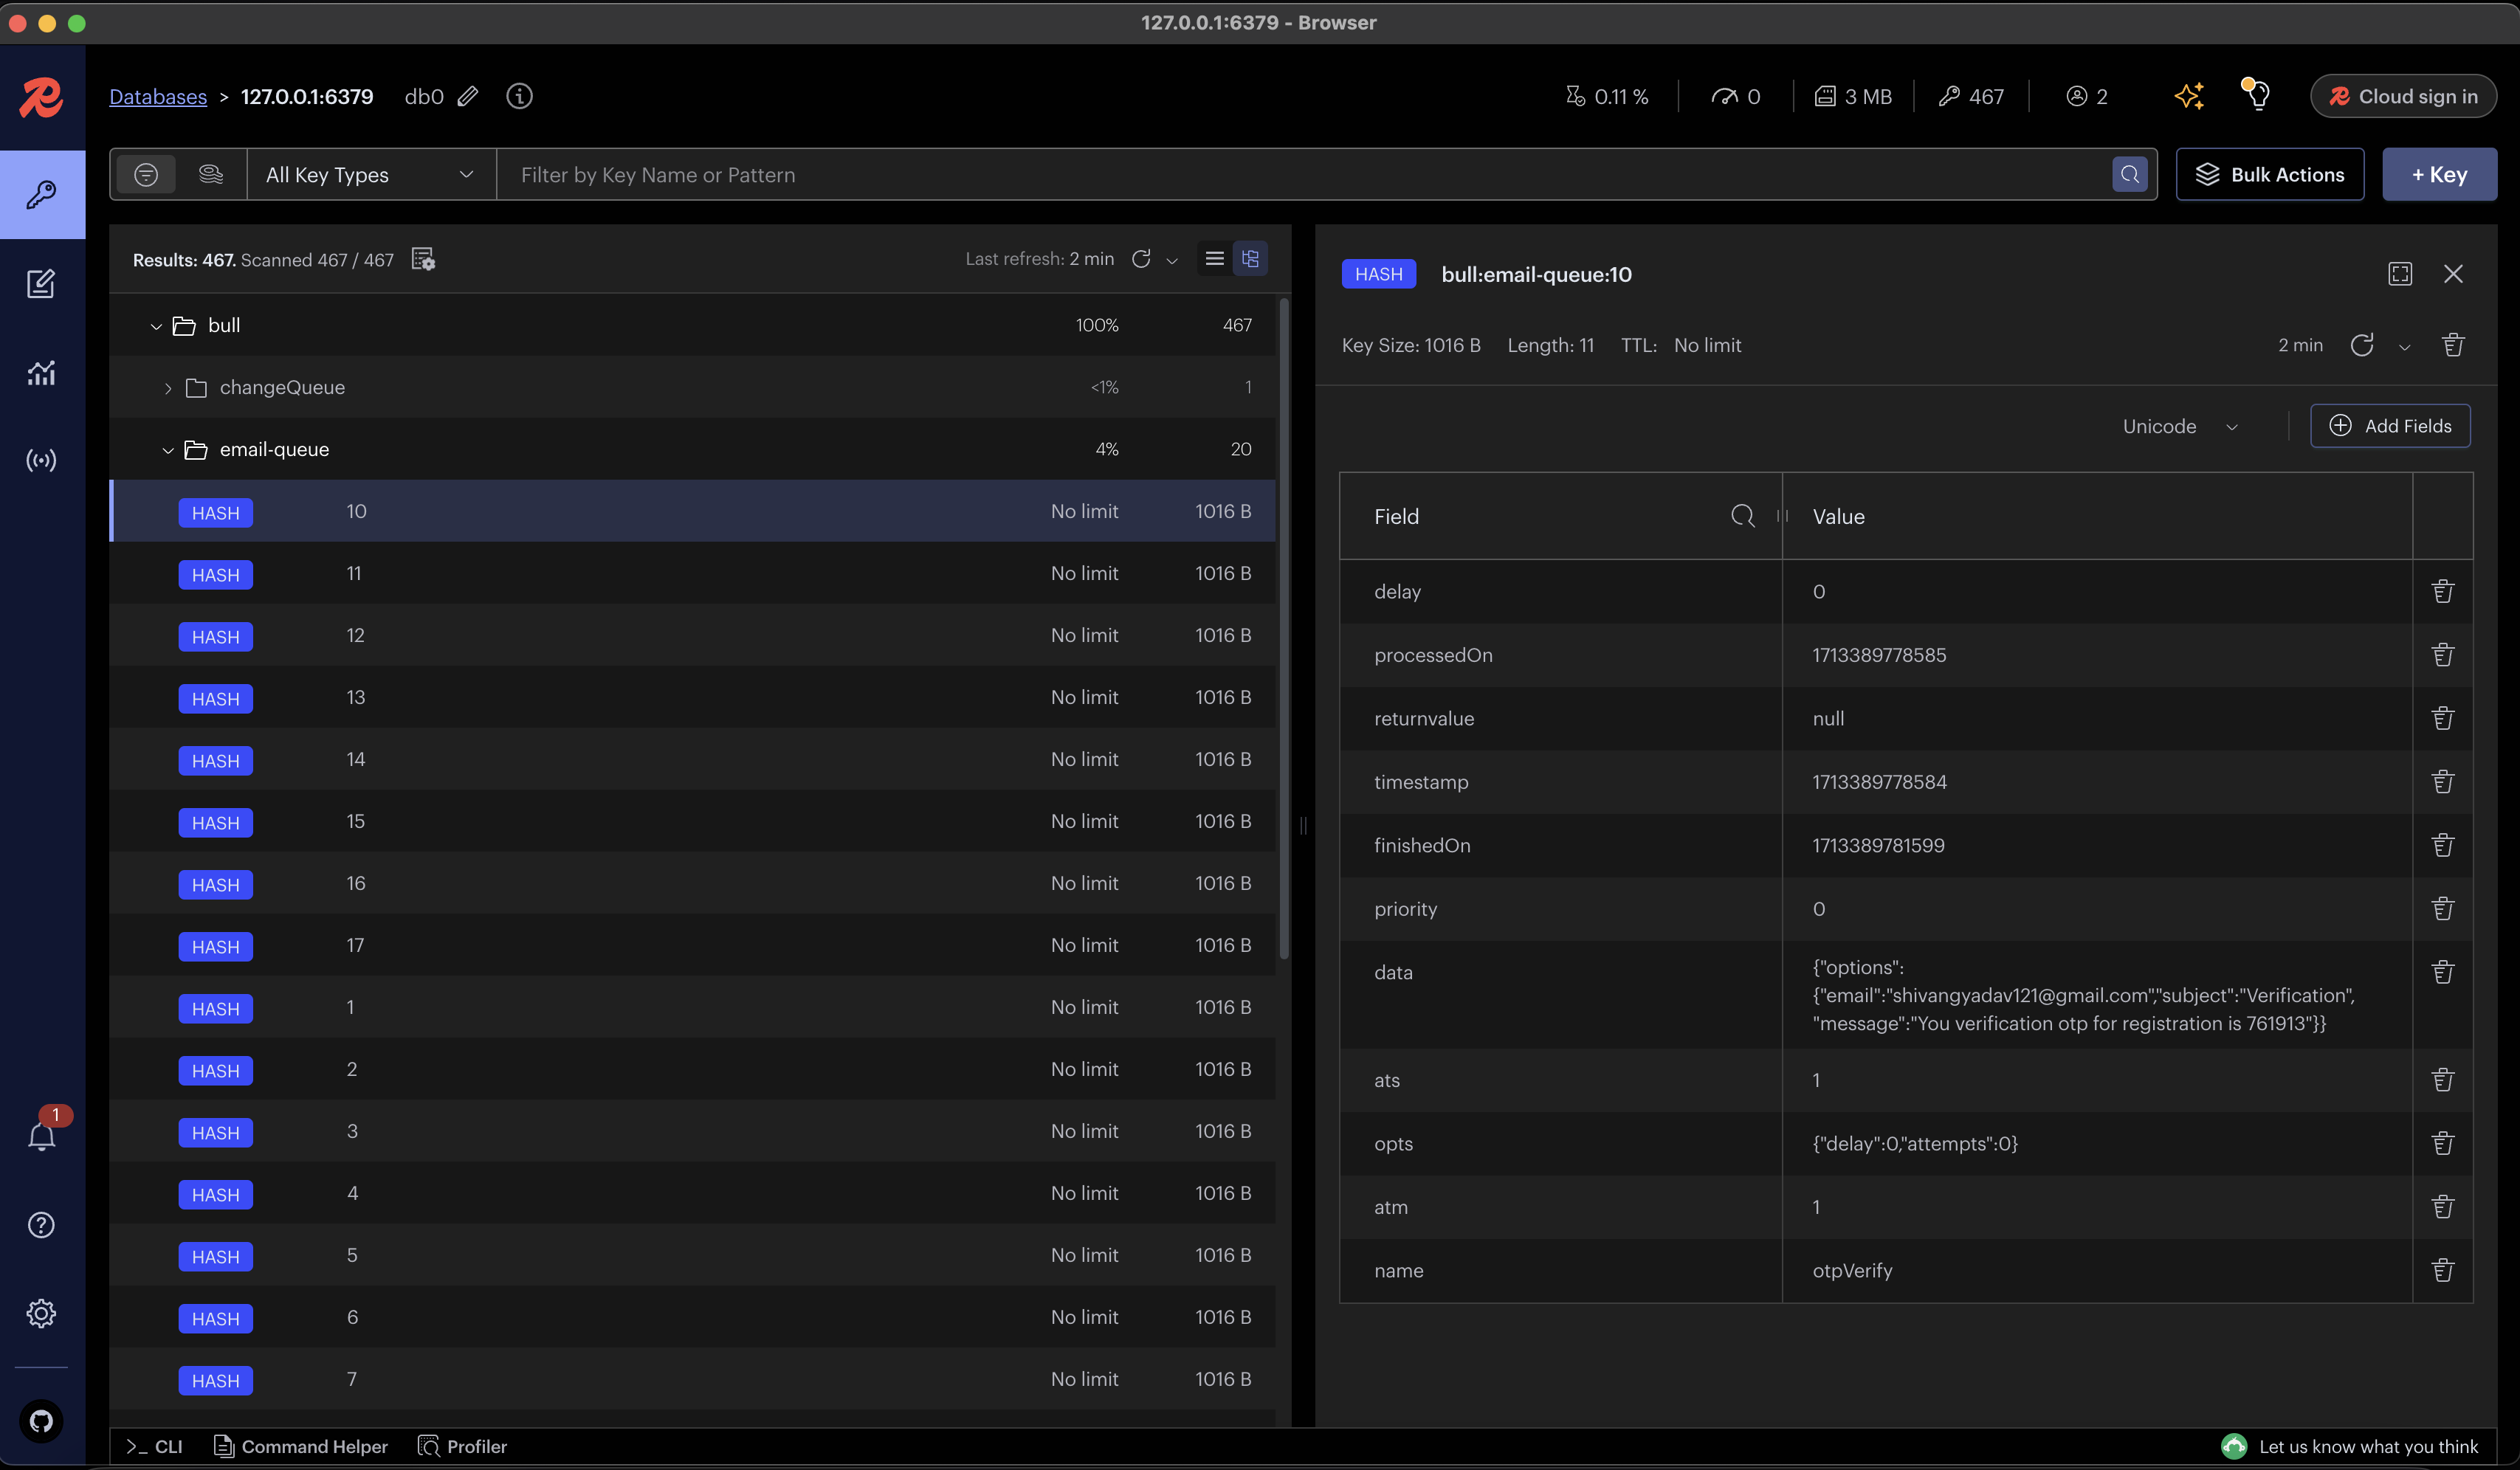
When dealing with multiple queues and jobs, having visibility into the state and performance of your queues is critical for debugging and scaling. RedisInsight is a visual tool that lets you monitor Redis instances and gain insights into BullMQ queues and jobs.
Step 1: Install RedisInsight
RedisInsight can be downloaded from the official Redis website or installed using Docker:
docker run -d --name redisinsight -p 5540:5540 redis/redisinsight:latest
Step 2: Connect RedisInsight to Your Redis Server
Once RedisInsight is running, navigate to http://localhost:5540 and connect it to your local or remote Redis instance by providing the Redis host and port (e.g., localhost:6379).
Step 3: Monitoring BullMQ Queues
Once connected, RedisInsight provides detailed insights into BullMQ queues:
Queue Statistics: Shows the number of jobs in various states (waiting, active, completed, failed, delayed).
Job Details: Allows you to inspect individual jobs, view their data, and see the exact error messages if they failed.
Job Performance: Monitor job processing times and identify bottlenecks.

RedisInsight makes it easy to:
Monitor job lifecycles in real time.
Debug failed jobs by inspecting their data and error stack.
Track delayed jobs and their execution schedules.
Optimize queue performance based on processing metrics.
This visual interface becomes invaluable for scaling, debugging, and optimizing job queues in production environments.
6. Where and When to Use Queues in Your Backend
You can use messaging queues for various tasks that don't need to be processed synchronously, including:
Email notifications: Offload email sending tasks to avoid blocking user-facing endpoints.
File processing: Large video, image, or document processing can be queued and handled by workers.
Data aggregation: Complex calculations (e.g., analytics) can be performed asynchronously without affecting user experience.
API requests to third parties: If you're integrating with external services (e.g., payment gateways), use queues to handle retries, failures, and timeouts more gracefully.
Scheduled tasks: BullMQ supports delayed tasks, so you can schedule jobs to be processed in the future (e.g., sending a reminder email after 24 hours).
7. Best Practices for Scaling with BullMQ
To ensure your system scales efficiently with BullMQ:
Monitor queues: Use BullMQ’s built-in UI to track job status, retry counts, and failures.
Retry logic: Configure retry strategies for handling intermittent failures (e.g., network issues).
Graceful shutdown: Ensure your workers handle termination signals (SIGTERM) and complete ongoing jobs before shutting down.
process.on('SIGTERM', () => { emailWorker.close().then(() => { console.log('Worker shut down gracefully'); process.exit(0); }); });Scaling: Horizontally scale workers to meet traffic demands. Redis as the backend allows for distributed processing across multiple machines.
Use Redis clusters: For larger applications, consider using Redis clusters for high availability and fault tolerance.
Conclusion
By integrating messaging queues like BullMQ into your backend, you can significantly improve scalability, reliability, and efficiency. Offloading long-running tasks to worker processes allows your application to handle more traffic and stay responsive even under heavy load.
With BullMQ, implementing a robust queue system in Node.js is straightforward. You can process tasks asynchronously, manage retries, and scale your system by adding more workers as needed.
Subscribe to my newsletter
Read articles from Shivang Yadav directly inside your inbox. Subscribe to the newsletter, and don't miss out.
Written by

Shivang Yadav
Shivang Yadav
Hi, I am Shivang Yadav, a Full Stack Developer and an undergrad BTech student from New Delhi, India.