Turning Obsidian into Your Personal Wiki
 Himanshu Nikhare
Table of contents
- Introduction
- Step 1: Understanding What a Personal Wiki Is
- Step 2: Creating Your Central Hub (Index)
- Step 3: Linking Notes to Build Connections
- Step 4: Building Categories and Subcategories
- Step 5: Using Graph View for Visual Exploration
- Step 6: Integrating Daily Notes into Your Wiki
- Step 7: Regularly Reviewing and Updating Your Wiki
- Conclusion
Introduction
Imagine having all your ideas, research, and projects organized and interconnected, allowing you to easily explore and retrieve information. That’s the power of turning Obsidian into a personal wiki. A personal wiki isn’t just a static collection of notes—it’s a living system where information is connected, grows over time, and reflects your learning and development.
In this episode, we’ll take a detailed look at how you can structure your Obsidian vault to act as a personal wiki. You’ll learn how to create central hubs, link related ideas, utilize categories, and harness the power of Obsidian’s Graph View to make your notes more dynamic and interconnected.
Step 1: Understanding What a Personal Wiki Is
A wiki is a network of interlinked notes or pages, organized in a way that allows you to navigate between related concepts seamlessly. Unlike traditional note-taking systems that rely heavily on folders and hierarchical structures, a wiki is based on relationships between notes.
Why Create a Personal Wiki?
Knowledge Management: A personal wiki helps you keep track of everything you learn, work on, or are interested in. Over time, it becomes a comprehensive resource you can reference and expand.
Flexibility: With a wiki, you’re not locked into rigid folder structures. Instead, you can organize your notes fluidly by linking them together as your ideas evolve.
Discovering Connections: By linking notes and using backlinks, you’ll often discover relationships between concepts that weren’t obvious at first. This enhances creativity and understanding.
Step 2: Creating Your Central Hub (Index)
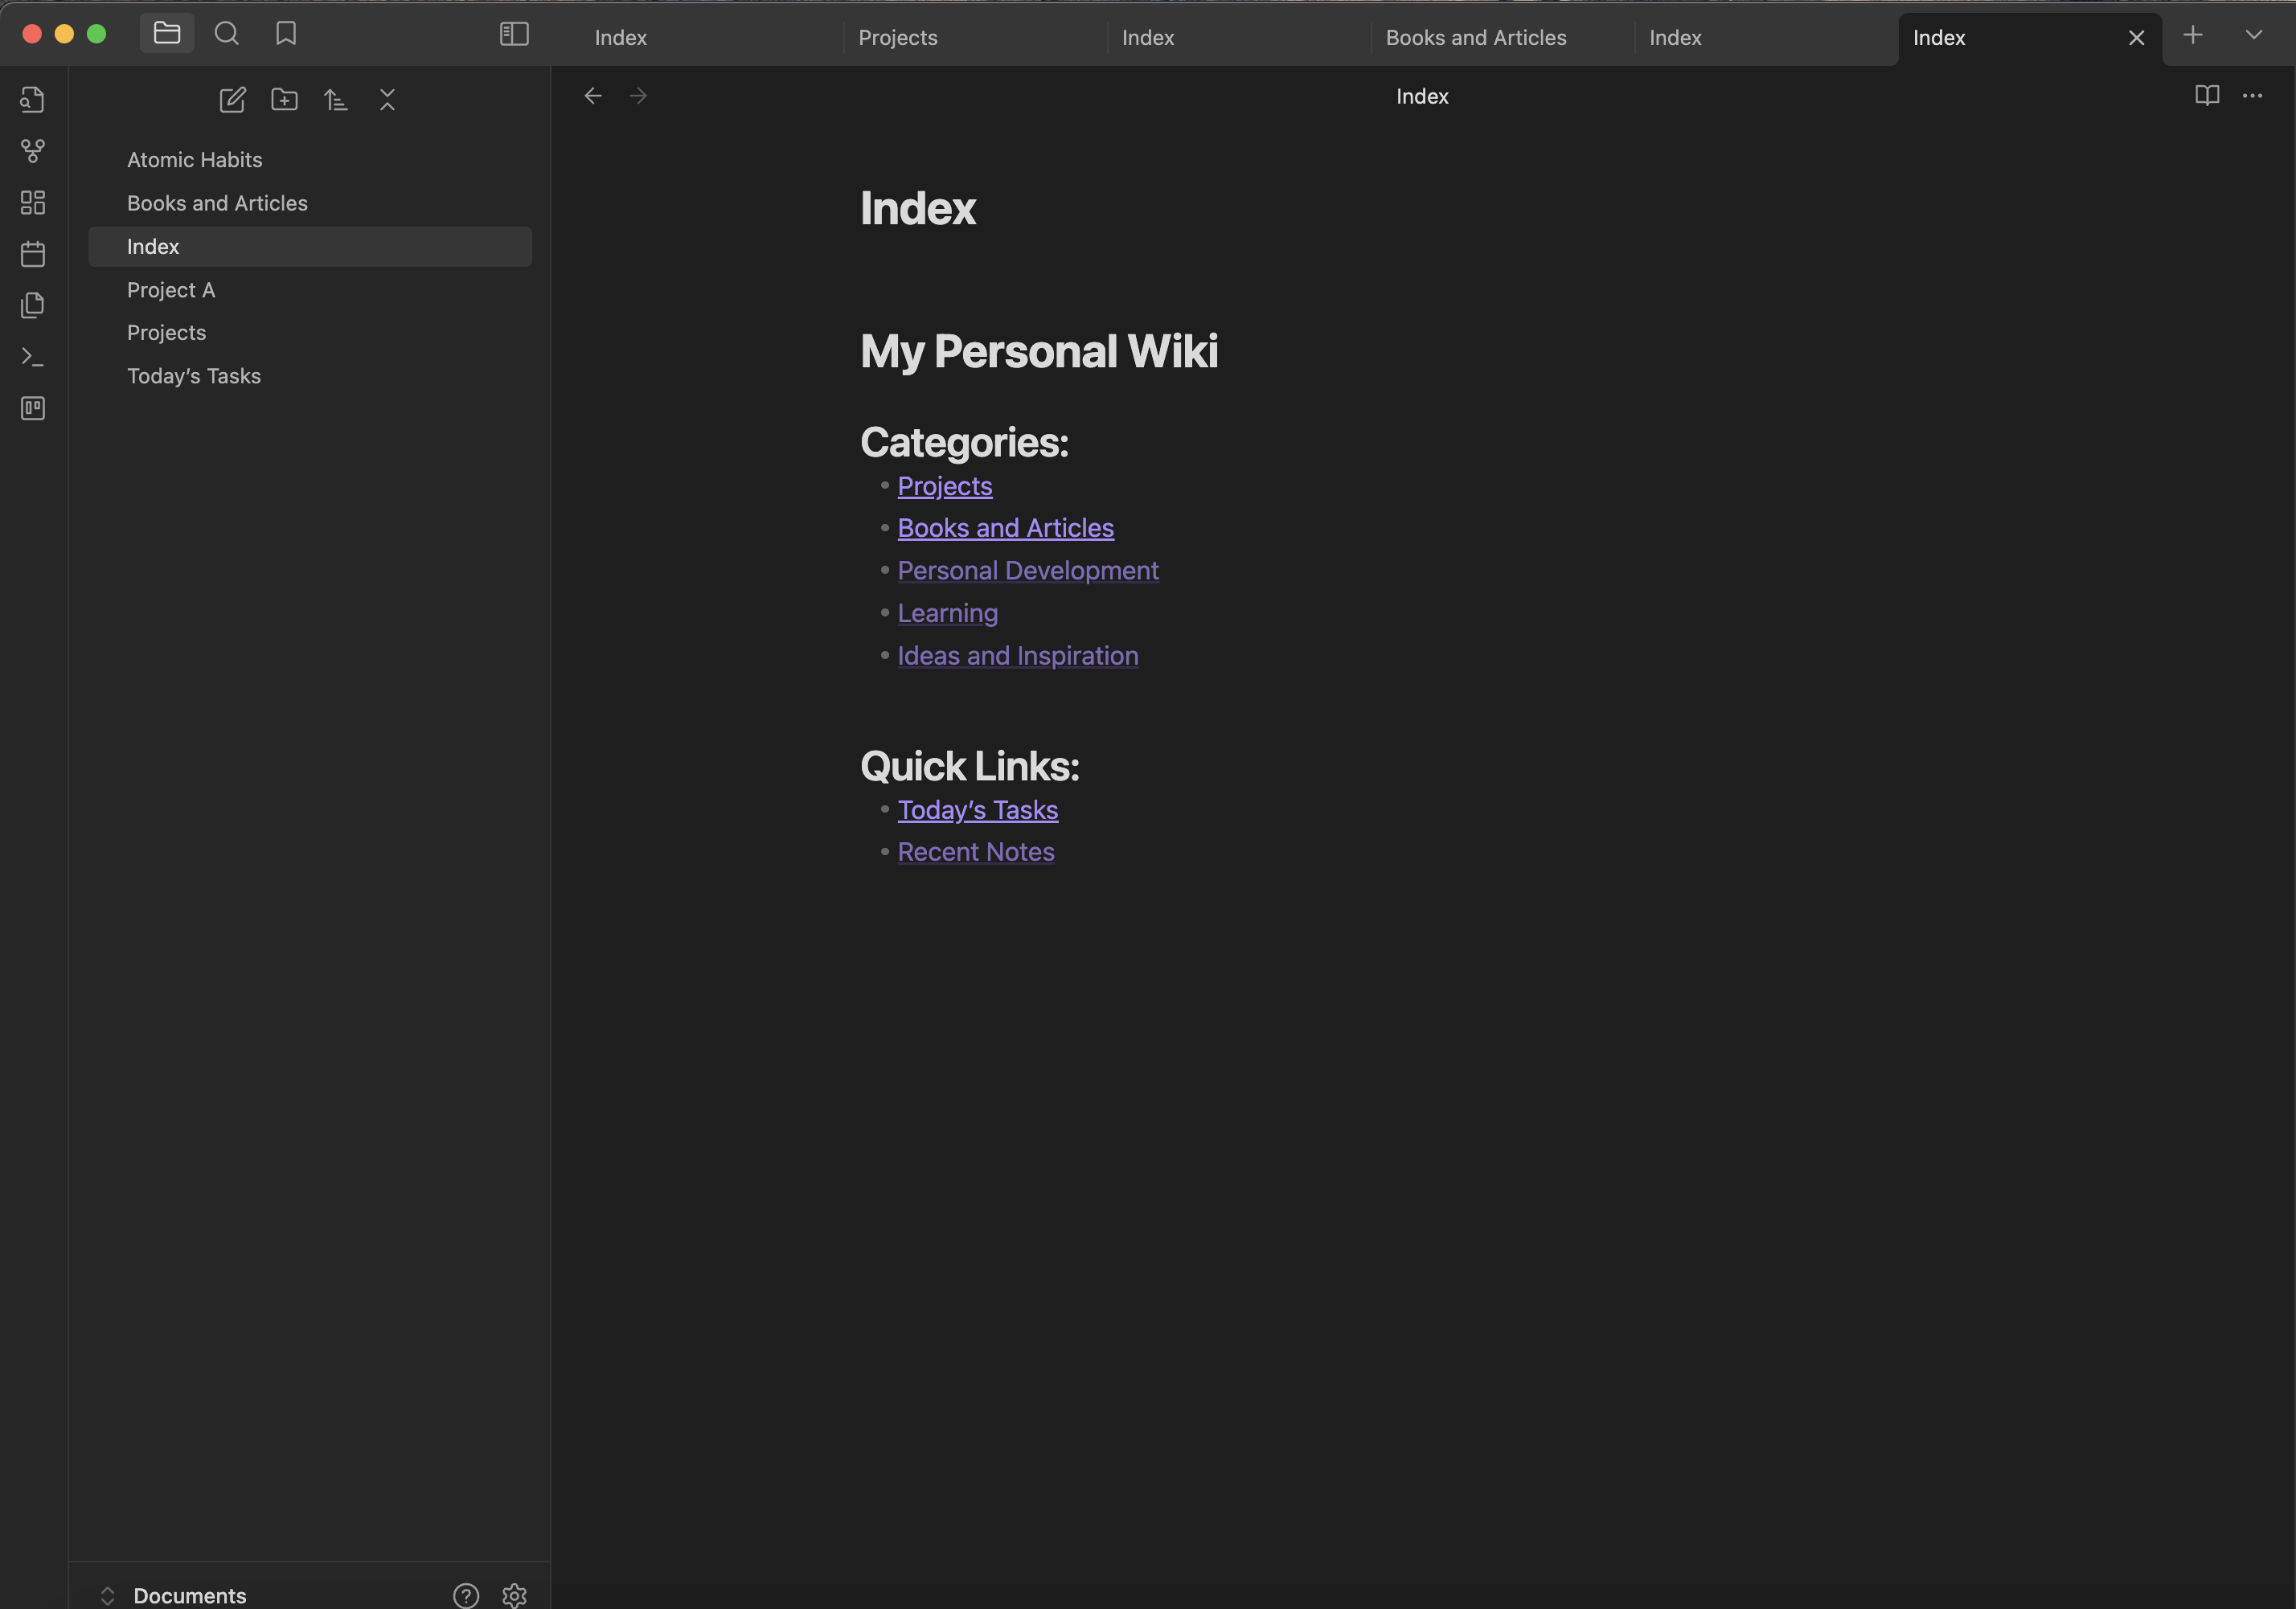
The first step to turning Obsidian into a personal wiki is to create an index note that acts as a central hub for all your notes. This note will serve as the gateway to different areas of your knowledge base.
How to Create an Index Note
Create a New Note: Name it something like
[[Index]],[[Home]], or[[Dashboard]].List Key Categories: In your index note, create a list of key categories or topics that represent the major areas of your personal wiki.
Example Categories:
[[Projects]][[Books and Articles]][[Personal Development]][[Learning]][[Ideas and Inspiration]]
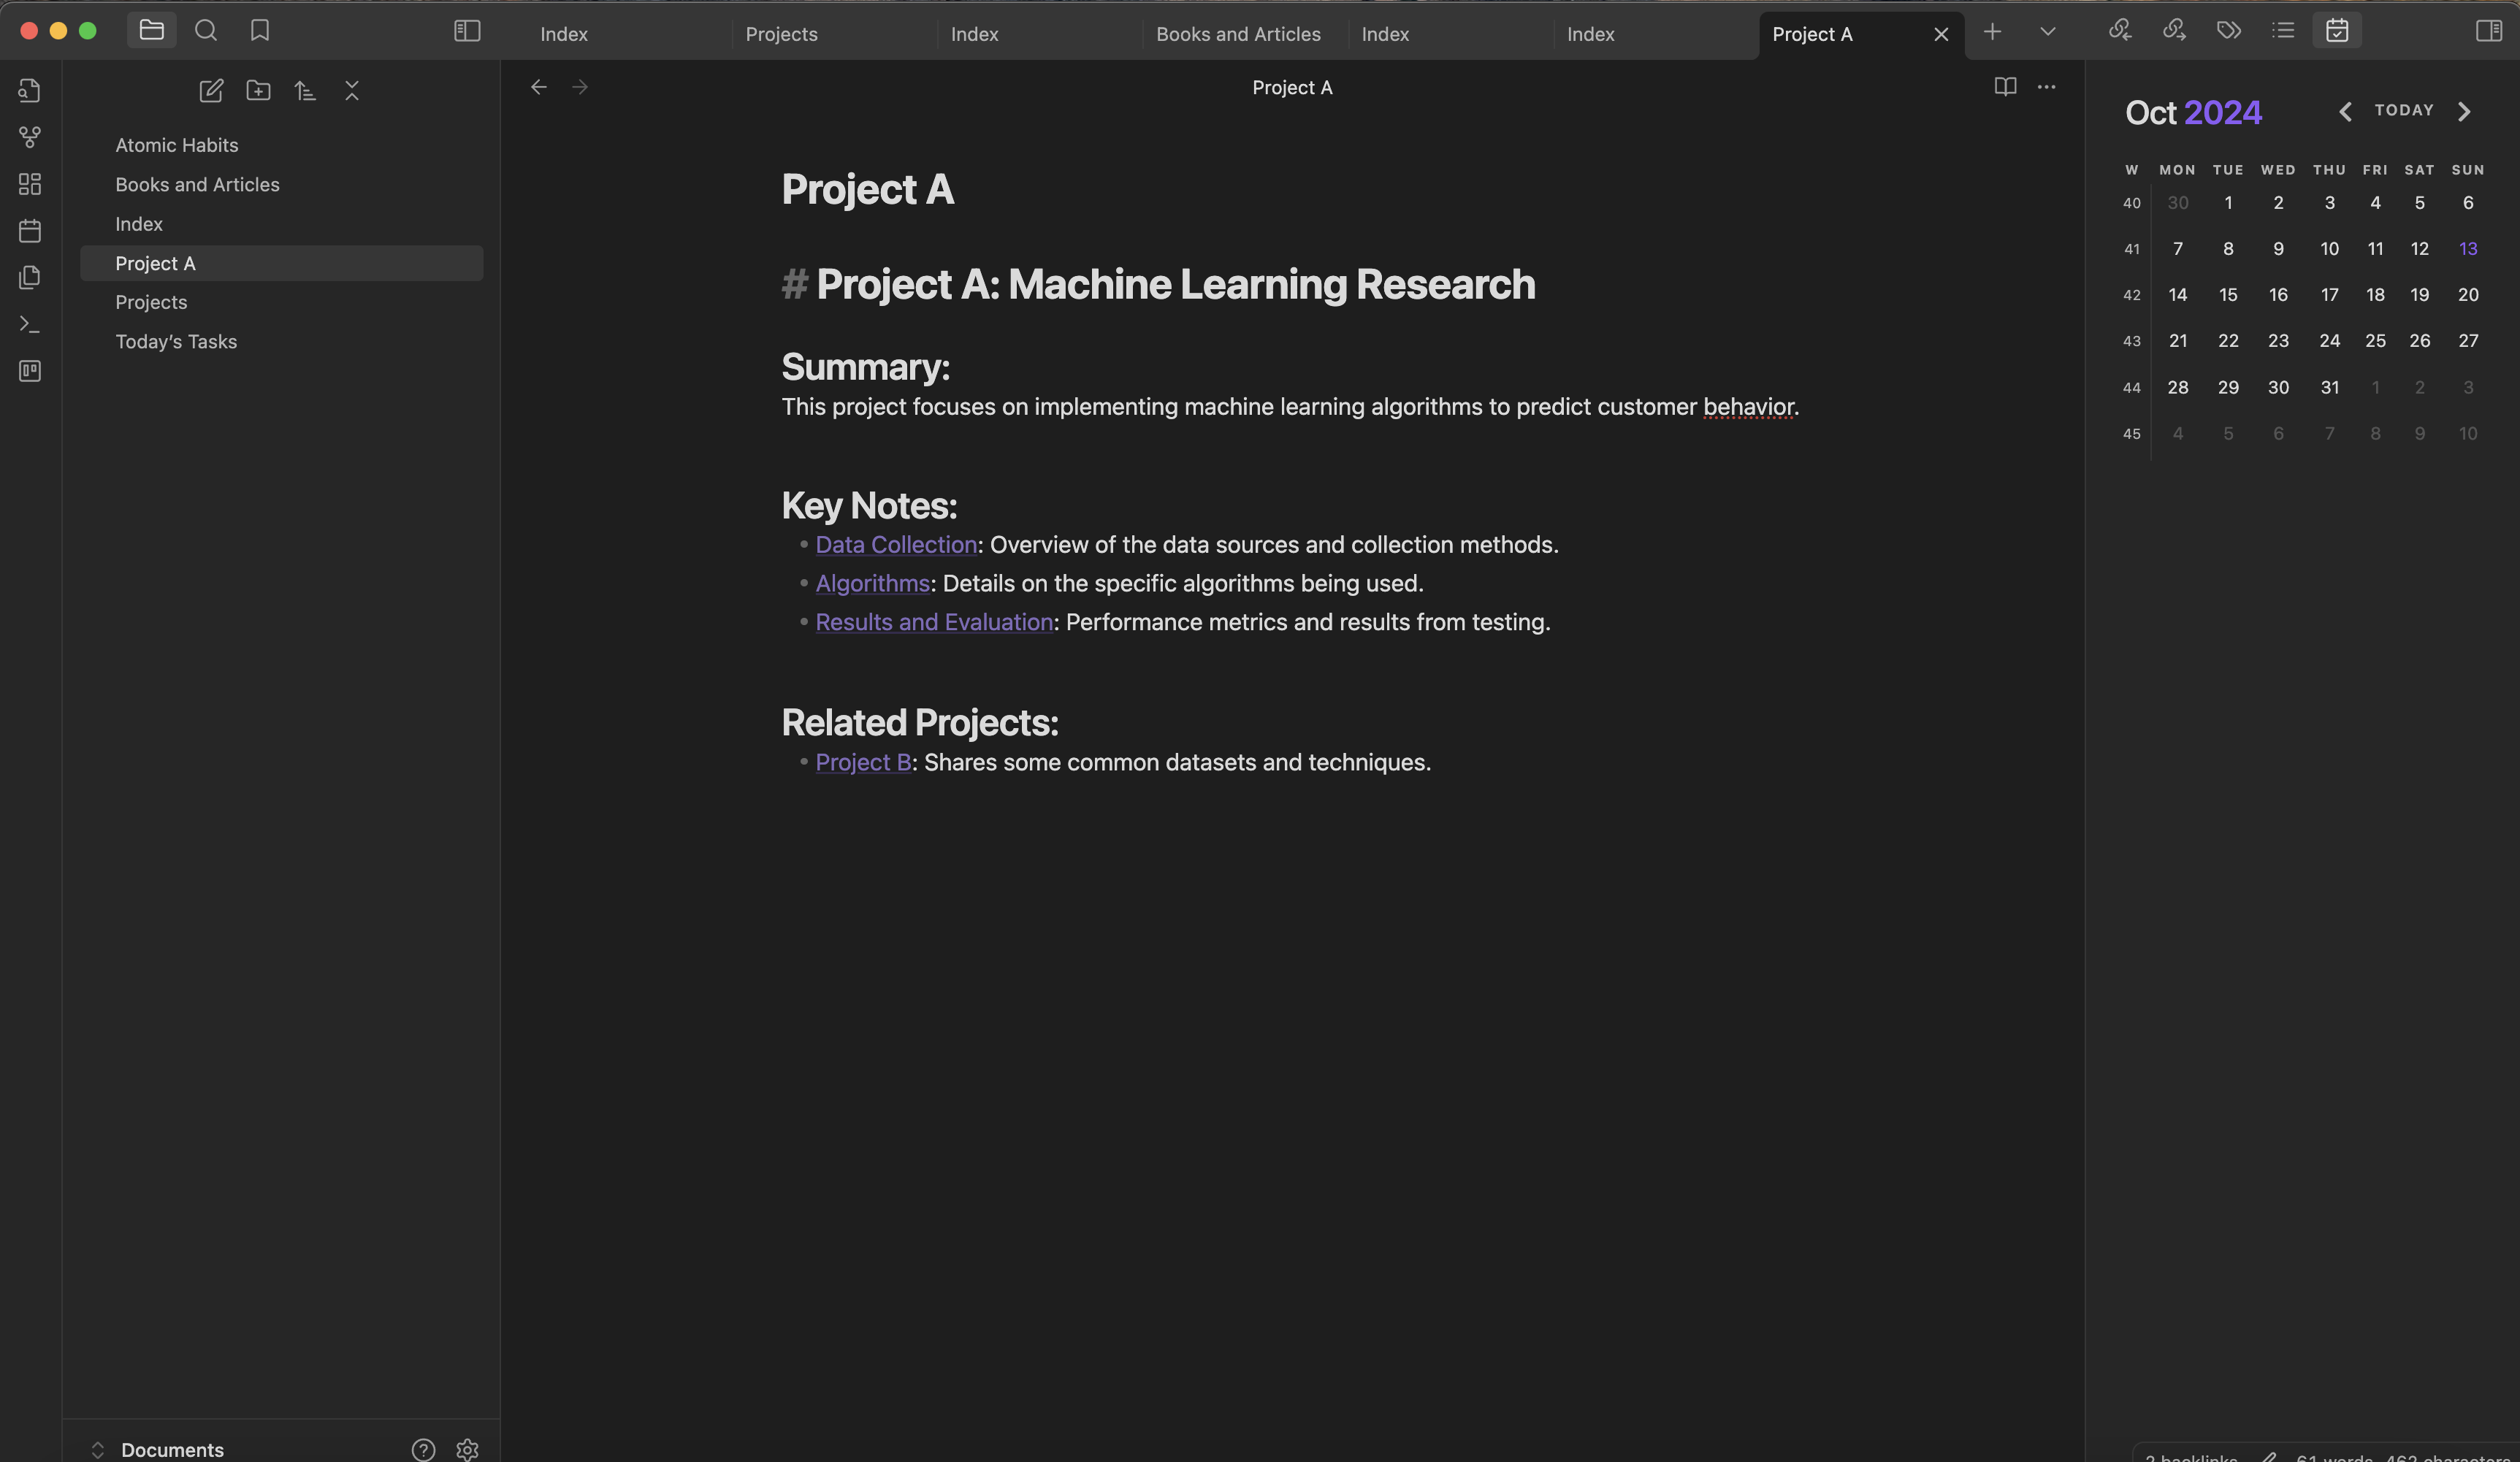
Link Category Pages: Each category should link to a new note where you’ll organize subtopics or related notes. For instance:
- In the
[[Projects]]category, create links to individual project notes such as[[Project A]],[[Project B]], etc.
- In the
Create a Table of Contents (Optional): To make navigation easier, you could structure your index note as a table of contents, outlining the different sections and linking to them directly.
Tips for a Strong Index:
Keep it Simple: Don’t overload your index with too much information. Focus on broad categories that will help you navigate your vault efficiently.
Use Keywords: Make sure the titles of categories and notes are easy to search for, so you can quickly access them through Obsidian’s search feature.
Refine Over Time: Your index isn’t set in stone. As your wiki grows, feel free to add new categories or reorganize existing ones.
Step 3: Linking Notes to Build Connections
The core of any wiki is the interconnectedness of notes. Rather than keeping ideas in isolation, Obsidian allows you to link notes together in ways that reflect how concepts and topics are related.
How to Link Notes in Obsidian
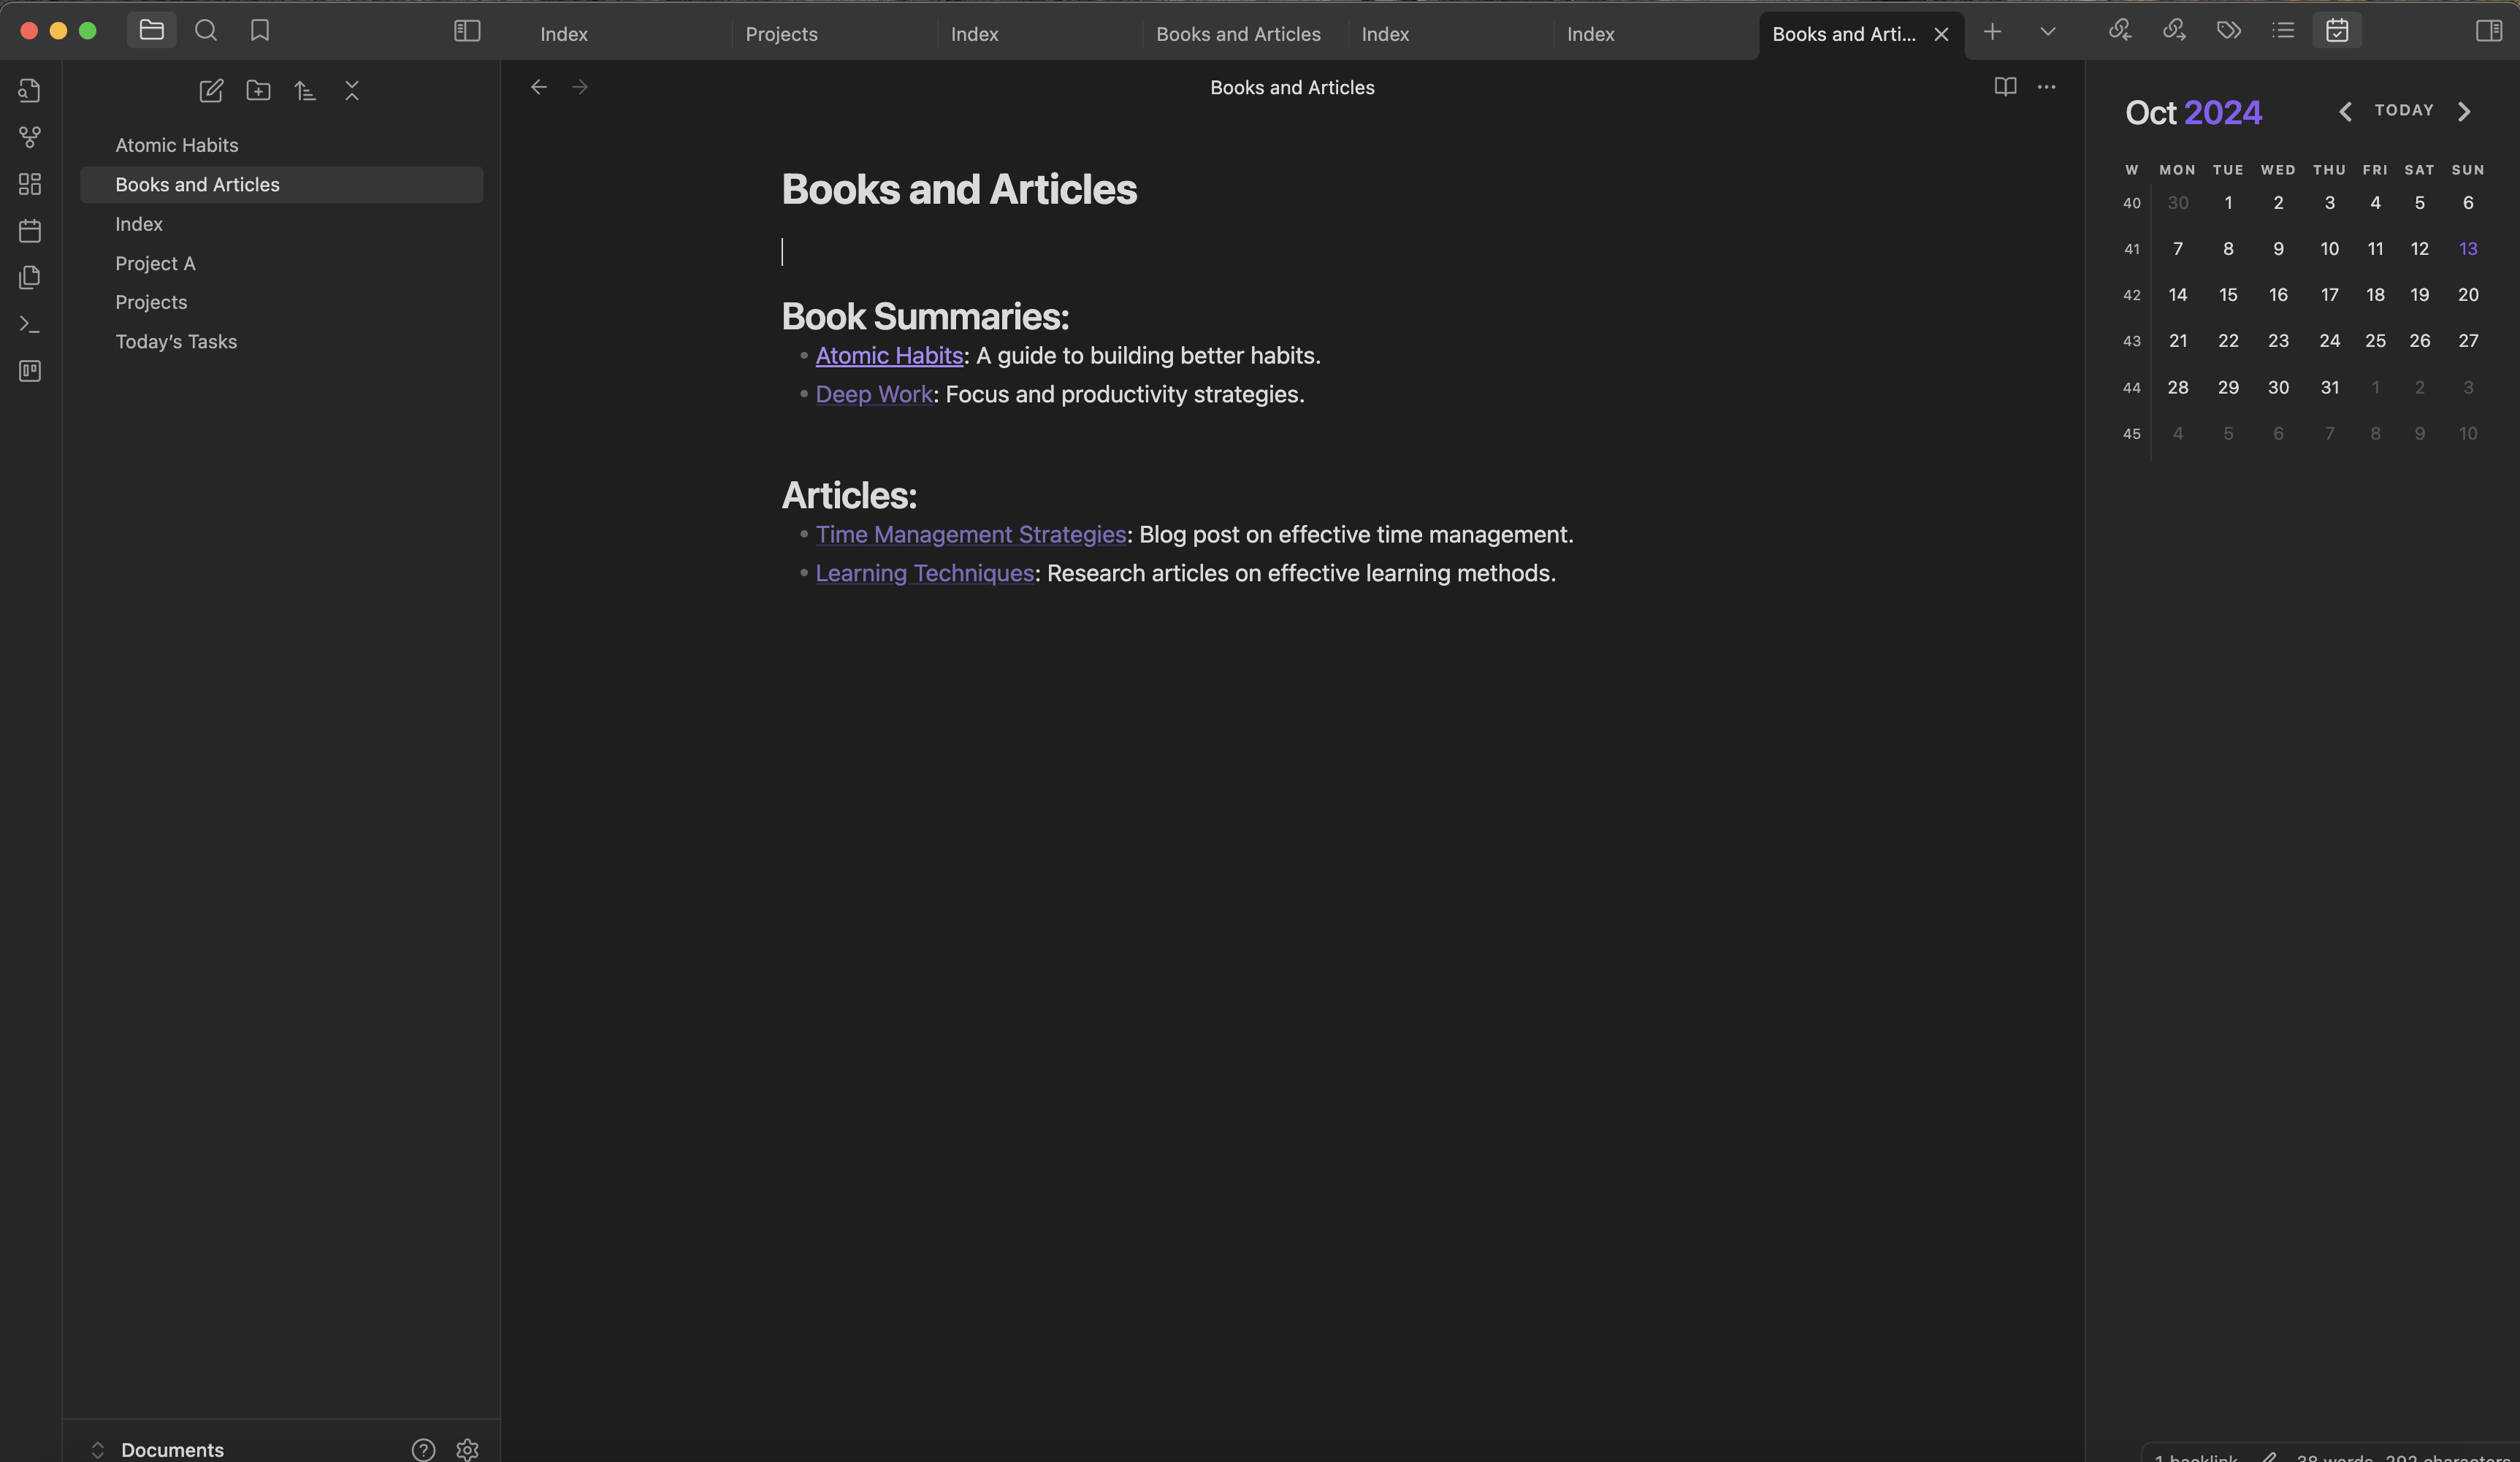
Internal Links: Simply type
[[followed by the name of the note you want to link to. Obsidian will provide auto-suggestions based on your existing notes.- Example: In your
[[Books and Articles]]category, you can link to specific book summaries like[[Atomic Habits]]or[[Deep Work]].
- Example: In your
Creating New Notes via Links: If the note doesn’t exist yet, typing
[[New Note Name]]will automatically create a new note when you click on the link.- Example: If you’re writing about a new topic and want to create a note for it, just type
[[New Topic]]and Obsidian will create a blank note for you to fill in later.
- Example: If you’re writing about a new topic and want to create a note for it, just type
Use Links for Conceptual Connections: Linking isn’t limited to organizing by categories. If you’re writing a note about a project and reference a book that inspired you, link directly to your book note using
[[Book Title]].
Backlinks: Viewing Connections
One of the most powerful features of Obsidian is the backlink feature. Backlinks show you where a specific note is referenced elsewhere in your vault.
Viewing Backlinks: When you open a note, the backlink section (usually at the bottom) shows all the other notes that have linked to the current note.
Why It’s Important: This helps you see how your ideas connect across different contexts, which can reveal patterns or relationships you may not have consciously realized.
Cross-Linking for Fluid Navigation
Make a habit of cross-linking between notes. For example:
- In your
[[Time Management]]note, you could link to methods like[[Pomodoro Technique]]and[[Time Blocking]], allowing you to easily jump between different strategies.
Cross-linking isn’t just for similar topics; it can also be used for contrasting ideas or complementary concepts, creating a more robust understanding.
Step 4: Building Categories and Subcategories
Once you have a basic structure in place, it’s time to build out categories and subcategories to keep things organized.
Creating Broad Categories
Start with high-level categories that encompass the main areas of your life or work.
Examples of broad categories:
[[Learning]][[Personal Development]][[Research]][[Work Projects]]
Creating Subcategories
Within each broad category, create subcategories to help break down the information further.
- Example: Inside your
[[Learning]]category, create subcategories for[[Books]],[[Online Courses]],[[Skills]], etc.
Linking from General to Specific
In each category note, link to the subcategories or specific notes.
- Example: In the
[[Books]]subcategory, link to individual book notes like[[Deep Work]],[[Sapiens]], and[[Atomic Habits]].
Step 5: Using Graph View for Visual Exploration
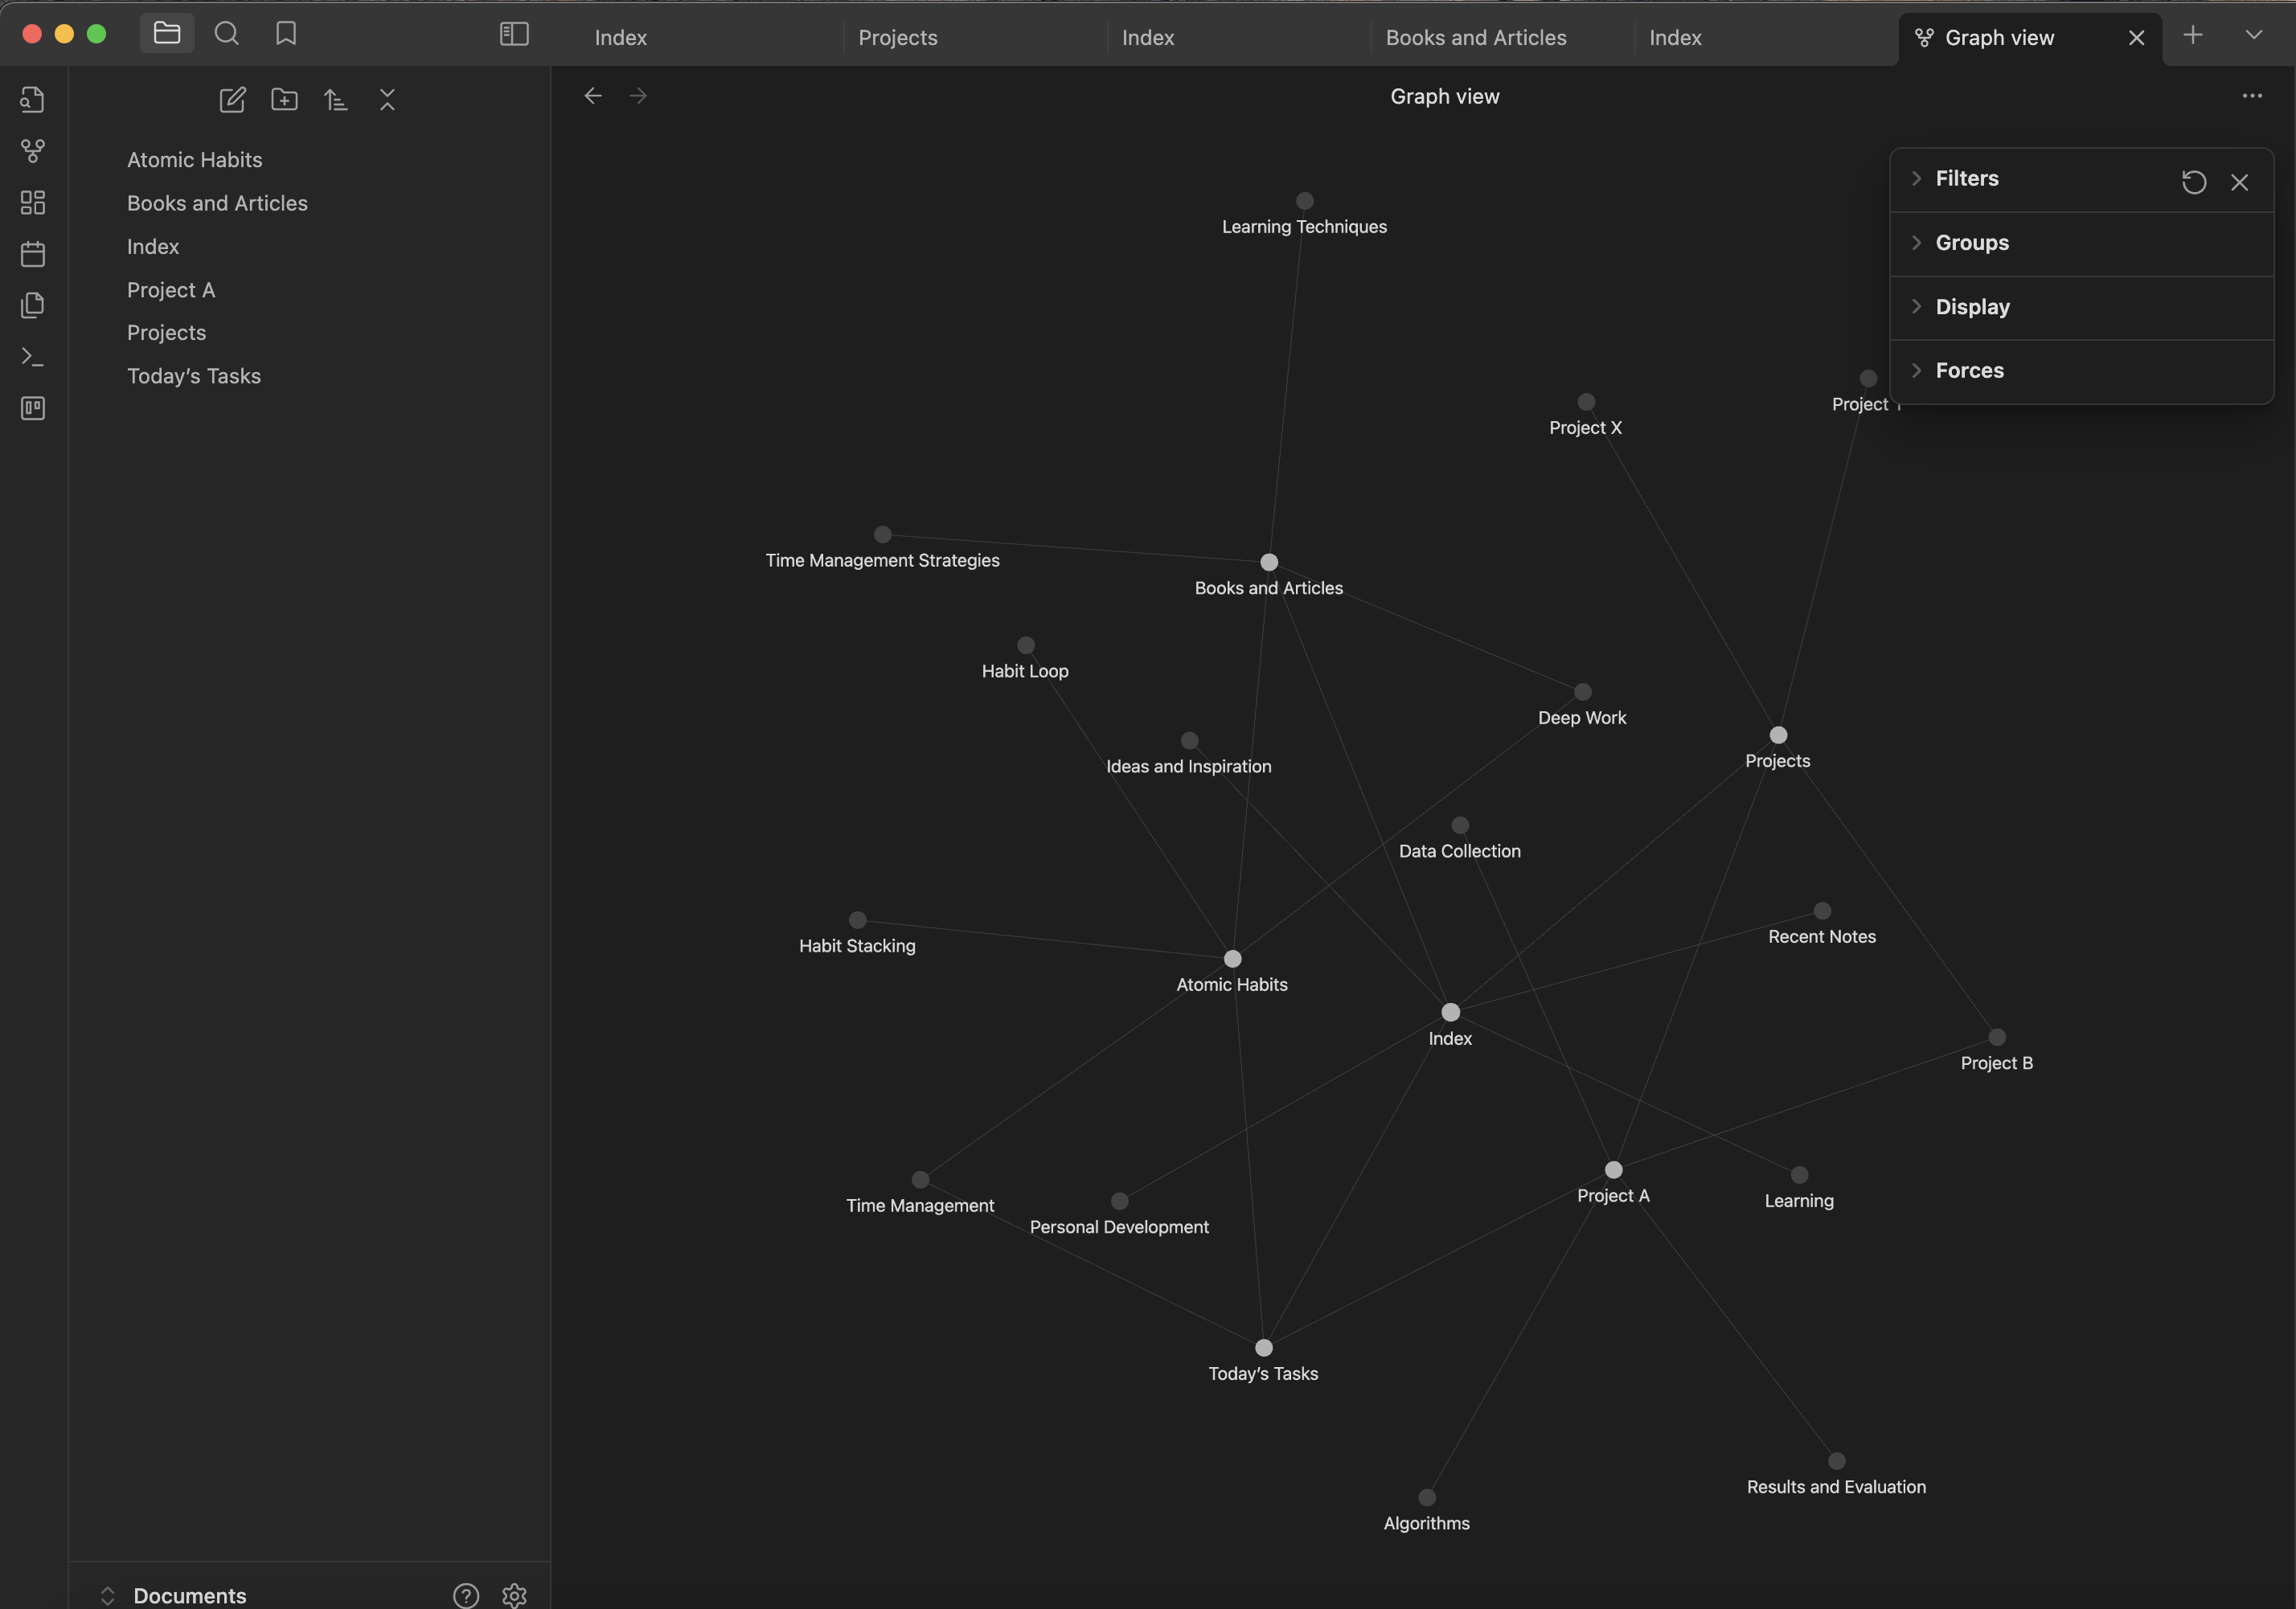
The Graph View is one of Obsidian’s standout features, offering a visual representation of how your notes are linked together. As you build your wiki, this becomes an incredibly useful tool for visualizing the relationships between ideas.
How to Use Graph View
Open Graph View: Click on the Graph View icon in the left sidebar. You’ll see a web of your notes represented as nodes, with links between them showing their connections.
Exploring Connections: You can zoom in on different clusters of notes to explore how ideas are interconnected. This helps you see patterns or gaps in your knowledge.
Filters: Use the filter options to narrow down your graph by specific tags or folders. For example, you can filter the graph to only show notes tagged with
#researchor#projects.
Tips for Using Graph View Effectively
Focus on Clusters: Look for clusters of related notes, which can give you insight into areas where your ideas are well-developed or need further exploration.
Spot Gaps: Use the graph to identify areas where more connections could be made. If a note appears isolated, consider how it might relate to other topics in your vault.
Step 6: Integrating Daily Notes into Your Wiki
Daily notes are often used for journaling, quick thoughts, or daily tasks, but they can also be a crucial part of your wiki.
Linking Daily Entries to Projects and Topics
When you mention something in your daily notes, consider linking it to a relevant topic or project in your wiki.
- Example: If you write “Worked on
[[Project A]]today” in your daily note, link it directly to the[[Project A]]page to track your work and reference it later.
Using Daily Notes for Incremental Growth
Daily notes allow you to build your wiki incrementally. As you create daily notes, link new ideas or projects back to your core wiki structure. This keeps your knowledge system evolving with your daily work.
Step 7: Regularly Reviewing and Updating Your Wiki
A personal wiki is not a static system. To get the most out of it, regularly review and update your notes.
How to Maintain Your Wiki
Review Key Notes: Periodically revisit your main category and project notes. Add new insights, update outdated information, and strengthen connections with new links.
Create Summary Notes: For topics that grow large, create summary notes that consolidate key information. This helps you get a quick overview of a subject without sifting through multiple notes.
Expand as You Learn: As you read new books, take new courses, or start new projects, continuously add to your wiki. The more connections you create, the more useful your wiki becomes.
Conclusion
By turning Obsidian into your personal wiki, you create a dynamic, interconnected system that grows alongside your knowledge and ideas. Through the use of internal links, categories, backlinks, and the powerful Graph View, your notes evolve from isolated pieces of information into a living web of interconnected thoughts. This approach helps you navigate your ideas more fluidly, discover hidden connections, and retrieve information effortlessly.
Your personal wiki is not a static resource—it's an ever-evolving system that reflects your ongoing learning, projects, and creativity. As you continue adding, linking, and refining your notes, your Obsidian vault will become a powerful second brain, capable of supporting you in your professional and personal pursuits.
In the next episode, we’ll dive into the Zettelkasten Method, a note-taking technique that further enhances this interconnectedness, helping you take your knowledge management to the next level. Stay tuned!
Subscribe to my newsletter
Read articles from Himanshu Nikhare directly inside your inbox. Subscribe to the newsletter, and don't miss out.
Written by

Himanshu Nikhare
Himanshu Nikhare
I am a Senior Software Engineer at BigBasket with over three years of experience in software development. Specializing in QA automation, CI/CD, and mobile automation, I am passionate about creating efficient workflows and sharing knowledge through blogs and articles. I actively contribute to the tech community through my work, open-source projects, and insightful content. Feel free to connect with me on GitHub or LinkedIn to explore my projects and contributions.