Kubernetes 101: Part 4
 Md Shahriyar Al Mustakim Mitul
Table of contents
- Authentication
- Kube-config
- API Groups
- API Versions
- API deprecations
- Kubectl Convert
- Authorization (What to access)
- Node Authorization
- ABAC
- Webhook
- Always Allow mode
- Role Based Access Controls (RBAC)
- Cluster roles
- Admission Controllers
- Validating and Mutating Admission Controllers
- Service accounts
- Image security
- Security Contexts
- Network Policies
- Developing Network policies
- Custom Resource Definition (CRD)
- Custom Controllers
- Operator Framework
We know that kubeapi has been guiding from master node till now and we need to make sure it’s secure.
Basically one using kubeapi might need to focus on these two permissions
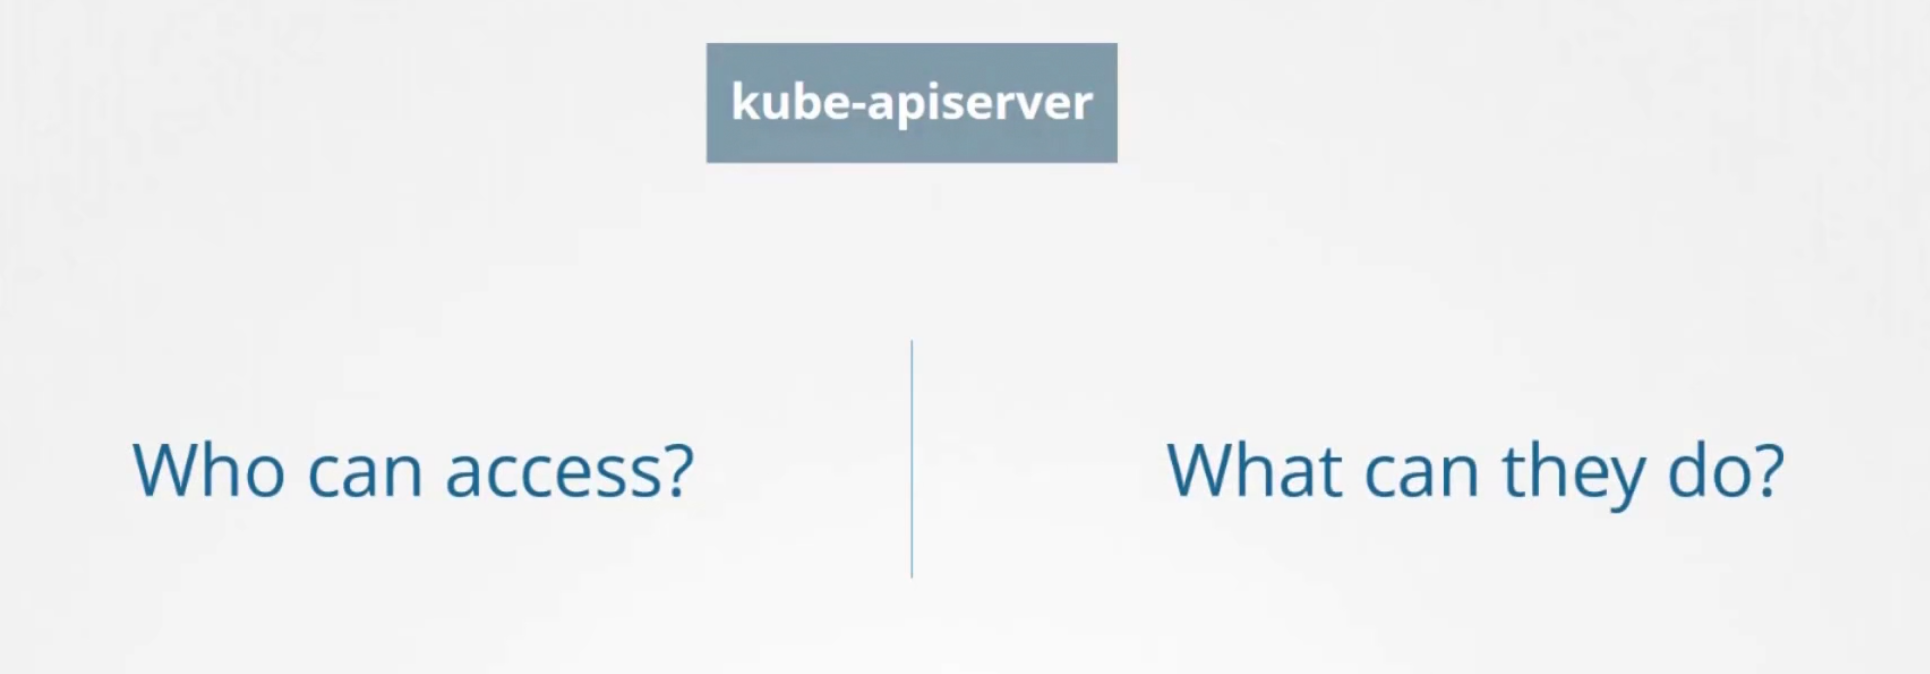
Who can access is - Authentication and what can they do is - Authorization
Authentication
Our kubernetes cluster is accessed by admins, developers, end users, bots etc.
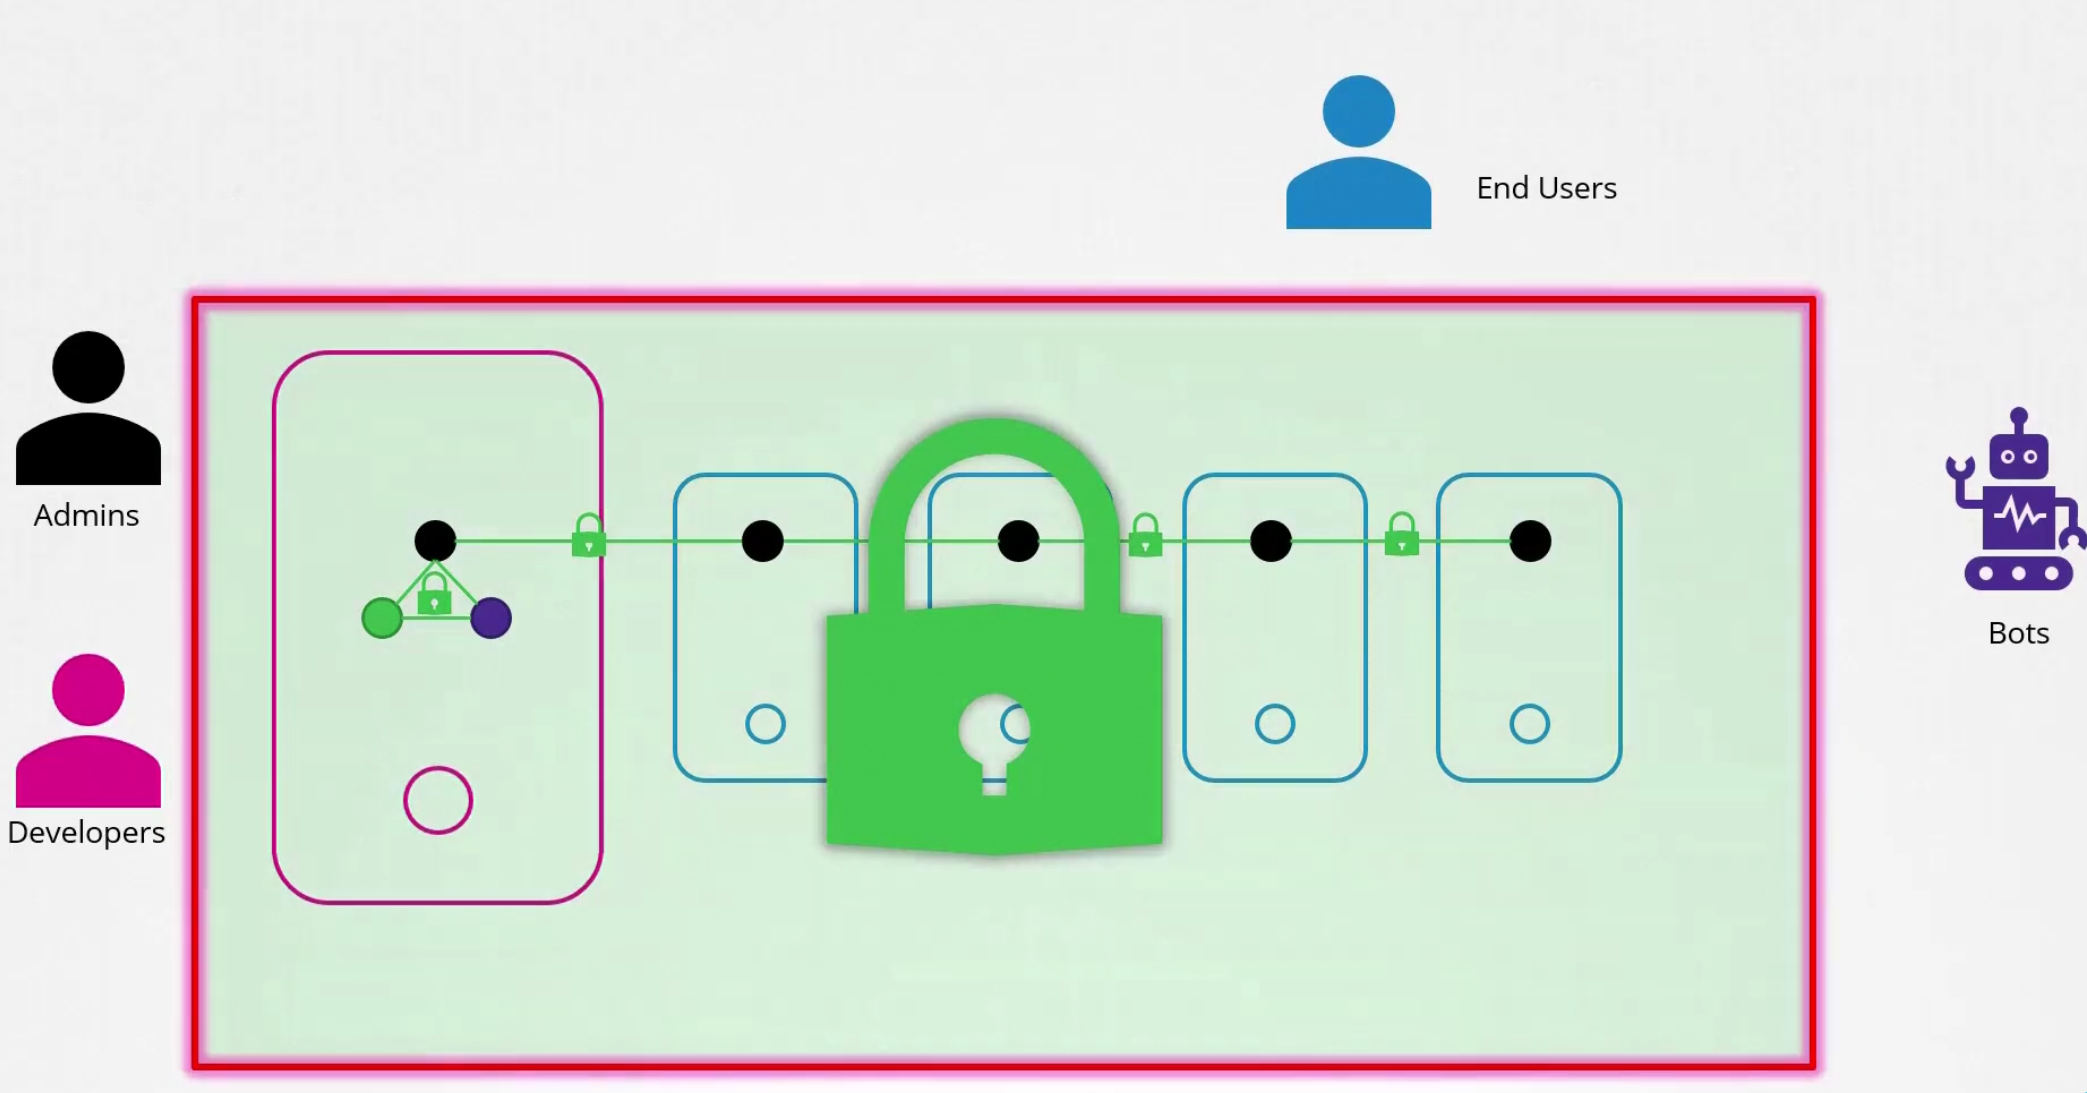
But whom to give what access? Let’s focus on administrative processes

Here Users are the admins and developers and other service accounts are basically bots.
You can’t create users but you can create service accounts
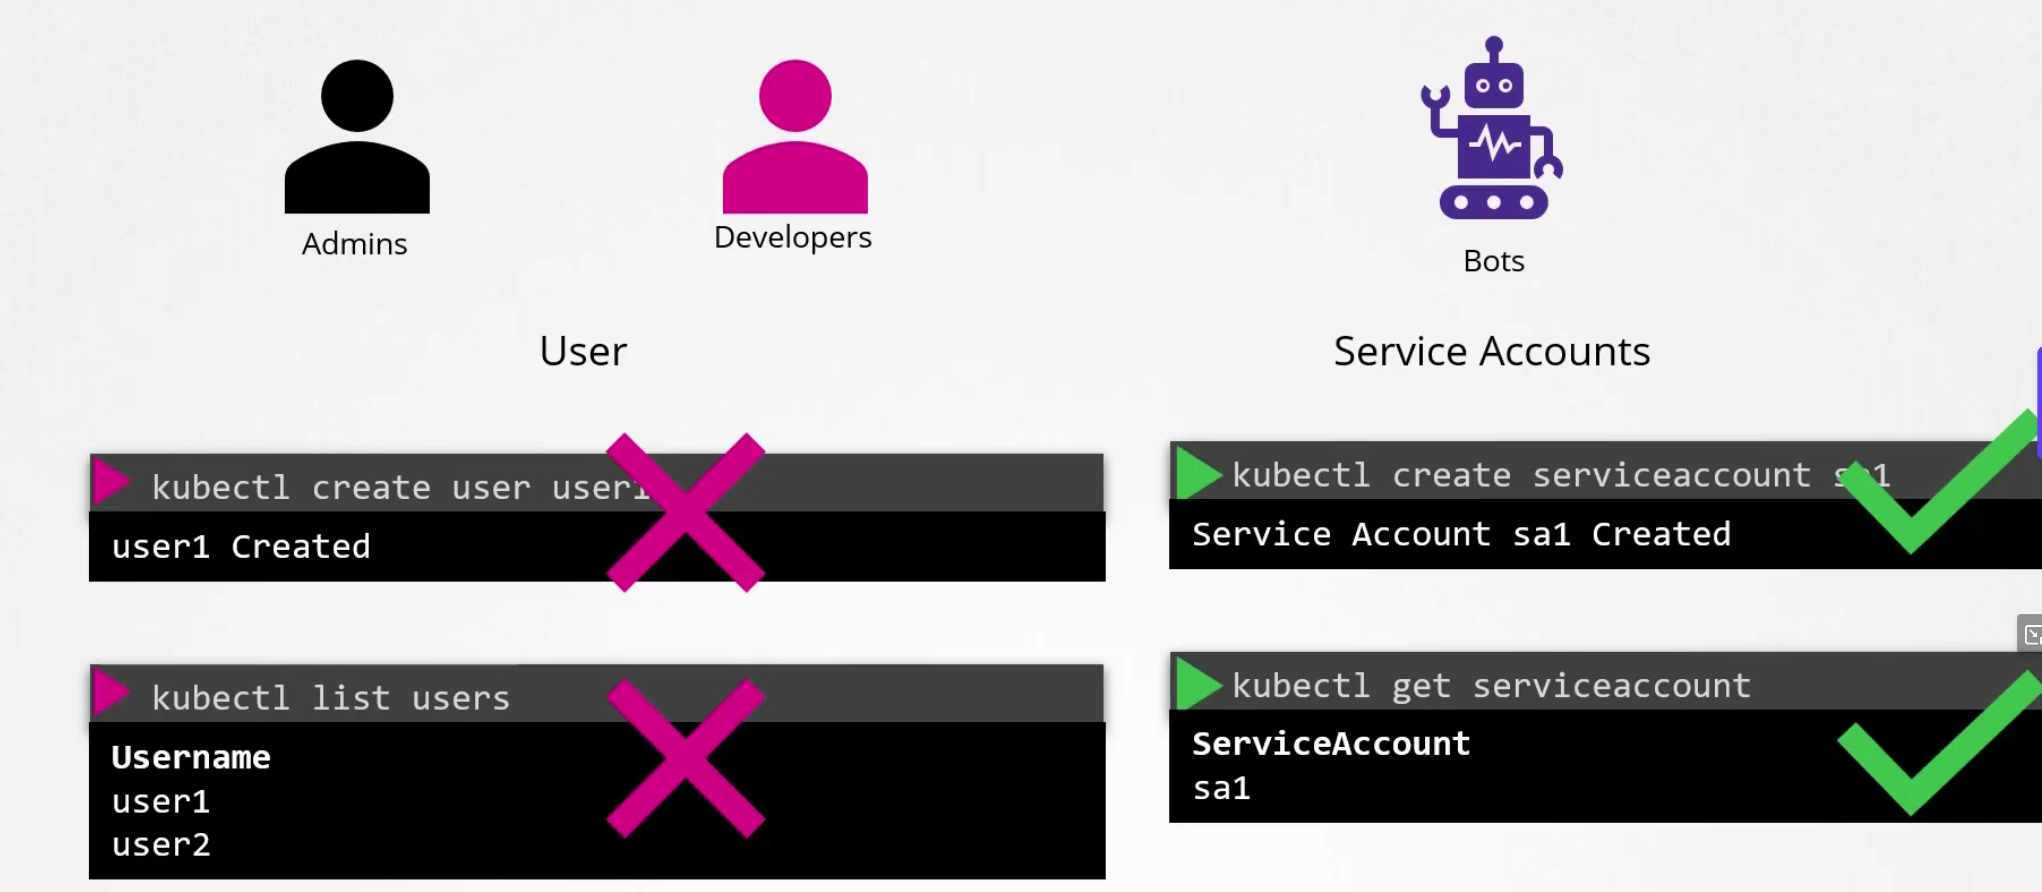
Let’s focus on Users

So, how do they access the cluster?
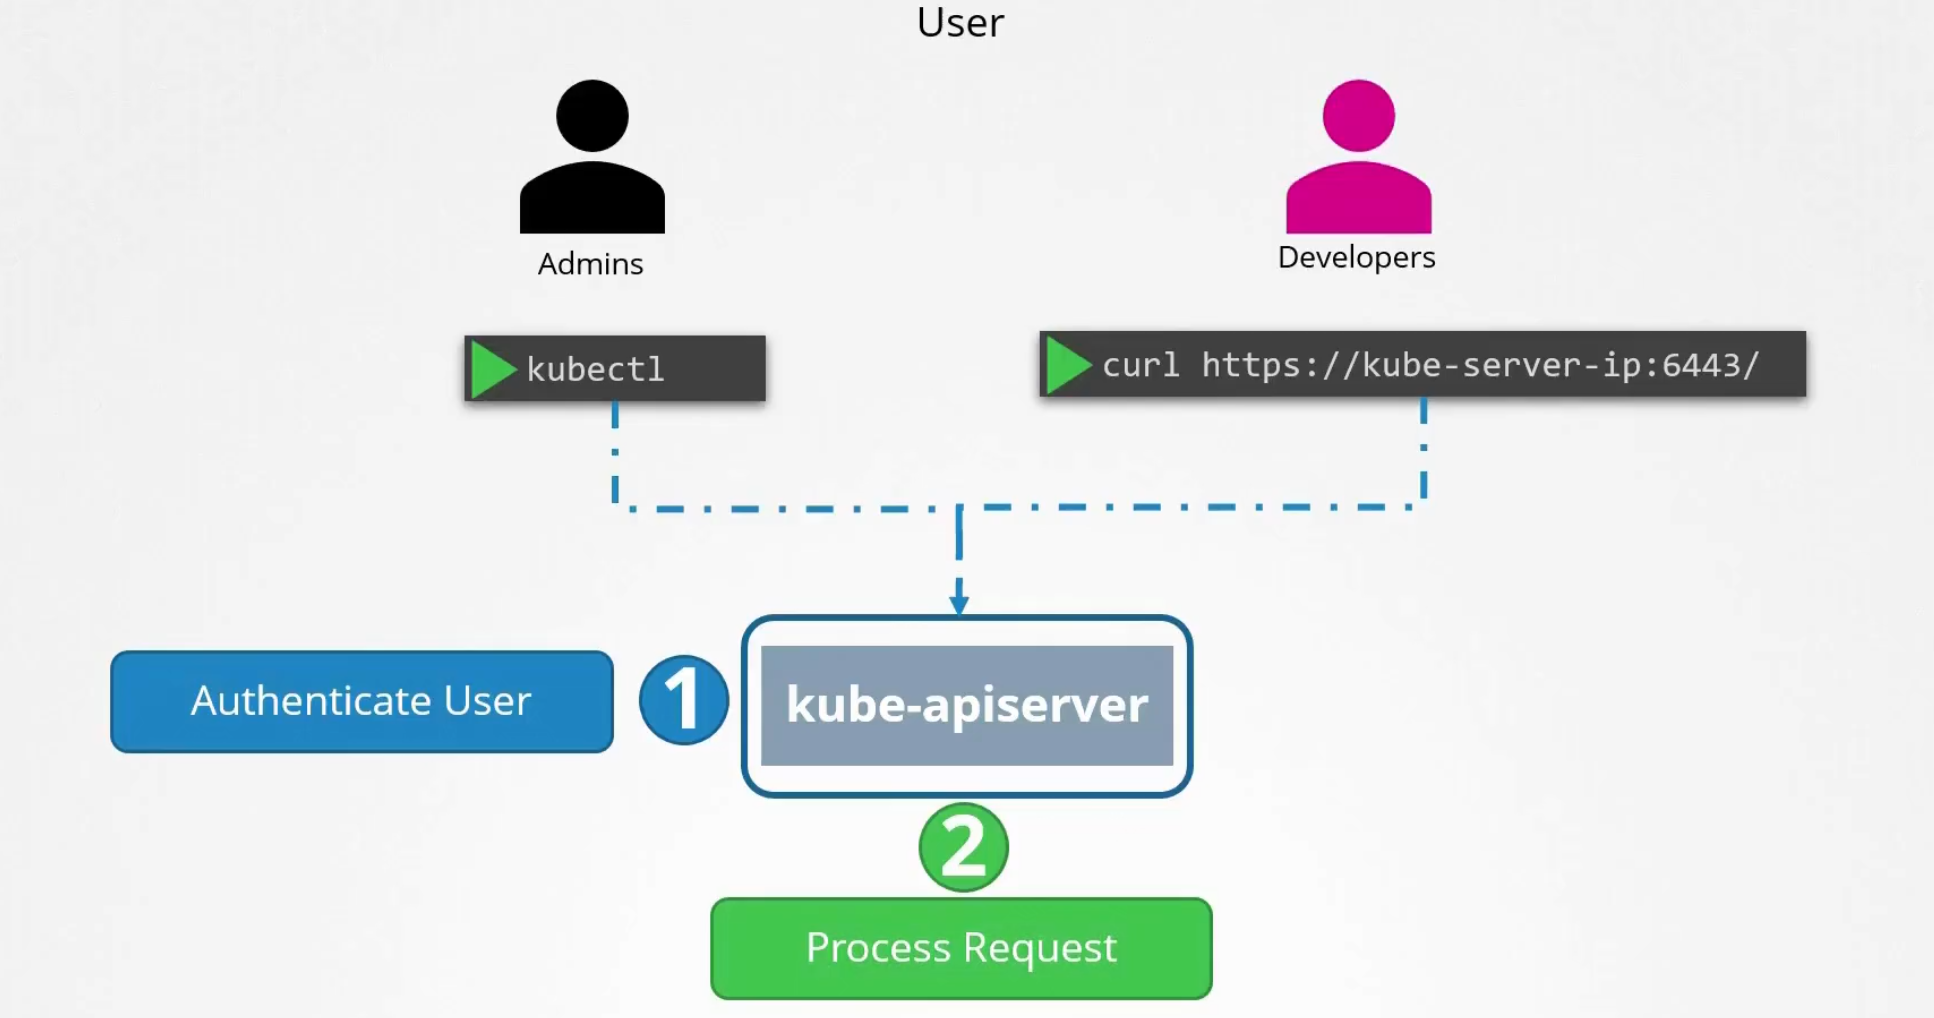
All the request goes to kubeapi server and then kubeapi server authenticate the user and then process it.
But how do they authenticate?
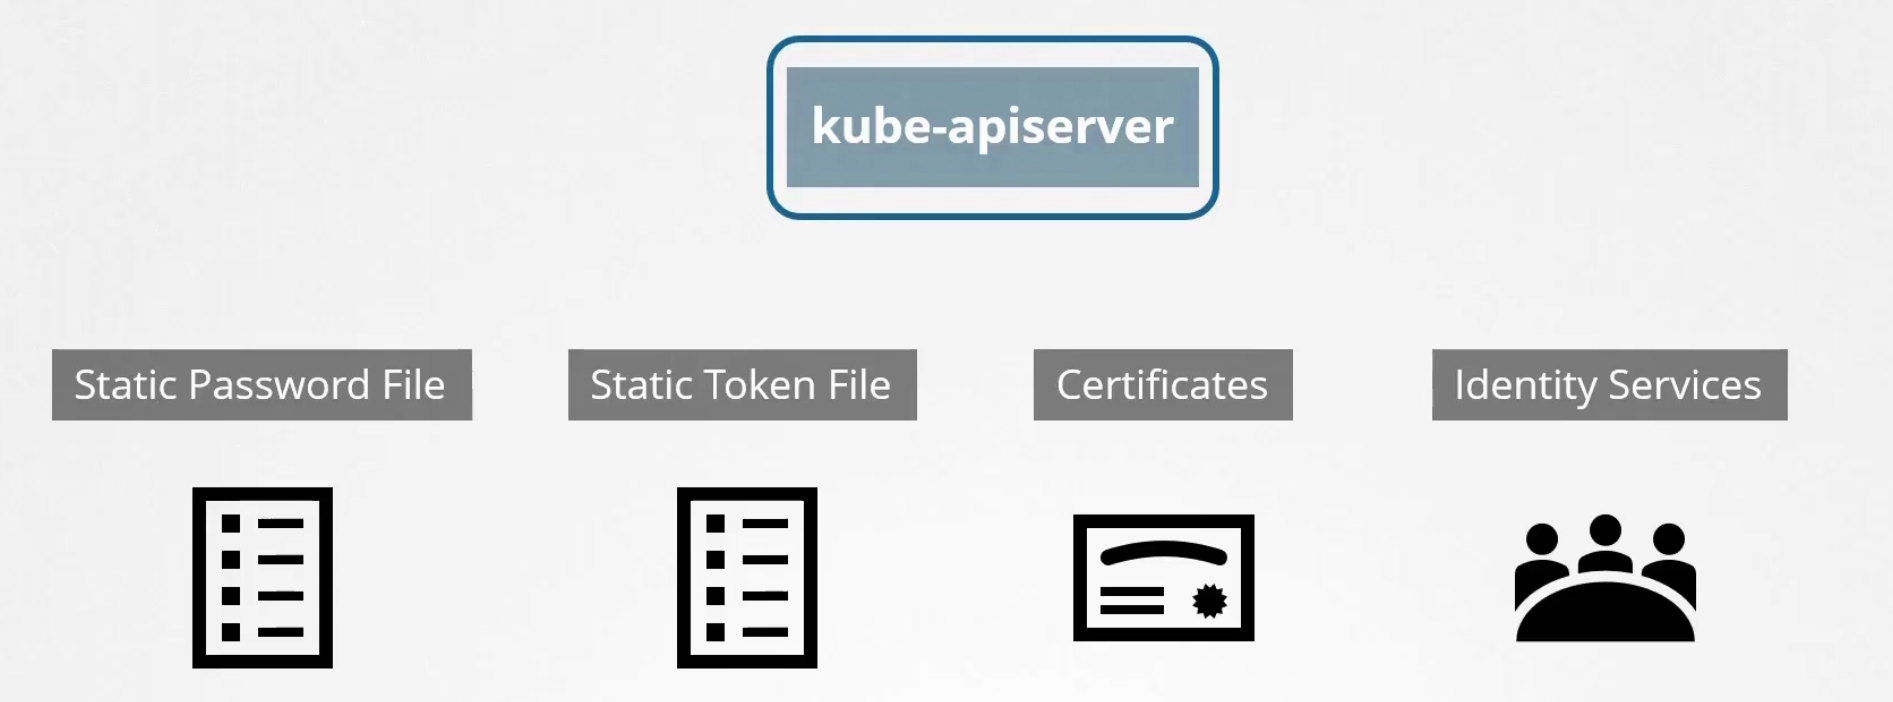
It can authenticate using these.
Static Password File:
First of all, there should be a csv file consist of password, username and user id. Then the file path should be passed to kube-apiserver.service (—basic-auth-file=user-details.csv)

Once done, we need to restart to make it work.
To authenticate using the basic credentials while accessing the API server, specify user and password like this:
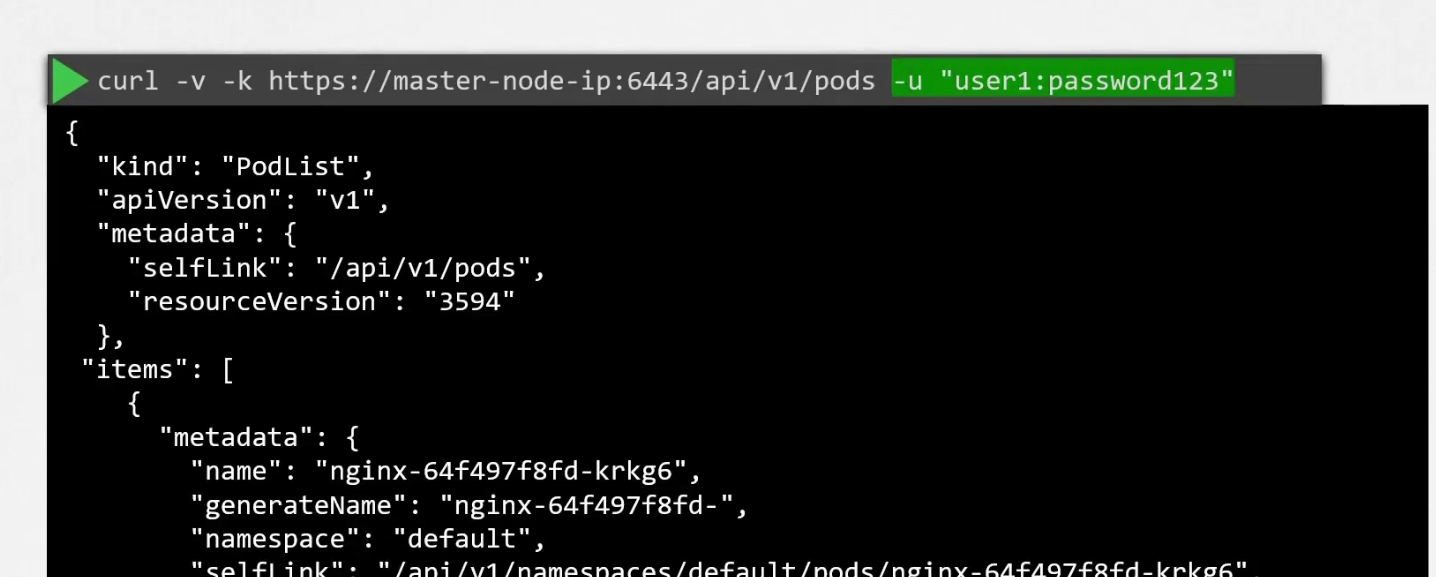
We can also add group in the csv file if we want.

Static token file:
You can create a csvfile with tokens, users, group name
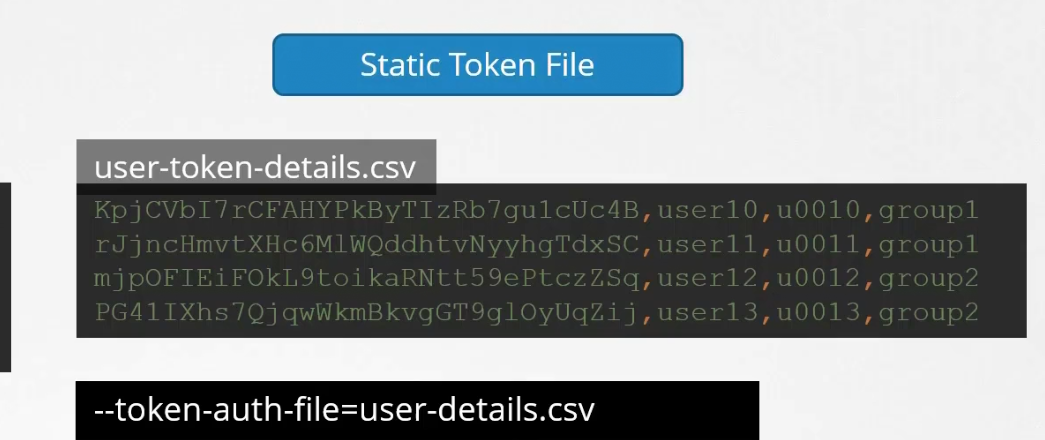
Then pass this file name to kube-apiserver.service (Add —token-auth-file = <csv file>)
While authenticating, use the token as Bearer token

TLS Certificate
First of all, understand what is a TLS certificate from here
There are various ways to create a certificate,

Now, we will create certificates for our cluster. Let’s use openssl today
Firstly we generate the ca key, then send a signing request and then sign it using CA
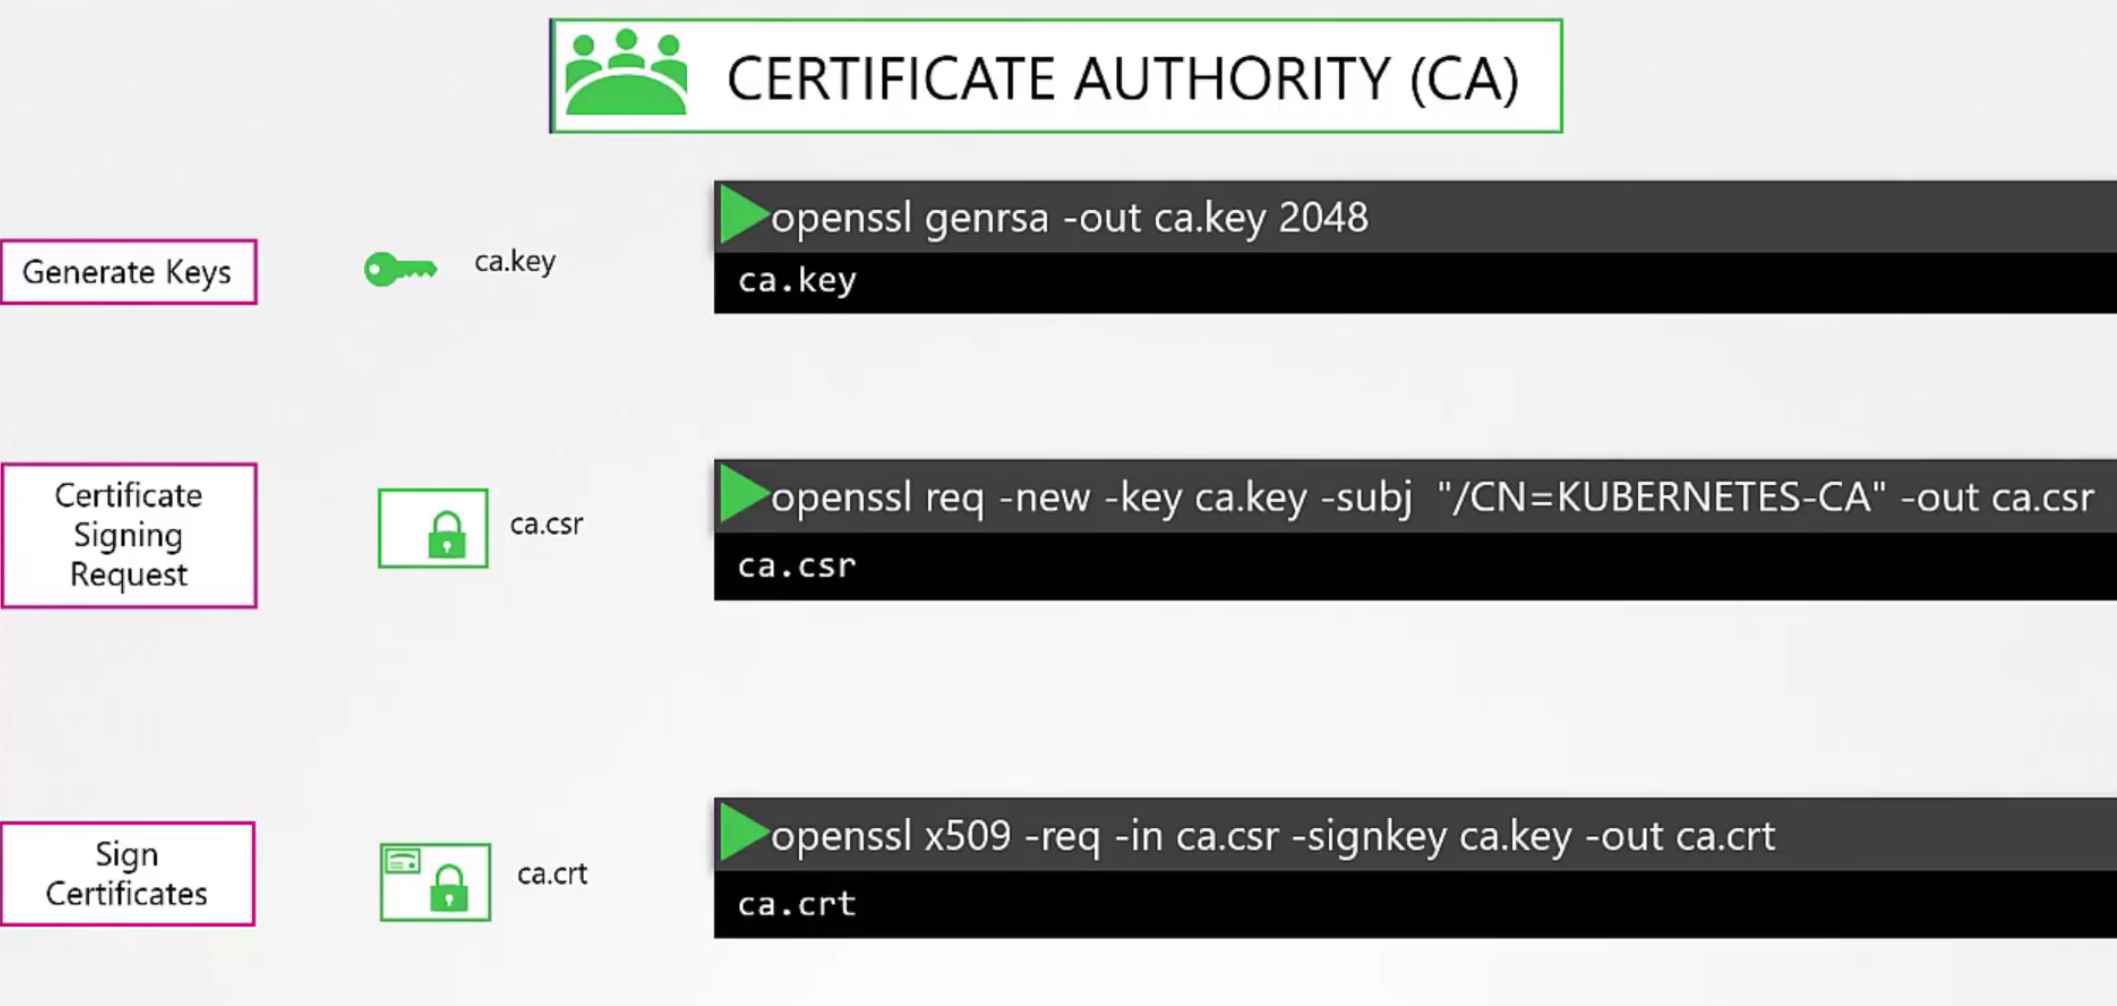

Now we have ca.key(CA’s private key) and ca.crt (certificate)
Note: CN is the name we need to keep in mind.
We will sign all other certificates using the CA.Then we generate key and certificate for the admin user. The certificate was signed using ca.key
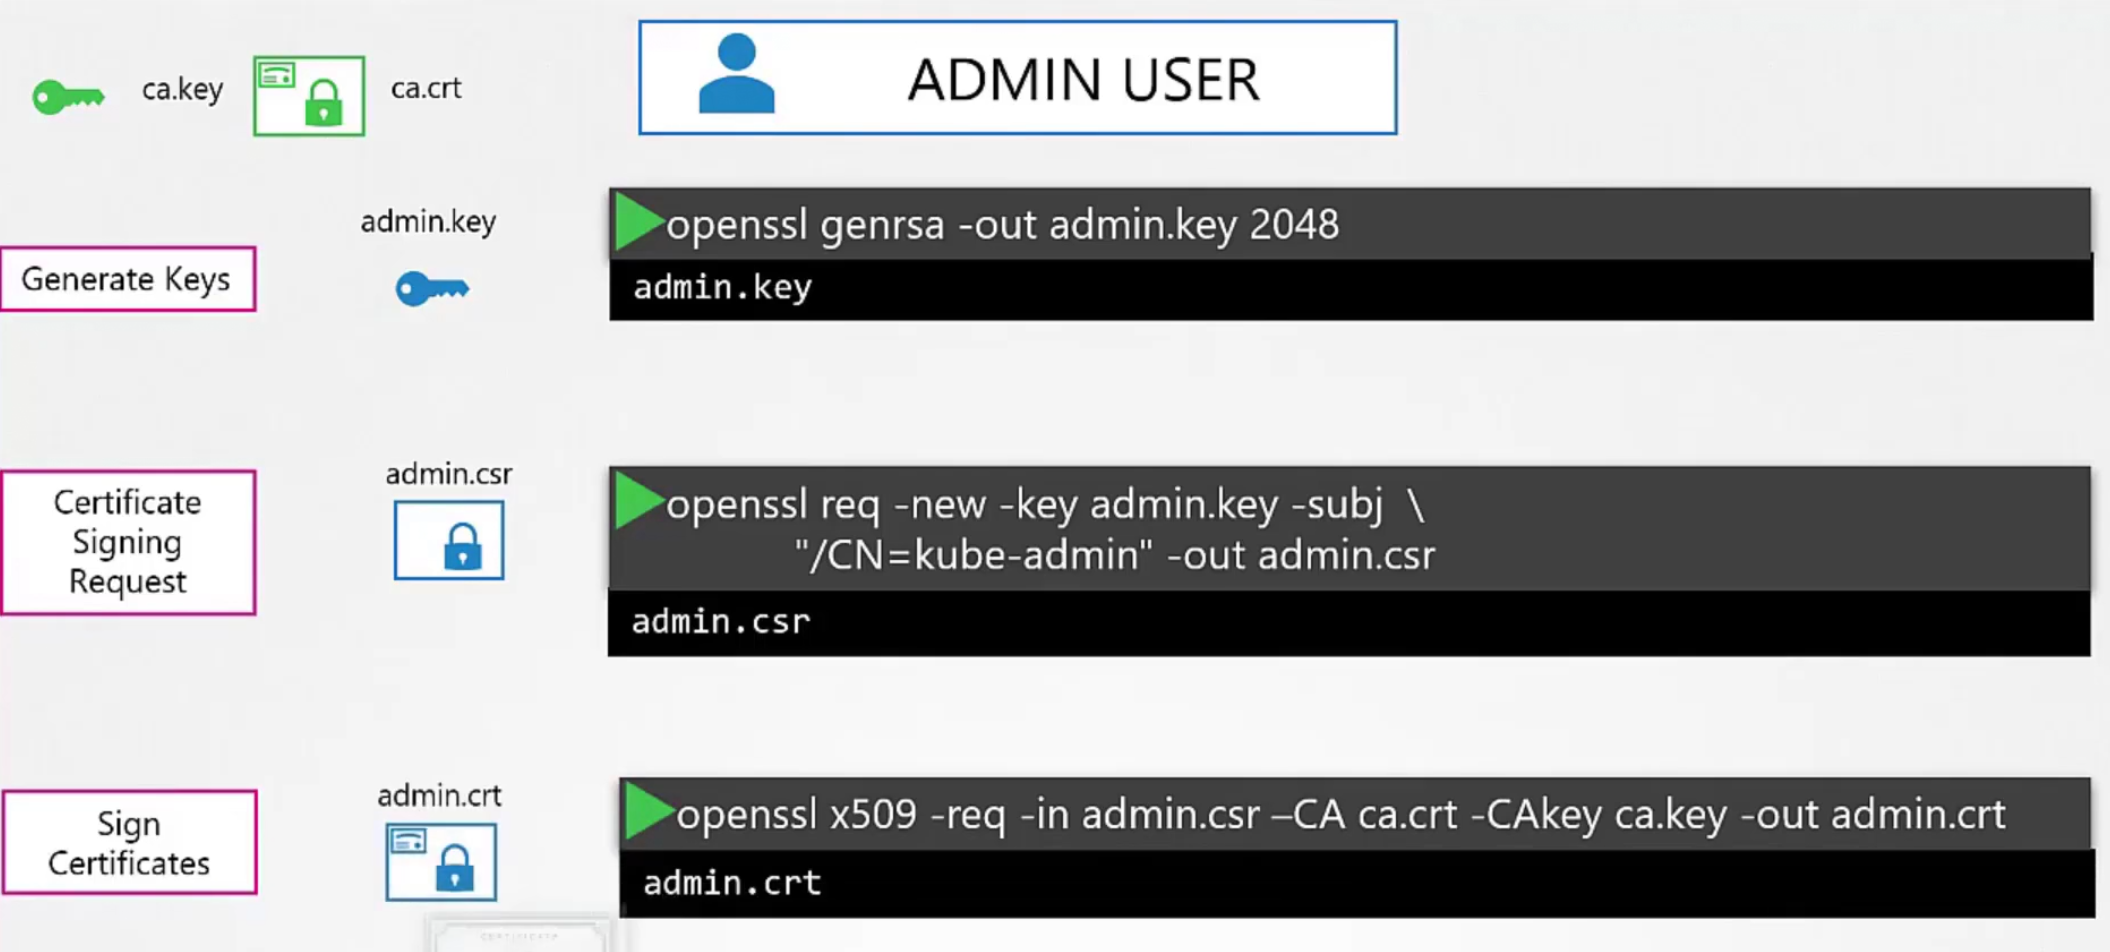
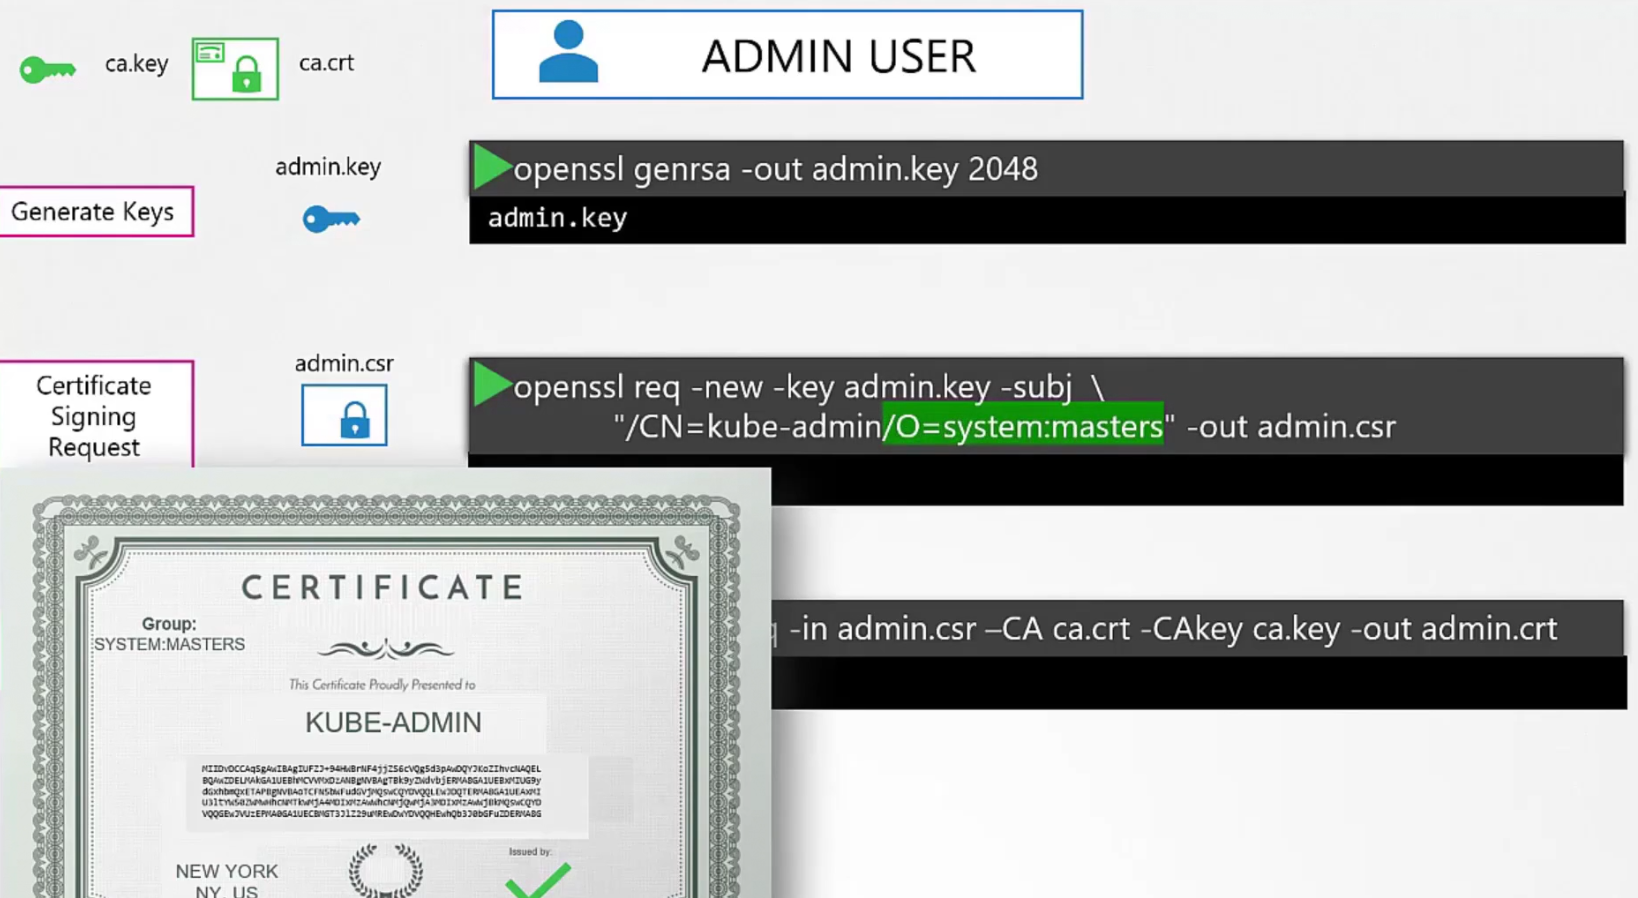
We can make this account different by adding it to system:master group and sign the certificate for it
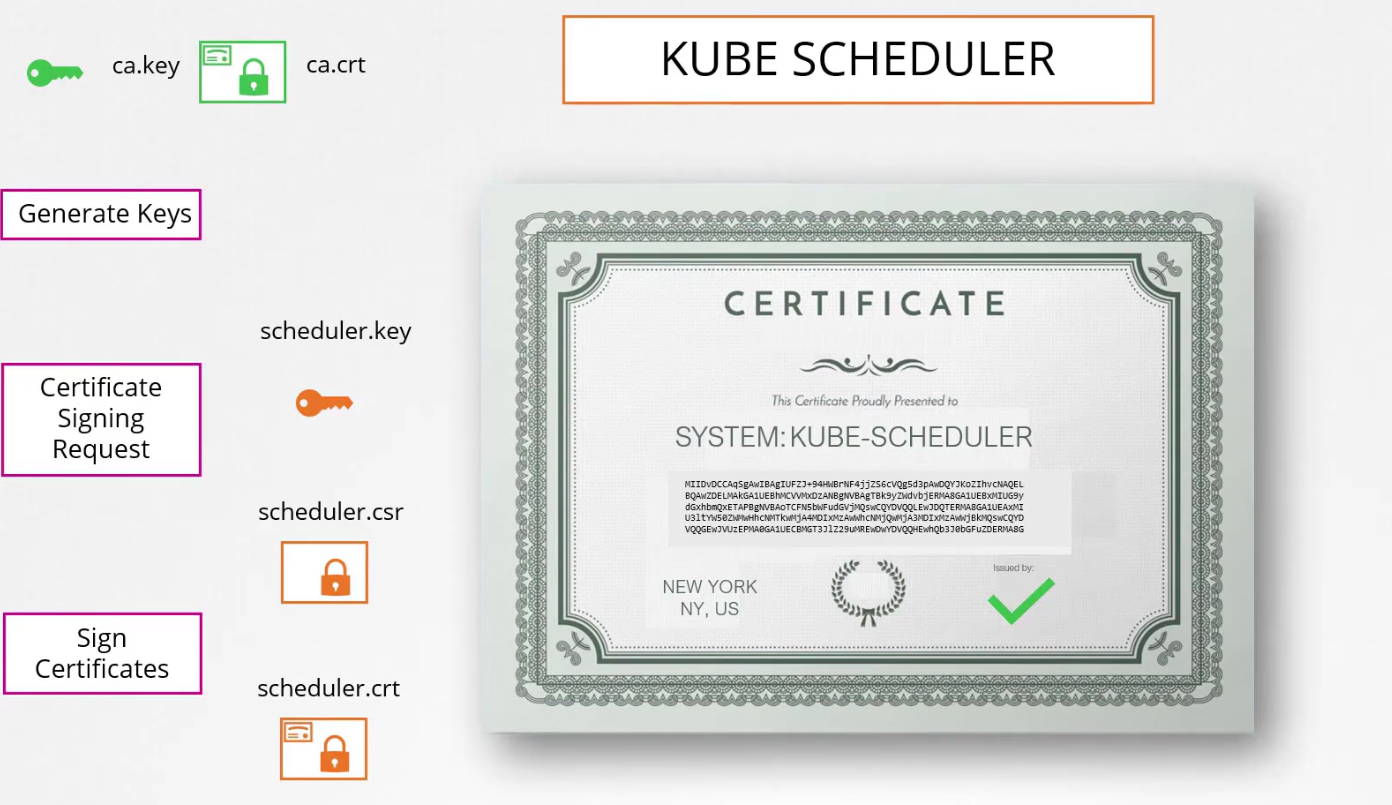
Then for kube scheduler which is part of the system
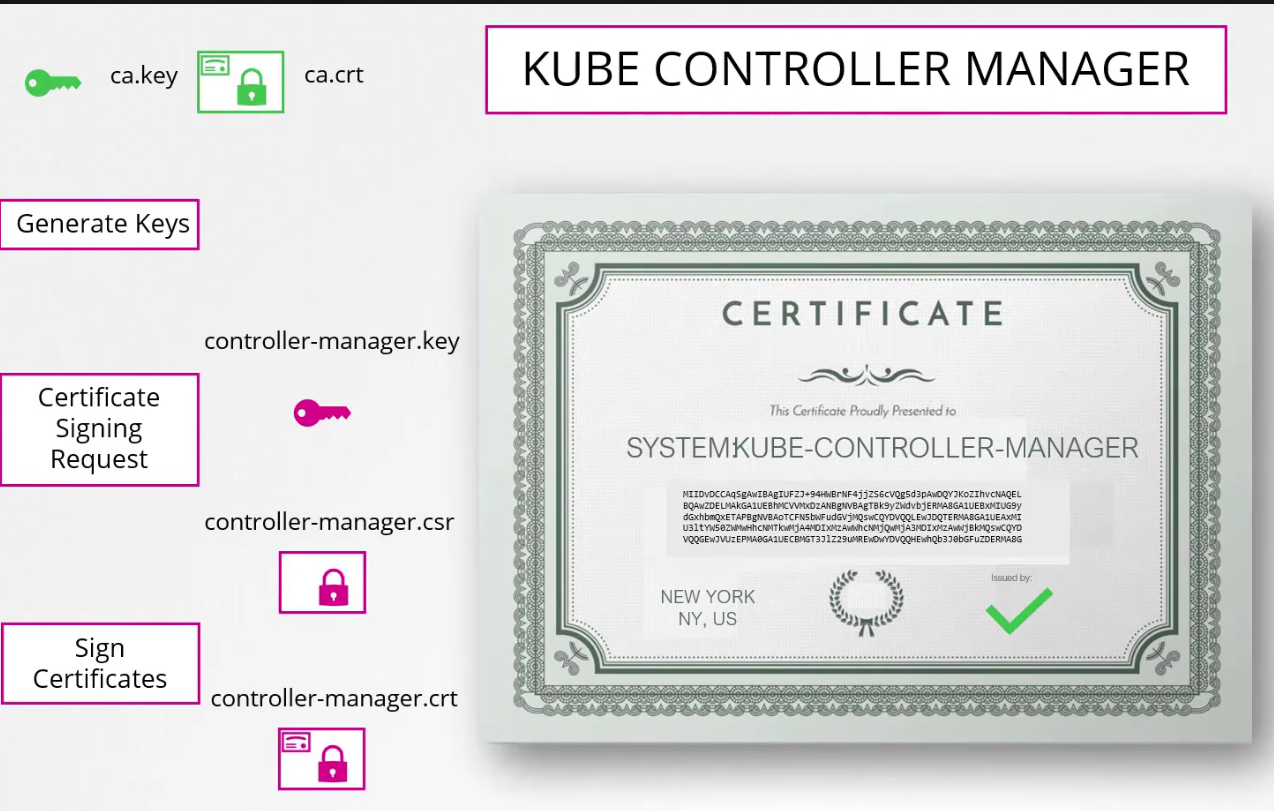
Then controller manager part of system,
Finally, kube-proxy
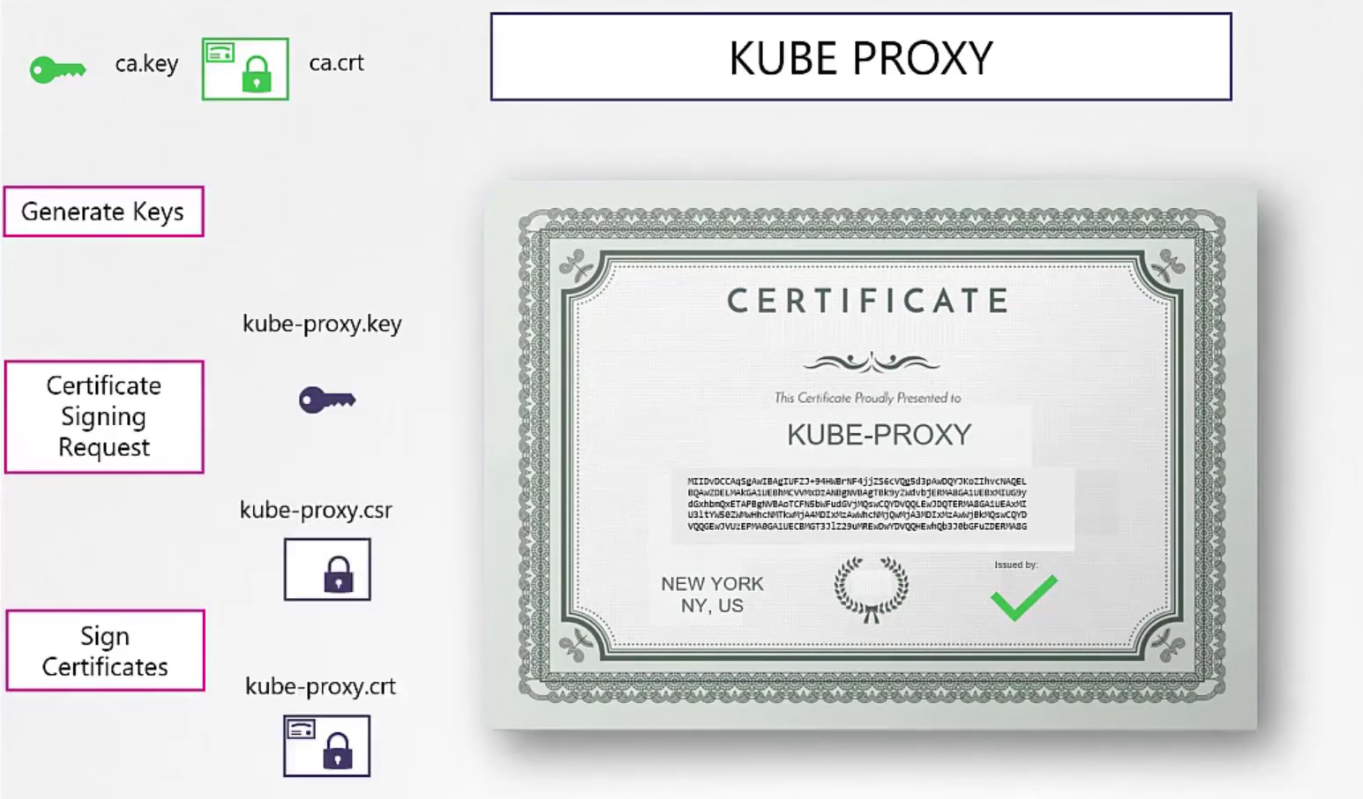
So, by now we have created these (Green ticked mark)
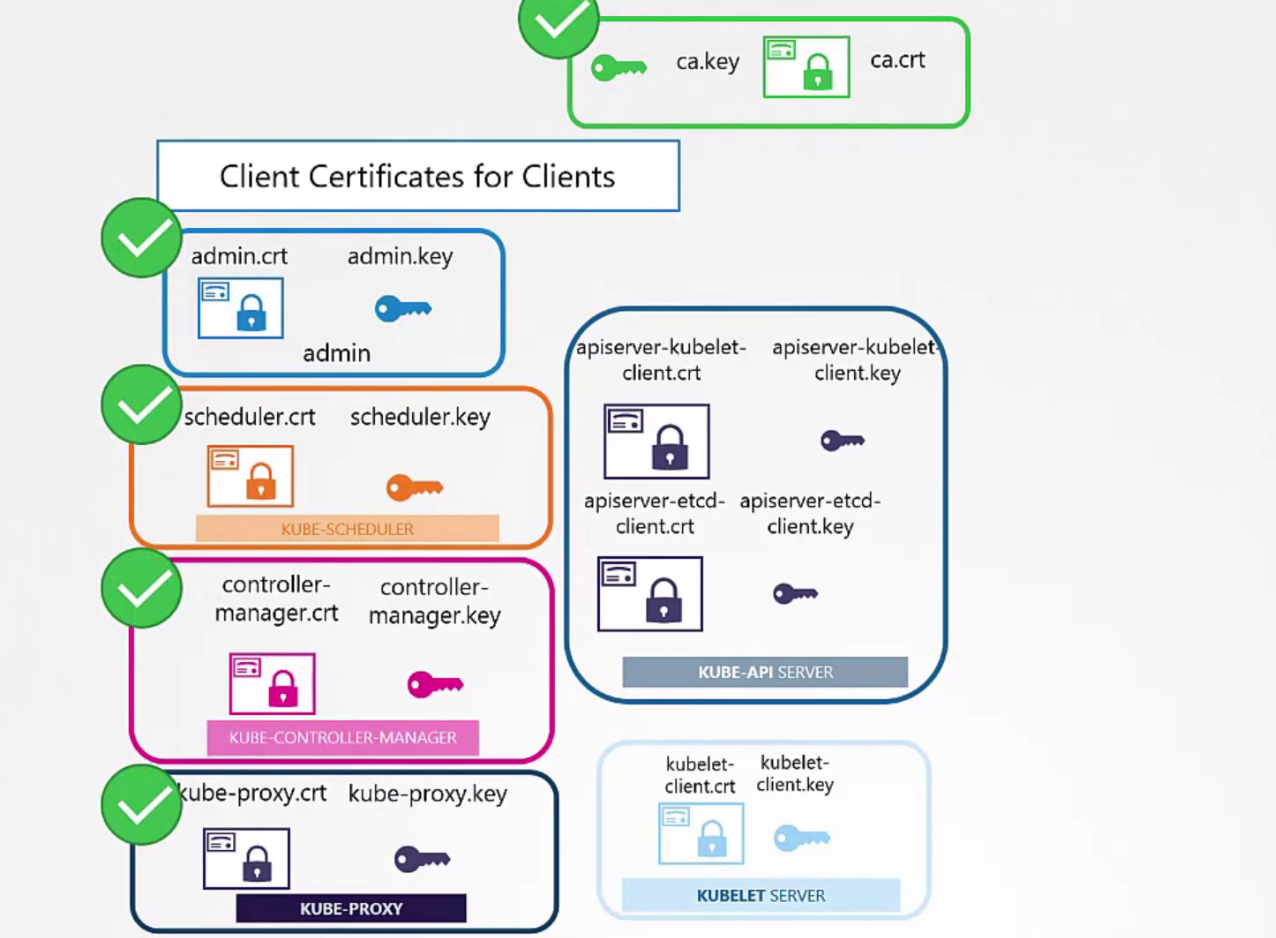
Other two will be generated when we are generating server certificate. So, how to use them?
For example, for the admin:
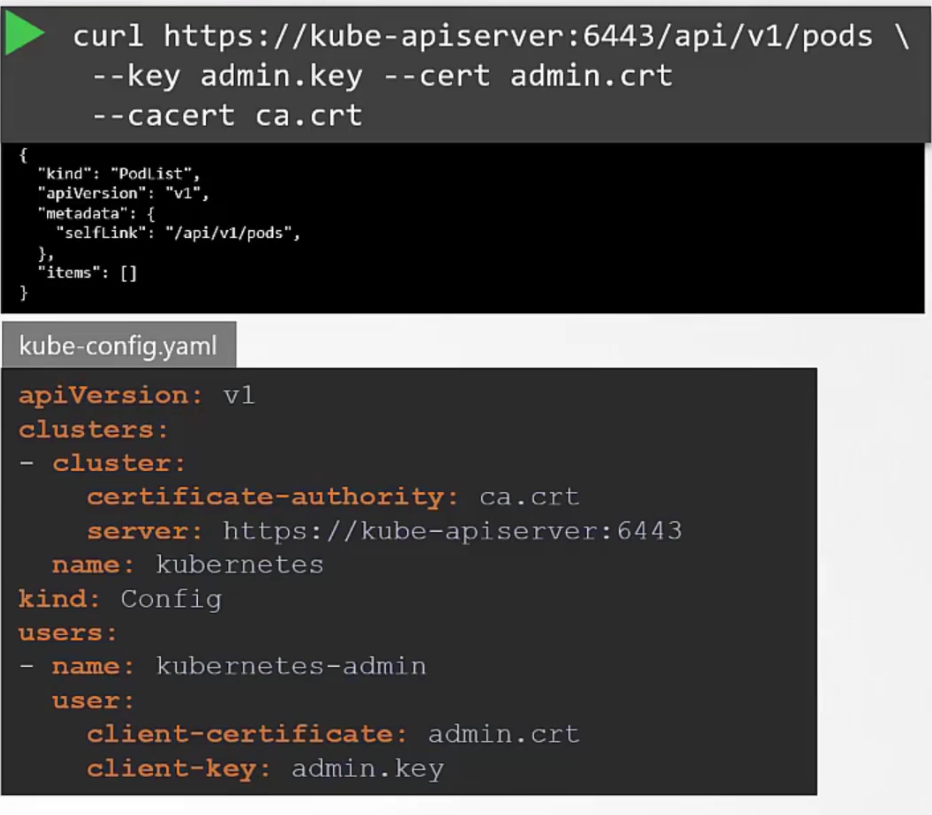
We can use curl or kube-config file and mention the certificates, keys and others to get the administrative privilege now
Note: Keep in mind that all of the certificates need ca.crt to validate their certificates
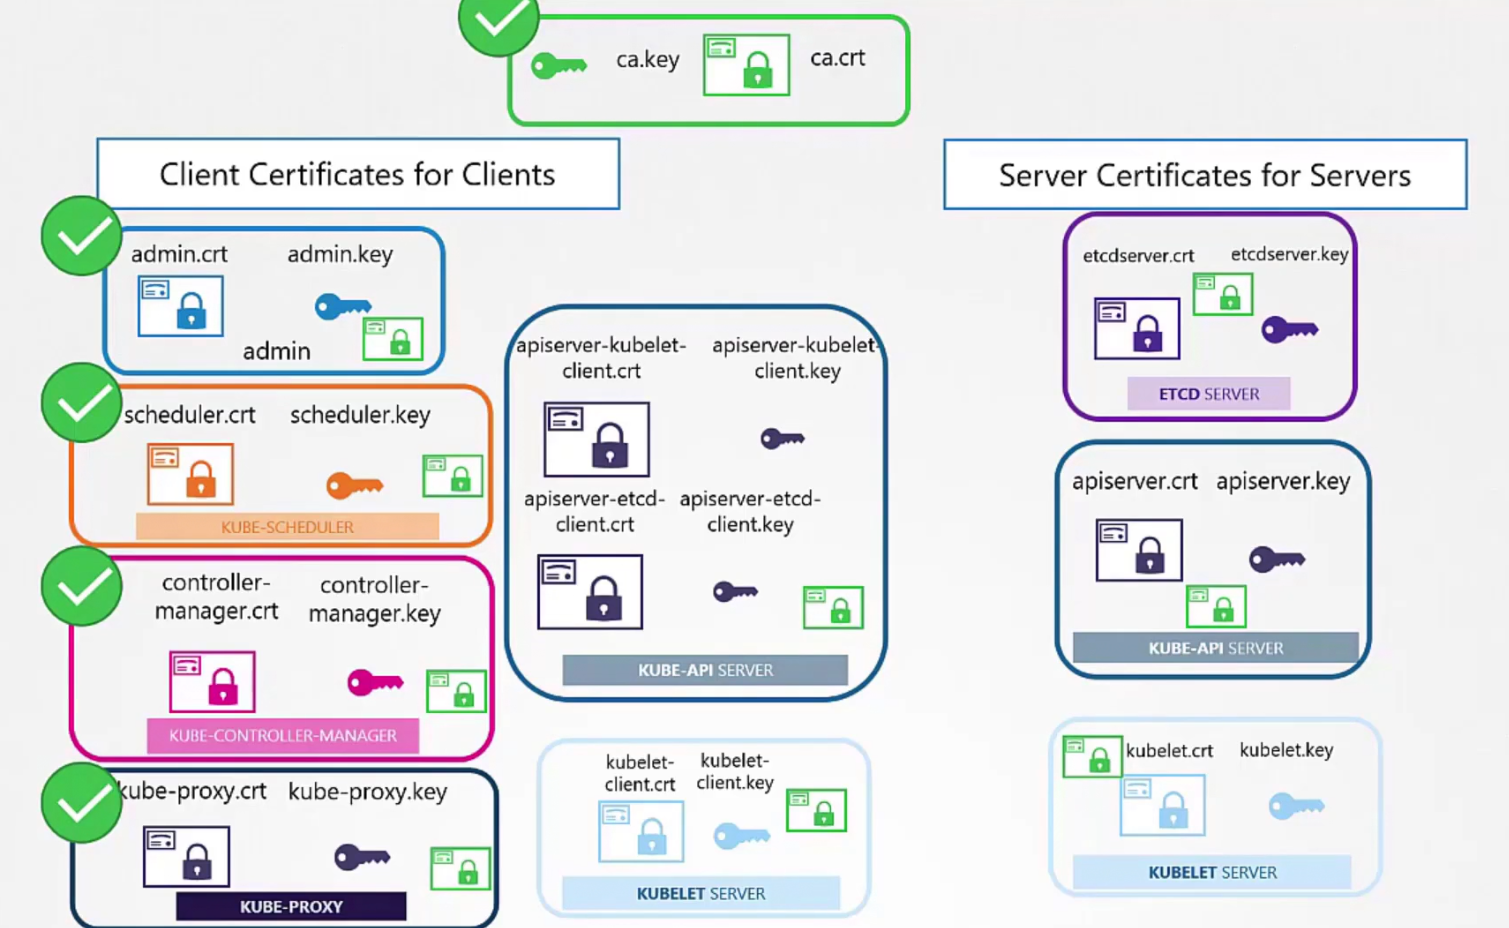
Let’s create server certificates
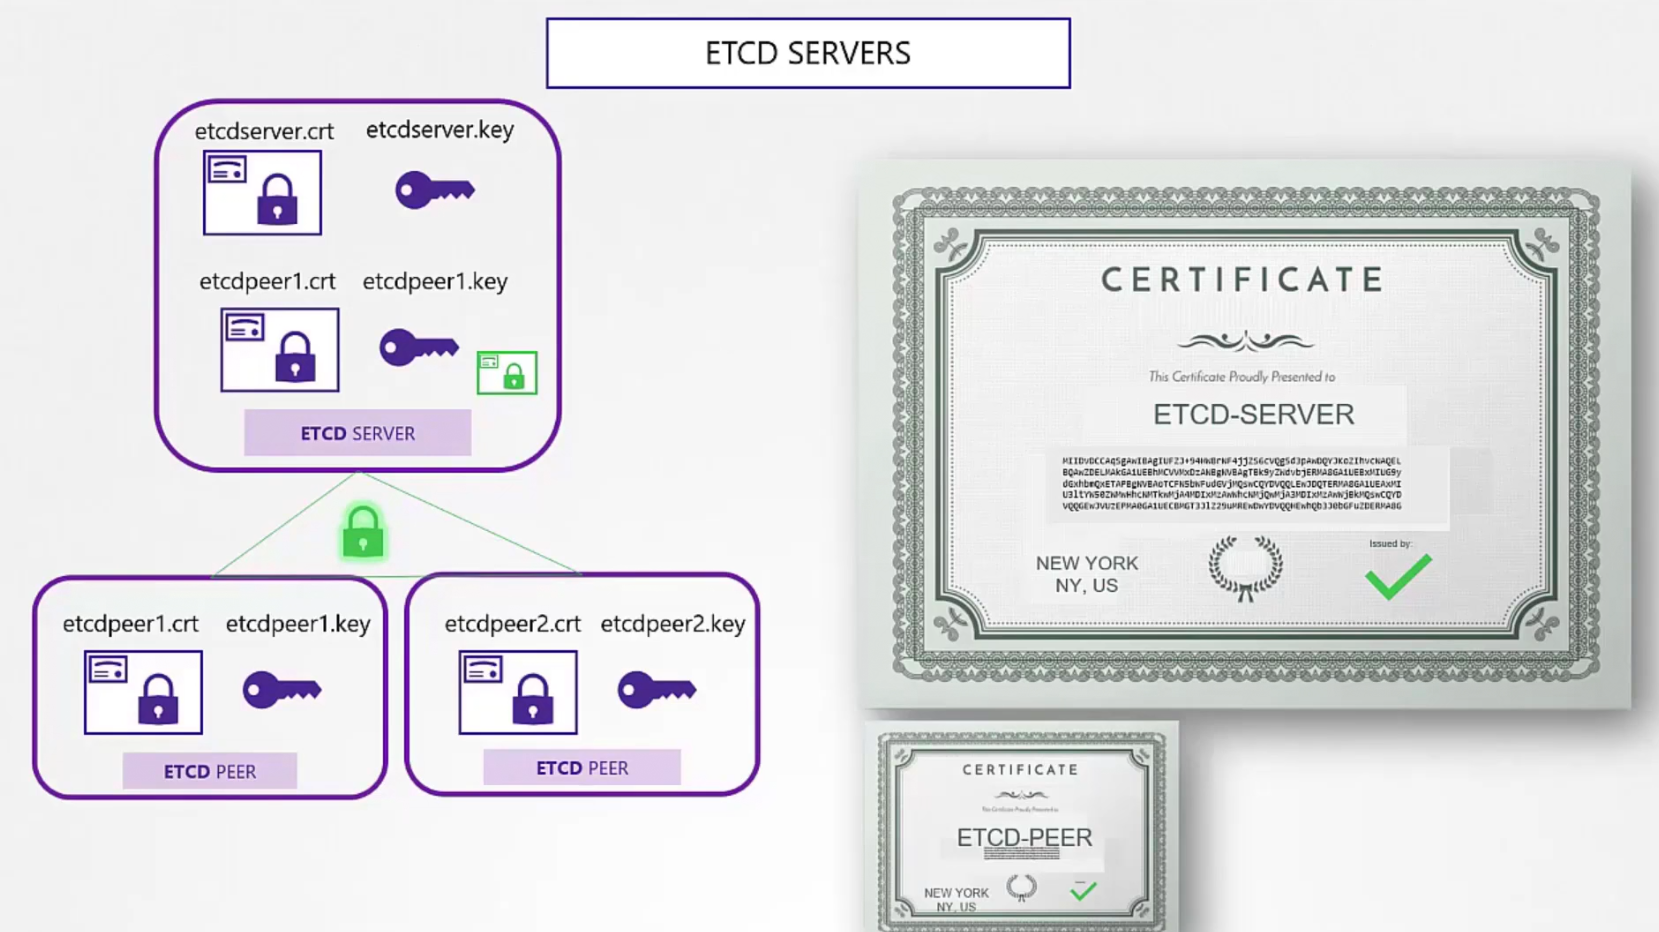
We firstly create etcd servers’s certificate and then for availability,we can use multiple peers in different zones. We can create certificate for them as well (etcdpeer1.crt, etcdpeer2.crt)
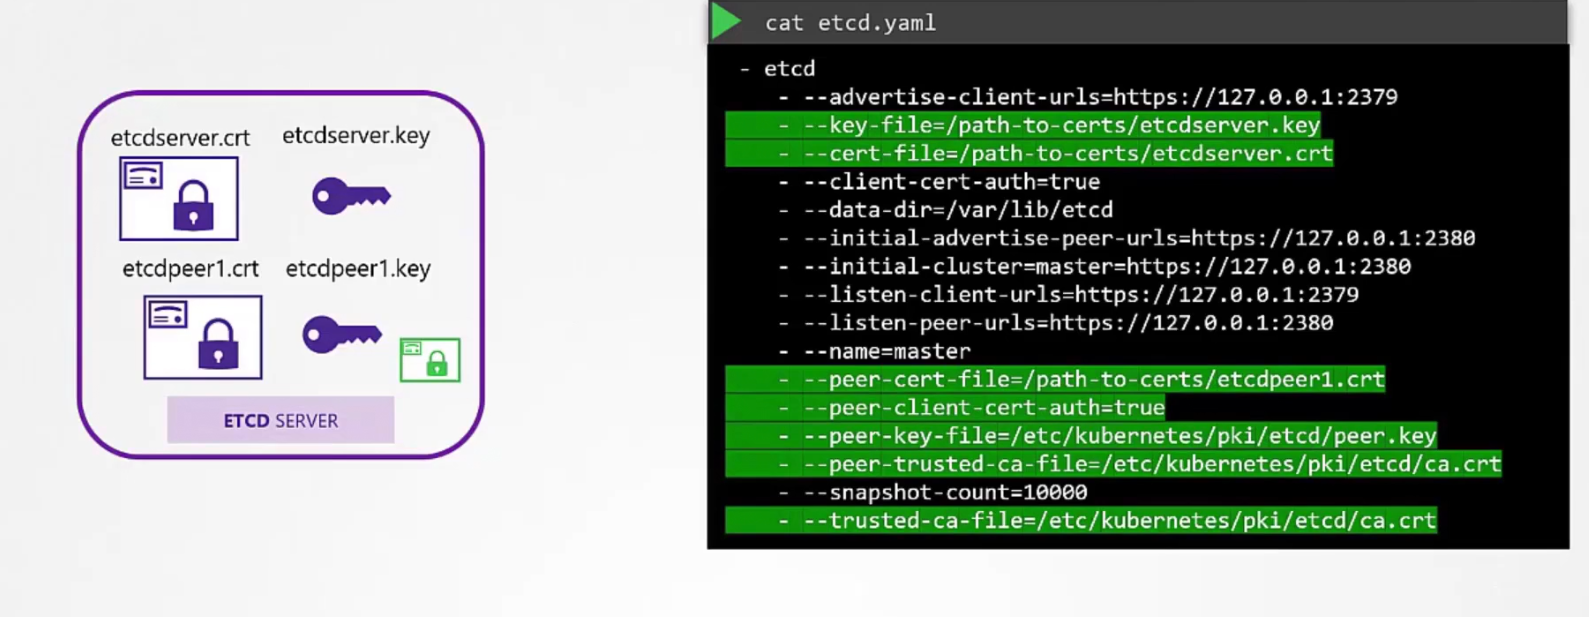
Then we need to add those in the etcd.yaml file
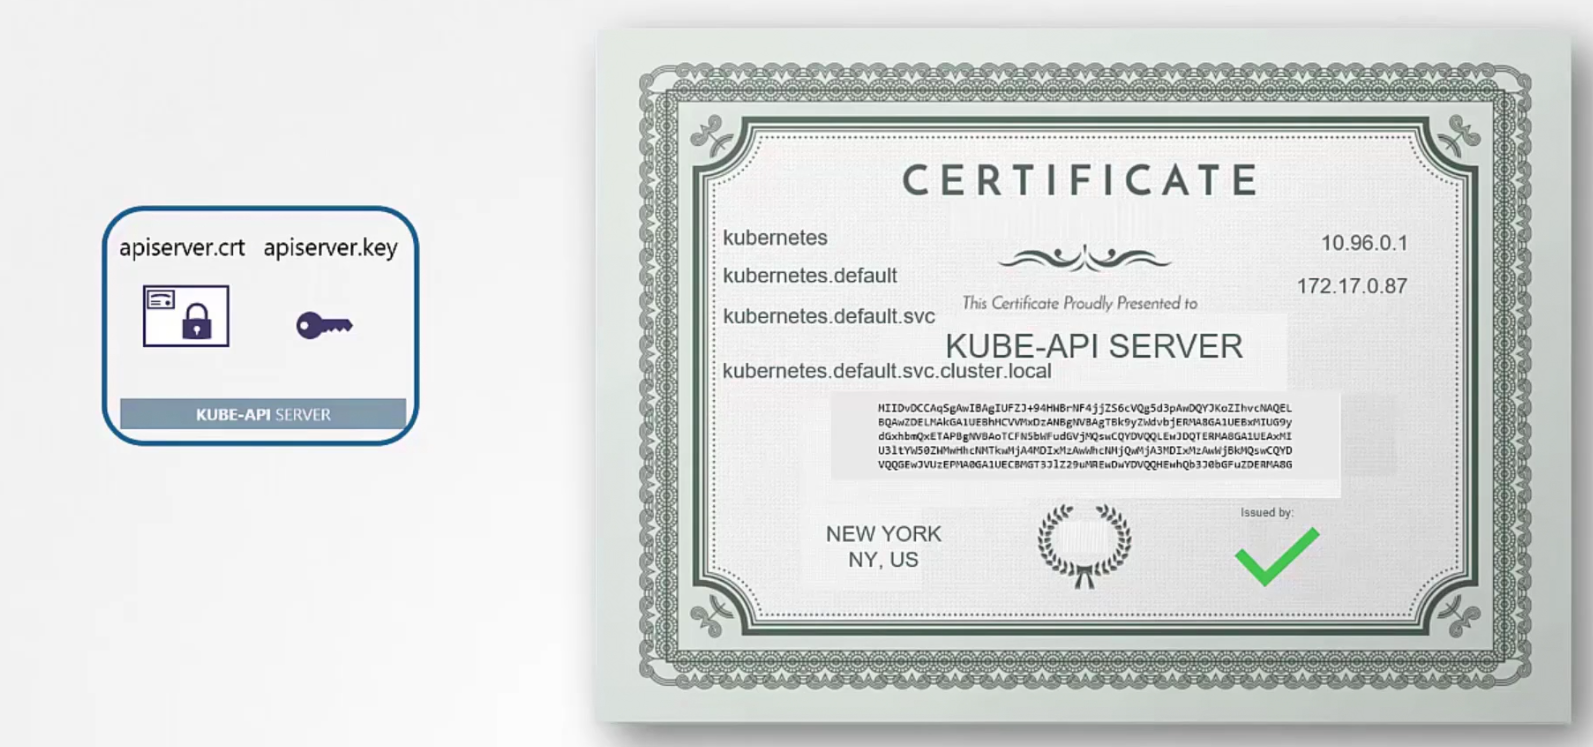
For kube-api server, we use this server with various alias /names like kubernetes, kubernetes.default, IP adress of the kubeapi, host IP of the kubeapi etc.
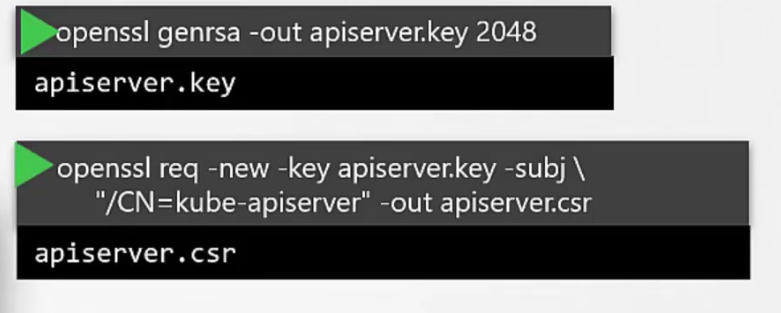
To generate the key for kube-api, firstly create a key and then create a signing request
But we have various names for kube-api as used by an user. We can specify all of those in the config file.
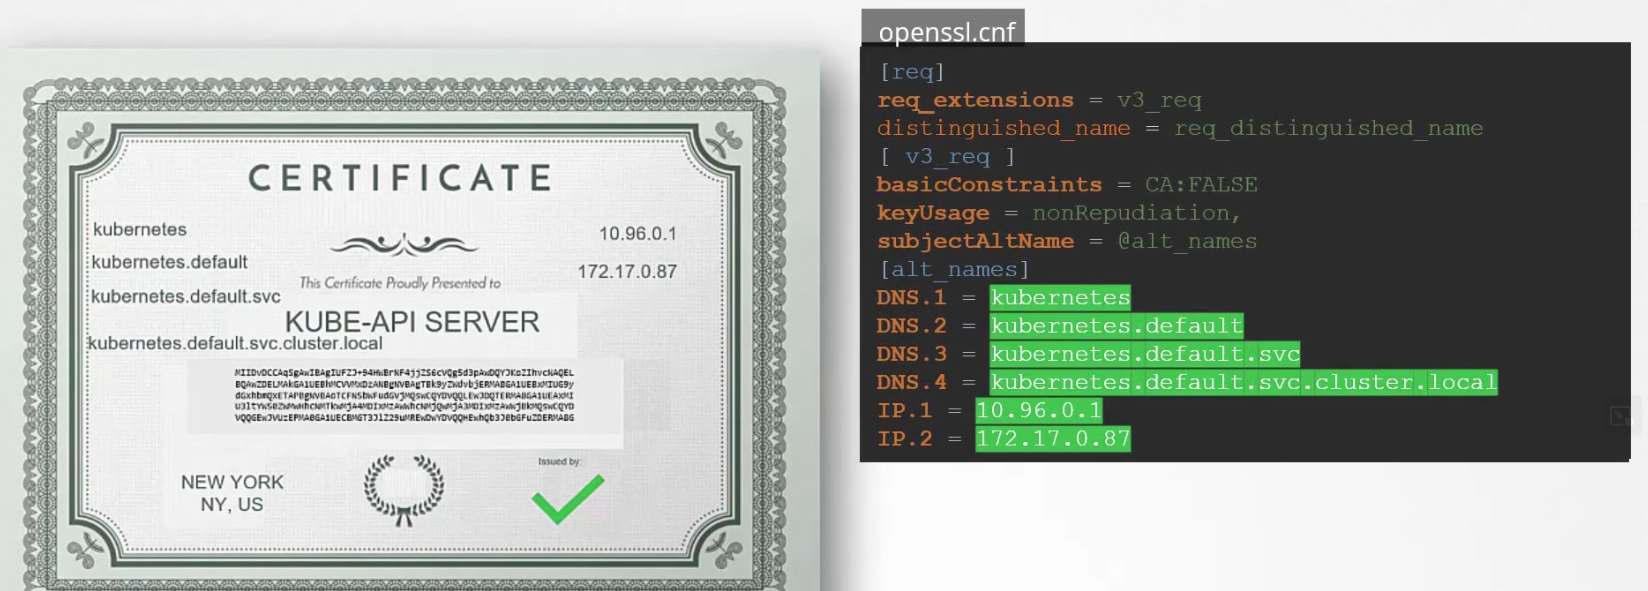
Instead of previous command line script, use this

Then generate the certificate

Also, we need to keep in mind of the API Client certificates that are used by the API server while communicating as a client to the ETCS and kubelet servers.
Then add all of these to the config file
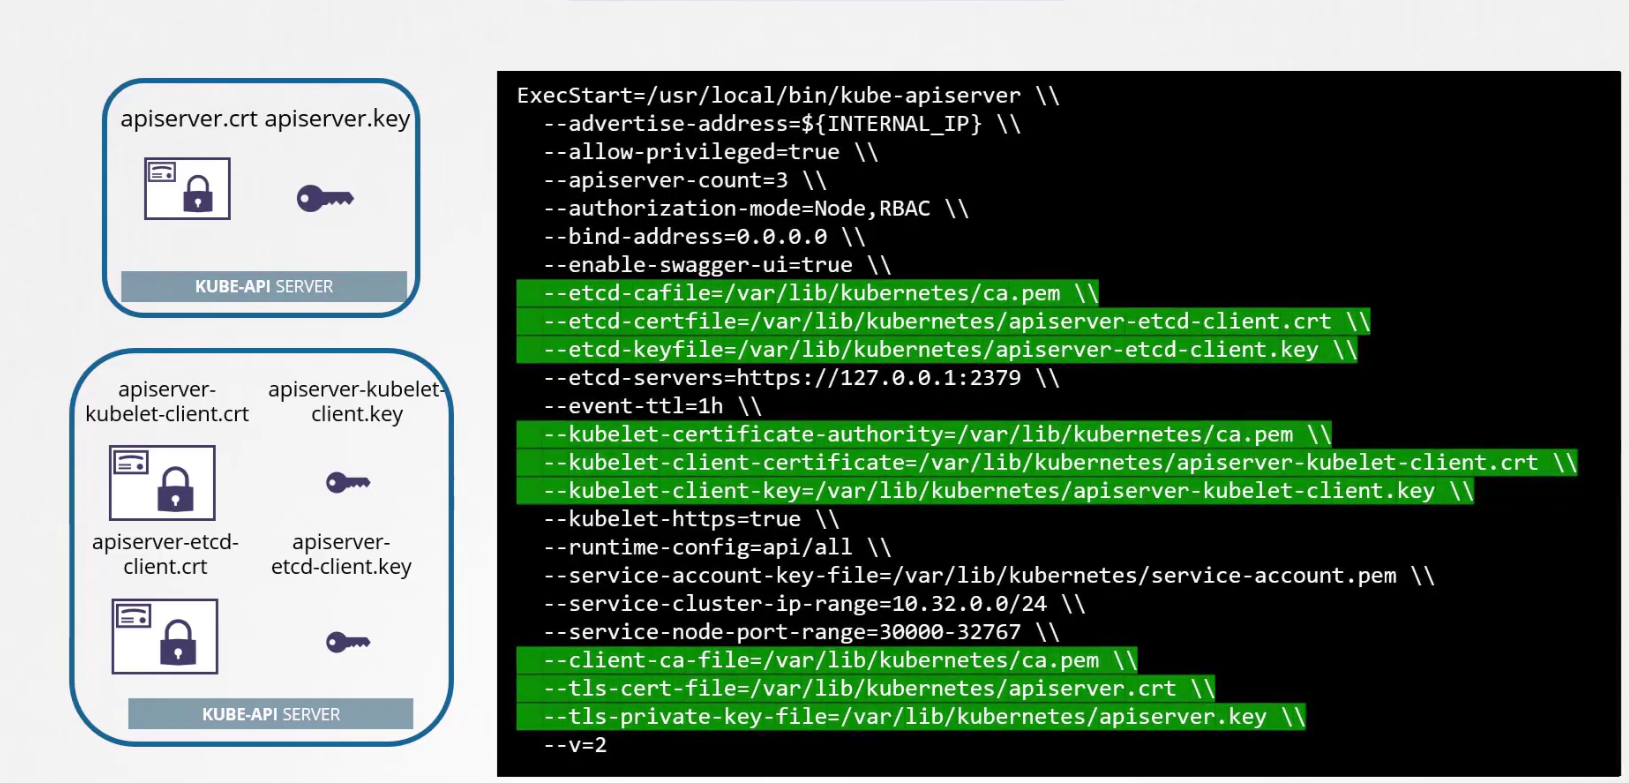
Then we need kubelet server certificate as they are going to be in the nodes (node01,node02, node03)communicating with the kube-api servers.
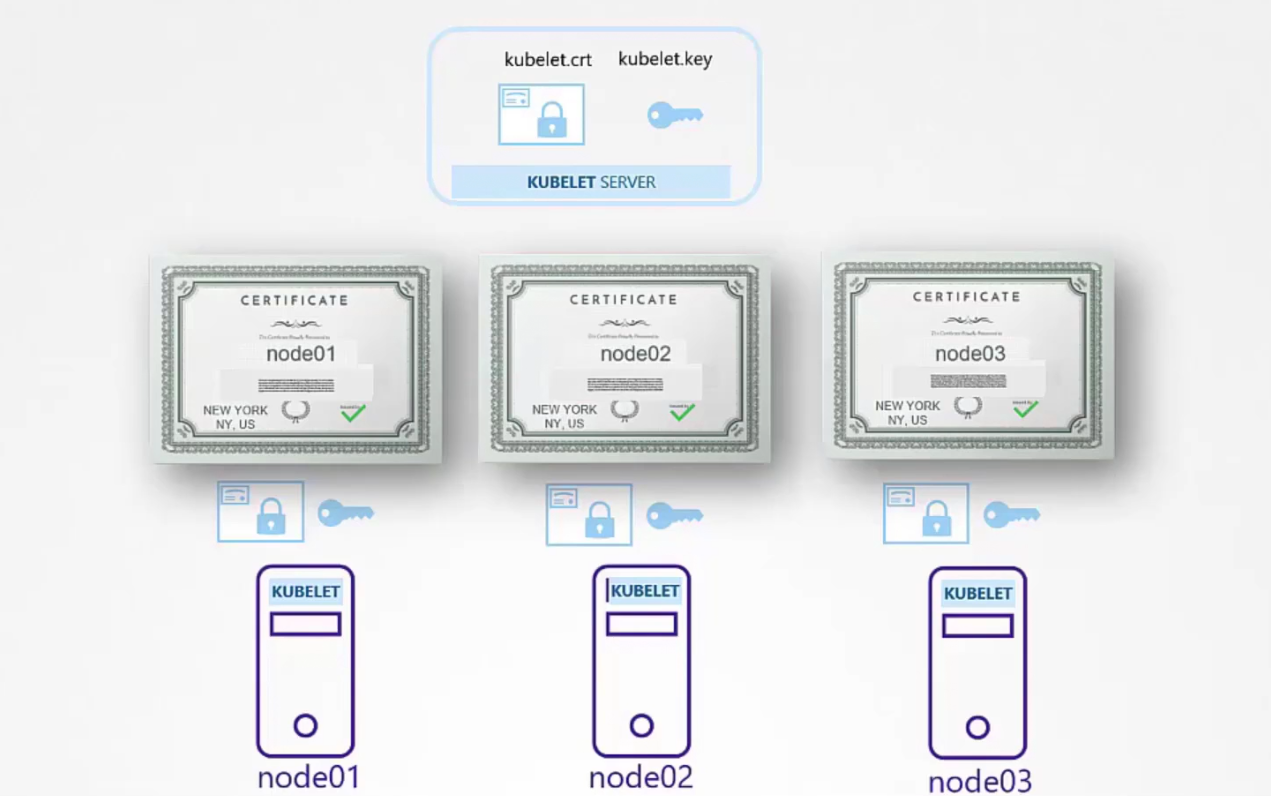
Then we need to configure for each node. Here done for node01,
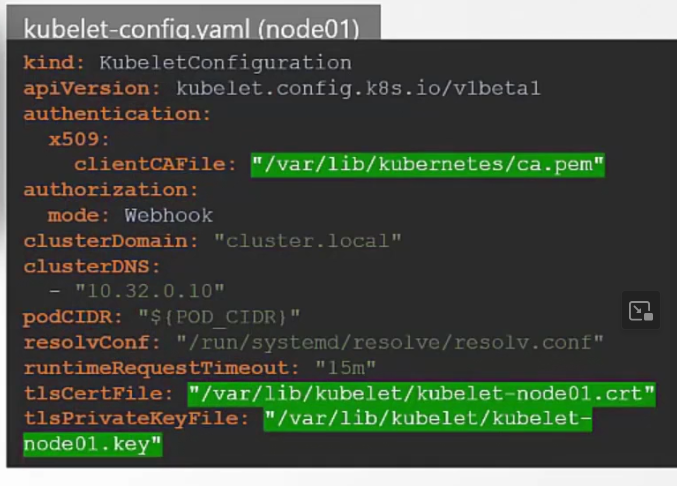
Also, we will create a client certificate to communicate to kube-api server
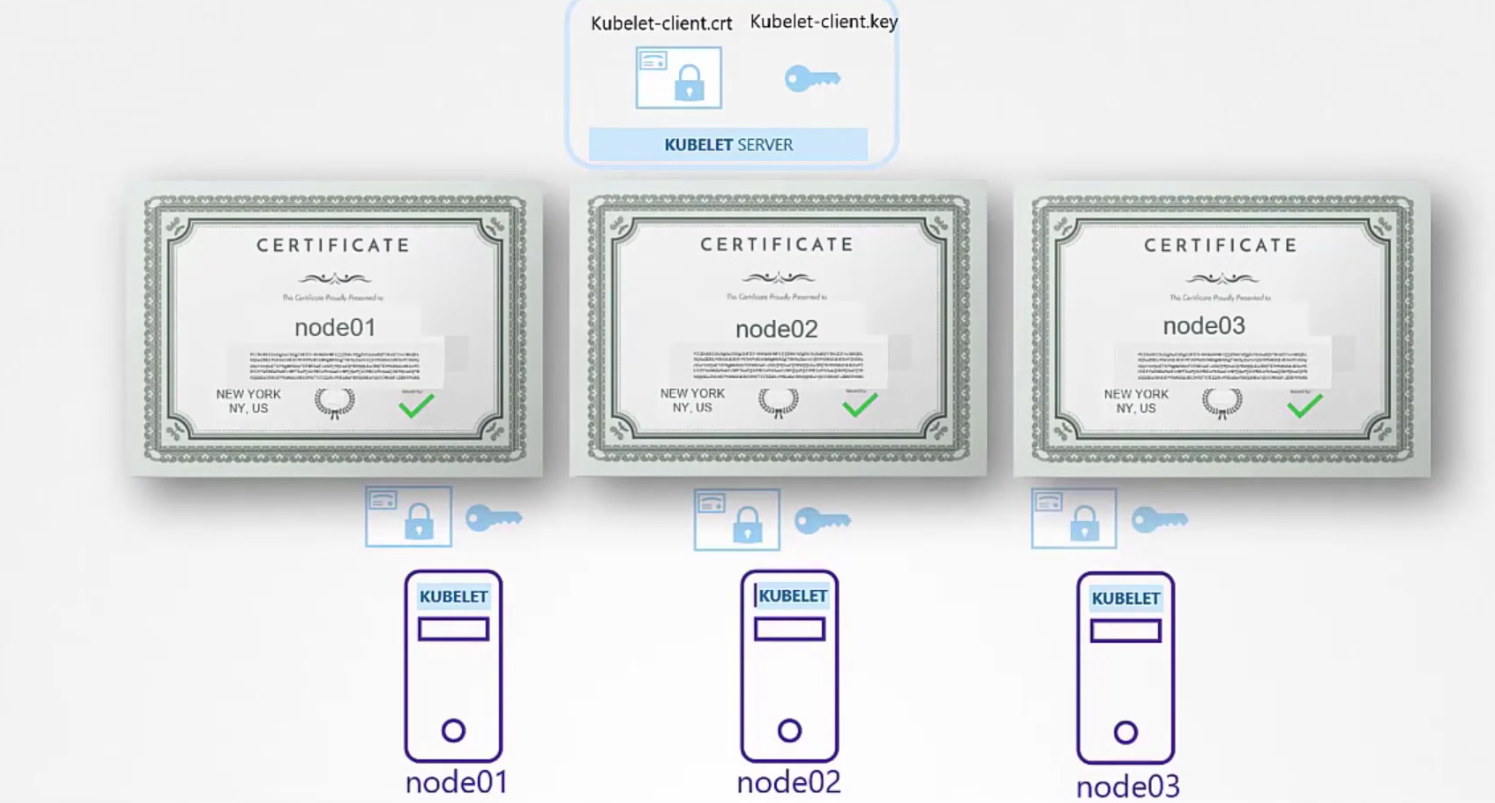
Again, once done we set the paths of these certificates to the kube-config file
Debug Certificate details
Assume that you have issues in your certificates and need to solve it. We have 2 ways to configure certificates.One is manual work and another one is using yaml file.
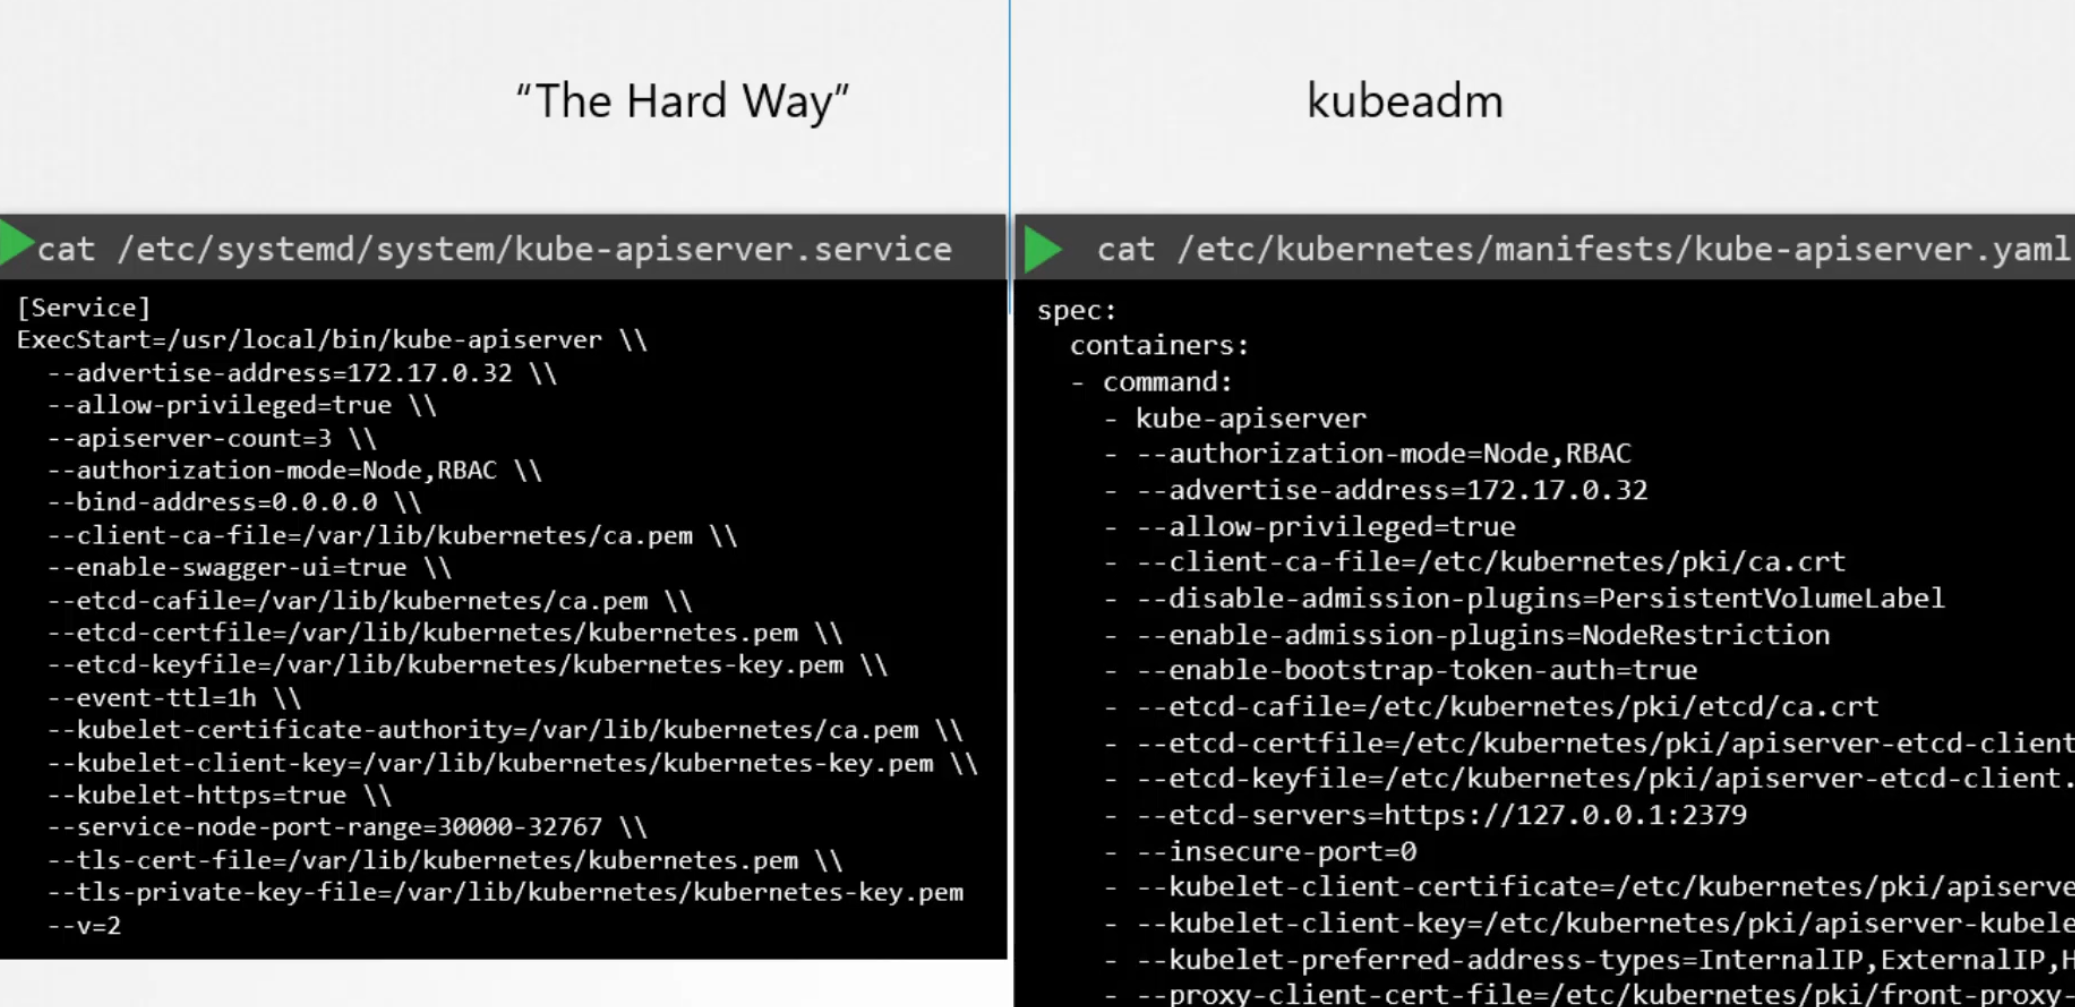
Assuming we have done our certificates task on kubeadm, let’s create an excel to list down certificates and their issuer and all.
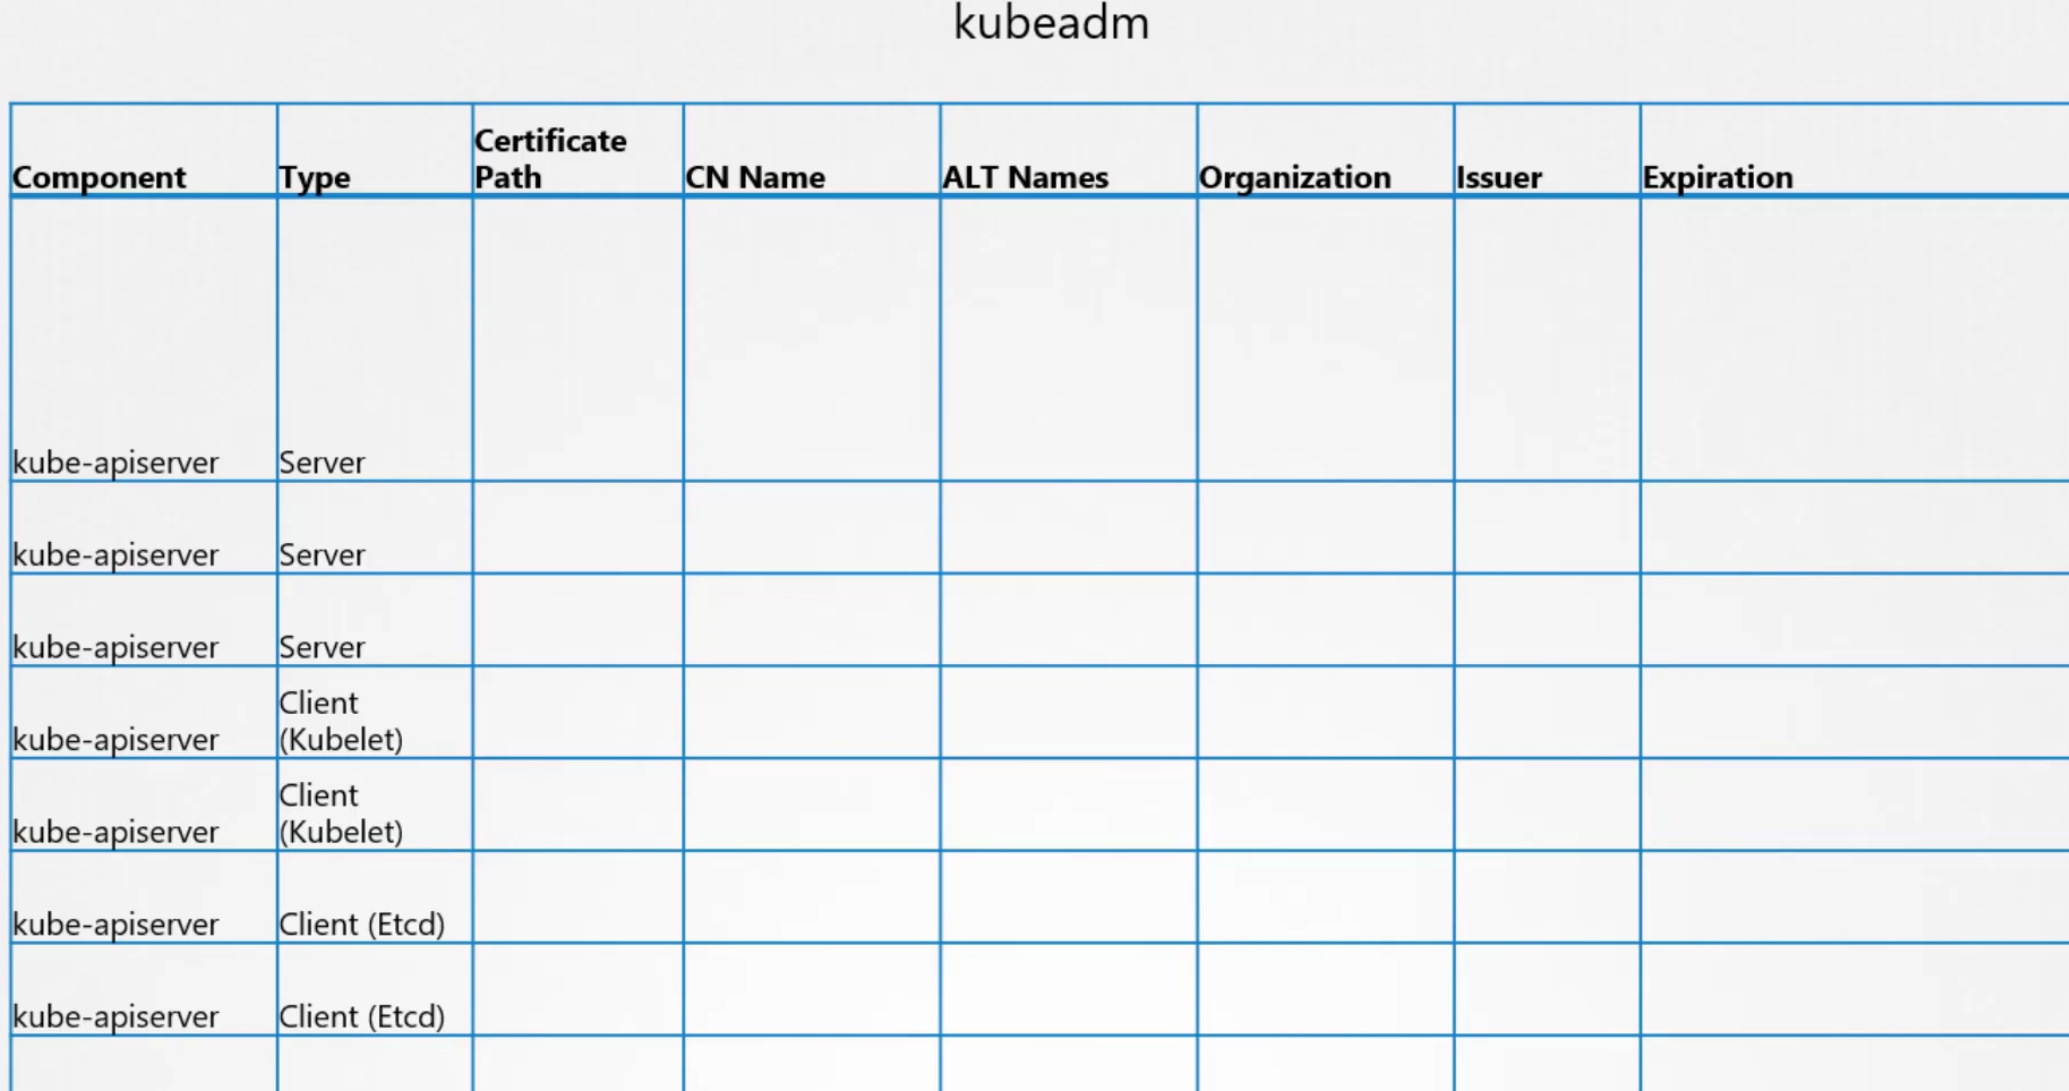
Now, we can check the certificate file list and
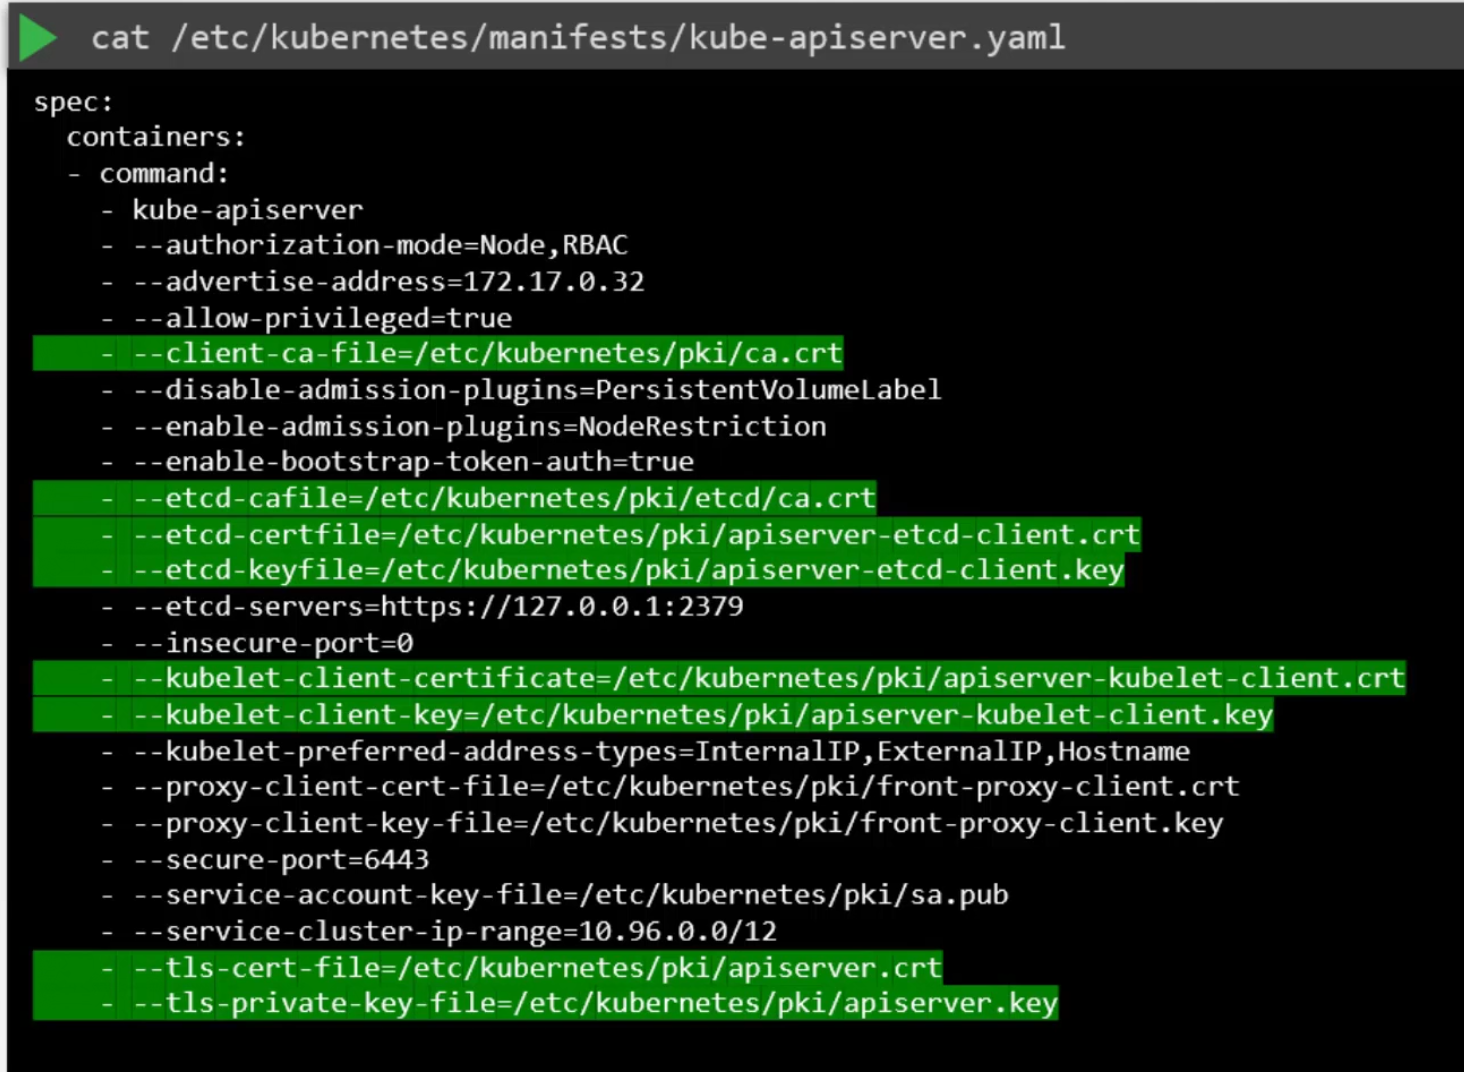
then manually inspect each file path
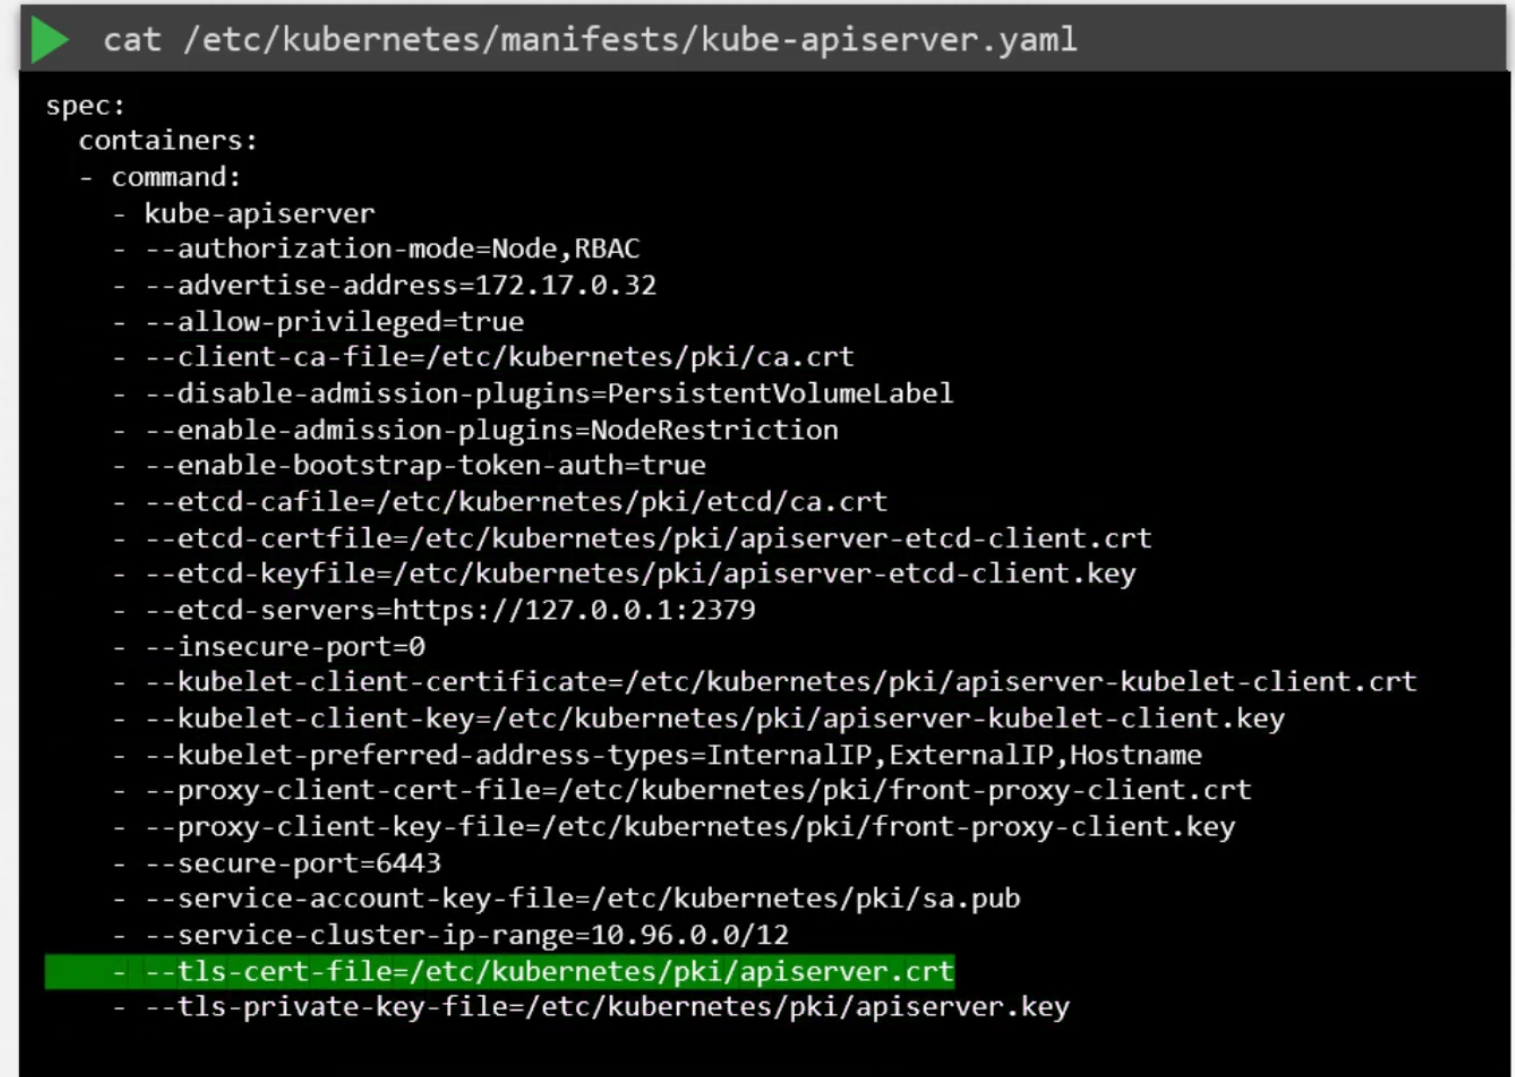
For example, let’s try and check this apiserver.crt file using openssl x509 -in <certificate file path> -text -noout
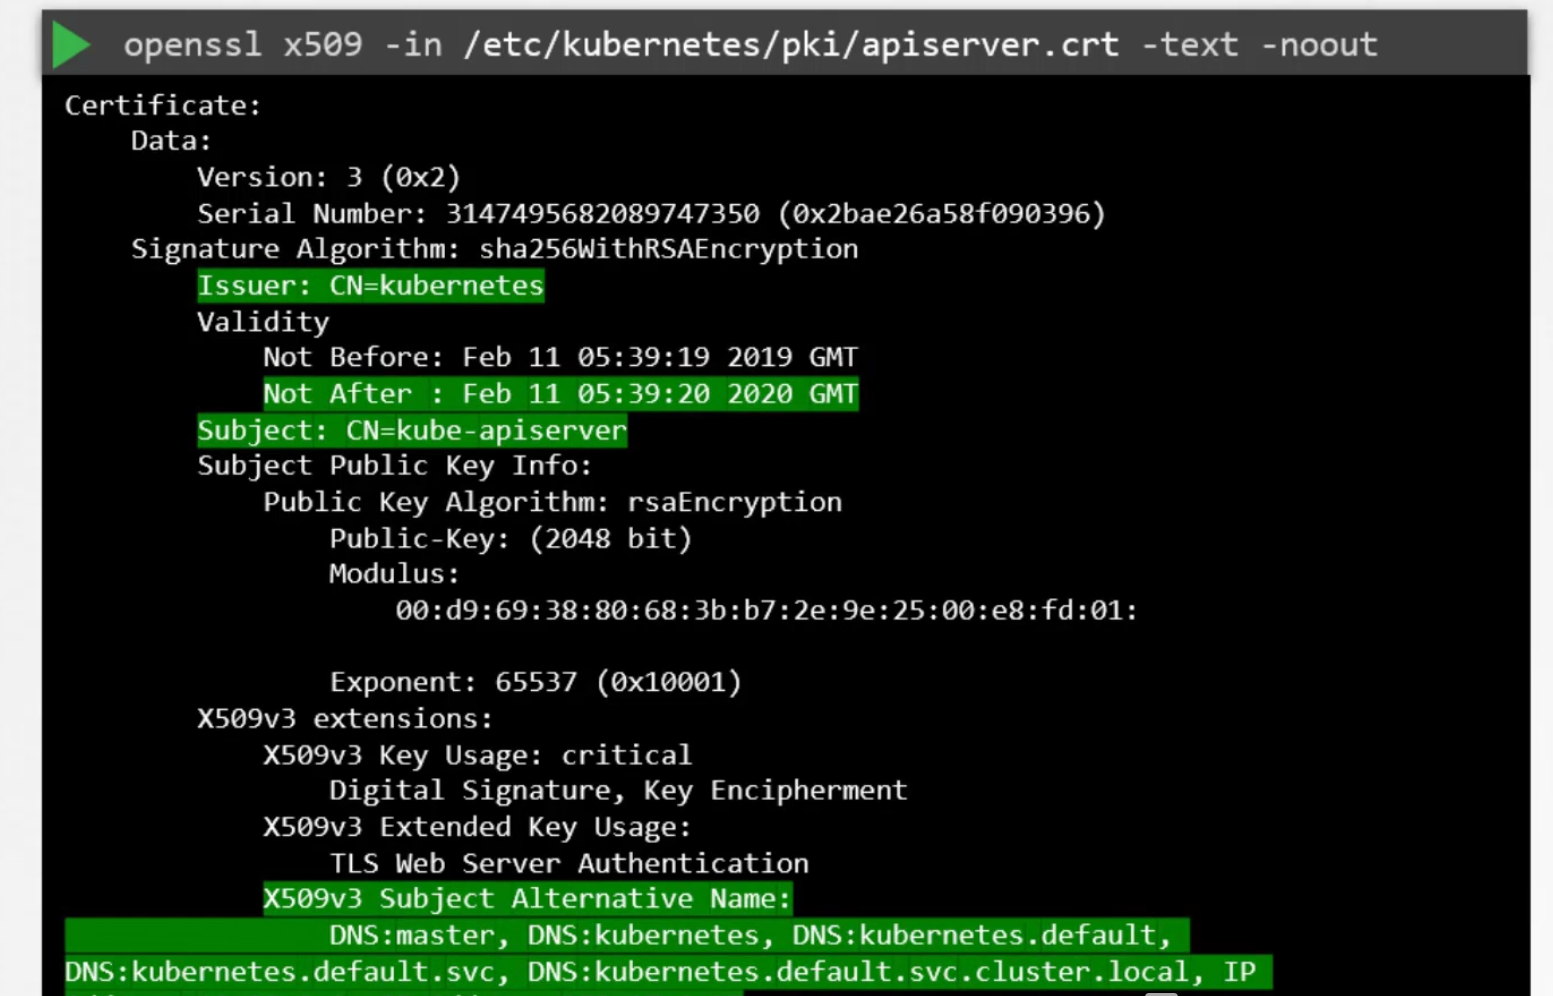
Here we can see Issuer, expiration date, alternative name all.
In this way, we can fill this excel and find issues like fake issuer, expiration etc.
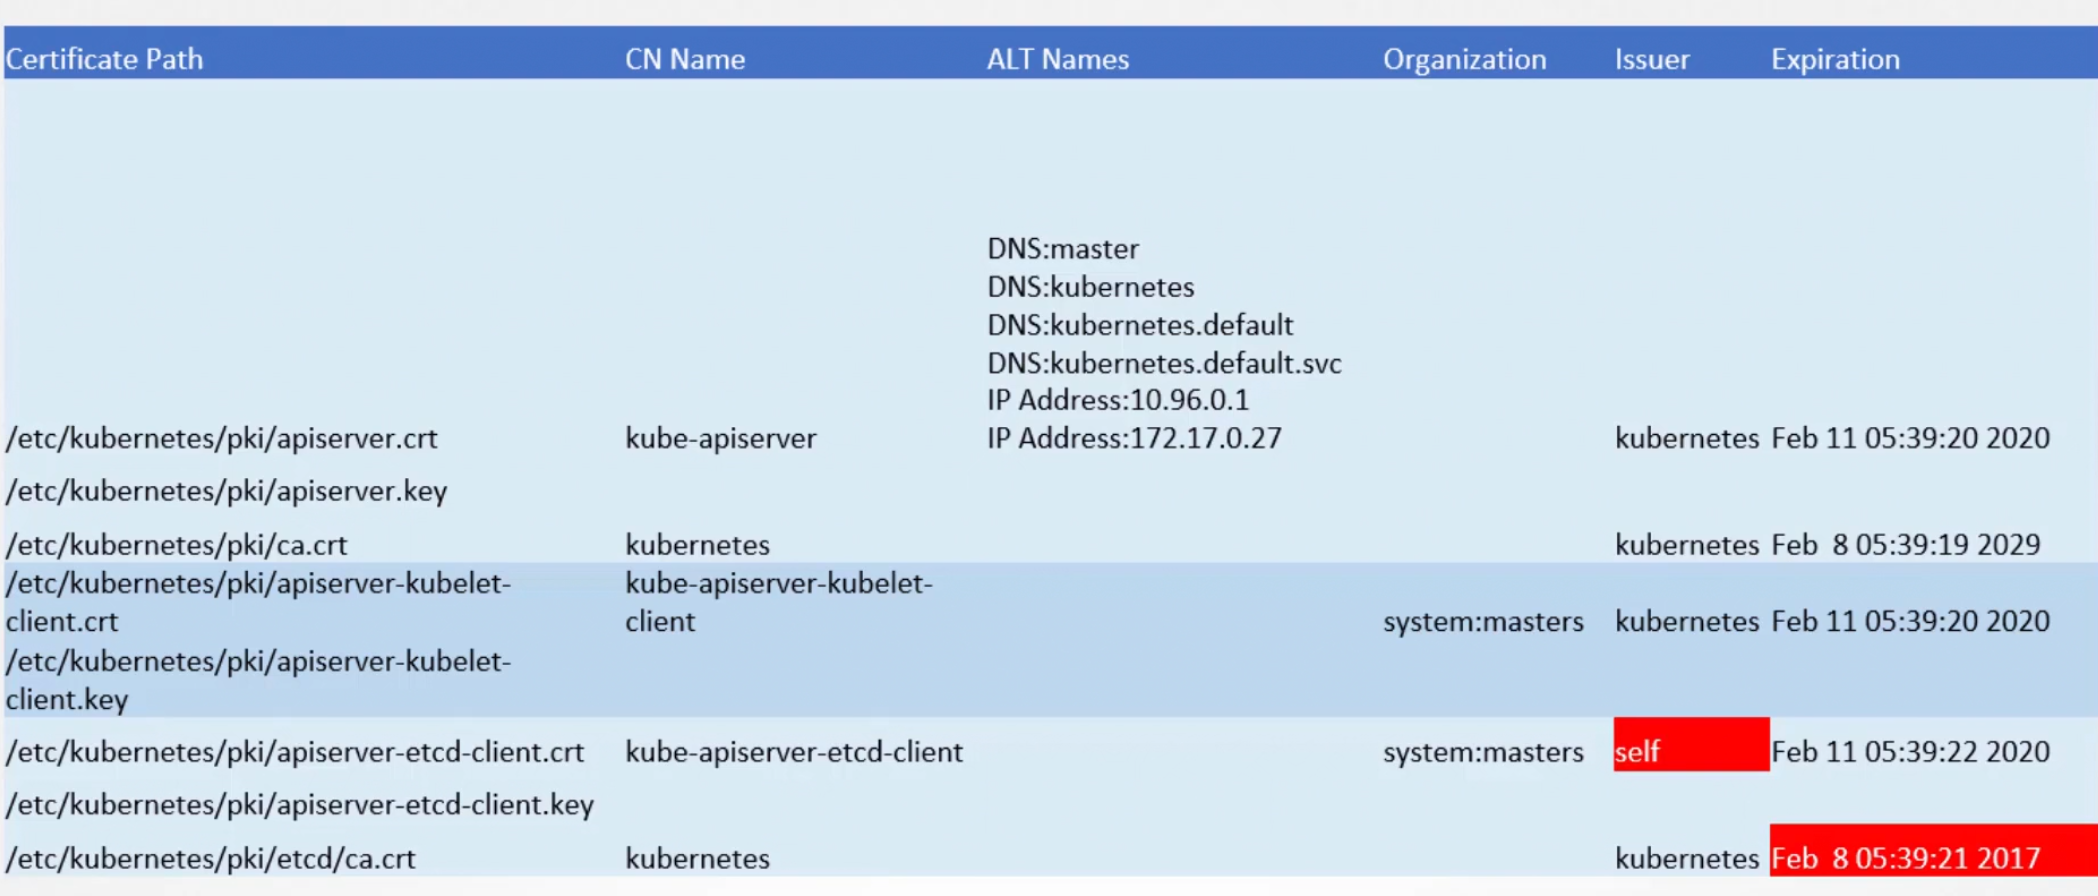
Then we can solve it manually.
Also, we can check logs to find issues using journalctl:
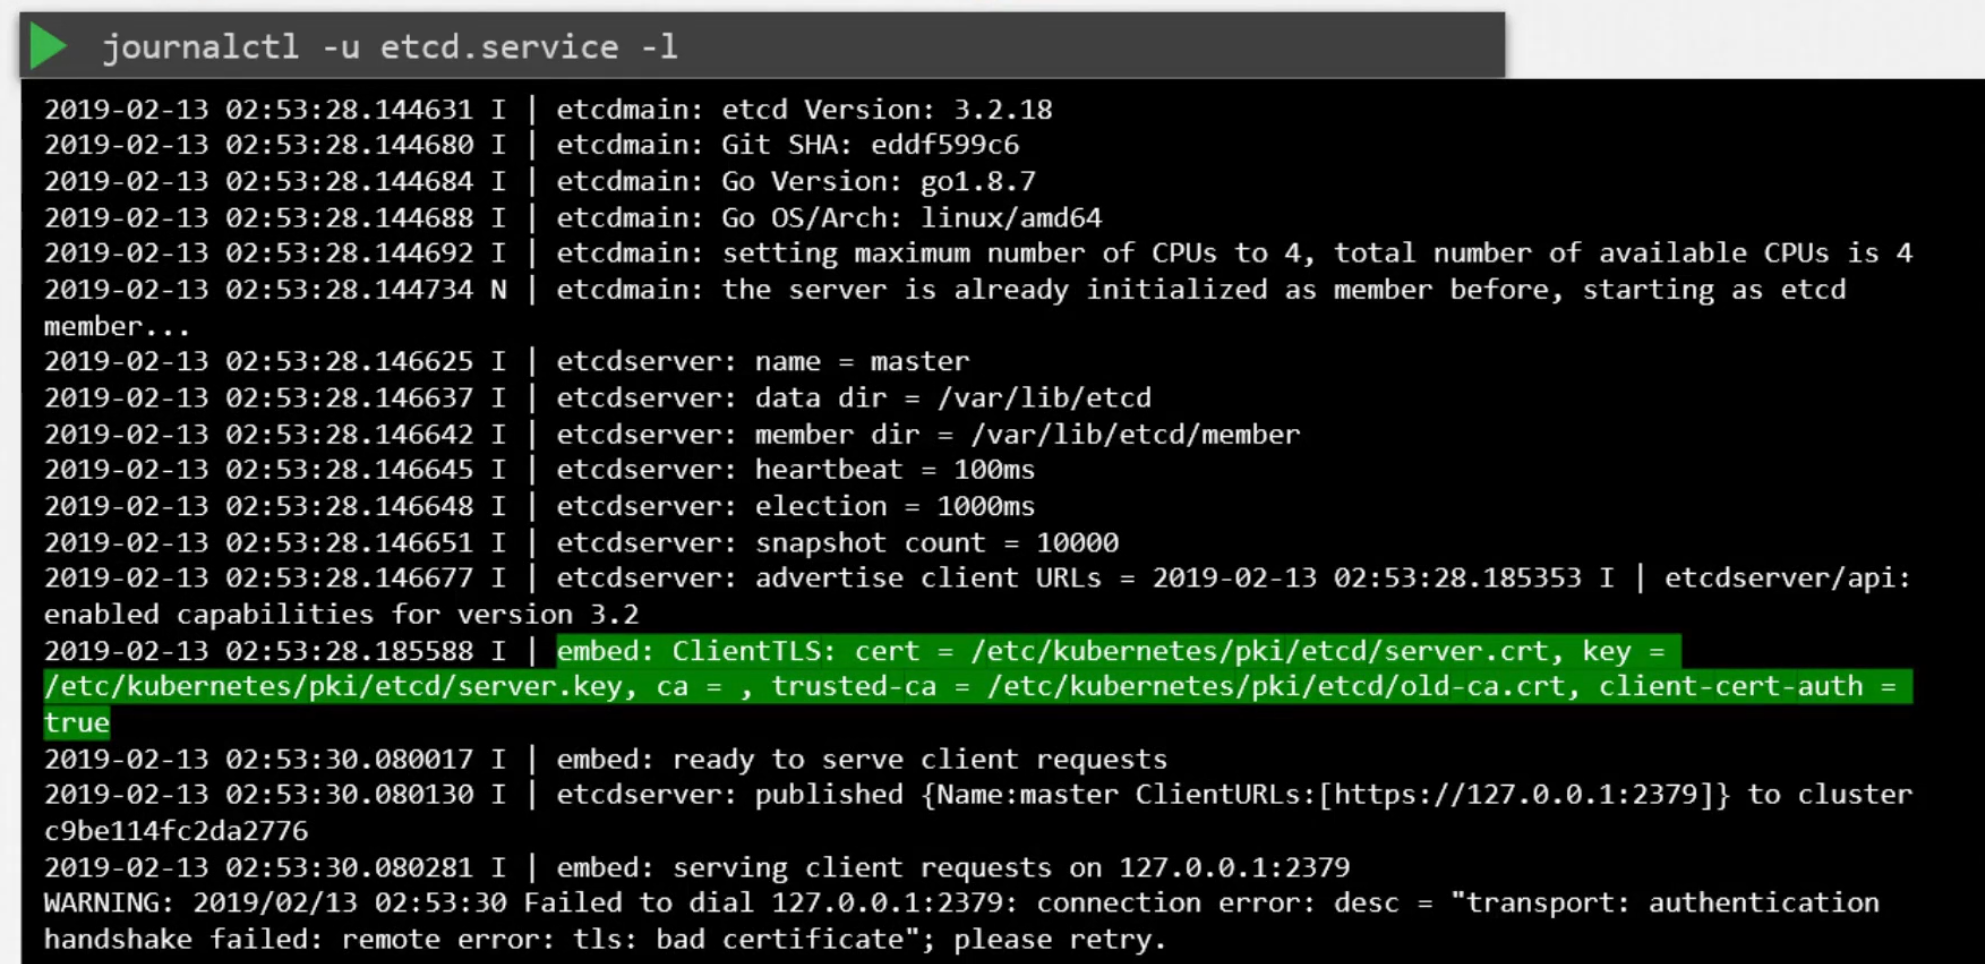
using kubectl:
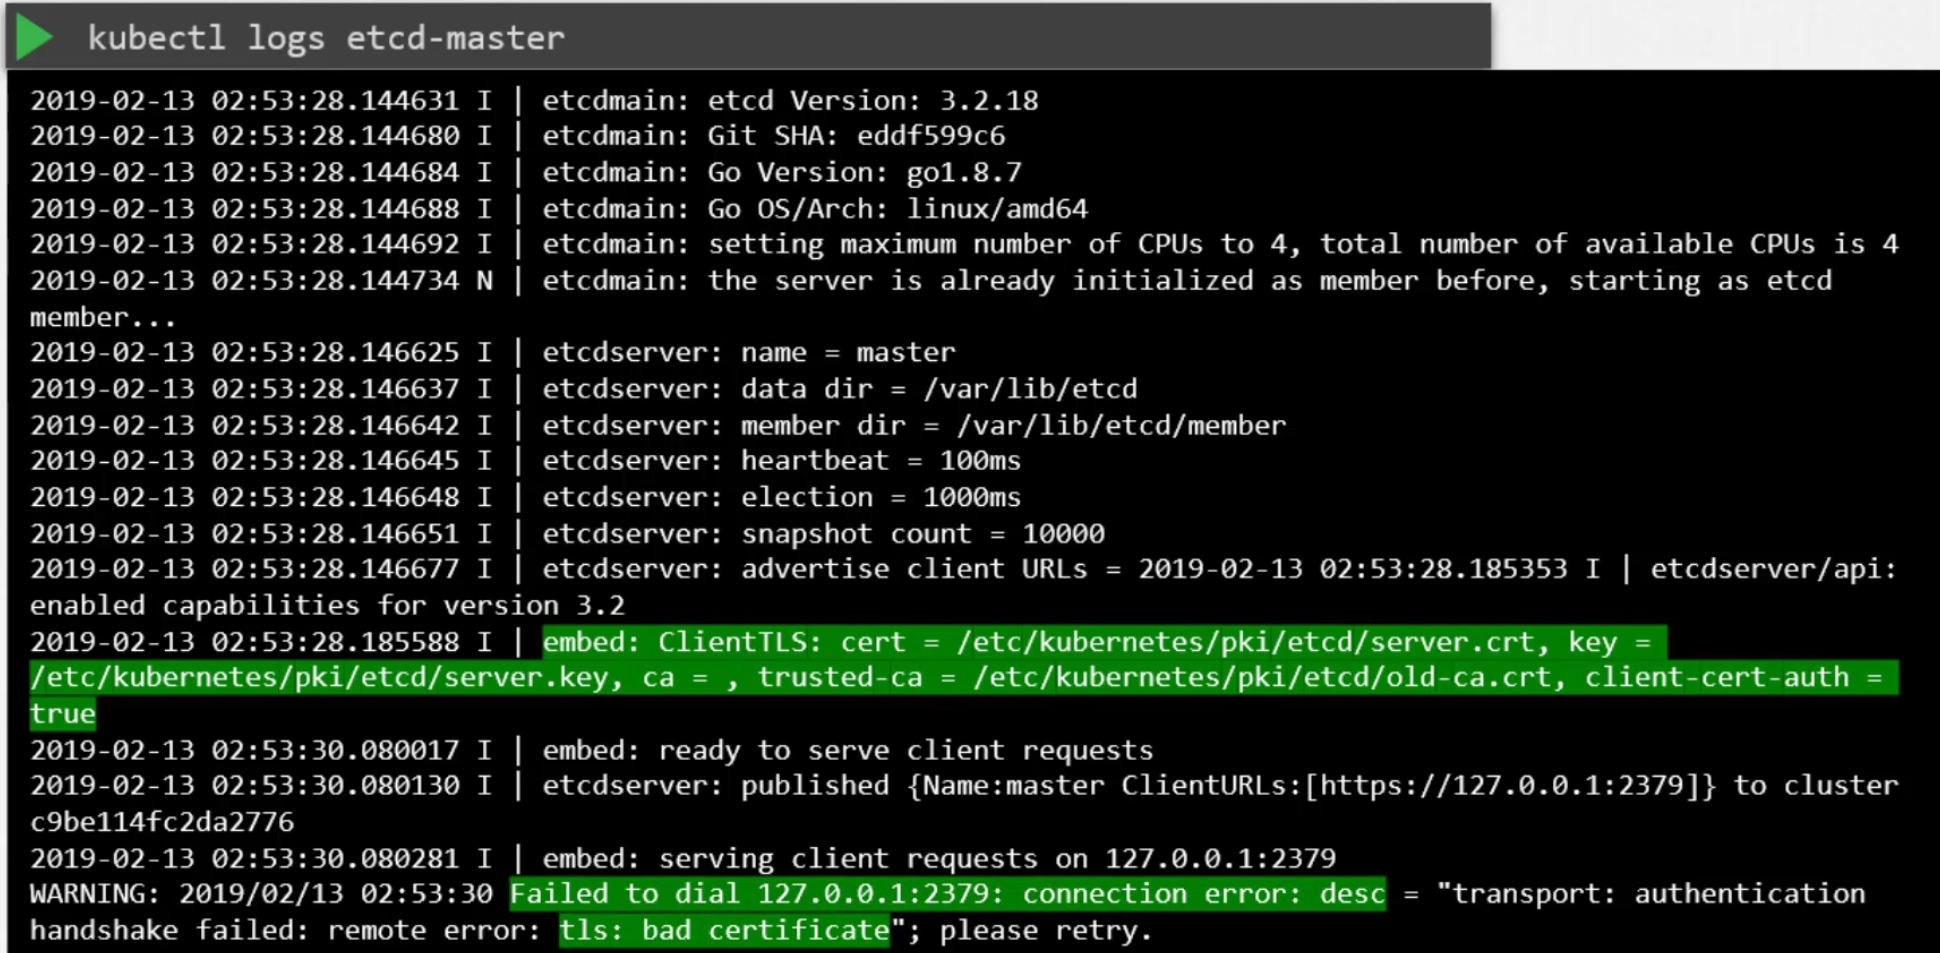
or using docker:

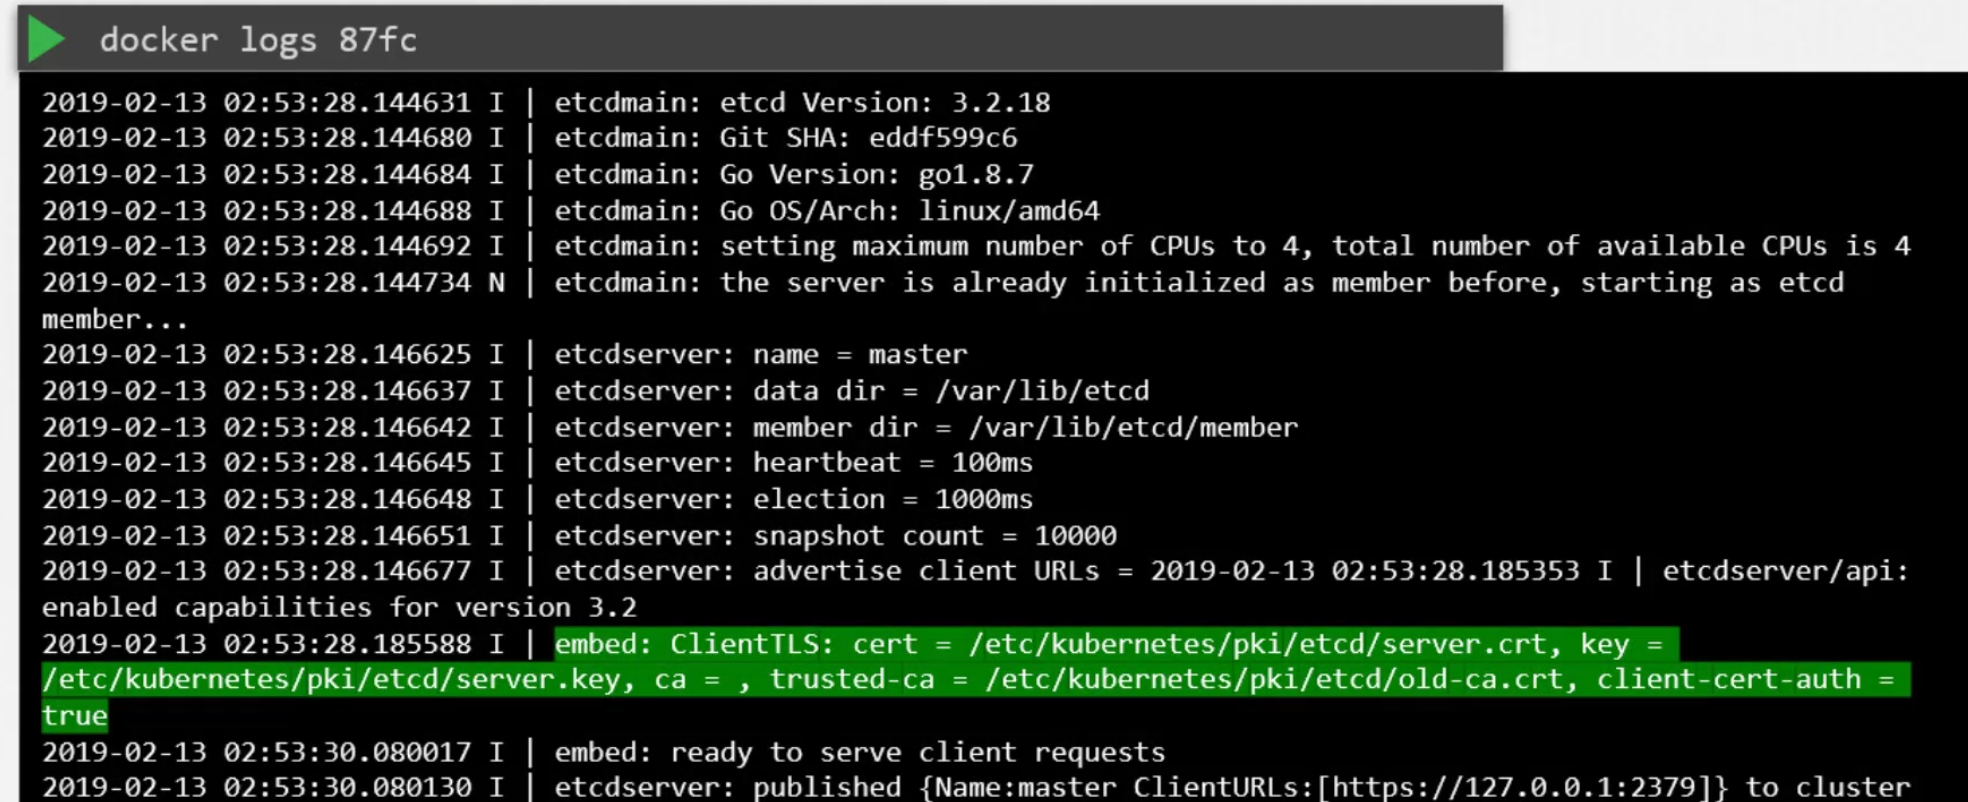
Certificates API
Now assume you are the only admin who has access to all of the certificates

and here comes a new admin. She will create her private key and send me a request to sign a certificate. I have to log into the CA server to sign the certificate.
Once done, she has her private key and valid certificate to access the cluster
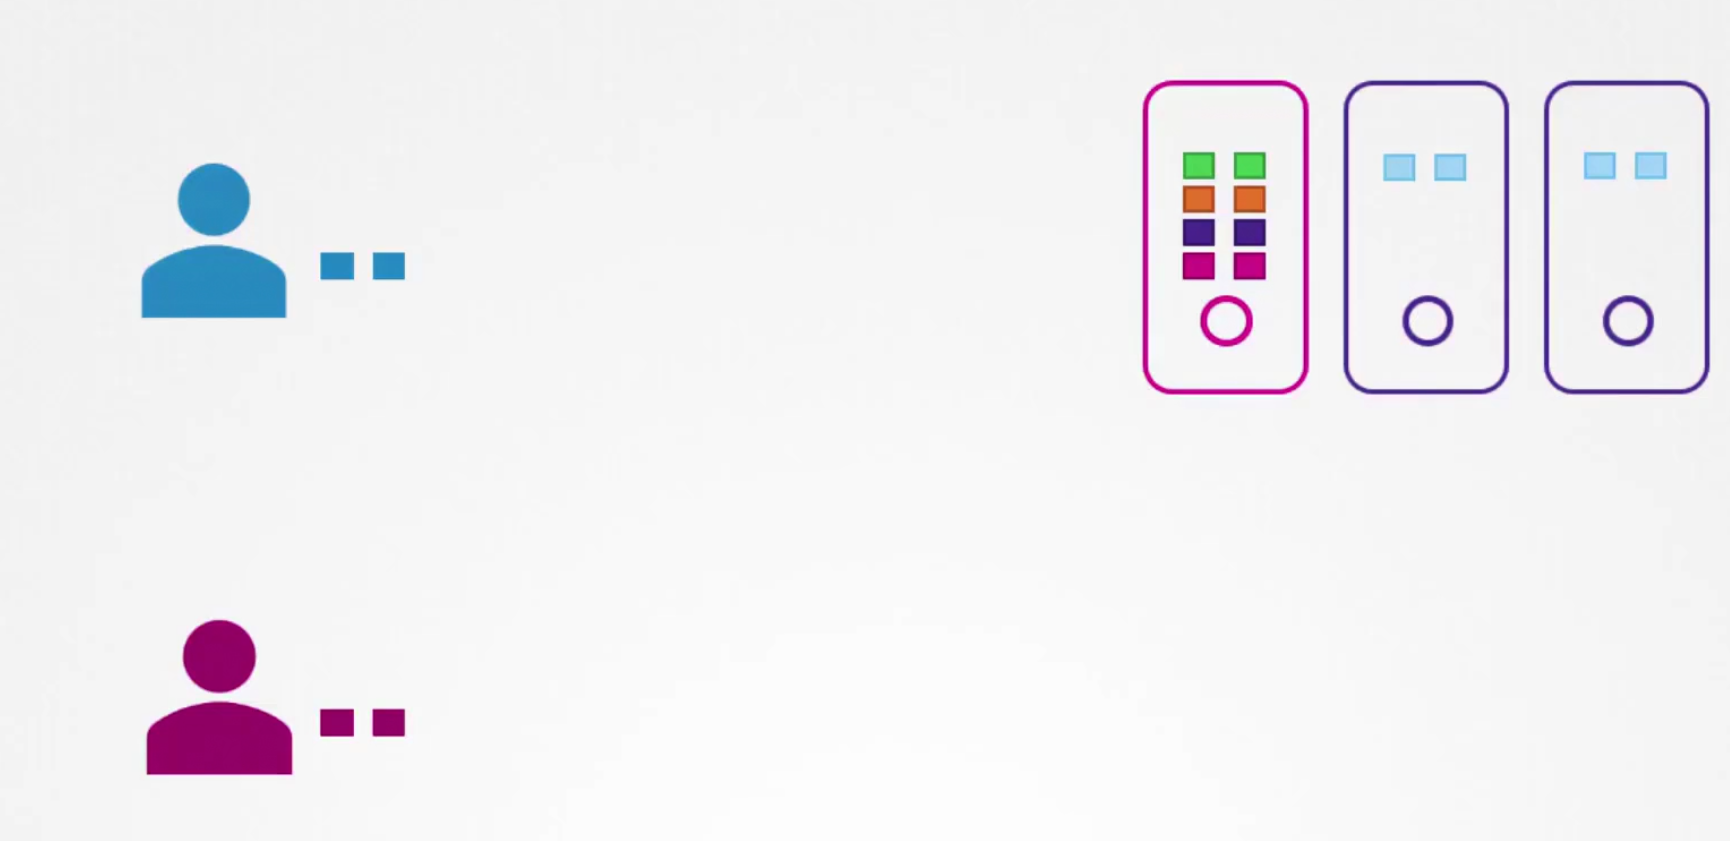
The certificate for her has expiry period and every time it expired, the admin sends a request to sign a certificate again for access.
Remember, we created a pair of key and certificate which is called CA. Once we keep it on a secured server, it becomes our CA Sever.
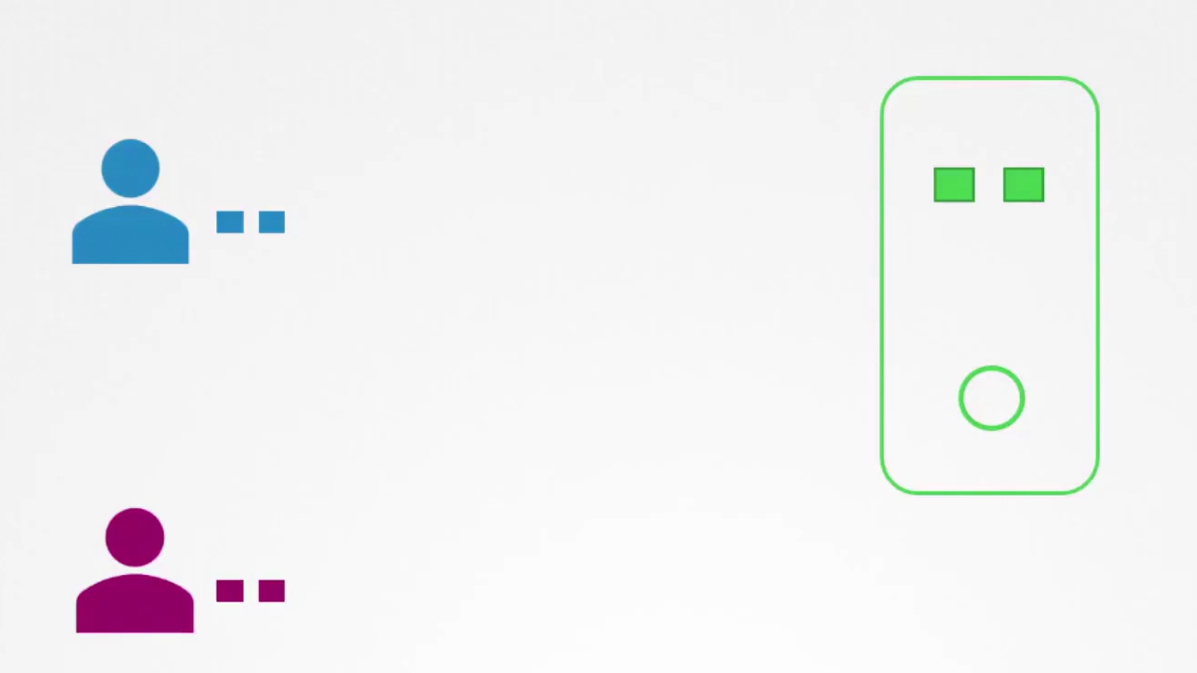
To sign new certificates, we need to log into the CA Sever.
In kubernetes, master node keeps the CA certificate and key paid . So, it acts as the CA server.
By now, we have seen how we have to manually sign certificates for a new admin and every time we had to log into the CA server for that. Once the certificate expires, we have to repeat it again. How to automate it?
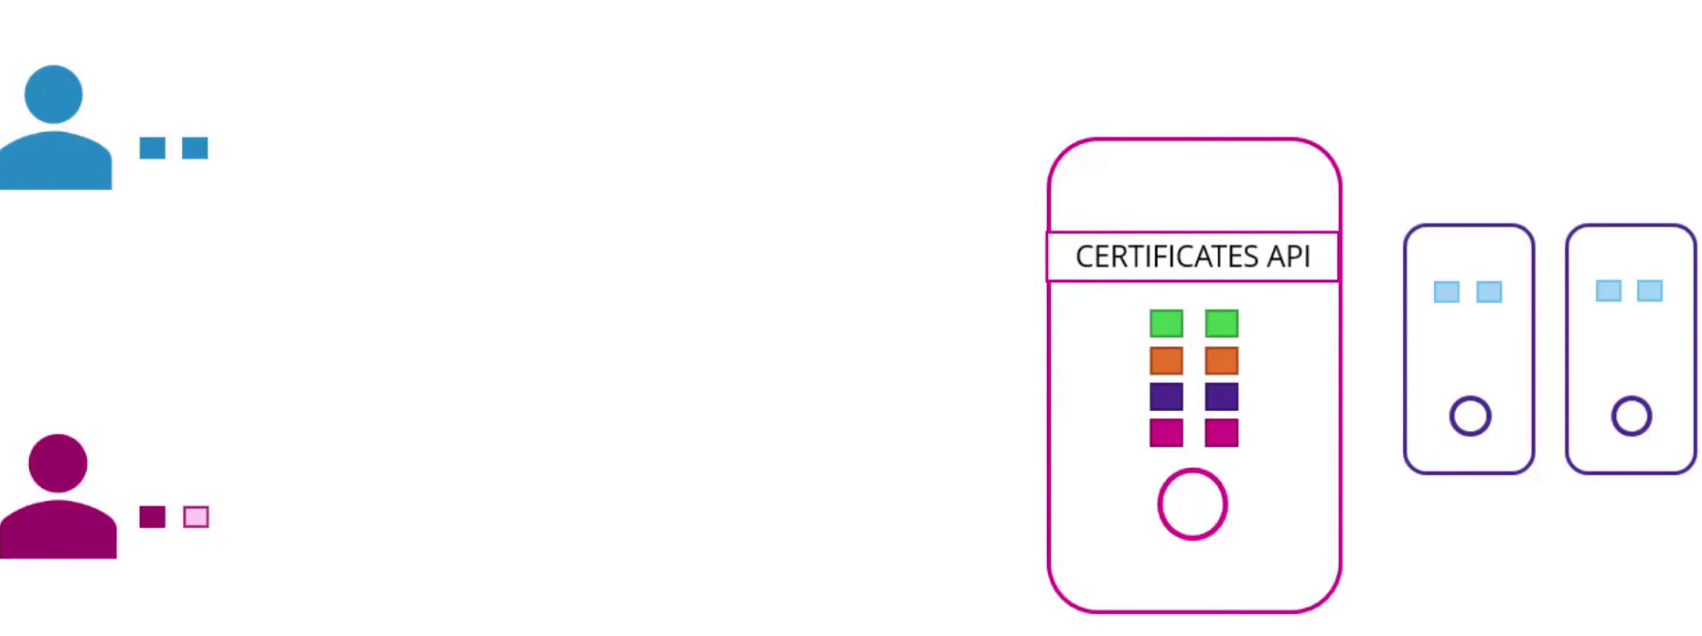
We can automate it using CERTIFICATES API. now the the request will be saved in CA server as an object and the admin of the cluster can review it and approve it.
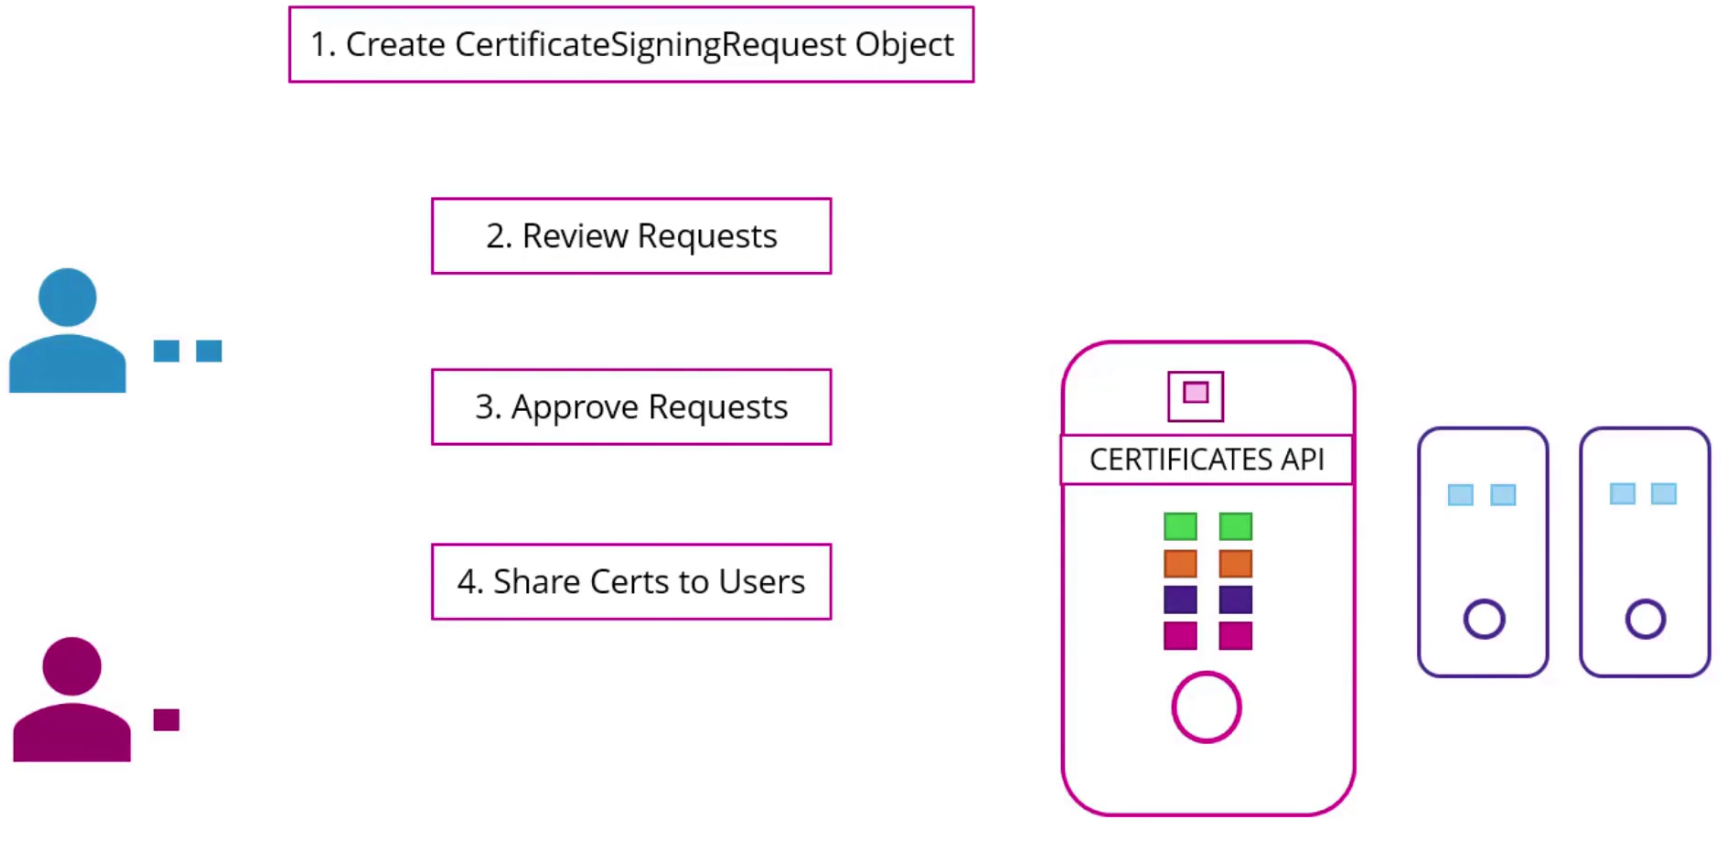
Finally it can be extracted and share with users
How to do it?
The new admin first creates a key
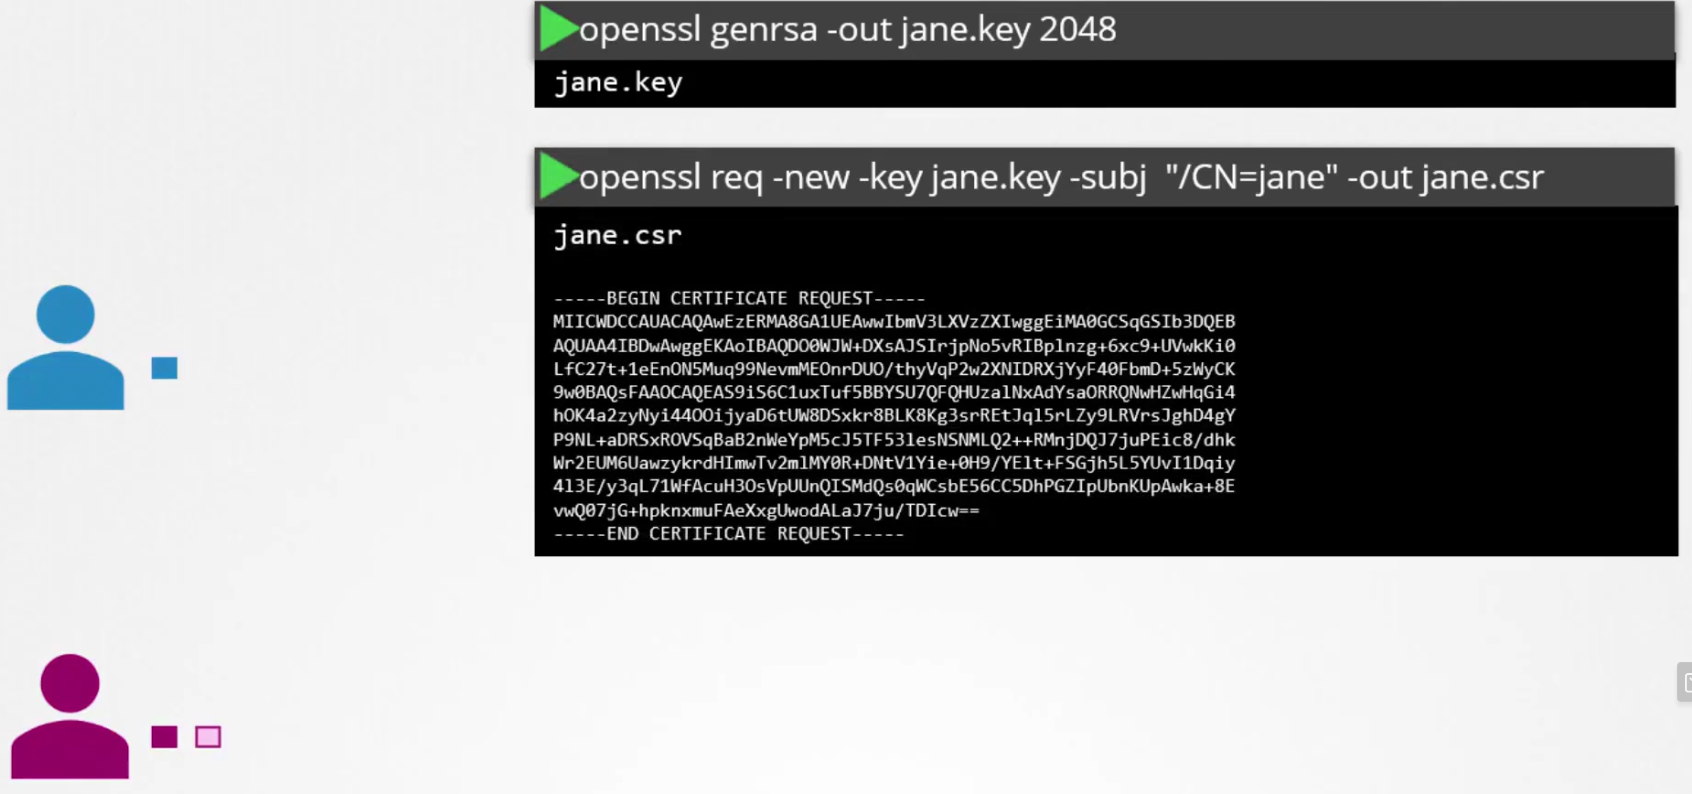
Then generates a certificate signing request using the key with admin’s name in it. (Here, Jane)Then the new admin send it to the administrator. The admin encodes it.
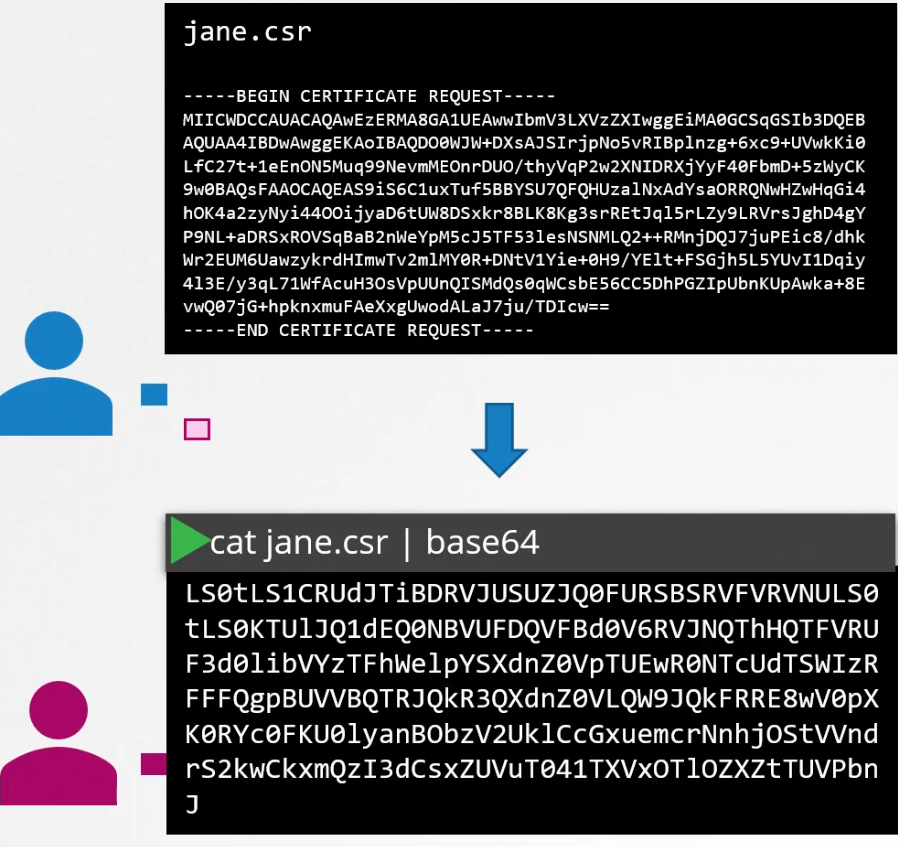
The administrator takes the encoded key and creates an object. It looks like any other object
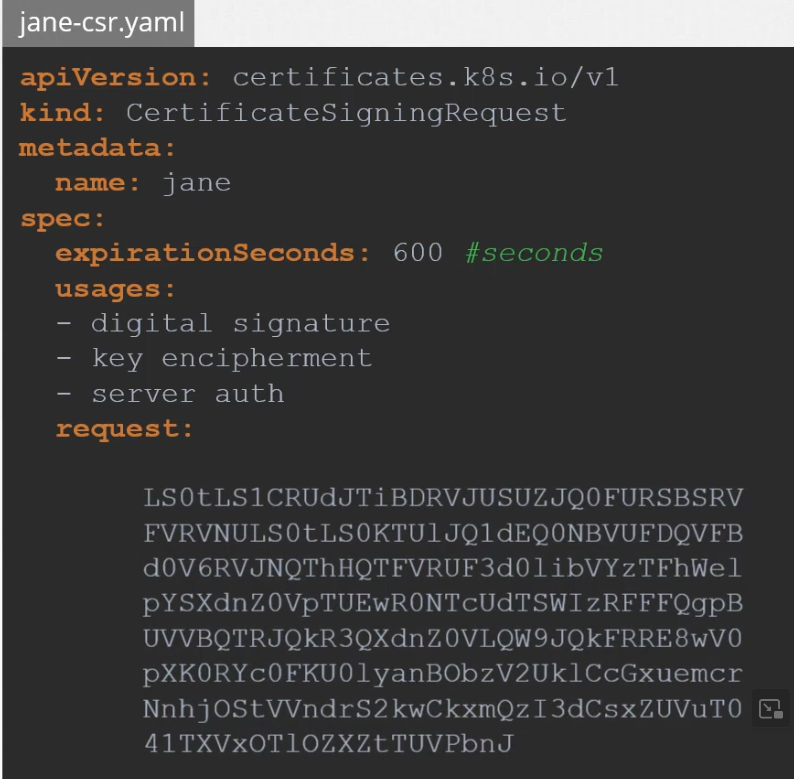
Once the object is ready, the administrator can check all the signing request and approve it

One can view the certificate using kubectl get csr <certificate request> -o yaml
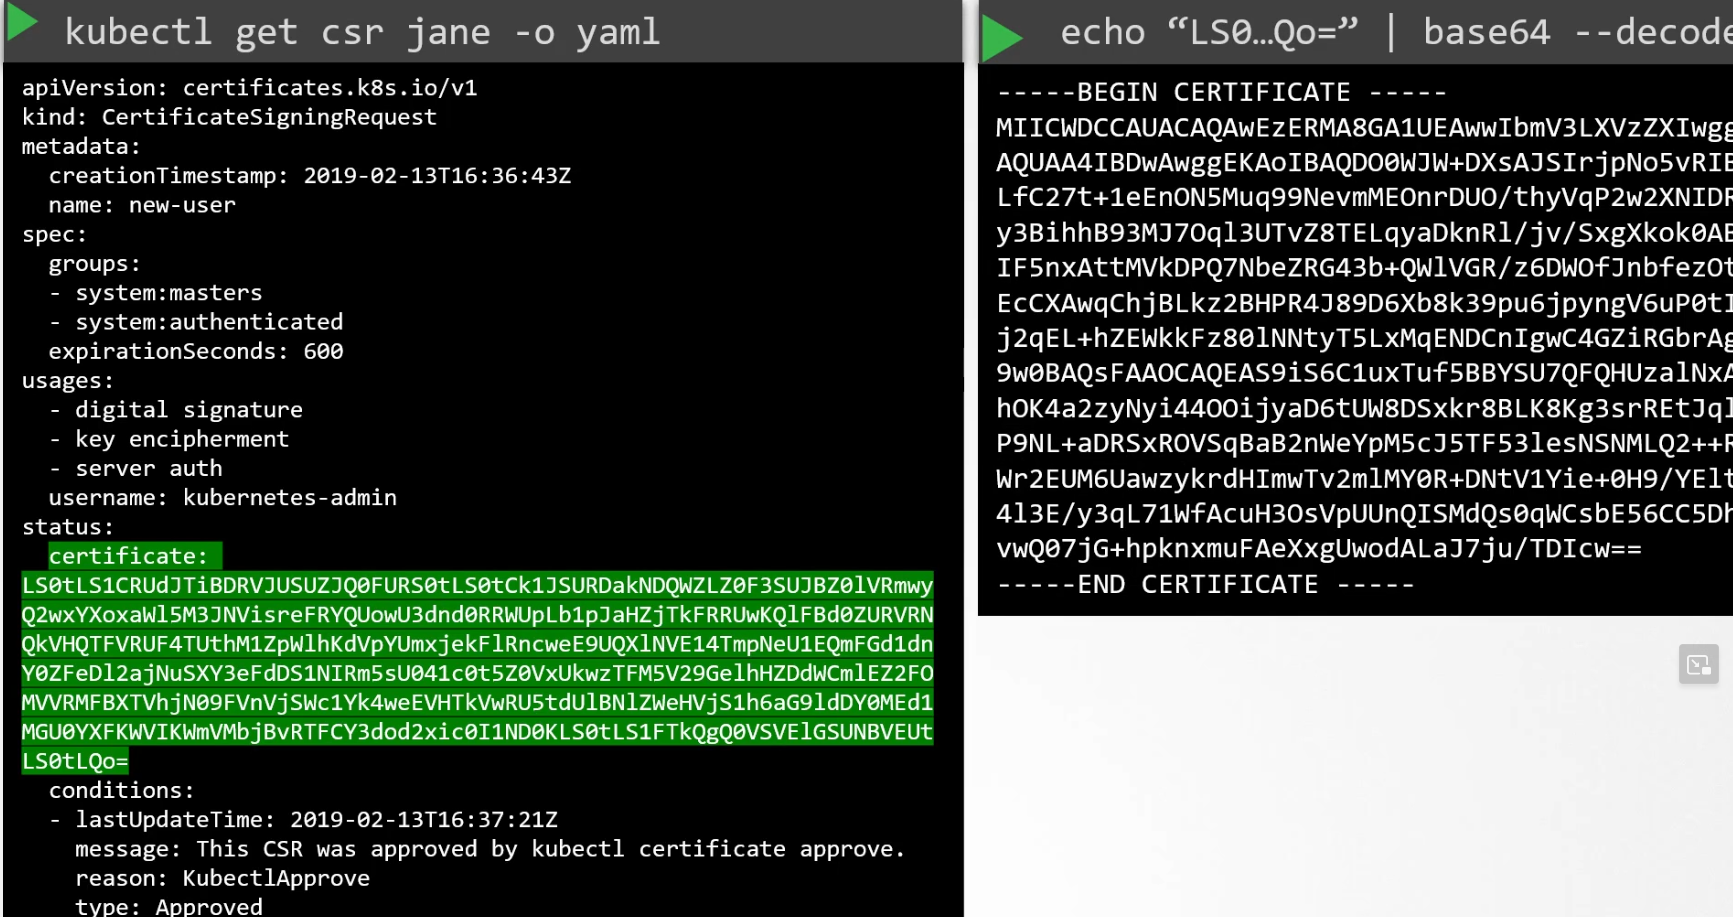
You can also decode the key and check real key.
Keep in mind that Control manager usually does all of these for us
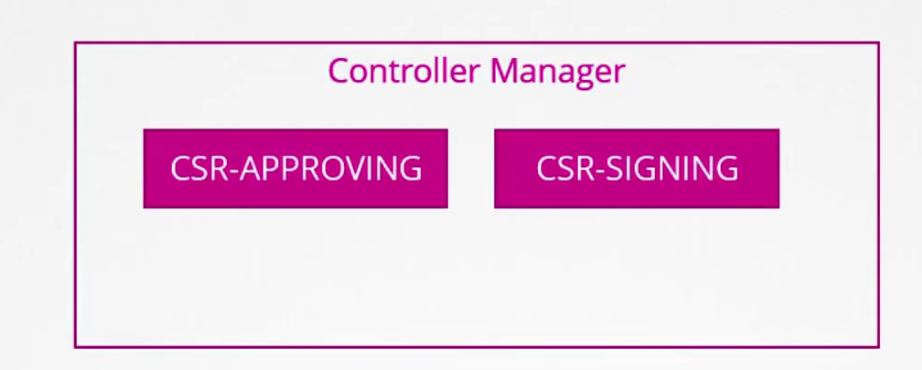
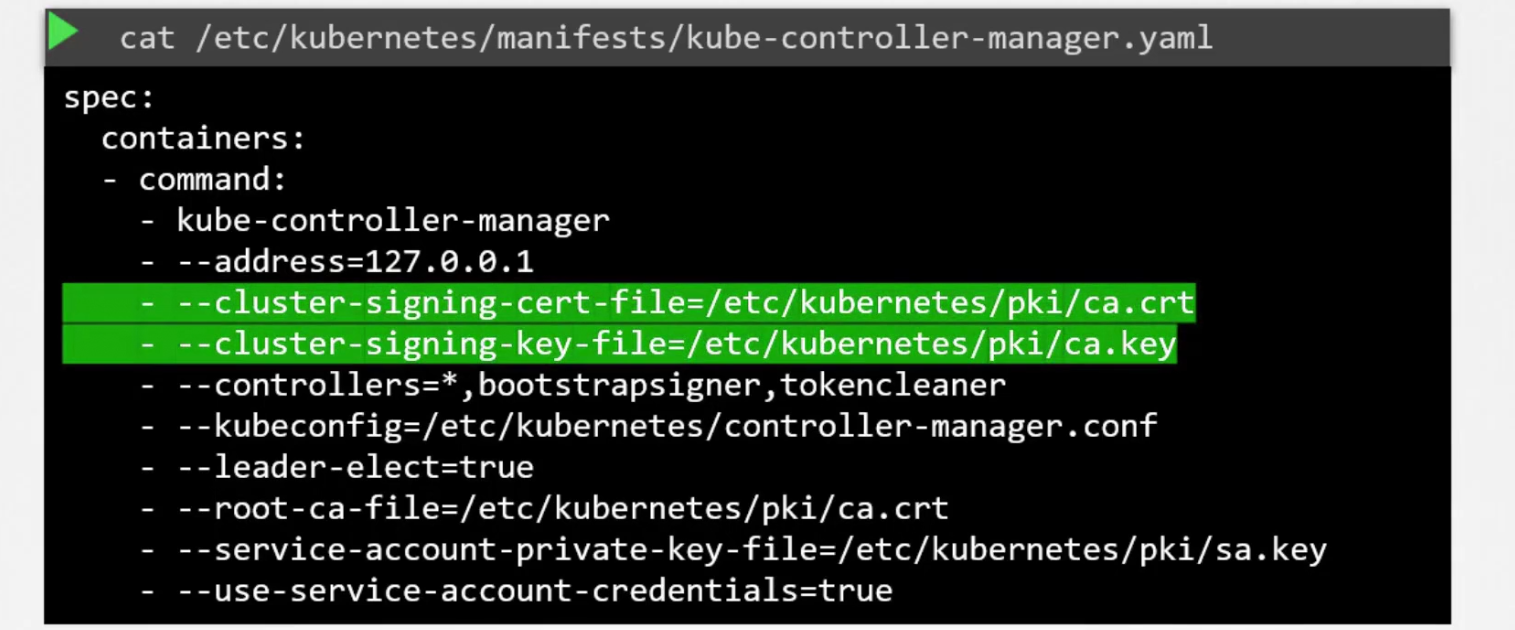
How to verify? We have seen if one wants to sign a certificate, the person needs certificate and private key. kube-controller-manager has both pf them.
Hands-on:

We can check the csr (certificate request file created by akshay). Basically this csr has akshay’s private key.
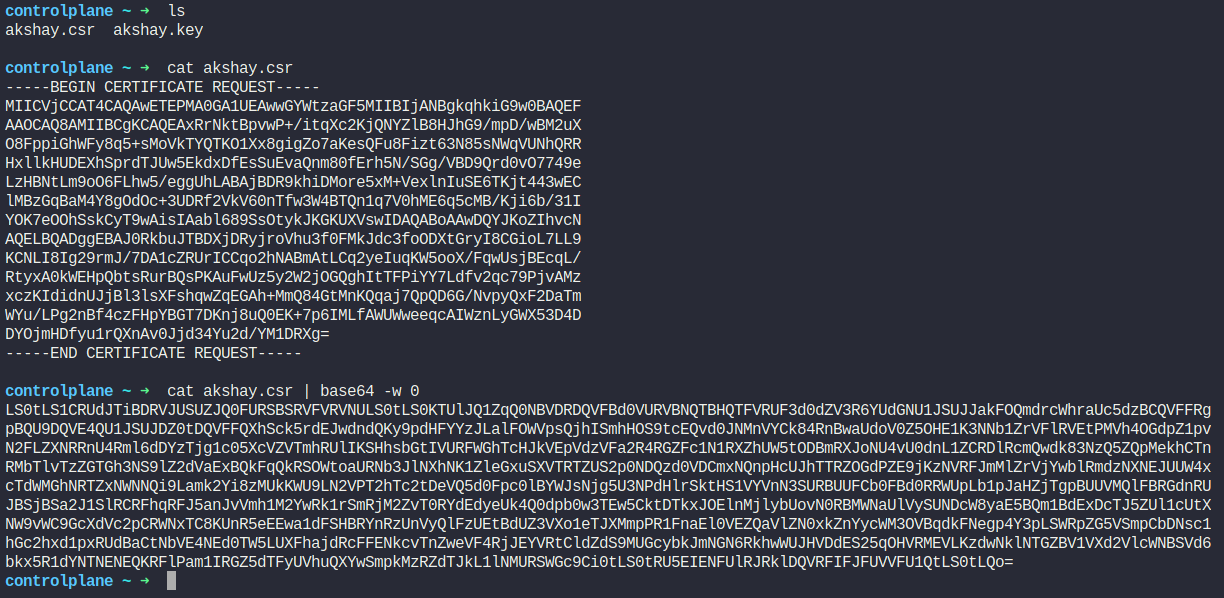
Then we as an administrator, encode that and paste this to create a certificate object
We have created a yaml file and pasted the encoded key
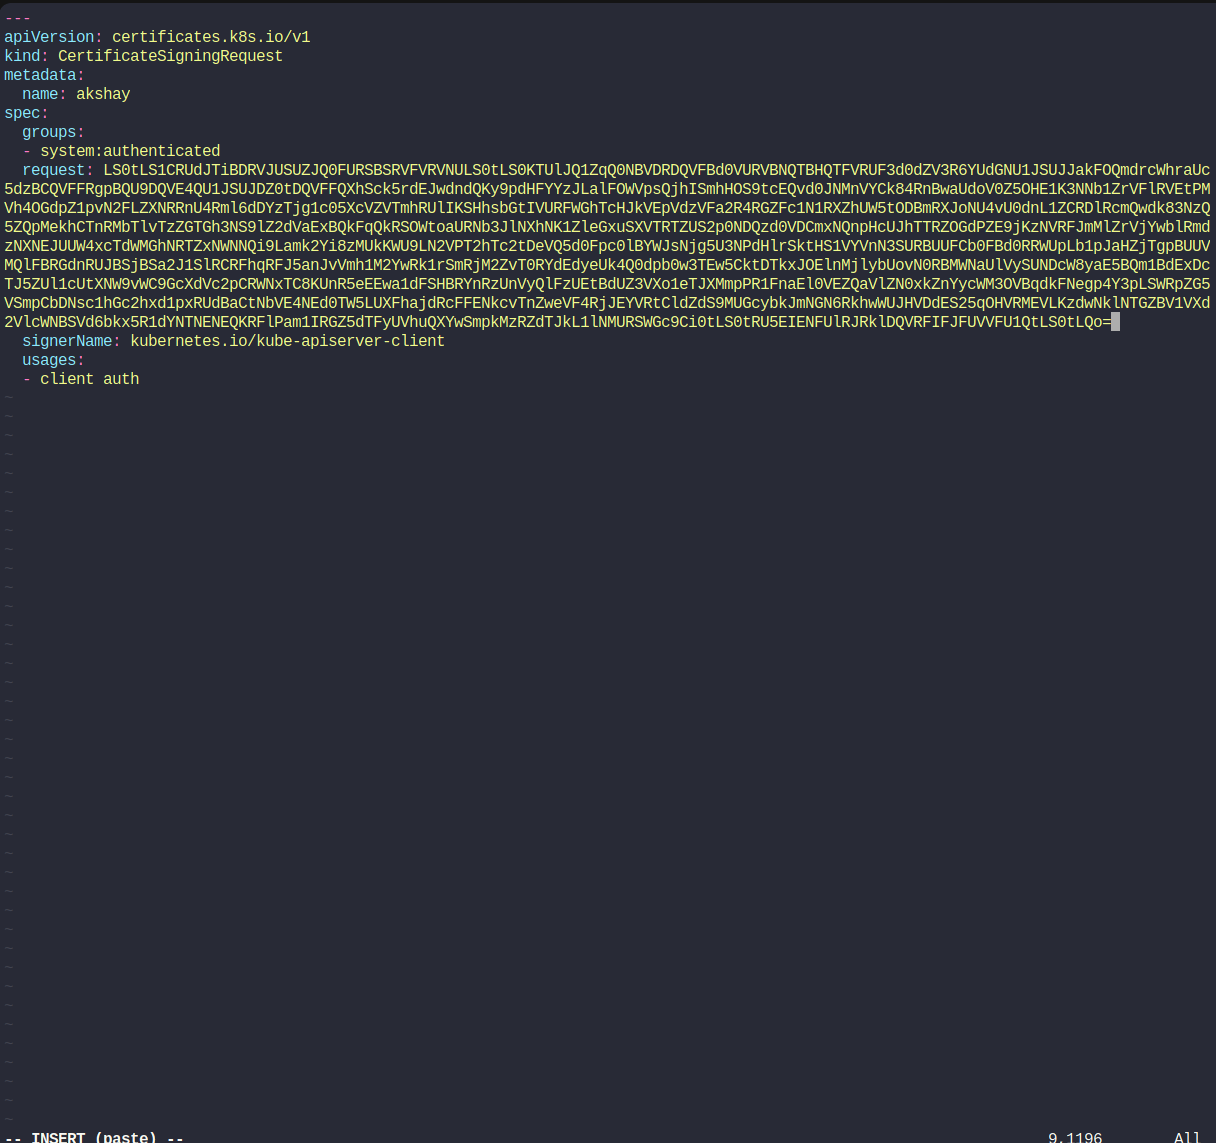
Let’s create the object using
kubectl apply -f akshay-csr.yaml

We can see the status of the signing request

Let’s approve that

Assume that , we have a new CSR named agent-smith
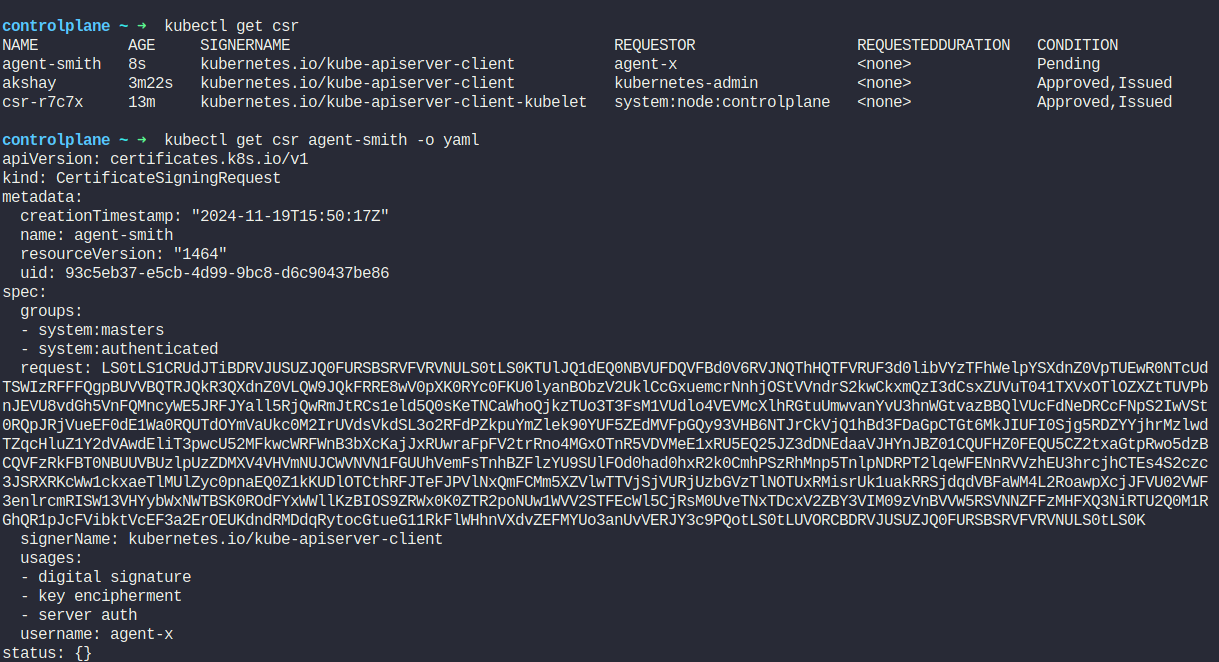
Let’s check it’s details and encoded key. It has requested access to system:masters
So, we will reject it.

We can also remove the csr object using
kubectl delete csr agent-smith
Kube-config
Assume that a user called my-kube-playground . He sent a request to the kub-api server while passing admin.key, admin certificate, ca certificate.
Then the apiserver validates them and gives access.

There are no items here though.
We can do that using kubelet

But adding all of these info every time is very hard. So, we use kubeConfig file and keep all of those server, client key, client certificate, certificate-authority info
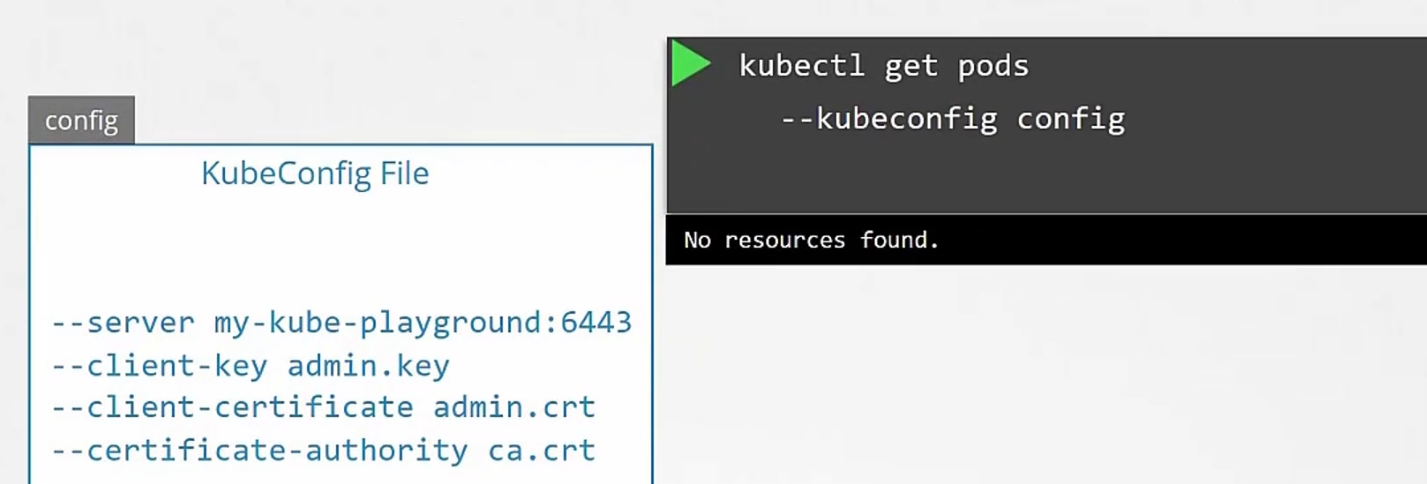
Then while using kubelet, we can just call the —kubeconfig file and here we go!
Let’s explore more about the config file
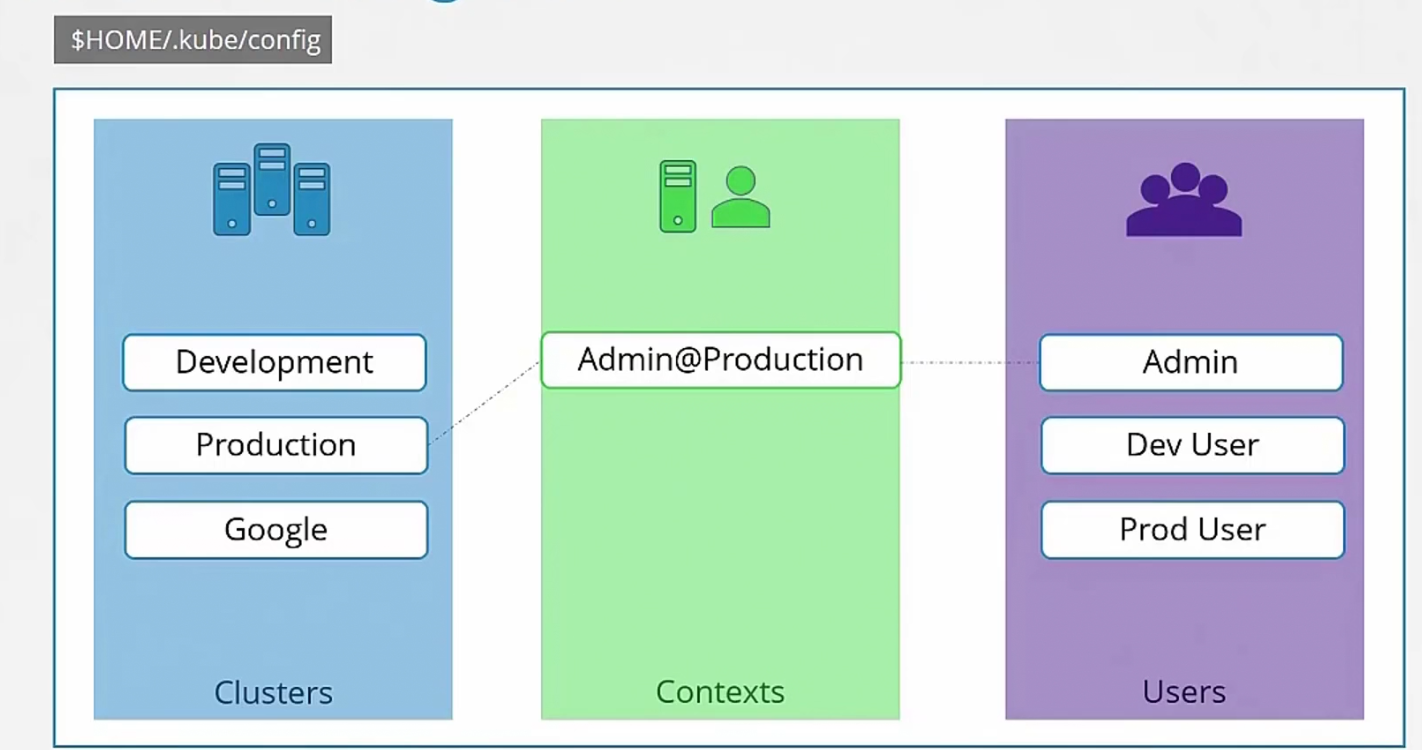
It generally has existing clusters info,existing users which uses those cluster and context. Context provides info about which user will get access to which cluster.
So, for our example, those lines we wrote in the config file will go
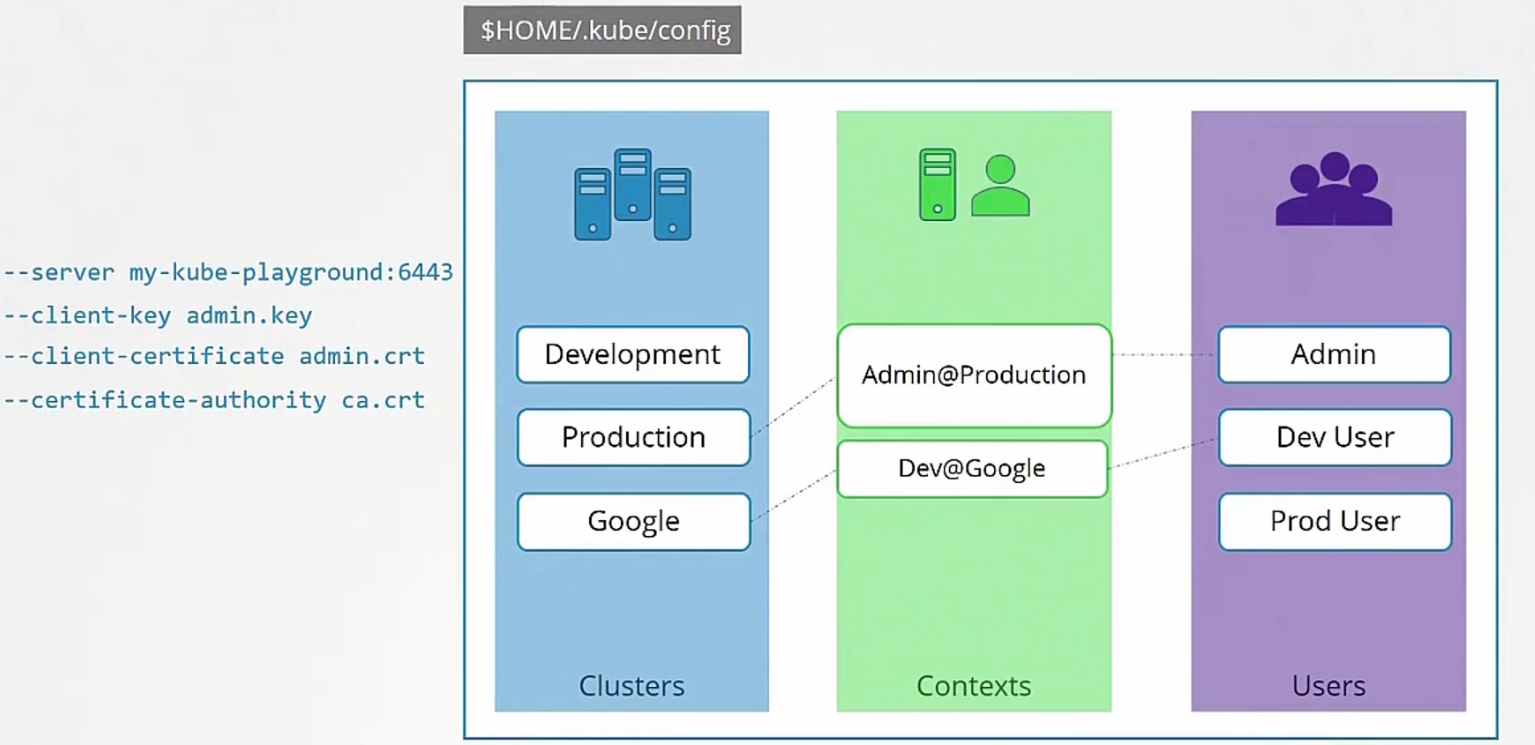
Like this:
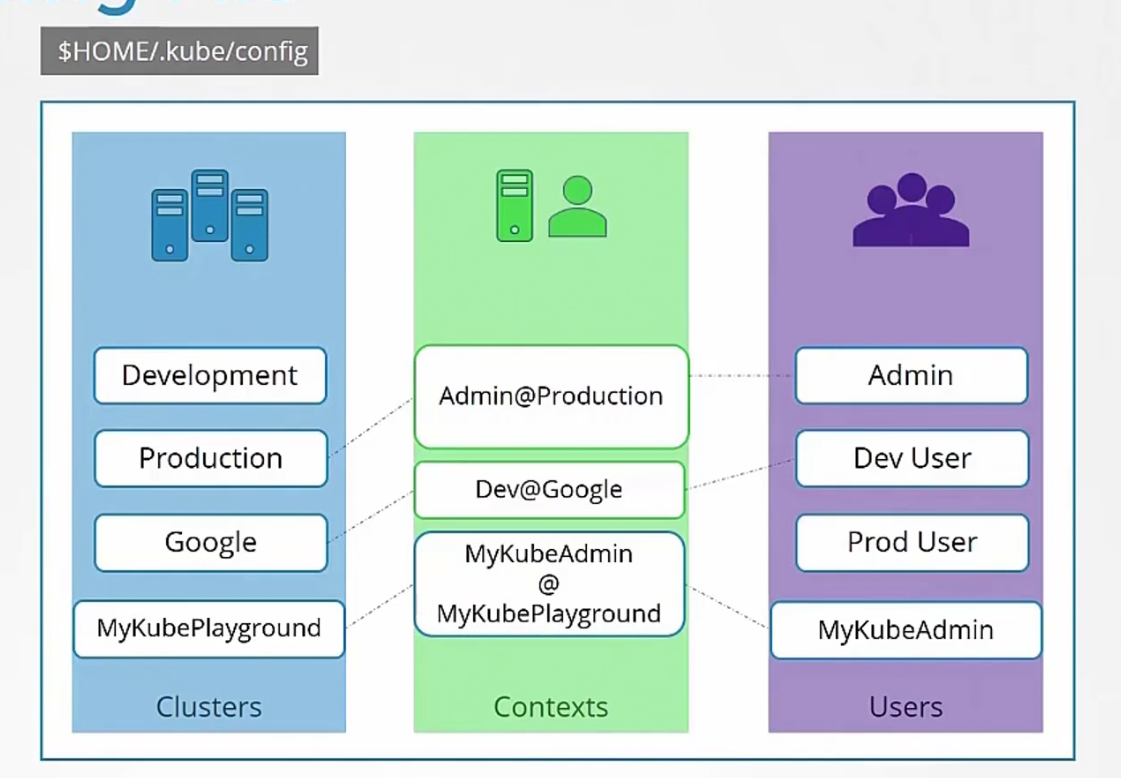
Basically this config file is in yaml format
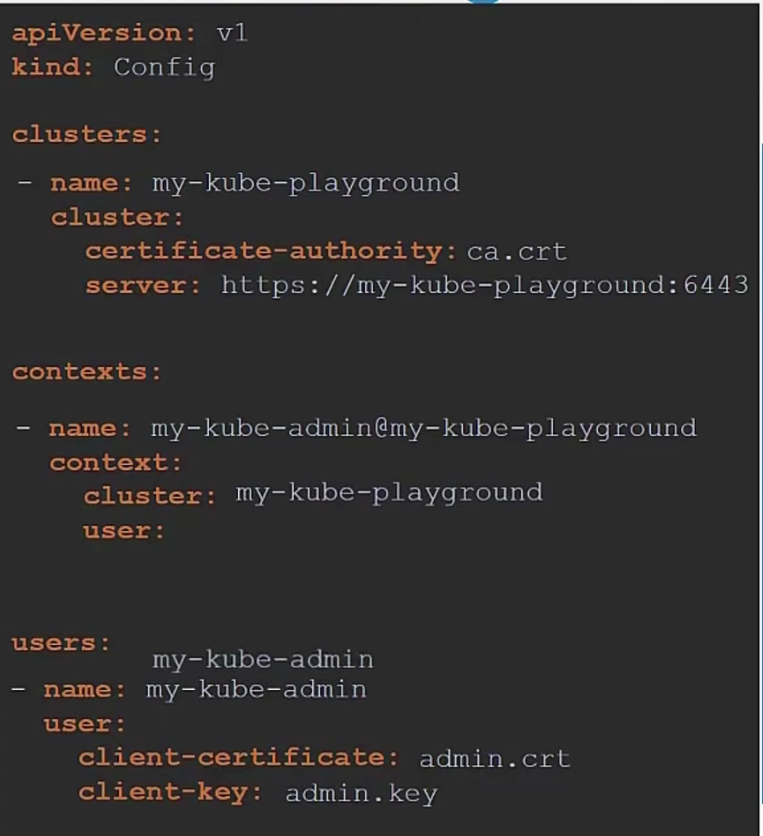
So, in this case , our config.yaml file might look like this
We can do it for all users, all clusters and contexts
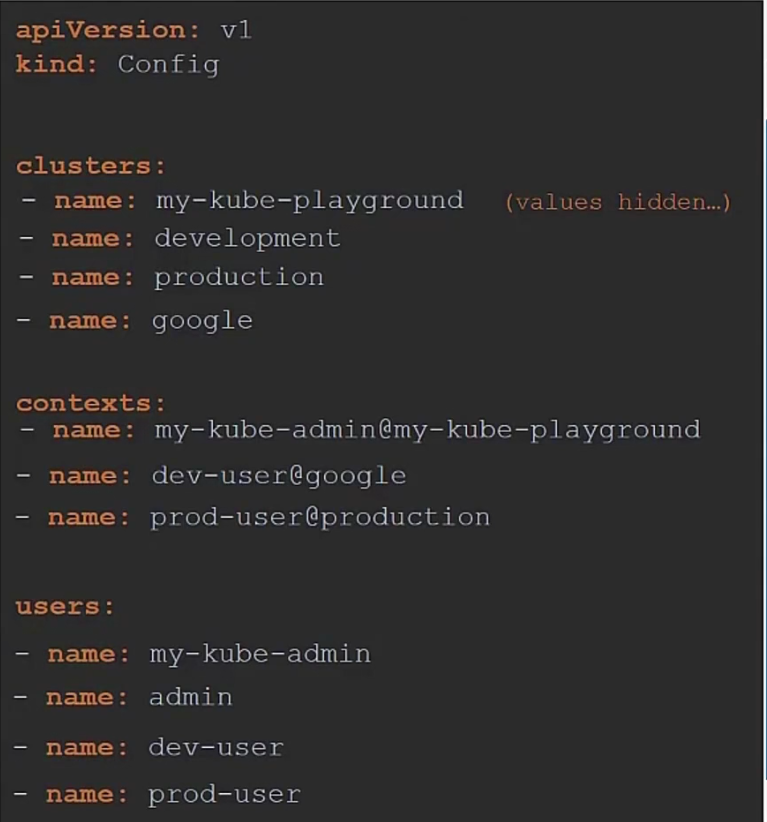
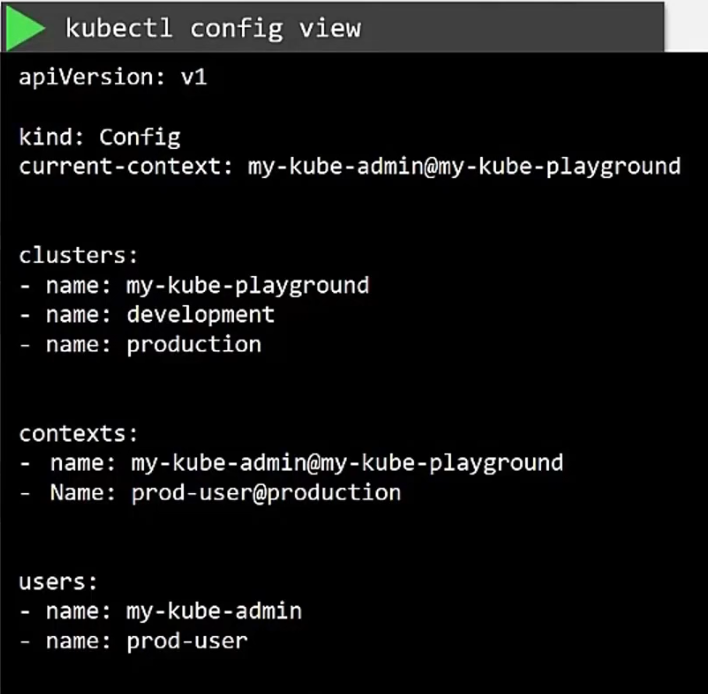
Now, to view the file, use
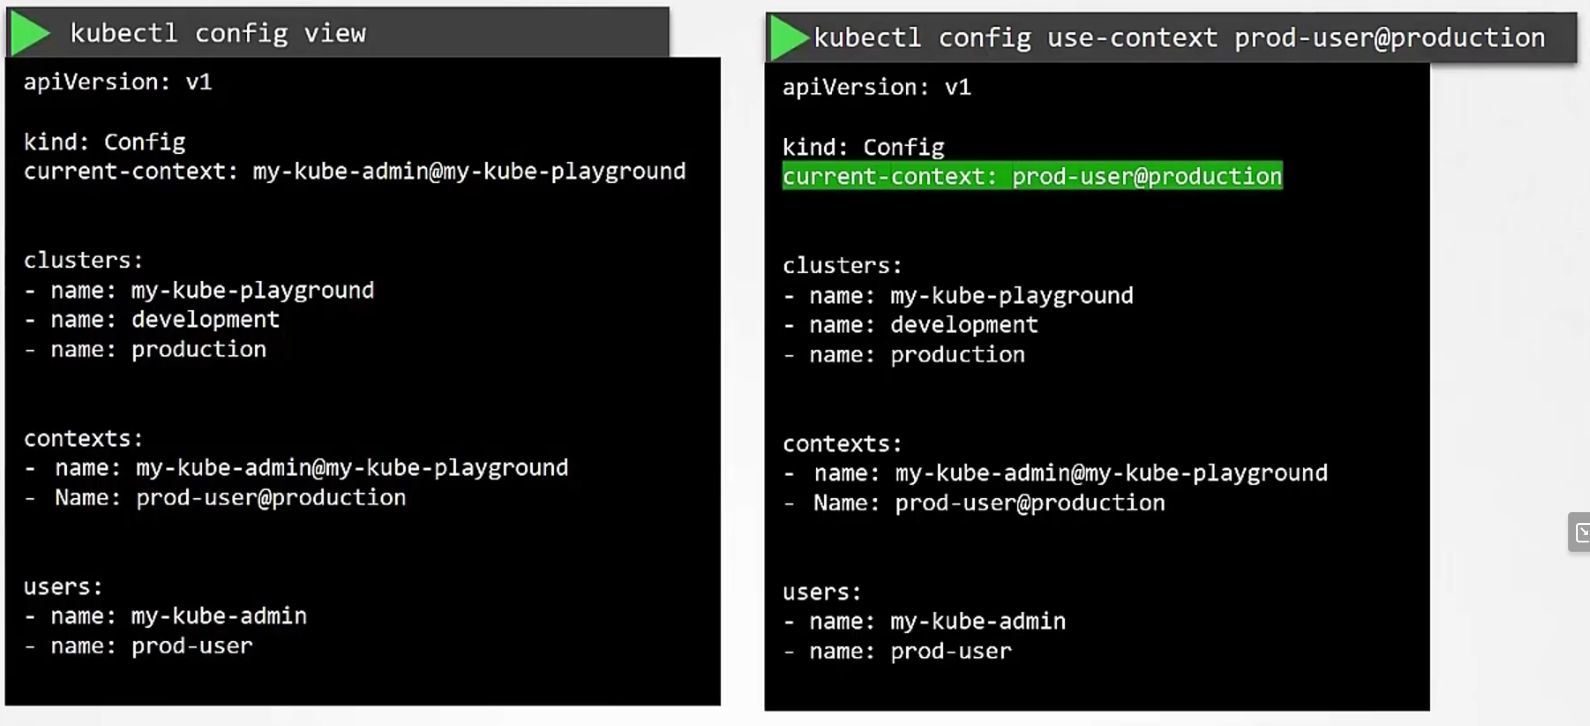
We can also change default context, (Here we set context to prod-user@….)
Also, we have an option to move to a namespace when we choose a particular context,
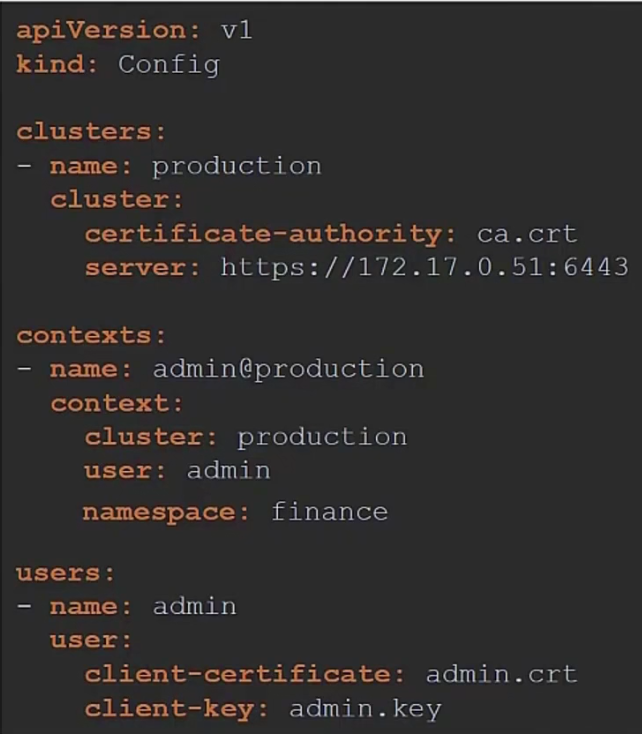
We just need to set the namespace within the contexts.
API Groups
We have two api groups in kubernetes

The core group has all of the main functionality files
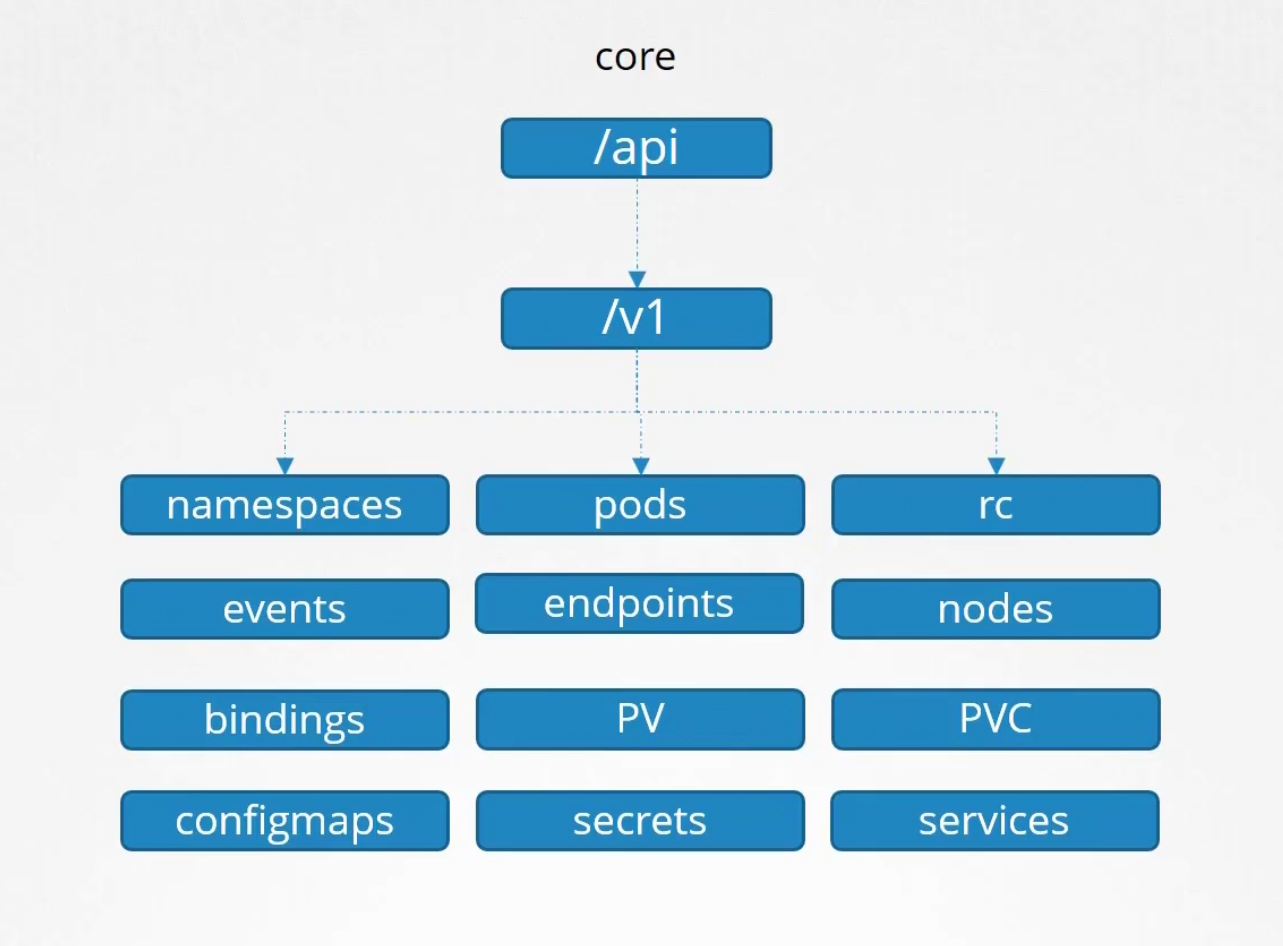
The named group has all of the organized ones

If we check them more, you will see more groups under the named one.
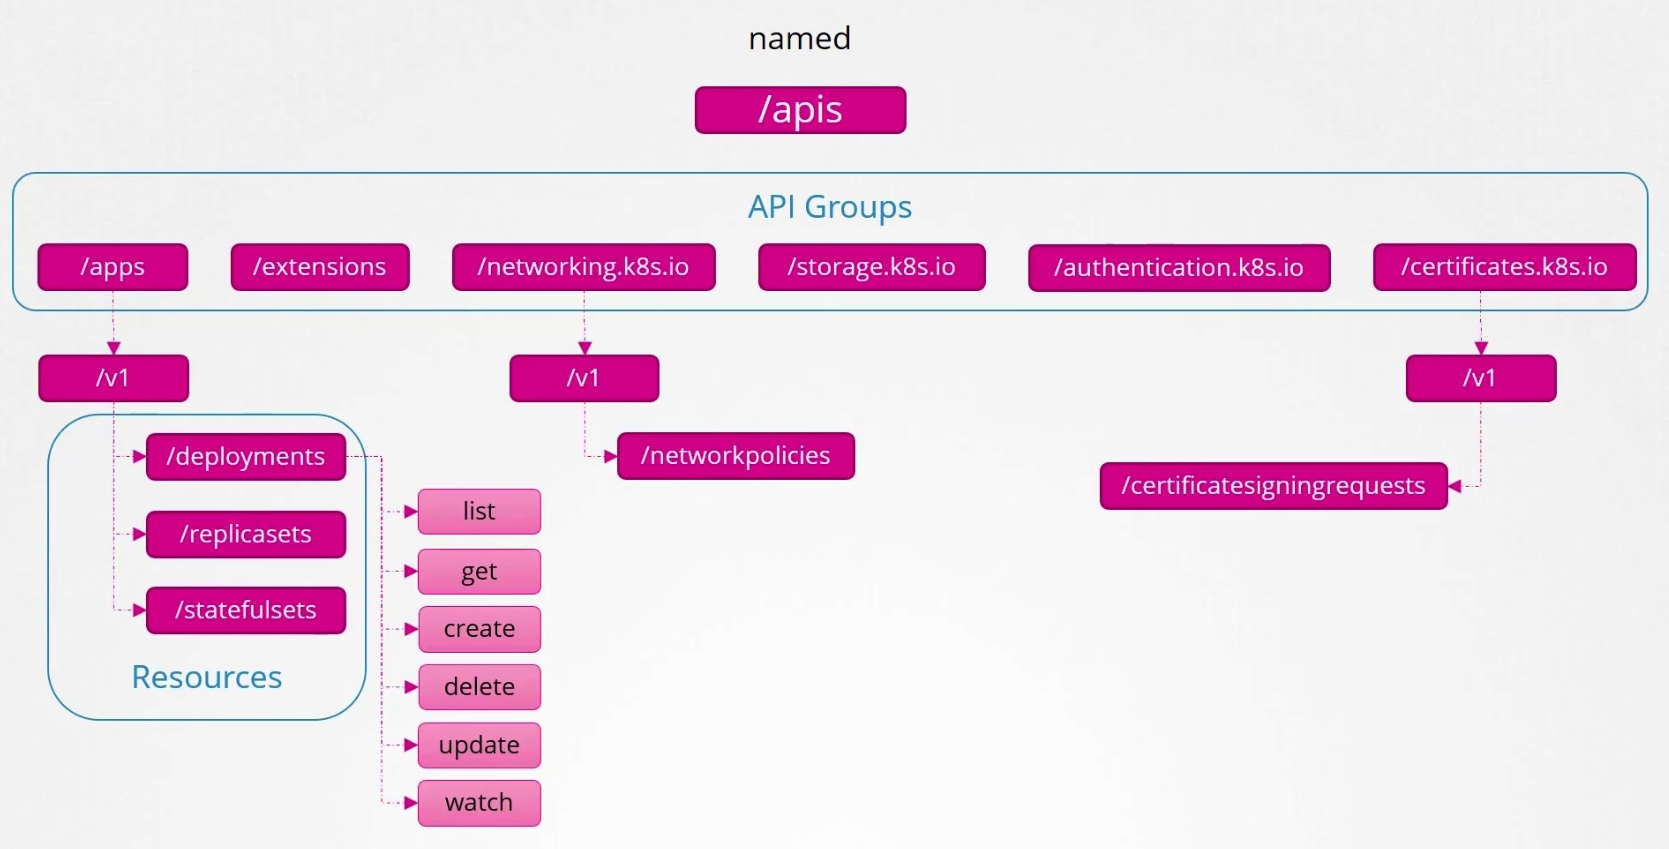
We can see options for deployments like create, get , delete etc.
There is a way to access KubeApi server in a better way and that’s by creating a proxy server.
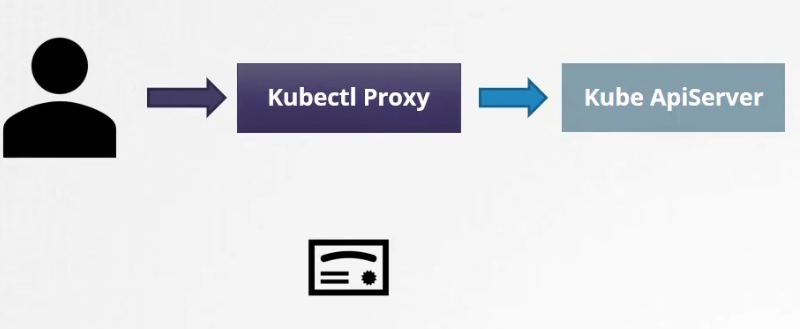
You can pass all of the certificates and pass them to kube-api-server in-order to get things done,
First create the kubectl proxy server(an HTTP proxy service created by kubectl to access kube-apiserver) at port 8001
kubectl proxy
Then check all of the api groups
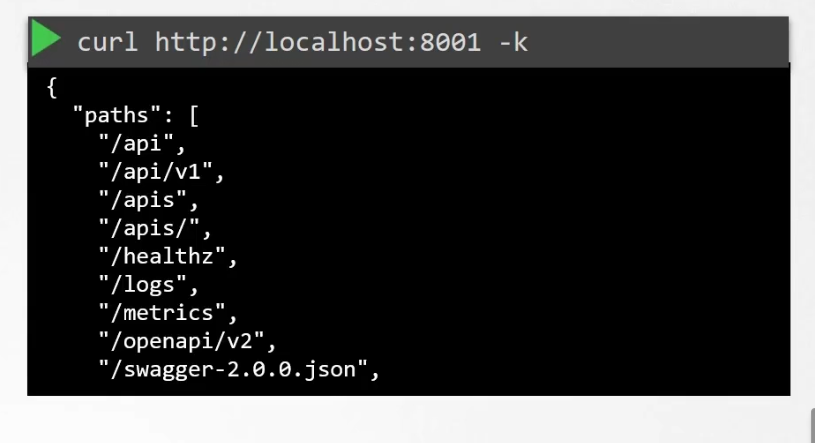
Keep this picture in mind
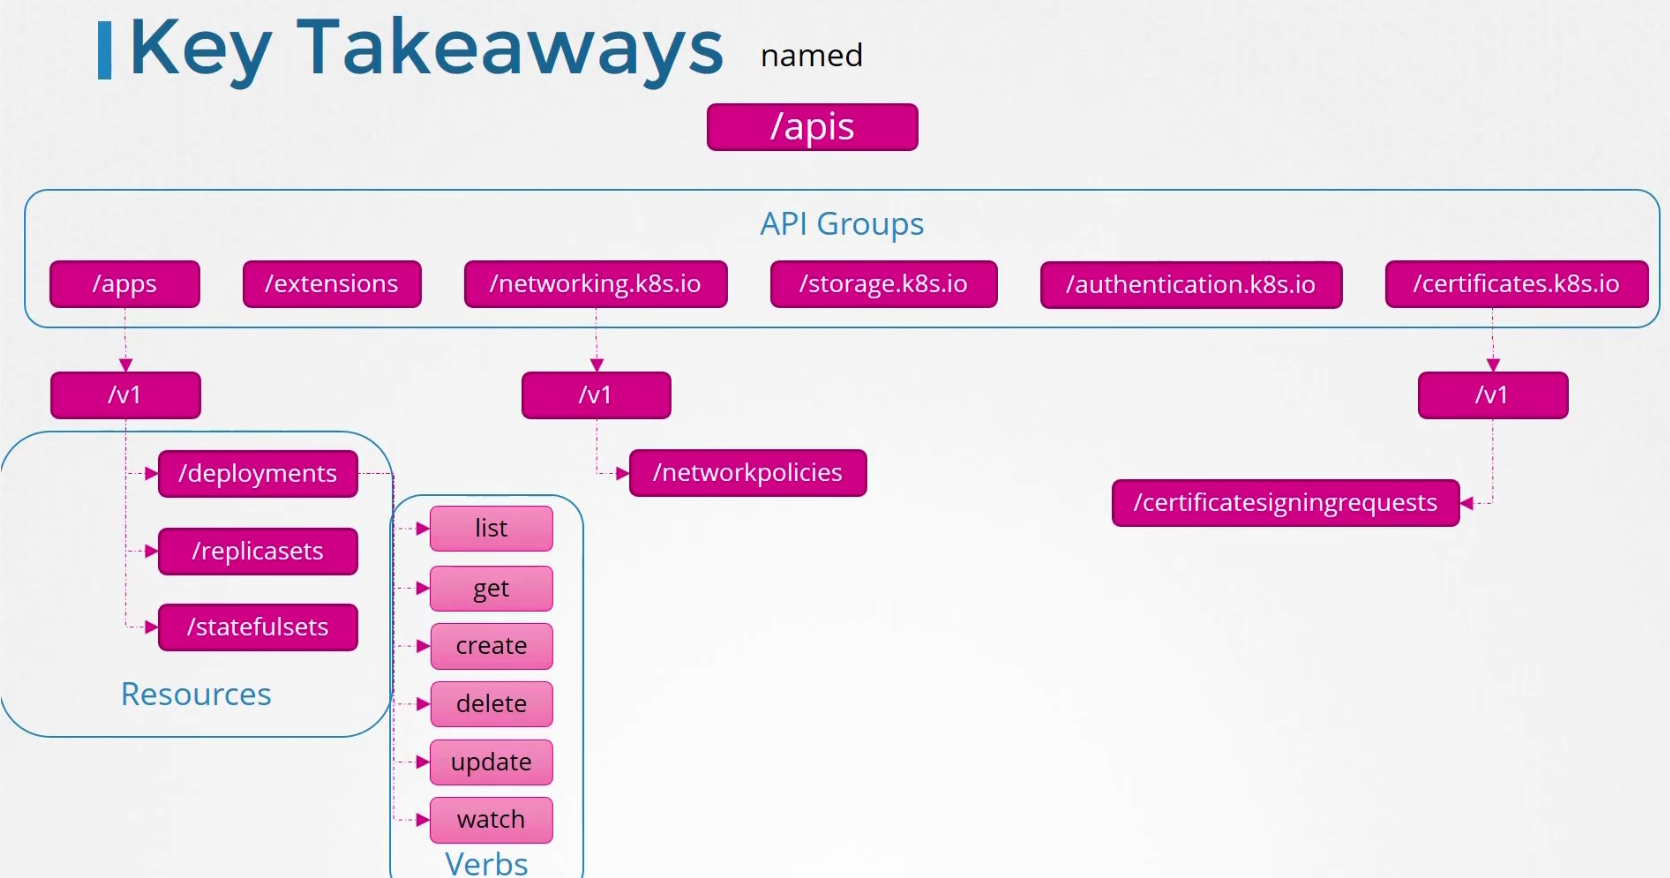
So, when we are creating a deployment, we mention apiVersion as apps/v1 to get access to resources.
API Versions
Each API groups have versions

When an API group has v1 version it’s actually GA (Generally Available) version.
But it can have other versions like Alpha, Beta

Alpha version: When an API is first developed and merged to kubernetes code base and becomes part of the kubernetes release for the very first time.

It’s not enabled by default.
Beta version: It’s enabled to beta by default and might move to GA version.

GA version: This is the version where users can use it without any bug.

Here you can see some has GA, some has Alpha, Beta , GA etc

For example, here /apps has GA, Beta and Alpha versions. So, you can create the object with any of the versions.

Despite working with all three versions, only one will be preferred (default) /storage (the version in which the object is stored in etcd)versions
For example, when you try to see a deployment information, it shows GA (apps/v1) version as it’s preferred in most cases

Here, you can see the preferred version

And storage version

To enable version or our choice edit the kube-api server

API deprecations
Assume that a platform called KodeKloud wants to launch some content on kubernetes and created an API group called /kodekloud. Under the kodekloud API groups we have two resources called course and webinar.
Assume, we are ready to push the PR . Once the PR was done, it got approved and now it’s on alpha version.

Now, the kodekloud team found out that webinar isn’t working well with audience . So, they want to remove it . But according to rule 1, they have to do it in the next version.

So,here it is!

Here, in the next version (v1alpha2), they removed webinar.
Here, v1alpha2 will remain as the storage/preferred version

The second rule is,

Now, with the kodekloud release, we have two versions. We are expecting not to have any information loss.
Assume our v1alpha2 version had duration included which was not there in v1alpha1

So,we have to update v1alpha1 so that, no information is loss

Then we do more testing and make beta versions and finally end with the GA version

Now, we don’t need old alpha versions and beta ones, right? But how to remove them?
Let’s visually see how we started and how to remove. We initially had v1alpha1 version. So, let’s start with it

As it’s the first one, it’s the preferred version.
According to rules 4a, Beta and GA versions has to be active for atleast 3 releases. But alpha versions need to be there for any releases. So, in the next alpha version (v1alpha2),we no need to have v1alpha1 (old one)

Then we had a second alpha version,

And in real life, this is how maintainers let people know about alpha version change as new users might not know.

Then , we had our first beta version v1beta1 and old alpha version (which does not need to be there for any release ) is removed

But for the next beta version v1beta2, there has to be the old beta version according to rule 4a

Notice that beta versions need to be there for 3 release after it’s first launch. And as the old version v1beta1 was launched earlier, it’s their with v1beta2. Shouldn’t the new beta version (v1beta2) be the preferred one?
According to 4b rule,

Here current release X+3 is the first release where both old and new beta versions are supported. As it’s the first time, we can’t change it. But we can do it on the next release (because the rule says we can do it after the release which supports both version)
On the next release X+4, we will have both of the versions but, v1beta2 can now be the preferred one. (because on release X+3, it supported both old and new versions but according to rule 4b, we had the opportunity to change preferred version right after the release X+3)

On X+5 release, we have added v1 (GA version )

We can’t have v1 as preferred due to rule 4b. Here the release X+5 supports old version (v1beta1, v1beta2) and new one (v1). But, as it’s the first one which supports both, we have to wait till next release to change the preferred one.
On release X+6, we can now remove v1beta1 according to rule 4a (v1beta1 was there for 3 releases(X+3,X+4,X+5) after it’s first preferred version launch at release X+2)

Now, according to 4b, we can change the preferred version to v1

Notice, v1beta2 was launched in release X+3 and it’s been there at X+4, X+5, X+6 releases. Shouldn’t it be deleted at X+7 version?
No!!
Why? Because v1beta2 became first preferred version at X+4. So, it can be there for 3 releases after that.

On the X+8 release, we can remove v1beta2 as it has completed 3 releases (X+5,X+6,X+7) after it’s was first launched as a preferred version.
Now, we will have this

Note: Deprecation does not mean deletion. Rather it means the version is going to be deleted soon.
Then we had our new alpha version,

Also notice, every time we saw a new version , we immediately deprecated the old version. For example at release X+3, we depreciated v1beta1 as we had v1beta2
But now we can’t deprecate v1 for an alpha version (v2alpha1) as it’s a GA version/Stable one according to rule 3.

So, we can deprecate v1 when we have new stable version v2.
Kubectl Convert
Now, let’s think about a user who was using v1beta1 and it got deprecated. Now, he needs to use v1 version. So, the user need to convert from the old version to new version

Here you can see how one can update one file with new version

the nginx.yaml file was updated with new version v1
Install the convert plugin from the documentation page

Authorization (What to access)
As an admin, we want to have all file access
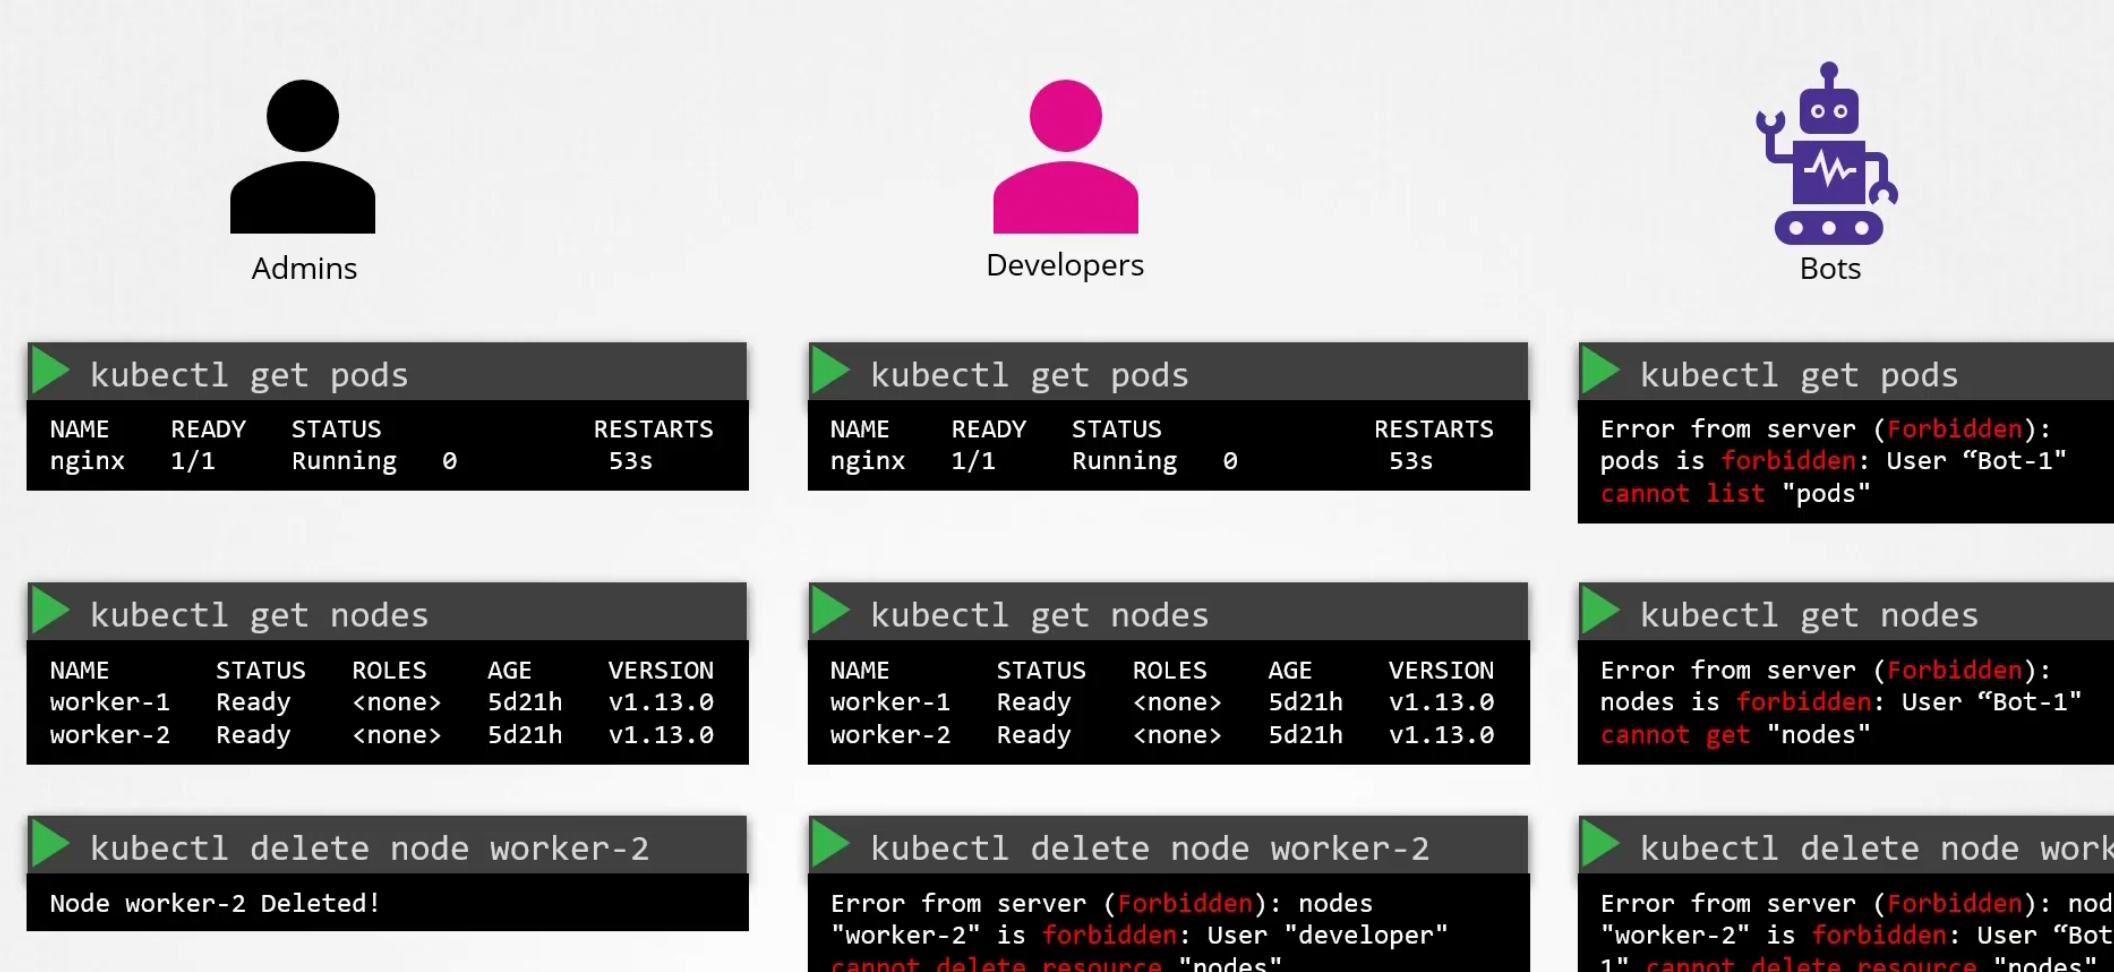
But for the developers and other services (bots) surely we don’t want to give edit access or others.
Let’s understand some authorization techniques now:

Node Authorization

Now, we know master node has KubeAPI server and the request can come from an outsider or from another kubelet residing in a node.
How to define the kubelet? We mentioned earlier that these kubelet certificates etc should be part of a group called SYSTEM. Basically they are part of system nodes . Then node authorizer checks that and allows kubelet to communicate to kube-api.
What about external users?
ABAC
To give access , we create e policy file and give the access in this format. Then we pass this file to the api-server’s config file. That’s ABAC.
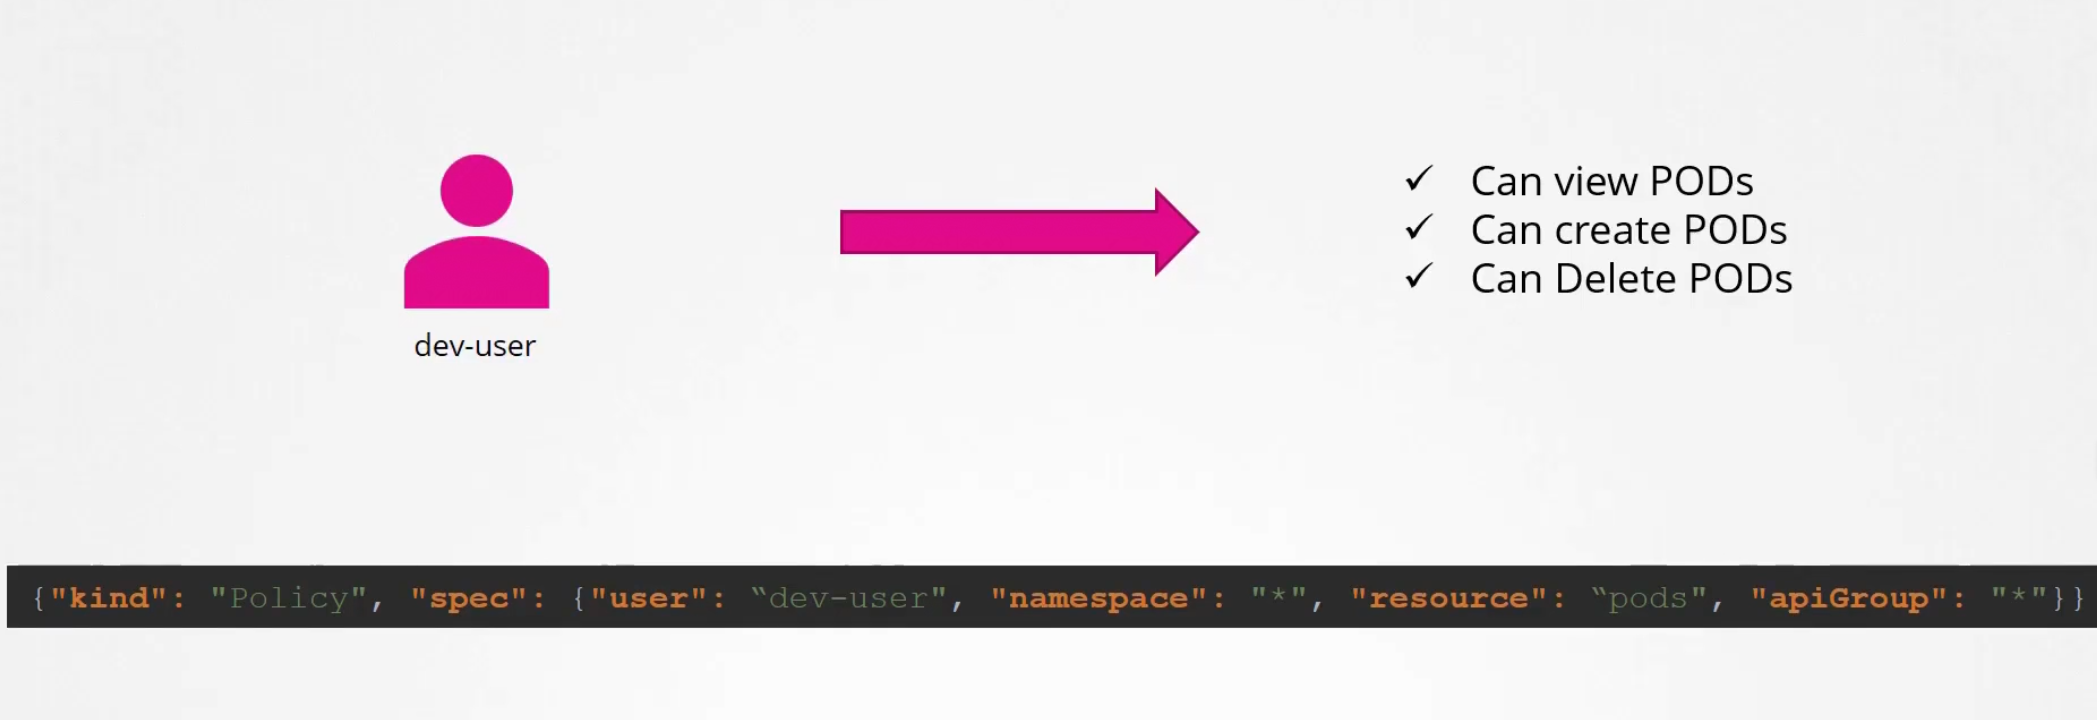
But for more users, more lines in the json file
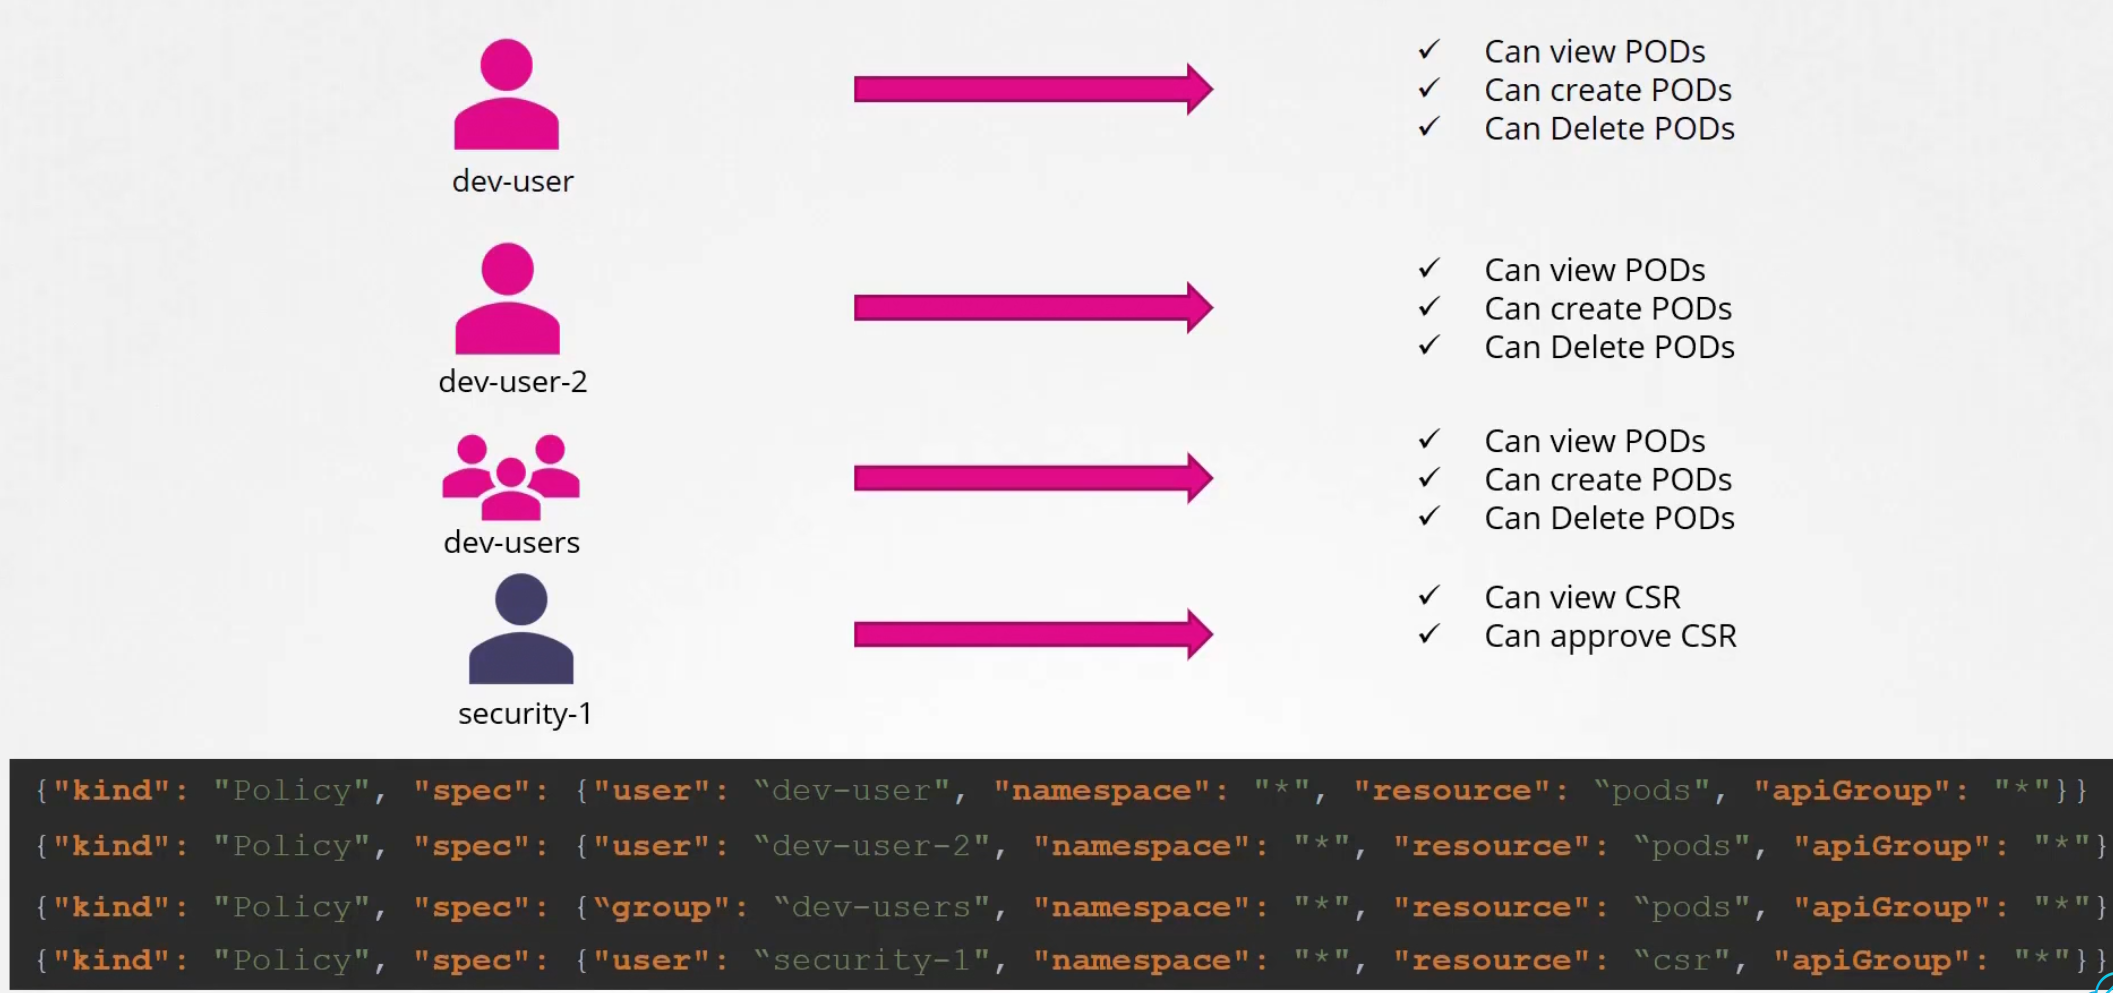
So, it’s becomes tougher
Instead, we use RBAC (Role based access control). Just create a role with all access needed and associate the user to the role
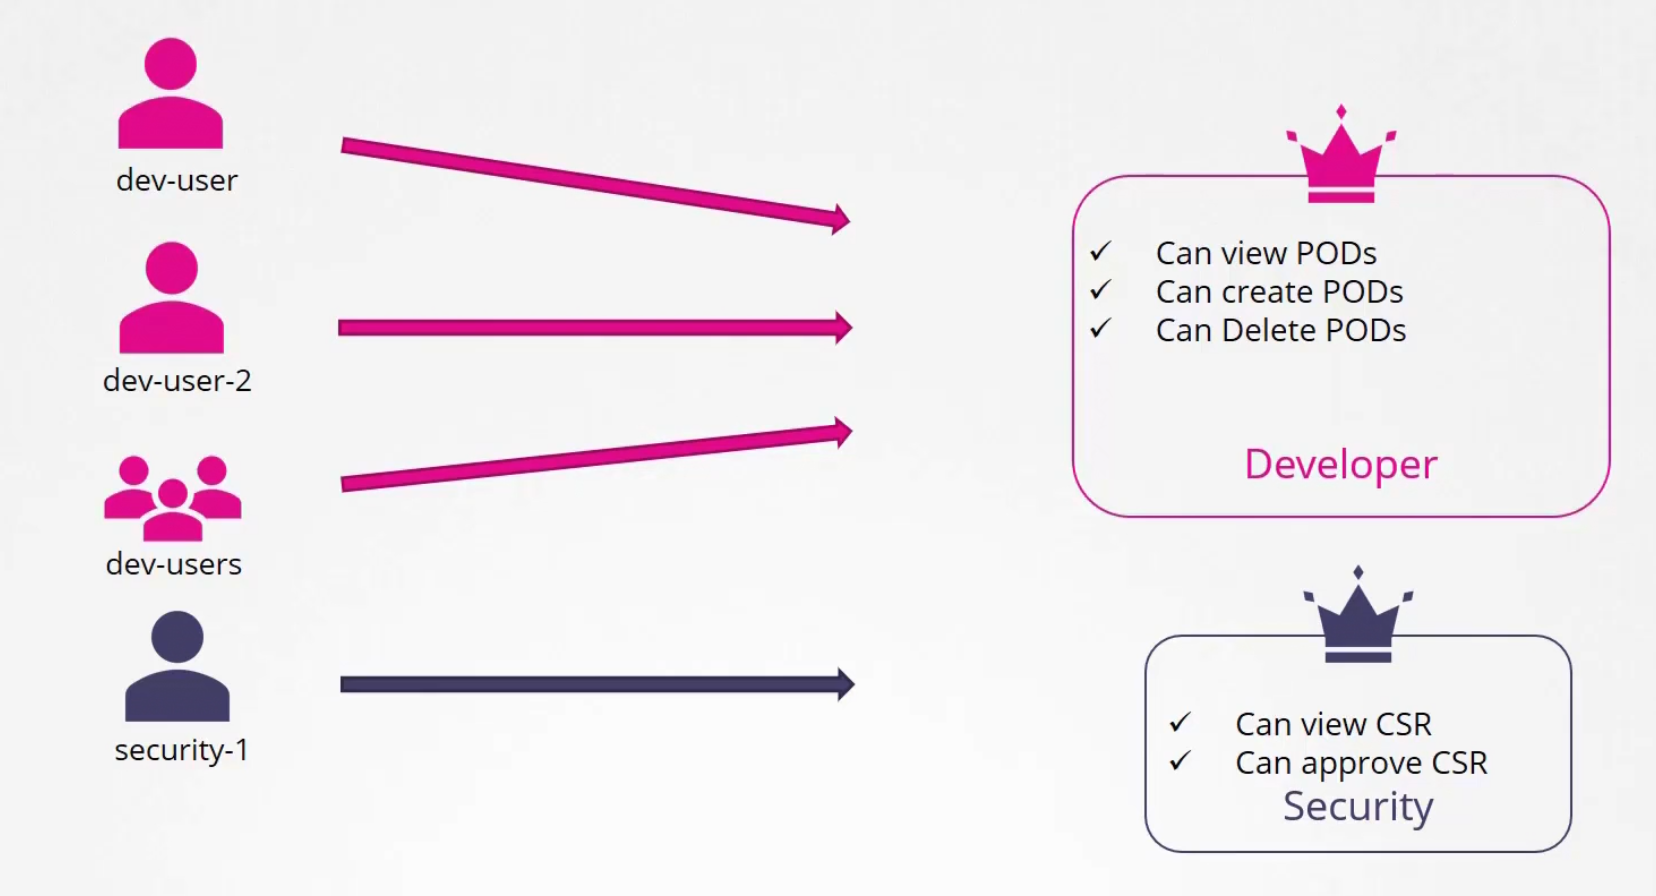
Later we can just update the access if needed.

Webhook
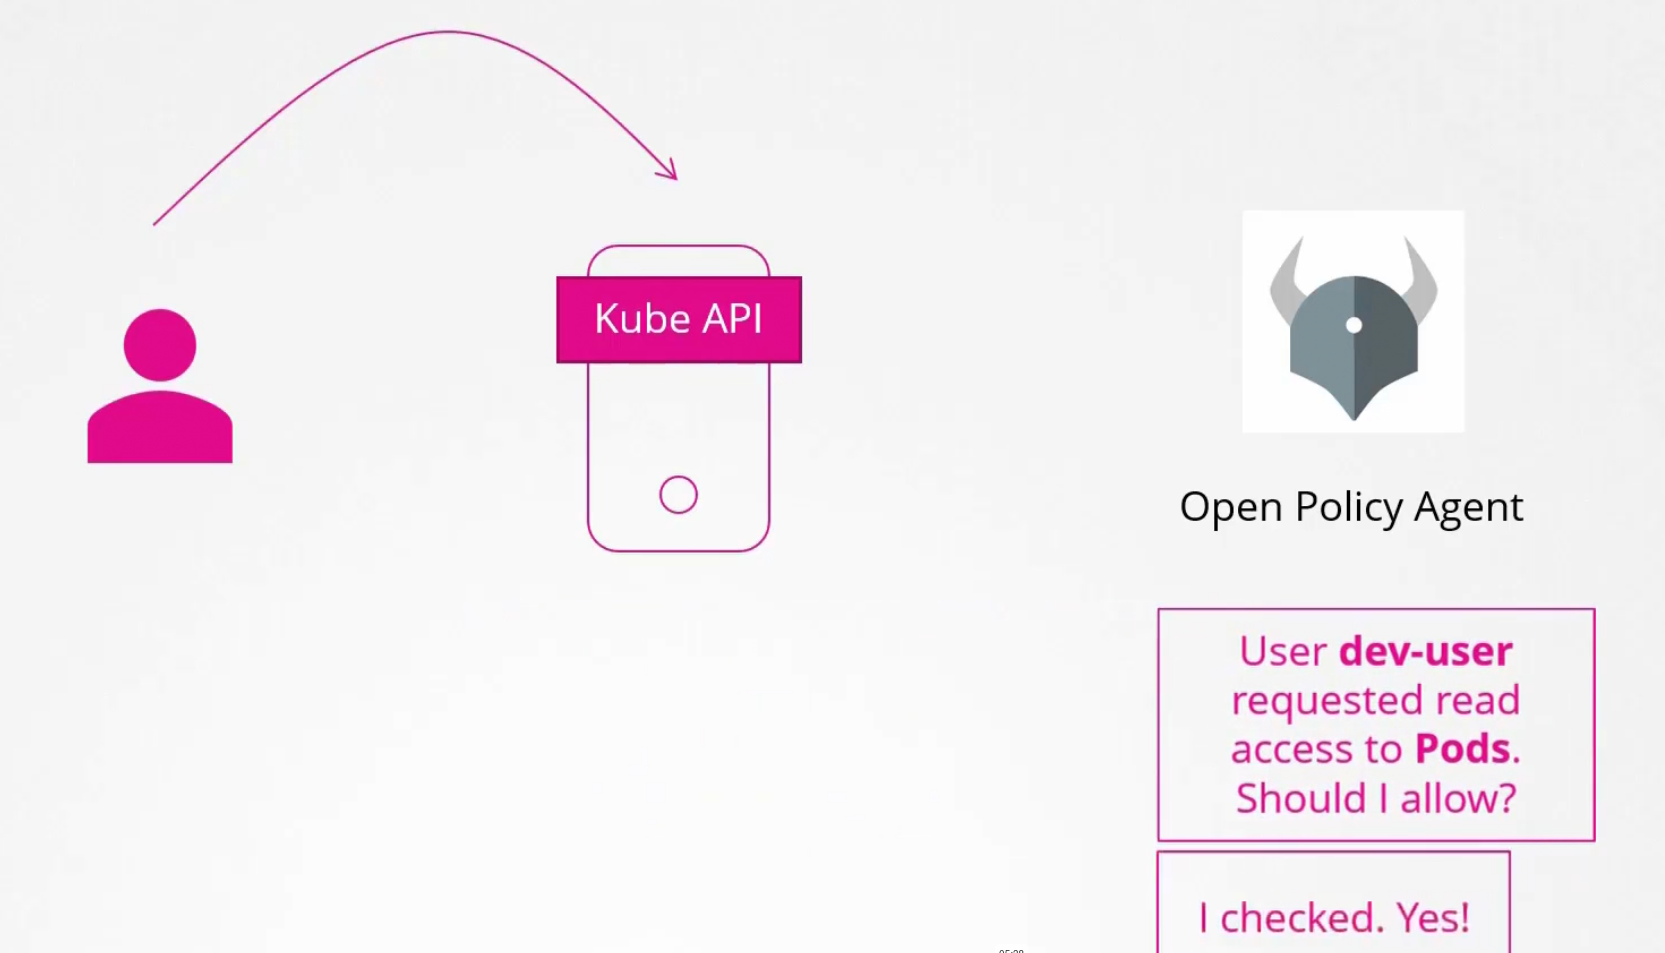
If we want to use 3rd party tool like (Open policy agent and a user asks to get access to kube-api, the agent will let us know if we should give access to them or not.
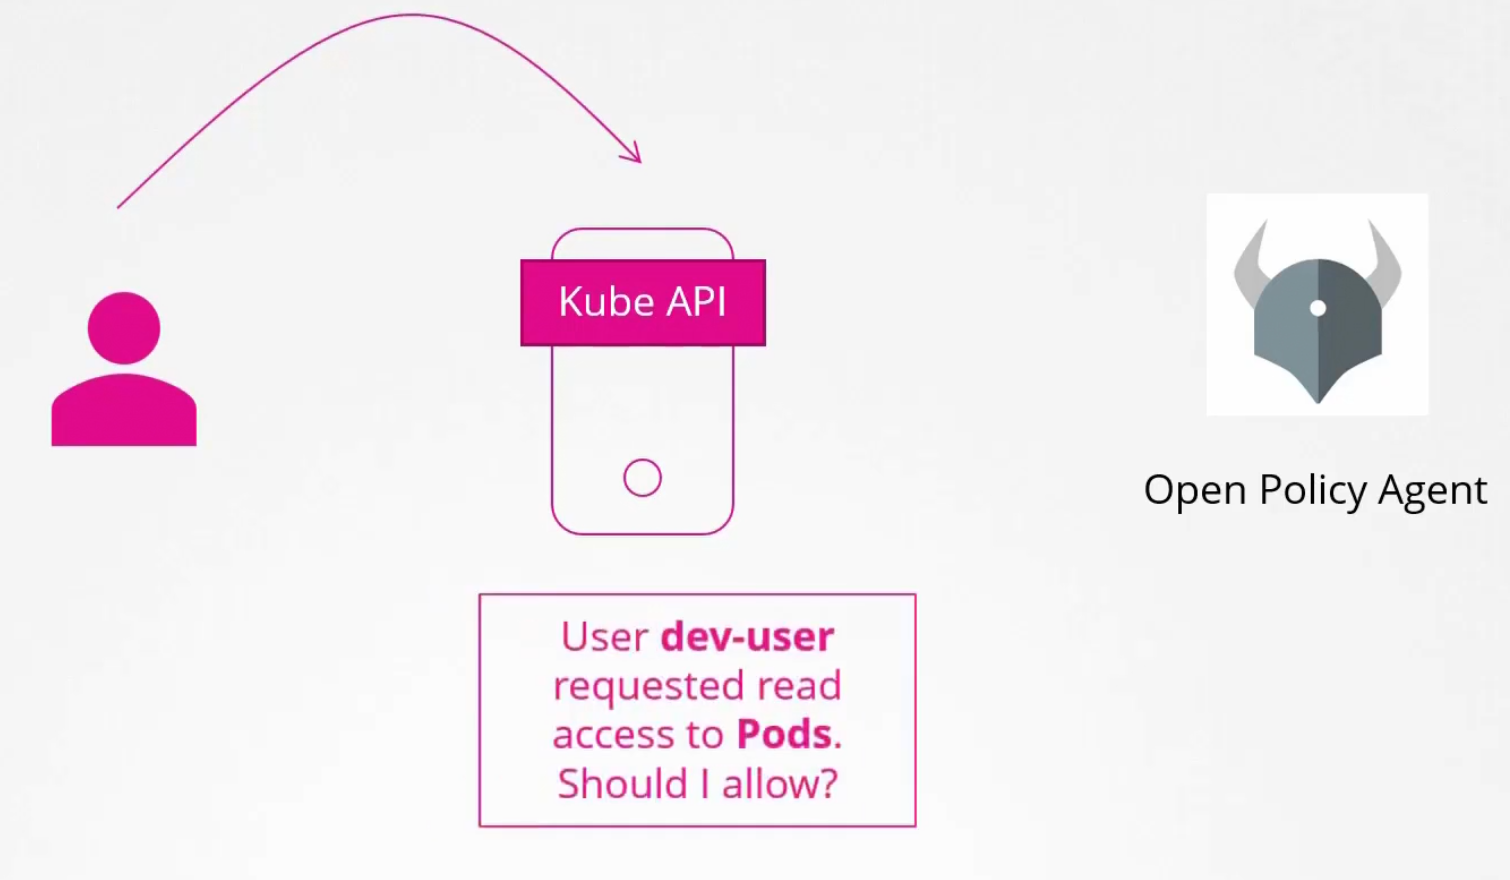
Here you can see kube-api passed the request to open policy agent to verify and it answered yes!
There are two more modes in authorization. Let’s know about them:

Always Allow mode
By default, this is set as AlwayAllow
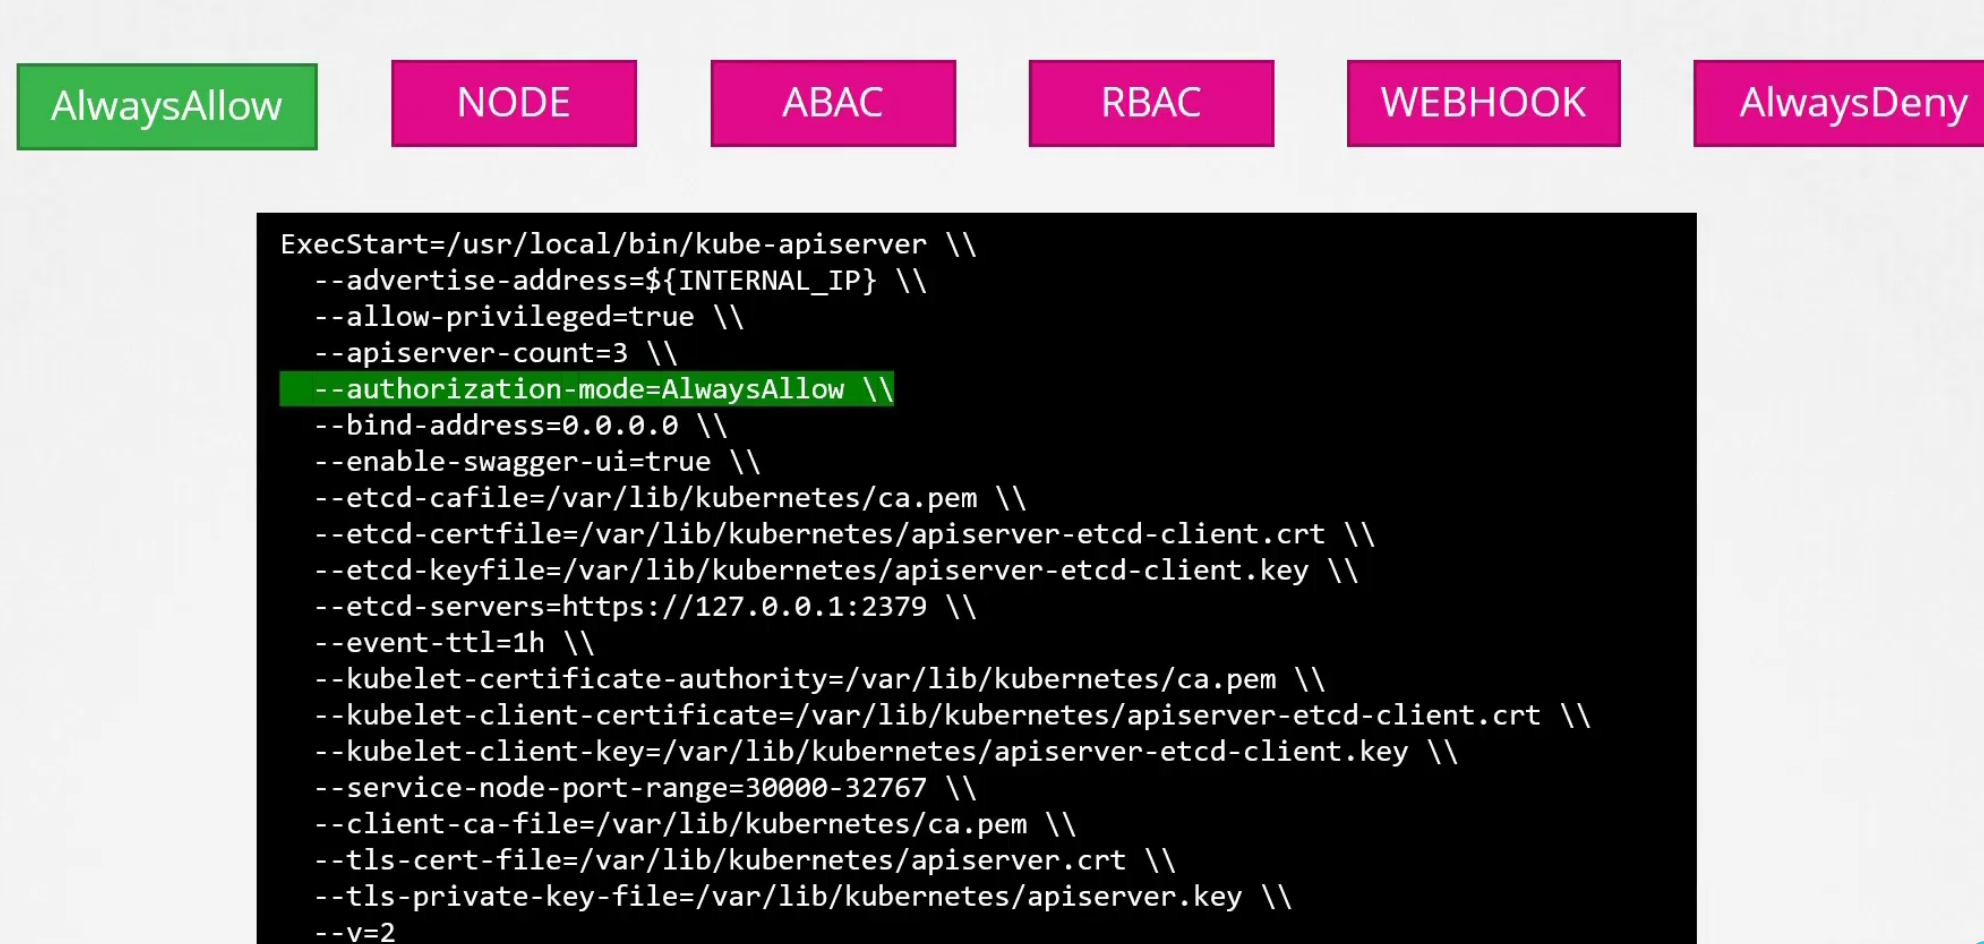
But one can specify what modes they want to use
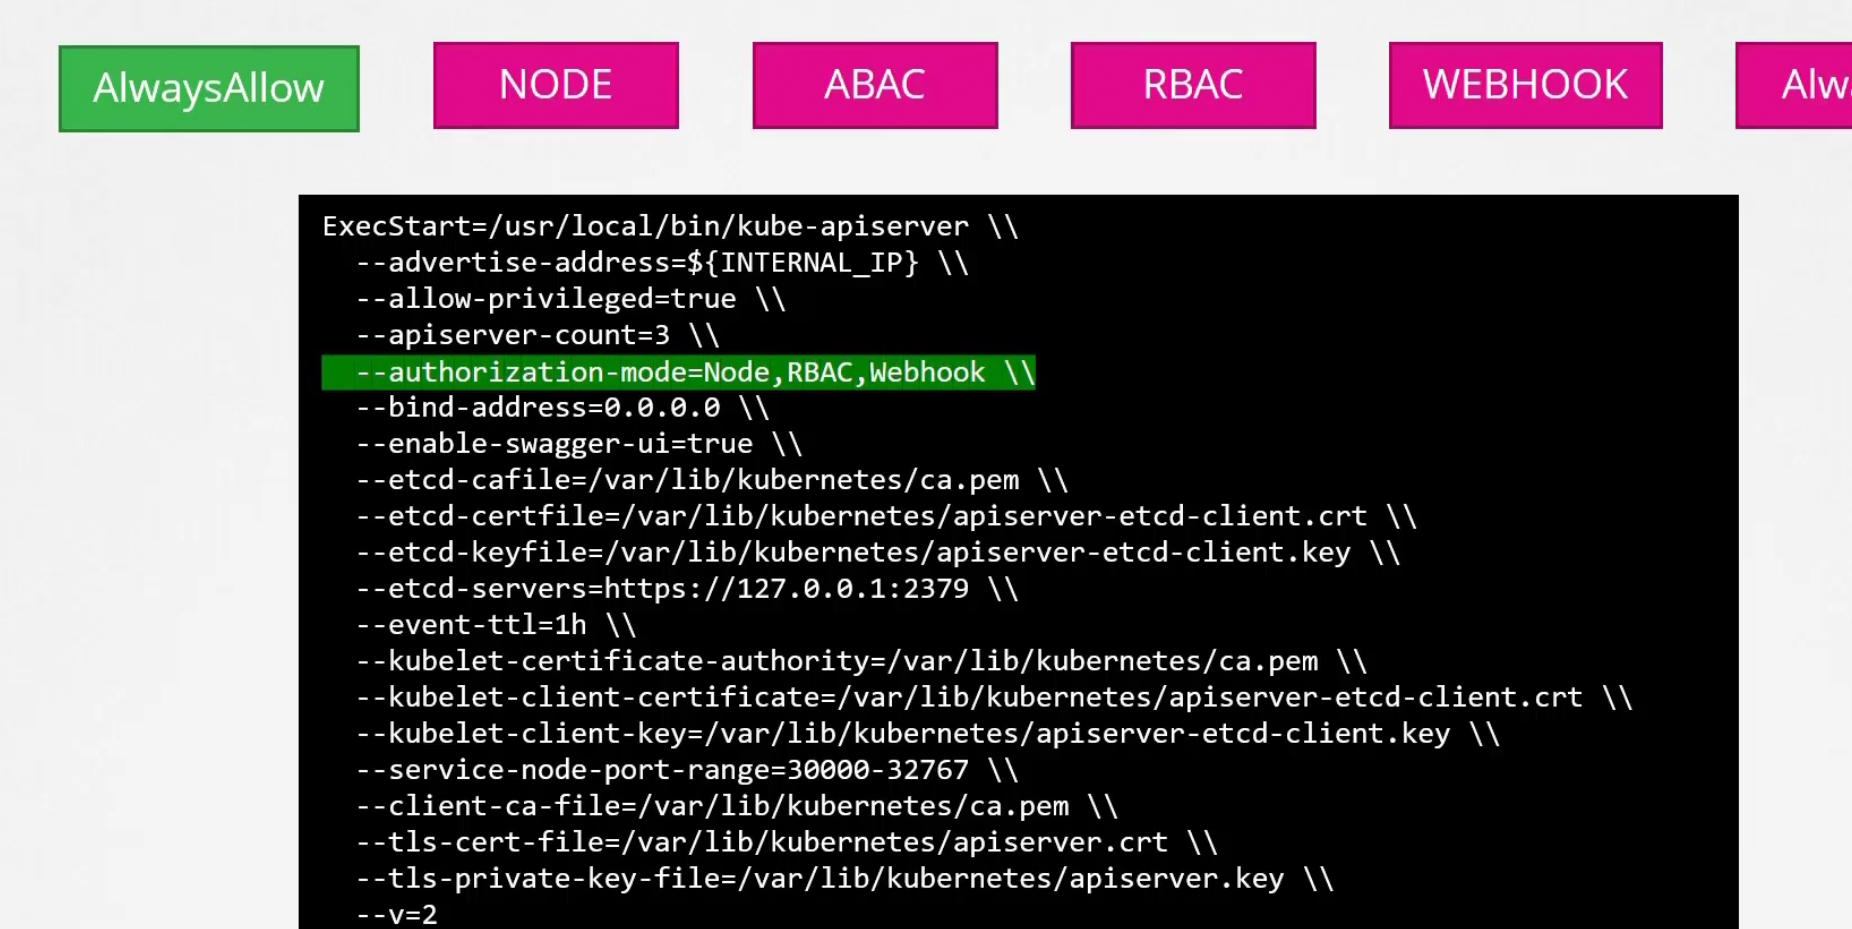
But why so many modes?
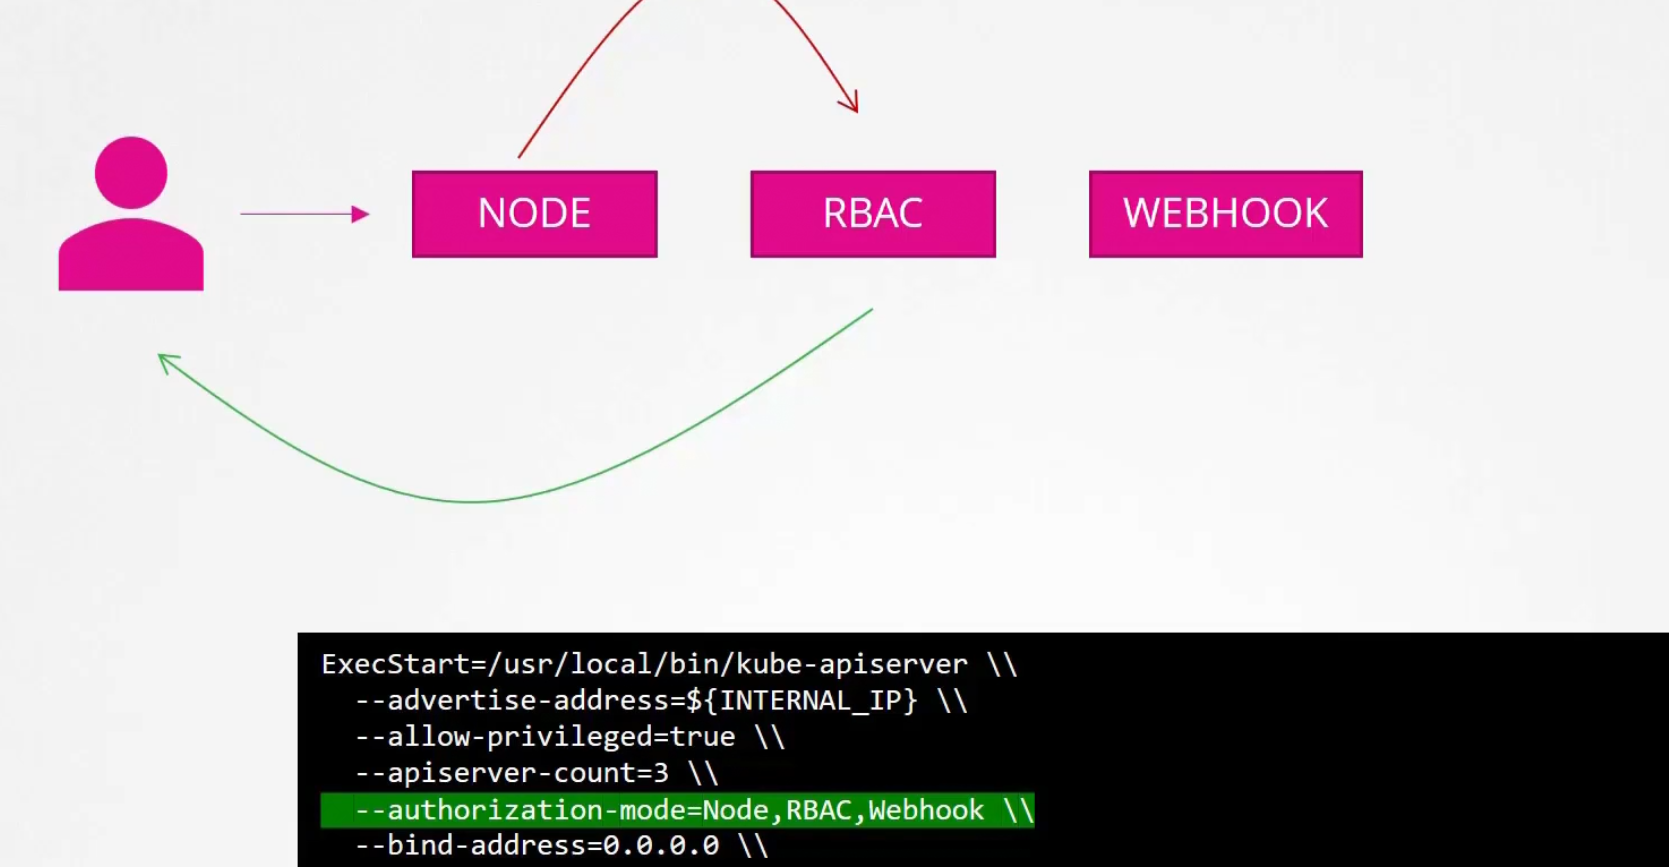
Because if one denies the request, then another mode gets the request and checks it. Here node denied the user access and passed to RBAC which verified that the user actually has access to role. Then provided access.
Role Based Access Controls (RBAC)
A role like “developer” might look like this
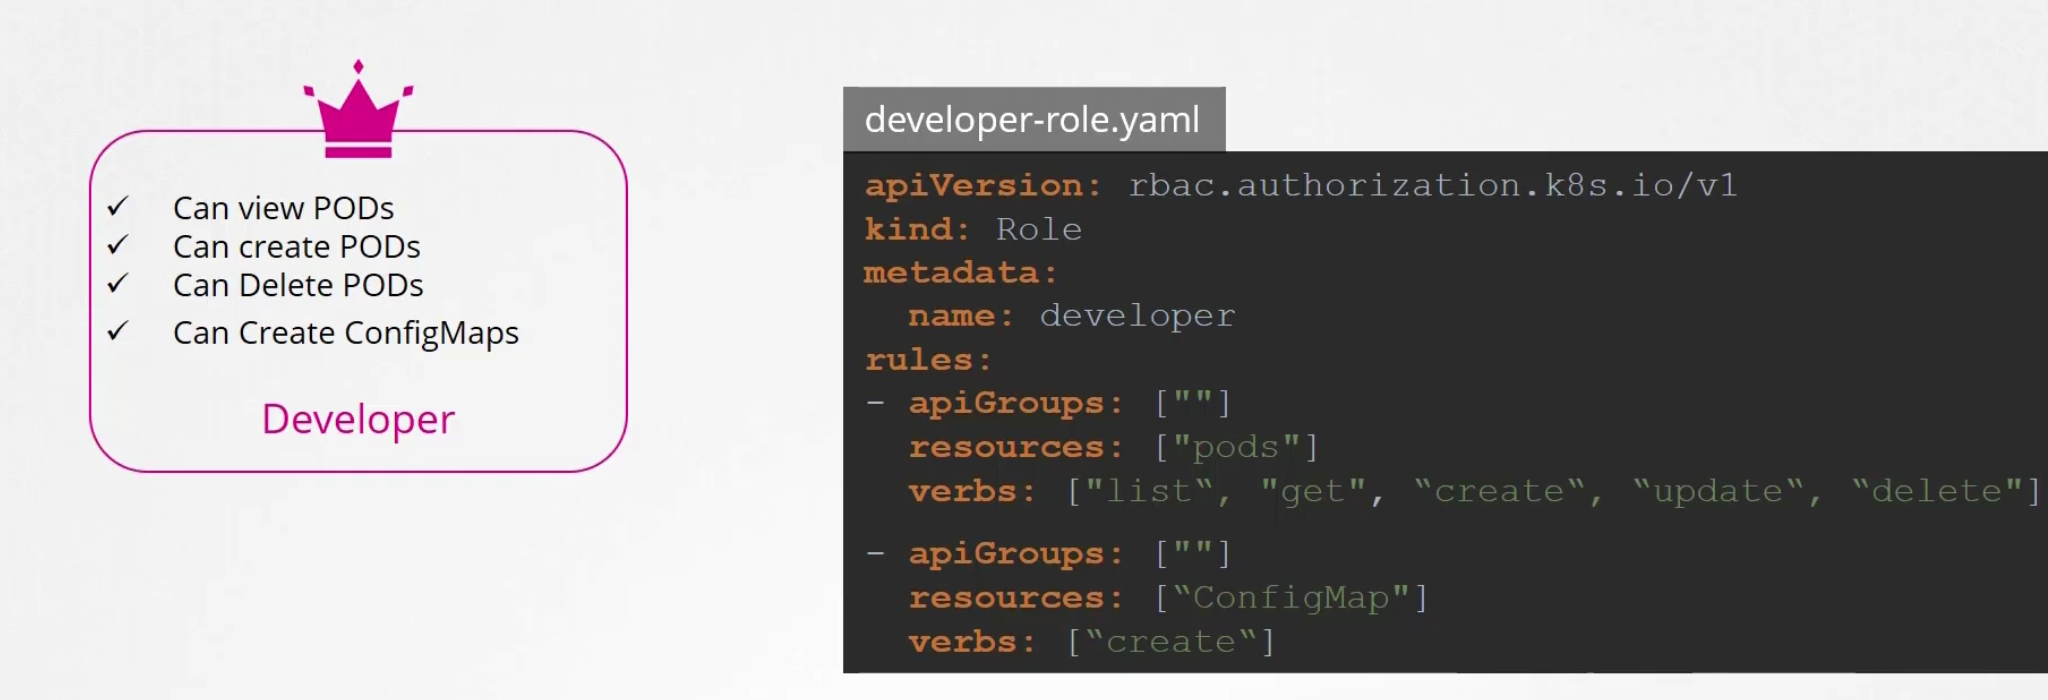
The role name is “developer”. Here we want to give access to pods, and want to let them check the list of pods, create, update , delete etc.
Then we link the user to the role
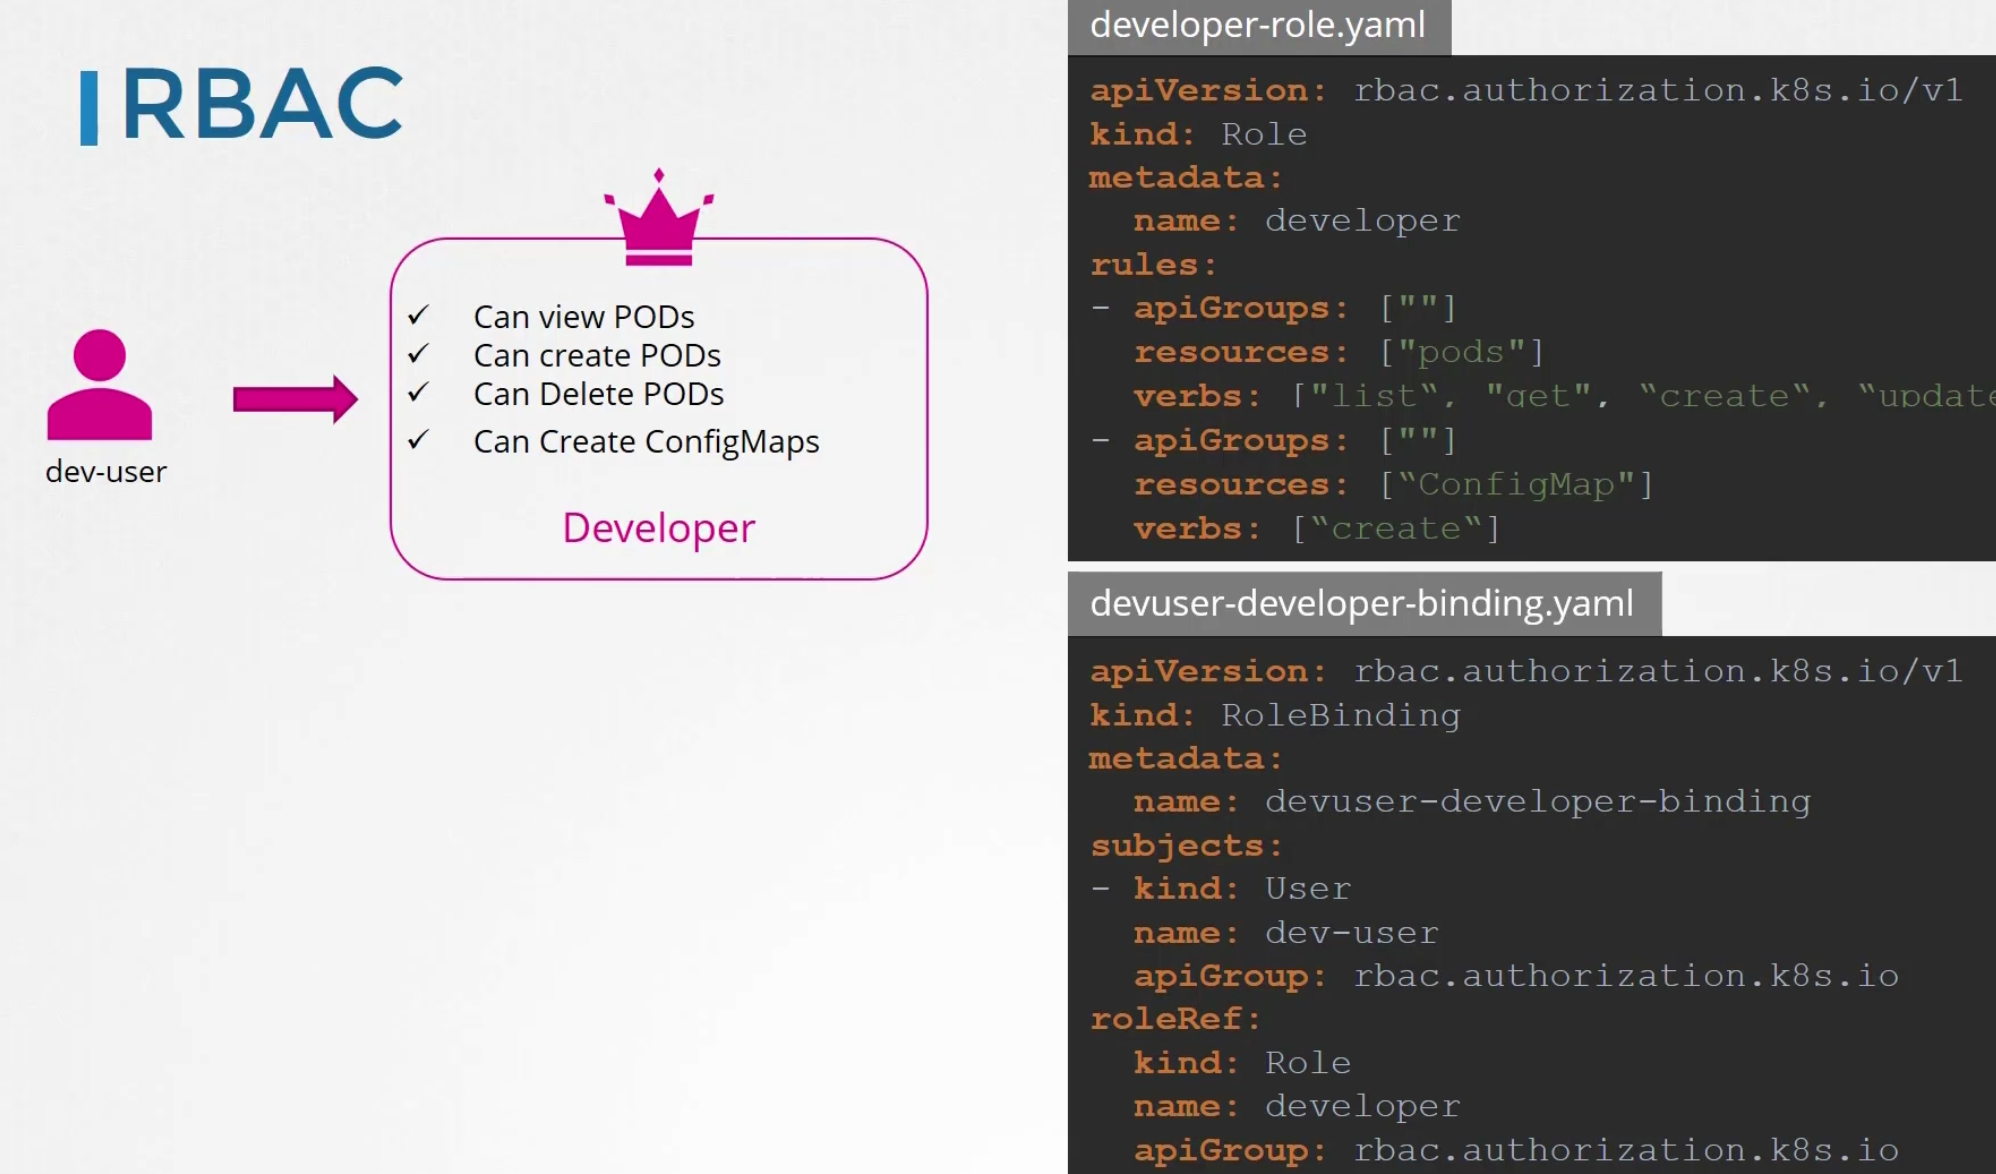
Here subjects has the user details and roleRef has the details of the role file
Note: Here in the role all the pods access was given. But we can specify that to specific pods if we want.

In this example, we saw how to use the destined pods using their names in the resourceNames
Then create the binding

Note: Here we are dealing all in the default namespace
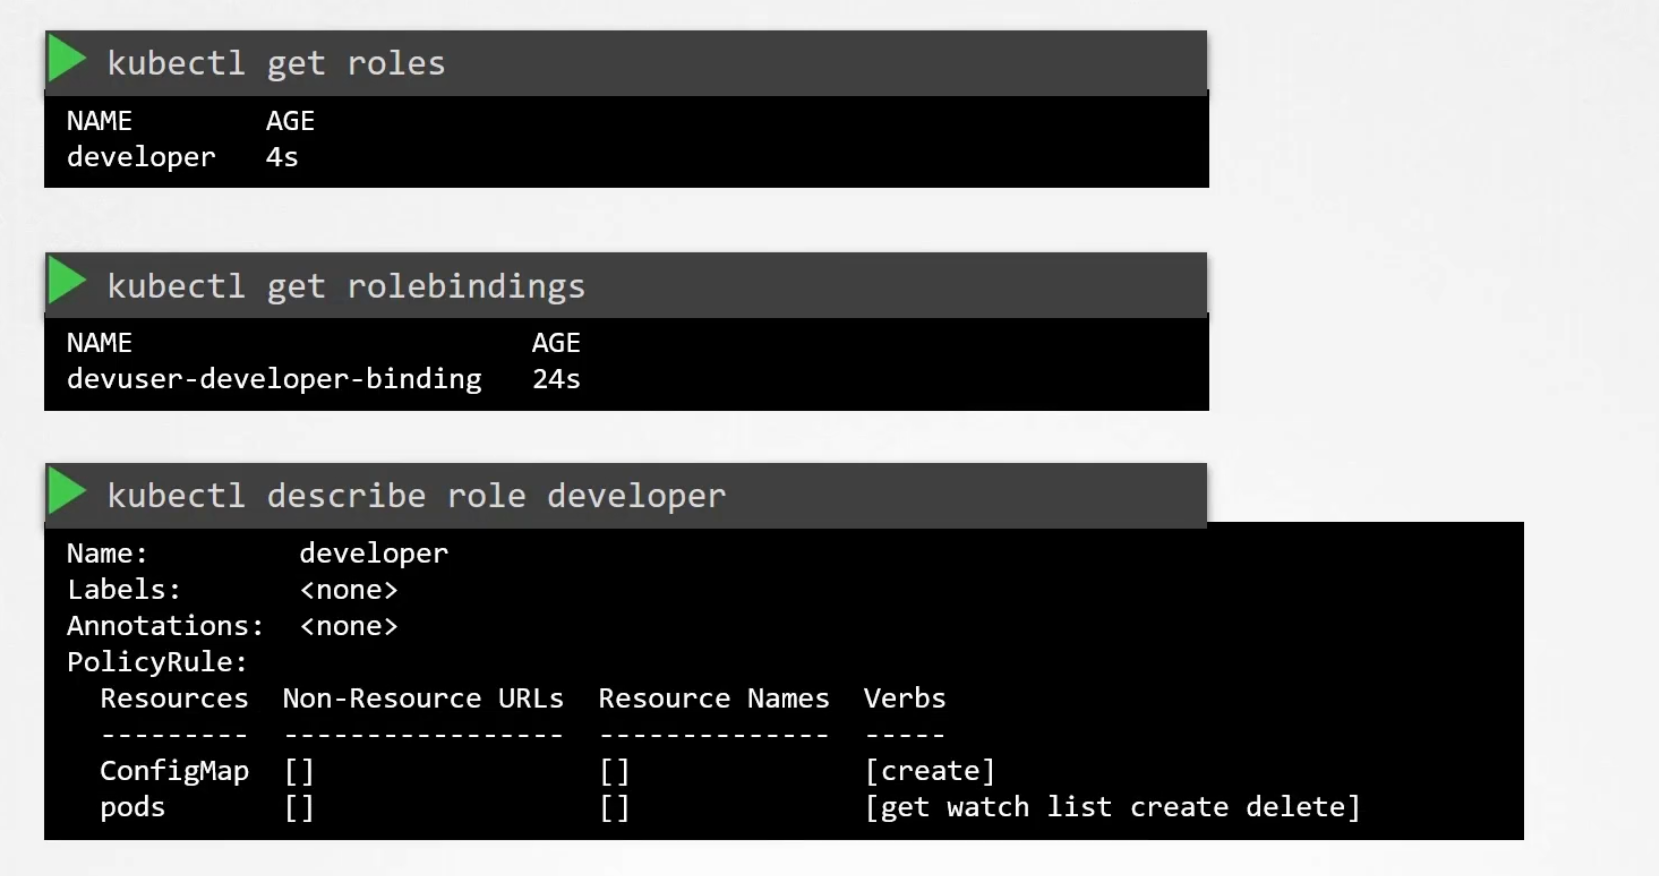
You can verify the roles, role-binding and others
You can also check your access to do things like creating deployment, deleting nodes etc
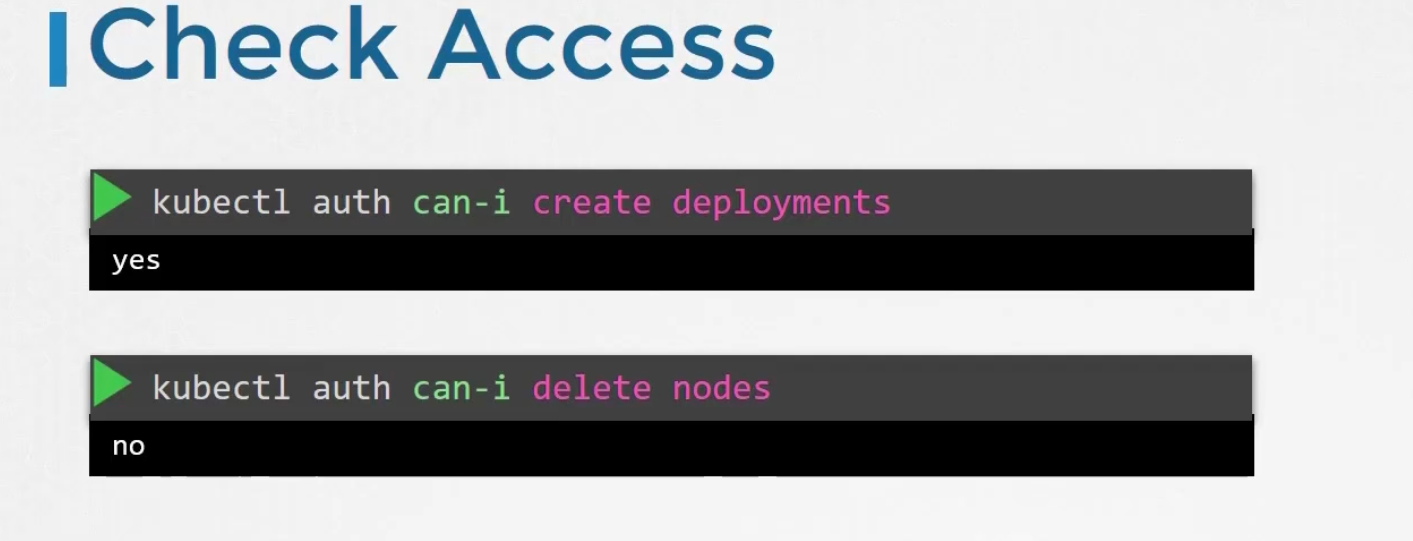
Also, you can check that for a user

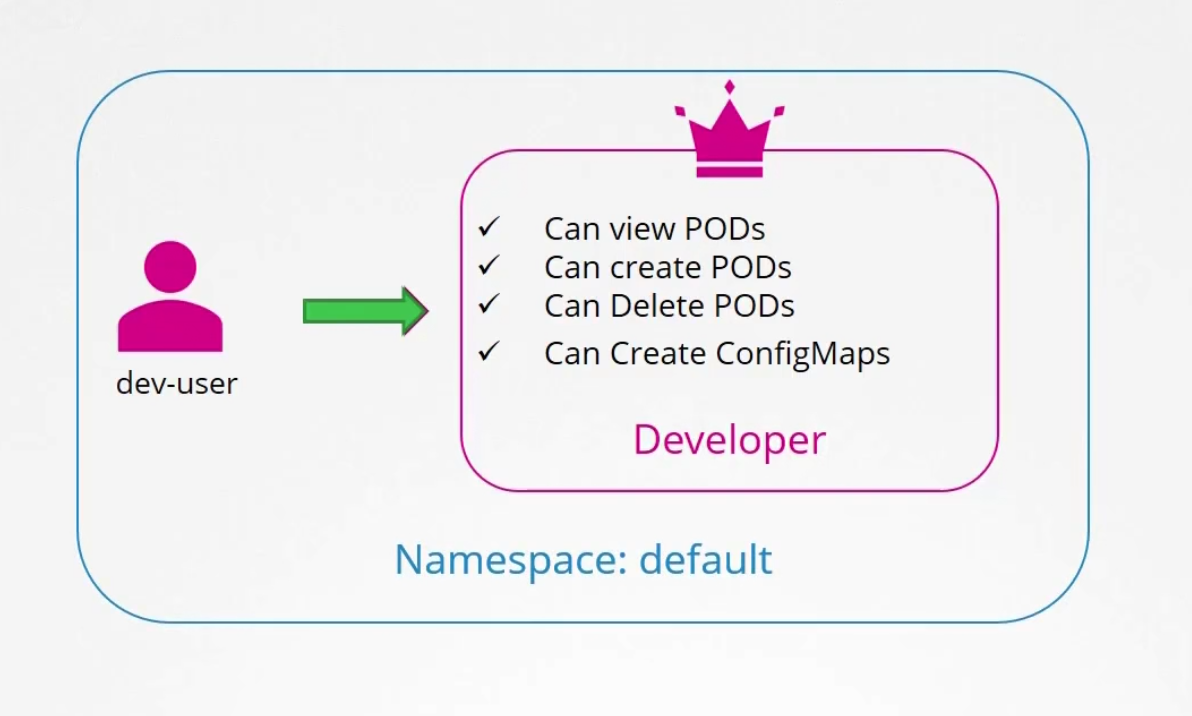
Here the dev-user does not have access to create deployments but can create pods
Cluster roles
In general the role are created and connected on the default namespace unless you change it
We can keep resources within different namespaces but, we can’t keep nodes in different namespaces. Nodes are part of cluster.
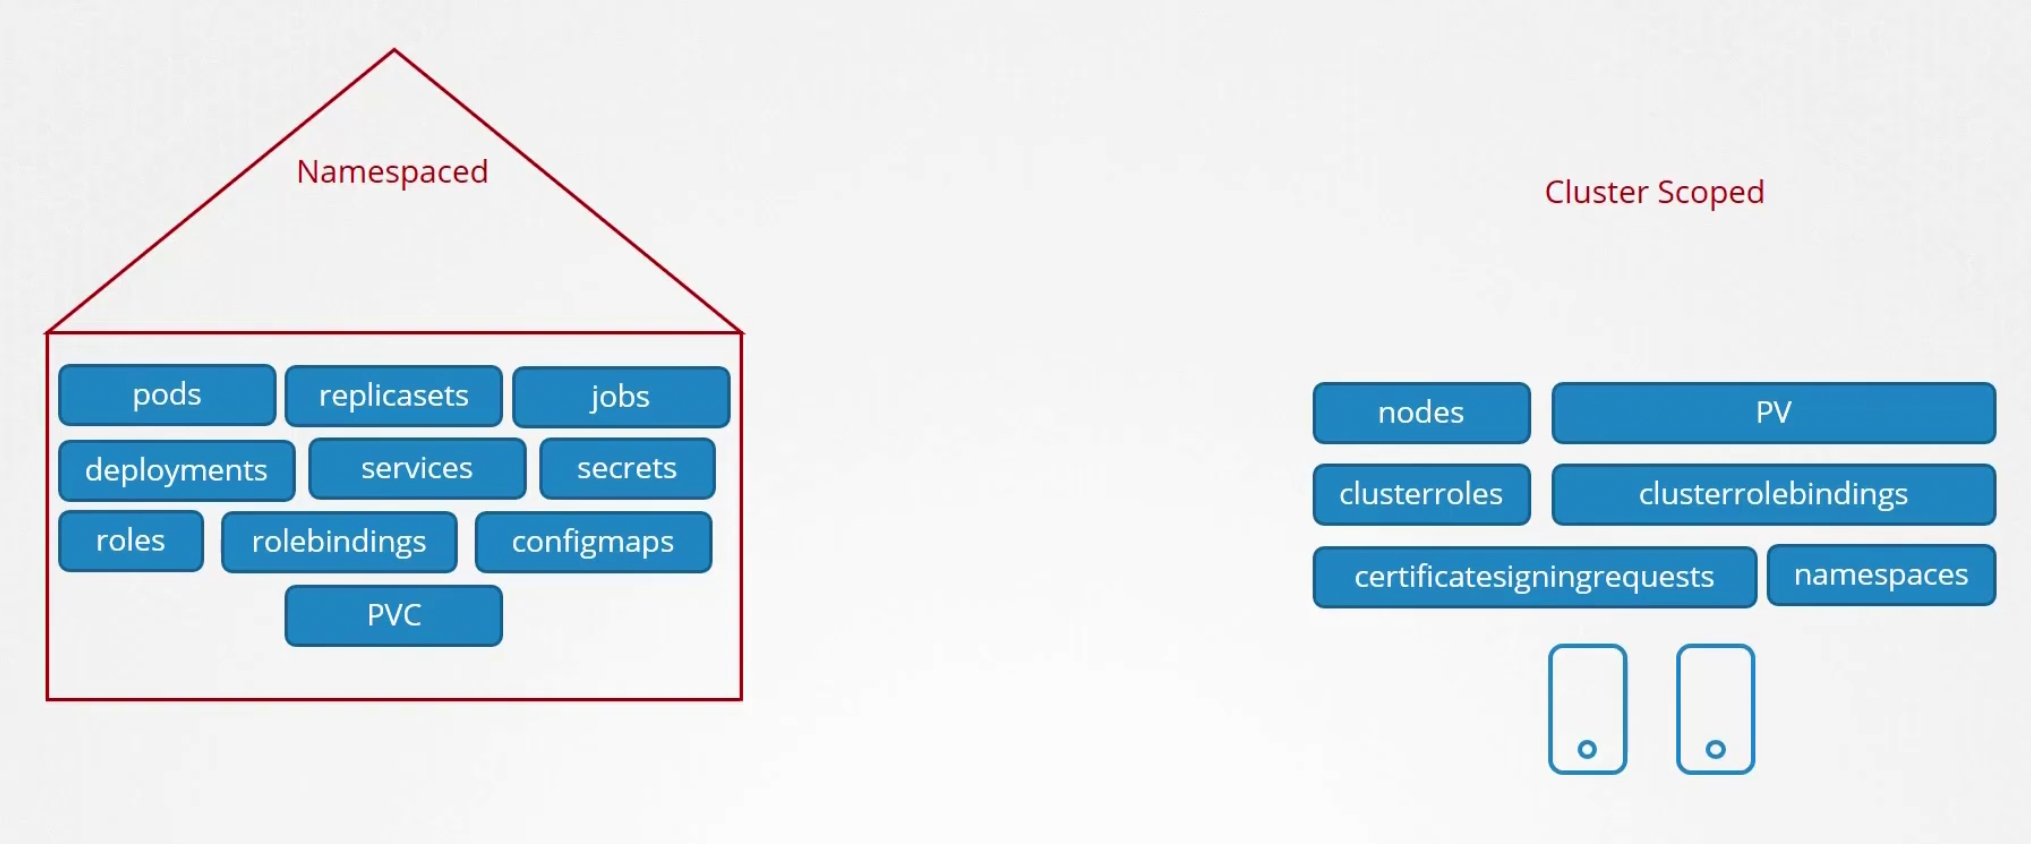
There are mode namespaced and cluster scoped resources, check them using this command
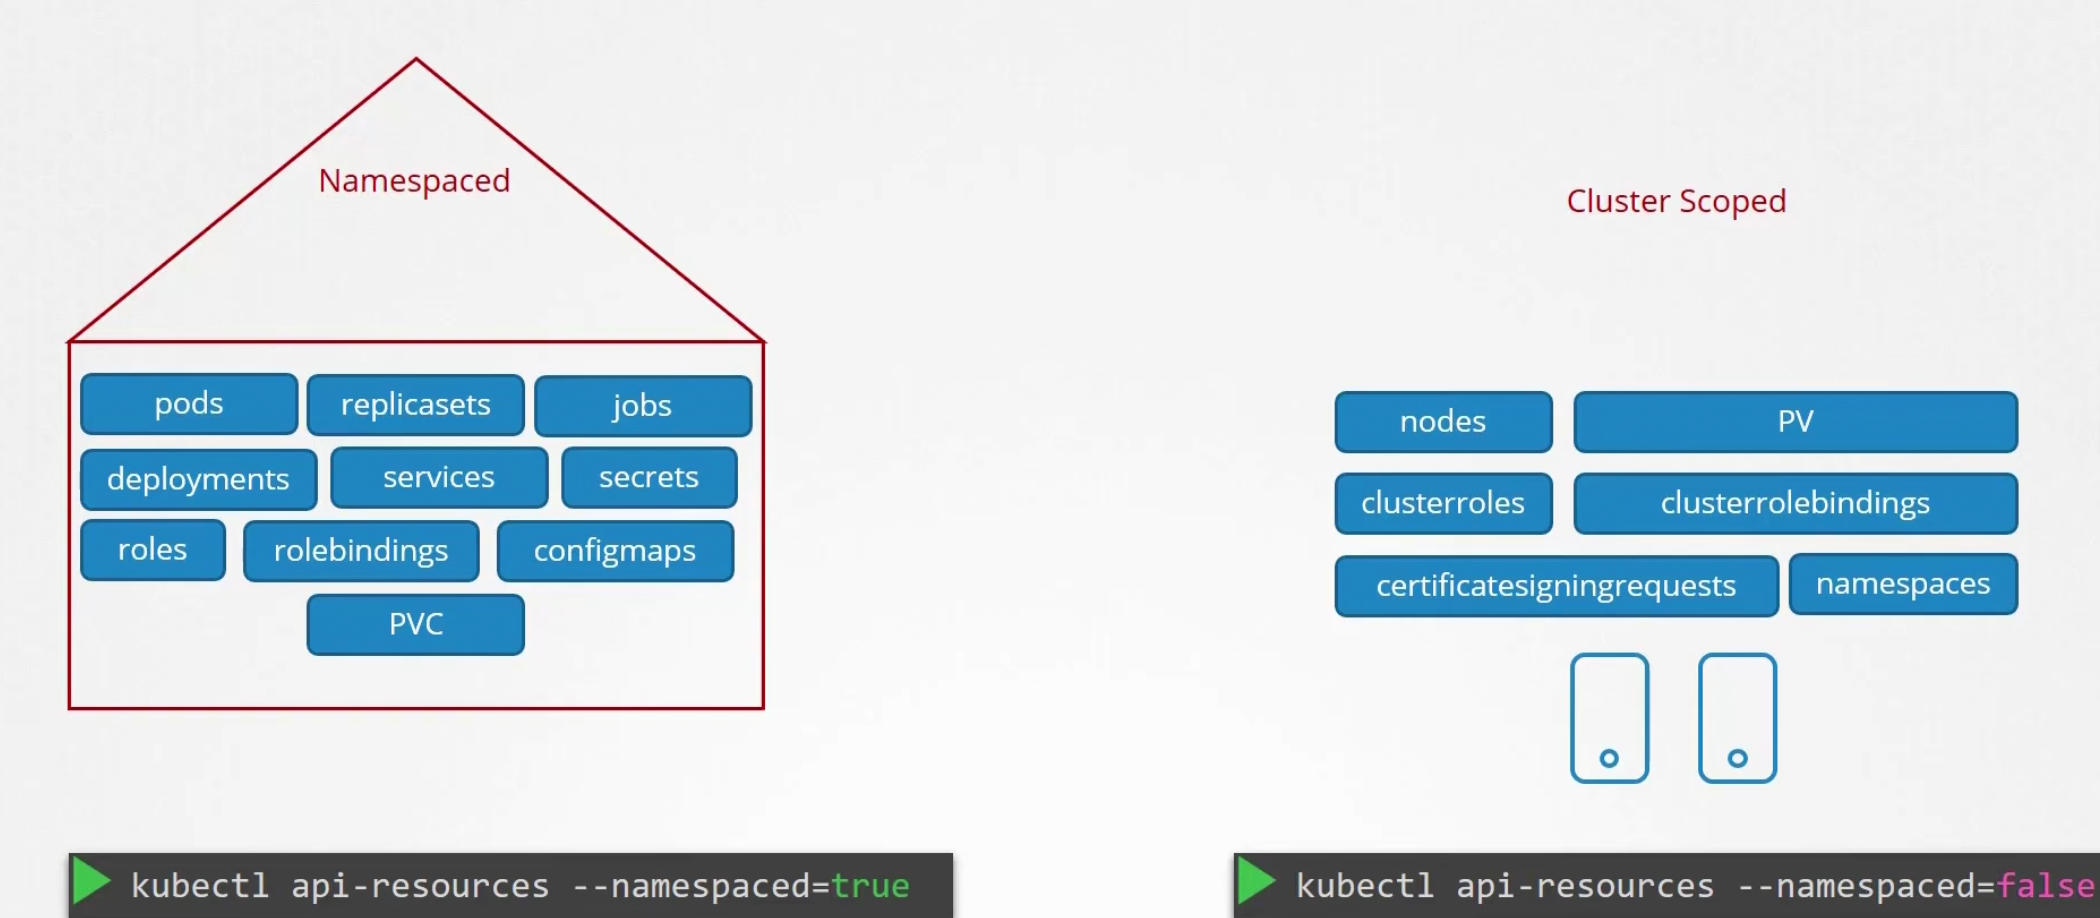
But we can also give access to cluster oriented resources through clusterrole
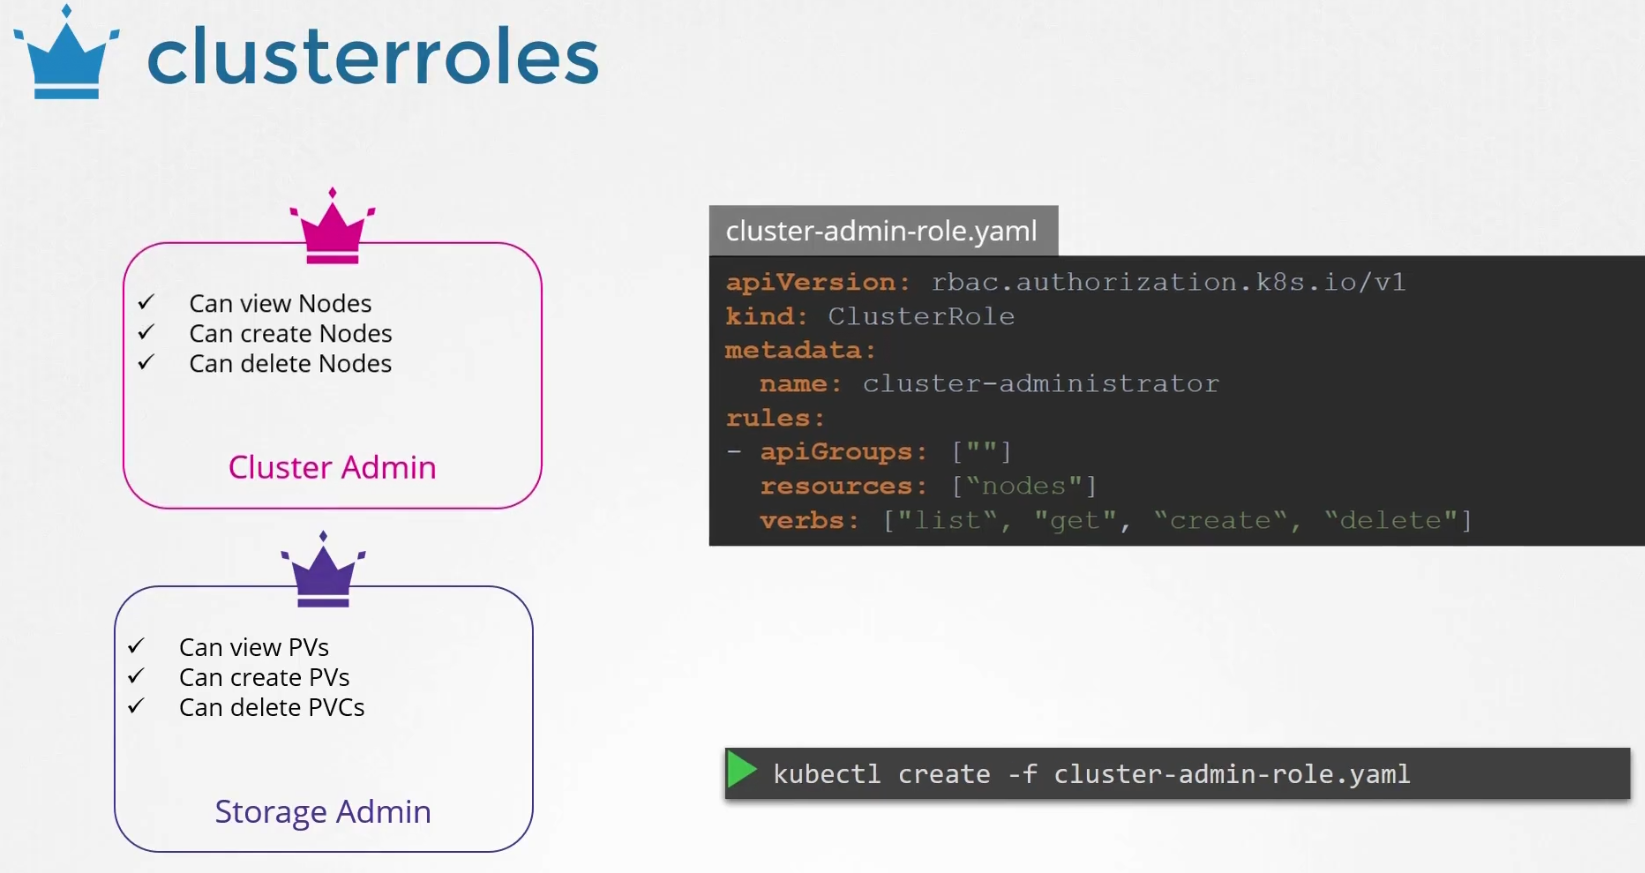
Here,we have given an example of creating cluster admin role and resources are nodes.
Note: Nodes are part of cluster and varies from cluster to cluster.
Then we bind the role to the user
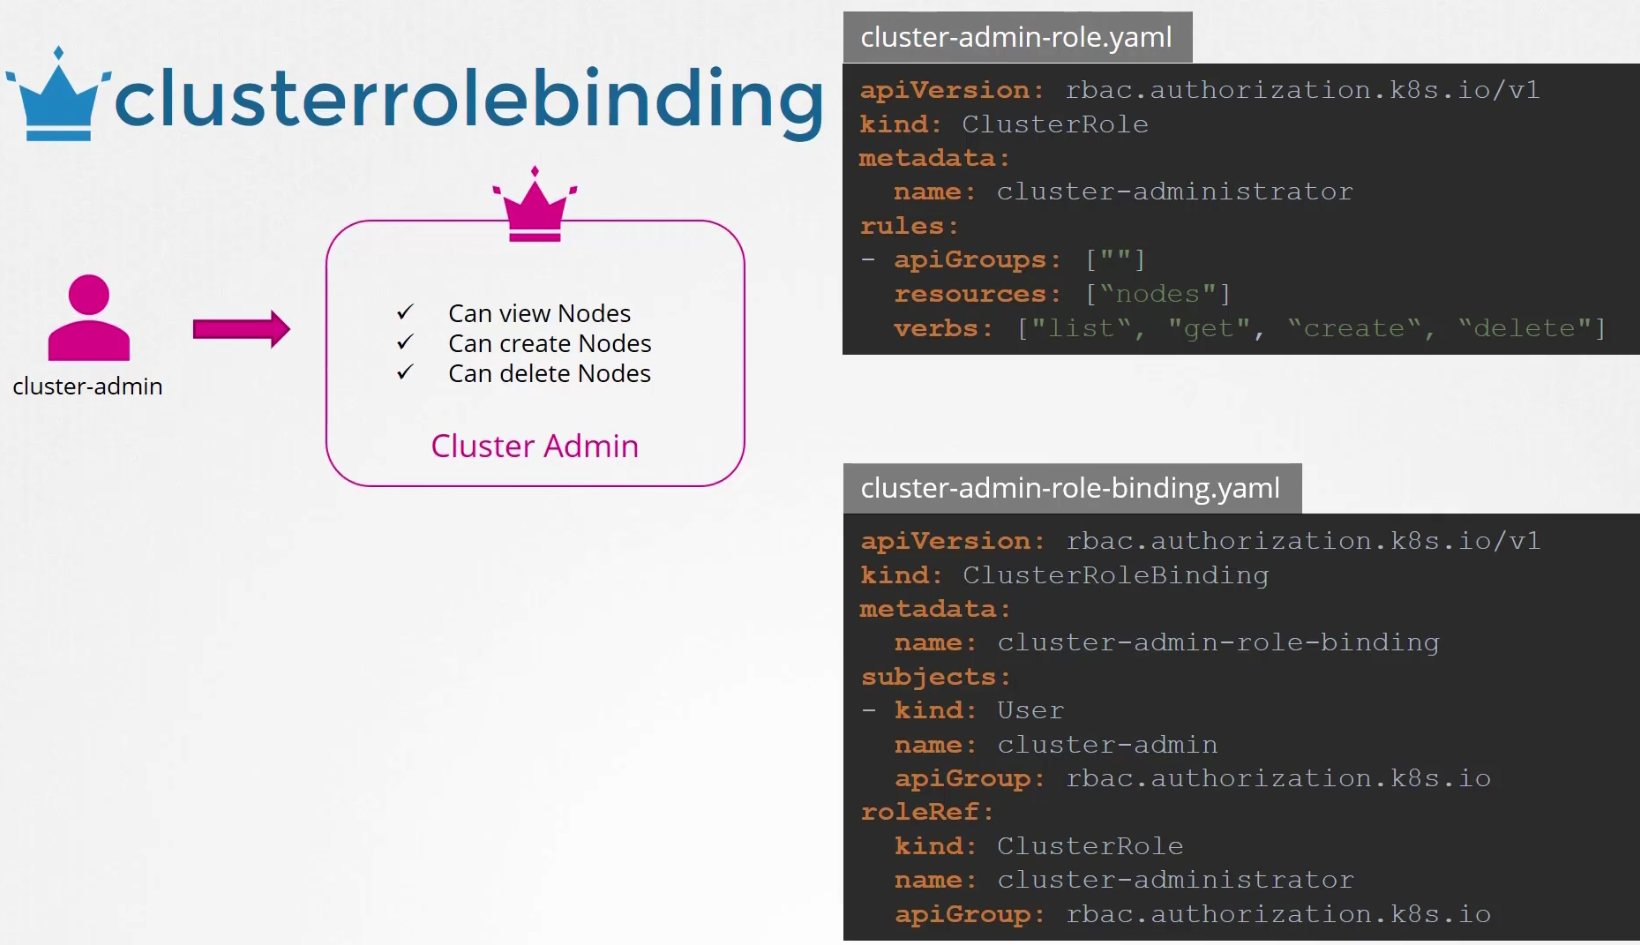
Then apply it

Admission Controllers
We have been creating pods through kubectl by now

The authentication is done through certificates kept in the kubeconfig file.

Then it goes through authorization (Looking for RBAC)

Here we can see the user has access to list, get, create, update and delete pods
And as the user asked to Create Pod, authorization can verify that the user has proper permission. Then it proceeds to create the pod.
So, the RBAC is done through APIs. RBAC has limited things that you can specify

But what if you want to specify more minor details to be checked? Like checking if a pod is not running as a root user (root user has user id 0), permit certain capabilities (here, MAC_ADMIN is a capability), only permit images from docker (here a docker image was used, must ensure a label (here “name: web-pod” is a label) etc.

We can’t do these using RBAC. RBAC basically gives role access and certain permissions. And that’s where Admission Controllers come in!

Apart from validating configurations, they can do a lot more such as change the request or, perform additional operations before the pod gets created etc.
There are some admission controllers which come prebuilt with kubernetes such as AlwaysPullImages, DefaultStorageClass, EventRateLimit, NamespaceExists etc.

Let’s see how NamespaceExist admission controller works. Assume that , we don’t have any namespace called “blue” and we want to run a container on it.

So, once we want to create a container/pod on the namespace blue, it will reject as there are no namespace called “blue”.
There is an admission controller called “NamespaceAutoProvision” which creates a namespace if that’s not there. Although it’s not enabled by default.

If you want to check all enabled admission controllers, check by this command

If you want to enable admission controllers of your choice, do it at the kube-apiserver service

If you are running kubernetes using kubeadm, then update the manifest file

Also, to disable some (here DefaultStorageClass is disabled), update the service file like this

As you saw, we enabled NamespaceAutoProvision , now if we ask to create a pod (with container nginx, image nginx), NamespaceAutoProvision will create a namespace

Sadly, NamespaceAutoProvision and NamespaceExists is no more in kubernetes. Now, we have NamespaceLifecycle which declines non-existent namespace.It also ensures that kube-system, kube-public etc. default namespace never gets deleted.

Validating and Mutating Admission Controllers
Assume that you have requested to create a PVC (Persistent Volume Claim). It will pass through authentication, authorization and then DefaultStorageClass (enabled by default) will check if we have mentioned the default storage class here. If not, it will add that.

Once the PVC is created, you can see that it has a storageClass default enabled even though you didn’t mention that in the pvc’s yaml file

So, this kind of controllers are called “Mutating Admission controllers”
Also previously we checked that NamespaceExists controller was looking for a namespace called blue. Once it didn’t find that, it rejected. That was a “Validating Admission Controller”
Generally a Mutating Admission controller works first and then Validating one works. It’s to ensure Mutating admission controller can make changes and Validating one can validate later.

Here, NamespaceAutoProvision works first and then NamespaceExists work.
What if we want to build our own Admission controllers?
There are two special admission controller called “MutatiingAdmissionWebhook” and “ValidatingAdmissionWebhook”

We can configure these webhooks to point to a server that’s hosted either within the kubernetes cluster or, outside.
The server will have our desired admission webhook service running with our own code and logic. After a request goes through the built-in admission controllers (AlwaysPulmages etc), it hits the webhook (we created on kubernetes) that we configured.
Once our controller gets hit, it makes a call to the admission webhook server (kept within kubernetes or outside) passing a JSON format admission review object.

This object will have all details. The admission webhook server then sends a rule (allow/reject the request)

How to do that?
First we need to create our admission webhook server with our own code and logic.
Then we need our webhook to be configured on the kubernetes

Here is an example of Webhook server

It’s written on go. But you need to ensure this code accepts the Mutate and Validate webhook APIs . It also need to respond with a JSON object that the webserver expects.
Here is another code written on python to accept APIs

Once the server is developer, we can host it as a deployment. A service to access it.

Now, we need to configure our cluster to validate or mutate the request.

Here is a yaml file which will configure our cluster to validate/mutate. As we have launched our webhook server on our kubernetes cluster,

we need to specify the service information under ClientConfig
Also we need to specify, when we want the server to call. Here we wanted the webhook server to be called once we get a pod creating request. That’s specified under the rules section.
Note: If we host the server outside the kubernetes cluster (may be in a third party website), specify the server link using url

Service accounts
There are two types of accounts
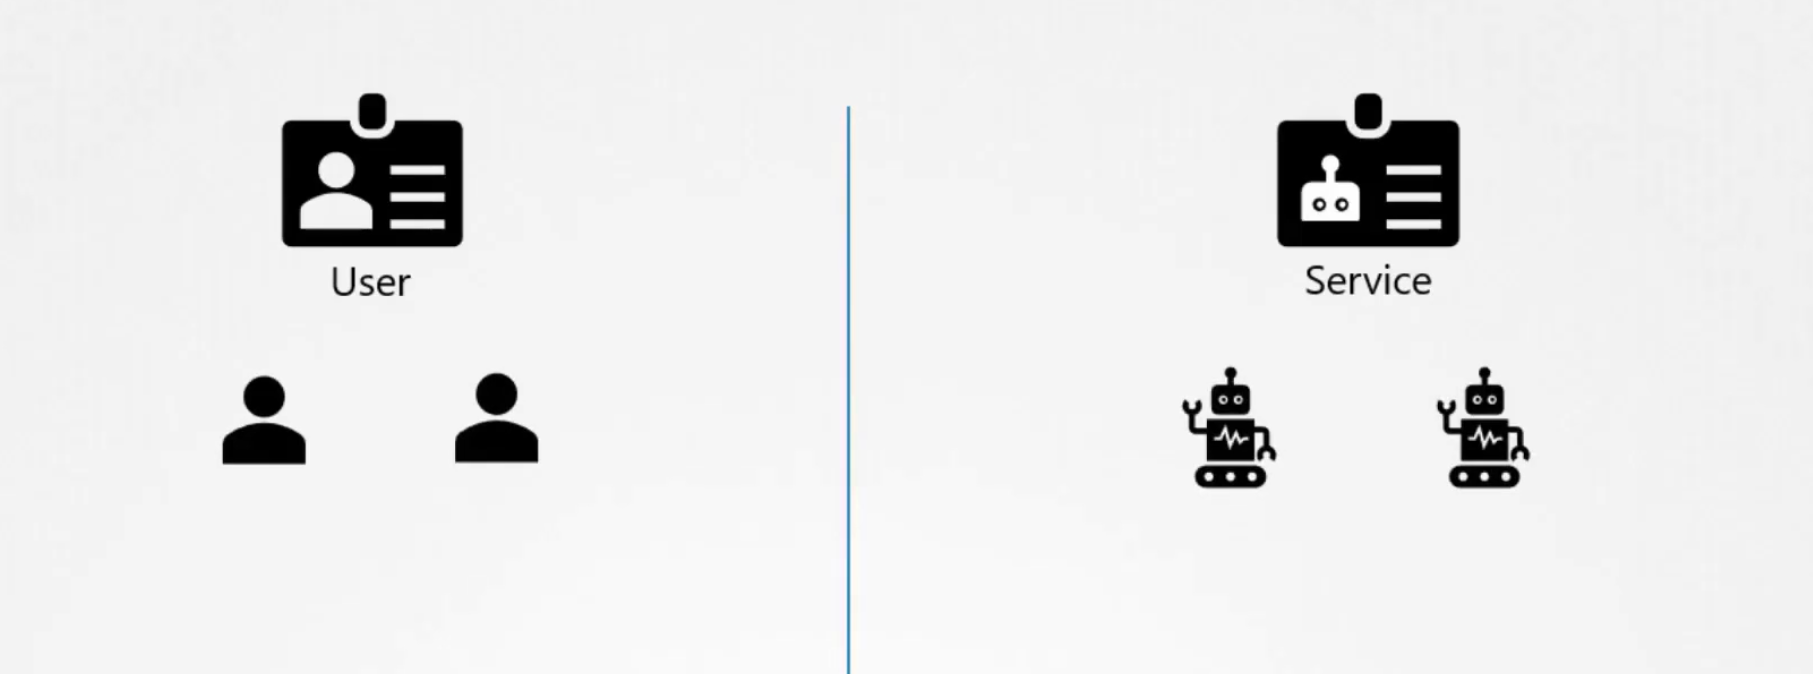
User account used by humans and service accounts to interact with resources
For example, assume we have a page which loads all pods list
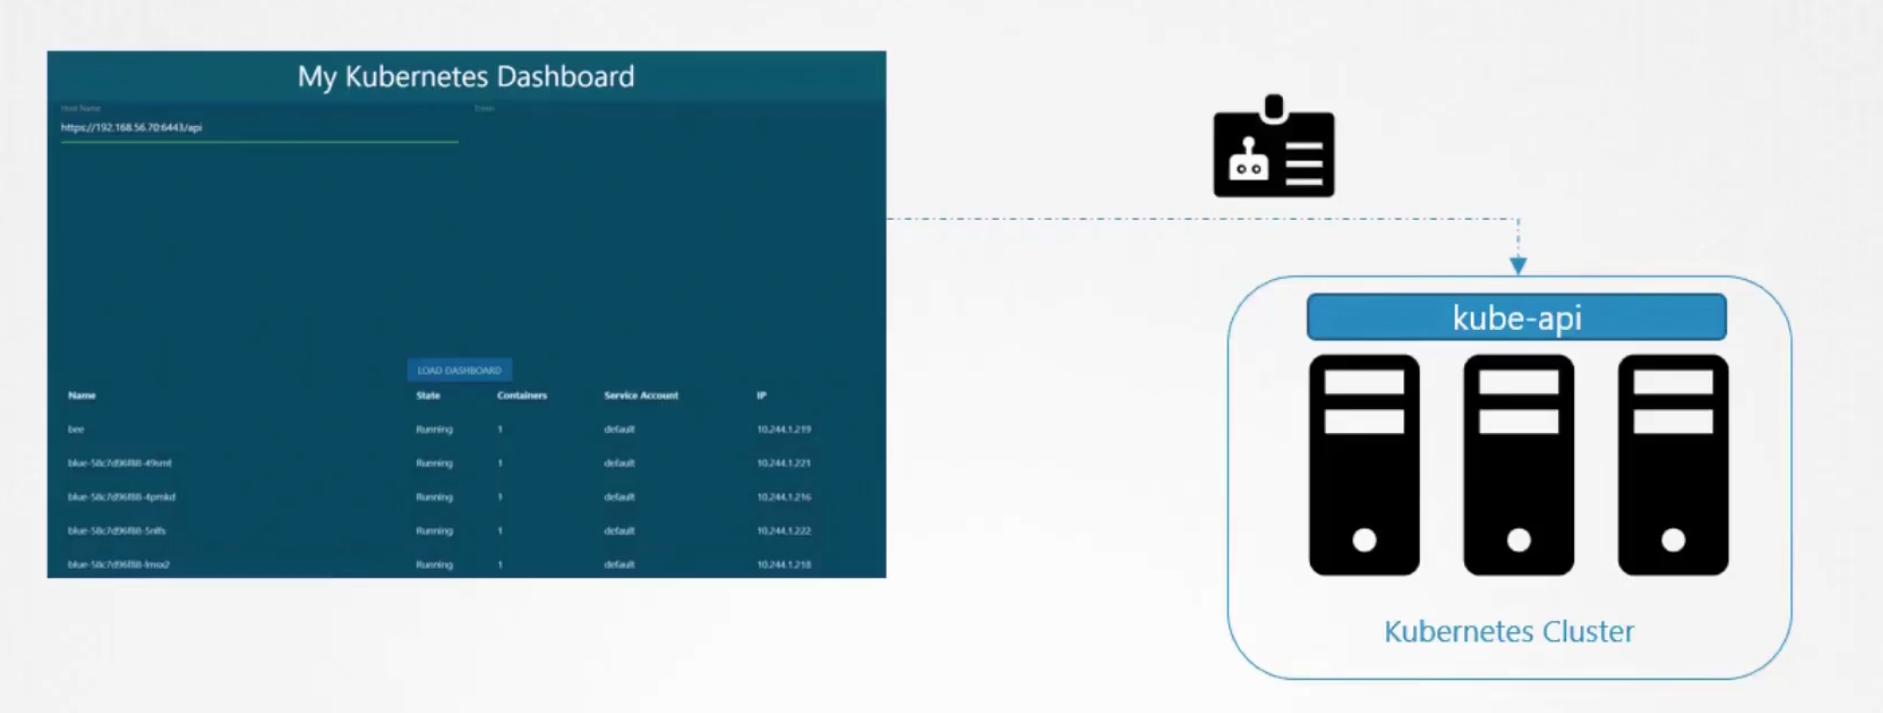
To do that we needed service accounts which were authenticated and contacted kubeapi to get the pod list and then published them in the page.
To create and check the service account, use these
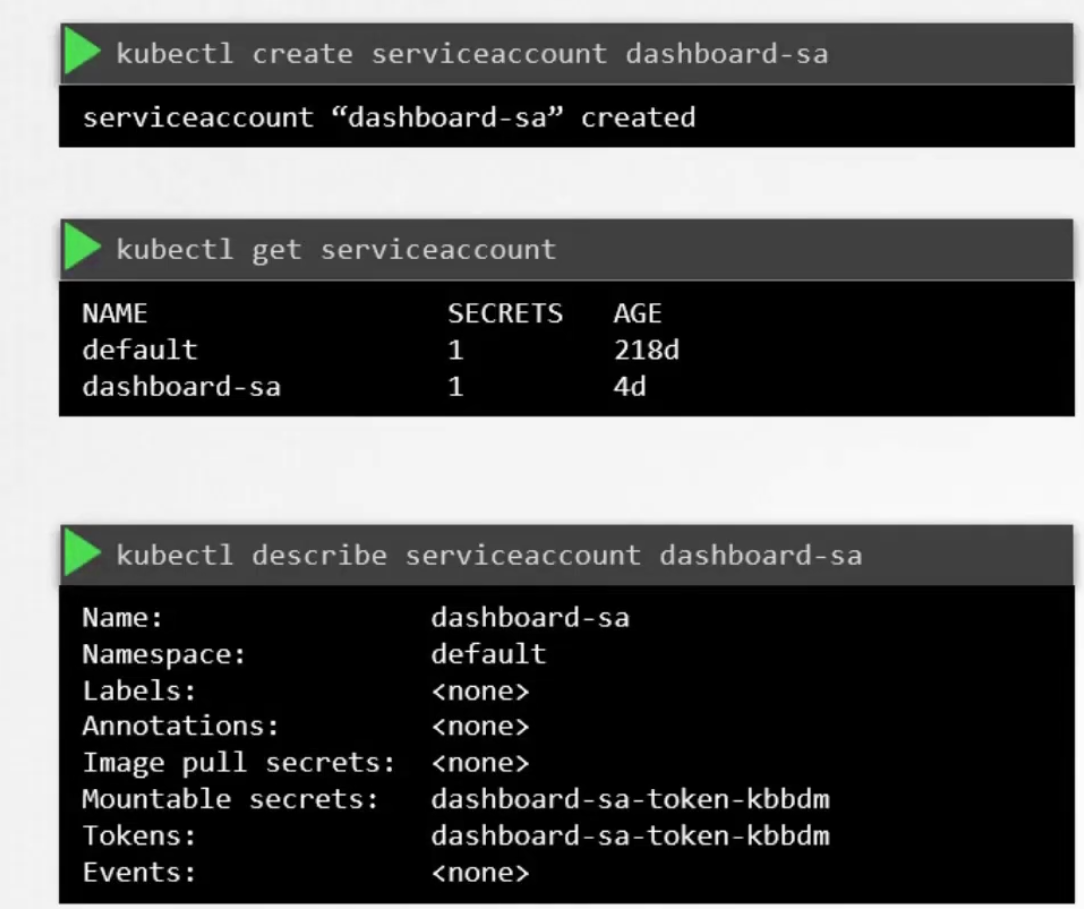
Also, when a service account is created, a token (Tokens) is automatically created. So, firstly an object named “dashboard-sa” got created and then the Token got created.

It then created a secret object and stored the token
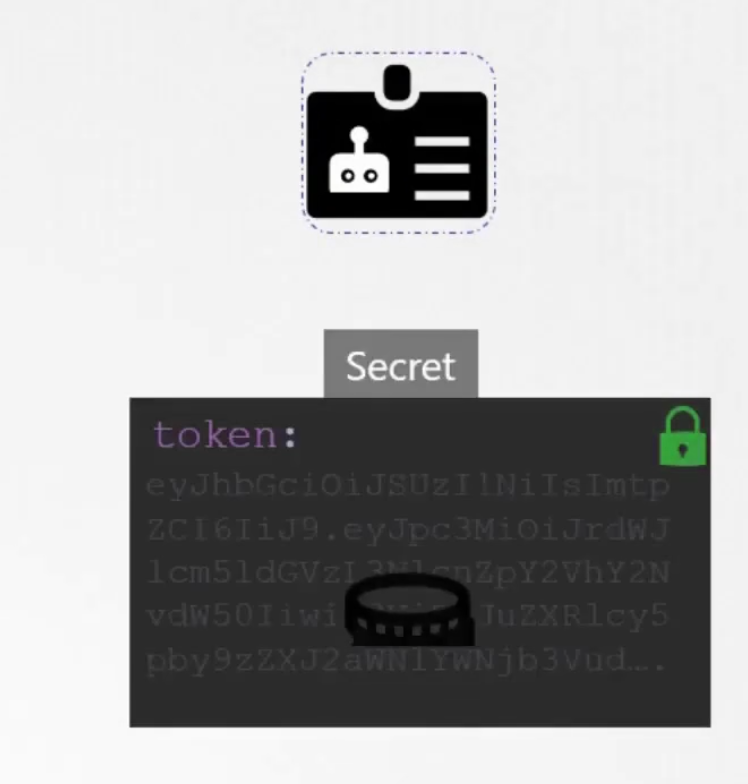
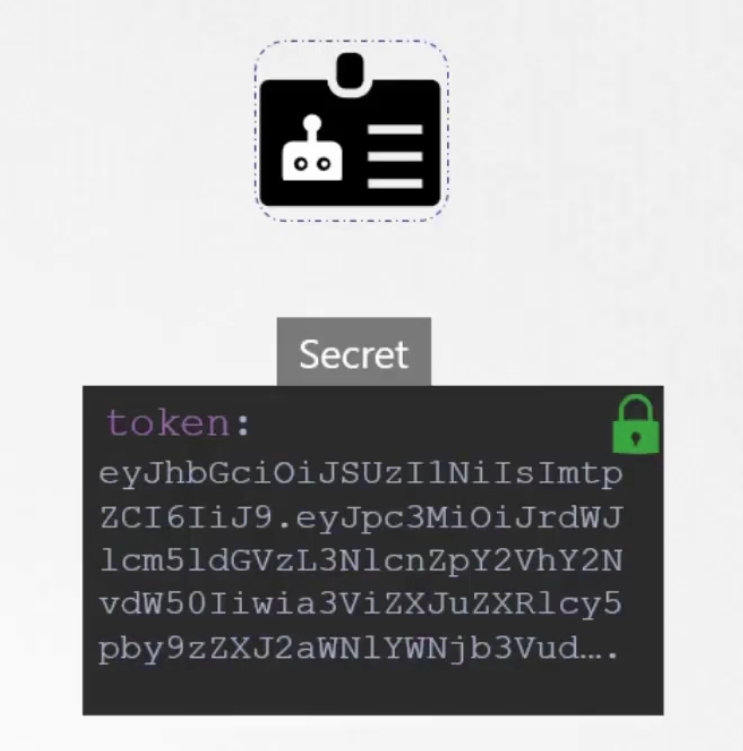
The secret object is then linked to the token. So, if we use the token and use describe, we can see the secret associated with it.
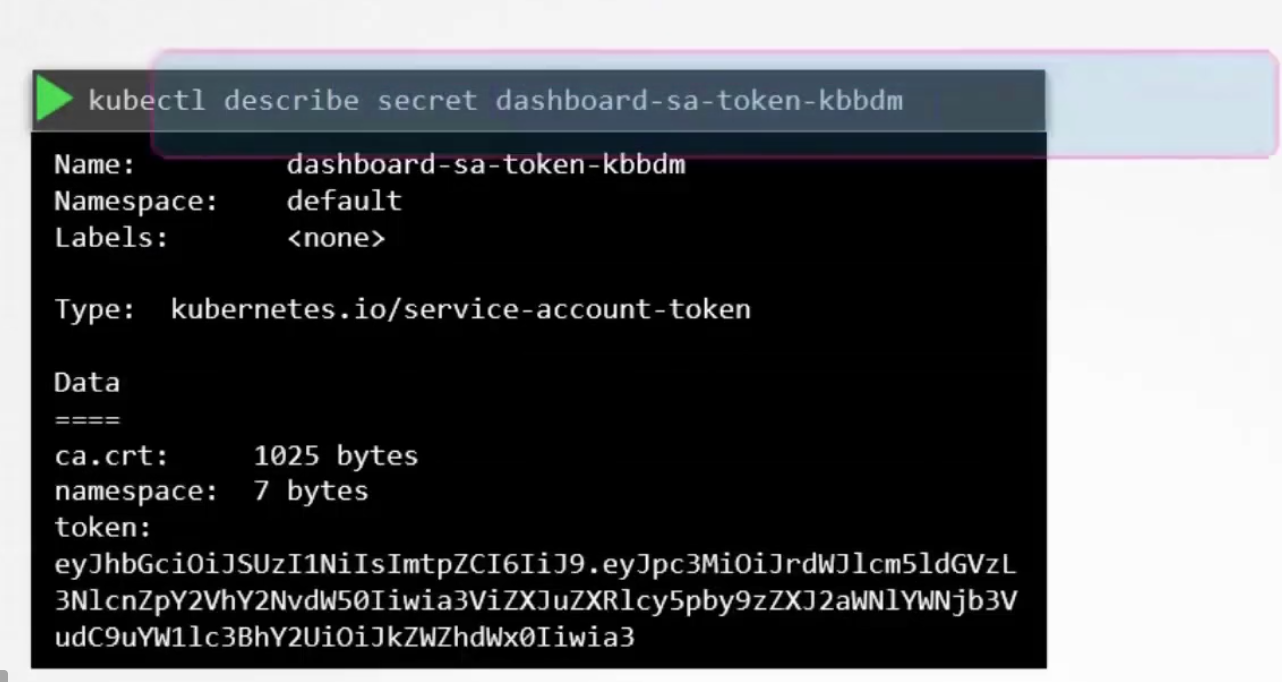
We can then use this secret token as a bearer token for authorization header to contact to kubernetes API

For our custom page, we can just copy paste that in the token field
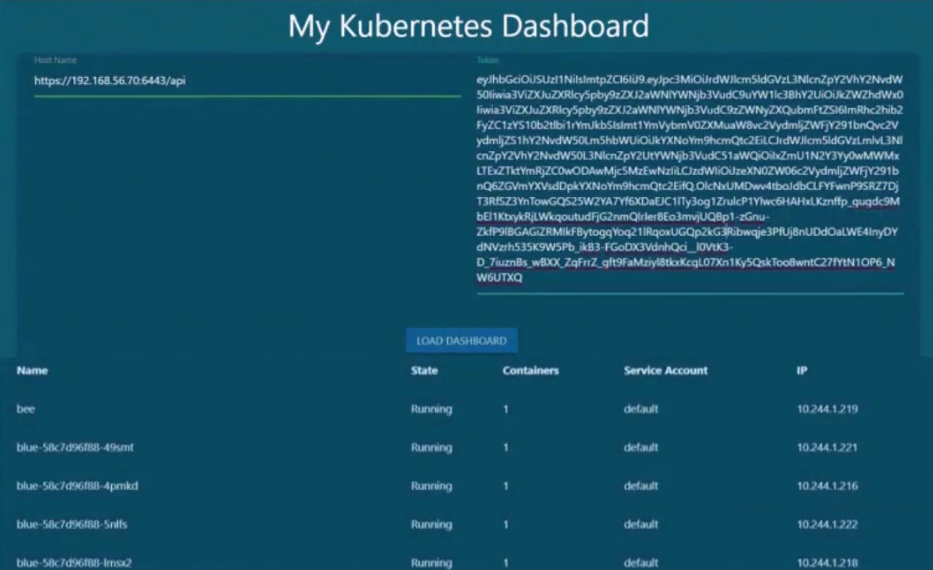
Again, there is a default service account created for every namespace.

That is automatically mounted as a volume mount. How to know that?
For example, assume we have created a container using yaml file where nothing like volume or other was mentioned.
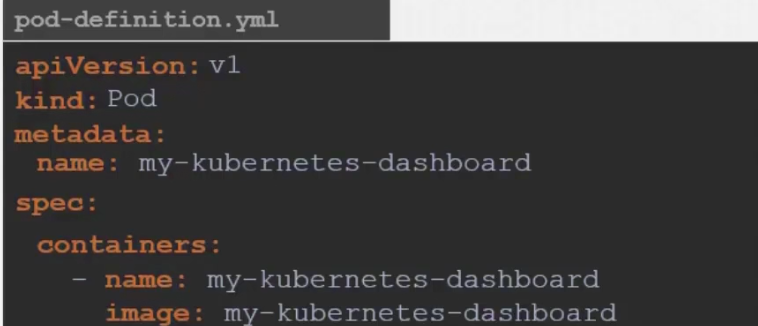
Now, if we check this container’s details once created, we can see
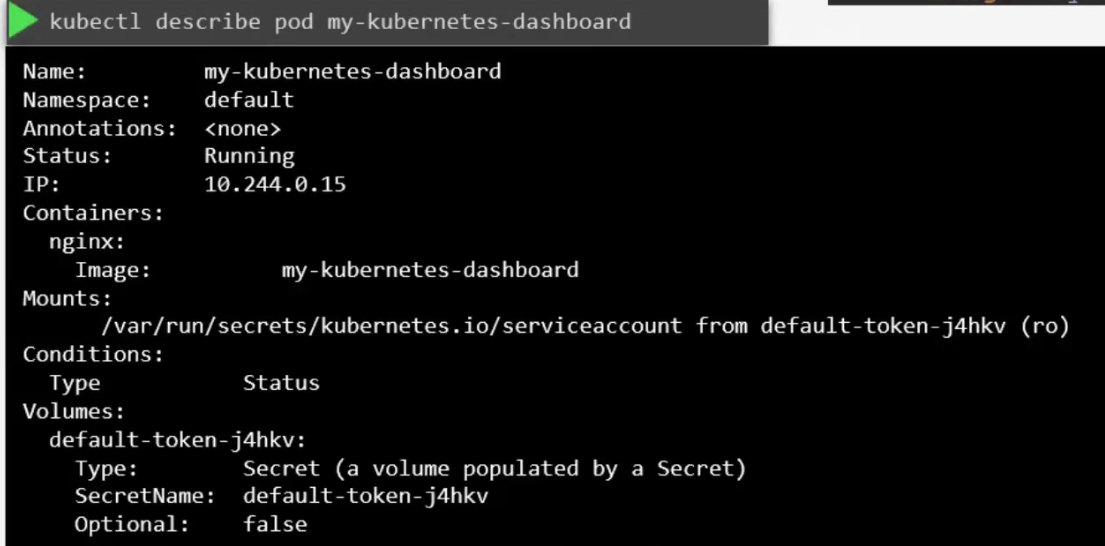
Here you can see that volume was created by a secret called default token. Which is the secret containing the token for this default service account. This secret is mounted on /var/run/secrets/…………………….serviceaccount inside the pod.
So, if we see the list of files within this location, we can see “token”

We can also view the content within token which actually interacts with kube-api for all of the processes.
Now, assume that we want to change the serviceaccountname for the pod

Here we will choose dashboard-sa as we have already created that:
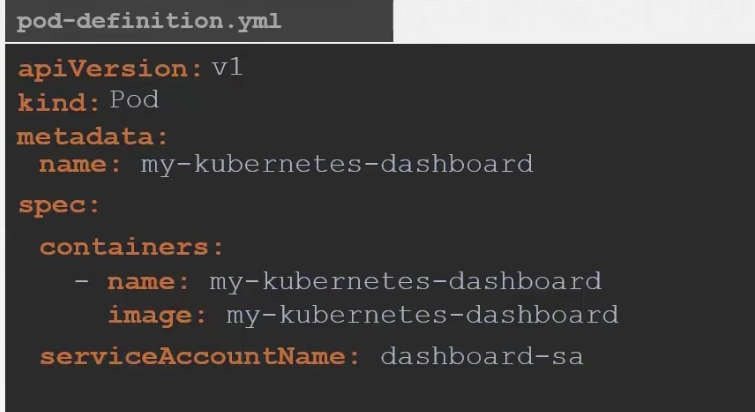
Keep in mind that, we can’t do this for a container unless it’s part of a deployment. If it’s part of a deployment, the deployment makes the changes automatically.
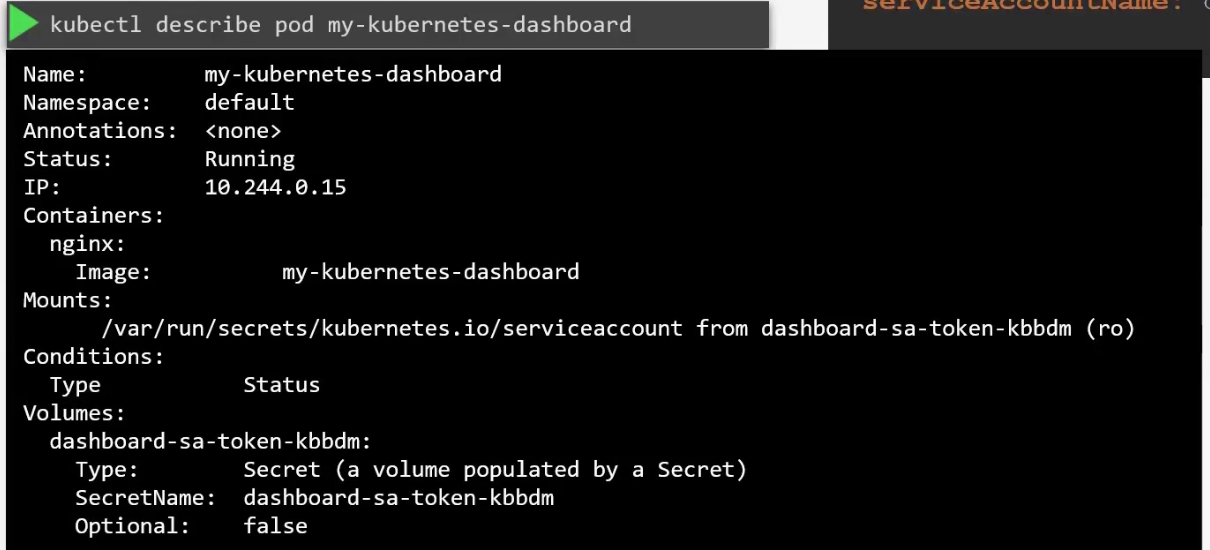
Once done, now you can see different secretName (dashboard-sa-……..) which was used instead of the default service (default-………) account.
There is also an option to not allow automatic service mounting to a pod
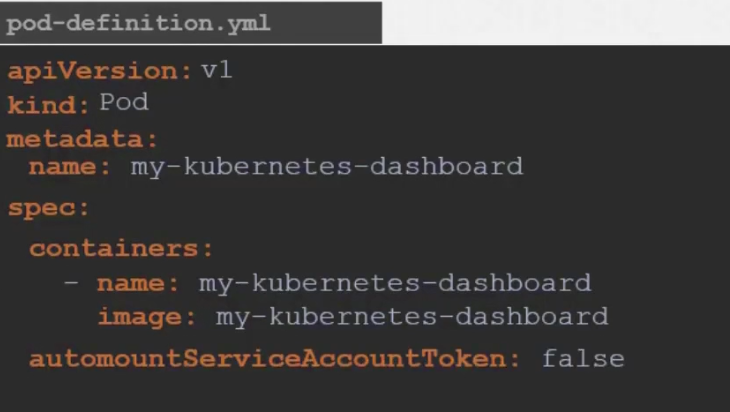
We just need to specify automountServiceAccountToken as false while creating the pods/containers.
Now, from v1.24 and later,
if we paste the secret token we got for the default secret in this website
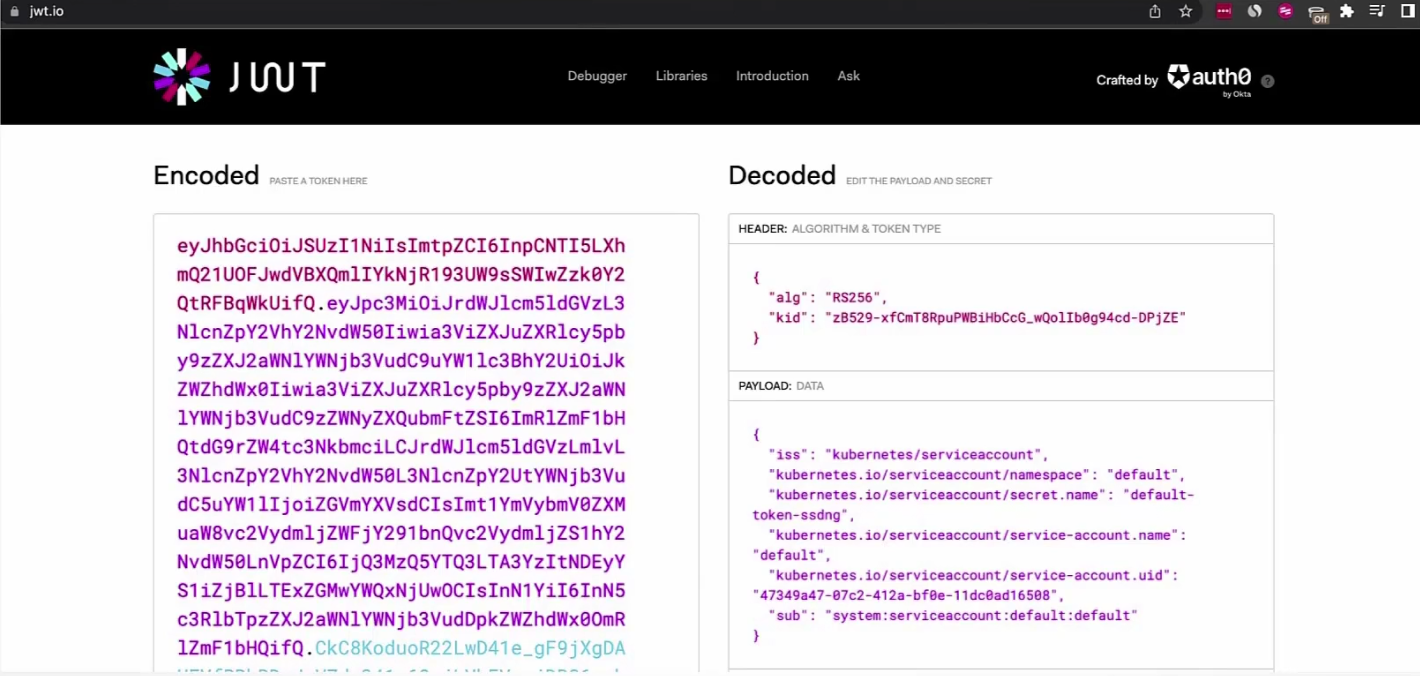
You can see that there is no expiry date in the payload which is an issue or becomes risky.
So, a new API called TokenRequestAPI was created
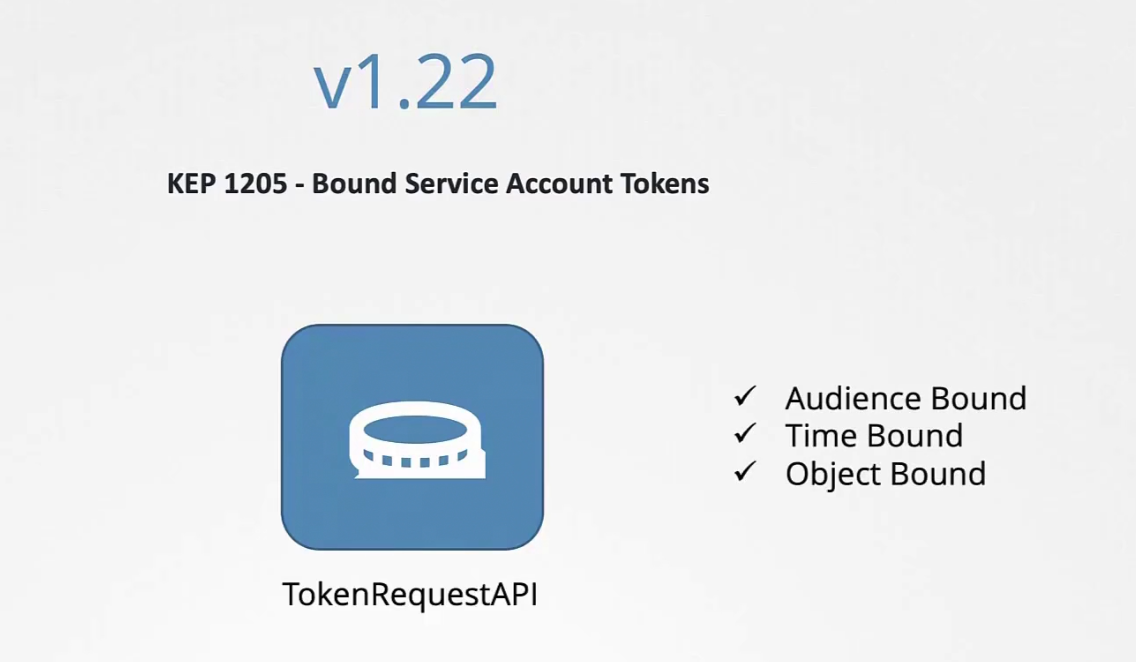
A token generated by this TokenRequestAPI is now more secured.
So, now if a pod is created, we can see this
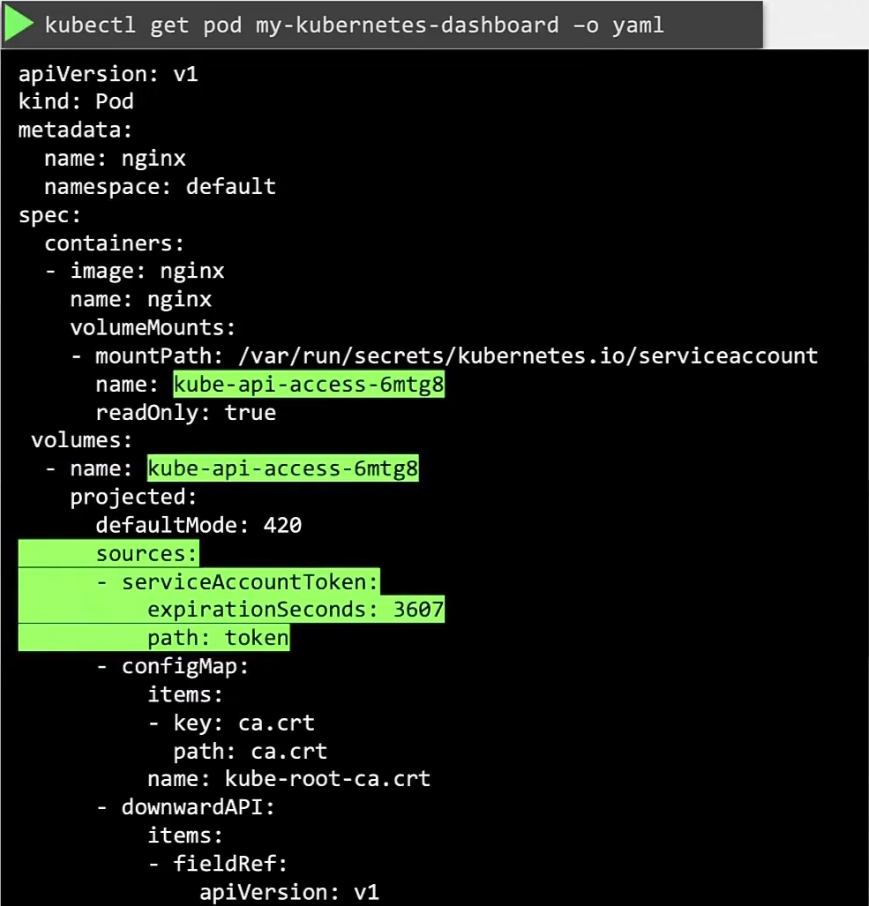
There is no volume created by the default service account. Earlier we had no expiry date but from this change, we have a token generated by TokenRequestAPI by the service account admission controller when the pod is created.
The token is mounted as a projected volume now.
In v1.24,
Once one created a service account, no token gets created.
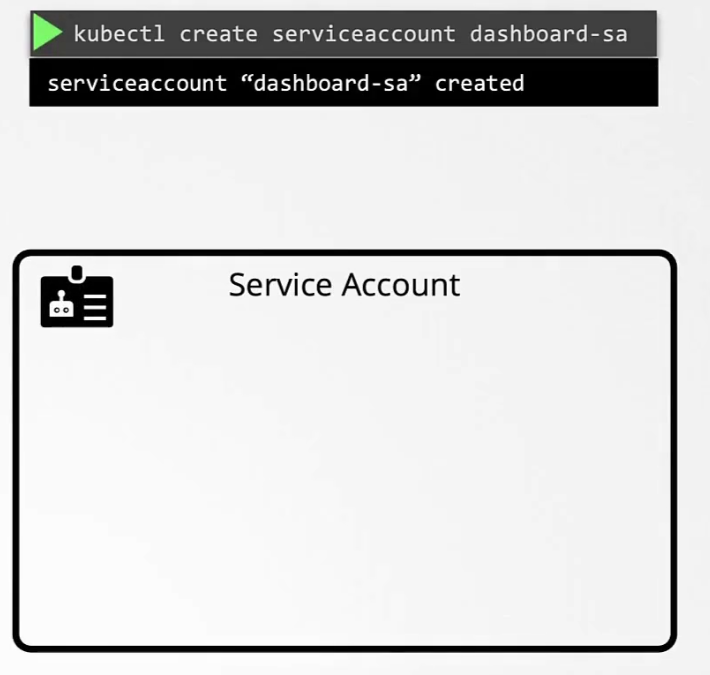
Whereas earlier, whenever we used to created a service account, a token was created right away.
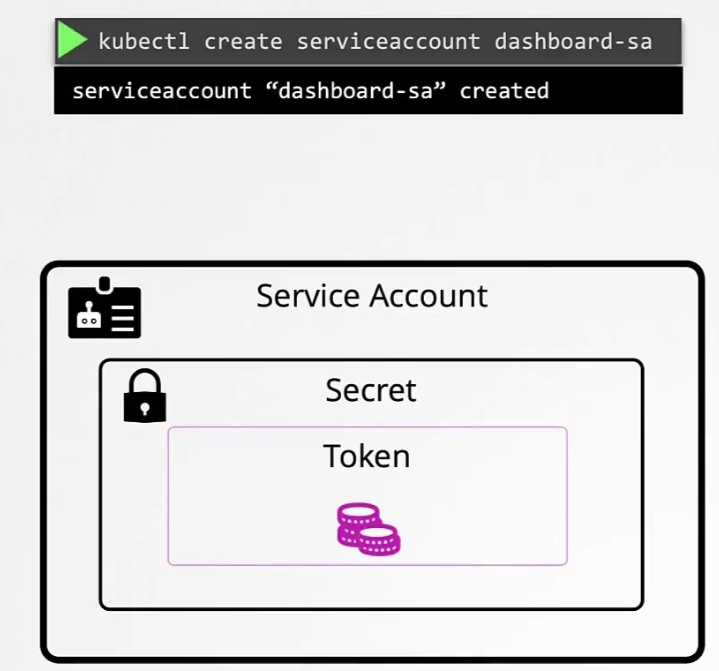
Now, you have to manually create a token for the service account you created
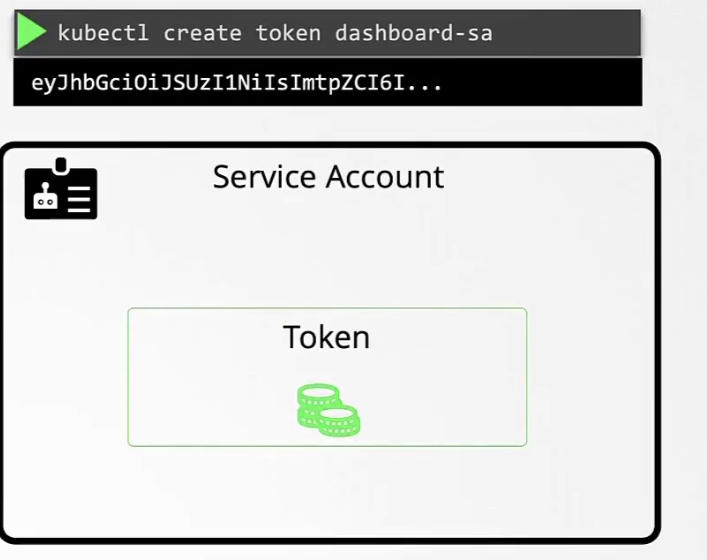
If you copy paste this token to the JWB website, you can see an expiry time for the token.
And now, if you want to associate your pod with your created service account, add the service account name within
annotations:
kubernetes.io/service-account.name:
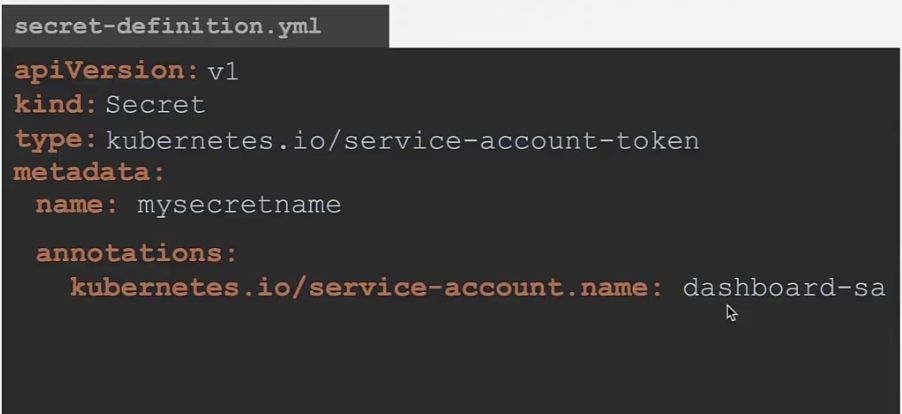
After that this service account will create a token for your pod.
But this is not recommended as TokenRequesAPI does that for you and creates a token.
Image security
When we use image: nginx
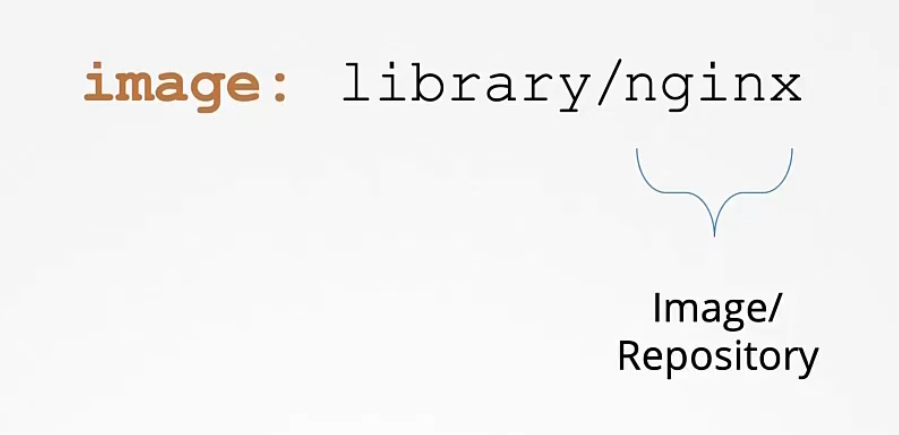
It understands library/nginx which is at dockerhub
By default the registry is docker.io
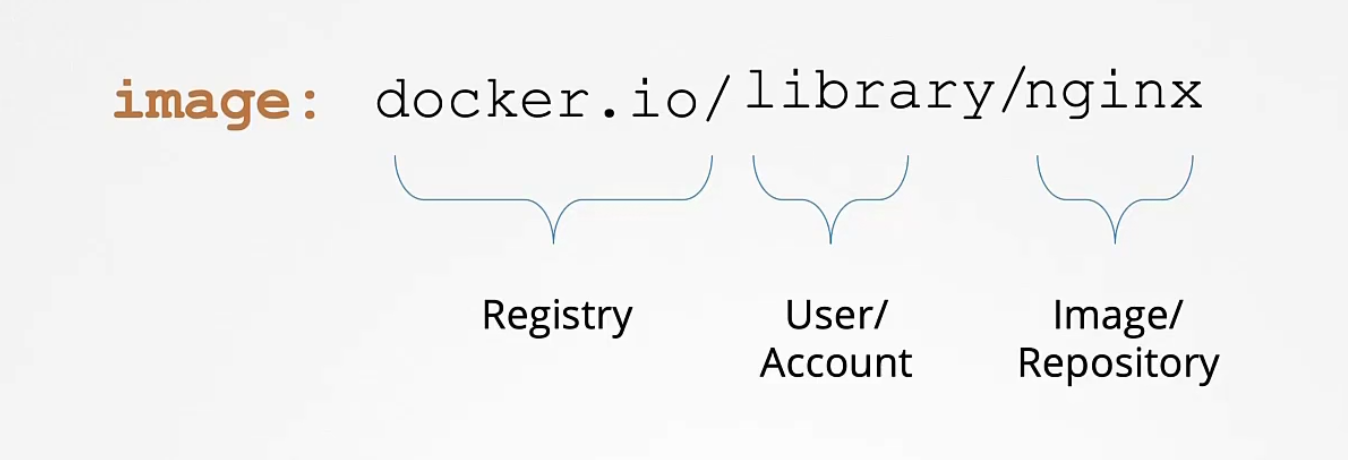
To use a private registry,

Login to your registry and then run your image.

But how kubernetes gets the credential to access the private repository?
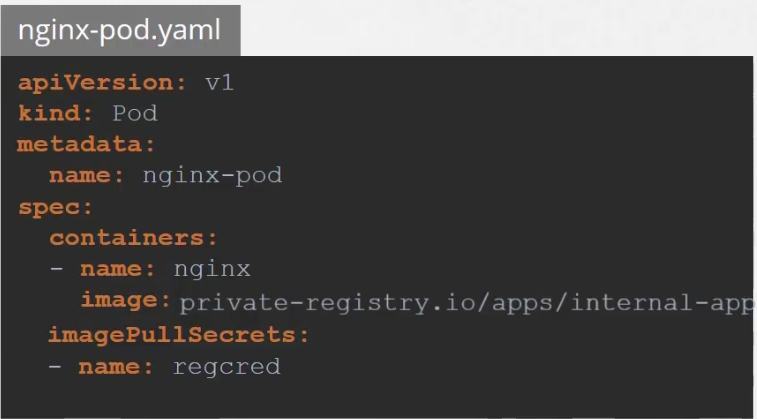
Basically, we first create a secret object (regcred) with a credentials in it. The secret is of type Docker-registry and that’s a built in secret type that was built for storing docker credentials. Here, regcred is the registry server name.

We then specify the file under the image pull secret selection.
Security Contexts
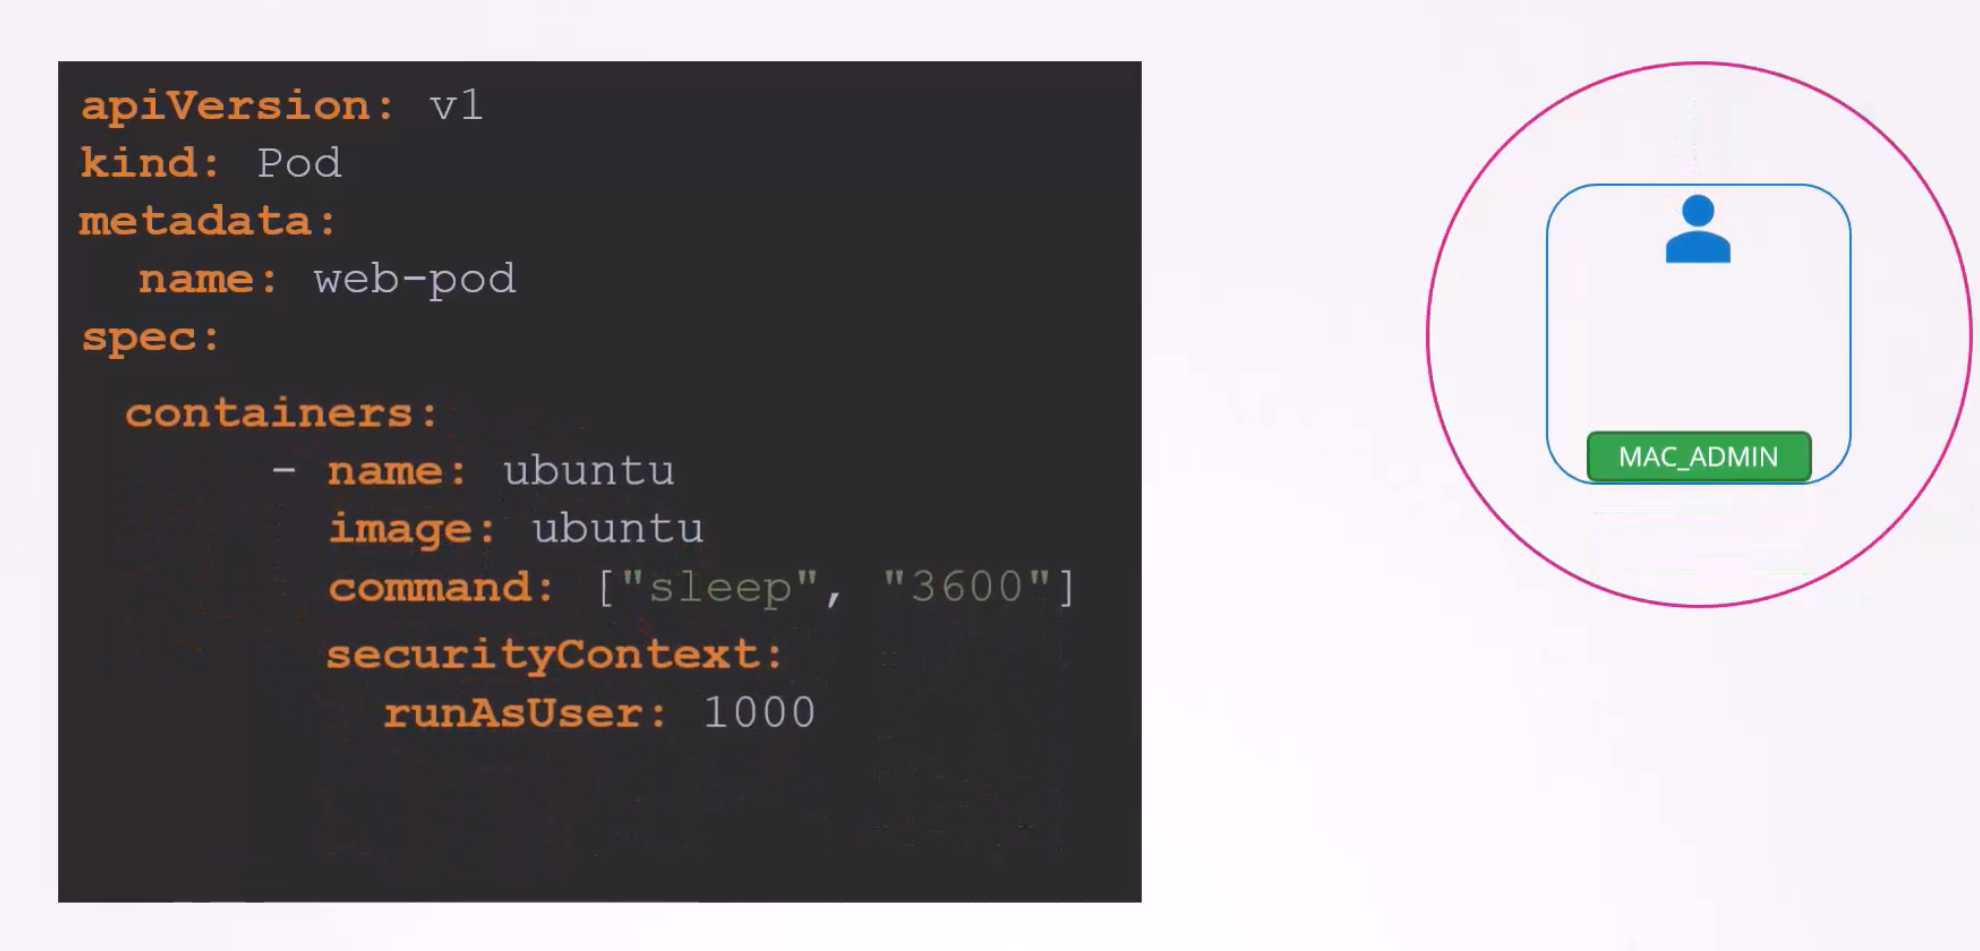
You can assign security credentials for pod or containers.
Basically containers remain within the pod. So, if we we apply rules for a pod, every container automatically gets assign to this rule
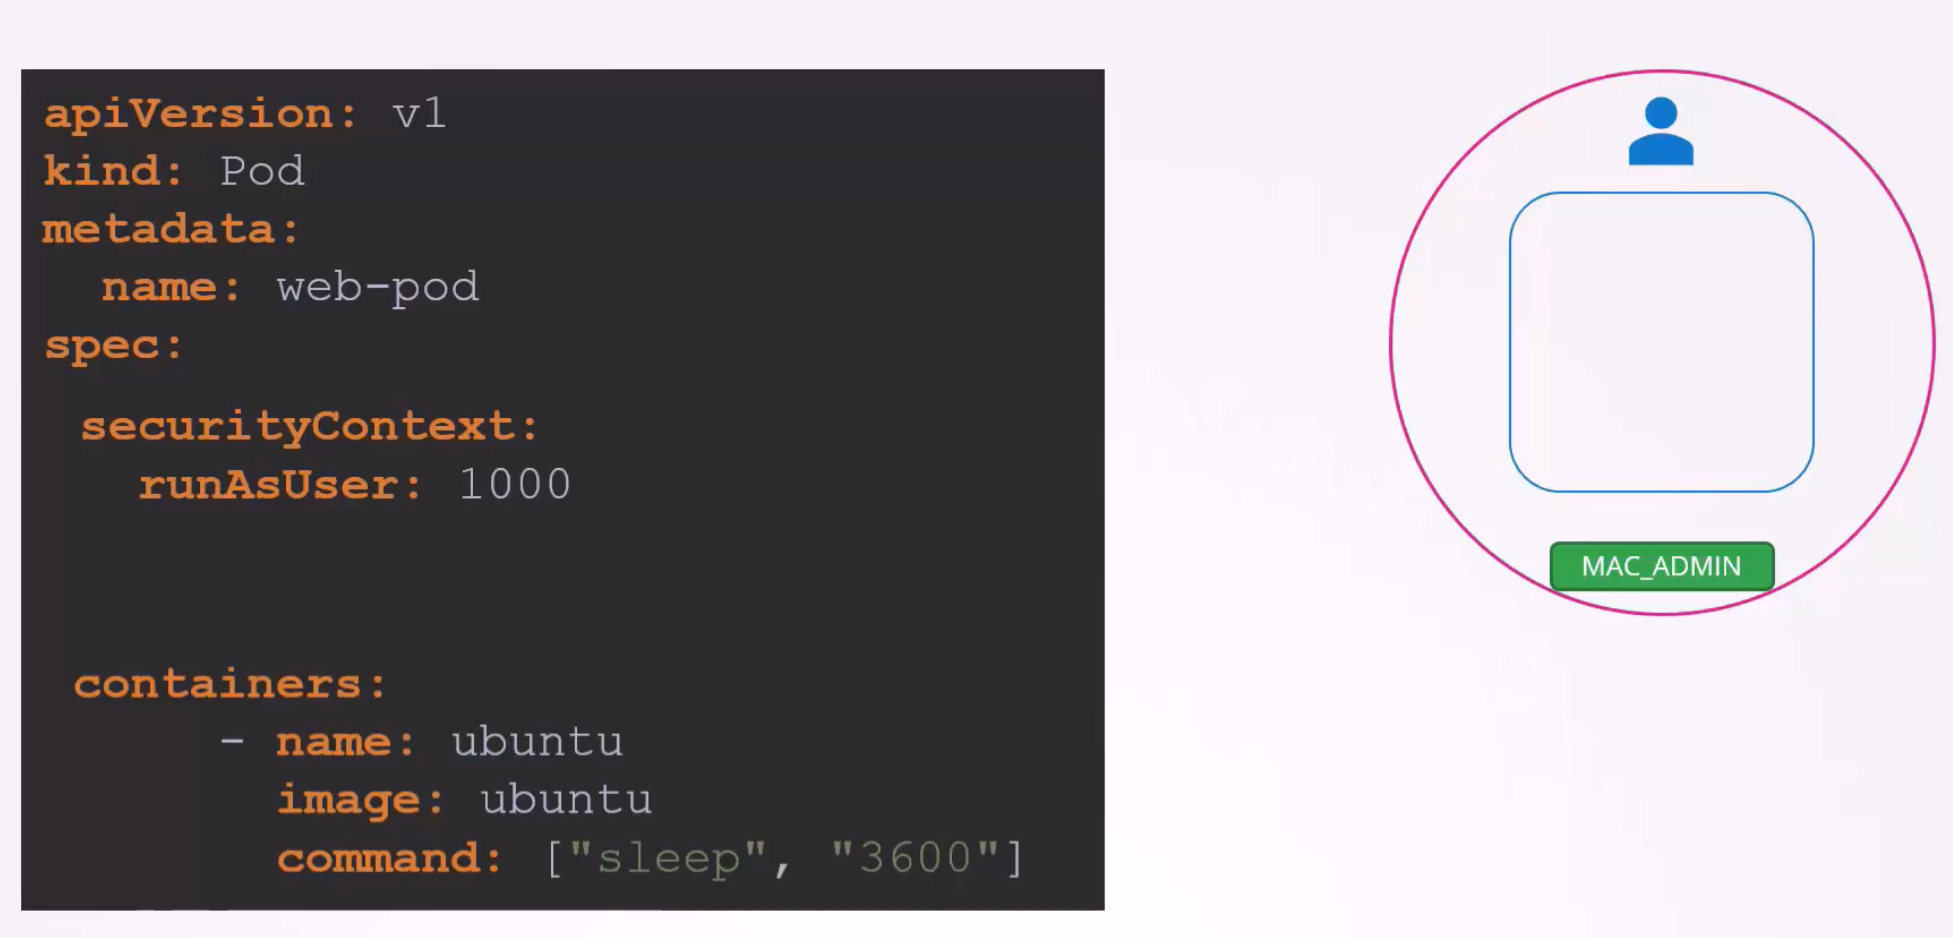
Here is a securityContext added for the pod. Here, runAsUser is the user ID.
Again, if we want to assign this for the container only, it will look like this
Network Policies
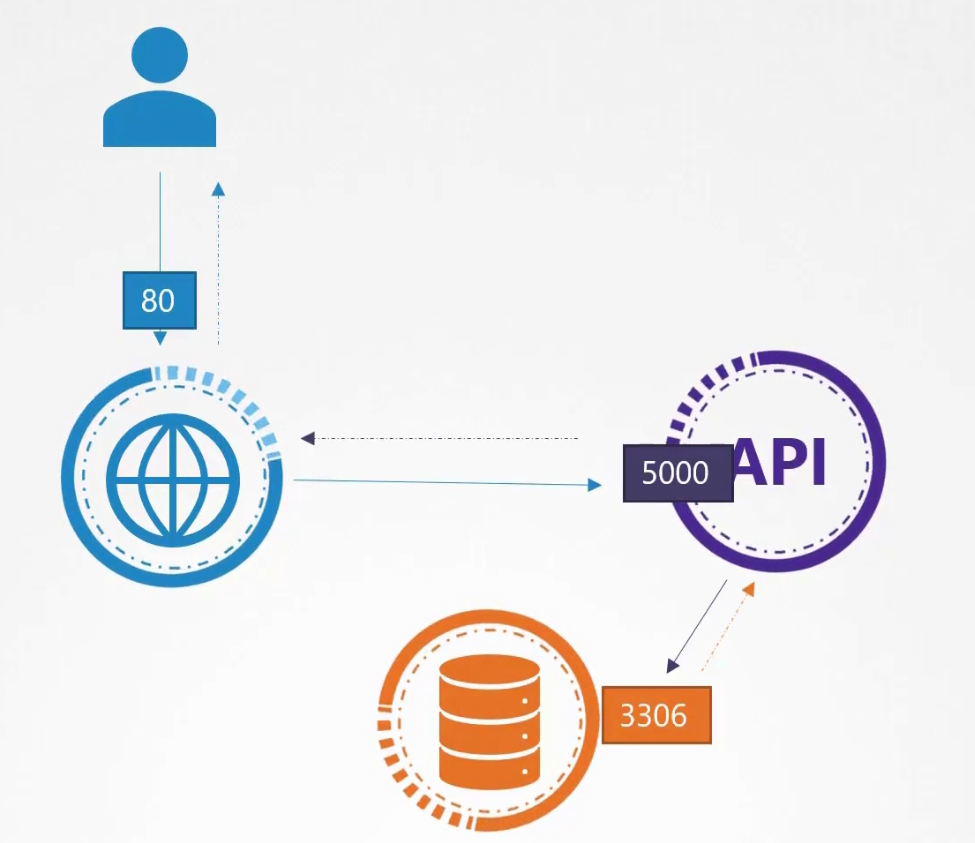
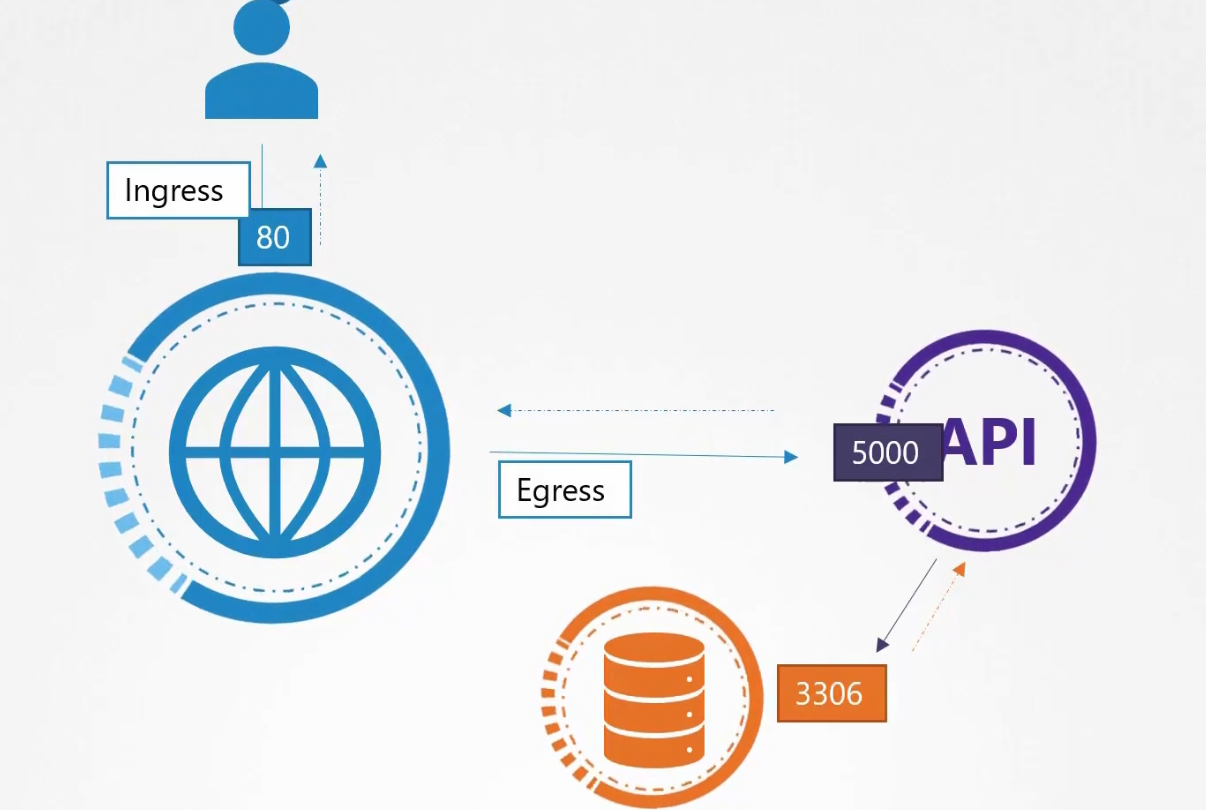
Assume that we have a web server serving front end to the users, an API server serving backend APIs and a database.
The user sends a request at port 80 for the frontend, the web server sends request at port 5000 at the API server and it sends request at port 3306
Then each of them response back
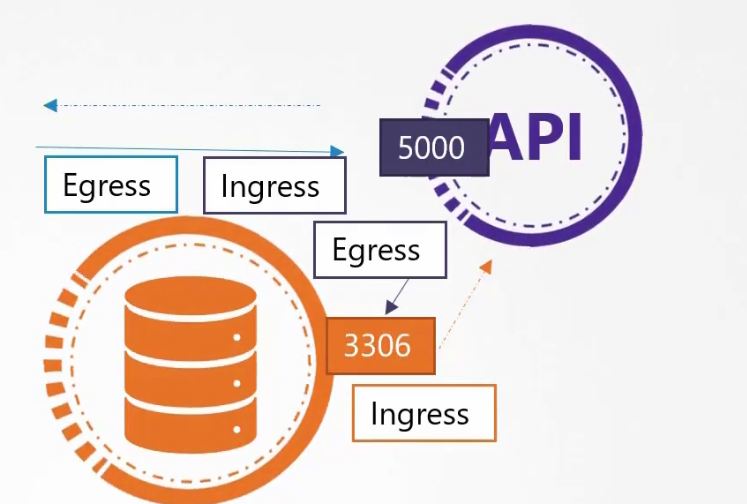
So, here we have 2 type of traffic.
- Ingress: For the web server, Incoming traffic from the user is ingress traffic. For the backend API server, request by the webserver is Ingress. For the database server, the incoming request from Backend API server is ingress.
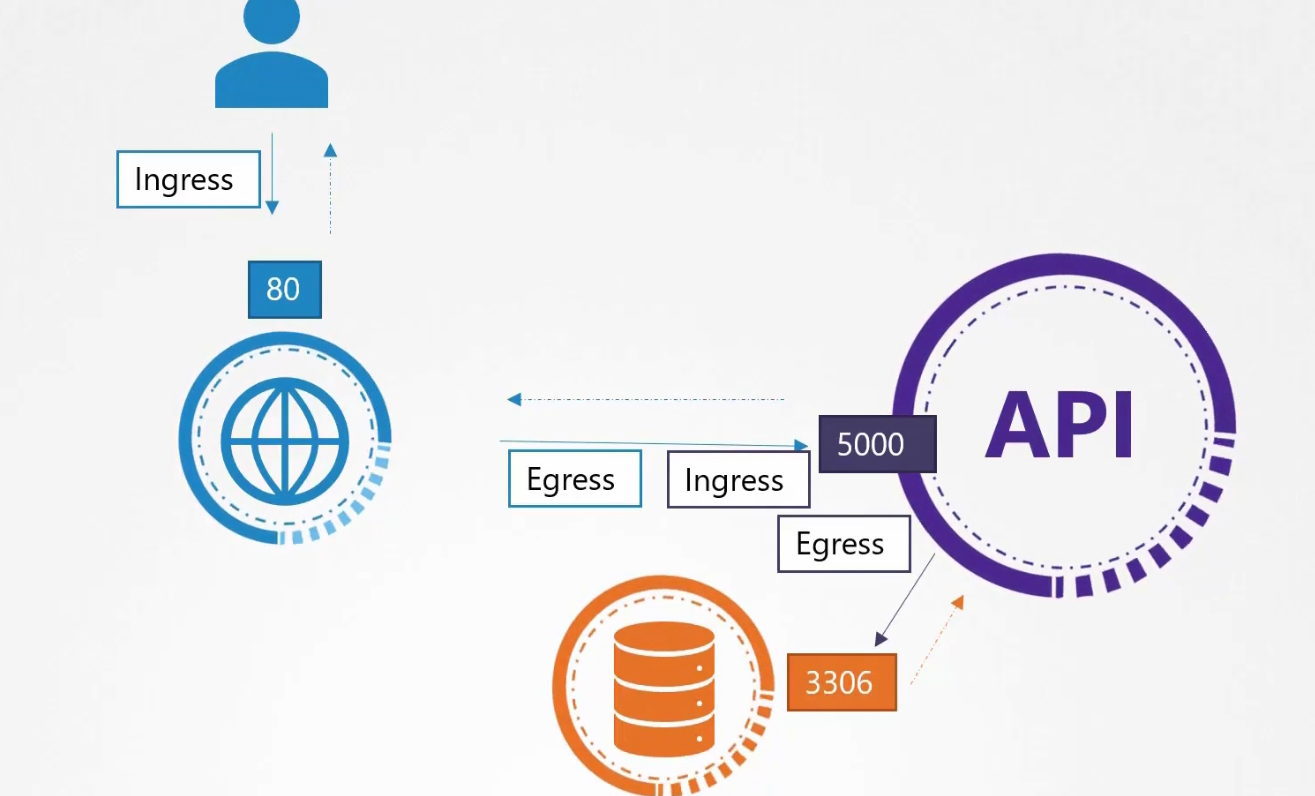
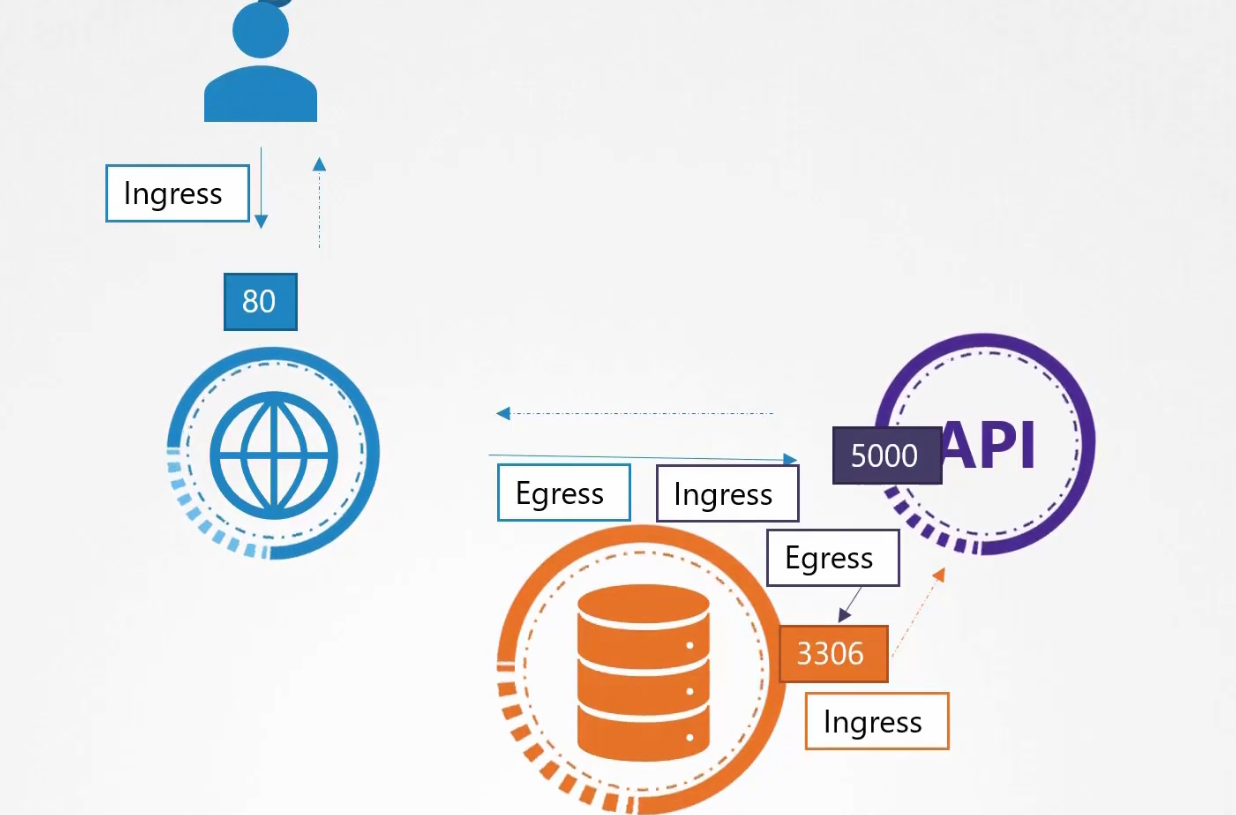
2)Egress: For the web server, request to the API server is egress traffic. For, backend API server, request to the database server is egress.
So, as a whole:
We had ingress rule at port 80, 5000, 3306 and egress rule at port 5000,3306.
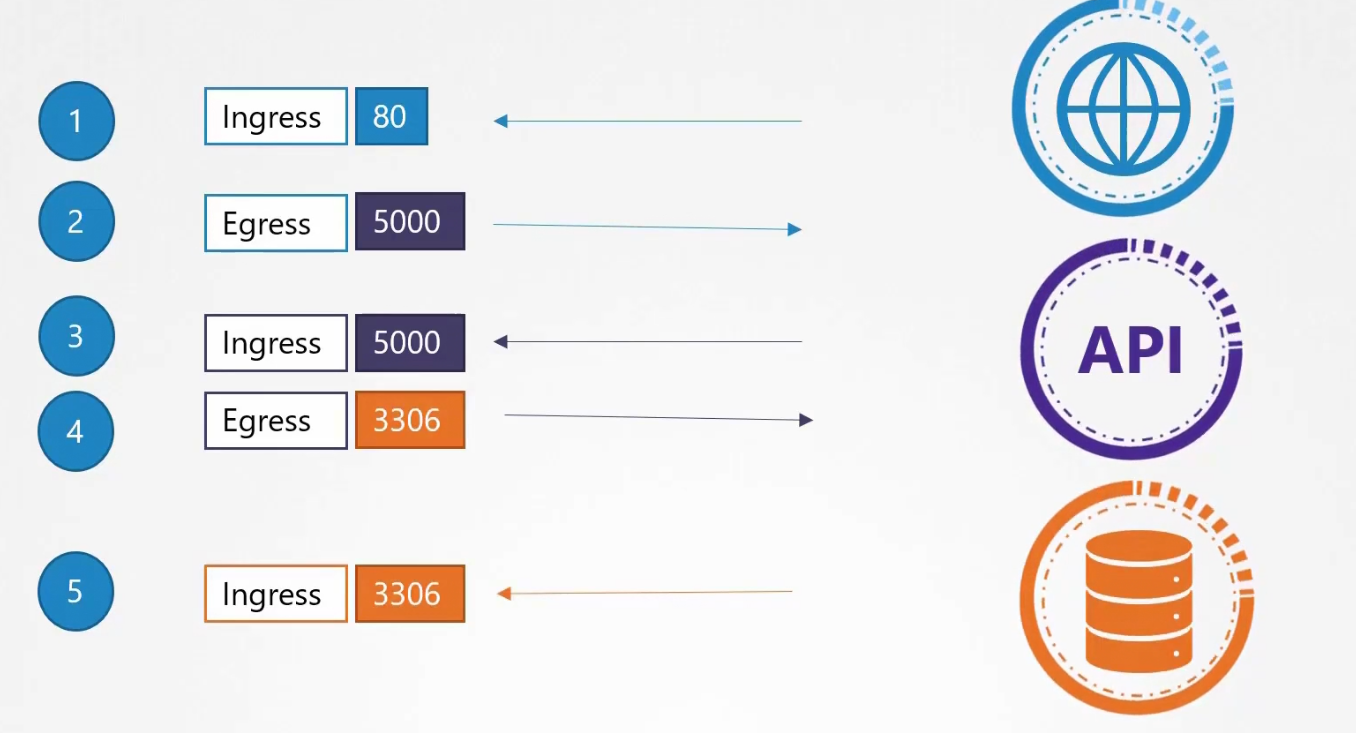
Now, let’s discuss the main topic.
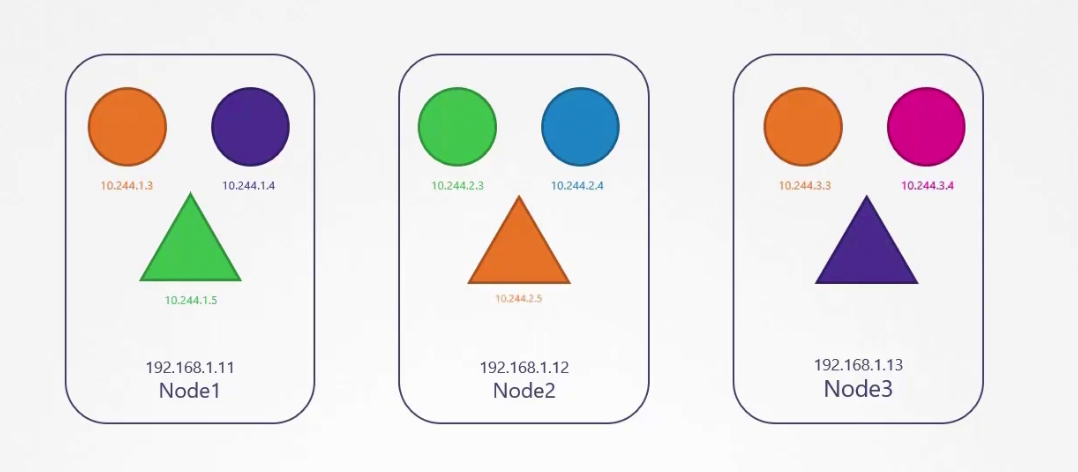
In a cluster, we have lots of nodes and each node carries pods. Pods have containers in them. But here triangle , circle etc means pods for now.
Assuming each have their private IP and it’s a must to let each pod contact one another.

By default the rule is set as “All Allow” for pods. Surely there are services to make the communication.
Now, talking about our earlier example, we learned using the server concept. Instead let’s learn these servers on a pod.
As we know, pods have servers to make sure that every pod contact each other.
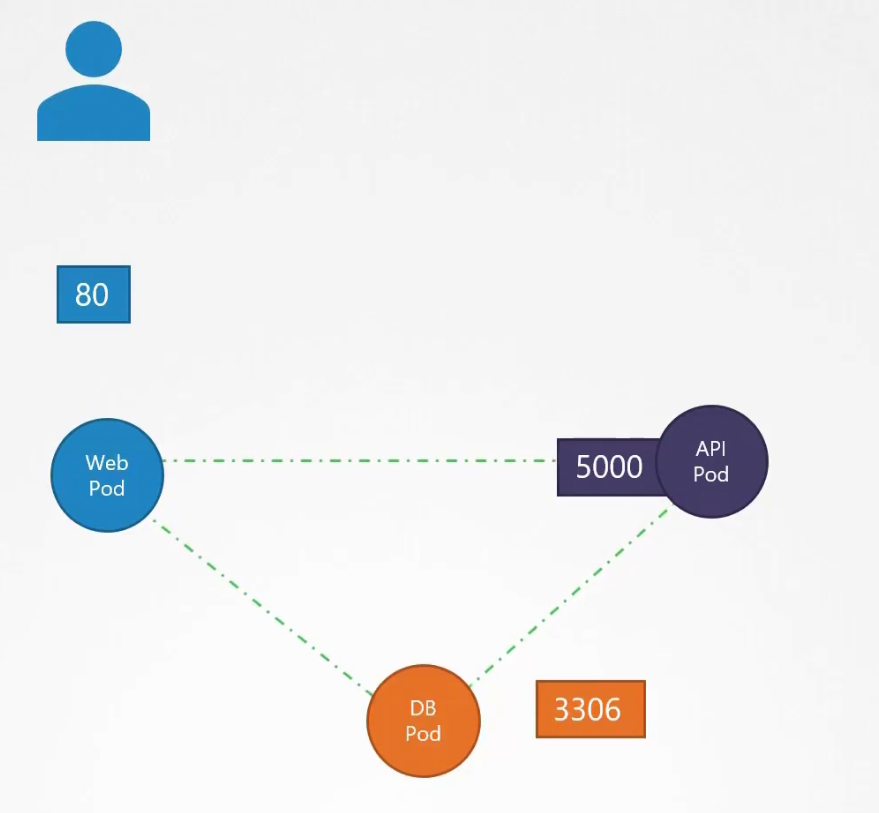
What if we don’t want the web pod to communicate with the database pod
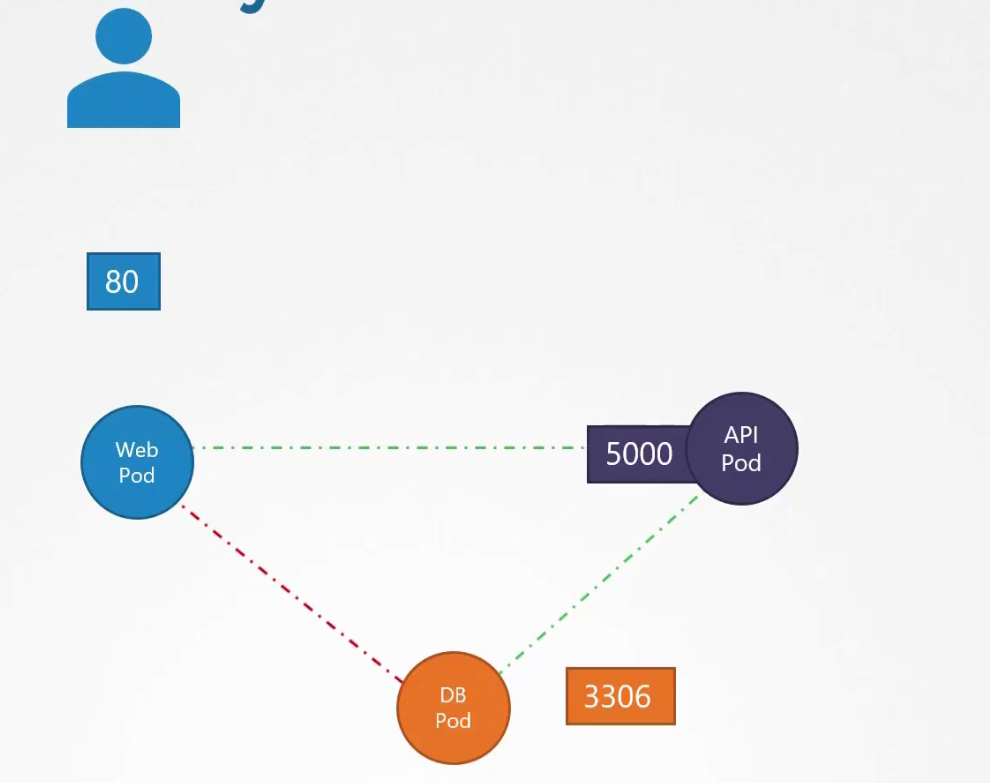
To do that, we need network policies to be set.
It’s another object kept in the namespace. We need to link that to one or more pods.
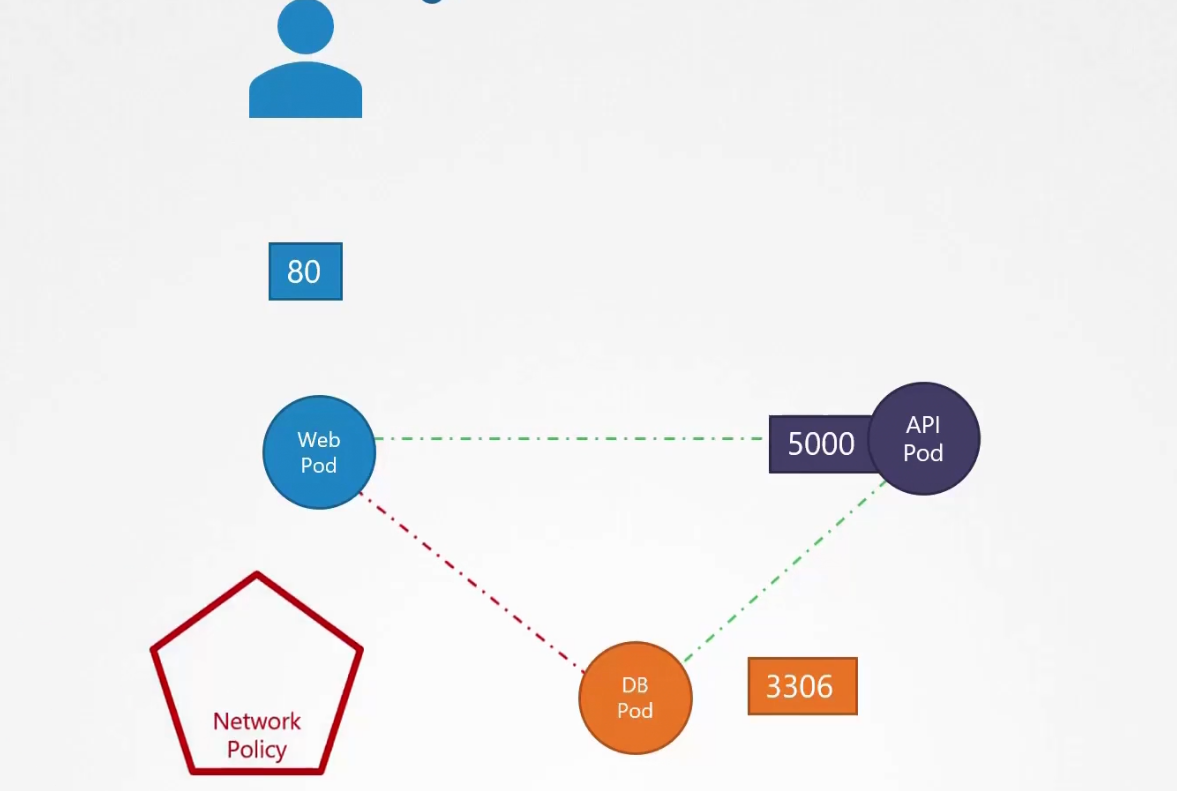
Then define the rules for the network policy
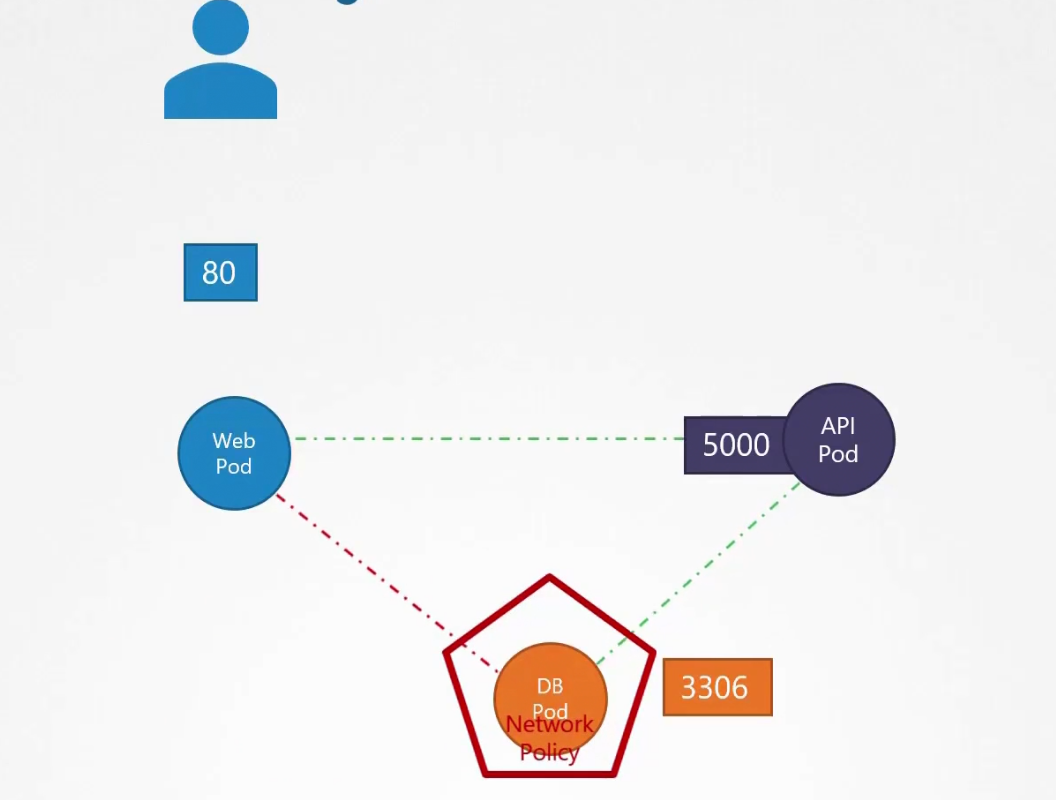
So, we want to allow ingress traffic from the API pod but don’t want to allow any ingress traffic from the web pod.
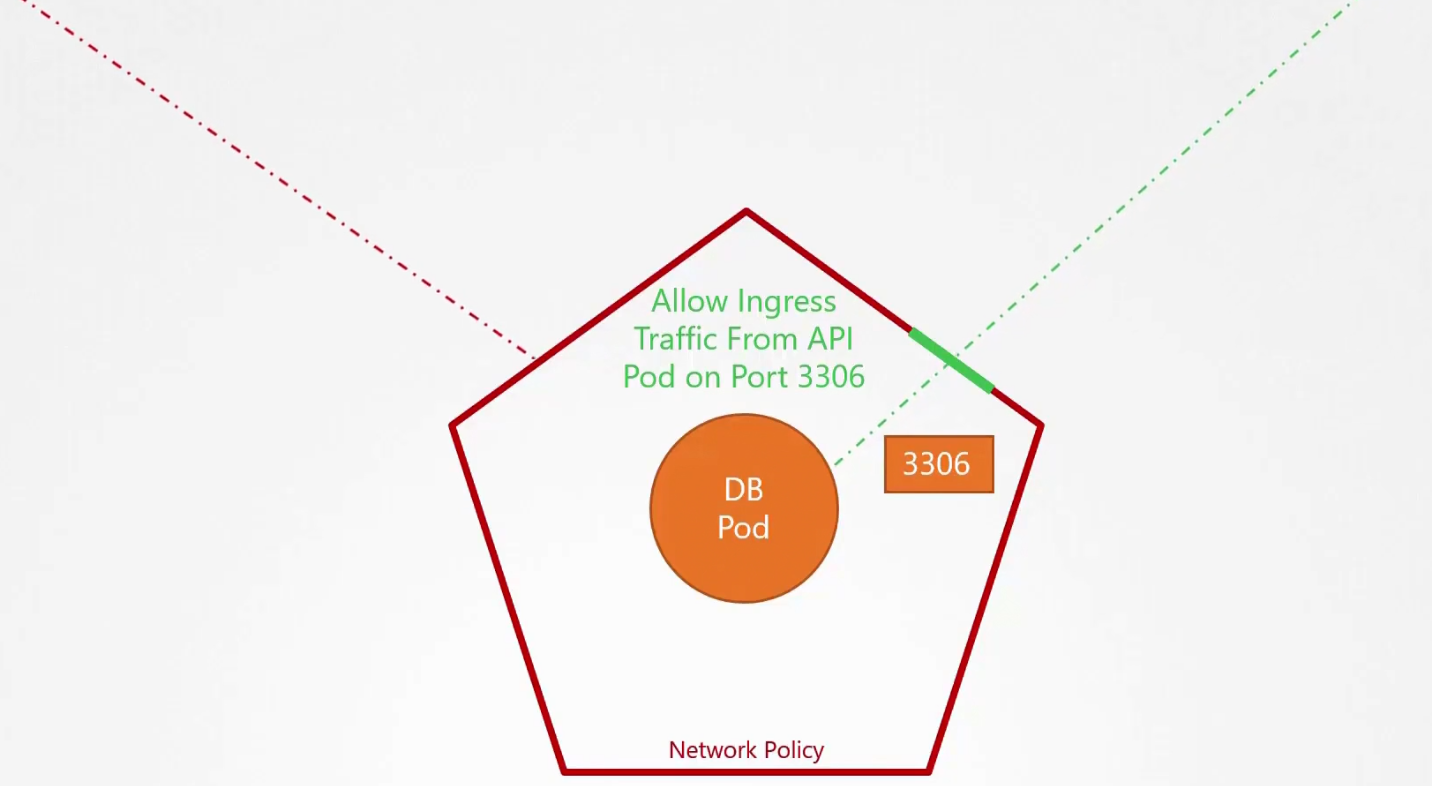
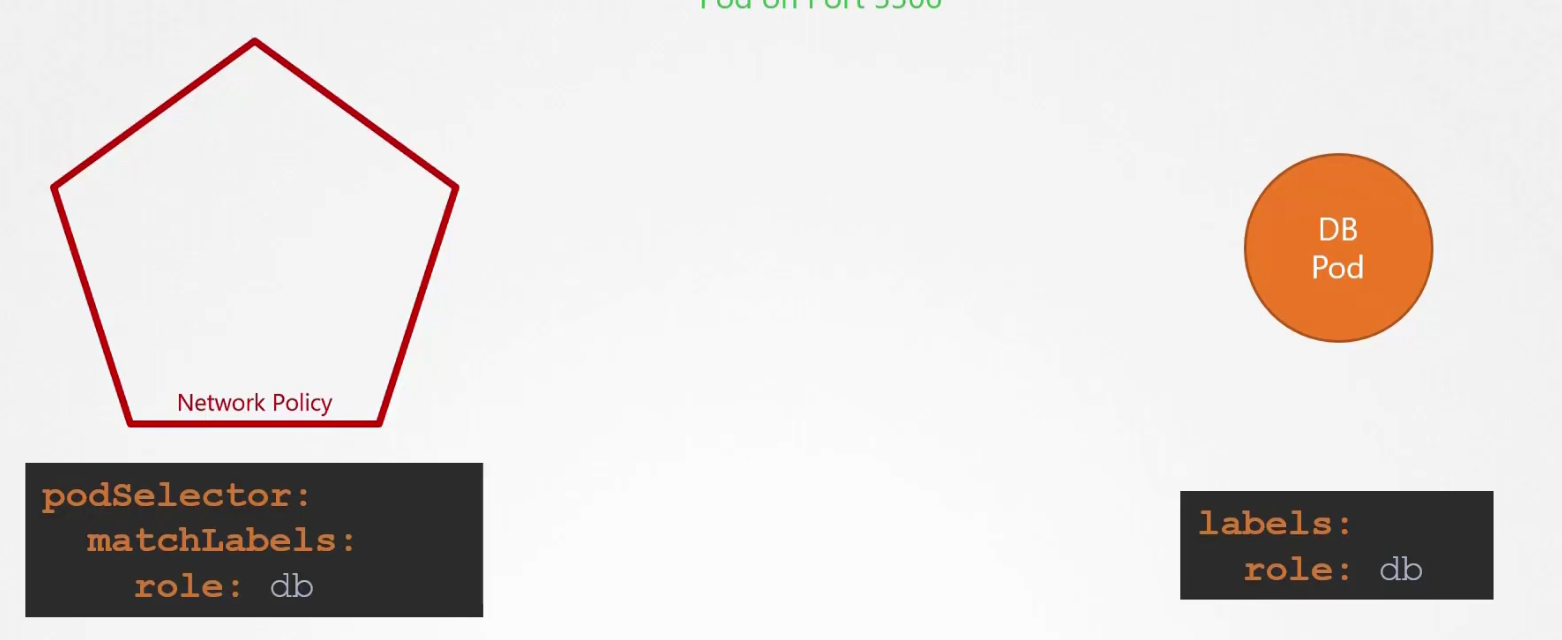
But how we select the DB pod for the network policy?
By using labels and selector.
We need to use the labels we set for db (for example, it’s db) and put that under the podSelector section,
Now, the rule:
We want to send ingress traffic to port 3306 from API pod, right?
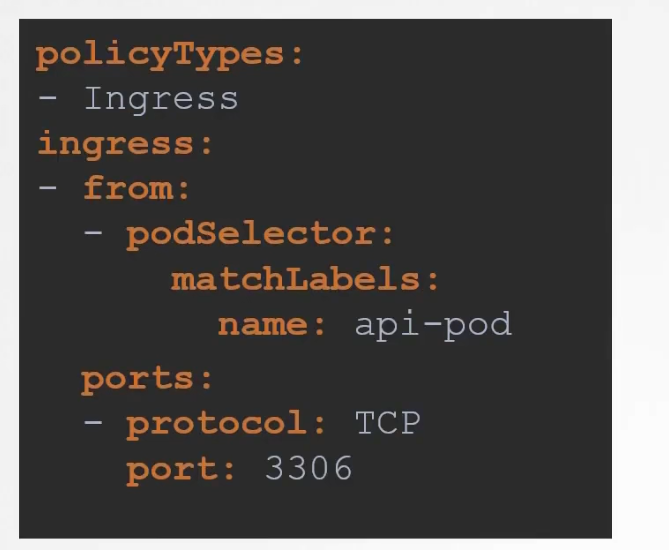
So, we used API pod’s label (api-pod) to allow ingress traffic for that. Add opened port 3306 to get the request.
So, what is the whole yaml file look like?
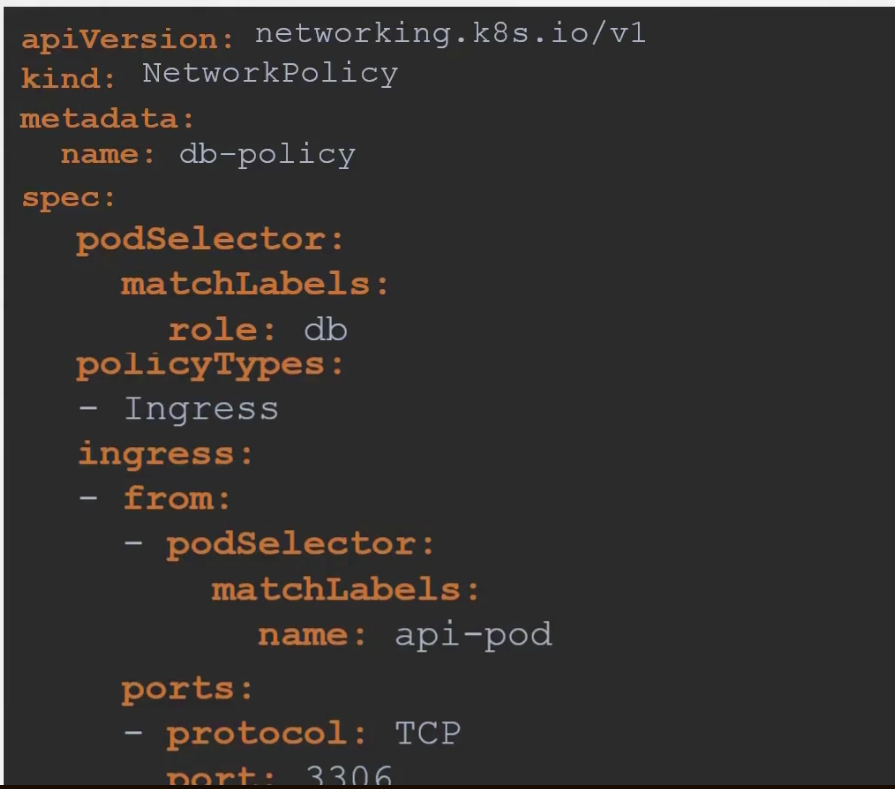
Note: Here we have isolated Ingress traffic (Traffic request coming from API pod and web server POD) for this database API. (policyTypes: -Ingress). That means Egress traffic(Traffic going to API Pod as a result of it’s request) to API server is unharmed.
Then apply the policy

We need to keep in mind that, we need to pick solutions which supports network policies

Developing Network policies
Assume that we are not letting any pod to access to DB pod except API pod on port 3306
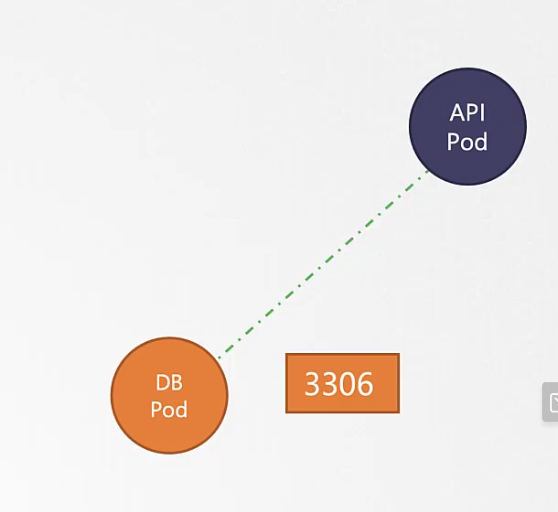
Kubernetes allow all traffic from all pods to all destinations. So, to achieve our goal, we need to block out all connection going in and out the DB pod.
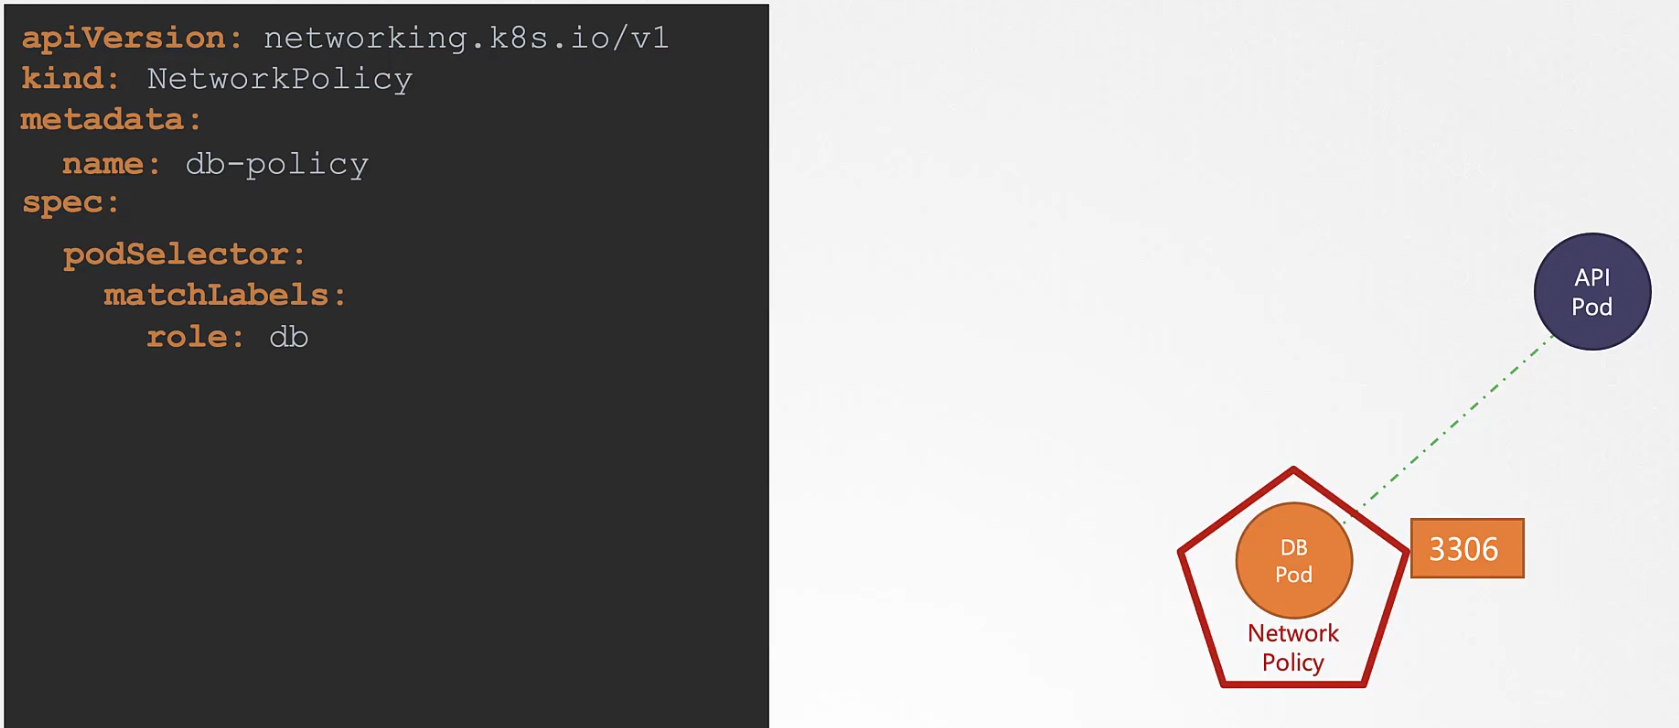
Here we did select the DB Pod, by using the label db (which was used for the DB pod and we used it as a matchLabels)
But have we made a connection from API pod to contact to DB Pod? No! Let’s specify this as Ingress. This way, the API pod can contact DB Pod
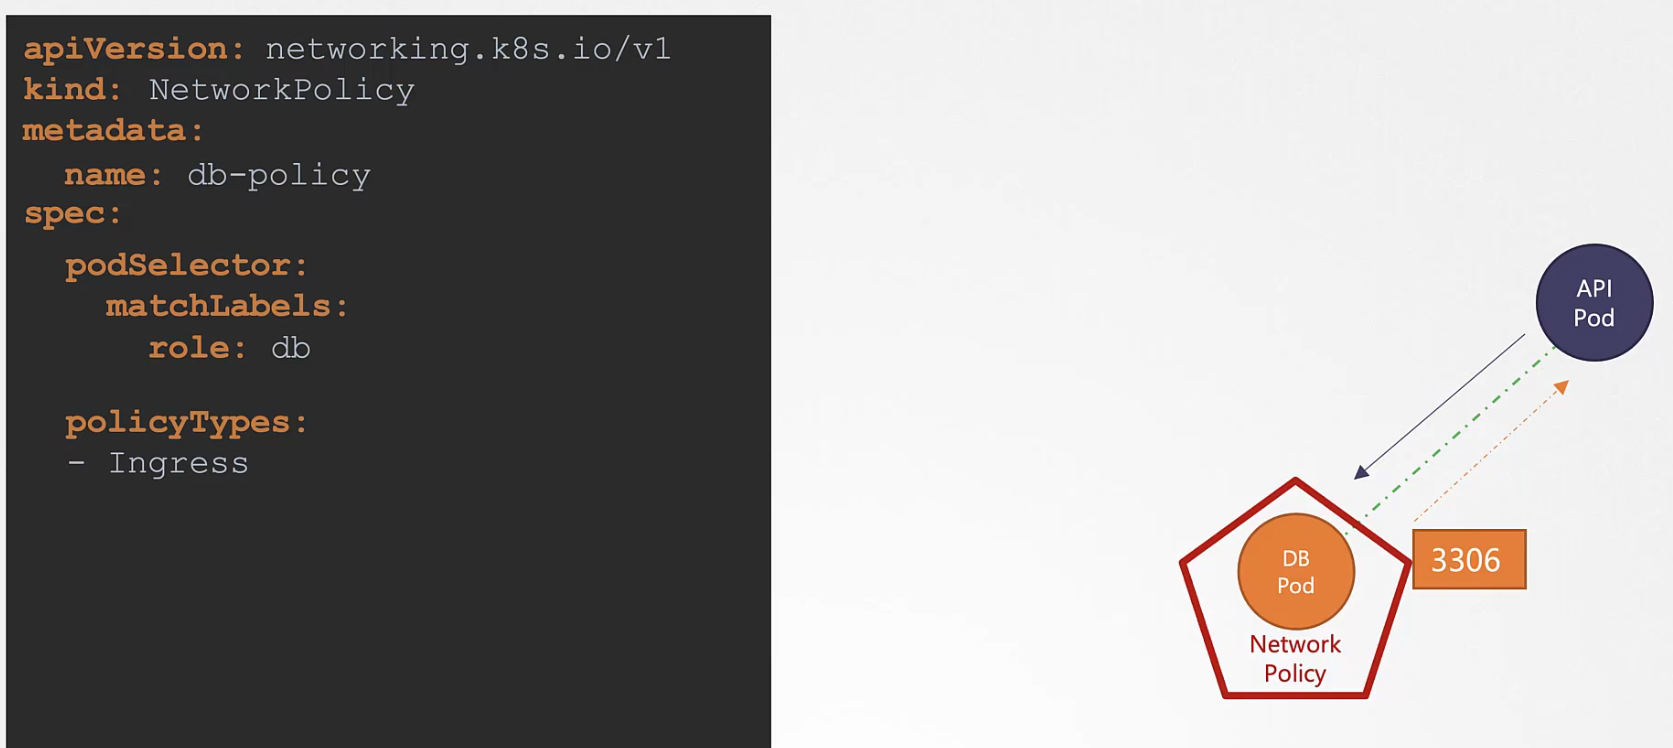
Finally we have to specify labels for the API pod and the pod on DB port where API pod will send traffic
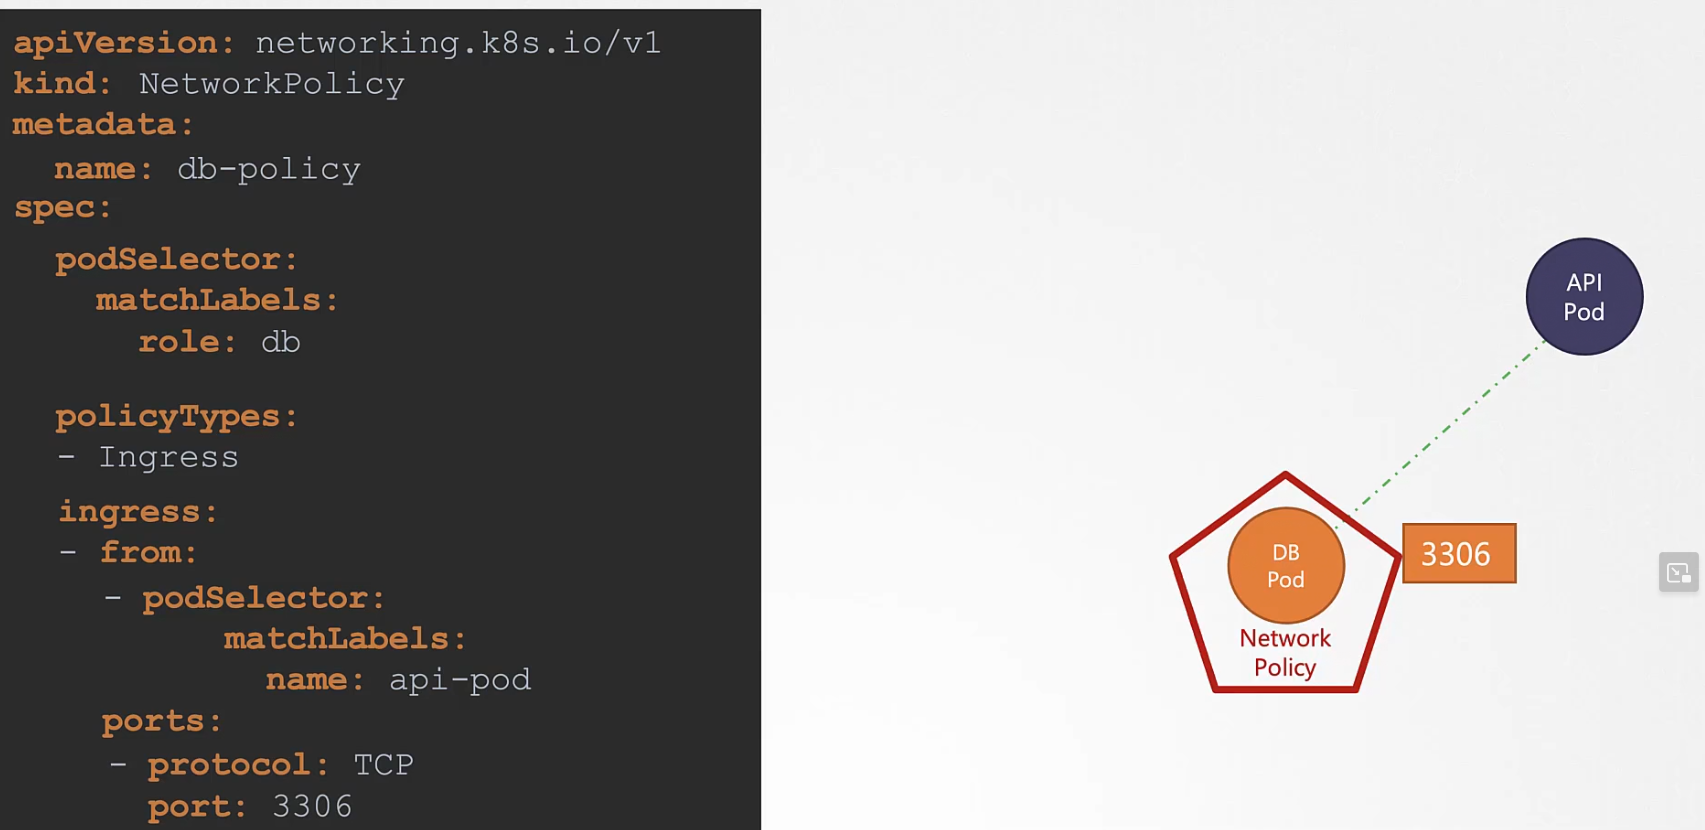
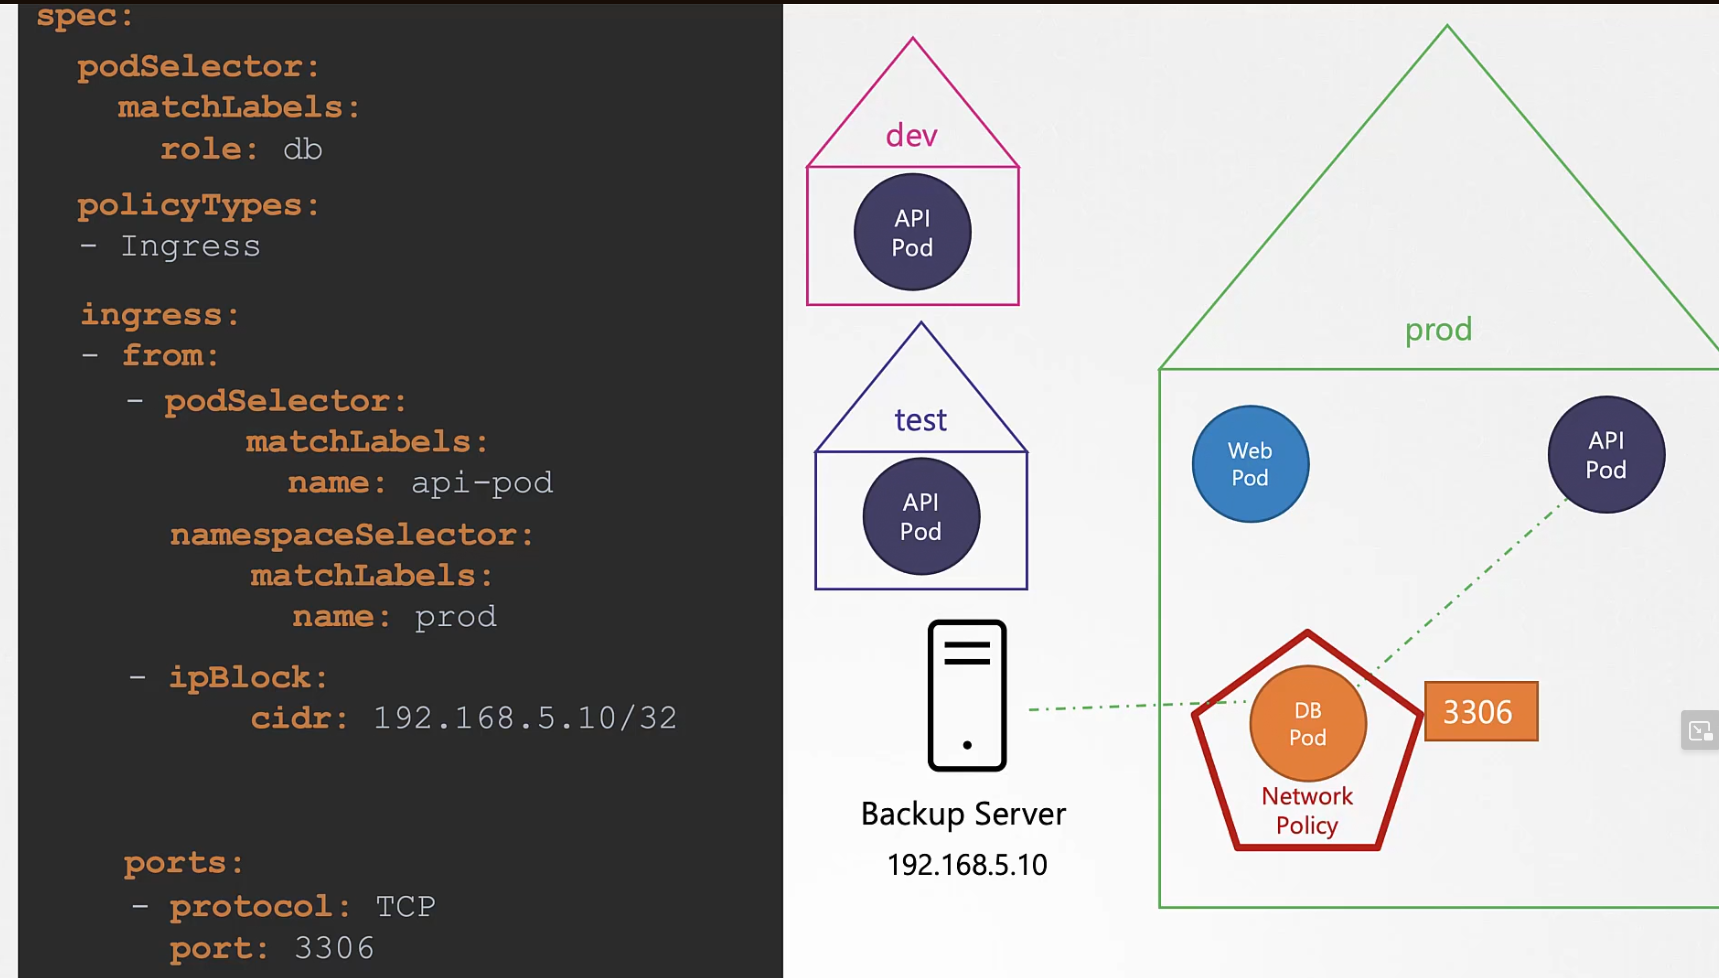
Assume that, we have 3 API pod in 3 different namespace. The yaml code we have will give access to all of the API pods which we don’t want.
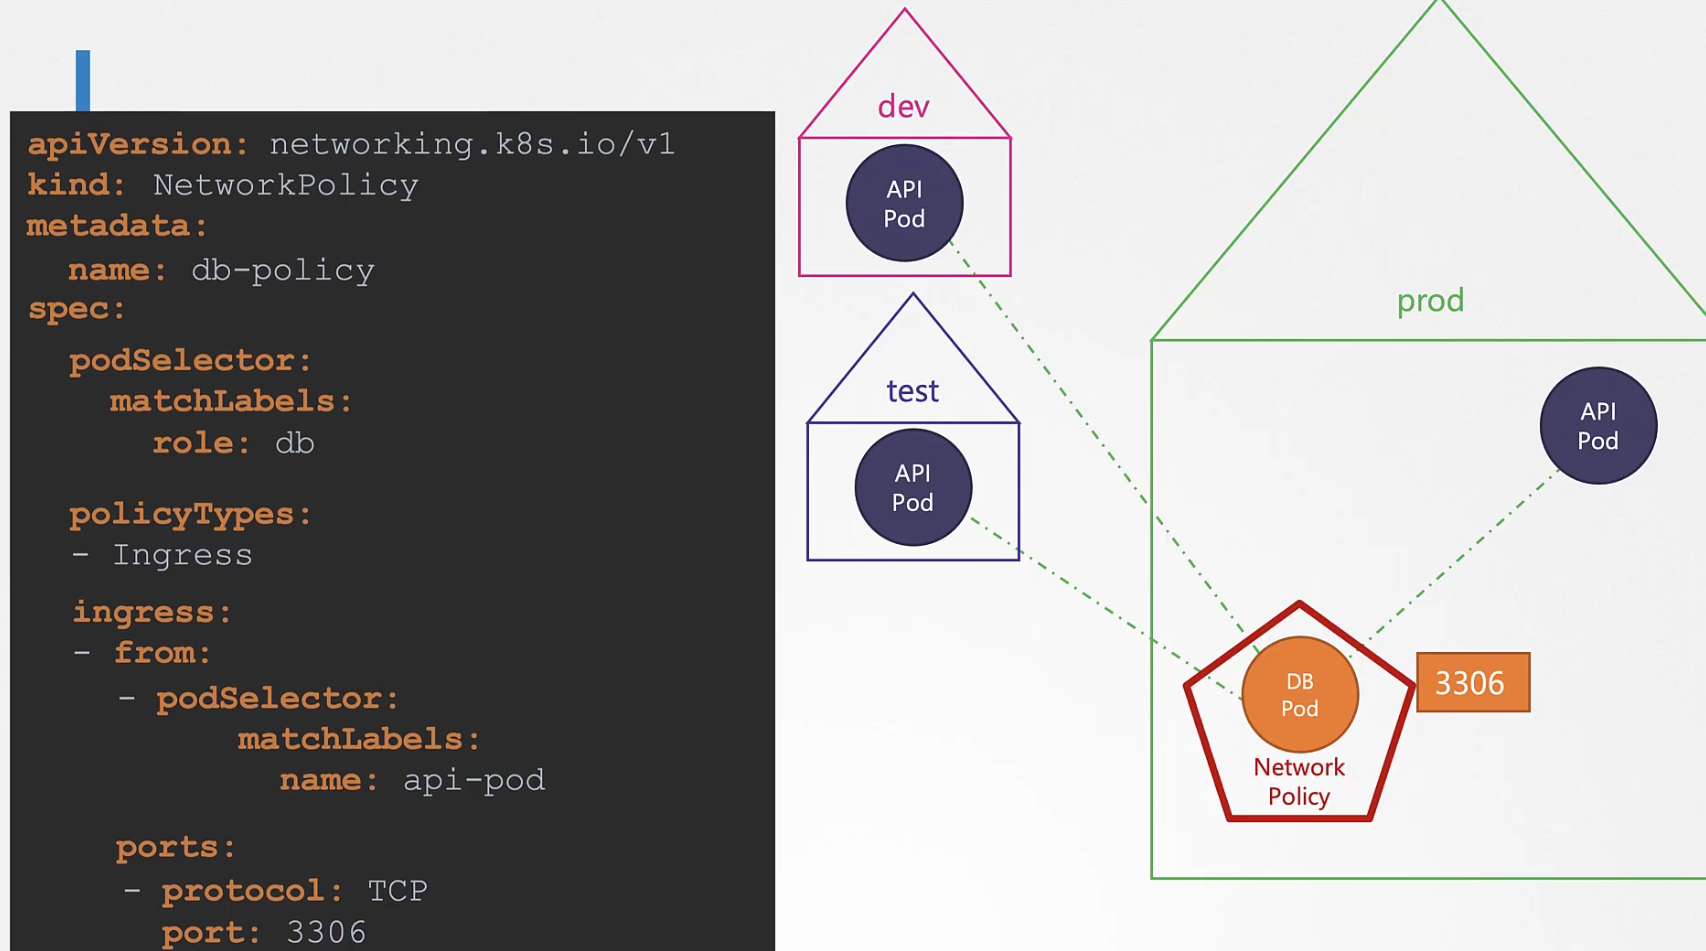
We only want the pod from prod namespace to connect with DB prod. So, we need to make sure that there is a label for the namespace. Assuming it as “prod”
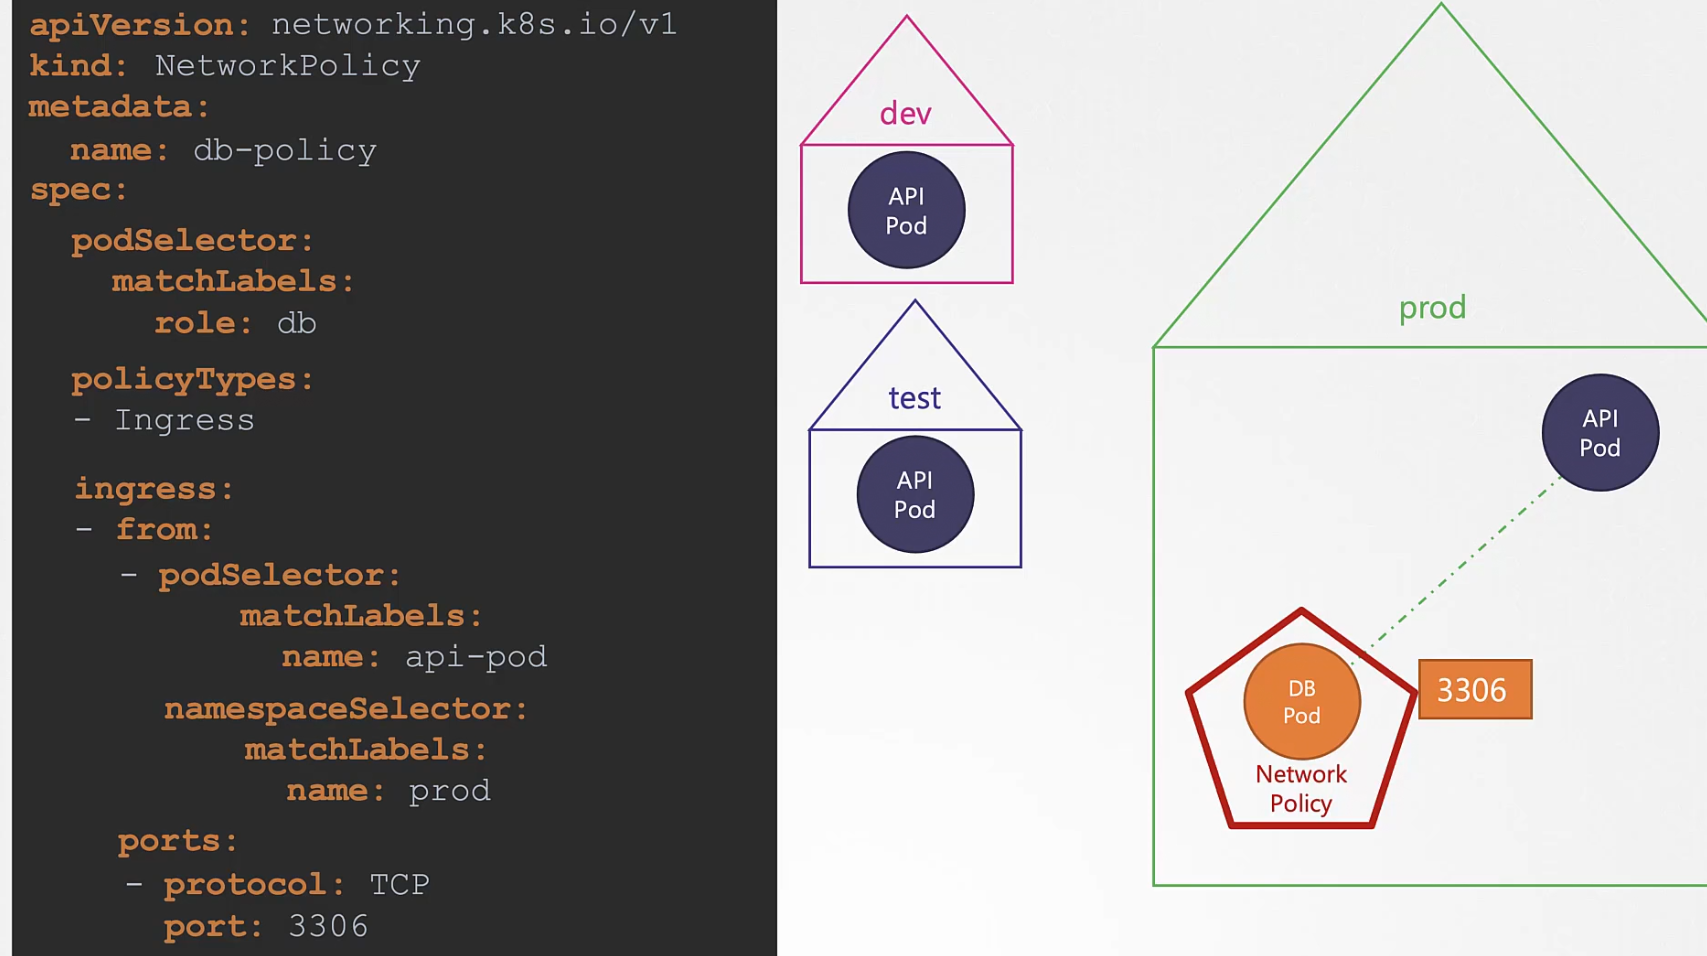
Also, in-case we need to allow traffic from a backup server which is out of our cluster, we can set the IP
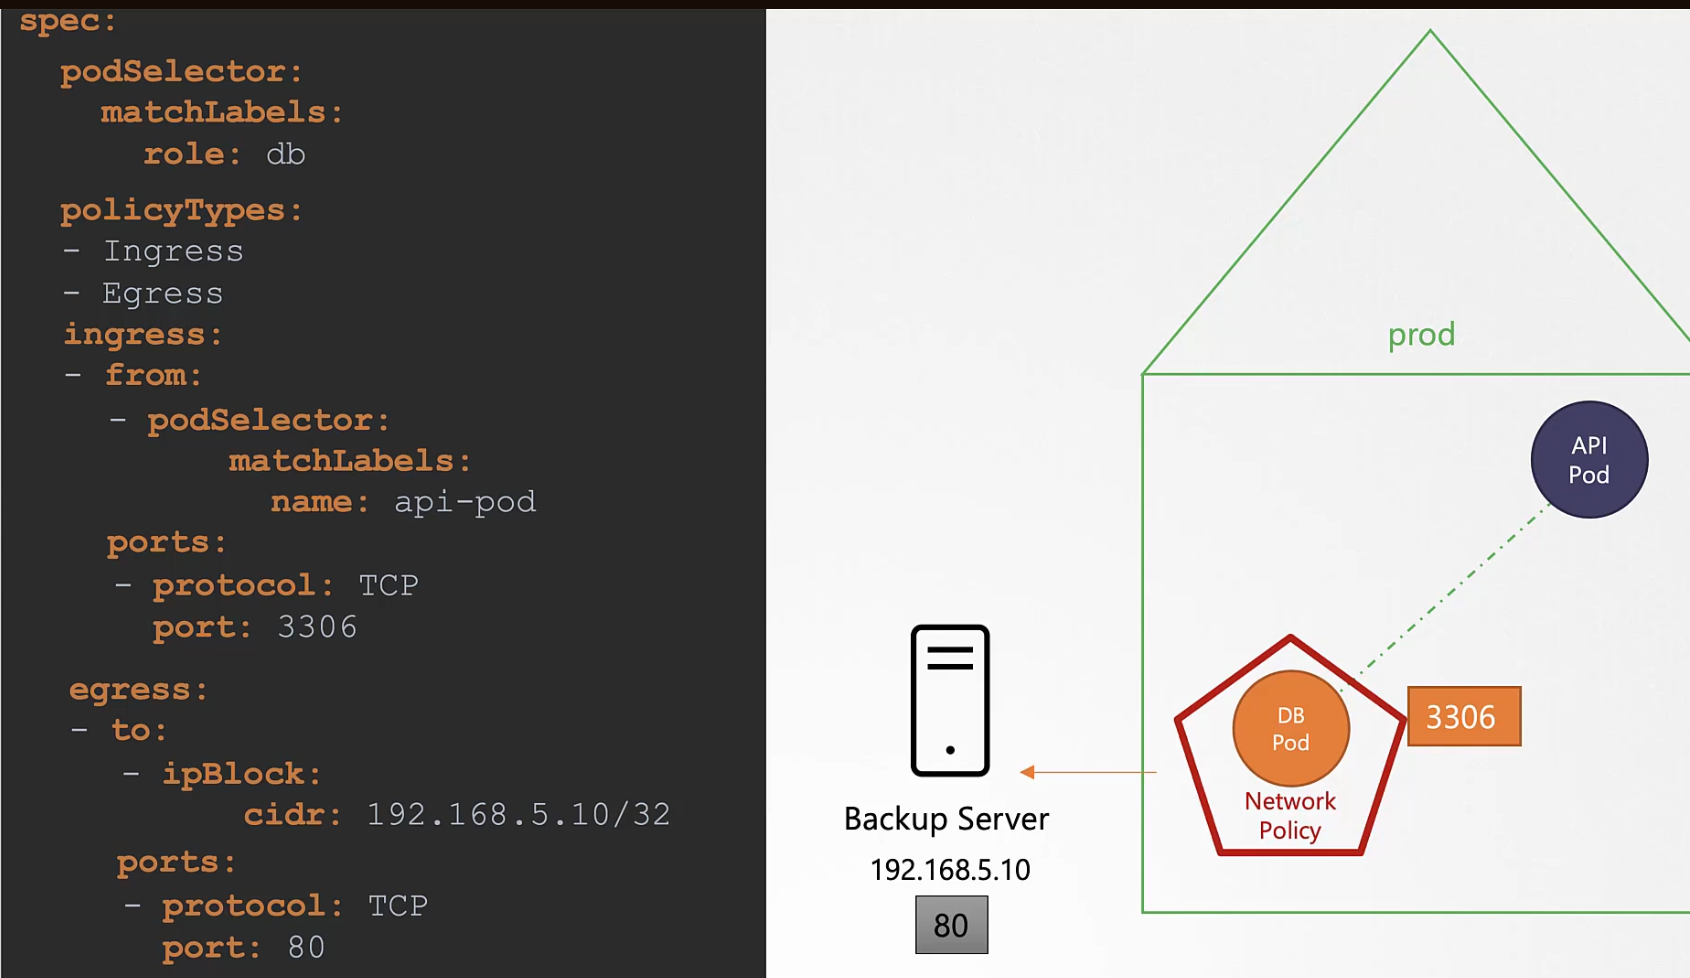
Now, assume instead of the traffic coming from backup server to network policy, we want the traffic to be sent to backup server.
Custom Resource Definition (CRD)
When we create a deployment, it’s updated on the ETCD

If we delete the deployment, it’s basically going to modifying the object on etcd

As we know when we create a deployment, a desired number of pods get created. Here our desired number of pods are 3. But who does that?
That’s the work of deployment controller (Installed by default). It updates, deletes the object on the etcd.
Here you can see the deployment controller written on go language.

Just like the deployment, we have other controllers to monitor the changes and update the etcd.

Now, assume that you want to create a flight ticket object (in your imagination for sure)
Assume we made a yaml file, created the resource, checked the status (surely it’s not running as there is nothing like flightticket kind), then deleted it

Did this actually book a ticket ? Not really!
Assume we really want to book a ticket with this resource.

Assume that we have an API which we will use for booking a ticket. And also, we have created a custom controller which will monitor the changes through the API.

Here the resource (ticket object) was a custom resource and the controller was also custom.
But how can we create custom resources in real life??
If we actually want to create an object using the yaml file, we surely would see errors

To solve this, we need to let kubernetes know that we want to create a flightticket object through CRD

Once you check the api-resources, you can see the plural version

We can specify the version (alpha, beta or GA) here, then mention if that need to serve though API server, if it’s a storage server, it’s short name

Then we have to mention what field can it support and what values can it take in the fields (from, to, number)

Here openAPIV3Schema was used. Here, from , to , number are specified.
Now create the custom resource definition and create/delete the flight ticker object

So, we have created flight object. But is it actually working? Have we linked it with any flight API? No!!
So, we solve this using custom controllers
Custom Controllers
The custom controller should listen to the API and look for our changes.

But how to create the controller?
Go to this repository

Firstly install go, then clone the repository, then cd inside the sample-controller folder

Then we will put our logic to create the controller on the controller.go file
We then build it (go build -o sample-controller) and run it (./sample-controller). We specify the kube-config file that the controller can use to authenticate the kubernetes API.
We can package this as an image

and run on a pod

Operator Framework
So, we have created CRD and Custom Controller by now

These two can be packaged together to be deployed as a single entity using the operator framework.

After that, we can easily create an object.
User case:
In Kubernetes, we have etcd operator which packages EtcdCluster, EtcdBackup etc with controller ETCD Controller, Backup Controller etc.


These operators take backup, fix any issues that may occur in the CRD or Controller , maintain etc.
You can find all operators at OperatorHub

That’s it!
Subscribe to my newsletter
Read articles from Md Shahriyar Al Mustakim Mitul directly inside your inbox. Subscribe to the newsletter, and don't miss out.
Written by
