Exploring Amazon S3 Pre-Signed URLs: A Scalable Approach to Secure File Access
 Shivang Yadav
We know, as applications grow in complexity and usage, efficient, secure, and scalable data handling becomes crucial. Handling file uploads is a common requirement in web applications, especially in scenarios where users upload large amounts of data like images, videos, or documents. Traditionally, this involves sending files to the backend server, which processes the upload and forwards it to a storage solution like AWS S3. However, as your user base grows, this approach can cause significant performance bottlenecks, scalability issues, and security concerns. This is where Amazon S3 pre-signed URLs come to the rescue!
In this blog, we’ll explore how Amazon S3 pre-signed URLs work, how they can help offload your server from handling file uploads directly, and how to implement them in a Node.js backend for a more scalable and efficient architecture.
What is Amazon S3?
Amazon Simple Storage Service (Amazon S3) is a cloud storage service provided by AWS (Amazon Web Services). It allows you to store and retrieve any amount of data at any time from anywhere on the web. S3 is ideal for storing files such as images, videos, documents, and backups. It provides high availability, security, and scalability for storing large amounts of data.
Key Components of Amazon S3
Buckets:
Buckets are the fundamental containers in S3 that hold your data. Each bucket has a unique name within the AWS region and acts as a namespace for the objects stored inside it. You can think of a bucket as a folder or directory that can contain multiple files.
For example, you might create a bucket named
my-photosto store all your image files, ormy-backupsfor backup files.
Objects:
The actual files stored in S3 are referred to as objects. Each object consists of the data itself, metadata (information about the data), and a unique identifier known as the object key (the path to the file within the bucket).
For instance, an object key could look like
my-photos/image1.jpg, representing an image stored in themy-photosbucket.
Unlimited Storage:
- One of the significant advantages of S3 is its virtually unlimited storage capability. You can create as many buckets as you need and store an unlimited number of objects within those buckets. This flexibility makes S3 an ideal choice for businesses and applications with growing data storage needs.
Storage Classes:
Amazon S3 offers various storage classes designed to optimize cost and performance for different use cases. For example:
S3 Standard: Best for frequently accessed data.
S3 Intelligent-Tiering: Automatically moves data between two access tiers when access patterns change.
S3 Glacier: Low-cost storage for data archiving, with retrieval times ranging from minutes to hours.
S3 One Zone-IA: For infrequently accessed data that doesn't require multiple availability zone resilience.
Access Control:
- Amazon S3 provides robust security and access control features. You can set permissions at both the bucket and object levels, allowing you to define who can access your data and what actions they can perform. This is managed through AWS Identity and Access Management (IAM) policies, bucket policies, and Access Control Lists (ACLs).
Data Management and Lifecycle Policies:
- S3 offers features to help manage your data efficiently. You can create lifecycle policies to automatically transition objects between different storage classes or delete them after a specified period. This helps optimize storage costs by moving less frequently accessed data to more cost-effective storage classes.
The Challenge with Traditional File Uploads
In traditional setups, files uploaded by users are first sent to the backend server. The server processes these files, perhaps performing validation or format conversion, and then stores them in a storage service like S3.
Let’s take the example of a video-sharing platform similar to YouTube, where users frequently upload large video files. In a traditional setup, the backend would need to handle each video file upload, which could be hundreds of megabytes or even gigabytes in size. With multiple users uploading videos simultaneously, the server’s bandwidth and CPU would be overwhelmed, causing high latency and slow uploads. This situation gets worse during peak hours or when the platform's popularity grows. As a result, scaling such a system would require adding more powerful servers or load balancers, significantly increasing costs.
The flow looks something like this:
Client → Uploads a file to Backend Server.
Backend Server → Receives the file, validates it, processes it, and uploads it to S3.
Problems with this approach:
Server Load: Your server must handle multiple uploads, which can consume bandwidth and CPU resources. This can slow down the server and lead to poor performance as more users upload files simultaneously.
Scaling Issues: As the number of users and file uploads increases, scaling your backend servers becomes challenging and costly.
Latency: Uploading files to the server and then transferring them to S3 introduces delays, affecting the overall user experience.
The Solution: Amazon S3 Pre-signed URLs
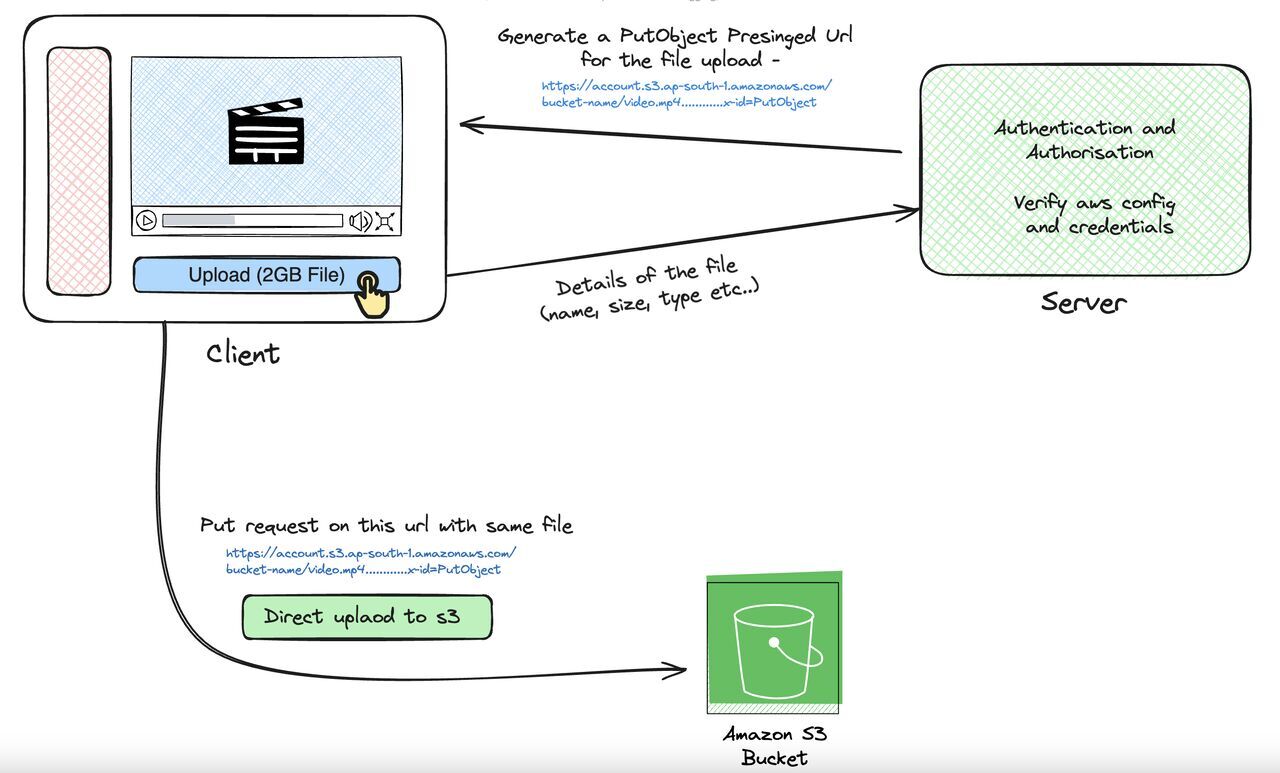
With Amazon S3 pre-signed URLs, you can bypass the backend server and upload files directly from the client to S3. The server's role is limited to generating a URL that gives the client temporary permission to upload a file directly to S3.
How It Works:
The client requests a pre-signed URL from the server.
The server generates a pre-signed URL with specific permissions and an expiration time.
The client uses this pre-signed URL to upload the file directly to Amazon S3.

Benefits:
Reduced Server Load: Since files are uploaded directly to S3, your backend doesn’t have to handle the file data.
Scalability: S3 is highly scalable, capable of handling thousands of file uploads simultaneously, so you don’t have to worry about scaling your backend servers for uploads.
Security: Pre-signed URLs are time-limited and only allow specific operations (like uploads), reducing the risk of unauthorized access to your S3 bucket.
Understanding Pre-signed URLs
A pre-signed URL is a URL that you generate in your backend using your AWS credentials. It gives a client temporary access to upload or download a file in S3. The URL contains parameters like:
Bucket Name: The name of the S3 bucket where the file will be uploaded.
Key (File Name): The path and name of the file within the bucket.
Permissions: The action the client can perform (e.g., PUT for uploading files).
Expiration Time: How long the URL will be valid (e.g., 15 minutes).
Once the URL is generated, the client can use it to interact with S3 without needing access to your AWS credentials.
Implementation in Node.js
Let’s implement a simple Node.js API that generates a pre-signed URL for uploading files to S3.
Prerequisites:
AWS Account with S3 permissions.
Node.js installed.
AWS SDK for Node.js installed.
Step 1: Set Up AWS SDK and S3 Bucket
First, install the AWS SDK in your Node.js project:
npm install aws-sdk @aws-sdk/client-s3 @aws-sdk/s3-request-presigner
In your AWS console, create an S3 bucket where the files will be stored. Note the bucket name for use in the code.
Step 2: Set Up Node.js Environment
In your project, create a .env file to store your AWS credentials:
AWS_ACCESS_KEY_ID=your-access-key-id
AWS_SECRET_ACCESS_KEY=your-secret-access-key
AWS_REGION=your-region
S3_BUCKET_NAME=your-s3-bucket-name
Then, create an index.js file for your server:
import { S3Client, PutObjectCommand } from "@aws-sdk/client-s3";
import { getSignedUrl } from "@aws-sdk/s3-request-presigner";
import { config } from "dotenv";
import express from "express";

config();

const app = express();

// Configure AWS SDK with credentials
const S3 = new S3Client({
  region: process.env.AWS_REGION,
  credentials: {
    accessKeyId: process.env.AWS_ACCESS_KEY_ID,
    secretAccessKey: process.env.AWS_SECRET_ACCESS_KEY,
  },
});

// Generate a pre-signed URL
app.get('/generate-presigned-url', async (req, res) => {
  const { fileName, fileType } = req.query;

  if (!fileName || !fileType) {
    return res.status(400).json({ error: "Missing fileName or fileType" });
  }

  try {
    // Define parameters for the pre-signed URL
    const command = new PutObjectCommand({
      Bucket: process.env.AWS_S3_BUCKET,
      Key: fileName,
      ContentType: fileType,
    });

    // Generate the pre-signed URL
    const requestURL = await getSignedUrl(S3, command, { expiresIn: 3600 }); // URL valid for 1 hour

    res.json({ requestURL });
  } catch (error) {
    console.error("Error generating presigned URL", error);
    res.status(500).json({ error: "Error generating presigned URL" });
  }
});

const port = 3000;
app.listen(port, () => {
  console.log(`Server running on port ${port}`);
});
Step 3: Using the Pre-signed URL in the Client
Once the pre-signed URL is generated, the client can use it to upload the file directly to S3. Here’s an example of how you can use the pre-signed URL in a frontend application:
async function uploadFile(file) {

  const fileName = file.name;
  const fileType = file.type;

  // Request the pre-signed URL from the server
  const response = await fetch(`/generate-presigned-url?fileName=${fileName}&fileType=${fileType}`);
  const data = await response.json();

  // Use the pre-signed URL to upload the file to S3
  const result = await fetch(data.url, {
    method: 'PUT',
    headers: {
      'Content-Type': fileType,
    },
    body: file,
  });

  if (result.ok) {
    console.log('File uploaded successfully');
  } else {
    console.error('File upload failed');
  }
}
Now, you can see that the file upload process is entirely client-side, meaning there’s no heavy load on the server for handling file uploads. This makes the system highly scalable, as the server’s responsibility is limited to generating pre-signed URLs. The actual file transfer happens directly between the client and Amazon S3.
Additionally, the pre-signed URL is secure, as the server authenticates the request and only generates URLs with limited, time-bound access to the files, ensuring security without exposing sensitive AWS credentials.
Building Scalable Systems with Pre-signed URLs
Pre-signed URLs are a powerful tool when it comes to building scalable file upload systems. Here’s why:
Load Offloading: By bypassing the backend server, you offload the load of handling large files directly to Amazon S3, which is built for such tasks.
Horizontal Scaling: Since your backend no longer handles the file upload process, it can scale horizontally to handle other tasks, like processing business logic, without being tied down by file transfers.
Reduced Latency: Direct upload to S3 minimizes the round-trip time for uploading files, improving user experience.
Cost Efficiency: Offloading file uploads to S3 reduces the need for powerful, resource-intensive backend servers, which can save infrastructure costs.
Security Considerations
Pre-signed URLs are a great way to securely upload files directly to S3, but there are a few things to keep in mind:
Expiration: Always set a reasonable expiration time for pre-signed URLs to limit their window of usage.
File Validation: You should still validate the file type and size on the backend when generating the pre-signed URL to avoid uploading malicious or oversized files.
Bucket Policies: Use S3 bucket policies to restrict access and control who can generate pre-signed URLs.
Conclusion
Amazon S3 pre-signed URLs are a highly effective way to manage file uploads in a scalable, secure, and efficient manner. By allowing users to upload files directly to S3, you reduce the load on your servers, improve performance, and enable your application to scale more easily.
Using pre-signed URLs is simple to implement with Node.js and AWS SDK, and they bring immense benefits, particularly for applications with heavy file uploads.
Happy coding!
Subscribe to my newsletter
Read articles from Shivang Yadav directly inside your inbox. Subscribe to the newsletter, and don't miss out.
Written by

Shivang Yadav
Shivang Yadav
Hi, I am Shivang Yadav, a Full Stack Developer and an undergrad BTech student from New Delhi, India.