Activity 16: user role in MySQL database
 Joshua Nato
Create a New Database
First, log in to MySQL with an admin user (like root) and create the new database.

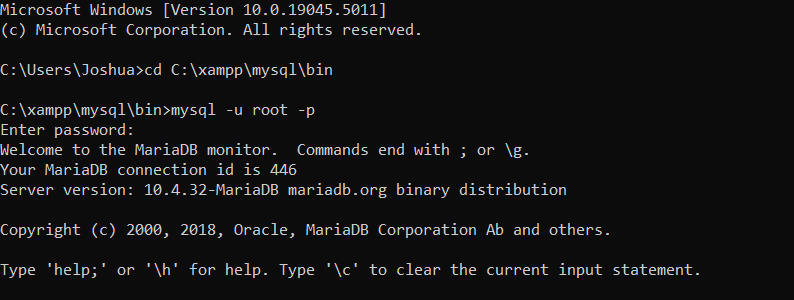
The shows the output of a command prompt window in a Windows environment. The first few lines display the operating system information (Microsoft Windows 10) and the current directory (C:\xampp\mysql\bin).
The command mysql -u root -p is then executed, which attempts to connect to the MySQL server using the root user. The user is prompted to enter the password for the root user.
Once the connection is established, the MySQL monitor is displayed, providing information about the server version and copyright details. The user is also instructed on how to use the MySQL command-line interface.
Overall, the image shows the initial steps of connecting to a MySQL server using the command prompt in Windows.

The shows the SQL command CREATE DATABASE Joshua; being executed in a MySQL terminal.
This command creates a new database named "Joshua".
The output Query OK, 1 row affected (0.001 sec) indicates that the database was created successfully.
2. Create a New User
Next, create a new user (role). This user will have specific permissions later.

The shows the following SQL commands being executed in a MySQL terminal:
MariaDB [(none)]> USE Joshua;
- This command switches the current database to the database named "Joshua".
MariaDB [Joshua]> CREATE USER 'Joshua'@'localhost' IDENTIFIED BY 'Joshua';
- This command creates a new user named "Joshua" with the password "Joshua". The user is granted access to the database server running on the local host ("localhost").
The output Query OK, 0 rows affected (0.013 sec) indicates that both commands were executed successfully. This means that the database has been switched to "Joshua" and the user "Joshua" has been created with the specified password.
3. Grant Permissions to the User
Now, give the user permission to view and edit the database, but restrict delete permissions.

The shows the SQL command GRANT SELECT, CREATE, INSERT, UPDATE, REFERENCES ON Joshua.* TO 'Joshua'@'localhost'; being executed in a MySQL terminal.
This command grants the user 'Joshua' with the following privileges on the database named 'Joshua':
SELECT: The ability to retrieve data from tables.
CREATE: The ability to create new tables.
INSERT: The ability to insert data into tables.
UPDATE: The ability to modify existing data in tables.
REFERENCES: The ability to create foreign key constraints.
These privileges are granted for all tables within the 'Joshua' database.
The output Query OK, 0 rows affected (0.004 sec) indicates that the command was executed successfully and that no data was affected. This means that the user 'Joshua' has been granted the specified privileges on the 'Joshua' database.
4. Apply Changes
After granting the permissions, run the following command to apply the changes:

The command FLUSH PRIVILEGES; is used to reload the privilege tables in MySQL. This is necessary whenever you modify user privileges or grant permissions.
In this case, the output Query OK, 0 rows affected (0.003 sec) indicates that the command was executed successfully and that no data was affected. This means that the changes made to user privileges have been applied and are now in effect.
Essentially, FLUSH PRIVILEGES ensures that the MySQL server is aware of and enforces the latest privilege settings.
5. Show Grants

The provided shows the SQL command SHOW GRANTS FOR 'Joshua'@'localhost'; being executed in a MySQL terminal. The output displays the privileges granted to the user 'Joshua' with the host 'localhost'. The user has general access to all databases and tables, as well as specific privileges on the database named 'joshua'.
CREATE TABLE
Users

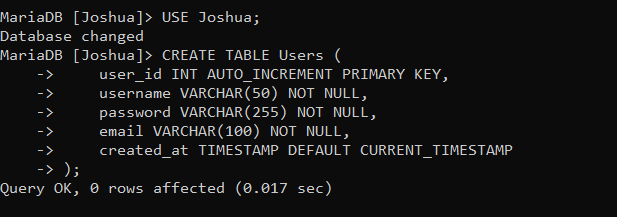
The shows a SQL command to create a table named "Users" in a MySQL database. The table has five columns: user_id, username, password, email, and created_at. The command was executed successfully, and no rows were affected.
INSERT Query:
Insert Data into the Profiles Table
Now, we will insert corresponding profile data. You'll need to know the user_id values generated for the Users table. For example, if john_doe has a user_id of 1 and jane_smith has a user_id of 2:

UPDATE Query:
SELECT * FROM Users;

shows a database query result from a MySQL database. The query SELECT * FROM Users; was executed, and the result returned two rows of data. Each row represents a user with the following attributes:
user_id: Unique identifier for the user
username: User's username
password: User's password
email: User's email address
created_at: Timestamp indicating when the user account was created
The query retrieved information about two users:
john_doe: With user_id 1, password "password123", email "john@example.com", and created on 2024-10-21 17:22:42.
jane_smith: With user_id 2, password "mypassword", email "jane@example.com", and created on 2024-10-21 17:22:42.
The query execution took 0.000 seconds.
Key Knowledge:
SELECT: A SQL statement used to retrieve data from a database.
FROM: Specifies the table from which data is retrieved.
*****: Represents all columns in the table.
user_id: A common way to uniquely identify users in a database.
created_at: A timestamp field that records when a record was created.
T
Subscribe to my newsletter
Read articles from Joshua Nato directly inside your inbox. Subscribe to the newsletter, and don't miss out.
Written by

Joshua Nato
Joshua Nato
Sucess