🚀 Day-5:AWS VPC Project: Step-by-Step Guide to Building a Secure 2-Tier Network Architecture
 Santhosh Haridass
Step-by-Steps
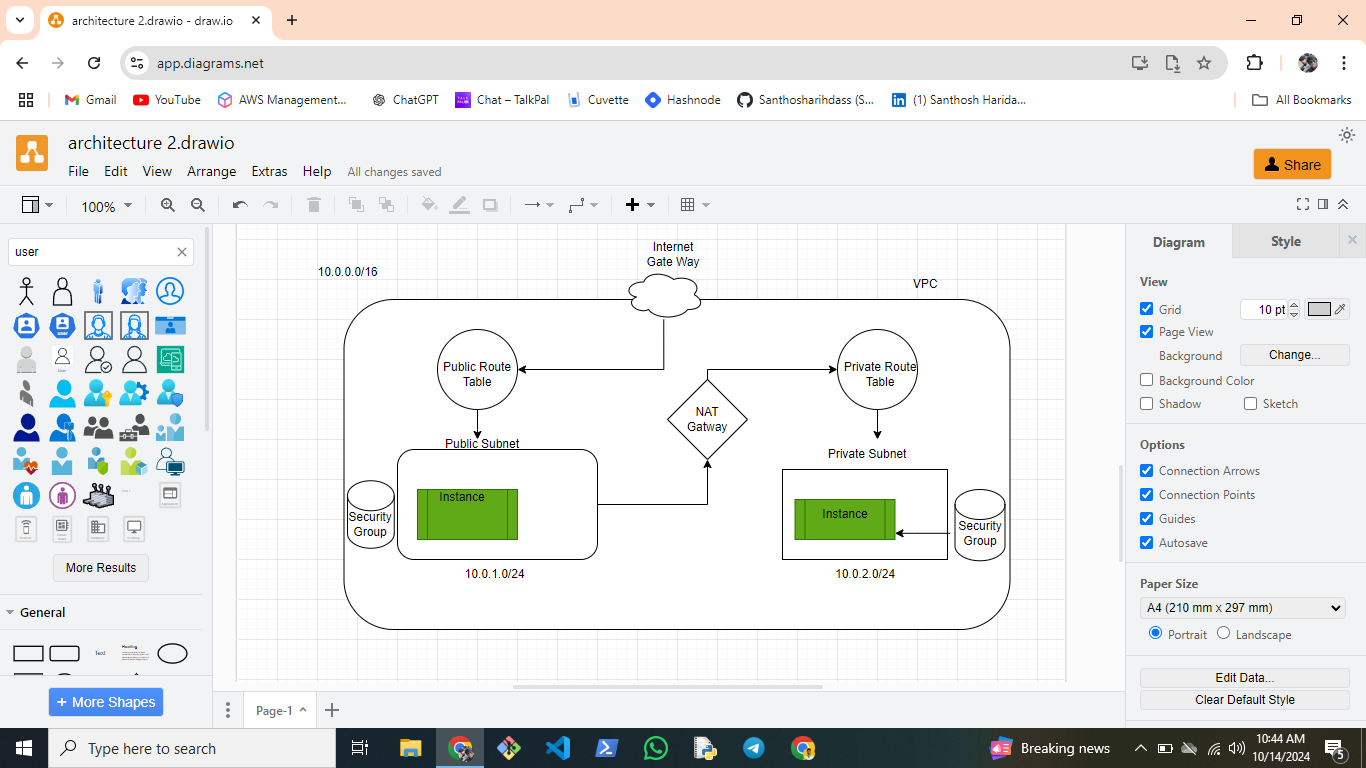
In this post, I'll walk you through creating a 2-tier AWS Virtual Private Cloud (VPC) setup. This project focuses on network isolation, security, and scalability by building a secure communication channel between public-facing resources and internal backend services.
Let’s dive into the details!
🛠 Step 1: Create the VPC
Open the AWS Management Console.
Navigate to the VPC Dashboard.
Click on Create VPC and configure:
VPC Name:
MyVPCCIDR Block:
10.0.0.0/16(providing up to 65,536 IP addresses).Leave the rest as default and click Create VPC.
This creates a custom VPC to host your resources in an isolated environment.
🛠 Step 2: Create Subnets (Public and Private)
Public Subnet (Tier 1 - Frontend)
Go to the Subnets section in the VPC dashboard.
Click Create Subnet and configure:
Name:
PublicSubnetVPC: Select
MyVPC.Availability Zone: Choose one (e.g.,
us-east-1a).CIDR Block:
10.0.1.0/24(providing 256 IP addresses).Click Create Subnet.
Private Subnet (Tier 2 - Backend)
Again, click Create Subnet and configure:
Name:
PrivateSubnetVPC: Select
MyVPC.Availability Zone: Choose one (e.g.,
us-east-1a).CIDR Block:
10.0.2.0/24(for 256 private IP addresses).Click Create Subnet.
You now have two subnets: a public one for internet-facing resources (Tier 1) and a private one for internal, secure resources (Tier 2).
🛠 Step 3: Create and Attach an Internet Gateway
In the VPC Dashboard, go to Internet Gateways and click Create Internet Gateway.
Name it
MyInternetGatewayand click Create.After creating it, select the newly created Internet Gateway, click Actions > Attach to VPC, and select
MyVPC.
This enables internet connectivity for the public subnet.
🛠 Step 4: Set Up Route Tables
Public Route Table
Go to Route Tables and click Create Route Table.
Name:
PublicRouteTableVPC: Select
MyVPC.
After creating it, click on the route table, go to the Routes tab, and click Edit Routes.
- Add a route:
0.0.0.0/0with the target as your Internet Gateway (MyInternetGateway).
- Add a route:
Associate this route table with the Public Subnet:
Go to Subnet Associations > Edit Subnet Associations.
Select
PublicSubnet.
Private Route Table
Similarly, create another route table:
Name:
PrivateRouteTable.VPC: Select
MyVPC.
No internet route is required for this route table yet. We’ll configure it in the next step.
🛠 Step 5: Deploy a NAT Gateway (For Private Subnet Outbound Access)
In the VPC Dashboard, go to NAT Gateways and click Create NAT Gateway.
Subnet: Select
PublicSubnet(it must be public to access the internet).Elastic IP Allocation: Create or select an Elastic IP.
Once created, go back to PrivateRouteTable:
In the Routes tab, click Edit Routes and add a route:
Destination:
0.0.0.0/0Target: Select the NAT Gateway created.
Now, instances in the private subnet will have secure outbound access to the internet without being exposed directly.
🛠 Step 6: Create Security Groups
Public Security Group (For Frontend Access)
Go to Security Groups and click Create Security Group.
Name:
PublicSecurityGroupVPC: Select
MyVPC.
Add inbound rules for:
SSH (22): For remote access.
RDP (3389): For Windows remote desktop access.
HTTP (80): For web traffic.
HTTPS (443): For secure web traffic.
Click Create Security Group.
Private Security Group (For Backend Security)
Create another security group:
Name:
PrivateSecurityGroupVPC: Select
MyVPC.
No inbound rules are necessary for external access, but you can add internal traffic rules as needed for communication between backend services.
🛠 Step 7: Launch Two Windows EC2 Instances
Instance 1 (Public Subnet)
Go to EC2 Dashboard and click Launch Instance.
Choose Windows Server AMI.
Select an instance type (e.g., t2.micro).
In Network Settings, choose:
VPC:
MyVPCSubnet:
PublicSubnetAuto-assign Public IP: Enable.
Select the PublicSecurityGroup created earlier.
Complete the remaining steps and launch the instance.
Instance 2 (Private Subnet)
Launch another instance similarly, but configure:
Subnet:
PrivateSubnetAuto-assign Public IP: Disable.
Select PrivateSecurityGroup.
This instance will be accessible only via internal traffic through the NAT Gateway.
🛠 Step 8: Test and Validate the Setup
Instance 1 (Public Subnet): Connect to it using RDP and verify internet access.
Instance 2 (Private Subnet): Test outbound access to the internet (e.g., software updates) via the NAT Gateway without a public IP.
You’ve now built a secure 2-tier architecture with proper isolation and internet connectivity.
Conclusion
This project highlights the foundational AWS services for creating a 2-tier network architecture, including VPC, subnets, Internet Gateway, NAT Gateway, security groups, and EC2 instances. This architecture is perfect for cloud environments where frontend resources communicate securely with backend services, ensuring security and scalability.
Subscribe to my newsletter
Read articles from Santhosh Haridass directly inside your inbox. Subscribe to the newsletter, and don't miss out.
Written by

Santhosh Haridass
Santhosh Haridass
🚀 𝐀𝐛𝐨𝐮𝐭 𝐌𝐞 "Hi, I'm Santhosh Haridass, a DevOps student passionate about cloud computing and automation. I'm currently learning AWS, Linux, Docker, and CI/CD pipelines, with a focus on automating workflows and building scalable solutions. My goal is to become a skilled DevOps/Cloud engineer, and I'm excited to share my learning journey and projects with the community."