Real-Time Push Notifications for Solana: Enhancing User Engagement with On-Chain Webhooks
 Vivek Suthar
Table of contents
- Introduction:
- What We’re Going to Build:
- Prerequisites :
- Setting up Firebase for Push Notifications.
- Setting up Helius WebHooks.
- Setting up Backend Server:
- Explanation:
- Breakdown of the Code:
- Building Mobile App
- Code Walkthrough:
- Extending Beyond SOL Transfers:
- Real-World Token Management:
- Conclusion
- Let's Connect
Introduction:
Building a consumer app that engages users with real-time on-chain events is a daunting challenge for any developer. The complexity of managing Android and iOS configurations, setting up webhook servers, and handling notifications for on-chain activities involves a hefty amount of work. From managing indexers and parsers to maintaining databases, setting up a reliable notification system for blockchain events can feel overwhelming.
Even in the current ecosystem, only a few mobile apps like Phantom, Backpack, and Solflare attempt to offer notifications for blockchain events, and even those are often unreliable(at least for me). Building your own notifications server from scratch becomes a massive task for a developer.
But here’s the good news: the landscape has evolved. Today, many RPC providers offer webhook services that deliver on-chain events directly to your server, allowing you to process and customize notifications to keep your users engaged seamlessly, no more struggling to manage complex infrastructure. Now you can focus on delivering a top-notch user experience with real-time updates on Solana.
So let’s dive in and build a Real-Time Notifications Server that keeps your users informed about on-chain events using Helius Webhooks, Firebase Cloud Messaging, and a Push Notification Service.
What We’re Going to Build:
We’ll create a simple app where users can subscribe to specific on-chain events or general topics of interest. Whenever something happens on-chain, our backend will process these events in real time and send push notifications directly to the user’s device. Here’s a breakdown of what we’ll be working on:
Mobile App: A user-friendly interface where users can subscribe to specific on-chain events (like token transfers or contract interactions) or general notifications.
Webhook Backend: A webhook server powered by Helius that listens to Solana events in real time, processes them, and triggers notifications.
Push Notification Service: We’ll use Firebase Cloud Messaging (FCM) to send push notifications to user's mobile devices, ensuring they stay up to date with on-chain activities as they happen.
By the end, we will have a fully functional notifications system, giving your users real-time updates without the hassle of building everything from scratch. Let’s code it.
Prerequisites :
React Native Development Setup:
Ensure you have React Native installed, with Node.js, React Native CLI (or Expo), Android Studio(Android SDK, Build Tools), and an Android/iOS emulator or device for testing. (A Guide on Environment Setup)
Basic Understanding of the Solana Ecosystem:
Familiarity with SOL/SPL tokens, Solana transactions, and using RPC providers like Helius to interact with the blockchain. (Learn about Solana)
Setting up Firebase for Push Notifications.
So Let’s First set up Firebase Cloud messaging and download some important files.
Visit https://console.firebase.google.com/ and create a new project.
Add your project name, allow the default setting, and click on Create project. Wait till your project is being created.
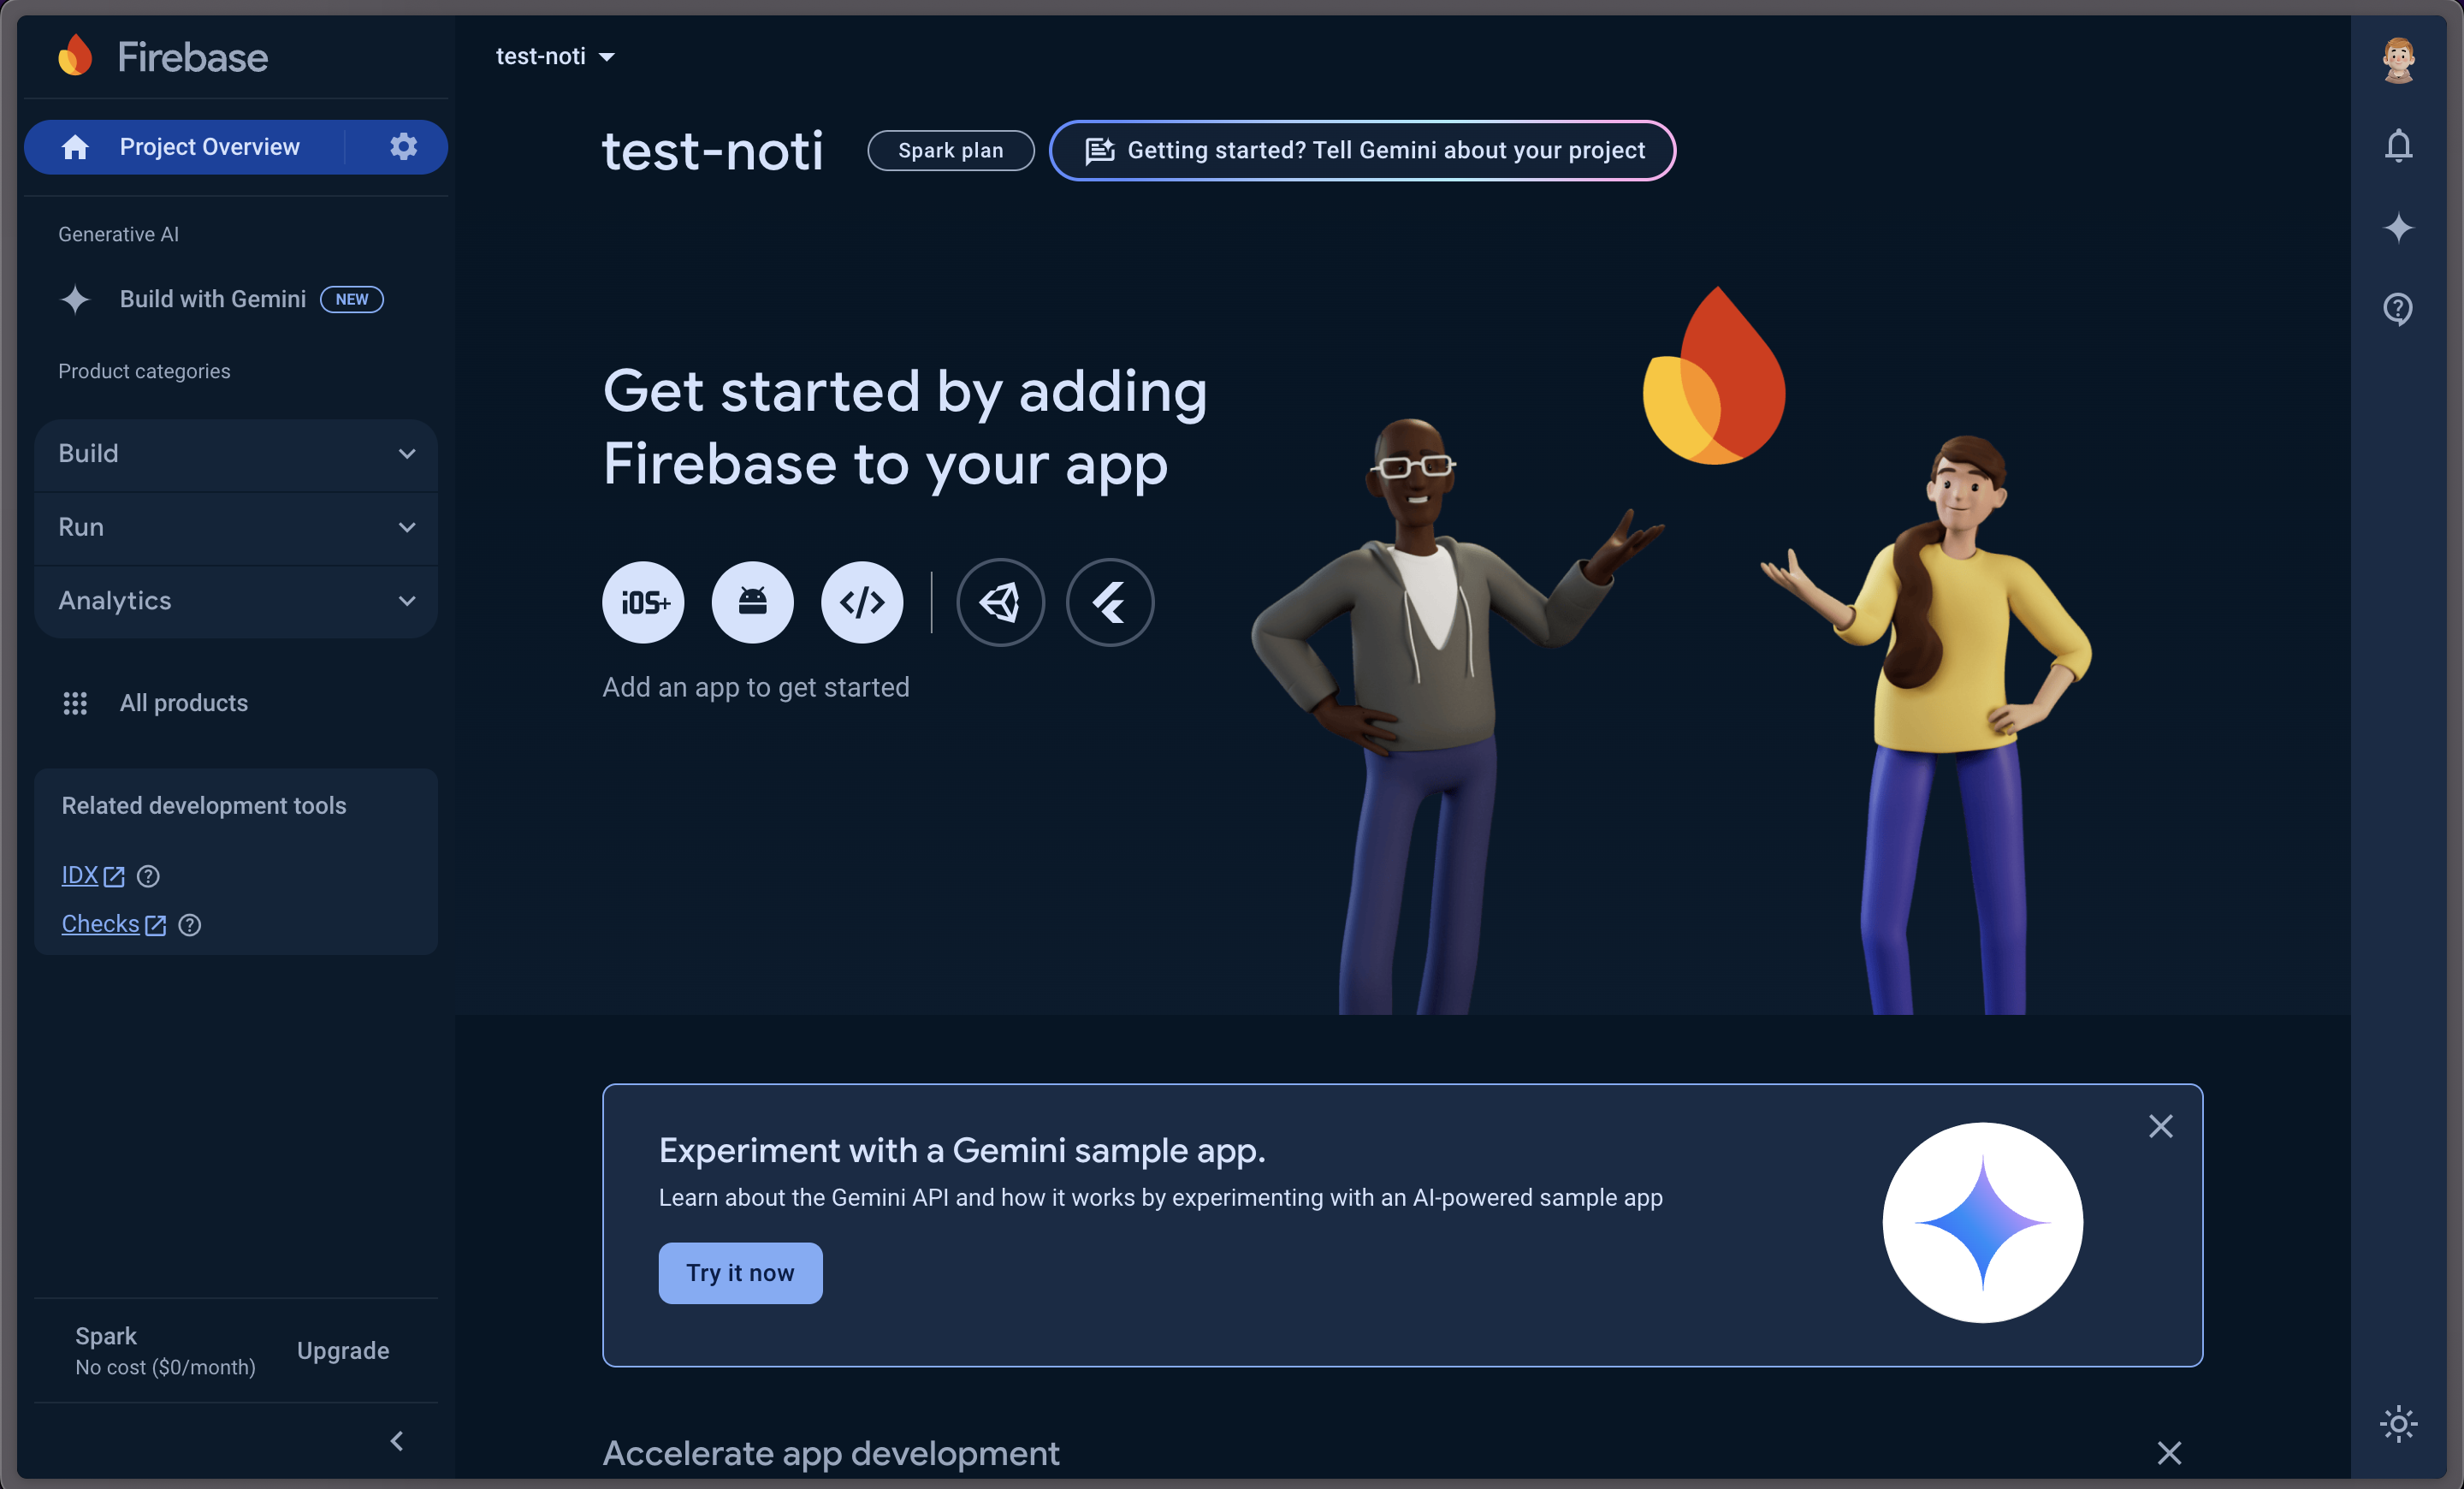
Once the project is created, you should see a screen like this.
Now, Let’s register our Android App, Click on the Android icon, which will open a page.
Enter the package name, but remember this name as we will require this while building our app.
After adding the package name, you can leave optional fields, then you will be prompted to download the google-services.json file. Download this file and keep it, we will need this in the next step where we will build the app.
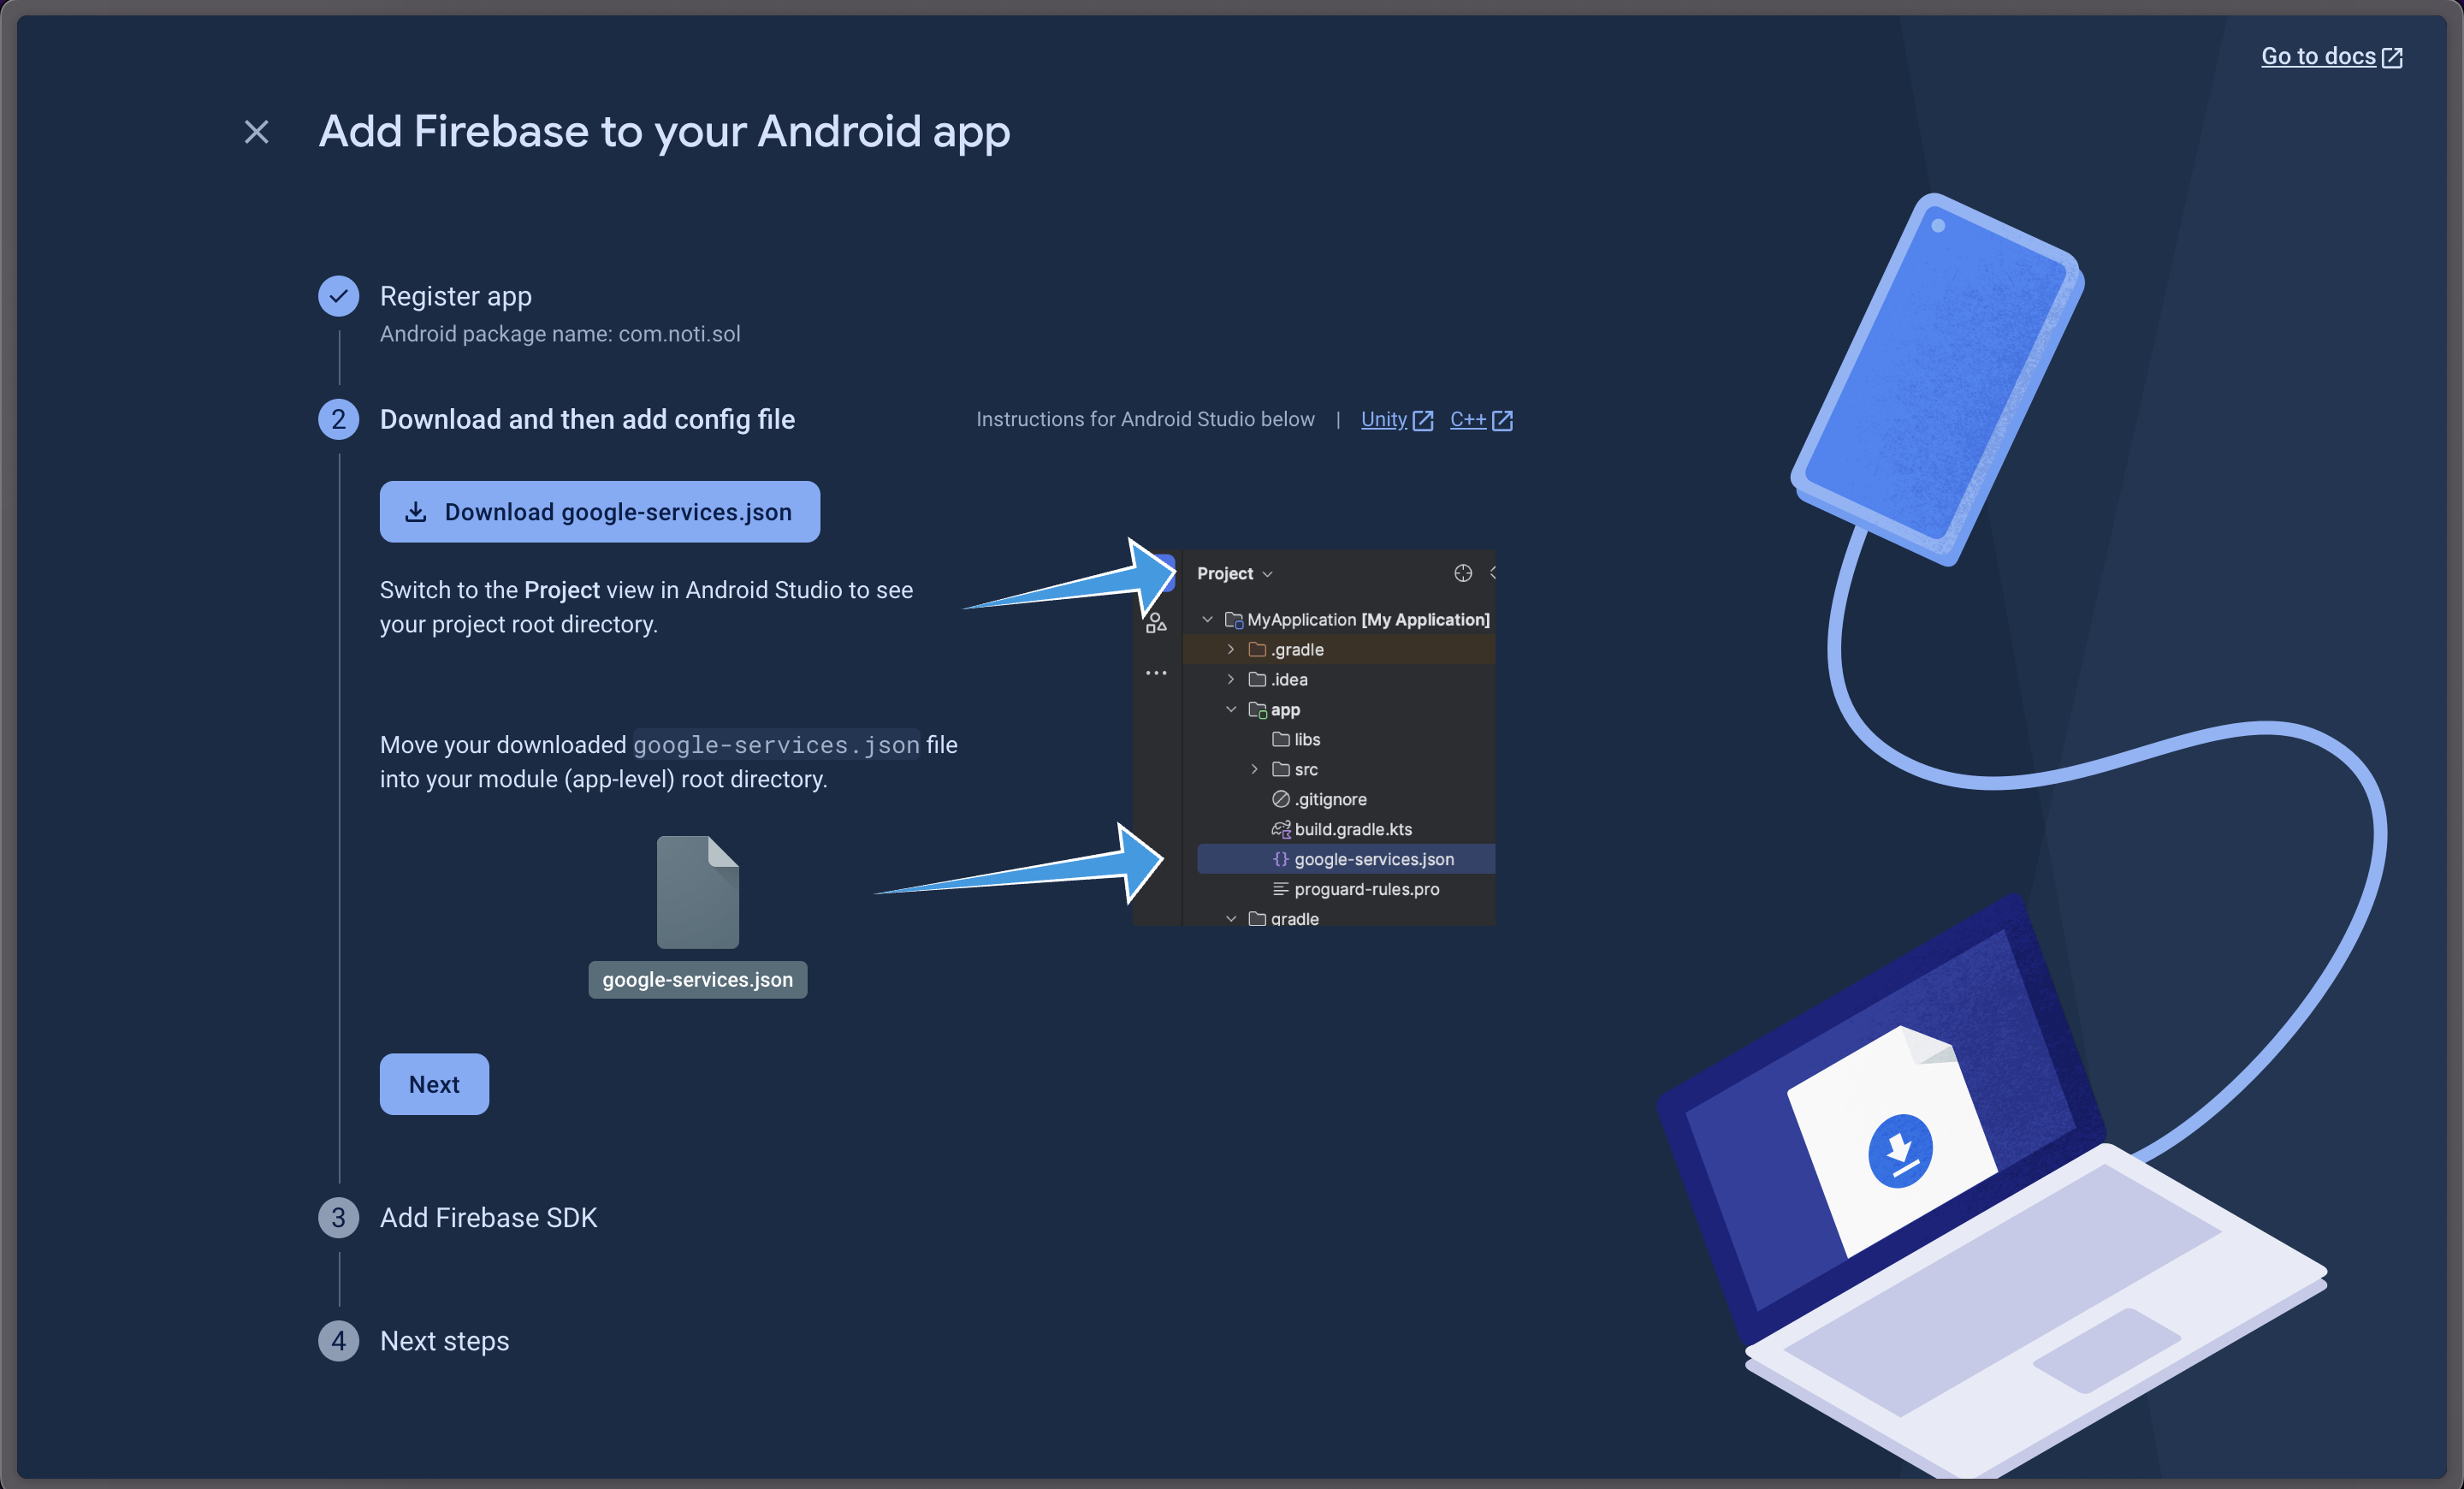
After downloading the file, click on Next and continue, skip Firebase SDK and in the last click go to the console.
Now Click on the Settings icon at top-left, Select project settings, and go to settings
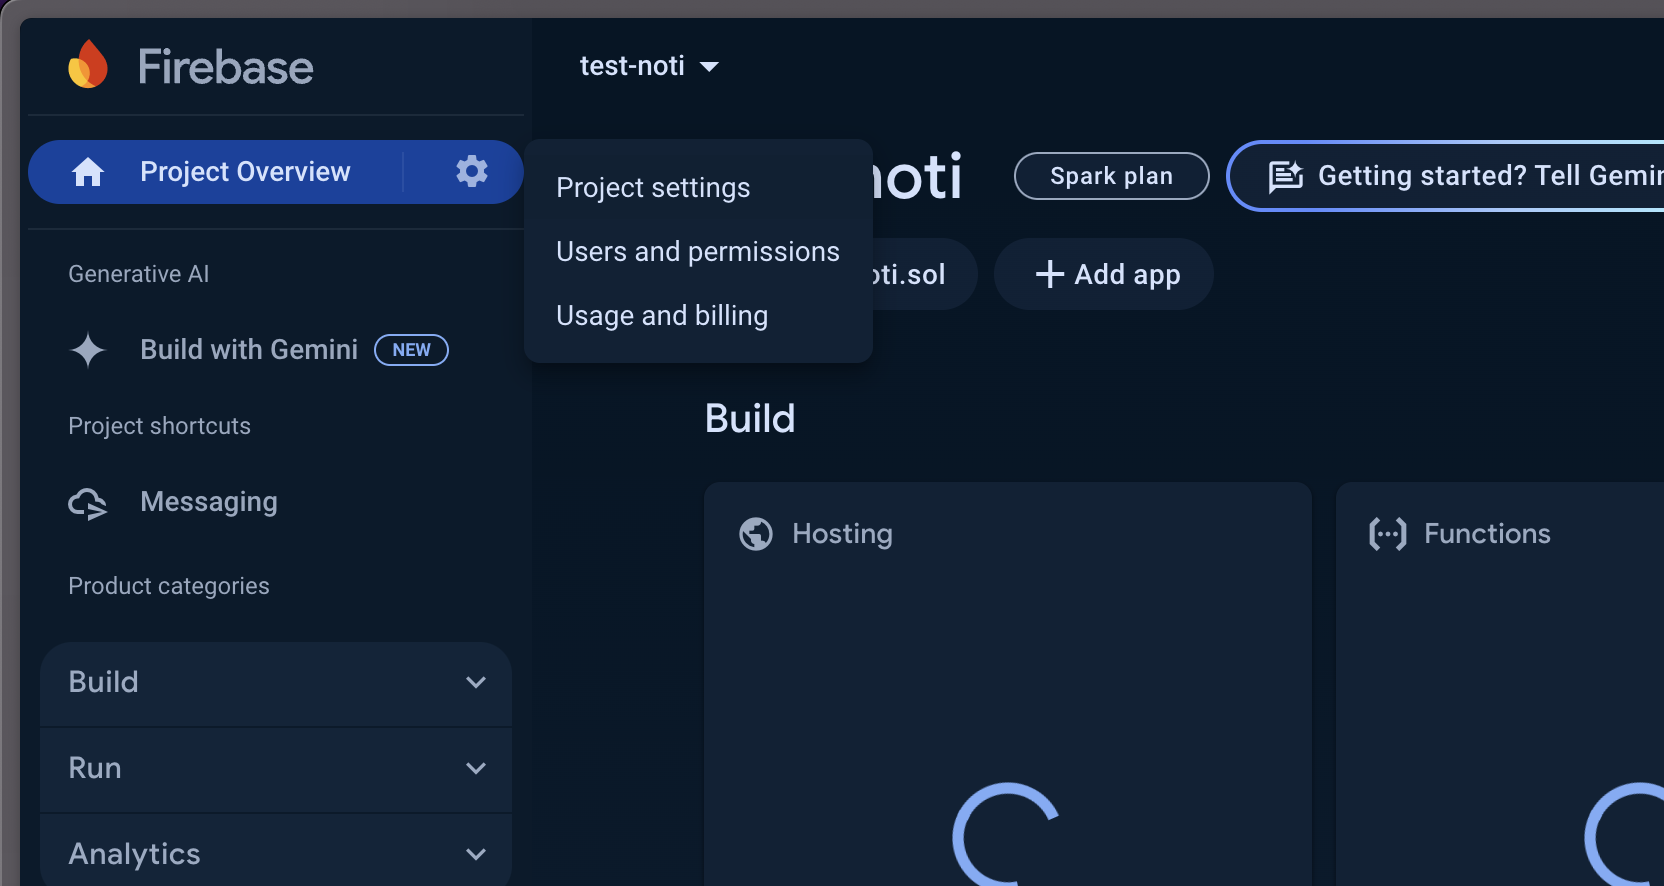
Now Here, Go to the Service account and you will see a screen like this
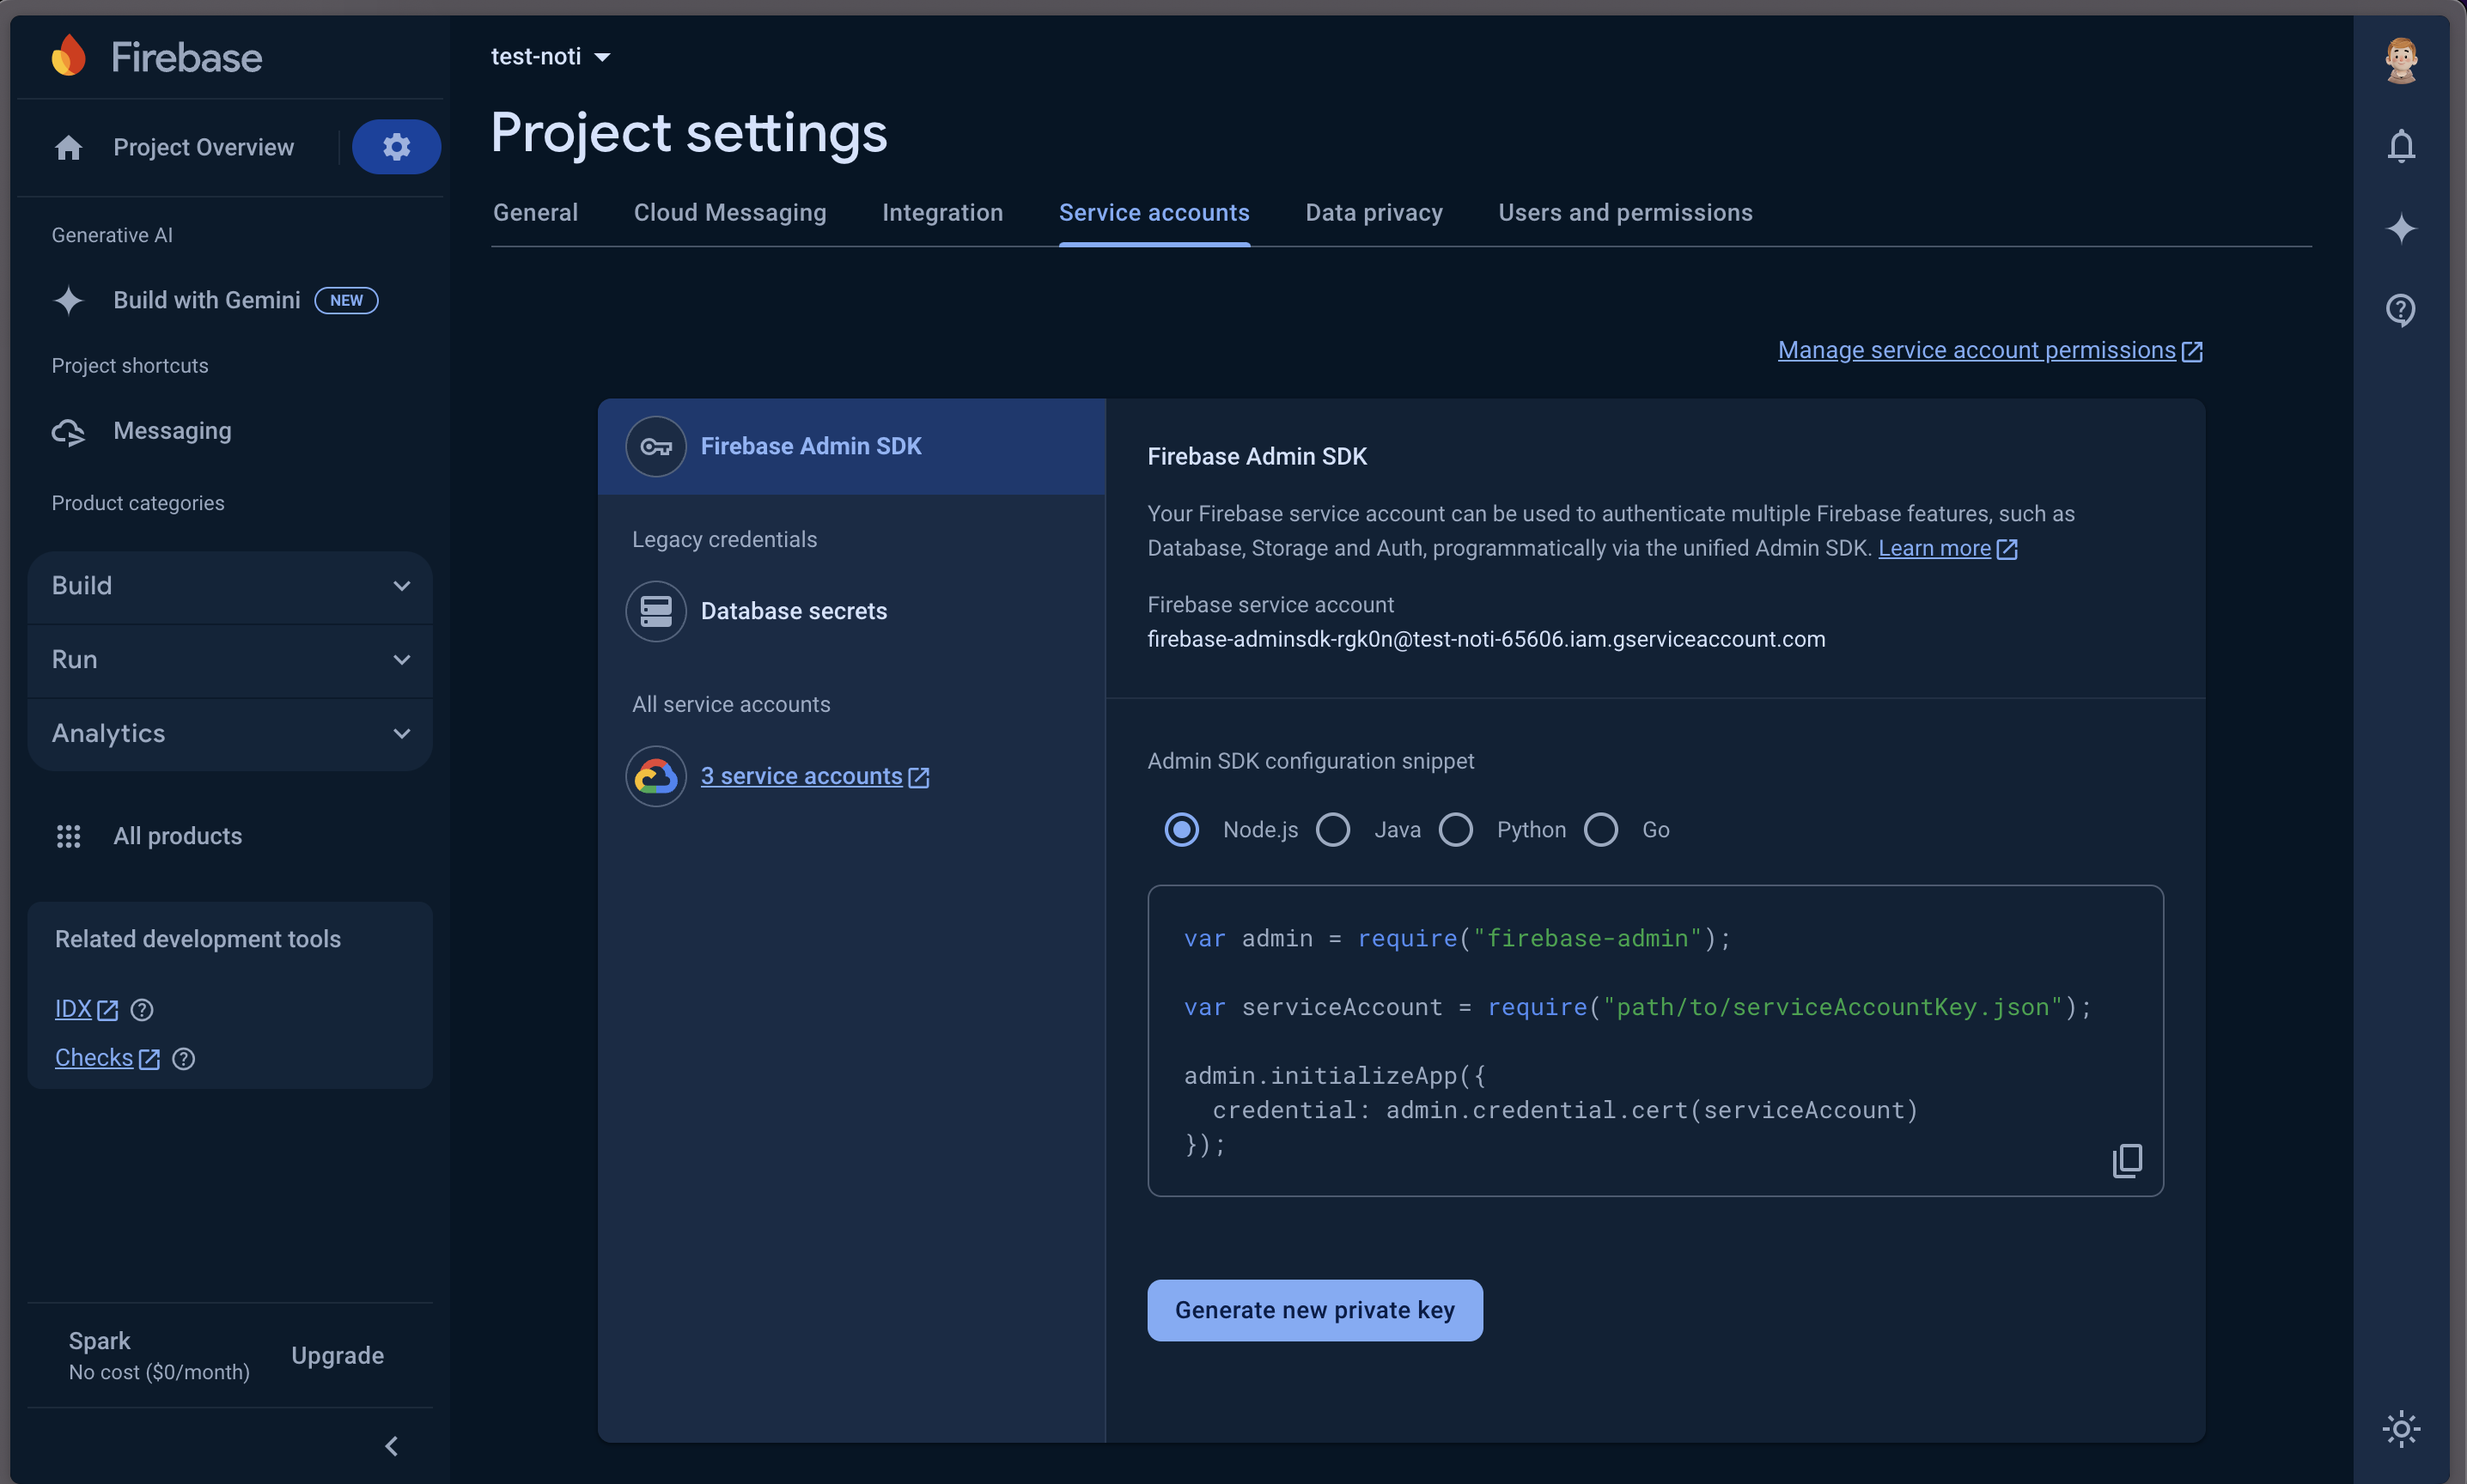
From Here, Select NodeJS and Click on Generate new Private key, it will download a service account.json file, keep this file as we will need it while building our backend file. I am referring to this file as solnoti.json
So At this point, we are done with the Firebase project config.
Make sure you have both google-services.json and solnoti.json file.
Setting up Helius WebHooks.
Visit https://www.helius.dev/ click on start building and create a new account.
Once logged in go to the WebHooks section
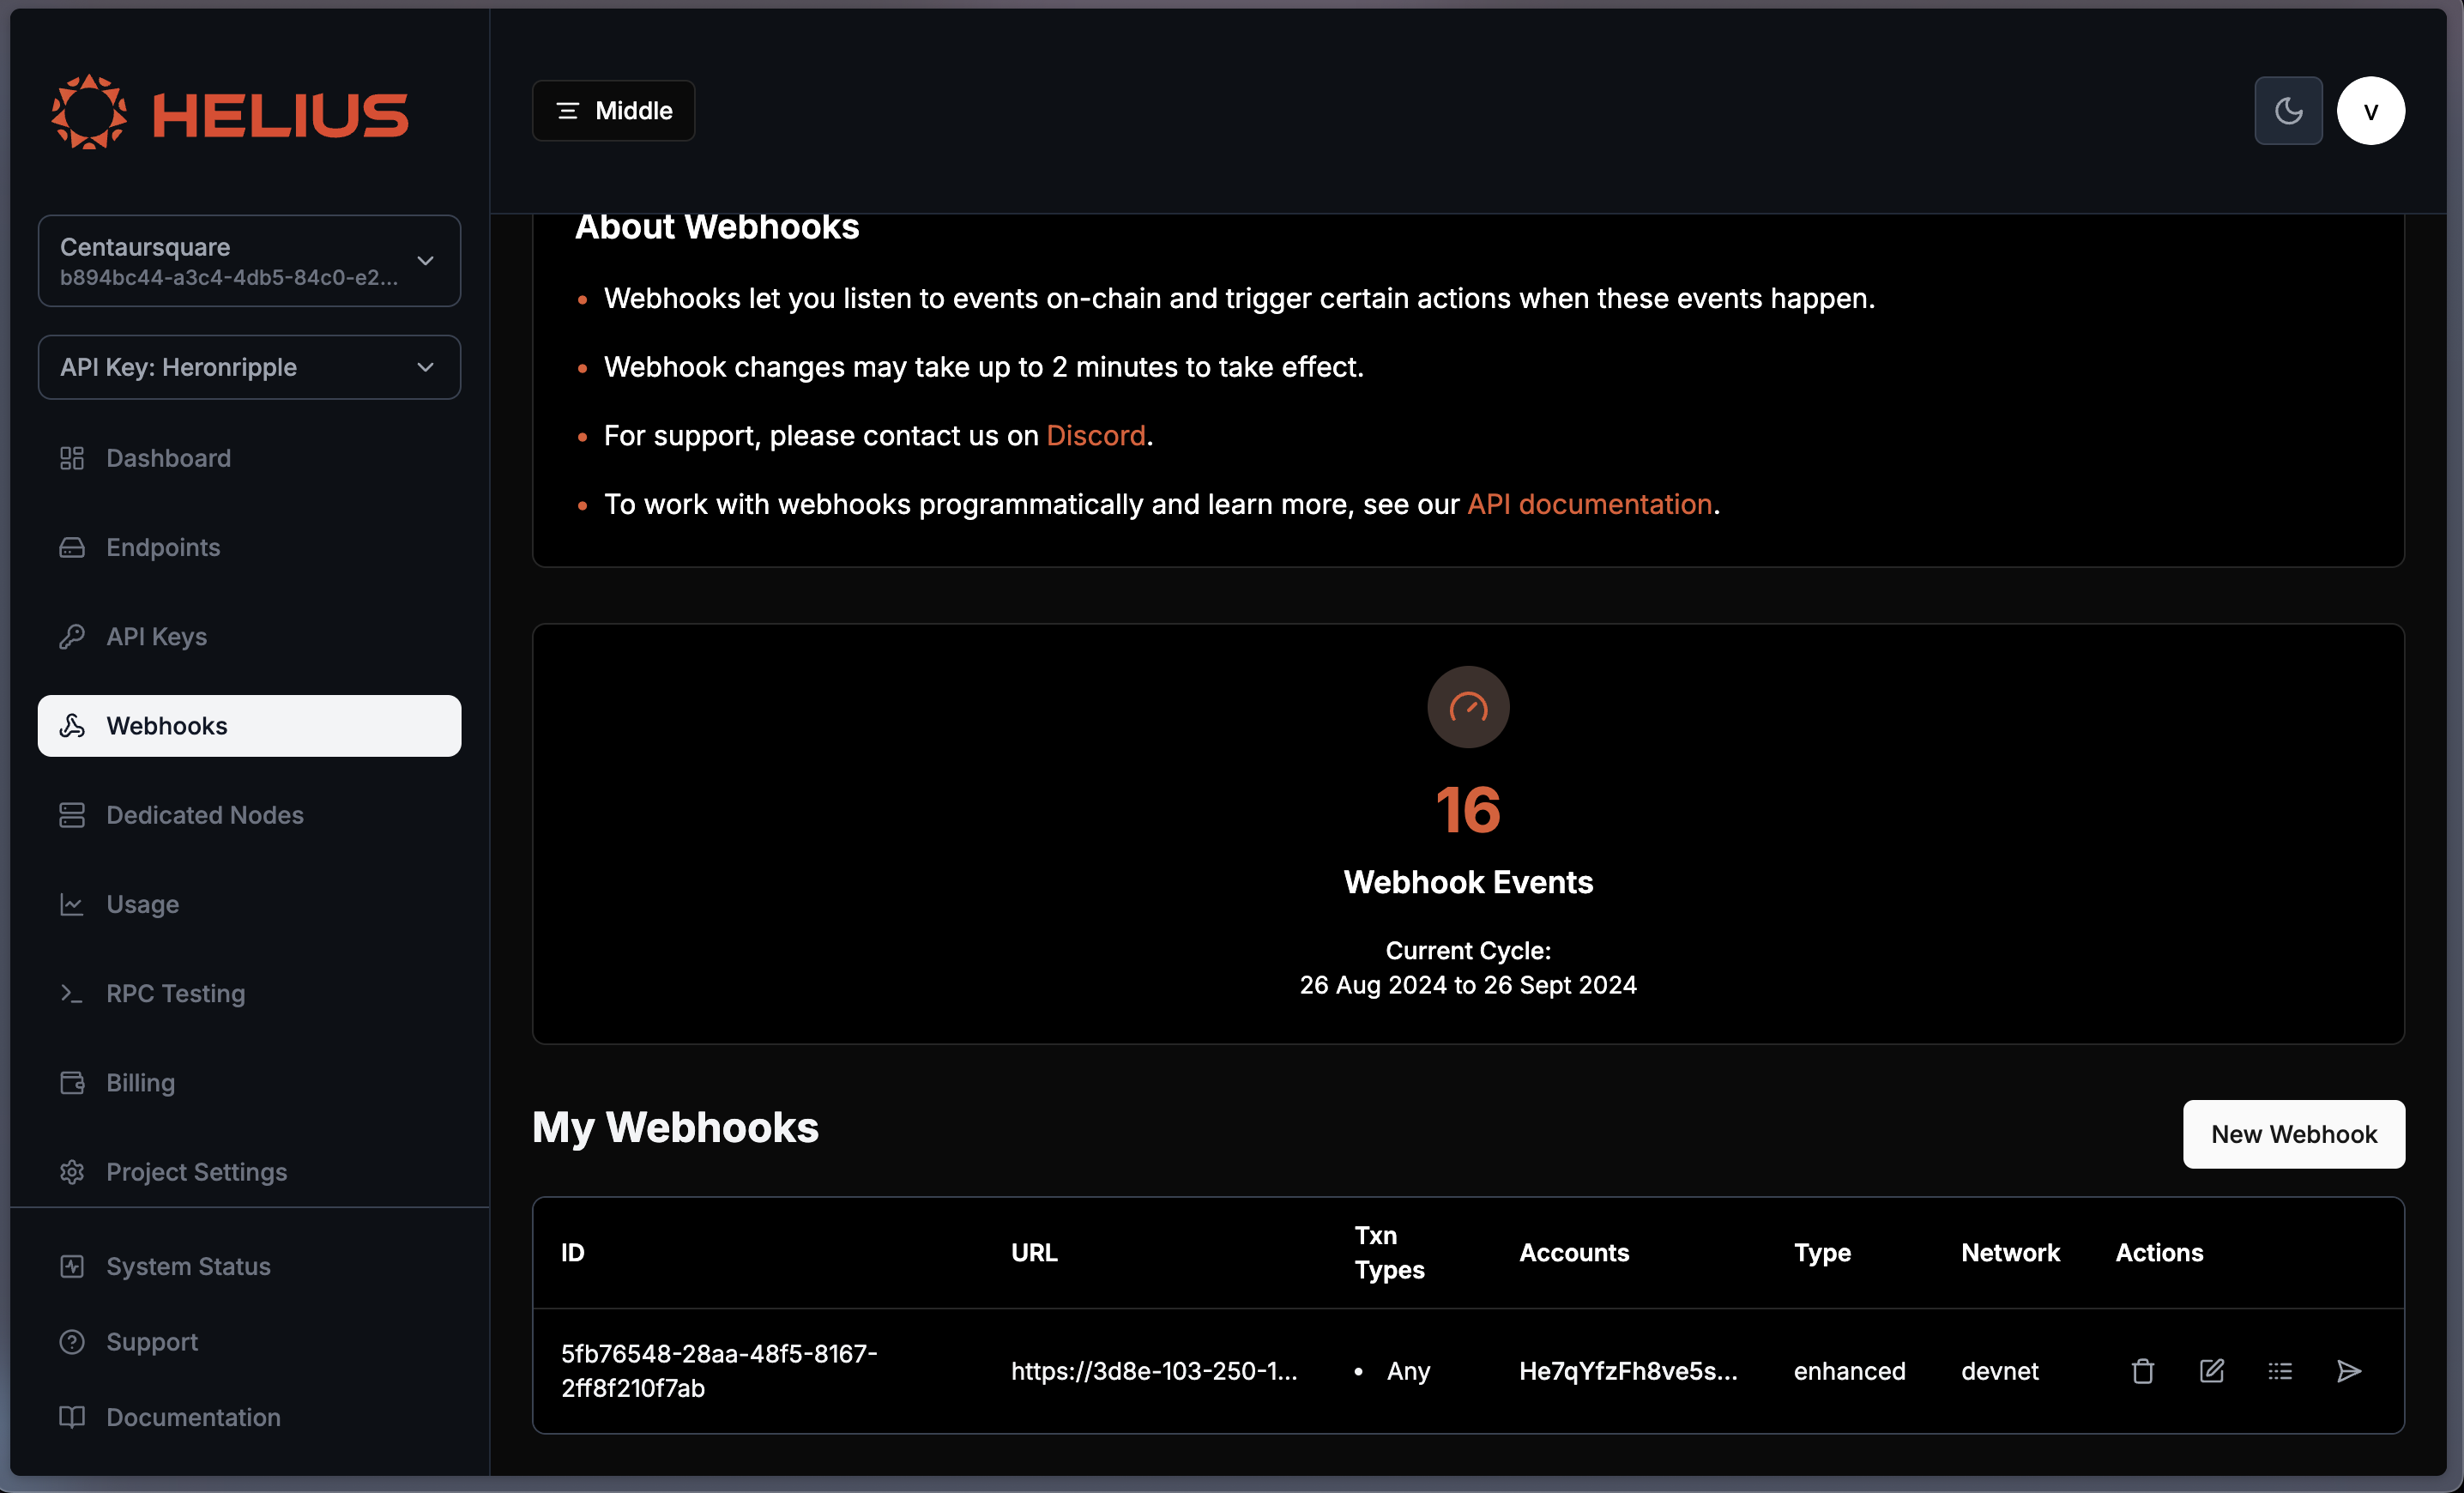
and click on New Webhook.
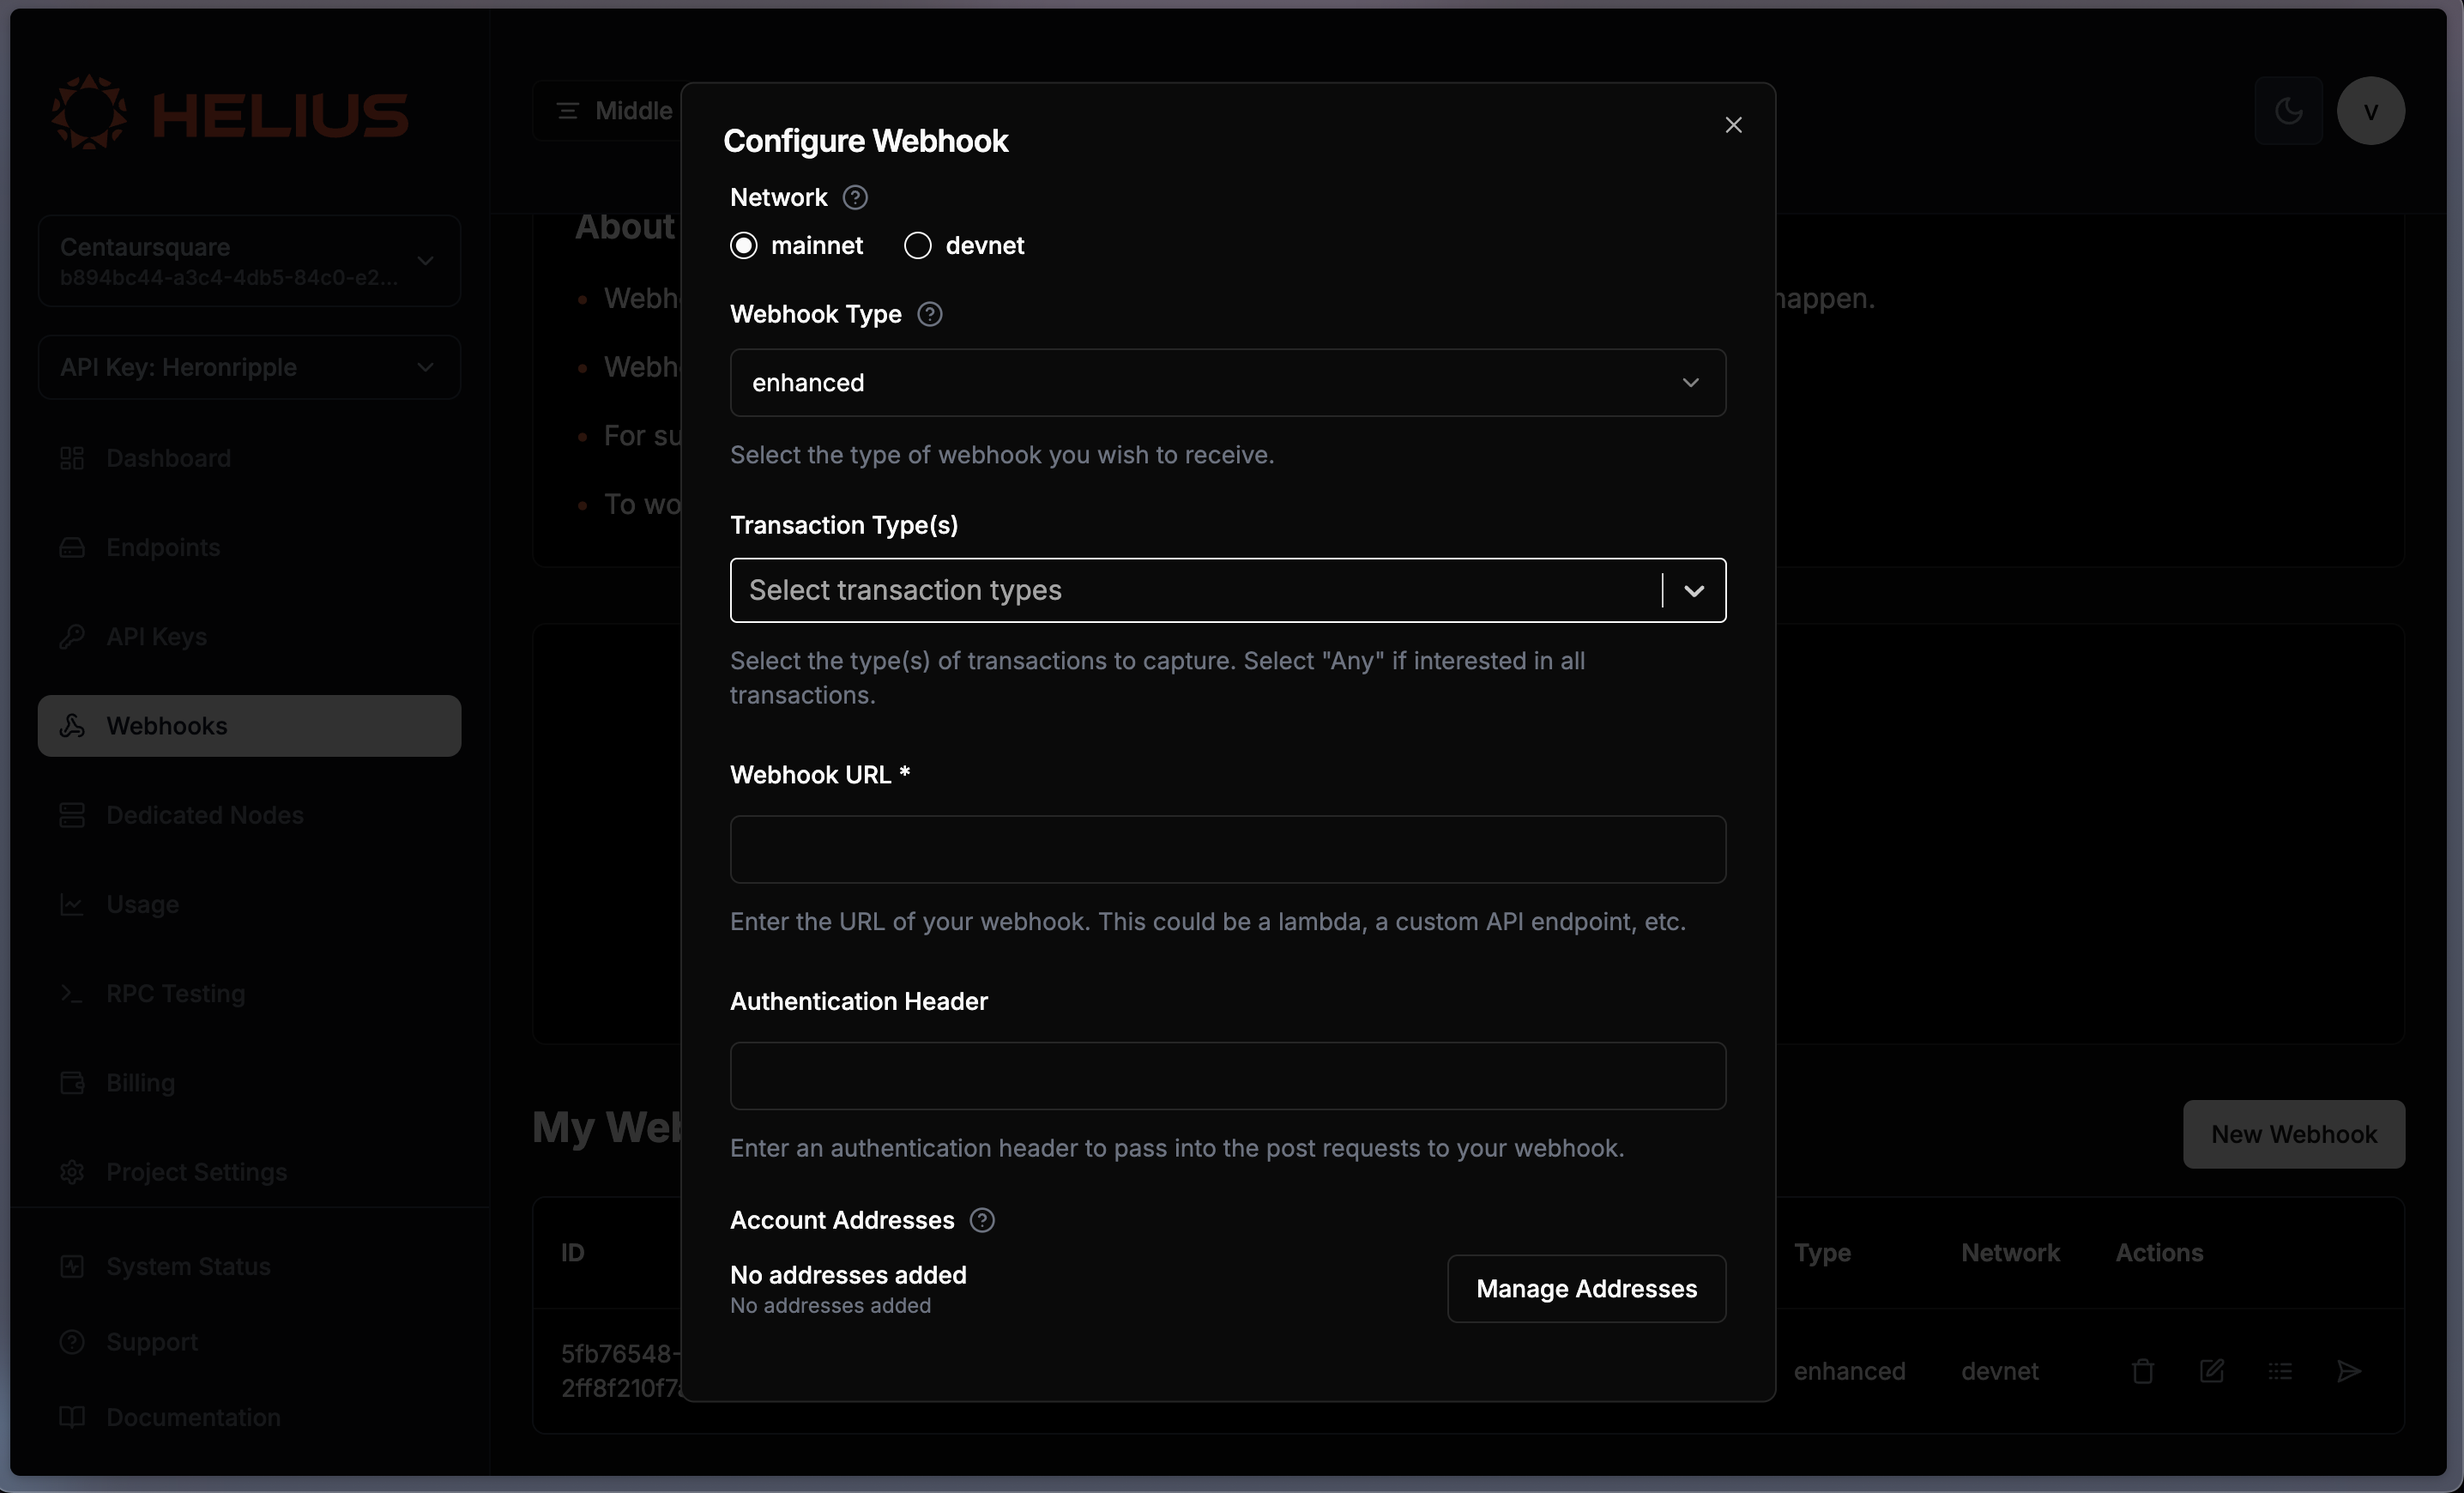
Now fill up the details, As of now we want to set our webhook on devnet,
Select the Webhook type as enhanced so we get the enhanced data, not the raw data. From the Transaction types, Select Any, So it will deliver every transaction to us and later we can decide which transaction to parse and process.
Now the thing you notice is WebHook Url, as our server is running on localhost how do we make a URL for it?
Don’t worry, it’s super easy, We will use the localhost.run to test our backend. (You can also use ngrok)
Now open another terminal and run
ssh -R 80:localhost:3000 nokey@localhost.run
This command establishes an SSH reverse tunnel, forwarding traffic from port 80 on the localhost.run server to port 3000 on your local machine. The -R flag is used to create the reverse tunnel, allowing external users to access your local server running on port 3000 by connecting to localhost.run port 80. The nokey@localhost.run part specifies the remote server (localhost.run) and user (nokey), with no SSH key required for the connection.
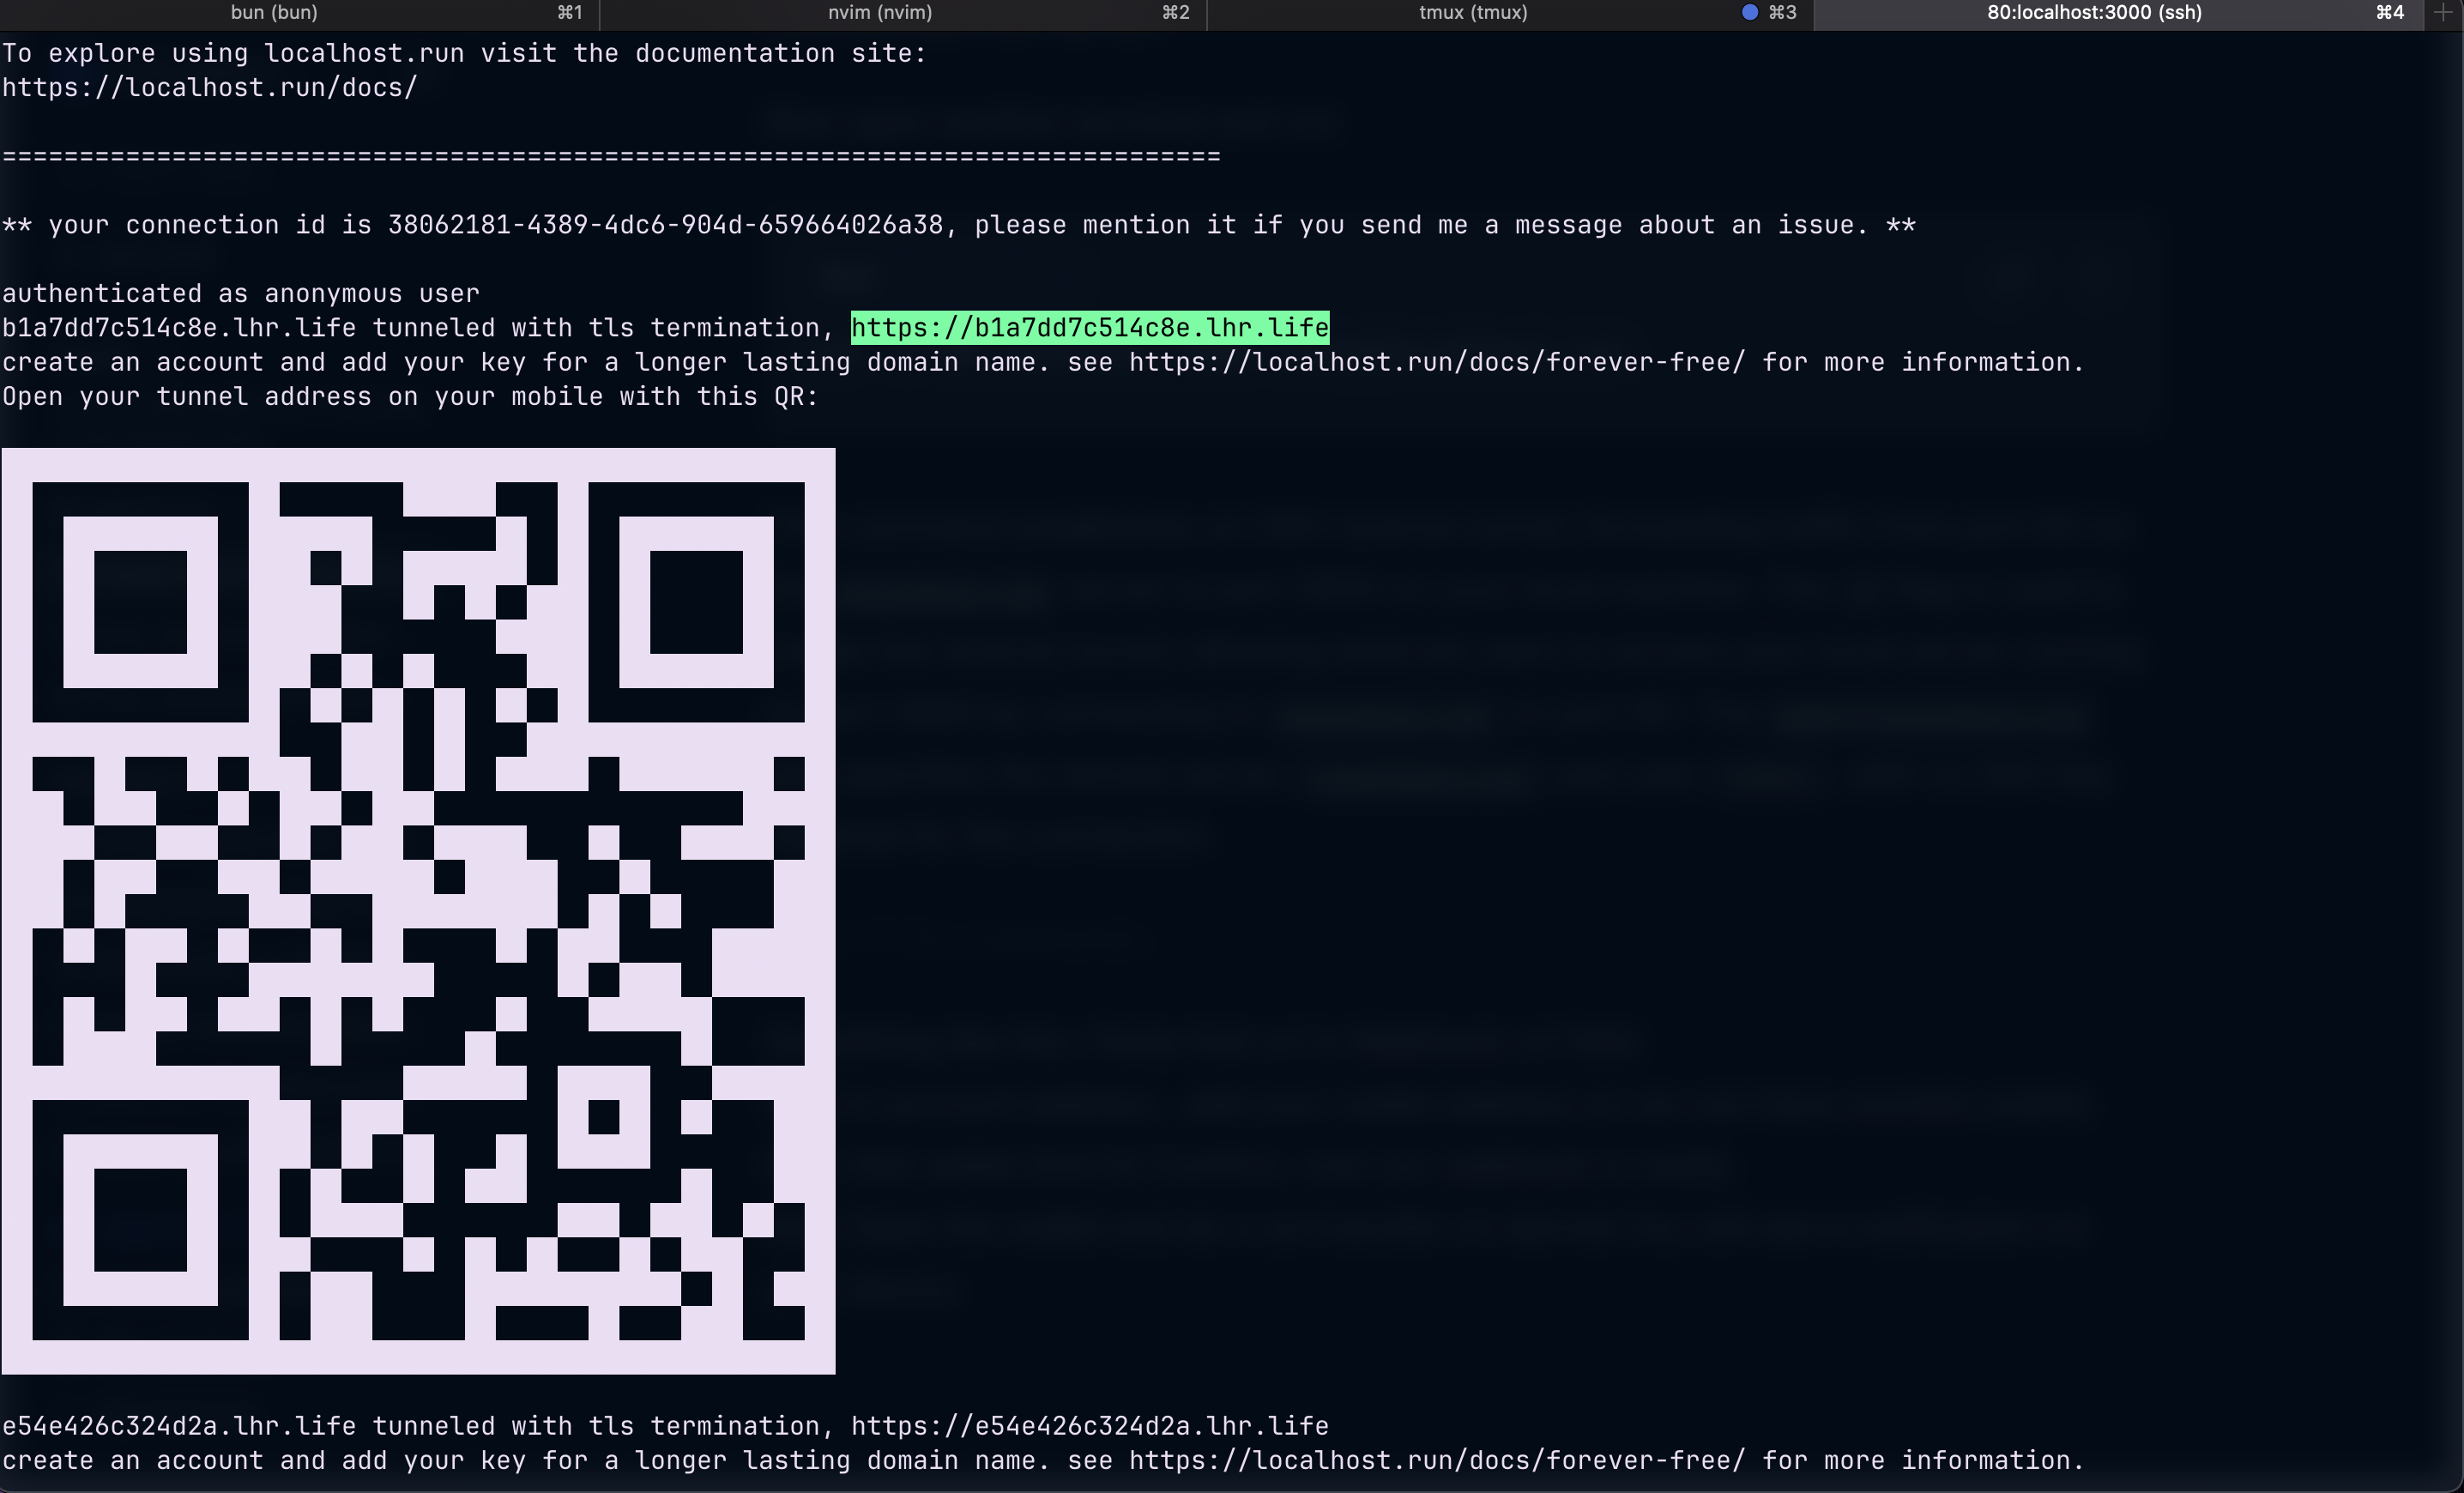
Something is shown above. Copy that URL and paste that URL into the Webhook URL field.
Now in the account address, add your wallet address so we can have onchain events from that wallet. Hit Confirm, and now our webhook is ready.
Keep this URL and Webhook ID as we need them in later steps.
Setting up Backend Server:
Open the terminal and run
mkdir solana-notification-backend
bun init -y .
bun install express body-parser @types/express firebase-admin
This will create a new directory, initialize a new Bun project, and add required dependencies like Express and firebase-admin.
Breakdown of Dependencies:
express: A web framework for Node.js to handle HTTP requests.body-parser: Middleware for parsing incoming request bodies.@types/express: TypeScript definitions for Express.firebase-admin: Firebase Admin SDK for server-side Firebase interactions.
Now, Remember the services-account.json we downloaded, paste it into the project root, and rename it to solnoti.json
Now create a lib folder and inside it create the below files and paste the below code.
firebaseadmin.ts
import admin from "firebase-admin";

import serviceAccount from "../solnoti.json";

admin.initializeApp({
  credential: admin.credential.cert(serviceAccount as never),
});

export default admin;
Explanation:
Imports: The code imports the Firebase Admin SDK and the service account credentials from a JSON file (typically generated from the Firebase console).
Initialization: The
admin.initializeApp()function is called with the service account credentials, allowing the application to authenticate and interact with Firebase services securely.Export: The initialized
admininstance is exported, making it available for use in other parts of the application, such as sending notifications or accessing Firestore.
processNotification.ts
import sendNotification, {
  type SendNotificationOptions,
} from "./sendNotification";
import { getFCMToken } from "../db";

type NativeTransfer = {
  amount: number;
  fromUserAccount: string;
  toUserAccount: string;
};

type ProcessTransferNotificationKey = {
  feePayer: string;
  signature: string;
  amount: number;
  nativeTransfers: NativeTransfer[];
};

export default async function processTransferNotification(
  options: ProcessTransferNotificationKey,
) {
  const transfers = options.nativeTransfers;
  for (const transfer of transfers) {
    await sendTransferNotifications(transfer);
  }
}

async function sendTransferNotifications(
  transfer: NativeTransfer,
): Promise<void> {
  const sendNotificationForSender =
    await buildNotificationMessageForSender(transfer);

  const sendNotificationForReceiver =
    await buildNotificationMessageForReceiver(transfer);

  if (sendNotificationForSender) {
    await sendNotification(sendNotificationForSender);
  }

  if (sendNotificationForReceiver) {
    await sendNotification(sendNotificationForReceiver);
  }
}

async function buildNotificationMessageForSender(
  transfer: NativeTransfer,
): Promise<SendNotificationOptions | null> {
  const sendFromPubKey = transfer.fromUserAccount;
  const fromUserFCMToken = await getFCMToken(sendFromPubKey);

  if (fromUserFCMToken) {
    const amountSent = transfer.amount / 1000000000;
    const to = transfer.toUserAccount;

    return {
      title: `You sent ${amountSent} SOL`,
      fcmToken: fromUserFCMToken,
      image: undefined,
      body: `You successfully sent ${amountSent} SOL to ${to}.`,
    };
  }

  return null;
}

async function buildNotificationMessageForReceiver(
  transfer: NativeTransfer,
): Promise<SendNotificationOptions | null> {
  const sentToPubKey = transfer.toUserAccount;
  const toUserFCMToken = await getFCMToken(sentToPubKey);

  if (toUserFCMToken) {
    const amountReceived = transfer.amount / 1000000000;
    const from = transfer.fromUserAccount;

    return {
      title: `You received ${amountReceived} SOL`,
      fcmToken: toUserFCMToken,
      image: undefined,
      body: `${from} sent you ${amountReceived} SOL.`,
    };
  }

  return null;
}
sendNotification.ts
import admin from "./firebaseadmin";

export type SendNotificationOptions = {
  fcmToken: string;
  title: string;
  body: string;
  image: string | undefined;
};

export default function sendNotification(options: SendNotificationOptions) {
  return admin.messaging().send({
    token: options.fcmToken,
    notification: {
      body: options.body,
      title: options.title,
      imageUrl: options?.image,
    },
  });
}
This function accepts SendNotificationOptions as its parameter and uses the Firebase Admin SDK's messaging().send() method to send a notification to the specified device:
It sets the target device using the
fcmToken.It constructs the notification payload with the provided title, body, and optional image.
addAddressToWebHook.ts
const HELIUS_API_KEY = process.env.HELIUS_API_KEY;
const ADDRESS_LISTENER_WEBHOOK_ID = process.env.WEBHOOK_ID;
const WEBHOOK_POST_URL = "URL_RETRIVED_IN_PREVIOUS_STEP";
if (!ADDRESS_LISTENER_WEBHOOK_ID || !HELIUS_API_KEY) {
  console.log("HELIUS_API_KEY or ADDRESS_LISTENER_WEBHOOK_ID not set");
  process.exit(1);
}
const getWebhookByID = async (webhookId: string) => {
  try {
    const response = await fetch(
      `https://api.helius.xyz/v0/webhooks/${webhookId}?api-key=${HELIUS_API_KEY}`,
      {
        method: "GET",
        headers: {
          "Content-Type": "application/json",
        },
      },
    );
    const data = await response.json();
    return data;
  } catch (e) {
    console.error("error", e);
  }
};
const addAddressToWebHook = async (address: string) => {
  try {
    const existing = await getWebhookByID(ADDRESS_LISTENER_WEBHOOK_ID);
    console.log("existing address", existing.accountAddresses);

    const response = await fetch(
      `https://api.helius.xyz/v0/webhooks/${ADDRESS_LISTENER_WEBHOOK_ID}?api-key=${HELIUS_API_KEY}`,
      {
        method: "PUT",
        headers: {
          "Content-Type": "application/json",
        },
        body: JSON.stringify({
          webhookURL: WEBHOOK_POST_URL,
          webhookType: "enhancedDevnet",
          transactionTypes: ["Any"],
          accountAddresses: [...existing.accountAddresses, address],
        }),
      },
    );
    const data = await response.json();
    console.log("Subscribed :", address);
  } catch (e) {
    throw e;
  }
};

export default addAddressToWebHook;
Breakdown:
Environment Variables:
HELIUS_API_KEYandADDRESS_LISTENER_WEBHOOK_IDare retrieved from the environment variables to be used in API requests.If either of them is not set, the program logs a message and exits.
getWebhookByIDFunction:This function takes
webhookIdas a parameter and fetches webhook details by requesting the Helius API.The response is returned as JSON.
If an error occurs during the request, it catches the error and logs it.
addAddressToWebHookFunction:This function is designed to add a Solana account
addressto an existing webhook.It first fetches the existing webhook using
getWebhookByID, retrieving the current list ofaccountAddresses.The new address is appended to the list of existing addresses.
A
PUTrequest is made to the Helius API to update the webhook with the newaccountAddresseslist.If successful, it logs a message confirming that the address has been subscribed.
If an error occurs, it throws the error.
WEBHOOK_POST_URLPlaceholder:WEBHOOK_POST_URLis currently set as a placeholder string ("URL_RETRIVED_IN_PREVIOUS_STEP") and should be updated with the actual URL where webhook events will be posted.
processWebHook.ts
import type { Request, Response } from "express";
import { storeFCMToken } from "../db";
import processTransferNotification from "../lib/processNotification";

export default async function processWebHook(req: Request, res: Response) {
  const data = req.body;
  if (data?.length > 0 && data[0] && data[0].type === "TRANSFER") {
    console.log("Processing SOl TRANSFER Noti", data);
    processTransferNotification(data[0]);
    console.log("Processed SOl TRANSFER Noti", data);
  }
  res.sendStatus(200);
}
- This is just a route handler for our webhook whenever there is an onchain activity for an address, Helius will deliver the data here by making a POST request.
registerTokenForAddress.ts
import type { Request, Response } from "express";
import { storeFCMToken } from "../db";
import addAddressToWebHook from "../lib/addAddressToWebHook";

export default async function registerTokenForAddress(
  req: Request,
  res: Response,
) {
  try {
    const { address, token } = req.body;

    if (!address || !token) {
      return res.status(400).json({
        error: "Address and token are required",
      });
    }
    await addAddressToWebHook(address);
    await storeFCMToken(address, token);
    res.status(200).json({
      message: "Registered",
    });
  } catch (error: any) {
    console.log(error);
    res.status(500).json({
      error: "Internal server error",
    });
  }
}
This handler registers an address and its associated Firebase Cloud Messaging (FCM) token.
It first extracts the
addressandtokenfrom the request body and check if both are provided. If they are missing, it returns400 Bad Requesterror.If valid, it adds the address to a webhook listener using the
addAddressToWebHookfunction, allowing the system to track transactions related to that address.It then stores the FCM token in the database via
storeFCMToken. If all operations are successful, it responds with a200 OKstatus; otherwise, it catches and logs any errors, returning a500 Internal Server Errorin case of failures.
Now In our root project, Let’s create db.ts a file that will handle our database.
Note that I am here using bun:sqlite as my database, but you can use any of the databases. (Ex Postgres, MongoDB, MySQL)
import { Database } from "bun:sqlite";

const db = new Database("fcm_tokens.db");

db.run(`
  CREATE TABLE IF NOT EXISTS fcm_tokens (
    address TEXT PRIMARY KEY,
    token TEXT NOT NULL,
    created_at DATETIME DEFAULT CURRENT_TIMESTAMP,
    updated_at DATETIME DEFAULT CURRENT_TIMESTAMP
  )
`);

export async function storeFCMToken(
  address: string,
  token: string,
): Promise<void> {
  const query = `
    INSERT INTO fcm_tokens (address, token, updated_at)
    VALUES (?, ?, CURRENT_TIMESTAMP)
    ON CONFLICT(address)
    DO UPDATE SET
      token = excluded.token,
      updated_at = CURRENT_TIMESTAMP
  `;

  db.run(query, [address, token]);
}

export async function getFCMToken(address: string): Promise<string | null> {
  const result = db
    .prepare("SELECT token FROM fcm_tokens WHERE address = ?")
    .get(address) as { token: string } | null;
  return result ? result.token : null;
}
Here, We
Initializes a SQLite database using Bun with a file named
fcm_tokens.db.Creates a table
fcm_tokenswith the following fields:address(Primary key)token(Non-null)created_at(Timestamp, default: current time)updated_at(Timestamp, default: current time)
storeFCMTokenfunction:Inserts or updates an FCM token for a given
address.If the
addressalready exists, it updates thetokenandupdated_attimestamp.
getFCMTokenfunction:Fetches the FCM token for a given
addressfrom the database.Returns the token or
nullif not found.
Now inside index.ts paste below code
import type { Request, Response } from "express";
import bodyParser from "body-parser";
import express from "express";
import admin from "./lib/firebaseadmin";
import registerTokenForAddress from "./routes/registerTokenForAddress";
import processWebHook from "./routes/processWebhook";

const app = express();

const PORT = 8080;

app.use(express.json());

app.post("/", processWebHook);

app.post("/registerTokenForAddress", registerTokenForAddress);

app.listen(PORT, () => {
  console.log(`Notification Server is running on port ${PORT}`);
});
Breakdown of the Code:
Imports necessary modules:
express,body-parser, and custom modulesfirebaseadmin,registerTokenForAddress, andprocessWebHook.Initializes an Express application (
app) with the server running on port8080.Uses
express.json()middleware to parse incoming JSON payloads.Defines two POST routes:
"/": Handles webhook events viaprocessWebHook."/registerTokenForAddress": Registers an FCM token for a blockchain address usingregisterTokenForAddress.
Starts the server and logs a message indicating it's running on the specified port (
8080).
So, At this point our backend server is ready, Now we have to register our backend service to Helius webhooks so It can deliver the onchain events to us. Let’s do it.
Now, Just Open a terminal and run.
bun run --watch ./index.ts
This will start our backend server on port 8080
Building Mobile App
Open your terminal and run the below command.
npx create-expo-app solnoti
It will create a new fresh expo app. Now open the project with your code editor.
Open the terminal and run the below command.
npm install @react-native-firebase/app @react-native-firebase/messaging
This will install Firebase for react native which we will use to setup native push notifications
Now just paste the google-services.json file in the project root.
Now open app.json and add the below code inside android field
    "android": {
      "adaptiveIcon": {
        "foregroundImage": "./assets/images/adaptive-icon.png",
        "backgroundColor": "#ffffff"
      },
      "googleServicesFile": "./google-services.json",
      "package": "com.buildtest.solnoti"
    },
Here, Replace the package name with your name which you entered in the Firebase config step.
Now inside the plugins field, paste the below content:
    "plugins": [
      "expo-router",
      "@react-native-firebase/app"
    ],
This will set up the native config for us so we don’t have to deal with complex configs.
Now open the app/(tabs)/index.tsx file.
Inside it, paste the below code.
import React, { useState } from 'react';
import {
  StyleSheet,
  View,
  Text,
  TextInput,
  TouchableOpacity,
  PermissionsAndroid,
  ActivityIndicator,
  Alert,
} from 'react-native';
import messaging from "@react-native-firebase/messaging";
import { LinearGradient } from 'expo-linear-gradient';

const COLORS = {
  primary: '#9945FF',
  secondary: '#14F195',
  background: '#121212',
  cardBg: '#1C1C1C',
  text: '#FFFFFF',
  textSecondary: '#A1A1A1',
  error: '#FF6B6B',
};

async function getFCMTokenFromFirebase() {
  try {
    await messaging().requestPermission();
    await messaging().registerDeviceForRemoteMessages();
    const notificationToken = await messaging().getToken();
    console.log("Token", notificationToken);
    return notificationToken;
  } catch (error) {
    throw new Error("Failed to get token");
  }
}

async function registerTokenWithAddress(address: string, token: string) {
  try {
//Here, you have to update the URL with your Backend Server URL.
    const response = await fetch('<http://192.168.1.4:8080/registerTokenForAddress', {
      method: 'POST',
      headers: {
        'Content-Type': 'application/json',
      },
      body: JSON.stringify({ address, token }),
    });

    if (!response.ok) throw new Error('Registration failed');
    return await response.json();
  } catch (error) {
    console.log(error)
    throw new Error('Failed to register token');
  }
}

export default function HomeScreen() {
  const [address, setAddress] = useState('');
  const [loading, setLoading] = useState(false);
  const [registered, setRegistered] = useState(false);
  const [token, setToken] = useState('');

  const requestPermission = async () => {
    try {
      const granted = await PermissionsAndroid.request(
        PermissionsAndroid.PERMISSIONS.POST_NOTIFICATIONS
      );
      if (granted === PermissionsAndroid.RESULTS.GRANTED) {
        Alert.alert('Success', 'Notification permissions granted!');
      }
    } catch (error) {
      Alert.alert('Error', 'Failed to request permission');
    }
  };

  const handleRegistration = async () => {
    if (!address) {
      Alert.alert('Error', 'Please enter a valid address');
      return;
    }

    setLoading(true);
    try {
      const fcmToken = await getFCMTokenFromFirebase();
      await registerTokenWithAddress(address, fcmToken);
      setToken(fcmToken);
      setRegistered(true);
      Alert.alert('Success', 'Successfully registered for notifications!');
    } catch (error) {
      Alert.alert('Error', 'Failed to register token');
    } finally {
      setLoading(false);
    }
  };

  return (
    <LinearGradient
      colors={[COLORS.background, '#2C1F4A']}
      style={styles.container}
      start={{ x: 0, y: 0 }}
      end={{ x: 1, y: 1 }}
    >
      <View style={styles.card}>
        <Text style={styles.title}>Notification Registration</Text>

        <View style={styles.inputContainer}>
          <Text style={styles.label}>Wallet Address</Text>
          <TextInput
            style={styles.input}
            placeholder="Enter your address"
            placeholderTextColor={COLORS.textSecondary}
            value={address}
            onChangeText={setAddress}
          />
        </View>

        <TouchableOpacity
          style={styles.permissionButton}
          onPress={requestPermission}
        >
          <LinearGradient
            colors={[COLORS.secondary + '20', COLORS.secondary + '40']}
            style={styles.buttonGradient}
            start={{ x: 0, y: 0 }}
            end={{ x: 1, y: 0 }}
          >
            <Text style={styles.buttonText}>Enable Notifications</Text>
          </LinearGradient>
        </TouchableOpacity>

        <TouchableOpacity
          style={[styles.registerButton, loading && styles.disabledButton]}
          onPress={handleRegistration}
          disabled={loading}
        >
          <LinearGradient
            colors={[COLORS.primary, '#7B2FFF']}
            style={styles.buttonGradient}
            start={{ x: 0, y: 0 }}
            end={{ x: 1, y: 0 }}
          >
            {loading ? (
              <ActivityIndicator color={COLORS.text} />
            ) : (
              <Text style={styles.buttonText}>Register Device</Text>
            )}
          </LinearGradient>
        </TouchableOpacity>

        {registered && (
          <View style={styles.successContainer}>
            <Text style={styles.successText}>🎉 Successfully Registered!</Text>
          </View>
        )}
      </View>
    </LinearGradient>
  );
}

const styles = StyleSheet.create({
  container: {
    flex: 1,
    padding: 16,
  },
  card: {
    backgroundColor: COLORS.cardBg,
    borderRadius: 20,
    padding: 24,
    marginTop: 40,
    shadowColor: COLORS.primary,
    shadowOffset: {
      width: 0,
      height: 4,
    },
    shadowOpacity: 0.3,
    shadowRadius: 8,
    elevation: 5,
  },
  title: {
    fontSize: 24,
    fontWeight: 'bold',
    color: COLORS.text,
    marginBottom: 24,
    textAlign: 'center',
  },
  inputContainer: {
    marginBottom: 20,
  },
  label: {
    color: COLORS.textSecondary,
    marginBottom: 8,
    fontSize: 16,
  },
  input: {
    backgroundColor: '#2A2A2A',
    borderRadius: 12,
    padding: 16,
    color: COLORS.text,
    fontSize: 16,
    borderWidth: 1,
    borderColor: COLORS.primary + '40',
  },
  permissionButton: {
    borderRadius: 12,
    marginBottom: 16,
    overflow: 'hidden',
  },
  registerButton: {
    borderRadius: 12,
    overflow: 'hidden',
  },
  buttonGradient: {
    padding: 16,
    alignItems: 'center',
  },
  disabledButton: {
    opacity: 0.6,
  },
  buttonText: {
    color: COLORS.text,
    fontSize: 16,
    fontWeight: '600',
  },
  successContainer: {
    marginTop: 24,
    alignItems: 'center',
  },
  successText: {
    color: COLORS.secondary,
    fontSize: 18,
    fontWeight: '600',
    marginBottom: 8,
  },
  tokenText: {
    color: COLORS.textSecondary,
    fontSize: 14,
    paddingHorizontal: 20,
  },
});
Code Walkthrough:
State Management: First we define necessary states, like
address: Stores the user's wallet address input.loading: Tracks the loading state during registration.registered: A boolean to indicate if registration is successful.token: Stores the generated FCM (Firebase Cloud Messaging) token after registration.
Permissions:
- The
requestPermissionfunction requests the user for permission to send notifications using Android'sPermissionsAndroid. If granted, an alert shows success.
- The
FCM Token Retrieval:
The
getFCMTokenFromFirebaseFunction uses Firebase Messaging to request permission, register the device for remote notifications, and retrieve the FCM token.This token is necessary for sending push notifications to the device.
Backend Registration:
The
registerTokenWithAddressfunction sends the user's address and the FCM token to the backend server (provided as a URL), which stores this information.It uses
fetchto send aPOSTrequest with the wallet address and token in the body.
Handle Registration:
The
handleRegistrationfunction combines these tasks:It validates the user input (wallet address).
It calls
getFCMTokenFromFirebaseto retrieve the FCM token.It sends the wallet address and token to the backend using.
registerTokenWithAddress.It displays appropriate success or error alerts based on the result.
User Feedback:
Displays a loading spinner while the registration process is ongoing.
Shows a success message and registered state once the registration is complete.
So our app is set now. Let’s run it and grab a token to test. Run the below command in your terminal.
npx expo run:android
This will build our app and make sure you connect your physical device, as the FCM doesn’t work in emulators.
Once the app is built, it will open the app on your device.
The app will look like this.
First, click on enable notifications. It will prompt for permission to send notifications, allow it.
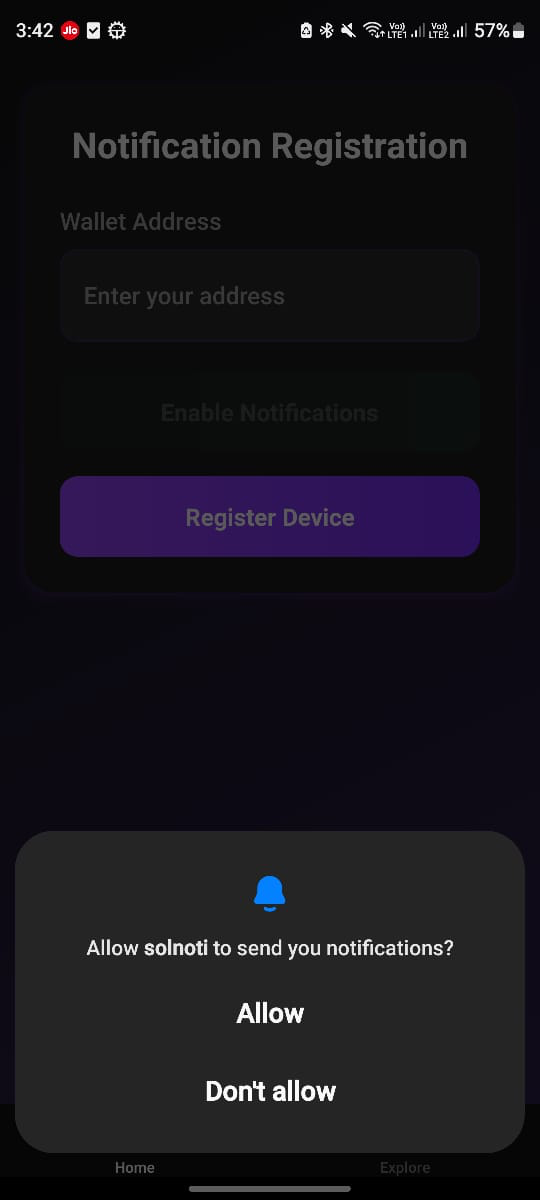
So now, Our app has notification permissions set.
Now, Go to the app, Paste a Wallet address that you want to watch, and hit register, you should see registration is successful.
Now Open the wallet and do a SOL transfer from or to the address you added on devnet. You will see a notification on your device.
See I got the notification as soon as I did the transaction.
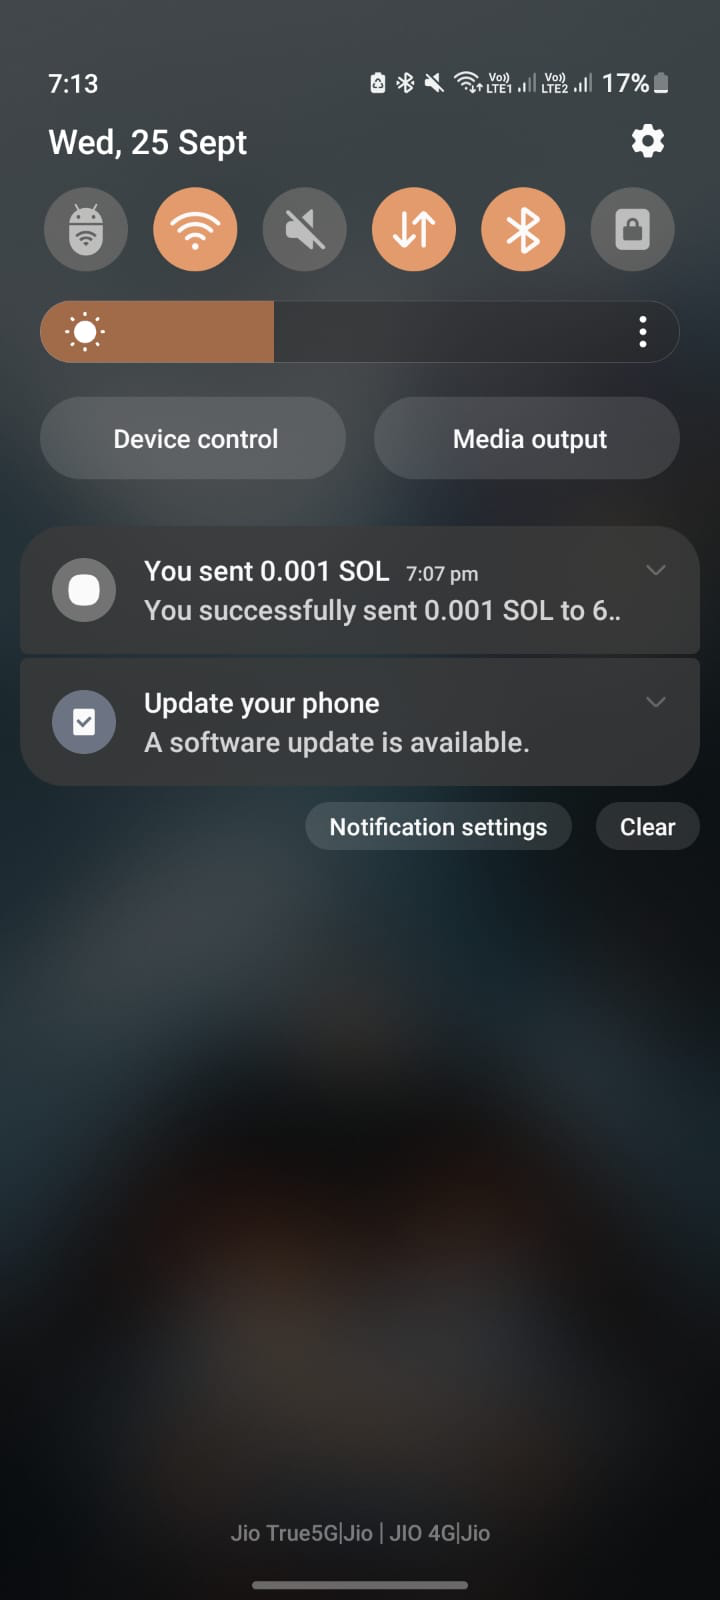
At this point, our notification server is up and running, processing notifications for SOL transfers. But the functionality is not limited to this. You can easily extend the server to handle various other on-chain activities, such as SPL token transfers, NFT sales, or even arbitrary transactions. All you need to do is parse the transaction, extract the necessary data, and send notifications to the appropriate user’s device based on their FCM token.
Extending Beyond SOL Transfers:
SPL Transfers: Capture token-specific transfers and notify users when they receive or send SPL tokens.
NFT Sales: Notify users about successful NFT sales, new listings, or bids on their assets.
Arbitrary Transactions: Process any kind of transaction on the Solana, extract relevant details, and push real-time notifications.
By parsing the transactions and extracting the relevant data, you can tailor notifications to fit different use cases, ensuring users are always informed and engaged.
Real-World Token Management:
For this demo, we used a basic sqlite db to simplify the implementation. However, in a real-world scenario, you wouldn’t use a static FCM token for each user. Instead, you need to:
Set Up a Database: Create a database to store the FCM tokens for all users. Each user’s device token should be saved and updated whenever a new token is generated (e.g. when the user reinstalls the app).
Fetch Tokens from Database: Modify your
getFCMTokenfunction to query the database and retrieve the correct FCM token for each user before sending notifications.Caching for Performance: Implement a caching layer to reduce database lookups and speed up token retrieval. This is especially important when handling large-scale notifications, ensuring faster responses and better performance.
Also, this demo is mainly focused on Android, but don’t worry, the iOS config is also the same you have to download one extra file for Apple, add it to the iOS config, and build the app, adding a few lines in the backend and you will have it working.
Conclusion
By now, you should have a solid understanding of how to set up event listeners for on-chain Solana events and engage users with real-time notifications. The tools and techniques discussed here empower you to keep your users informed and excited about the latest on-chain activities. So, what are you waiting for? Go build the next disruptive dApp that will onboard the next million users into Web3 and ultimately bring billions to the decentralized future.
If you get stuck at any point or need more advanced content on Solana X Mobile Development, feel free to reach out!
Let's Connect
By sharing this blog, you're not only helping others discover valuable insights but also contributing to building a supportive community of learners and developers. Plus, you never know who might benefit from the information shared here, just like I did many times. If you find this helpful, leave a reaction to encourage more knowledge-sharing!
Here are my socials in case you'd like to connect with me :
Twitter: @theviveksuthar
GitHub: Vivek Suthar
Portfolio: devvivek.tech
Thank you for being part of this journey. Until next time, keep coding, keep debugging, and keep building amazing things!
You can find the code here:
Backend: https://github.com/VIVEK-SUTHAR/solana-notification-backend
App: https://github.com/VIVEK-SUTHAR/solana-notifications-app
Subscribe to my newsletter
Read articles from Vivek Suthar directly inside your inbox. Subscribe to the newsletter, and don't miss out.
Written by

Vivek Suthar
Vivek Suthar
React Native Developer