AWS Route 53 Alias vs CNAME Records
 Maxat Akbanov
A CNAME (Canonical Name) record is a type of DNS record used to alias one domain name to another. When a DNS resolver encounters a CNAME record, it will replace the original domain with the target domain and make a new DNS query for the target.
For example, suppose blog.example.com has a CNAME record with a value of "example.com" (without the "blog"). This means when a DNS server hits the DNS records for blog.example.com, it actually triggers another DNS lookup to example.com, returning example.com’s IP address via its A record. In this case we would say that example.com is the canonical name (or true name) of blog.example.com.

Characteristics of CNAME:
Aliases one domain to another domain: The domain with the CNAME will inherit all records (e.g., A, MX, etc.) from the target domain.
Common Use Case: Typically used to map subdomains (e.g.,
www.example.com) to the main domain (example.com) or to an external service.Limitations:
MX and NS records cannot point to a CNAME record; they have to point to an A record (for IPv4) or an AAAA record (for IPv6). An MX record is a mail exchange record that directs email to a mail server. An NS record is a "name server" record and indicates which DNS server is authoritative for that domain.
It cannot be used for the root domain (also known as the "apex" or "naked" domain, such as
example.com).
Example:

Reference: Cloudflare
When a user requests blog.example.com, DNS will look for the records of example.com and return them, usually the A/AAAA record.
How to Create a CNAME Record in AWS Route 53
To create a CNAME record in AWS Route 53, follow these steps:
Log in to AWS Console:
Go to AWS Management Console.
Use your credentials to log in.
Open Route 53:
- In the search bar at the top, type Route 53 and select it from the results.
Select Hosted Zones:
In the Route 53 dashboard, click on Hosted Zones.
Select the hosted zone for the domain where you want to create the CNAME record.

Create a Record:
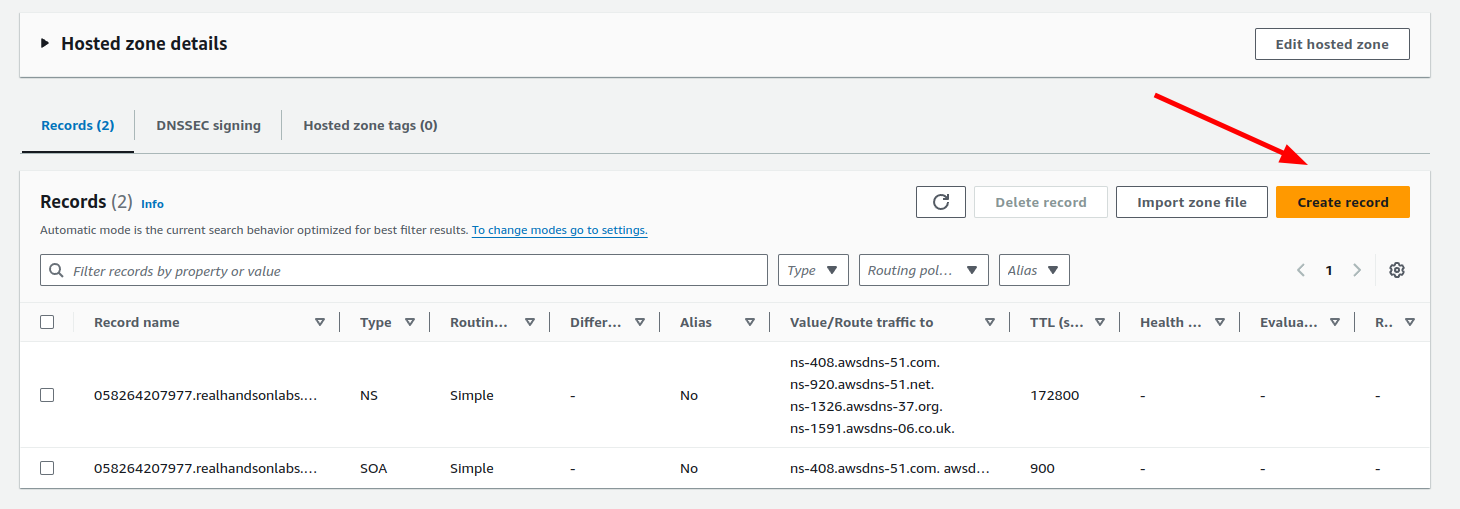
In the hosted zone, click the Create record button.

Set Record Type and Details:
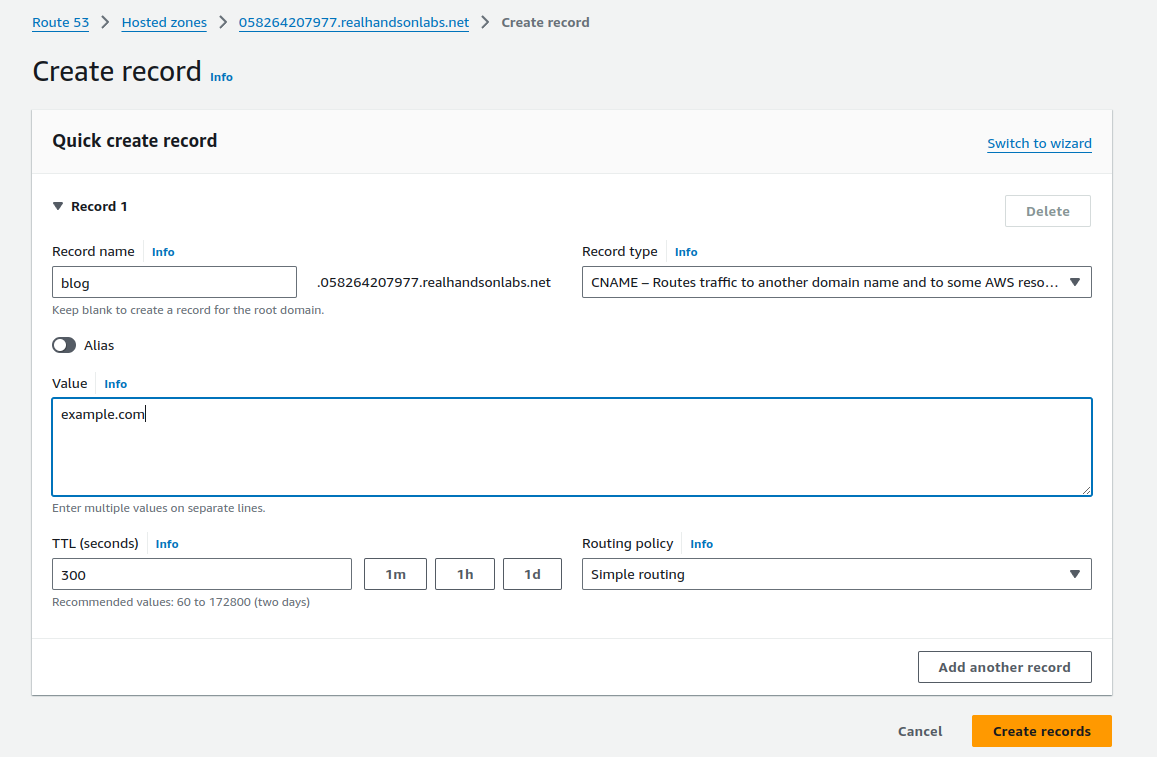
Name: Enter the subdomain name you want to map (e.g.,
blog.example.com).Record Type: Select CNAME - Canonical name from the drop-down menu.
Value: Enter the target domain (e.g.,
example.comor another domain likeservice.example.com).Leave the default TTL (Time to Live) or adjust if necessary.
Routing Policy: Use the default Simple routing unless you need more advanced options like failover.

Create the Record:
- Review your settings and click Create records.
This will create a CNAME record mapping blog.example.com to example.com.
AWS Route 53 Alias Records
Alias records are AWS-specific and provide functionality similar to CNAME but with additional features tailored to AWS services.
Characteristics of AWS Alias Records:
Integration with AWS Services: Alias records allow you to map a domain name to AWS services like CloudFront distributions, S3 buckets (website mode), Elastic Load Balancers (ELBs), and API Gateways.
Root Domain Support: Unlike CNAME records, Alias records can be used at the root domain (e.g.,
example.com) to point to an AWS resource. This is because AWS manages the DNS lookup internally.Free Queries for AWS Targets: Alias records do not incur additional DNS query charges when they point to AWS services.
Fast Failover: Since they’re integrated into Route 53, they can be used for Route 53-specific features like health checks and failover.
Example:

In this case, the root domain example.com can point to an AWS Application Load Balancer using an Alias record, something that isn’t possible with a traditional CNAME.
When you use an alias record to route traffic to an AWS resource, Route 53 automatically recognizes changes in the resource. In the given example, an alias record for example.com points to an Elastic Load Balancing load balancer at my-load-balancer-1234567890.us-west-2.elb.amazonaws.com. If the IP address of the load balancer changes, Route 53 automatically starts to respond to DNS queries using the new IP address.
Key Differences between CNAME and Alias Records
| Feature | CNAME | AWS Alias |
| AWS Service Integration | No | Yes |
| Root Domain Support | No | Yes |
| DNS Query Cost | Standard DNS pricing applies | Free if pointing to AWS resources |
| Works with AWS Services | No | Yes |
| Use Outside AWS | Yes | No (AWS-specific) |
| Failover & Health Checks | Not supported | Supported (when using Route 53) |
When to Use Each
CNAME Record:
Use it when you want to alias one domain to another domain or subdomain outside AWS, or if you're mapping subdomains to external services (like
app.example.compointing tothirdparty.mywebsite.com).Avoid using it at the root domain (
example.com) as DNS specifications do not allow CNAME records at the apex of a domain.
Alias Record:
Use when integrating with AWS resources (like CloudFront, ELB, or S3) to take advantage of AWS-specific optimizations, especially when you need to map a root domain (
example.com) to AWS services.Preferred when using Route 53 for advanced DNS features like failover, routing policies, and health checks.
In summary, CNAME records are more universal and suited for general aliasing, while Alias records are AWS-specific and offer extended functionality when dealing with AWS infrastructure and services.
How to Create Route 53 Alias Record by using Console
Sign in to the AWS Management Console and open the Route 53 console.
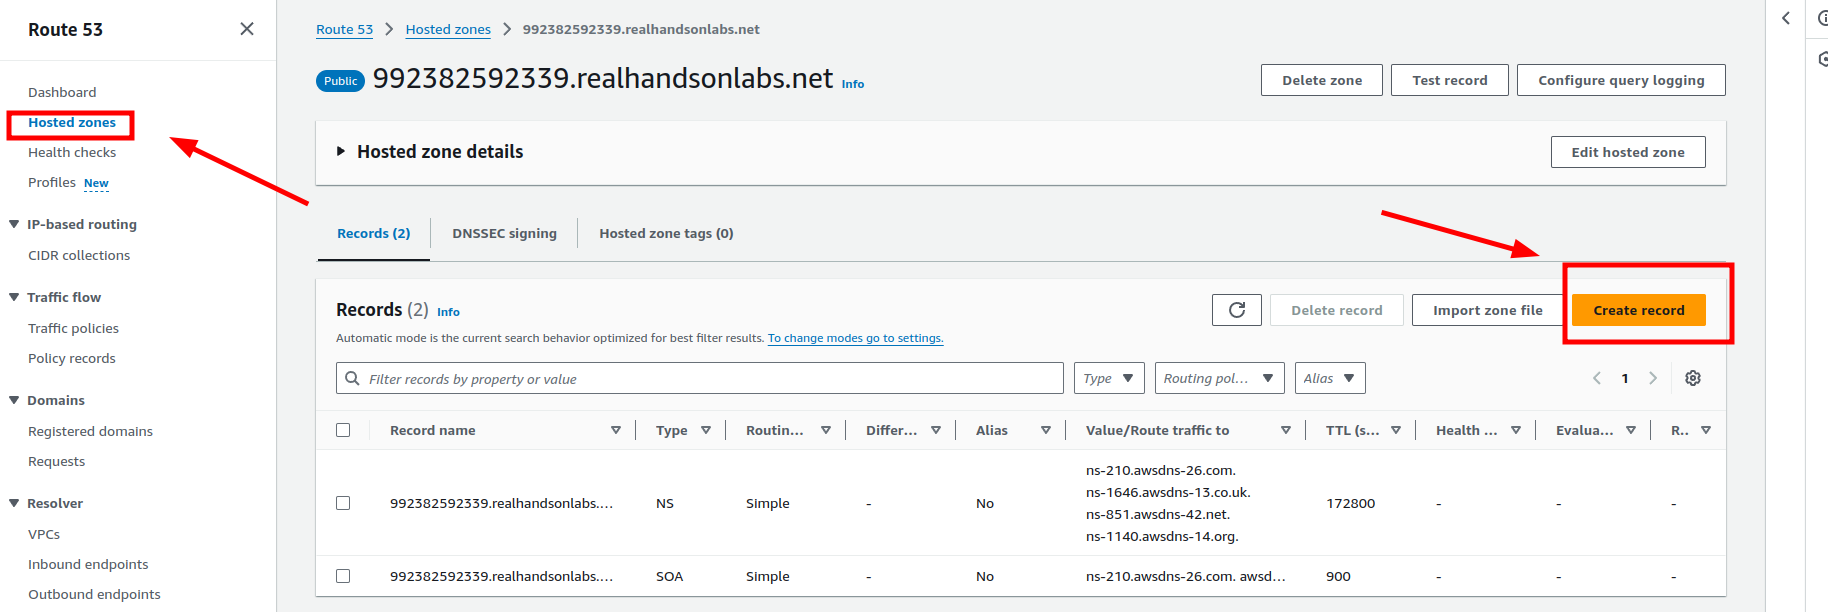
In the navigation pane, choose Hosted zones.
Choose the name of the hosted zone that you want to use to route traffic to your App Runner service.
Choose Create record.

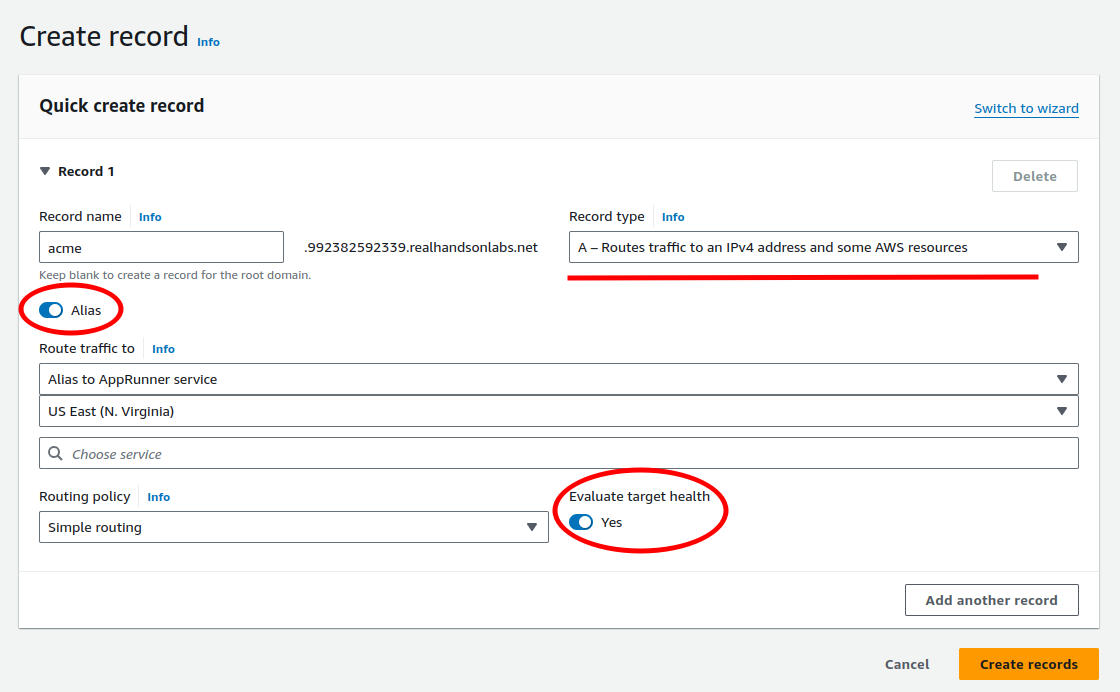
Specify the following values:
Routing policy: Choose the applicable routing policy. For more information, see Choosing a routing policy.
Record name: Enter the domain name that you want to use to route traffic to your App Runner service. The default value is the name of the hosted zone. For example, if the name of the hosted zone is
example.comand you want to useacme.example.comto route traffic to your environment, enteracme.Value/Route traffic to: Choose Alias to App Runner Application, then choose the Region that the endpoint is from. Choose the domain name of the application that you want to route traffic to.
Record type: Accept the default, A – IPv4 address.
Evaluate target health: Accept the default value, Yes.
Choose Create records.

The Route 53 alias record that you created gets propagated on all Route 53 servers within 60 seconds. When the Route 53 servers are propagated with your alias record, you can route traffic to your App Runner service by using the name of the alias record that you created.
References:
Subscribe to my newsletter
Read articles from Maxat Akbanov directly inside your inbox. Subscribe to the newsletter, and don't miss out.
Written by

Maxat Akbanov
Maxat Akbanov
Hey, I'm a postgraduate in Cyber Security with practical experience in Software Engineering and DevOps Operations. The top player on TryHackMe platform, multilingual speaker (Kazakh, Russian, English, Spanish, and Turkish), curios person, bookworm, geek, sports lover, and just a good guy to speak with!