Managed Identities in Microsoft Azure
 Sachin Nandanwar

Imagine managing a large-scale data environment where you have tens of different database servers spread across multiple regions or environments, including production, development, and staging. Each of these database servers requires its own set of credentials—whether they're SQL Server databases or any other database technology. Then you also have hundreds of Azure Blob Storage containers each storing critical data like logs, backups, or media files, all across different storage accounts, subscriptions, or regions.
Now, to securely access each of these resources you are maintaining separate credentials for every connection through connection strings, access keys, or service accounts. This causes significant operational overhead in terms of managing secrets, rotating credentials, and ensuring secure access. Any change in credentials (like password rotation or expiry) across even a small percentage of these resources means manual updates to configurations across data pipelines, applications, or other Azure services.
This approach introduces vulnerabilities in terms of human error accidentally exposing credentials, failing to rotate them on time, or hard-coding them into scripts and applications. As the systems grows the complexity of managing these secrets securely becomes increasingly unmanageable.
Using Managed Identity in Azure we can simplify and enhance security when connecting Azure services by providing an automatically managed identity for applications and mitigate the challenges and risks that we face while managing credentials. Lets see how.
Basically there are two types of managed identities: System-Assigned and User-Assigned.
System-Assigned Managed Identity is created and enabled directly on an Azure service, such as a virtual machine or a data factory and is tied to the lifecycle of that resource. When the resource is deleted the identity is automatically removed. Once the system assigned managed identity is enabled this resource will be registered with
Microsoft Entra ID. After being registered you can control its access to other services like storage and service accounts.User-Assigned Managed Identity on the other hand it is created as a standalone Azure resource and can be shared across multiple services offering more flexibility.
The primary benefit of Managed Identity is that it removes the need to manage credentials, secrets, or certificates when authenticating to Azure services like Azure Key Vault, Azure Storage, or SQL Database. Instead, the identity is automatically trusted by Azure AD and can be assigned permissions using Azure Role-Based Access Control (RBAC). This helps to streamline operations and reduce potential security vulnerabilities related to credential management.
In this article I am going to demonstrate on how we can leverage managed identity to overcome the challenges that come with handling credential management pertaining to complex environments through a much simplified approach. I will do it using Azure Data Factory service where the linked services would use user and service managed identities to authenticate across other Azure services.
Setup
So to get the ball rolling, we will create a empty Azure Data Factory and then add components to import data from a text file on a Azure container into a Azure Sql Database.
We can do it through Azure portal or PowerShell.
To get started with PowerShell, we have to install the following PS modules.
Install-Module -Name Az -AllowClobber -Force
Install-Module -Name Az.Sql -AllowClobber -Force
Install-Module -Name Az.DataFactory -AllowClobber  -Force
Install-Module -Name Az.Resources -AllowClobber -Force
Install-Module -Name Az.ManagedServiceIdentity -AllowClobber -Force
Install-Module -Name Az.Storage -AllowClobber -Force
Incase if you need to upgrade your PowerShell environment you can do it through the following command
winget install --id Microsoft.PowerShell --source winget
Code
Connect to Azure PowerShell. You can use PowerShell ISE.
Connect-AzAccount
We will use the following variables in the PowerShell script.
$resourceGroupName = "synapseworkspace" ## The name I used here is a misnomer
$dataFactoryName = "ADF-MI-POC" ##Data factory name
$identityName="ADF-User-Managed-Identity" ##User managed identity name
$location="Central India" ##resource location
$sqlServerName="adf-sqlserverdb" ##Azure sql instance name
$Admin="User to be assigned as Azure SQL server admin" ##The entra Id user
In Azure Portal
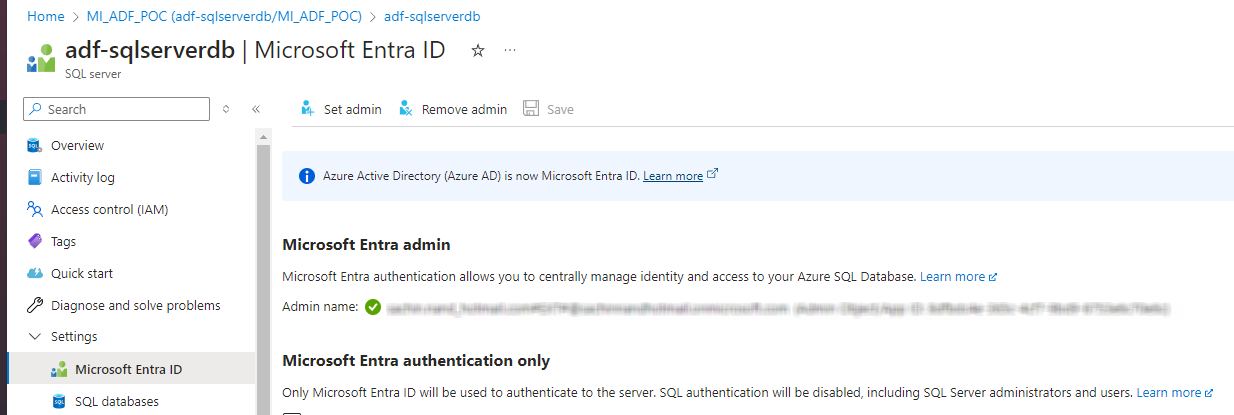
Set the admin for Azure Sql instance. The Sql instance in this case is adf-sqlserverdb
In PowerShell
$resourceGroupName = "synapseworkspace" ## The name I used here is a misnomer
$sqlServerName="adf-sqlserverdb"
$aadAdmin="User to be assigned as Azure SQL server admin"
Set-AzSqlServerActiveDirectoryAdministrator `
  -ResourceGroupName $resourceGroupName `
  -ServerName $sqlServerName `
  -DisplayName $aadAdmin `
  -ObjectId (Get-AzADUser -UserPrincipalName $aadAdmin).Id
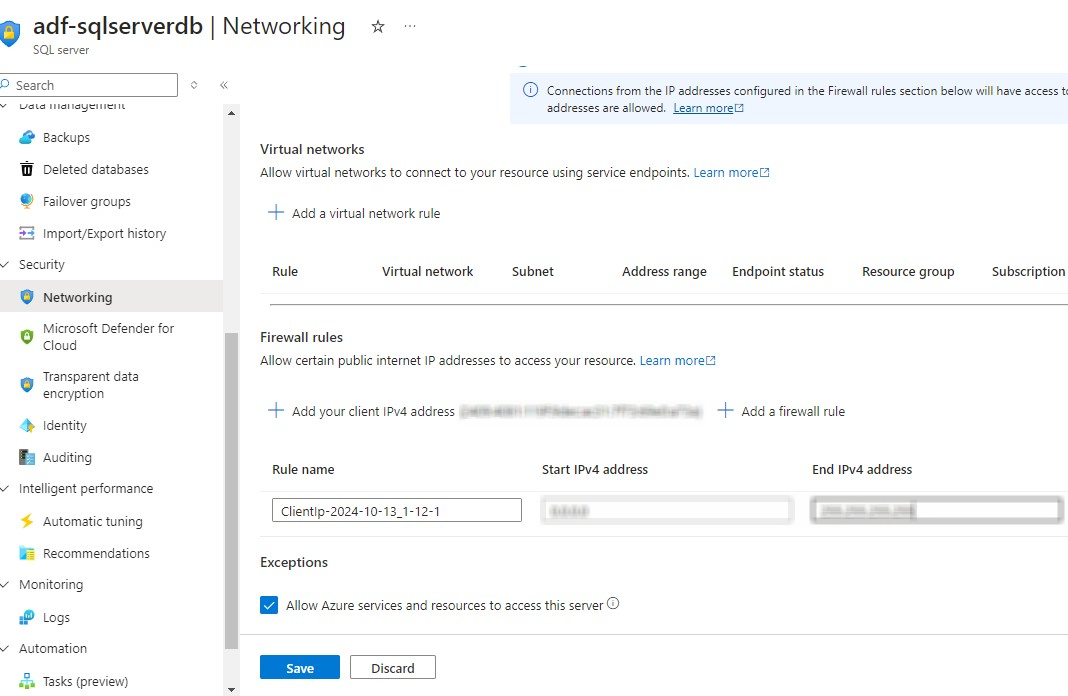
You also might want to set up Network access to the Azure Sql Server instance.
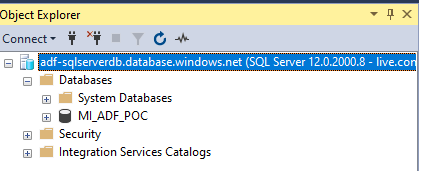
Lets connect to the Azure Sql Instance adf-sqlserverdb through SSMS and create a database named MI_ADF_POC and create a table that maps the source data schema. I named the table as tbl and has 2 columns date and values.
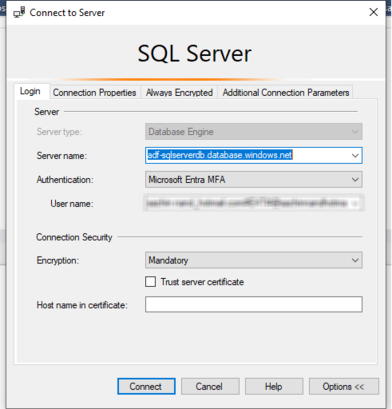
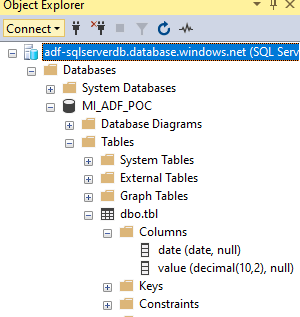
The SSMS connection to the Azure Sql works ok as I have logged in through the Entra authentication which was assigned as a admin to the instance.
Next we create a User Managed Identity. Its pretty straightforward.
In Azure Portal

In PowerShell
$resourceGroupName = "synapseworkspace" ## The name I used here is a misnomer
$identityName="ADF-User-Managed-Identity"
$location="Central India"
New-AzUserAssignedIdentity -ResourceGroupName $resourceGroupName -Name $identityName -Location $location

Now we would create a ADF project and assign the newly created managed identity to it under the Managed Identities option. The project name is ADF-MI-POC.
In Azure Portal


In PowerShell
Note that with PowerShell its possible to create a new ADF project, assign the user managed identity and enable the System assigned status in one single step through the Set-AzDataFactoryV2 cmdlet.
$resourceGroupName = "synapseworkspace" ## The name I used here is a misnomer
$dataFactoryName = "ADF-MI-POC"
$identityName="ADF-User-Managed-Identity"
$location="Central India"

$identityId = Get-AzUserAssignedIdentity -ResourceGroupName $resourceGroupName -Name $identityName
$userAssignedIdentity = [System.Collections.Generic.Dictionary[string, object]]::new()
$userAssignedIdentity.Add($identityName.Id,  @{})

Set-AzDataFactoryV2 `
   -ResourceGroupName $resourceGroupName `
   -Name $dataFactoryName `
   -Location $location `
   -IdentityType SystemAssigned `
   -UserAssignedIdentity  $identityName

  $dataFactory = Get-AzDataFactoryV2 -ResourceGroupName $resourceGroupName -Name $dataFactoryName

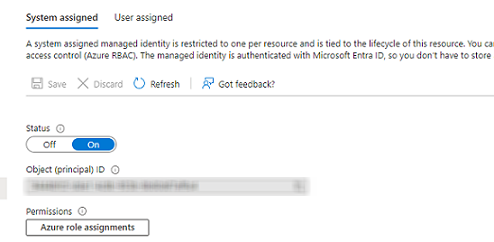
To check if the system assigned is enabled we can do it through the following PowerShell command
$dataFactoryName = "ADF-MI-POC"
$dataFactoryName.Identity.PrincipalId
Now that we have set the Sql Server instance, ADF project and the User Managed Identity in the next step we would create linked services in ADF and create pipeline to import data from a text file into the SQL Database MI_ADF_POC
Before we do that we first need to set the credentials property for the pipeline in the ADF project that we created.
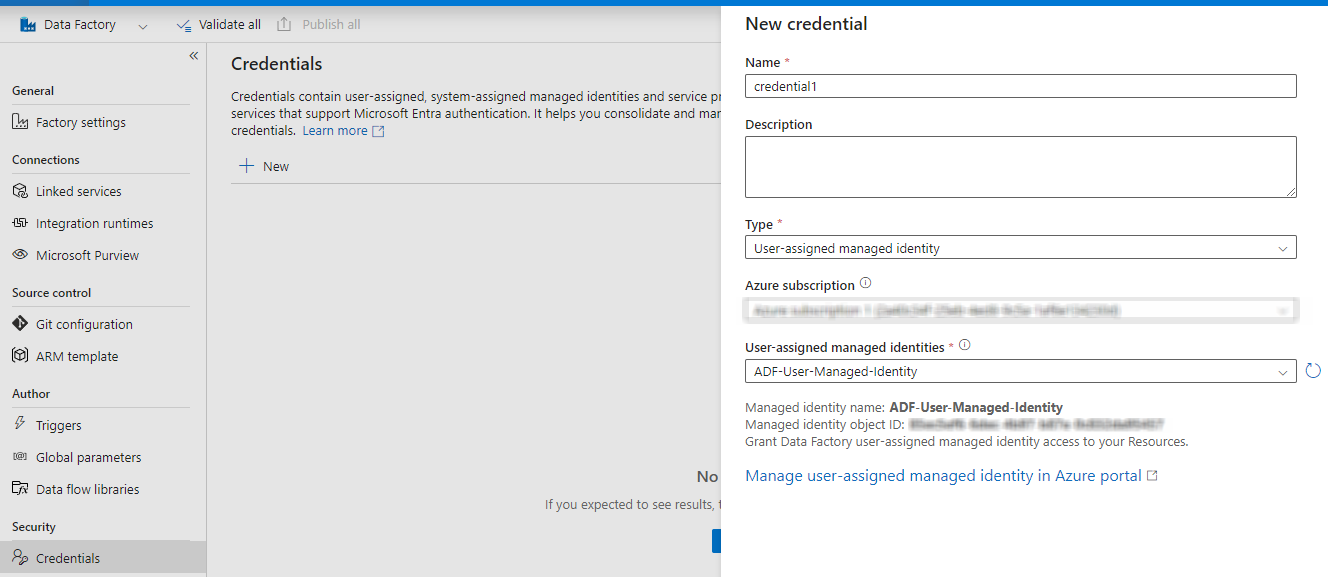
I am unsure as how to set credentials for Type User Managed Identity in ADF through PowerShell. There isnt any official Microsoft documentation on how this could be done. Though, there is a REST API method that can be executed through PowerShell script but it looks a bit complicated to me and is beyond the scope of this article.
Now lets create a linked service for the Azure Sql Database instance adf-sqlserverdb using the credentials property that we created earlier. We would do it only through the Azure Portal.
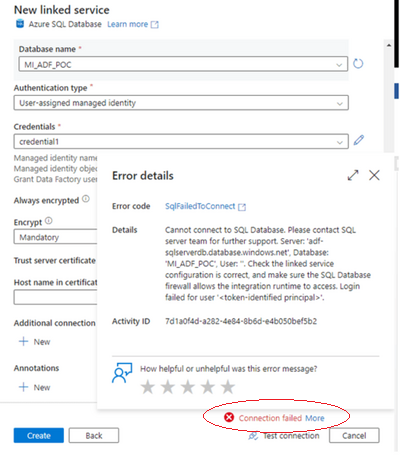
The connection fails to the database. This is because we used the User Managed Identity ADF-User-Managed-Identity defined through the credential property to connect to the Sql Instance. To fix the issue we have to create a user in the Sql Database MI_ADF_POC for the User Managed Identity ADF-User-Managed-Identity.
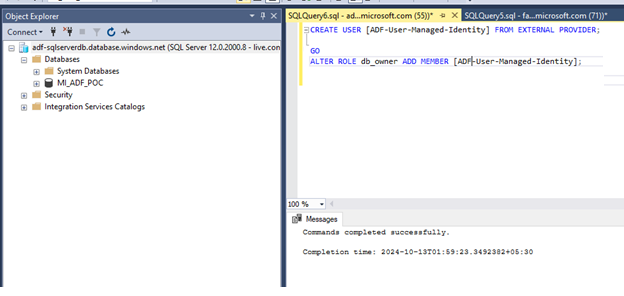
CREATE USER [ADF-User-Managed-Identity] FROm EXTERNAL PROVIDER;
GO
ALTER ROLE db_owner ADD MEMBER[ADF-User-Managed-Identity]
Instead of assigning db_owner role to the managed identity ,roles db_writer and db_reader could be assigned to limit the access on the database.
Now, retest the linked service connection.
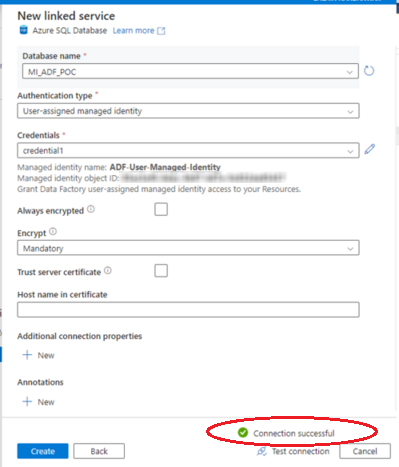
This time the connection succeeds.
Next, lets create a linked service to a Azure Blob container using the credential property. The linked service is trying to connect to a container named temporarycontainer under the storage account synapseaccount. The connection fails.
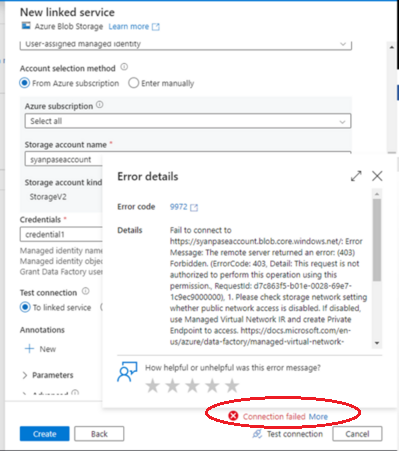
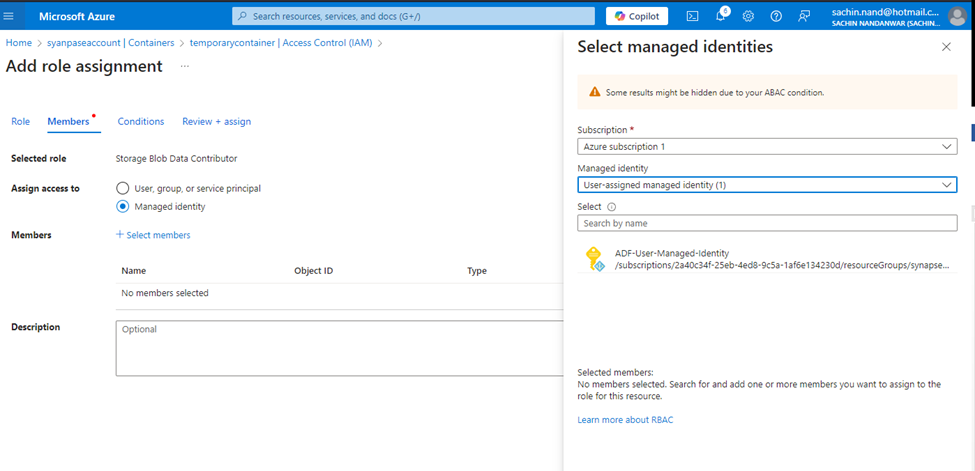
To resolve this, we would have to grant Contributor access to the user managed identity for the container.
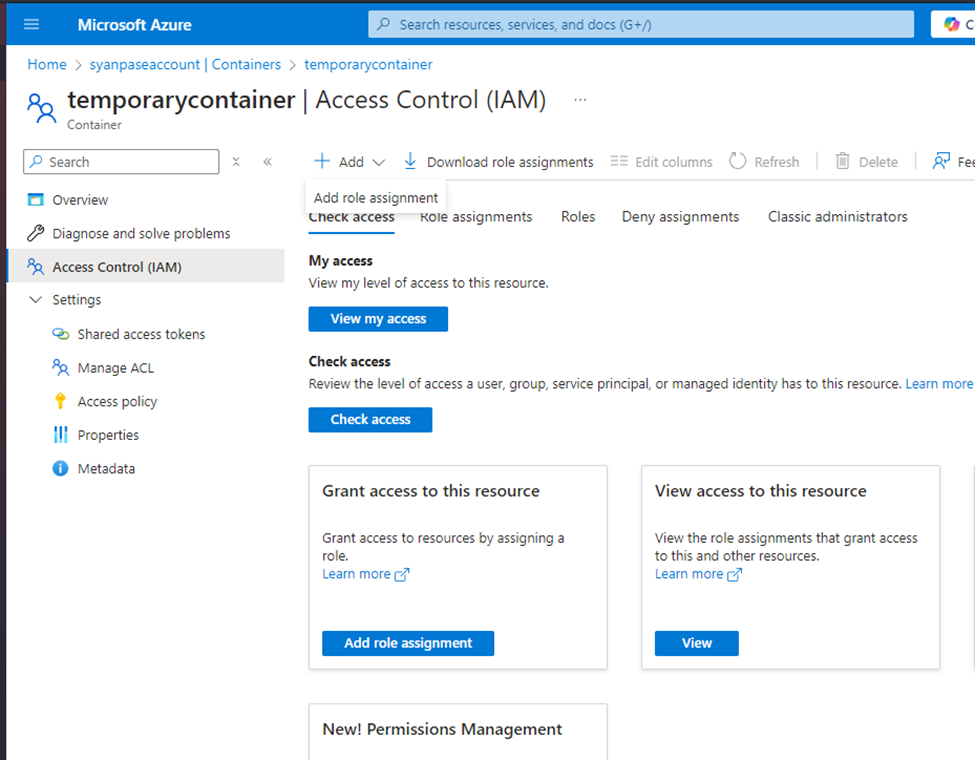
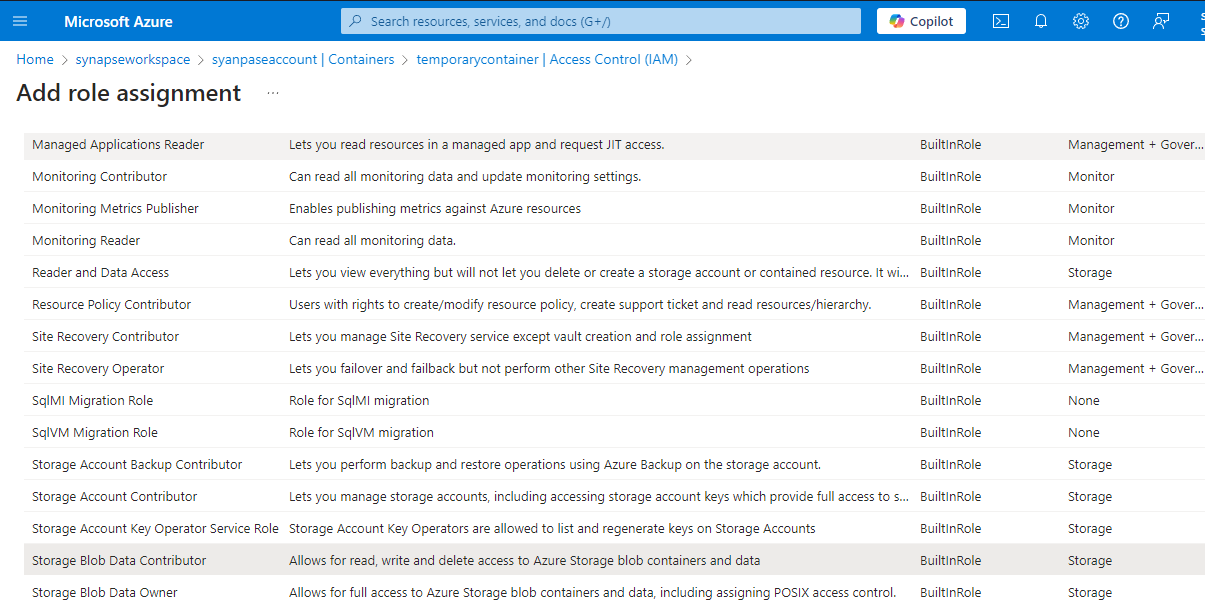
To do it through Azure portal, traverse to the Container and under Add role assignment, grant the Storage Blob Data Contributor access to the user managed identity for the container temporarycontainer.
In Azure Portal
In PowerShell
$resourceGroupName = "synapseworkspace" ## The name I used here is a misnomer
$storageAccount="syanpaseaccount"
$identityName="ADF-User-Managed-Identity"
$containerName = "temporarycontainer"

$identityId = Get-AzUserAssignedIdentity -ResourceGroupName $resourceGroupName -Name $identityName

$storageAccount = Get-AzStorageAccount -ResourceGroupName $resourceGroupName -Name $storageAccount
$ContainerId = "$storageAccountId/blobServices/default/containers/$containerName"
New-AzRoleAssignment -ObjectId $identityId.PrincipalId -RoleDefinitionName "Storage Blob Data Contributor" -Scope $ContainerId

## -Scope : The scope is the level at which you're assigning the role. In this case, its the blob container.
The connection should now succeed.
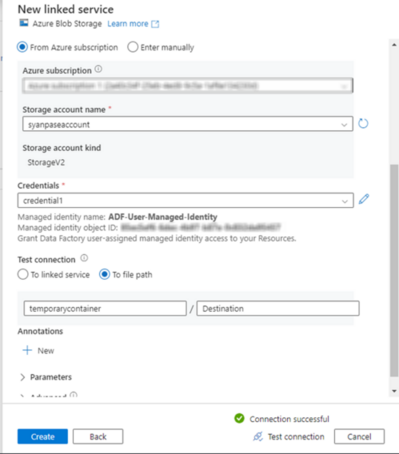
The connections of both the linked services is successful through user managed identity.
Now lets try connecting through System Assigned Managed Identity. Note that System Managed Identity ADF-MI-POC is auto created when we created the ADF project with the same name.
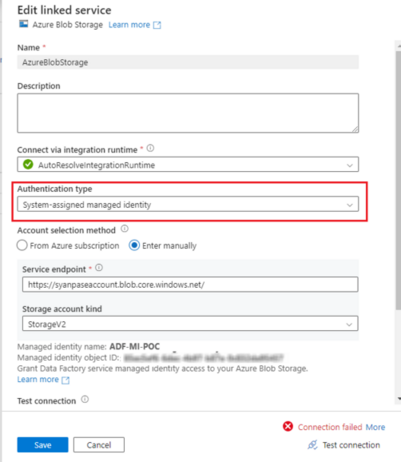
The connection to the storage container temporarycontainer failed. This is because the system identity has no access to the blob storage. To resolve it we have to assign the storage Contributoraccess to it.
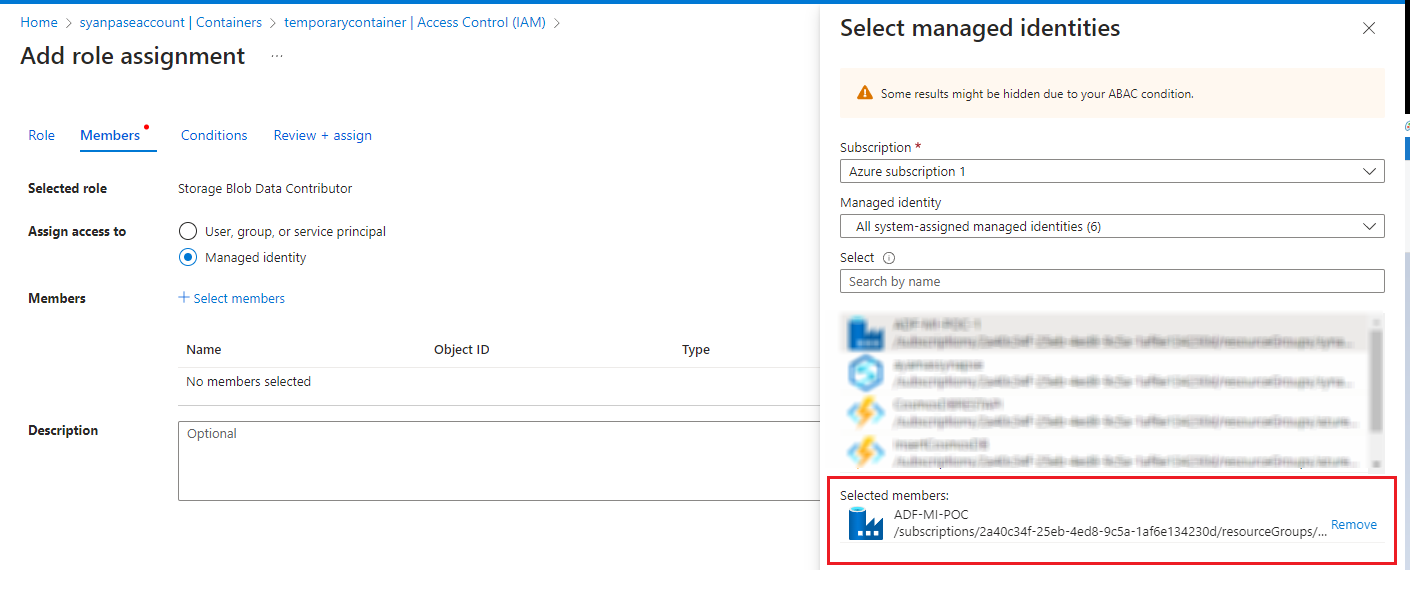
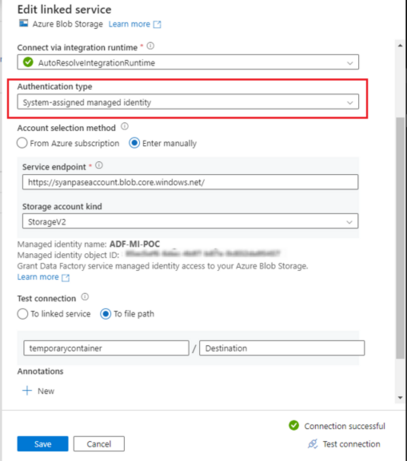
This time the connection succeeds. Similarly, connection to the Azure Sql instance would also fail. To fix it just add the system managed identity ADF-MI-POC as an database user to the database similar to what we did earlier for user managed identity.
CREATE USER [ADF-MI-POC] FROm EXTERNAL PROVIDER;
GO
ALTER ROLE db_owner ADD MEMBER[ADF-MI-POC]
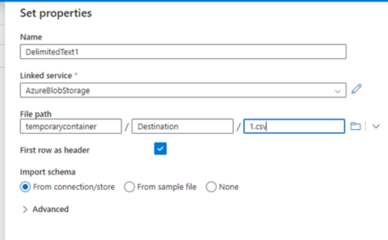
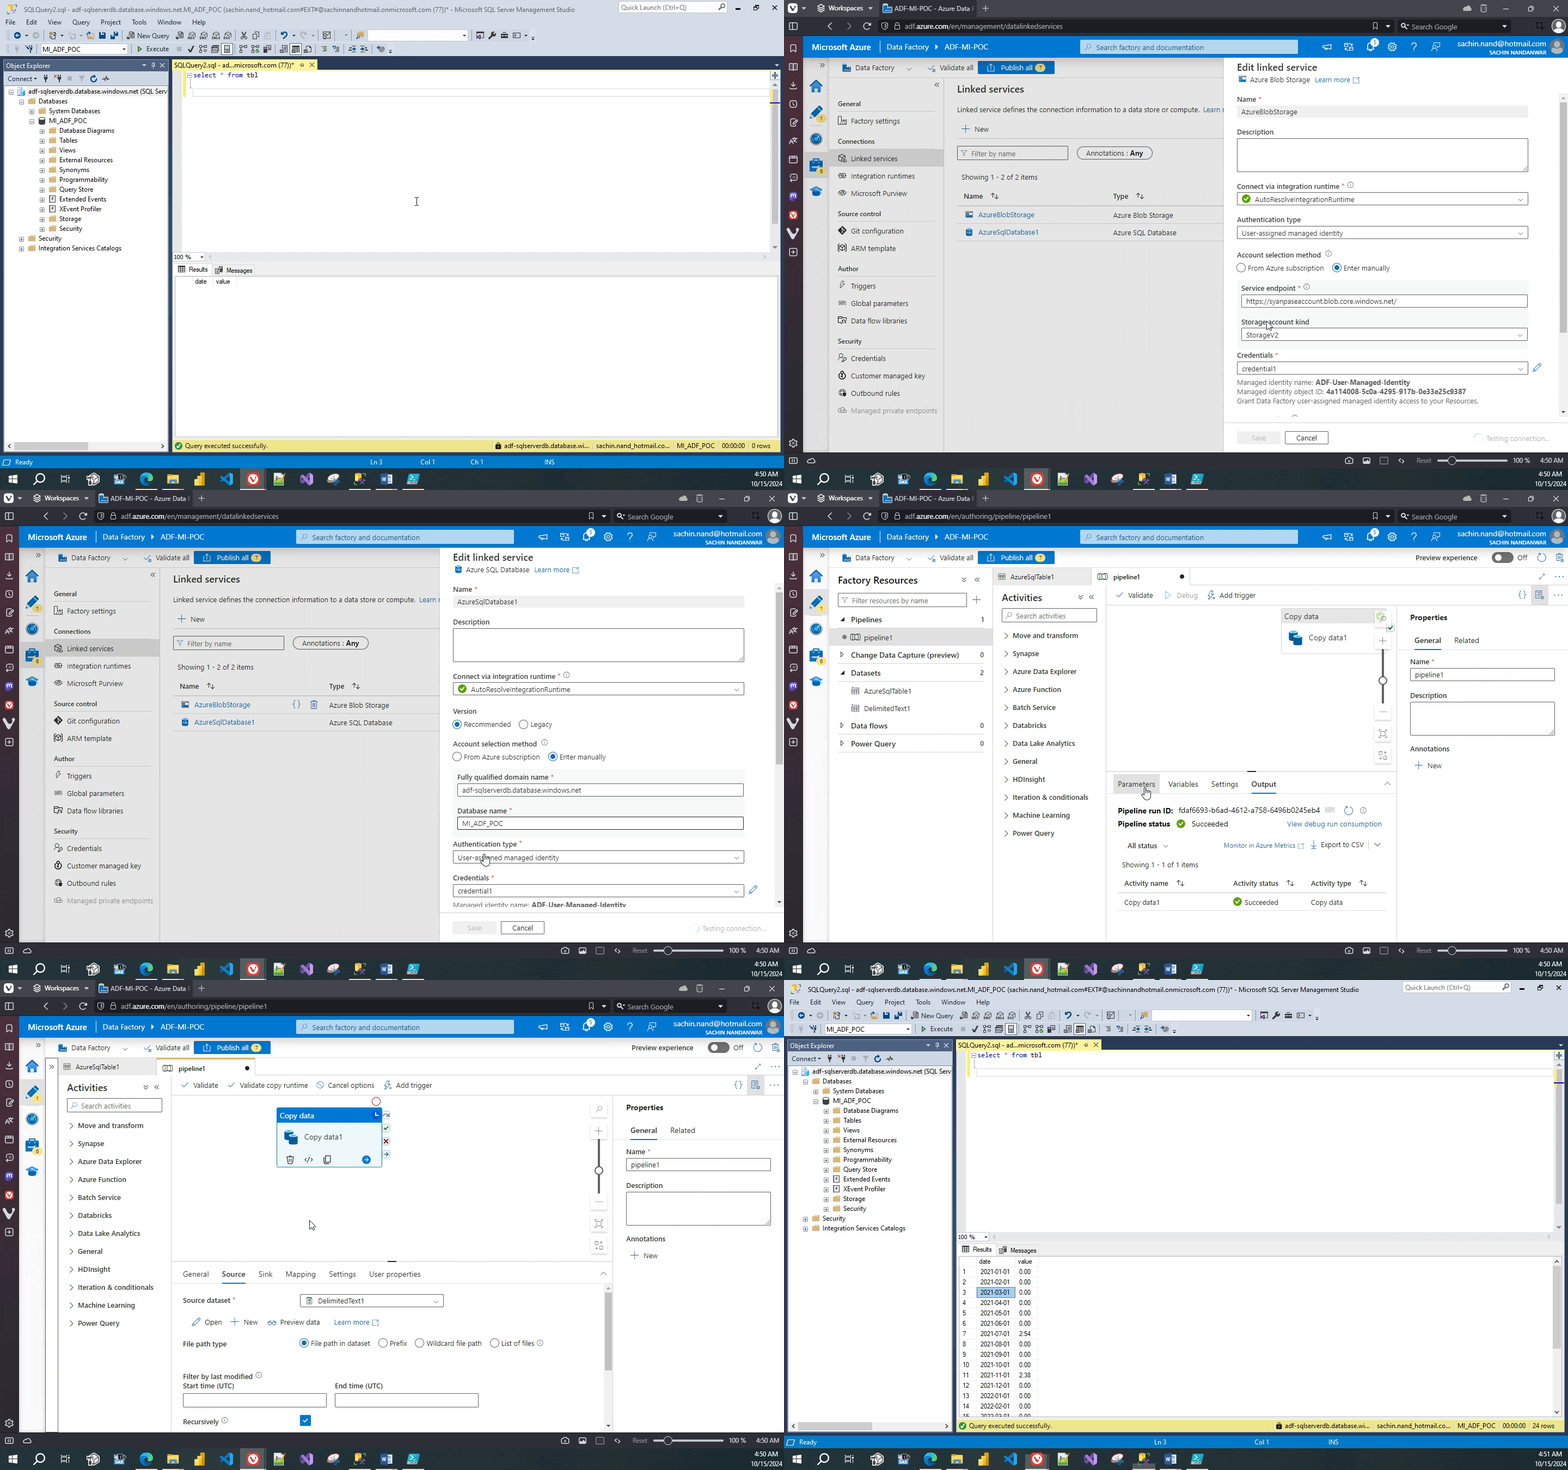
Lets move ahead and set up the Source and Sink connection in Data Factory. Our source file is 1.csv under the Destination directory in containertemporarycontainer.
In the destination, the database is MI_ADF_POC.
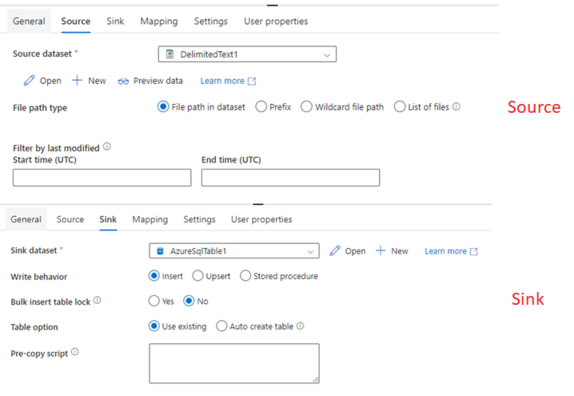
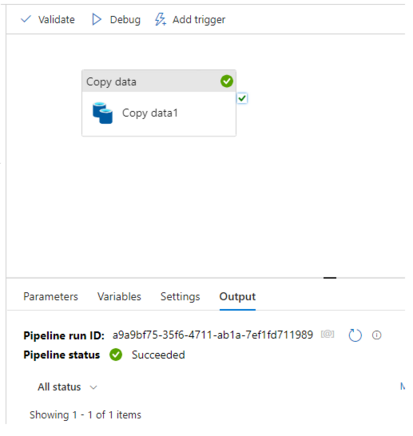
Execute the package and it should succeed.
Final Thoughts
As we saw, I used only a single credential object to authenticate both the blob container and the Azure sql instance without maintaining any credential details anywhere with zero risks of accidental leakage of credentials or expiry.
Using Managed Identity in Azure, access to Azure resources eliminates the need to manage credentials manually. By leveraging either system-assigned or user-assigned identities, Managed Identity integrates seamlessly with Azure AD providing strong security and simplified management. This solution greatly reduces the risk of credential exposure.
Thanks for reading !!!
Subscribe to my newsletter
Read articles from Sachin Nandanwar directly inside your inbox. Subscribe to the newsletter, and don't miss out.
Written by
