Decoding JWT: Authentication and Authorization in Node.js
 Shivang Yadav
JSON Web Token (JWT) is widely used for handling authentication and authorization in modern web applications. JWT allows secure and compact transmission of information between parties as a JSON object, and this information is verifiable and trusted because it is digitally signed. In this blog, we will explore the underlying mechanisms of JWT, understand its importance in web security, and walk through a practical implementation in Node.js.
What is JWT?
JSON Web Token (JWT) is an open standard (RFC 7519) to send information between two parties securely. It uses a compact format that is safe to use in URLs, and it contains claims (data) that can be verified and trusted.
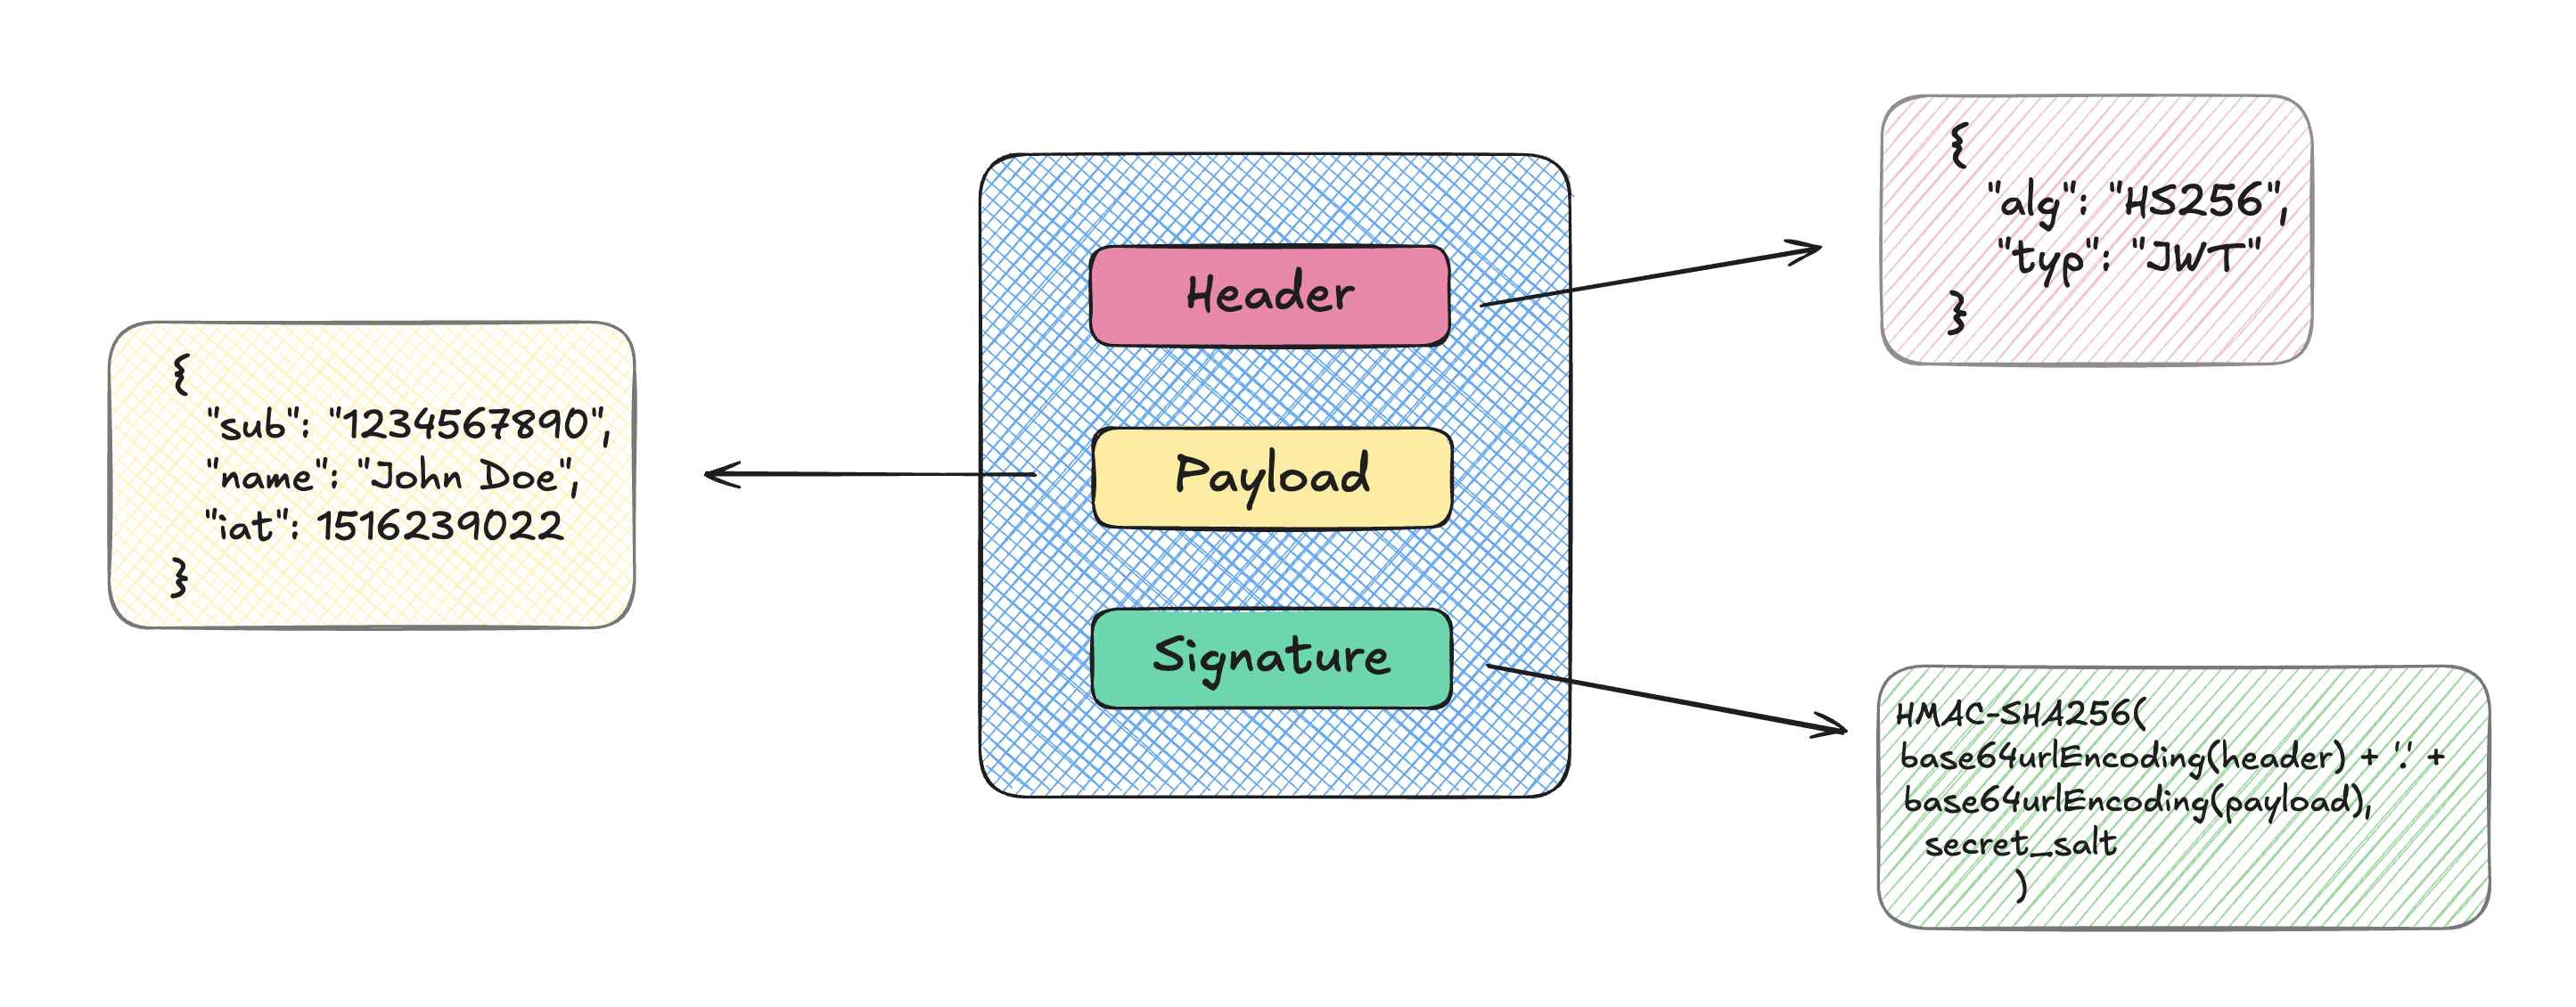
A JWT is essentially a long string made up of three parts:
Header
Payload
Signature
These parts are concatenated with dots (.), making up a token of the form:
{Base64Url encoded header}.{Base64Url encoded payload}.{Signature}
JWT Structure
Let’s break down each of the three parts of JWT in detail:

1. Header
The header contains two critical elements:
alg: The algorithm used to sign the token (e.g., HMAC SHA256 or RSA).typ: The type of token, which is usually"JWT".
Here’s an example of what a JWT header might look like:
{
  "alg": "HS256",
  "typ": "JWT"
}
The header is Base64Url encoded to form the first part of the token.
2. Payload
The payload is where the actual data is stored in the form of claims. Claims are statements about an entity (usually the user) and additional metadata. JWT defines three types of claims:
Registered Claims: Predefined, optional claims that are useful across many use cases. Examples include:
iss: Issuer (who issued the token).sub: Subject (the user or entity the token is for).aud: Audience (who the token is intended for).exp: Expiration time (when the token expires).iat: Issued at (the time when the token was issued).
These registered claims are optional, but using them is a good practice as they standardize token structure.
Public Claims: These claims are custom, and you define them according to your needs. An example could be the role of the user (
admin,editor,viewer).{ "sub": "1234567890", "name": "John Doe", "admin": true }Private Claims: Claims created specifically for sharing information between parties that agree on using them. These are generally application-specific and should not collide with registered or public claims.
The payload is also Base64Url encoded.
What is a Claim?
A claim is a piece of information in a JWT that expresses something about the user, the authentication session, or other relevant context. Claims can be anything from a user’s identity (sub) to their role (admin), or even metadata like the time the token was issued (iat) or its expiration (exp). Claims allow the server to enforce access control based on the information contained in the token.
3. Signature
The signature is the key to verifying that the token hasn’t been tampered with. It is created by taking the encoded header, encoded payload, and a secret key and signing them using the algorithm specified in the header.
The signature process looks like this:
HMACSHA256(
  base64UrlEncode(header) + "." + base64UrlEncode(payload),
  secret
)
The signature ensures that the token’s contents have not been modified. If someone tries to tamper with the payload or header, the signature verification will fail on the server.
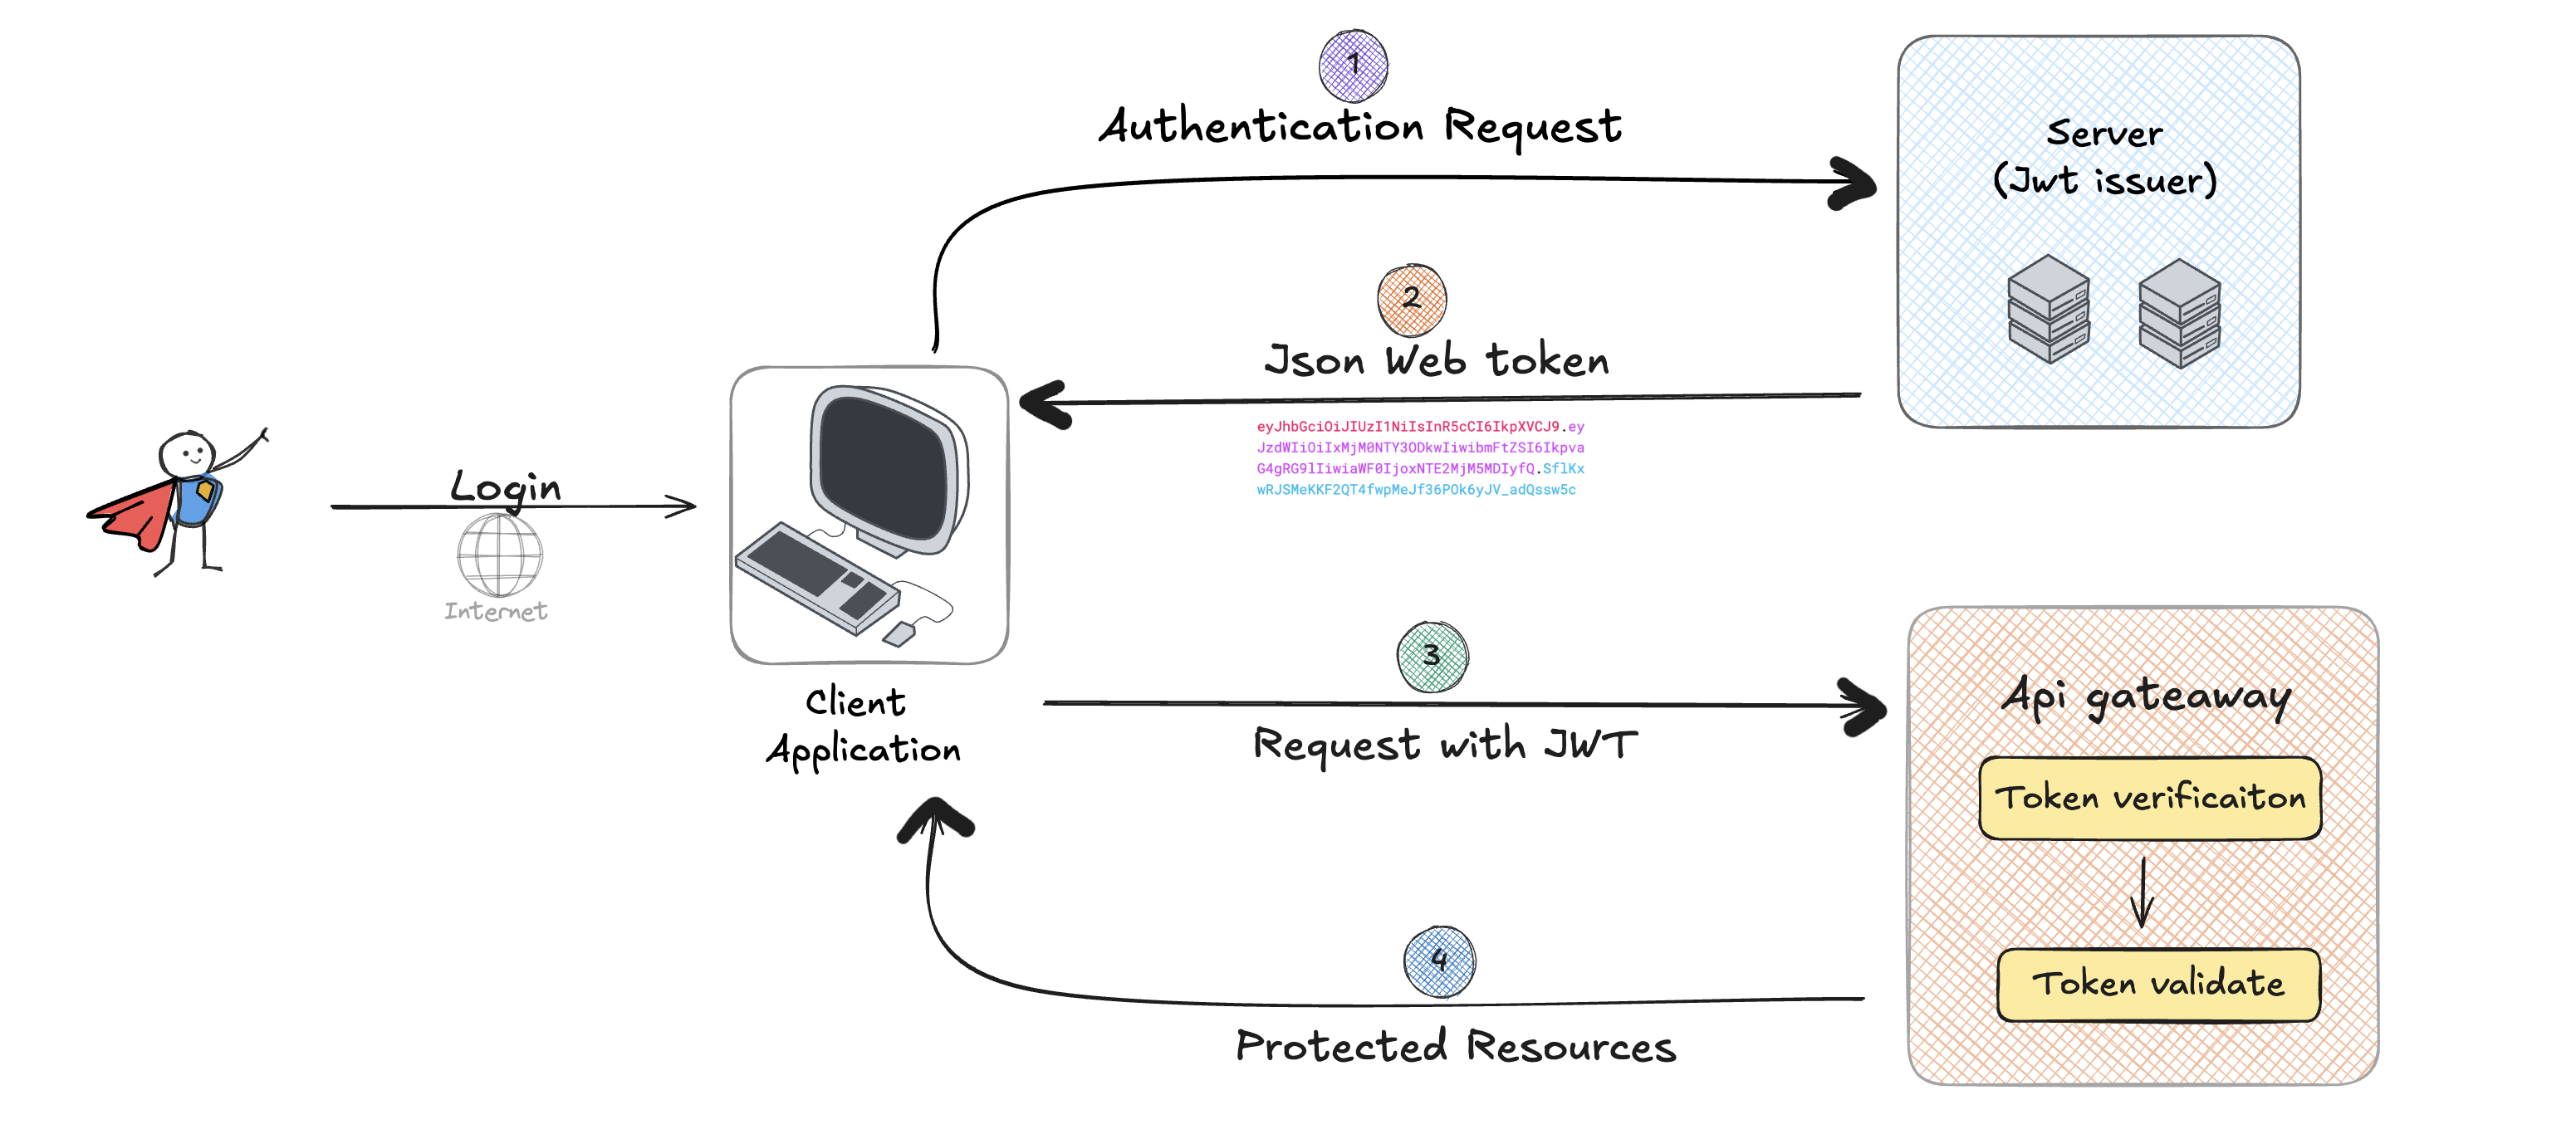
How JWT Works
Now that we’ve broken down the structure of a JWT, let’s see how it works in practice.
1. Authentication
When a user logs in to an application (by providing their credentials, for example), the server authenticates the user and creates a JWT that includes information about the user (e.g., sub: the user's ID). This token is then sent to the client, which stores it (usually in localStorage or cookies).
2. Authorization
When the client makes subsequent requests to the server (for example, accessing a protected route), the JWT is sent along in the HTTP Authorization header, in the format:
Authorization: Bearer <token>

The server verifies the token using the secret key. If the token is valid and has not expired, the server grants access to the requested resource. If the token is invalid (e.g., due to tampering or expiration), the server rejects the request.
JWT Lifecycle
User Login: The client sends credentials (username and password) to the server.
Token Generation: The server verifies the credentials and generates a JWT containing the user's information (payload), signing it with a secret.
Token Storage: The client stores the token in localStorage, sessionStorage, or a cookie.
Authenticated Requests: For protected routes, the client includes the token in the
Authorizationheader.Token Verification: The server verifies the token and checks for valid claims (e.g., expiration, issuer).
Response: If the token is valid, the server responds with the requested data. Otherwise, it rejects the request.
Implementing JWT in Node.js
Let’s now implement JWT for authentication and authorization in a simple Node.js application using the jsonwebtoken library.
Step 1: Project Setup
npm init -y
npm install express jsonwebtoken bcrypt
Step 2: Create a Simple Authentication System
const express = require('express');
const jwt = require('jsonwebtoken');
const bcrypt = require('bcrypt');

const app = express();
app.use(express.json());

const users = [];
const SECRET_KEY = 'your_jwt_secret_key';

// Register Endpoint
app.post('/register', async (req, res) => {
  const { username, password } = req.body;
  const hashedPassword = await bcrypt.hash(password, 10);
  users.push({ username, password: hashedPassword });
  res.json({ message: 'User registered successfully!' });
});

// Login Endpoint
app.post('/login', async (req, res) => {
  const { username, password } = req.body;
  const user = users.find(user => user.username === username);

  if (!user || !(await bcrypt.compare(password, user.password))) {
    return res.status(400).json({ message: 'Invalid credentials' });
  }

  const token = jwt.sign({ username }, SECRET_KEY, { expiresIn: '1h' });
  res.json({ token });
});

// Protected Route
app.get('/protected', (req, res) => {
  const token = req.headers['authorization']?.split(' ')[1];

  if (!token) {
    return res.status(401).json({ message: 'Token required' });
  }

  try {
    const decoded = jwt.verify(token, SECRET_KEY);
    res.json({ message: `Welcome, ${decoded.username}!` });
  } catch (err) {
    res.status(401).json({ message: 'Invalid token' });
  }
});

app.listen(3000, () => {
  console.log('Server running on port 3000');
});
In this code:
Users register with a username and password, which is hashed using
bcrypt.Upon login, a JWT is generated and sent back to the client.
The protected route
/protectedis only accessible to users with a valid JWT token in theAuthorizationheader.
Conclusion
JWT is an essential part of modern authentication and authorization systems due to its stateless, compact, and secure nature. By using claims, JWT provides flexibility in representing user data while ensuring the integrity and authenticity of that data through signatures.
Subscribe to my newsletter
Read articles from Shivang Yadav directly inside your inbox. Subscribe to the newsletter, and don't miss out.
Written by

Shivang Yadav
Shivang Yadav
Hi, I am Shivang Yadav, a Full Stack Developer and an undergrad BTech student from New Delhi, India.