Reverse engineering a dead MOTU audio interface to detect its failure
 Bonsembiante
A few months ago, I bought a used MOTU Ultralite AVB audio interface for only $100, a fraction of its original price. It was listed as "for parts" due to a malfunction, but I decided to take it and see if I could fix it myself.
The previous owner had sent it to two different non-official technical services, neither of which could diagnose or fix the issue. The main problem is that MOTU doesn’t provide service manuals, circuit diagrams, or even technical support documentation for their devices. They do offer official support in US, but shipping the unit from Argentina isn’t exactly practical. So, I took it upon myself to figure out what was wrong with it.
What makes this audio interface especially interesting is that it contains an embedded Linux system. There’s a user online (fohdeesha at servethehome) who owns a similar model, and he had the idea to investigate the system's internals. He discovered that the device has a UART serial port within certain pins, which allowed him to connect to it using a USB-to-serial adapter and access the embedded Linux console. This opened up the possibility of modifying the system, understanding its internals, and any other reverse engineering idea that come to your mind.
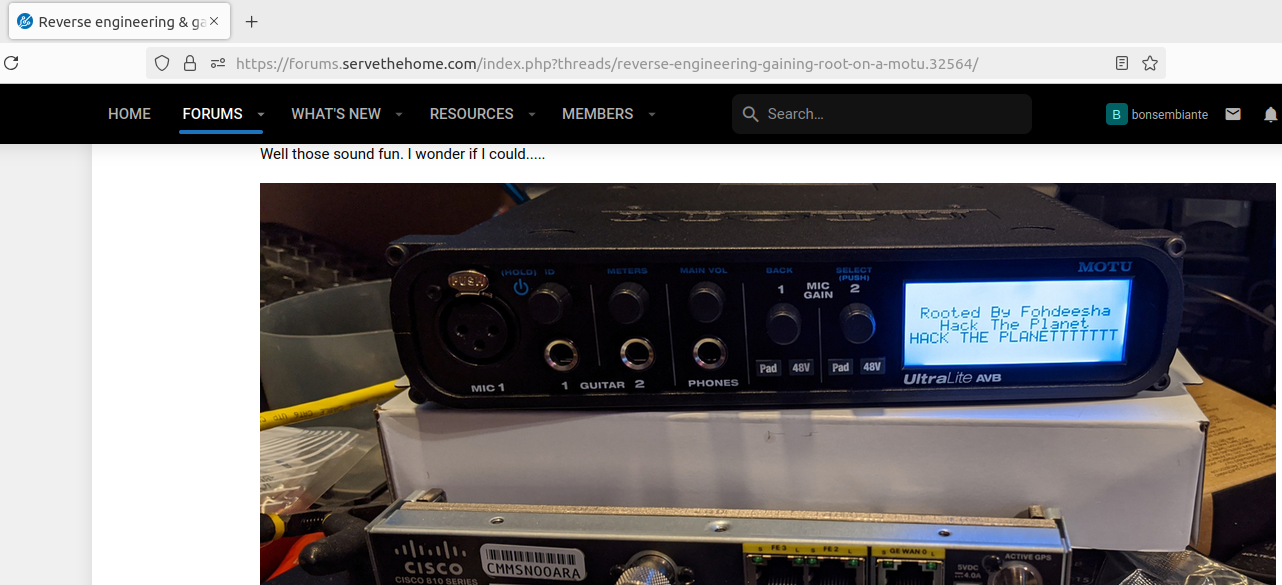
When I got the device, I first checked that it wasn’t powering up at all, that the PC didn’t recognize it when connected via USB, that there was no network traffic over Ethernet. There was no sign of life anywhere. With no lights, sounds, or screen activity, the only logical step was to open it up and take a look inside.
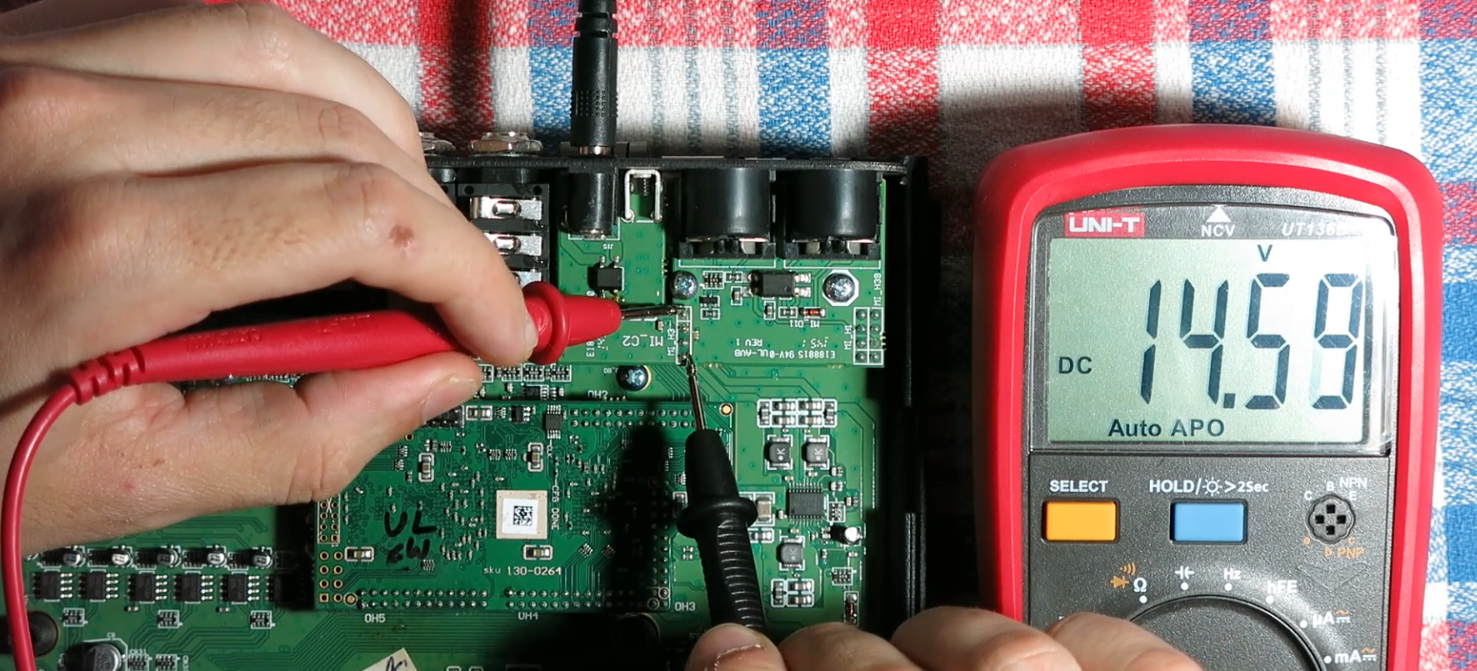
I tested the original 15V power supply and verified it was working correctly. Also I used a lab power supply to check out power issues and measure the device’s current draw. The power consumption seemed normal, but still, the device remained dead. I couldn’t find any abnormal heat spots, and nothing seemed to be malfunctioning, no short circuits, no signs of damage to capacitors, nothing unusual at all.
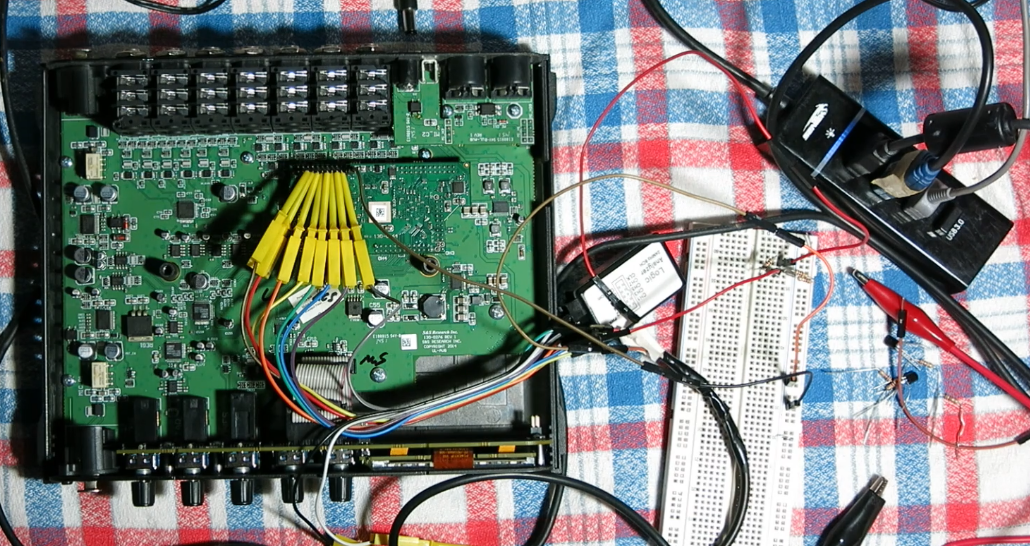
After some research, I decided to try what the user on the forum did: connect a USB-to-serial adapter to the UART pins and see if I could access the device’s bootloader. So, when I tried to power it on, I started receiving bootloader logs. The device was running U-Boot, a common bootloader for embedded systems, but the initialization was quickly failing with an "invalid firmware" error. This was a big clue, something was stopping the system from booting up properly.
Additionally, there was a message saying that the network interface wasn’t being initialized, though I figured out that this wasn’t necessarily a real symptom. The "invalid firmware" message, however, seemed like the key issue. U-Boot was detecting something wrong with the firmware, and it wasn’t letting the system continue its boot process.
Chip initialization passed!

Booting with TI UBL
Device OPP (456MHz, 1.3V)
Booting Catalog Boot Loader
BootMode = SPI 1 Flash
Starting SPI Copy...

UBOOT header : (magicnumber, entry, appsize , ldAddress) - (0xA1ACED00 ,0xC1080000 ,0x00039E60 ,0xC1080000 )   DONE
Jumping to entry point at 0xC1080000.


U-Boot 2013.07-g3ab5589 (Nov 19 2015 - 16:59:13)

I2C:   ready
DRAM:  64 MiB
WARNING: Caches not enabled
MMC:
SF: Detected S25FL256S_64K with page size 64 KiB, total 32 MiB
In:    serial
Out:   serial
Err:   serial
SS AVB SOM u-boot 1.00d0
Tamio: get mac address.
00:00:xx:xx:xx:xx
set mac handler registered


*** ERROR ***
Error: Invalid firmware detected

*************

Net:   No ethernet found.
LCD initialized.
SF: Detected S25FL256S_64K with page size 64 KiB, total 32 MiB
SF: 768 bytes @ 0x580000 Read: OK
Bitmap draw not supported
U-Boot >
To proceed, I decided to dump the entire flash memory from the device, some how. Even though the system wasn’t booting, I still had access to the U-Boot console, which allowed me to issue commands to read from the flash. Using a tool called minicom and following instructions I found in this site cybergibbons, I was able to create a raw dump of the device's flash memory.
The main key of the process is to load the entire flash content into ram, and then, usin md.b command, make an hexadecimal dump of that ram region into the console output. The use of minicom is very important to save the output to a text file. Later, with this script, you can convert that hexadecimal values from md.b output to a pure binary file.
md.b command gives you an output like that:
...
c0009e20: 00 00 00 00 00 00 00 00 00 00 00 00 00 00 00 00    ................
c0009e30: 00 00 00 00 00 00 00 00 00 00 00 00 00 00 00 00    ................
c0009e40: 00 00 00 00 00 00 00 00 00 00 00 00 00 00 00 00    ................
c0009e50: 00 00 00 00 00 00 00 00 00 00 00 00 00 00 00 00    ................
c0009e60: 00 00 00 00 00 00 00 00 00 00 00 00 00 00 00 00    ................
c0009e70: 00 00 00 00 00 00 00 00 00 00 00 00 00 00 00 00    ................
c0009e80: 00 00 00 00 00 00 00 00 00 00 00 00 00 00 00 00    ................
...
And the output of binwalk over the full flash dump:
$ binwalk full_flash_dump.bin

DECIMAL       HEXADECIMAL     DESCRIPTION
--------------------------------------------------------------------------------
230540        0x3848C         CRC32 polynomial table, little endian
244048        0x3B950         Motorola S-Record; binary data in text format, record type: header
327692        0x5000C         Xilinx Virtex/Spartan FPGA bitstream dummy + sync word
1179648       0x120000        uImage header, header size: 64 bytes, header CRC: 0xC7F85571, created: 2015-11-19 21:57:57, image size: 1130816 bytes, Data Address: 0xC0008000, Entry Point: 0xC0008000, data CRC: 0xC452E389, OS: Linux, CPU: ARM, image type: OS Kernel Image, compression type: none, image name: "Linux-2.6.32-rc7"
1179712       0x120040        Linux kernel ARM boot executable zImage (little-endian)
1192229       0x123125        gzip compressed data, maximum compression, from Unix, last modified: 2015-11-19 21:57:57
2490368       0x260000        gzip compressed data, maximum compression, has original file name: "rootfs-firmware", from Unix, last modified: 2015-11-19 21:57:21
5963788       0x5B000C        Xilinx Virtex/Spartan FPGA bitstream dummy + sync word
5986210       0x5B57A2        Boot section Start 0x424241BE End 0x0
6488076       0x63000C        Xilinx Virtex/Spartan FPGA bitstream dummy + sync word
6526678       0x6396D6        MySQL MISAM index file Version 3
6670809       0x65C9D9        Intel x86 or x64 microcode, sig 0x00002000, pf_mask 0x40c0, 2003-11-10, rev 0x40501, size 524288
7012364       0x6B000C        Xilinx Virtex/Spartan FPGA bitstream dummy + sync word
7536652       0x73000C        Xilinx Virtex/Spartan FPGA bitstream dummy + sync word
7576950       0x739D76        Intel x86 or x64 microcode, pf_mask 0x00, 2041-05-20, rev 0x3210302, size 528387
7817368       0x774898        Intel x86 or x64 microcode, sig 0x02088320, pf_mask 0x51011, 2002-11-04, rev 0x-7dfcfadf, size 2048
7822302       0x775BDE        MySQL ISAM index file Version 10
7832905       0x778549        bix header, header size: 64 bytes, header CRC: 0x0, created: 1970-07-14 06:36:48, image size: 9437184 bytes, Data Address: 0x840980, Entry Point: 0x111, data CRC: 0x1820000, image name: ""
7855288       0x77DCB8        Intel x86 or x64 microcode, sig 0x20032008, pf_mask 0x110000, 2000-09-04, rev 0x89c000, size 2048
8060940       0x7B000C        Xilinx Virtex/Spartan FPGA bitstream dummy + sync word
8089444       0x7B6F64        bix header, header size: 64 bytes, header CRC: 0x2A00000, created: 2038-05-08 10:57:06, image size: 8585221 bytes, Data Address: 0x2090A008, Entry Point: 0x80028088, data CRC: 0x800080, OS: NetBSD, image name: ""
8376339       0x7FD013        LZMA compressed data, properties: 0xC0, dictionary size: 131072 bytes, uncompressed size: 16384 bytes
8585228       0x83000C        Xilinx Virtex/Spartan FPGA bitstream dummy + sync word
8722936       0x8519F8        bix header, header size: 64 bytes, header CRC: 0x8000, created: 1970-01-01 00:00:00, image size: 131080 bytes, Data Address: 0x800, Entry Point: 0x100010, data CRC: 0x80808000, image name: ""
10092544      0x9A0000        uImage header, header size: 64 bytes, header CRC: 0x919397D5, created: 2018-11-06 19:19:35, image size: 1863008 bytes, Data Address: 0xC0008000, Entry Point: 0xC0008000, data CRC: 0xEC41C576, OS: Linux, CPU: ARM, image type: OS Kernel Image, compression type: none, image name: "Linux-2.6.32-rc8"
10092608      0x9A0040        Linux kernel ARM boot executable zImage (little-endian)
10105397      0x9A3235        gzip compressed data, maximum compression, from Unix, last modified: 2018-11-06 19:19:34
12058624      0xB80000        gzip compressed data, has original file name: "rootfs", from Unix, last modified: 2022-03-31 16:40:24
20447232      0x1380000       JFFS2 filesystem, little endian
The next step was to compare the firmware version that was currently installed with one available on MOTU’s website. The firmware update from MOTU came in a .update file, so I used binwalk to examine the file’s contents. binwalk showed that the .update file contained multiple partitions, and I could isolate the relevant sections.
I searched in the dump to the same contents that I found in the .update file. Luckily almost the entire content from the .update file was present in the same order in the dump file. I used dd command to isolate that matching contents from both files (using the offsets and sizes that I could read from binwalk output) and the result were two files, part-of-interest-web.bin and part-of-interest-dump.bin. When binwalk ran over this two files, the output was the same.
But then, I created a sum hash for each file with sha256sum. To my surprise, they matched exactly, and this confirmed that the firmware in the device was, in fact, "enough" valid. I meant "enough" because I only analized a part of the flash content, but because it was mainly the total content of the .update file downloaded from Motu site, I could understand that the firmware is not corrupted inside the device.
$ sha256sum part-of-interest-web.bin
566165d92bb8cbebda611d89ff25a3e1eda60306fe26e0f8e4ea3e5cfc17bb6d  part-of-interest-web.bin
$ sha256sum part-of-interest-flash.bin
566165d92bb8cbebda611d89ff25a3e1eda60306fe26e0f8e4ea3e5cfc17bb6d  part-of-interest-flash.bin
So, the problem did not seem related with the firmware itself, but something else was causing the bootloader to believe it was corrupt. At this point, I turned my attention to the bootloader’s code.
I tried to extract the bootloader program. First, I focused in the entire flash dump that I already had, but I could not determine where the bootloader began neither its size. But as I watched in my U-Boot logs, I knew that the bootloader is already loaded in RAM when the device is turned on. So using the address and size found in the logs, I could repeat the md.b process to dump the memory content and it resulted in a binary file containing the entire bootloader program.
UBOOT header : (magicnumber, entry, appsize , ldAddress) - (0xA1ACED00 ,0xC1080000 ,0x00039E60 ,0xC1080000 )   DONE
Jumping to entry point at 0xC1080000.
Once I had the bootloader extracted onto my computer, I attempted to decompile it. For this, I used Ghidra, a powerful reverse engineering tool. Because the bootloader file wasn’t an executable with headers, Ghidra couldn’t infer how to decompile it.
To solve this, I extracted the firmware downloaded from MOTU's website using binwalk -e. This allowed me to access the filesystem partition. There, in the bin directory, I found the busybox executable, a program with headers that runs on the same system as the bootloader. By importing this program into Ghidra, I was able to identify the necessary features to decompile the bootloader: ARM v8, Little Endian.
Once the bootloader was decompiled, I traced where the string "invalid firmware" was used in the program. At first, the decompiled code wasn’t very clear, but there were a few things I could note down. First, by looking at the literal string constants used in certain parts of the program, I could identify that a frequently used function seemed to be a print function, so I renamed the method. This helped in building a general understanding of the program, replacing meaningless names with something more meaningful to us.
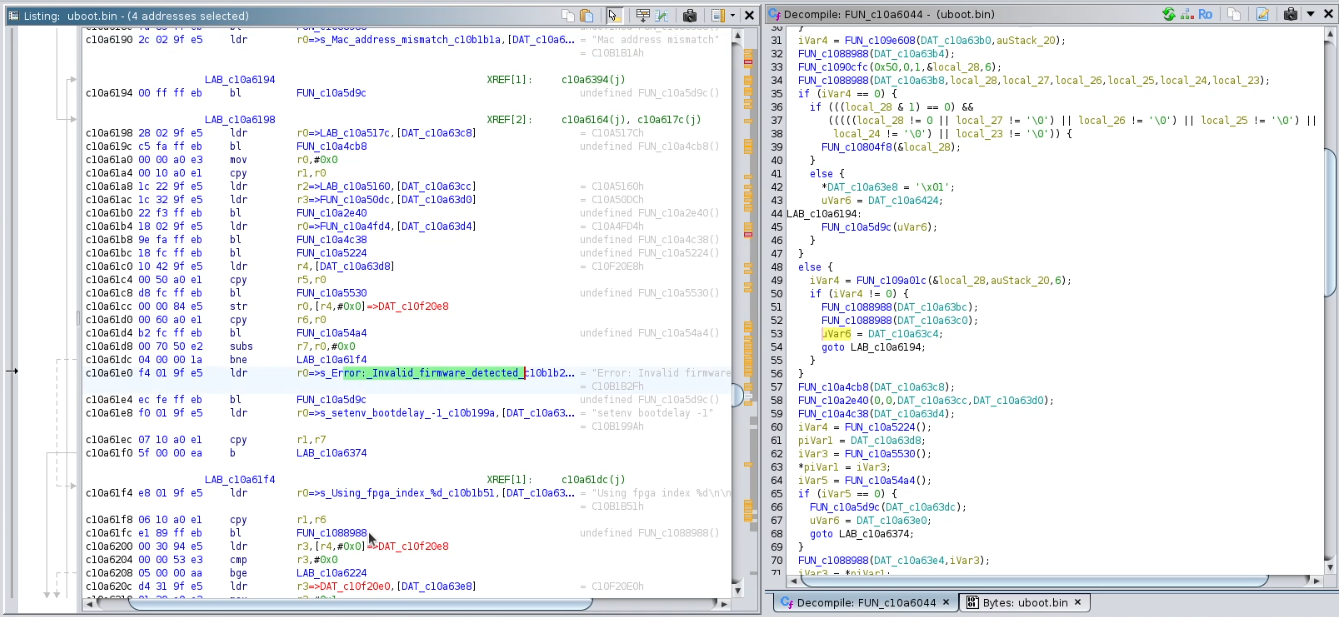
Then, I paid attention to the strings used in other methods and I was able to infer other functions, such as "detectMotuDevice", "i2cRead", "i2cWrite", "initFPGA", and a few others.
After several hours of trying to understand the program without reaching any particular conclusion, I had the idea to pay attention to the bootloader logs from the forum user and compare them with my own logs, to determine which line should be printed next if the bootloader didn’t finish like mine did. There, I noticed that the next line was related to "Expander ID: ...".
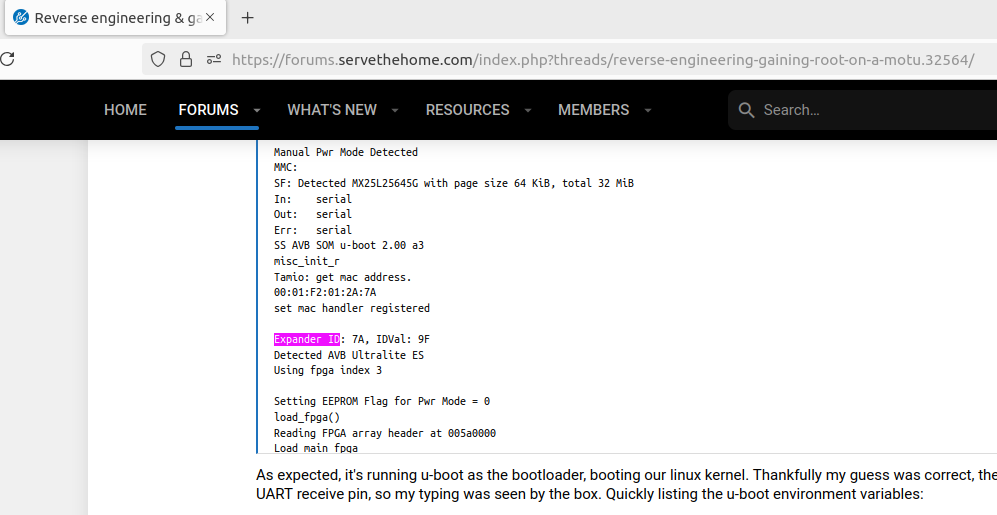
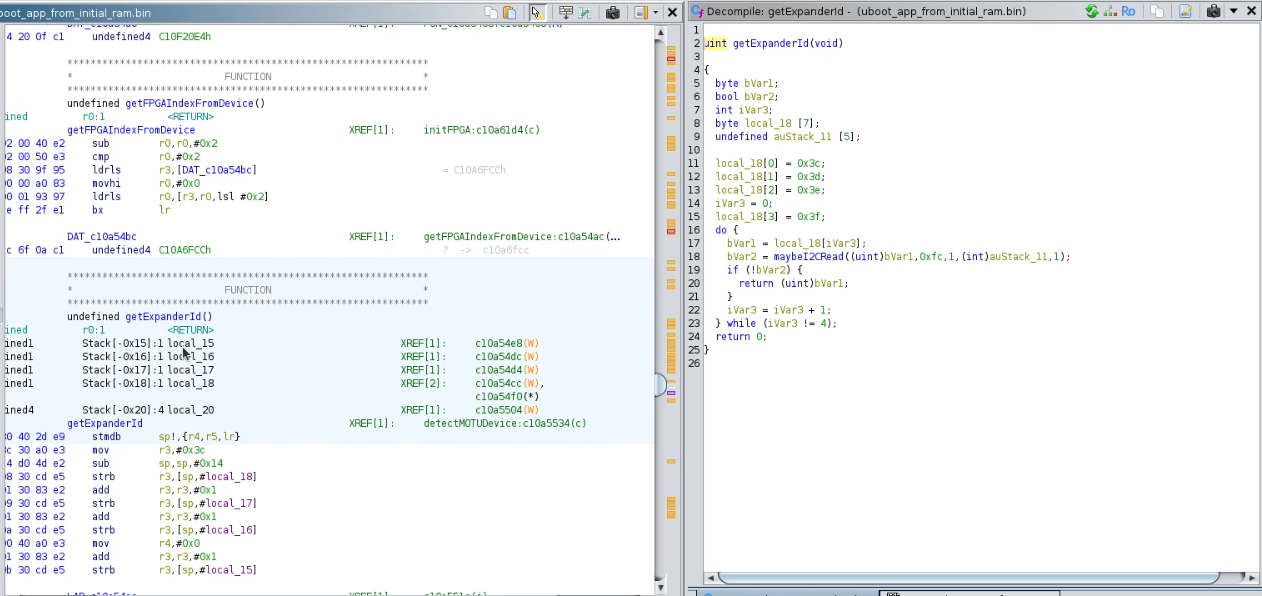
Tracking this string in Ghidra, I found a method that I could rename as "getExpanderId", which iterated over 4 consecutive bytes (0x3c, 0x3d, 0x3e, and 0x3f), seemed to do something with them over the I2C bus, and, if a certain condition was true, it returned that byte, which would end up being printed as "Expander ID: <byte>". This ID appeared to be the address on the I2C bus where a PCF8574 expander was located. Searching for information about the integrated circuit, I found a document that described how to configure the addresses on the I2C bus for this expander, and indeed, these four bytes were possible addresses for the integrated circuit.
I then connected the logic analyzer to the I2C bus where this expander was connected, and upon powering on the device, I saw that four packets were sent, one for each address, but no acknowledgment was received, so all suspicions pointed to a failure in the integrated circuit.
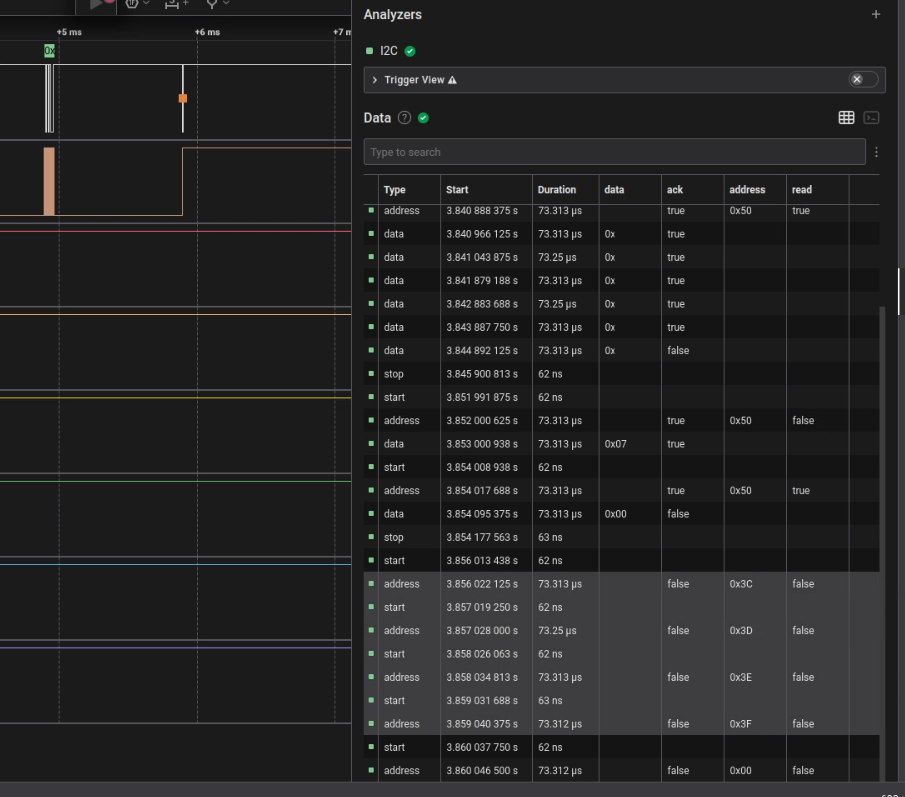
After confirming that the integrated circuit had the necessary voltage and there were no open circuits, I decided to replace the component with a new one.
Aaaaaand…
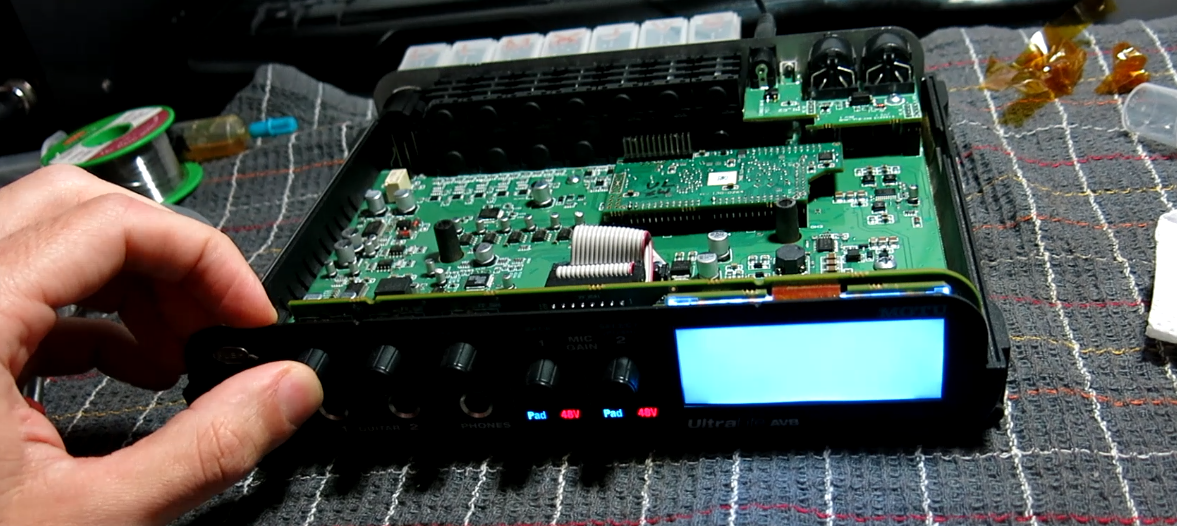
The result was that the interface came back to life perfectly. Apparently, for some reason, this integrated circuit had stopped functioning, and that’s why the bootloader couldn’t communicate with it via I2C. It also seemed that the bootloader was very dependent on it because, I suspect that depending on the address the expander was configured to, the bootloader could infer which MOTU product it was dealing with. It’s likely that different products use the same bootloader, and depending on how the expander is configured, it can determine which hardware version it’s running on.
A very interesting repair that took me to many places but also taught me a lot.
Subscribe to my newsletter
Read articles from Bonsembiante directly inside your inbox. Subscribe to the newsletter, and don't miss out.
Written by
