Automating Data Collection from Dynamic Websites: My Journey with Puppeteer, API Fetching, and AWS Lambda
 Evan
Evan
Introduction
I embarked on this project to deepen my hands-on experience with AWS Lambda and JavaScript. Despite having no prior background in JavaScript, I decided to dive in headfirst because I learn best through practice. I was eager to develop new skills, especially in automation, which is crucial for a cloud engineer. It's important to thoroughly understand automation concepts, even at a foundational level, to effectively manage cloud-based infrastructures.
AWS Lambda, a serverless compute service, allows you to run code without the need to manage or provision the underlying servers. For this project, my main goal was to scrape product listings from an online marketplace using JavaScript code executed in a Lambda function, and then upload the collected data to an S3 bucket. I chose a publicly available website for this task, and I want to emphasize that the project was undertaken solely for educational purposes.
As a hobbyist gamer with a strong interest in PC hardware and building custom gaming rigs, I selected jawa.gg, a marketplace for second-hand PC components, as the target website. My script scrapes current GPU listings, processes the data, and uploads the raw results in JSON format to an AWS S3 bucket, where it’s ready for further analysis and transformation.
As I worked through the data collection process, I discovered that the raw JSON output from the API fetch is a deeply nested object. This means that the data will need to be transformed before it can be uploaded to an SQL database for querying. I’ll provide a brief preview of the data structure at the end, however, I plan to post on this in-depth in a different post.
The project breaks down into two key parts: writing a JavaScript program to collect the data and setting up an AWS stack that includes Lambda for execution, S3 for storage, IAM for authentication, and CloudWatch for monitoring.
When I began this project, I initially opted for a traditional web scraping approach using Puppeteer. However, I quickly realized that this method wasn't well-suited for jawa.gg, as it's a dynamic website. This challenge prompted me to shift to using the API fetch method, which proved to be far more effective for retrieving the data I needed.
The journey has been both challenging and rewarding, and I’m excited to share the insights I’ve gained!
This article is geared towards those with a beginner to intermediate understanding of JavaScript and a working knowledge of AWS at a practitioner level. With that in mind, let’s dive in!
The Web Scraping Challenge: Using Puppeteer
The Puppeteer library is a Node.js tool that provides a high-level API for controlling headless Chrome or Chromium browsers programmatically. It can also run Chrome or Chromium in full (non-headless) mode. Puppeteer is commonly used for tasks such as web scraping, automated testing, generating PDFs, capturing screenshots, and interacting with web pages in a way that simulates user behavior.

I began by writing code for Puppeteer, but eventually, I moved away from it because it couldn't deliver the results I needed. I can show why at the end.
I kicked off coding in a streamlined dev setup, which was a Node.js installation running on my local Windows 11 machine.
//import the puppeteer module. I have included it in the package.json
import puppeteer from 'puppeteer';

//this is the website URL
const url = 'https://www.jawa.gg/shop/pc-parts-and-components/graphics-cards-G2XFDKAS'

/* the main function launches a new browser instance
extracts GPU product information (title, price, image)
by interacting with the page’s DOM.
Logs the extracted GPU data to the console (without a headless
browser for debugging purposes). */

const main = async () => {
    const browser = await puppeteer.launch({ headless: false})
    const page = await browser.newPage()
    await page.goto(url)

    const gpuListing = await page.evaluate((url) => {
        //convert the price string to a number
        const convertPrice = (price) => {
            return parseFloat(price.replace('$', ''))
        }
        //find a specific image URL that I found manually after
        //inspecting the website. I am selecting the URL for the width of 384 px and return it.
        const convertimgSrc = (srcset) => {
            if (!srcset) {
                return null;
            }
              const urls = srcset.split(' '); // Split on spaces to separate URLs

              return urls.find(url => url.includes('w_384')); // Find the URL with "w_384"


        }
        /* maps over the array gpuPods and for each GPU listing (gpu)
           extact the title pthe listing from the HTML element, the price,and the
            image URL*/
        const gpuPods = Array.from(document.querySelectorAll('.tw-group.tw-relative'))
        const productData = gpuPods.map(gpu => ({
            title: gpu.querySelector('.tw-paragraph-m-bold.tw-mt-3.tw-line-clamp-1.tw-overflow-ellipsis').innerText,
            price: convertPrice(gpu.querySelector('.tw-paragraph-m-bold.tw-order-2.tw-font-bold.tw-text-jawa-blue-500').innerText),
            imgSrc: convertimgSrc(gpu.querySelector('img').getAttribute('srcset'))

            }));


        return productData

    }, url);

    console.log(gpuListing)

    await browser.close()
}

main();
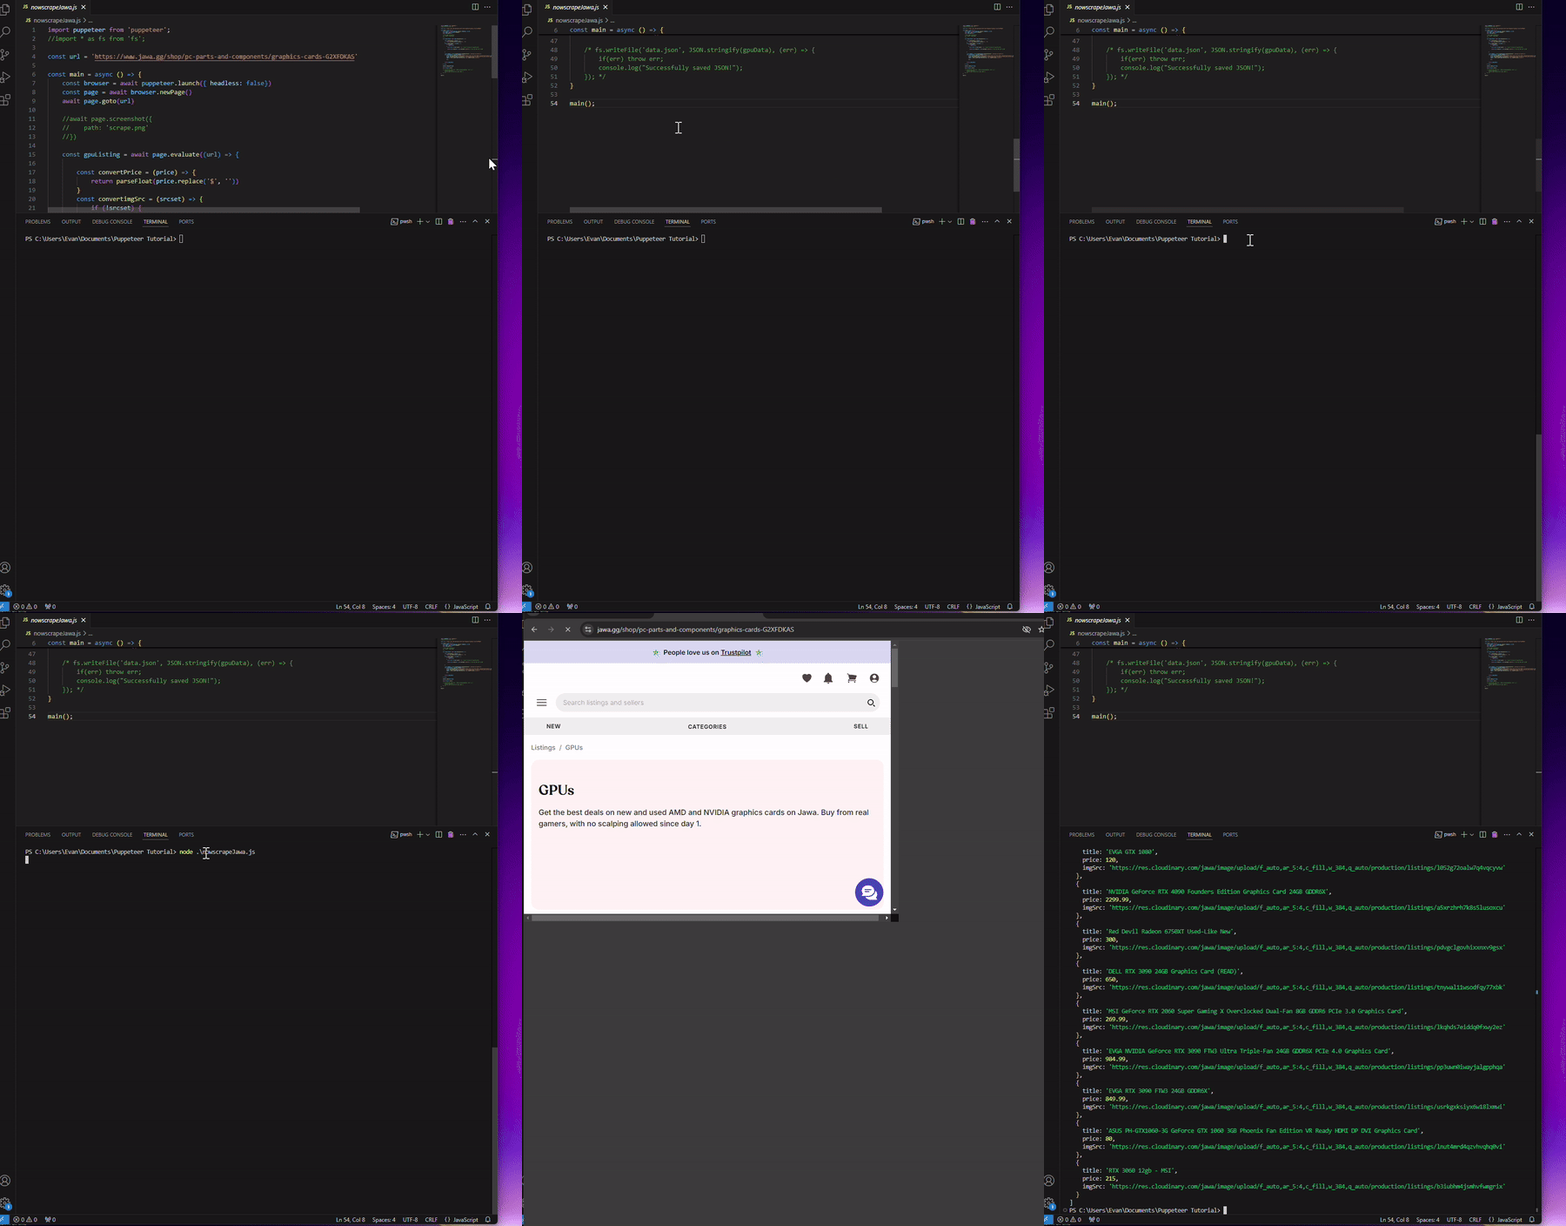
The program exits cleanly, however, these results are incomplete because it only returns the first page of the available listings.
Sample of the data:
[
  {
    title: 'ZOTAC RTX 2080 Ti TWIN FAN',
    price: 330,
    imgSrc: 'https://res.cloudinary.com/jawa/image/upload/f_auto,ar_5:4,c_fill,w_384,q_auto/production/listings/n92a3ylsspxyzouwsriw'
  },
  {
    title: 'ROG Strix GeForce RTX™ 4070 Ti 12GB GDDR6X OC Edition',
    price: 785,
    imgSrc: 'https://res.cloudinary.com/jawa/image/upload/f_auto,ar_5:4,c_fill,w_384,q_auto/production/listings/d7dqykw5lczm8wld3kxf'
  },
  {
    title: 'Sapphire Pulse RX 6600XT',
    price: 165,
    imgSrc: 'https://res.cloudinary.com/jawa/image/upload/f_auto,ar_5:4,c_fill,w_384,q_auto/production/listings/fu6rlj1c3iu0h6is0pga'
  },

//...
I attempted to progress the program so that the puppeteer agent would click on the next page button like a real person would, log the page, and continue this pattern until it had reached the end of the product listings in a loop. However, I didn’t have any success with this approach. After identifying the HTML element that contained the “next page” button on the site, I assigned it to a variable and wrote a while loop that would check if the element was on the page and then use the .click() method to click on it before running the main function again. But I would either run into an error that said …
throw new Error('Node is either not clickable or not an Element');
… or the browser session would only loop between pages 1 & 2 endlessly. I was sure to include .waitForNavigation() but it made no difference.
So, I investigated the website more closely. I noticed two important clues. For one, I could not manually navigate to a page on the site by simply adding the page number at the end of the URL. It always bounced back to the first page.
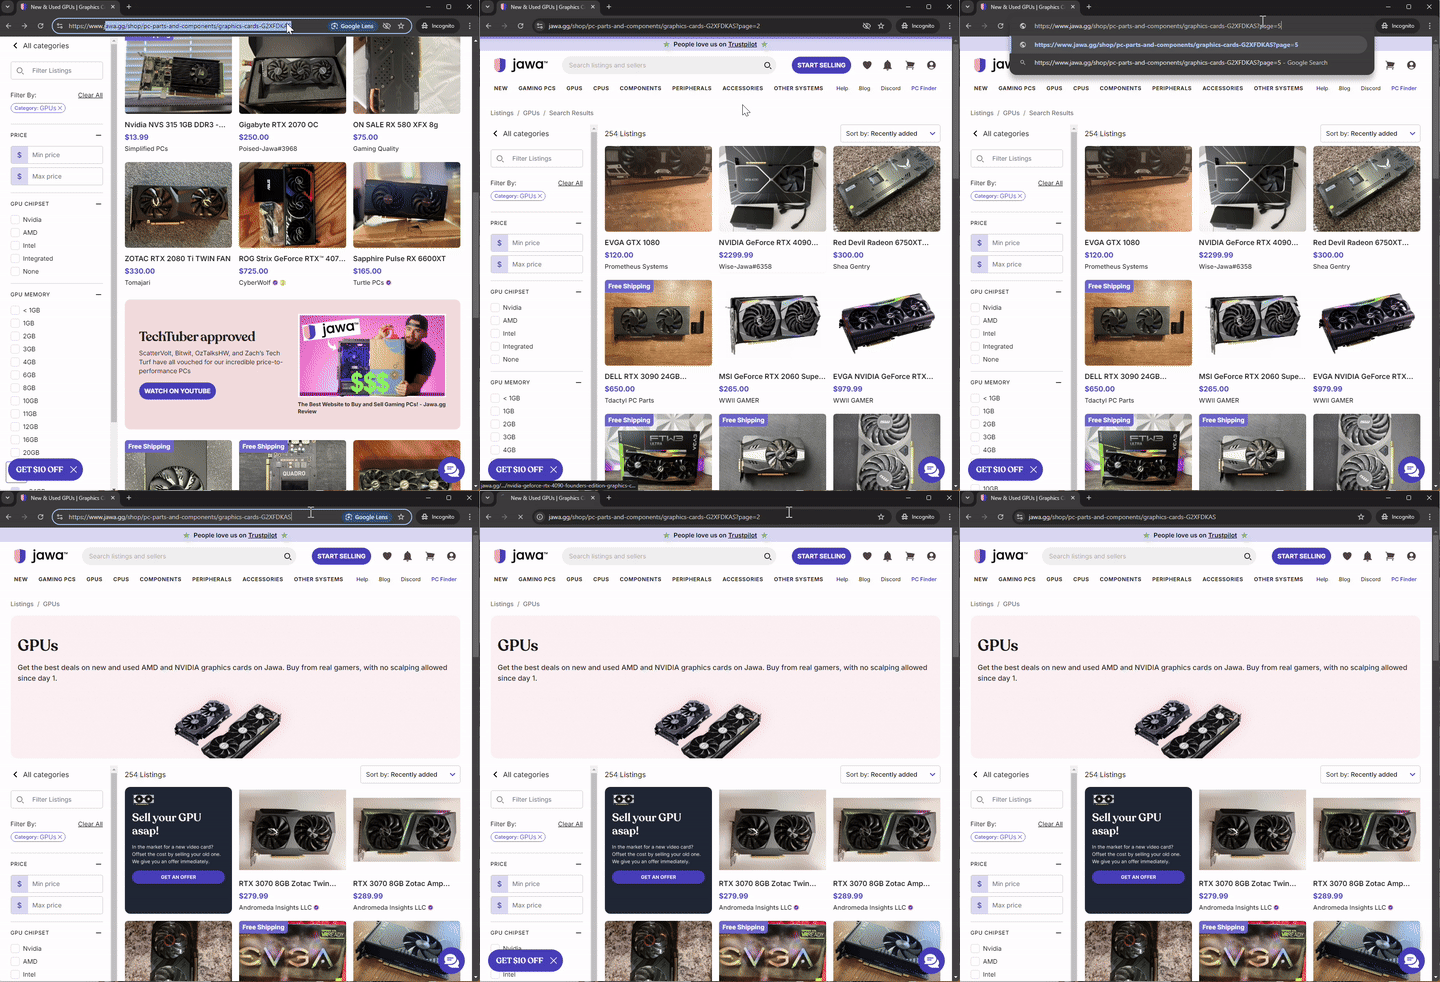
That prompted me to take a closer look and understand how the site was designed. I began to analyze the underlying logic for navigating pages so I could try to replicate it in my code in the browser dev tools. I noticed that when the user clicks on the next page, instead of loading a new page, it starts a fetch request.
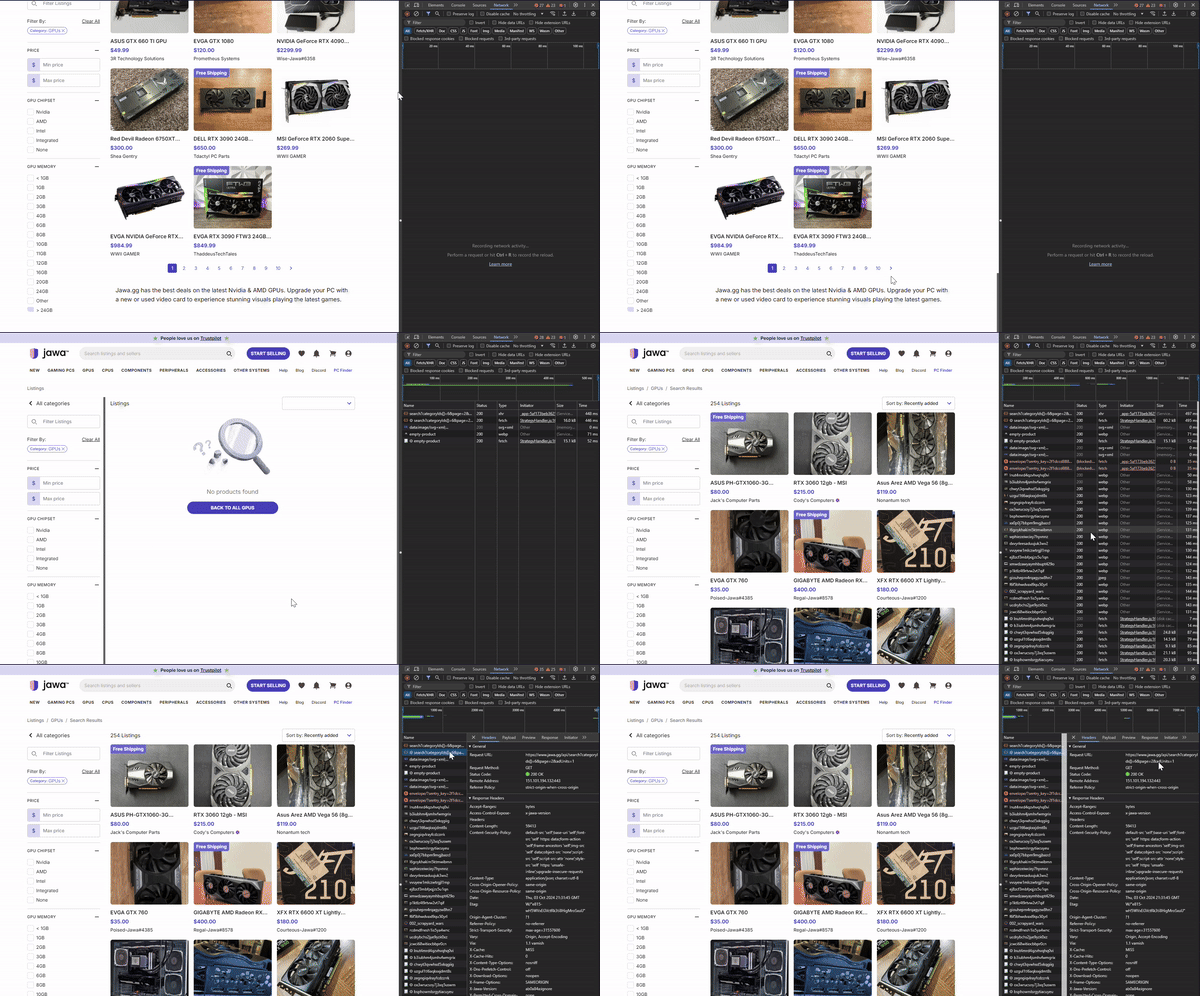
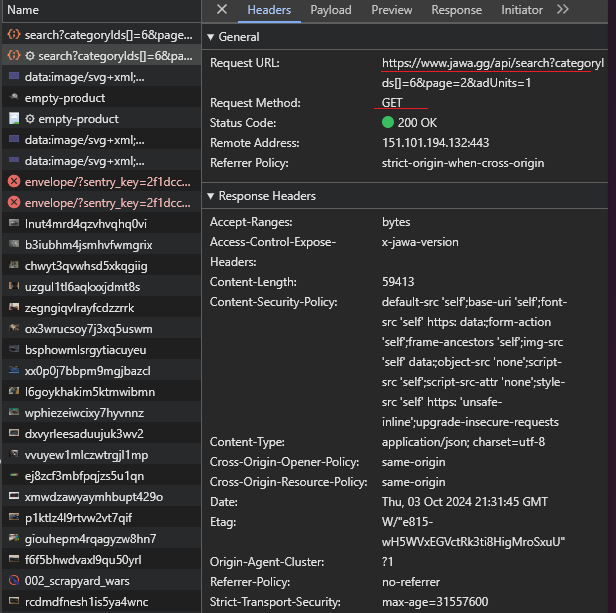
This discovery helped me to confirm that this webpage is actually being loaded dynamically rather than through using traditional URL-based navigation. When you click a page number or "Next" button, a fetch call is made to the backend API (at the /api endpoint) to retrieve the new set of products. This data is then likely injected into the current page without reloading it. Apparently, this technique is called API pagination. If you want to learn about it more in depth, I have linked a resource here that discusses in much more detail.
So, after I had a better understanding of how the website was displaying the product listings, I adjusted my approach to access the site’s API directly and abandoned the traditional web scraping approach with Puppeteer.
Shifting Gears: Querying the API Directly
I rewrote the program to use fetch() to query the API directly.
//At the end I write a .JSON file with the output
import * as fs from 'fs';

const apiUrl = 'https://www.jawa.gg/api/search?categoryIds[]';  // the API endpoint
let initialPageNumber = 1  // The starting page number for the request is "1", "0" returns code 400
let response = await fetch(`${apiUrl}=6&page=${initialPageNumber}`);
let dataJson = await response.json();
const now = Date.now();


async function getApiData () {
    //an array that will be updated with the product listings from each page
  let productData = [];

  let state = Object.keys(dataJson.products).length !== 0;
  console.log(state);


  while (state) {

    response = await fetch(`${apiUrl}=6&page=${initialPageNumber}`);
    dataJson = await response.json();
    state = Object.keys(dataJson.products).length !== 0;

    let nextPageNumber = initialPageNumber;
    initialPageNumber++;
    //this console log is for debugging.
    console.log(`The page number is: ${nextPageNumber}`);
    productData.push(dataJson.products);

  }

  if (!state) {
    console.error('No more products');
  }

  return productData;

}


async function cleanData(data) {
//write the output as 'fetchedarray.json'
 fs.writeFile((`${now}_fetchedarray.json`), JSON.stringify(data), (err) => {
    if(err) throw err;
    console.log("Successfully saved JSON!")});

}

const apiData = await getApiData();

cleanData(apiData);
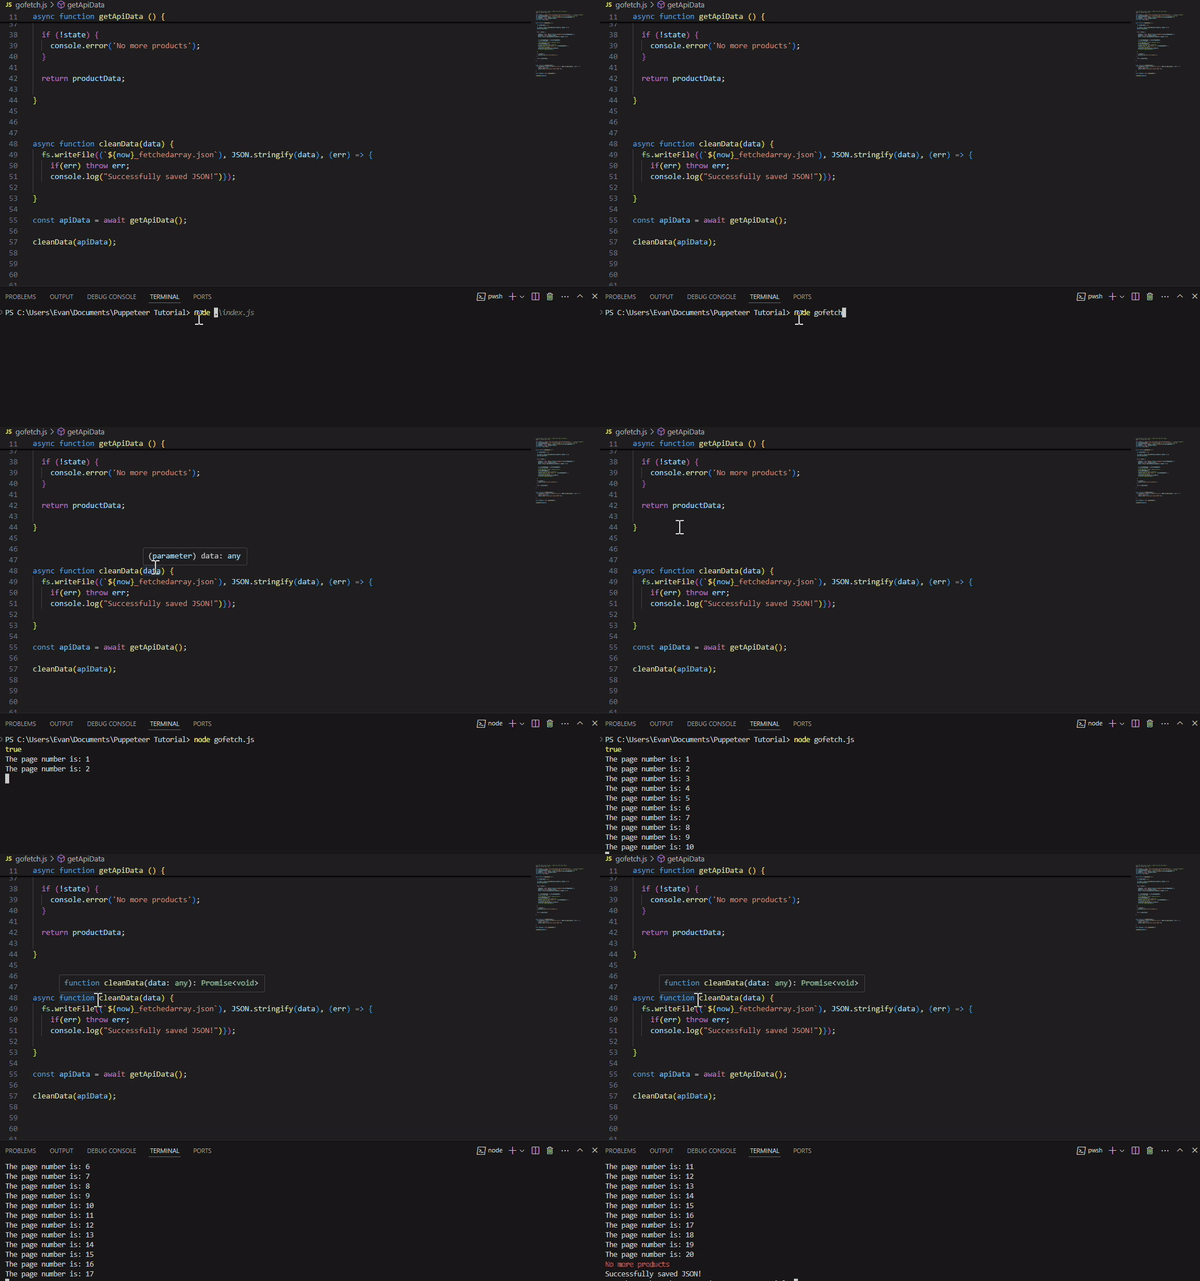
The apiUrl variable holds the API endpoint, and we kick things off by setting the page number to 1—starting at 0 throws a ‘400’ error. We grab the first batch of data using fetch and convert the response into a JSON object. The core logic is inside of the getApiData function. Here, we create an empty productData array to store product listings as we loop through the pages. To keep the loop going, the state variable checks if there are still products available.
As the loop runs, each page is fetched, and we log the page number in the console for some helpful debugging—just to confirm it's pulling every page correctly. The product data is added to the productData array, and once we hit a page with no more products, the loop breaks and console logs “No more products”. Finally, the cleanData function steps in to save everything into a fetchedarray.json file. Date.now() is used to capture the current timestamp in milliseconds (since January 1, 1970). This value is being used in the fs.writeFile function to create a unique filename for saving the JSON data. Any errors during the file writing process will be caught and thrown, and a success message is logged when the data is saved.
Using AWS Lambda for Automation and S3 for Storage
This is where the fun in the cloud begins! The first step is to create the Lambda function that will run our Javascript program.
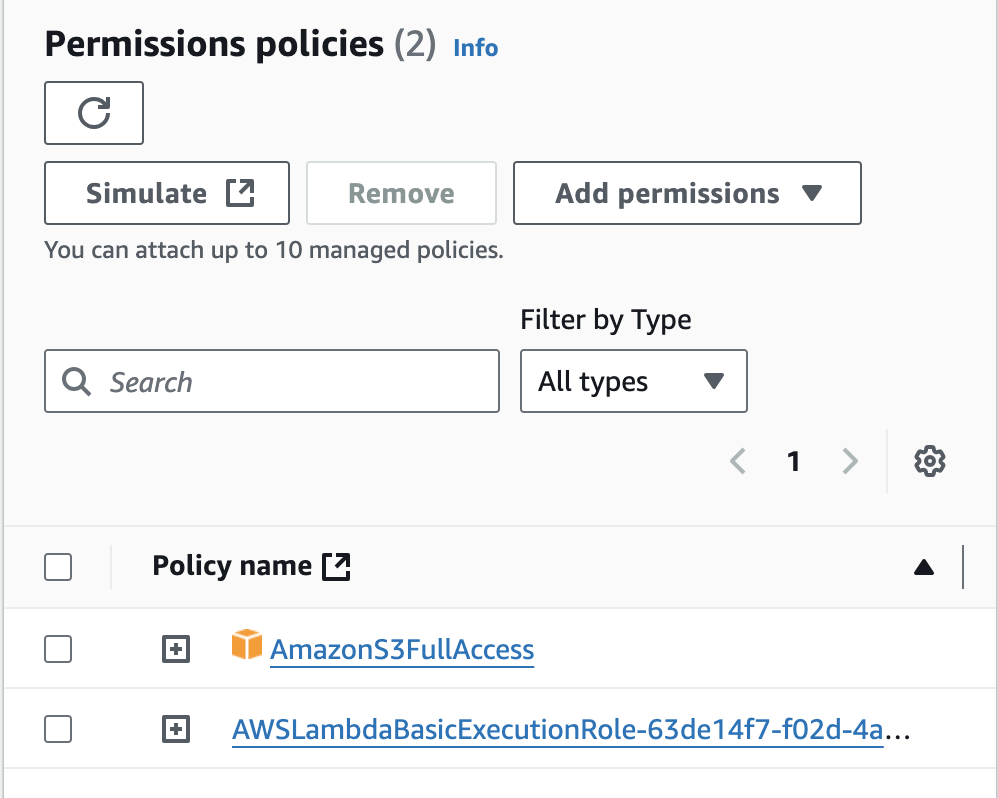
This function's configuration is basic. It's important to assign the correct permissions with IAM. The function's execution role should allow it to access S3 (AmazonS3FullAccess) and write logs to CloudWatch for monitoring (AWSLambdaBasicExecutionRole).
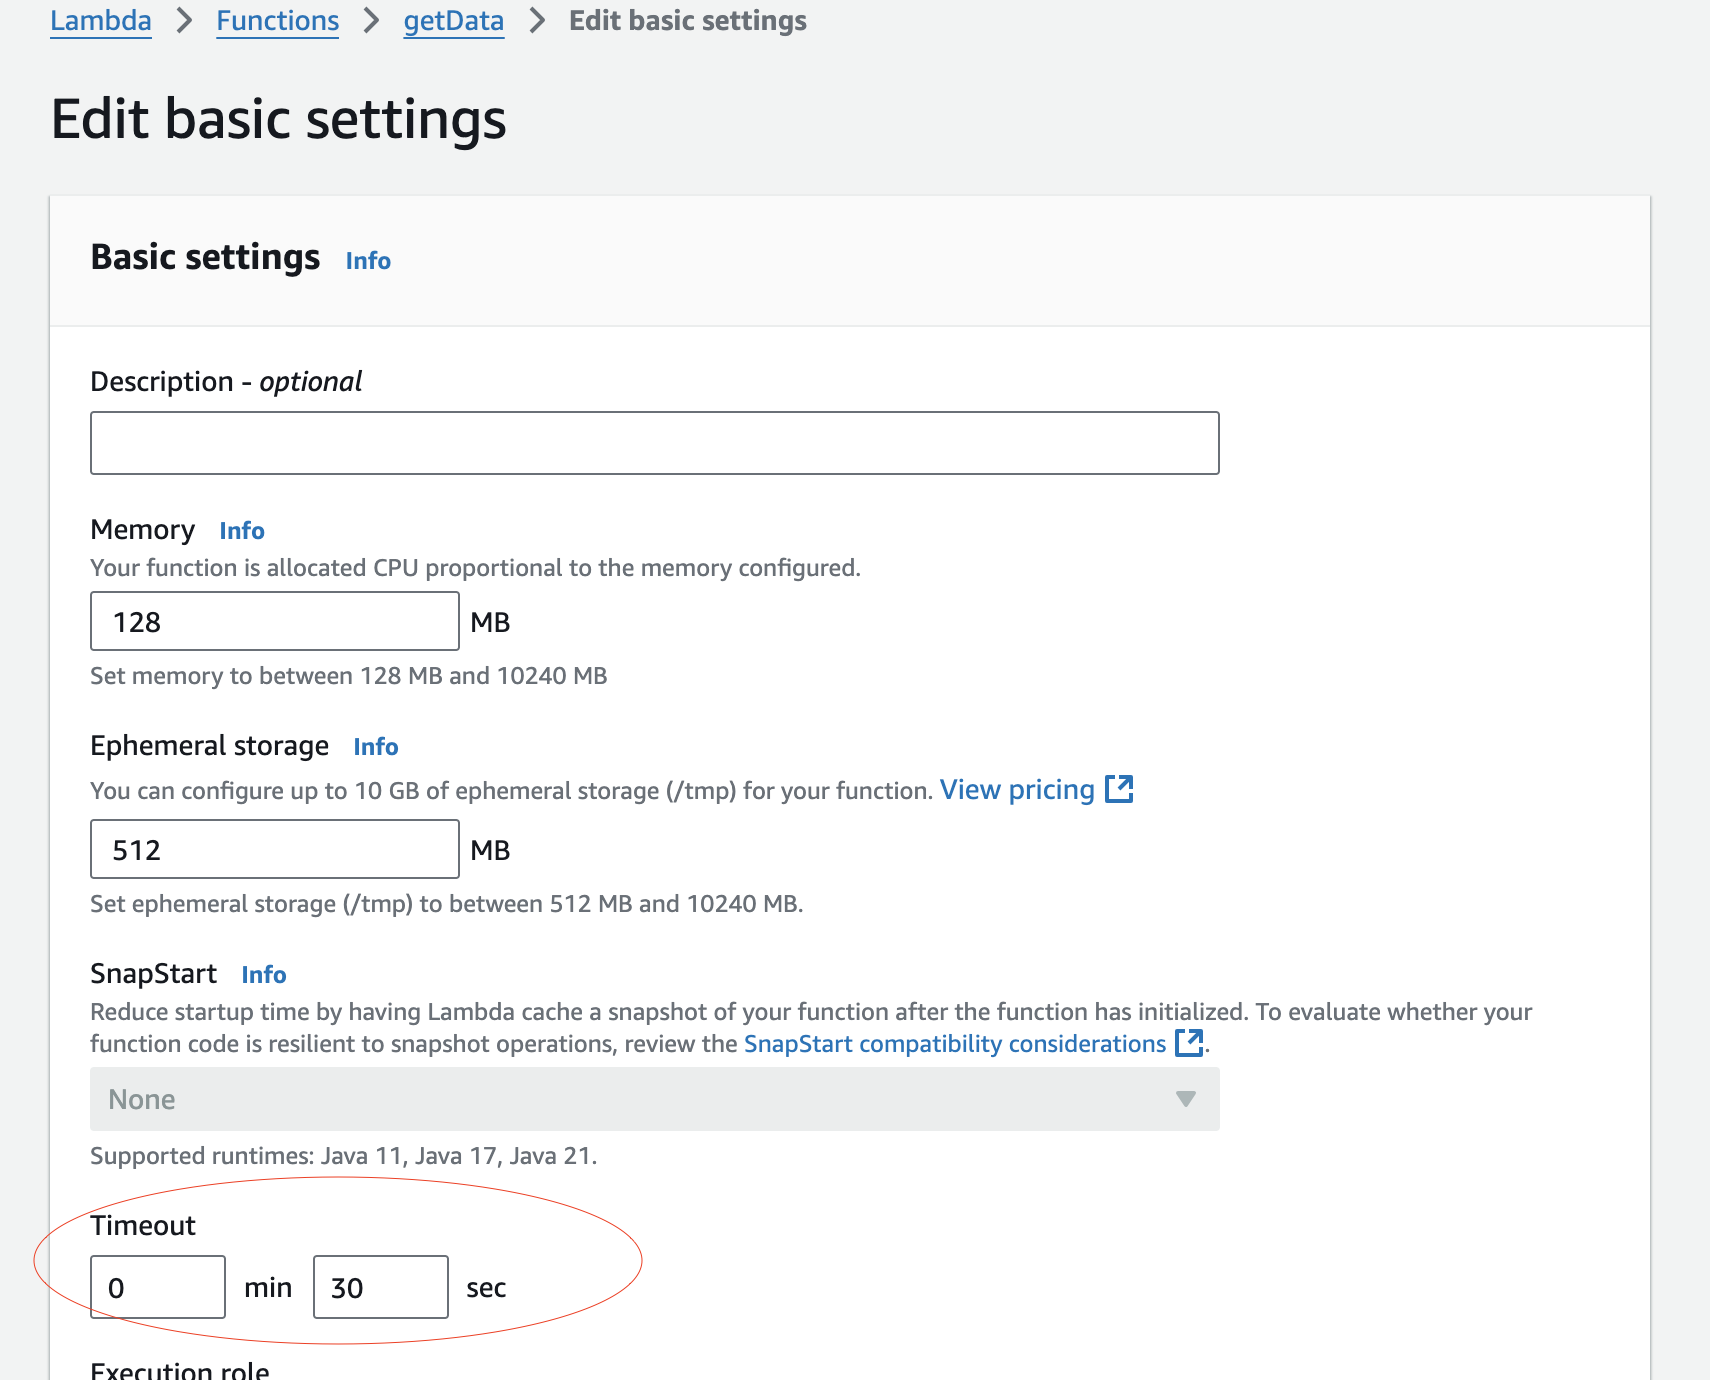
The next thing I needed to do was adjust the execution time of the Lambda function. The default timeout is 3 seconds but this function runs anywhere from about 7-15 seconds depending on how many listings are being fetched. Trying to run the function without adjusting the default timeout setting will result in this error:

Rewriting the code for Lambda using the AWS JavaScript SDK was not too complicated. I followed the AWS documentation. However, calling the AWS S3 submodule from SDK v3 was not as straightforward as I expected. Many guides I consulted suggested using var AWS = require('aws-sdk');, which calls the entire SDK v2. But since version 3 of the SDK is essentially “modularized” to reduce it’s size, you must call the submodules or you will see a “not found” error. Ultimately, this documentation was helpful in the end:
https://docs.aws.amazon.com/AWSJavaScriptSDK/v3/latest/introduction/#modularized-packages
const AWS = require('@aws-sdk/client-s3');
//AWS javascript SDK v3
const s3 = new AWS.S3();
//create a new S3 client


exports.handler = async function (event) {
  const apiUrl = 'https://www.jawa.gg/api/search?categoryIds[]';
  let initialPageNumber = 1
  let response = await fetch(`${apiUrl}=6&page=${initialPageNumber}`);
  let dataJson = await response.json();
  const now = Date.now();


  async function getApiData () {

    let productData = [];

    let state = Object.keys(dataJson.products).length !== 0;
    //console.log(state);


    while (state) {

      response = await fetch(`${apiUrl}=6&page=${initialPageNumber}`);
      dataJson = await response.json();
      state = Object.keys(dataJson.products).length !== 0;


      let nextPageNumber = initialPageNumber;
      //turn in to JSON
      //let dataJson = await response.json();
      initialPageNumber++;
      //console.log(dataJson.products);
      console.log(`The page number is: ${nextPageNumber}`);
      //console.log(state);
      productData.push(dataJson.products);
      //console.log(productData);

    }

    if (!state) {
      console.error('No more products');
    }

    return productData;

  }

  const apiData = await getApiData();

  try {
    var params = {
      Bucket : 'fetcheddata',
      Key: `${now}_fetchedarray.json`,
      Body : JSON.stringify(apiData)
    };

    await s3.putObject (params);
    return { statusCode: 200, body: 'File uploaded successfully' };
  } catch (err) {
    console.error("Error uploading file:", err);
    return { statusCode: 500, body: 'Error uploading file' }
  };


}
The getApiData function logic has not changed. The biggest differences here are adding the Lambda function handler and the try catch block where the PUT operation is initiated. Some highlights:
This imports the AWS SDK client for S3, which allows interaction with Amazon S3.
A new instance of the S3 client (
s3) is created, which will be used to upload the raw JSON file to my S3 bucket.Once the API data is collected (
apiData), the function tries to upload it to an S3 bucket.The
paramsobject defines my S3 bucket, the file key (which includes the current timestamp), and the file body (the JSON string of the fetched data).s3.putObjectuploads the file to S3.If successful, it returns a 200 status with a success message.
If an error occurs during upload, it logs the error and returns a 500 status with an error message.
Let’s see it in action!
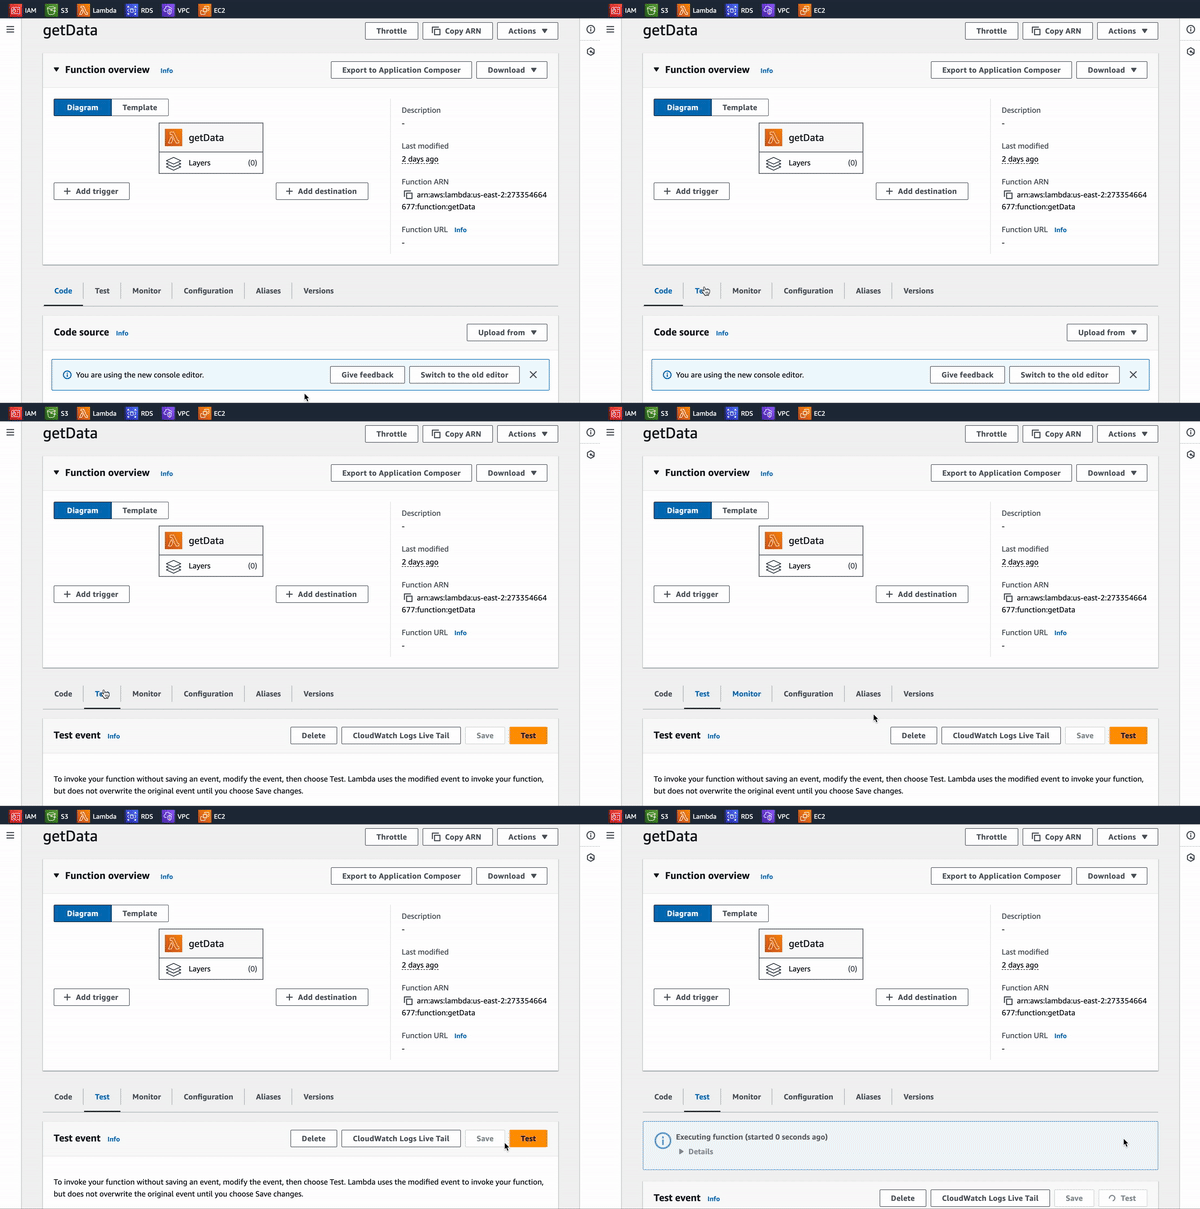
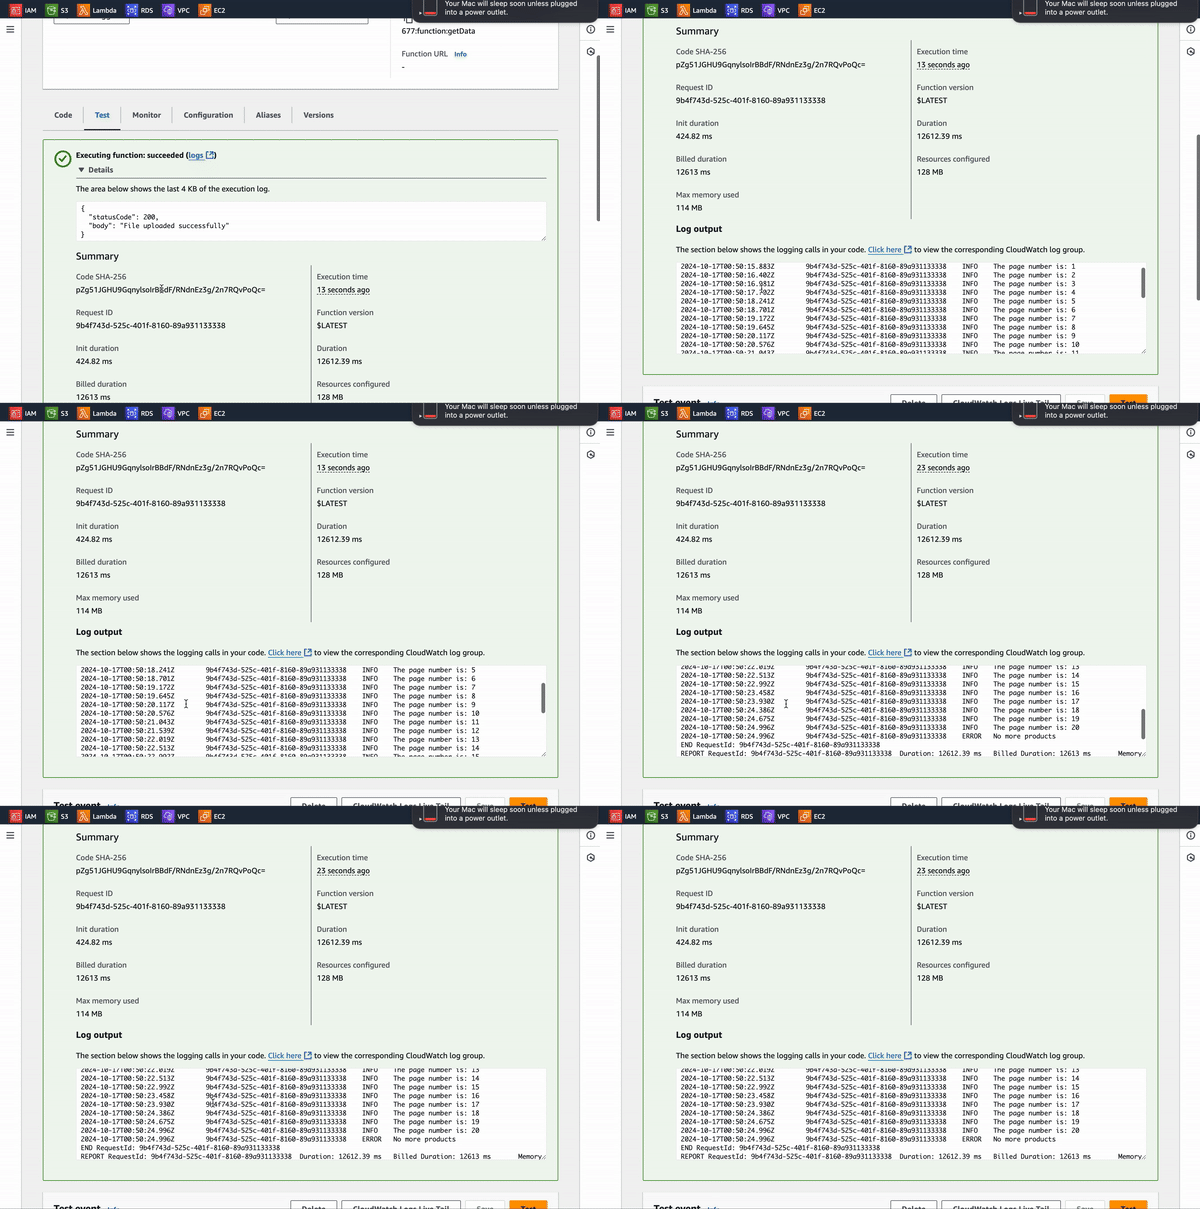
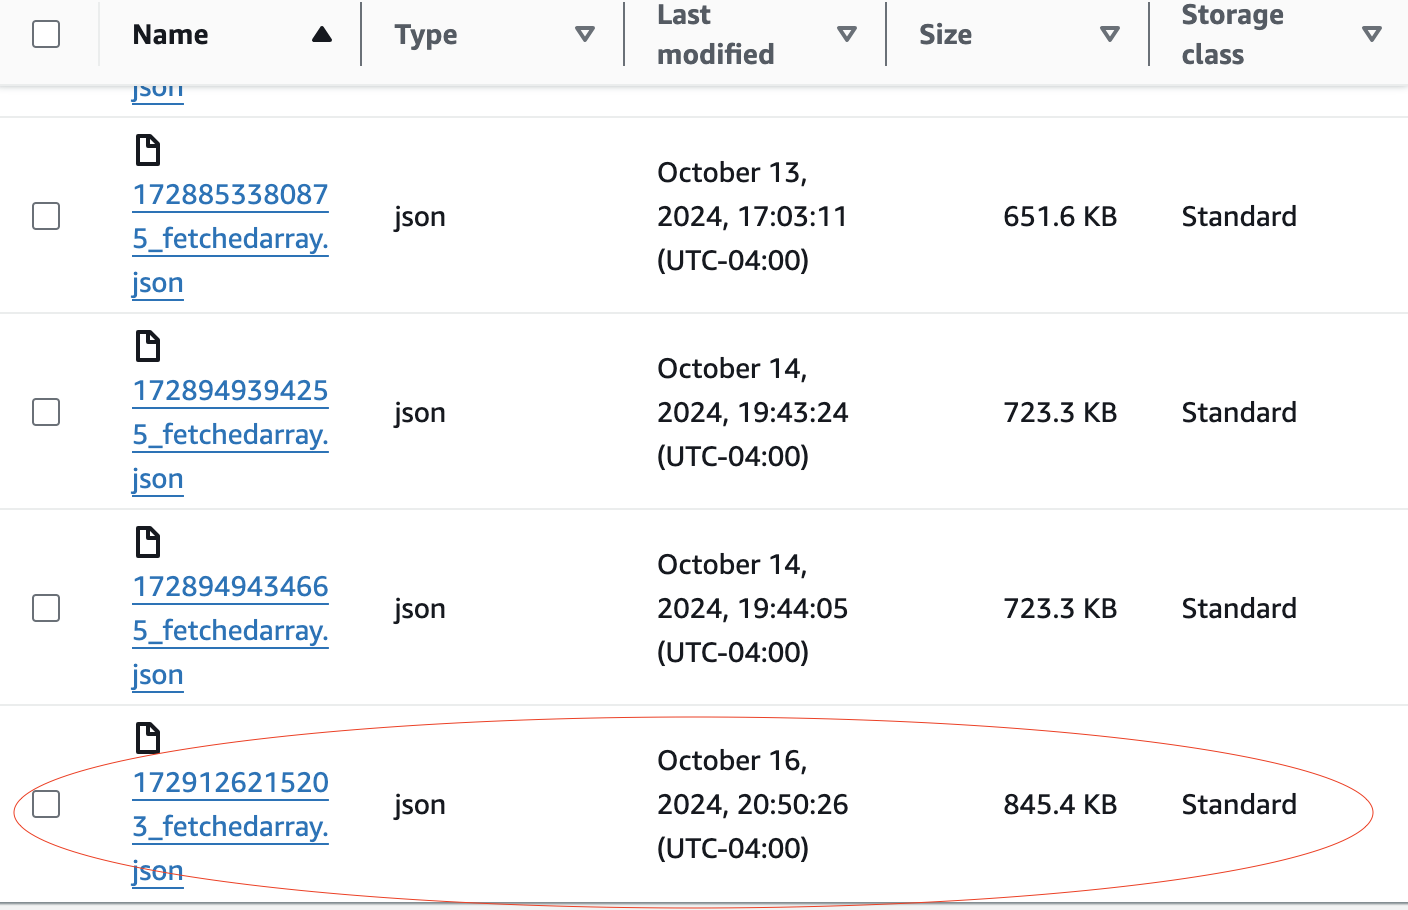
Here is the file, ready and waiting in the S3 bucket!
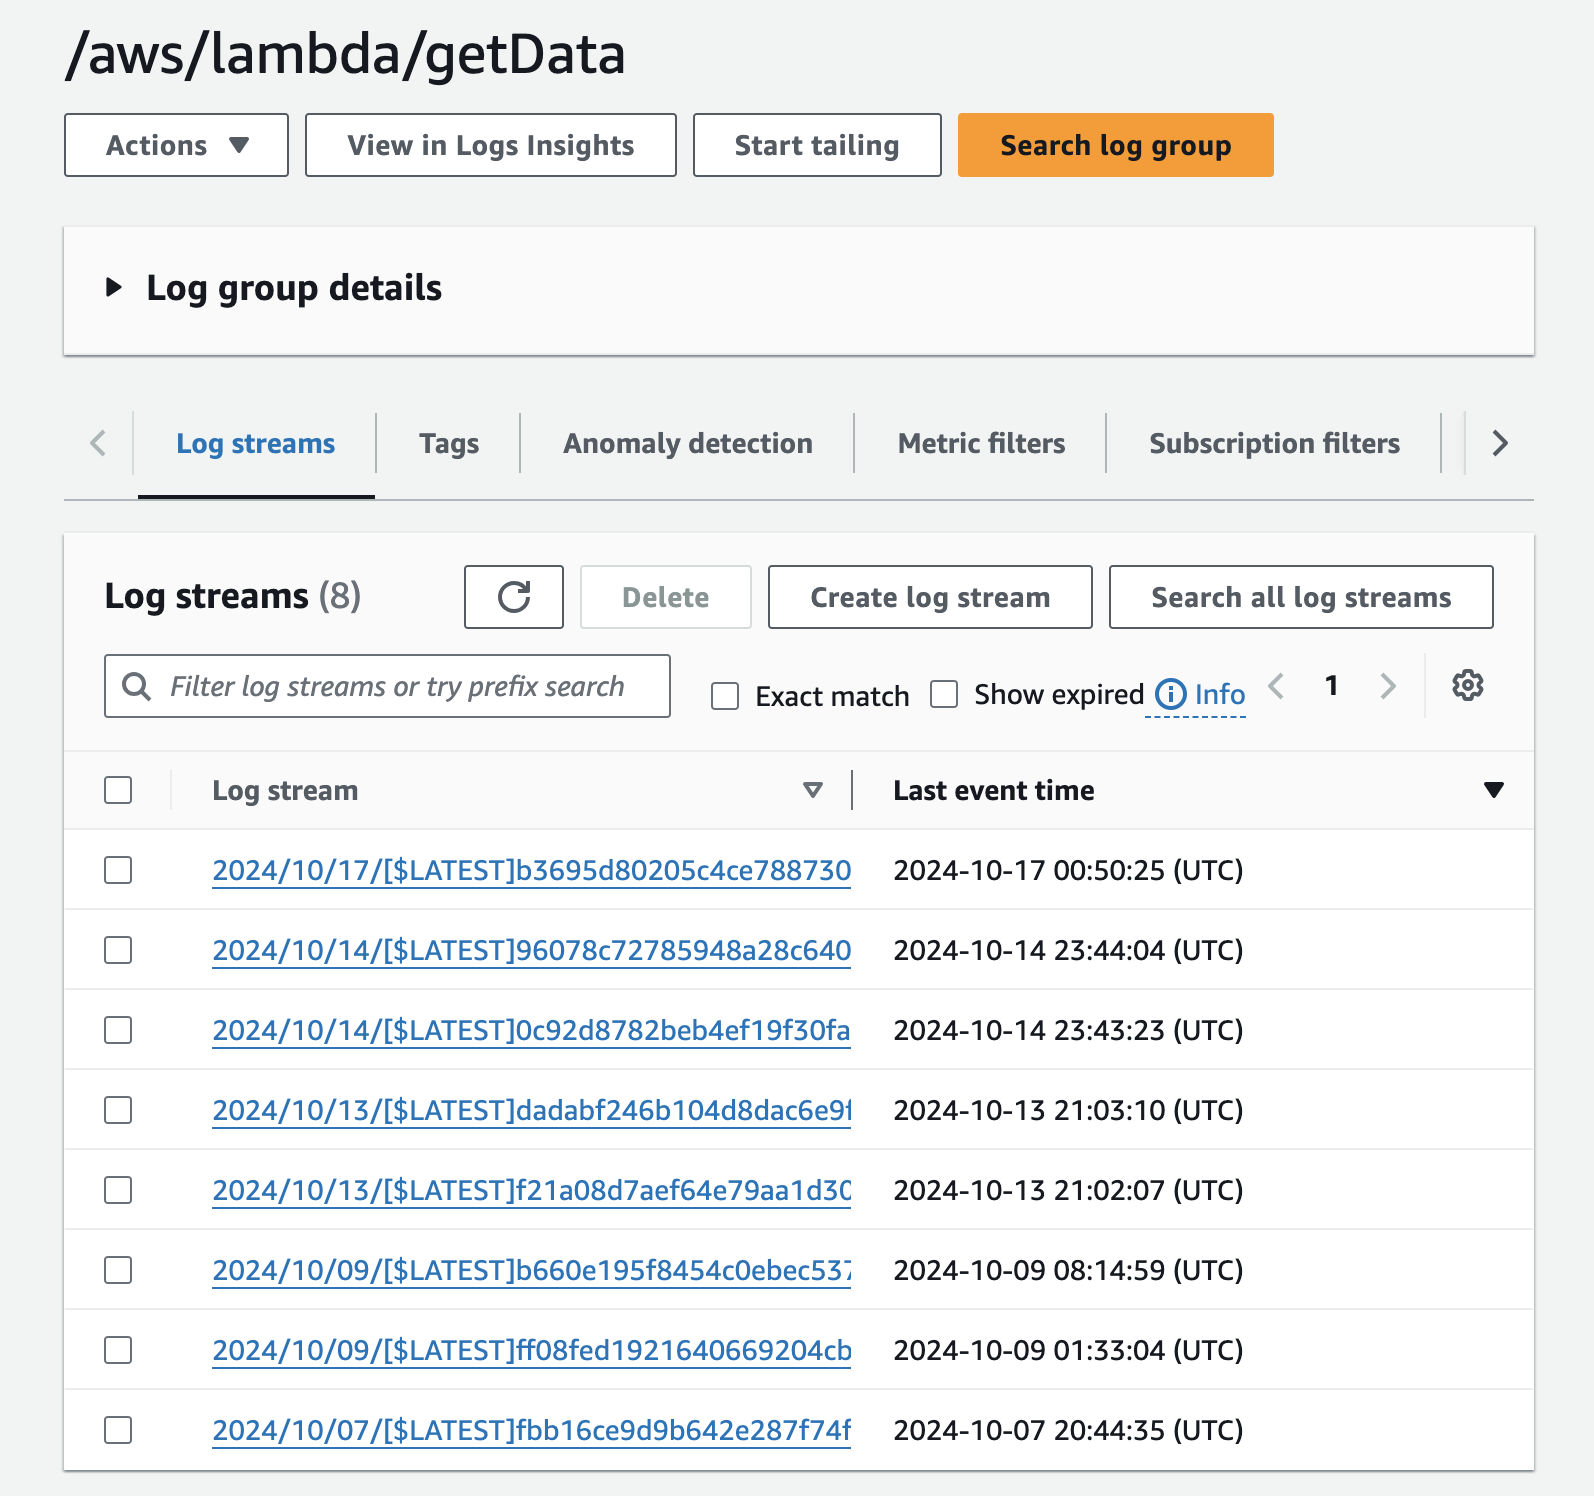
And, here are the logs in CloudWatch.
Analyzing the Data
Taking a closer look at the kind of data I am getting from the API, this is an example of a single product listing. There are over 250 products listings in this fetch.
{'blocked_at': '',
'buyer_protection_policy': None,
'category': {'id': 6, 'name': 'GPUs'},
'condition': 'used-good',
'created_at': '2024-07-24T21:35:14.356Z',
'description': 'This AMD Radeon HD 5870 1GB GDDR5 Graphics Card features DisplayPort, HDMI, and DVI ports. It has been tested, cleaned, and confirmed to be in good working condition, with potential signs of previous use.',
'expired_at': '',
'featured_at': '',
'height': 0,
'id': 37723,
'images':
    {'ids': ['production/listings/qgry6fkvna5423moqtbx', 'production/listings/rhr6groalzpbispxazse', 'production/listings/cmeqwppvlbsqctc8iywh', 'production/listings/d37tvncxckowxh2myb0p'], 'source': 'cloudinary'},
'is_insured': False,
'is_on_sale': True,
'is_private_listing': False,
'is_published': True,
'is_sold_out': False,
'labels': [{'id': -1, 'name': 'Free Shipping'}],
'last_featured_at': '',
'last_published_at': '2024-07-24T21:35:14.356Z',
'last_sold_at': '',
'length': 0,
'listing_code': '',
'listing_expires_at': '',
'minimum_offer_amount': 2039,
'name': 'AMD Radeon HD 5870 1GB GDDR5 Graphics Card -DisplayPort, HDMI, DVI',
'number_sold': 0,
'original_price': 2599,
'price': 2399,
'price_last_changed_at':
'2024-07-24T21:35:14.356Z',
'published_at': '2024-07-24T21:35:14.356Z',
'quantity': 2,
'quantity_available': 2,
'return_policy': {'restocking_fee_percent': 0, 'return_window': 30},
'shipping_jawa_manual_price': 0,
'shipping_option': 'seller_manual',
'shipping_seller_manual_price': 0,
'sku': 'AMD HD 5870 1G GDDR5 (2,3)',
'specs': {'Memory': '1GB'},
'status': 'available',
'url': '/product/37723/amd-radeon-hd-5870-1gb-gddr5-graphics-card-displayport-hdmi-dvi',
'user': {'badges': [], 'displayed_name': 'TechCastle', 'facebook_ids': ['fd8bd165-53b5-4c9c-a710-da5b6589ae07'], 'id': 215231, 'images': {'avatar': 'production/avatars/deiaybd5arnm9tzr0yam', 'source': 'cloudinary'},
'is_business': False, 'is_guest': False,
'is_on_vacation': False,
'is_verified': True,
'store_name': 'TechCastle',
'tag_line': '',
'username': 'TechCastle',
'website': ''},
'user_id': 215231,
'video_url': '',
'watch_count': 0,
'weight': 0,
'width': 0}
This dataset is deeply nested, so extra steps are needed to properly extract the product listing data and prepare it for querying. Additionally, there are a few quirks in the data that must be addressed. For example, while some of the key-value pairs, like 'tag_line,' may be interesting, they are not particularly useful and can be removed. Furthermore, the 'price' value is not displayed in a readable format.
To address these issues, I plan to use a secondary Lambda function to transform the data, leveraging Python which is better suited for the task. We'll reduce it down to only the necessary fields—'name,' 'description,' and 'price.' The price will be converted to an integer and divided by 100 to represent the amount in USD.
The result is a much more useable (this is not the same product show above):
{'name': 'MSI GTX 1650 D6 AERO ITX OC GeForce Graphics Card 4GB GDDR6',
'description': 'MSI GTX 1650 D6 AERO ITX OC GeForce Graphics Card 4GB GDDR6.\n\nCard was used in an church office computer for around 2 years (only two days a week), just to get 3 monitor support. It was never used for gaming or anything taxing on the GPU.\n\nPulled from that working system and tested to verify functionality.\n\nCard does not require any external power connection. It draws all needed power from the PCIe slot.\n\nDoes not include original box, packaging, or documentation.',
'price': 89.99},
Reflections and Key Insights from the Process
Facing issues with the Puppeteer approach at first was disappointing, but I'm glad I could switch to a new method for collecting data that worked much better. I discovered that I really enjoy writing JavaScript, and I plan to keep learning more about it. In the coming days, I will need to think like a data scientist and learn how to further transform the data to make it more useful. Incorporating a database would be the best option for data queries.
Stay tuned for more updates on my progress. Thanks for learning with me! If you found this blog interesting, please check out some of my other posts.
Subscribe to my newsletter
Read articles from Evan directly inside your inbox. Subscribe to the newsletter, and don't miss out.
Written by

Evan
Evan
Hi, I’m Evan — an engineer with a passion for automation, security, and building resilient cloud infrastructure. I spend a lot of time in the weeds solving real-world problems, whether that’s through client work or experiments in my homelab. This blog is where I document those lessons, not just to keep track of what I’ve learned, but to share practical insights that others in the field can apply too. My focus is on bridging the gap between security best practices and operational efficiency, using tools like Ansible, Docker, and AWS to make systems both secure and manageable. Whether you’re planning your infrastructure, hardening environments, or just learning the ropes, I hope these posts give you something useful to take with you. I’m always learning too, and this blog is as much about sharing the process as it is the results. Thanks for stopping by — let’s keep learning and building together.