Easy Steps to Develop a Bankbot with Amazon Lex
 Keerthi Ravilla Subramanyam
Table of contents
- Key components
- Prerequisites
- Step 1: Creating Your AWS Lex BankBot
- Step 2: Creating a Welcome Intent
- Step 3: Creating Fallback intent
- Step 4: Create a slot
- Step 5: Create a check balance intent
- Step 6: Create Your AWS Lambda Function
- Step 7: Connect the lambda to amazon lex
- Step 8: Connecting CheckBalance intent to Lambda Function
- Step 6: Setting up context carryover
- Step 7: Create FollowupCheckBalance intent
- Step 8: Create Transfer intent
- Visual representation

Let’s build a banking chatbot that greets users, checks account balances, and facilitates fund transfers all while ensuring a secure and interactive experience! In this article, we’ll walk through the process of creating a fully functional bankbot using Amazon Lex and AWS Lambda. Our bot will not only handle essential banking tasks but will also prioritize user security by requesting the date of birth for identity verification. By leveraging AWS services, we’ll empower our chatbot to manage banking needs effectively and securely. It's a lengthy process, but trust me, it's easy if you follow along. Join me as we embark on this journey to create a smarter, safer banking assistant!
Key components
Amazon Lex: Amazon Lex is an AWS AI service that enables you to build conversational interfaces using voice and text. It uses deep learning to understand natural language and manage dialogues, allowing you to create chatbots and virtual assistants that interact with users in real-time. It integrates with other AWS services for scalability and intelligence.
Intents: In Amazon Lex, intents represent the actions or tasks users want to accomplish through the chatbot, like checking balances or transferring funds. They include utterances (phrases users say to trigger an intent), slots (variables to capture user input), and fulfillment (the action taken when the intent is triggered).
Slots: In Amazon Lex, a slot is a variable used to capture specific information from the user, such as dates, locations, or other details required to fulfill an intent. Slots help the chatbot gather the necessary data to complete the user's request.
Aliases: They are used to create different versions of a bot for various environments, such as development, testing, or production. They allow you to manage and deploy multiple versions of a bot while pointing users to the appropriate one without altering the bot’s core configuration.
AWS Lambda: The serverless compute service that processes the logic behind the intents, executing code in response to user interactions and retrieving information as needed.
Prerequisites
Before diving into the development of our banking chatbot, ensure you have the following prerequisites in place:
AWS Account: You need an Amazon Web Services (AWS) account to use both S3 and QuickSight. Signing up is free, and the services come with free tiers.
Python Programming Skills: Understanding of Python, as we will be writing Lambda functions in this language.
Step 1: Creating Your AWS Lex BankBot
Navigate to
AWS Lex.Ensures you're using the Lex V2 console, if not click on the "Switch to the new Lex V2 console" link in the left-hand menu.
Click on the
Create Botbutton.Choose the
Blank Botoption.Enter a name for your bot, such as "sample-bank-bot," and add a description like "This bot helps customers check their balance and transfer funds."
Under the
IAM permissionssection, select "Create a role with basic Amazon Lex permissions."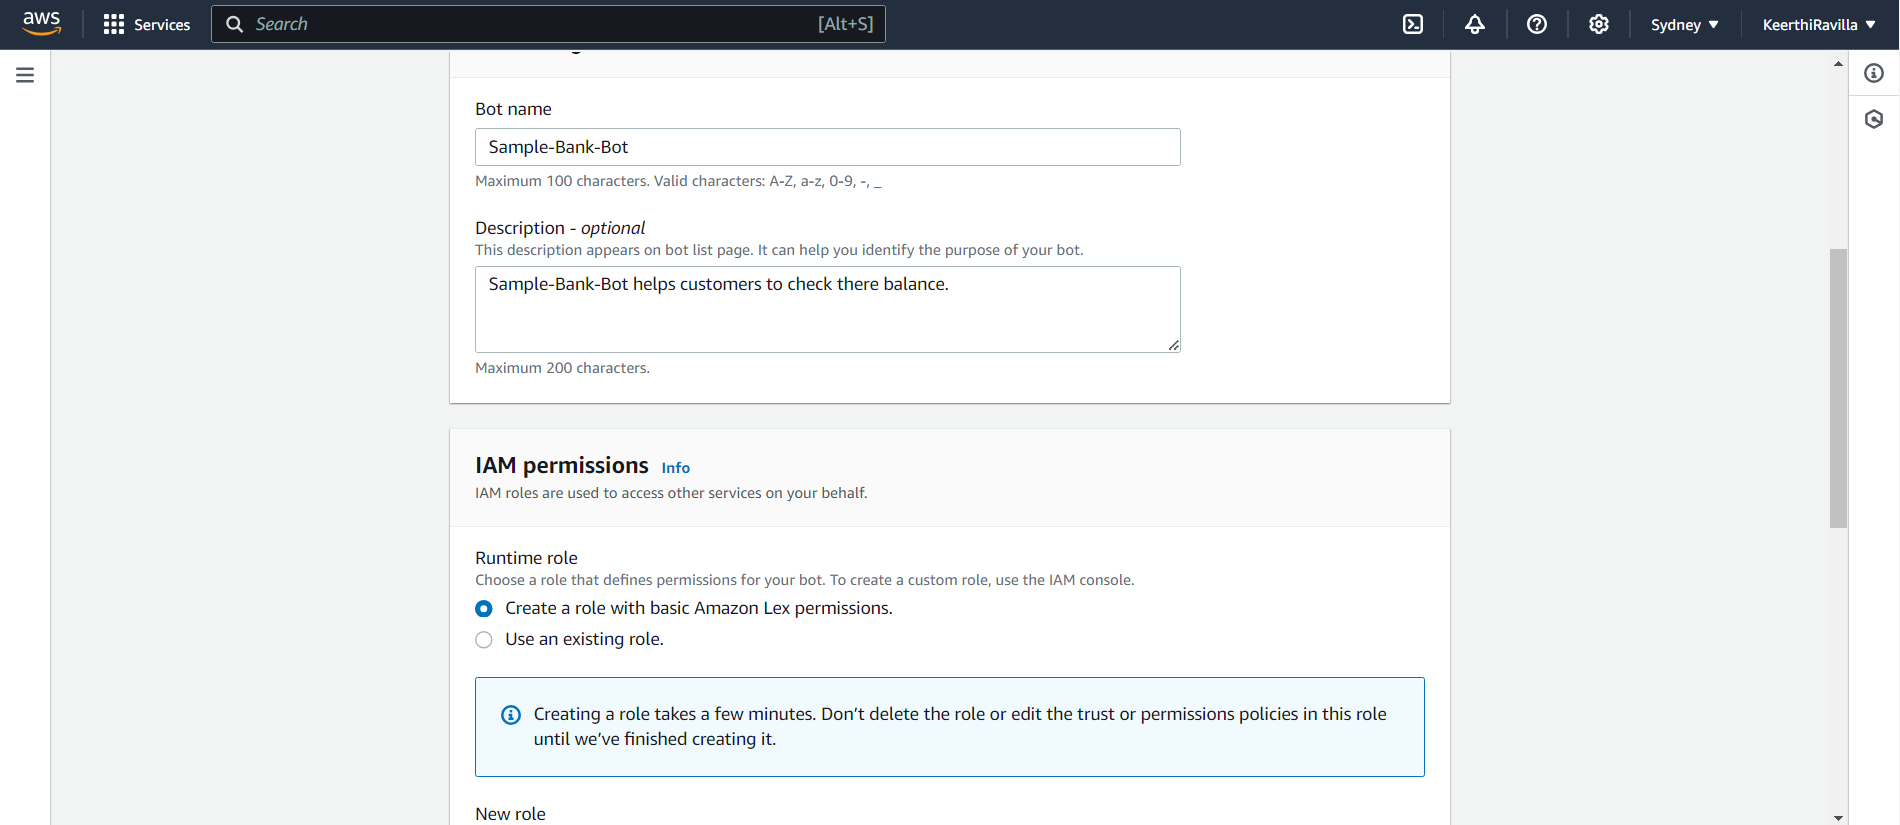
For the
COPPAoption, select No (since this bot is not intended for children under 13).
Keep the
Idle session timeoutat its default setting of 5 minutes.Click Next.
On the
Add languagespage, selectEnglish (US)and pick any voice that you prefer.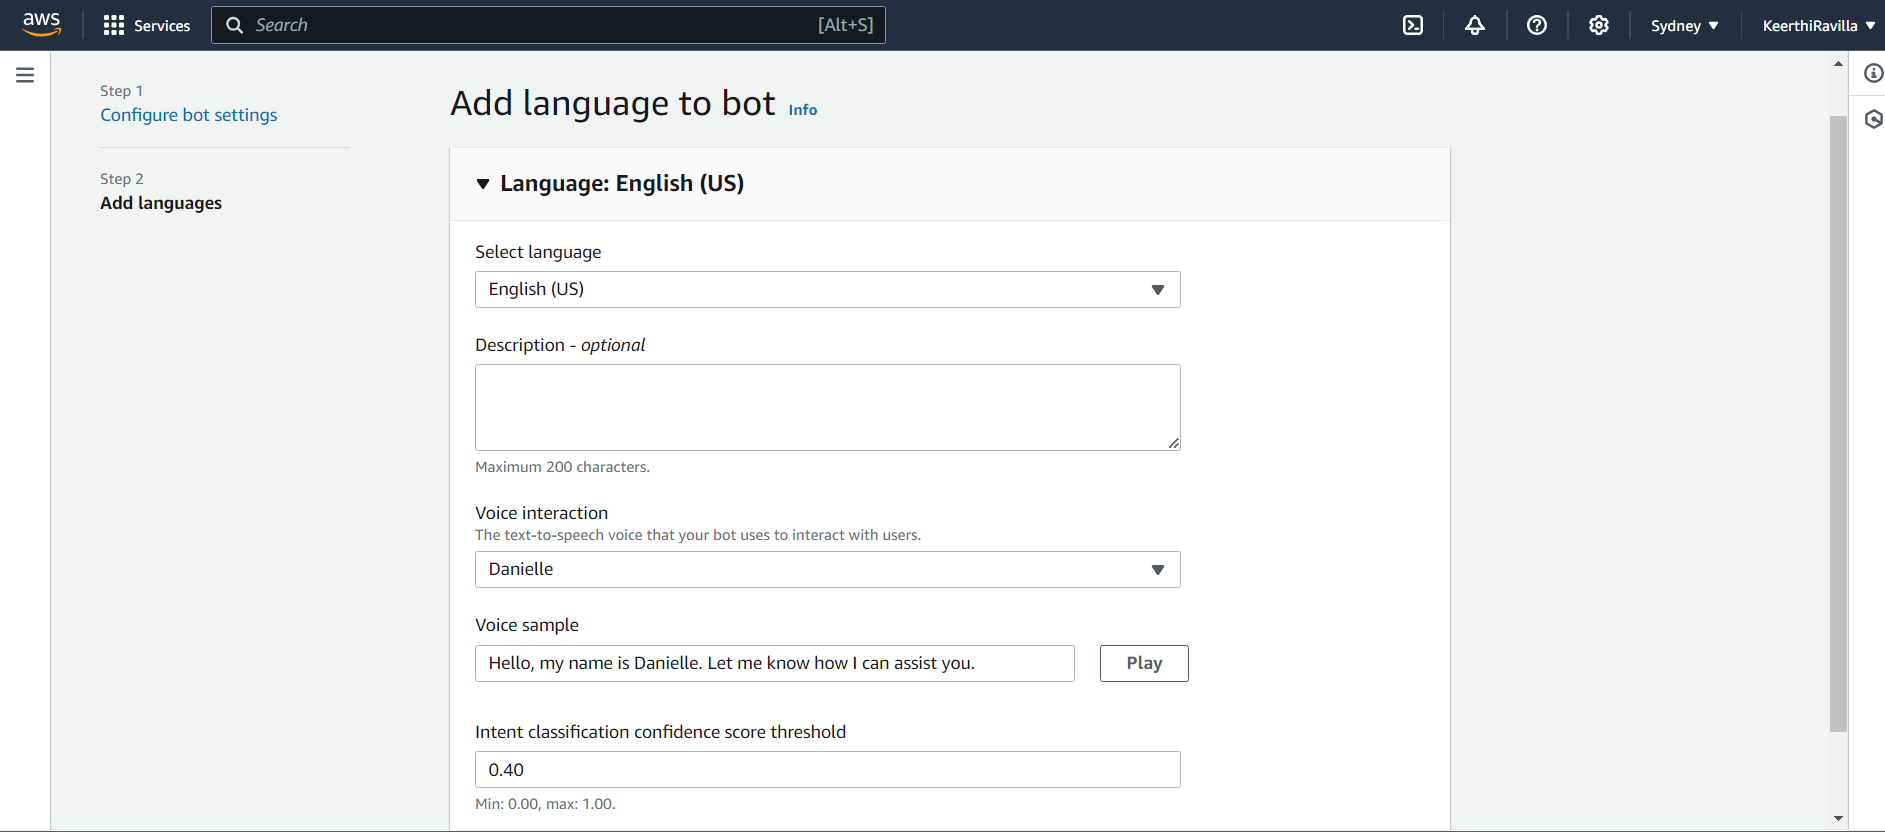
Set the
Intent classification confidence thresholdto 0.40 (meaning the bot will trigger intents when it’s at least 40% confident).Click
Createto finish.
Wooo!!! We've successfully created a simple Amazon Lex V2 chatbot named 'sample-bank-bot' with basic settings. The bot is set to use the English (US) language, a chosen voice, and an intent classification threshold of 40%. We've also given it an IAM role with basic permissions to interact with Lex services.
Step 2: Creating a Welcome Intent
Once your bot is created, you'll be directed to the Intent page.In Intent, Here, click on
New Intentalready available one.Rename the default
New IntenttoWelcomeNewIntentand provide a clear description, such as "This intent greets users when they start interacting with the bot," for better understanding and future reference.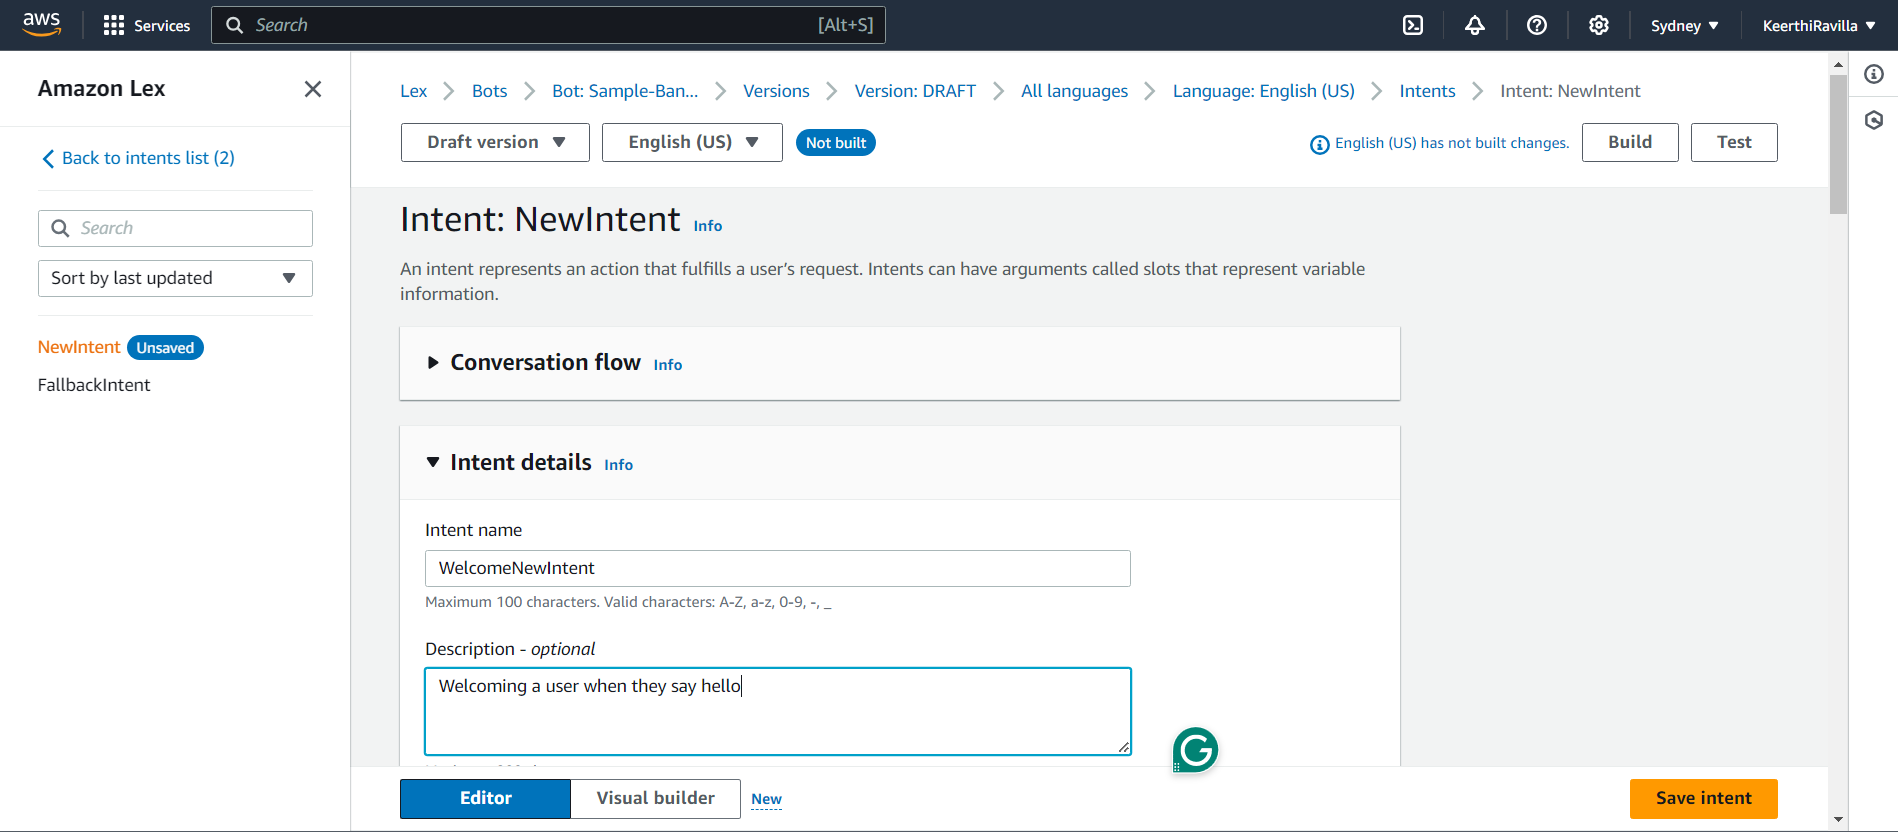
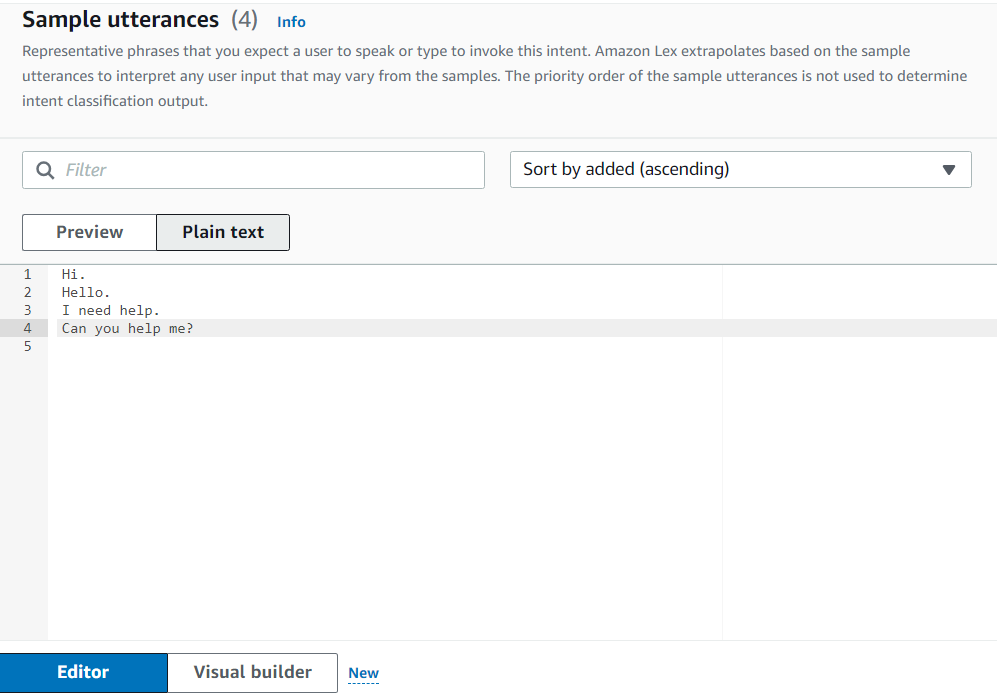
In the
Sample utterancessection, input phrases users are likely to say when they first interact with the bot. The sample utterances guide Lex in recognizing user intents by matching these predefined phrases with user inputs. Examples include:"Hello"
"Hi"
"I need help"
"Can you help me?"
Add more utterances if needed to cover various ways users might greet the bot.
Next, scroll down to
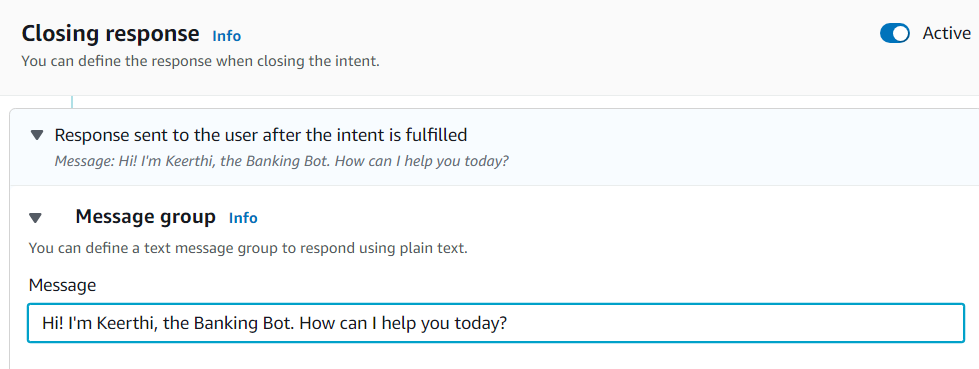
Closing responsesection, and expand theResponse sent to the user after the intent is fulfilledhere you can provide the response you want the bot to display when one of the sample utterances is detected. This is the message the user will see when they greet the bot.- For this intent, you could use a message like: "Hi, I'm Keerthi, the banking bot. How can I assist you today?"
Click the
Save Intentbutton once you're done.Now, click the
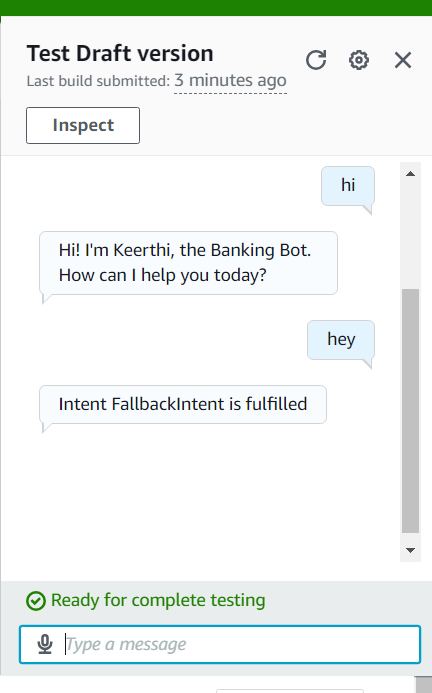
Buildbutton at the top-right of the console. Building the bot integrates all the intents, utterances, and responses into a deployable model. Depending on the complexity of your bot, this may take a minute or two.After the build is complete, test your bot by opening the Test window. Enter some of the sample utterances you provided (e.g., "Hello" or "Can you help me?") to see if the bot responds correctly with the message you specified. If needed, adjust the utterances or responses and rebuild the bot.
Here's the fun part!🤖🎉 Use voice messages to talk to the bot. Click the microphone icon and start speaking. The bot will process your voice input and respond just like it does with text. This is perfect for hands-free use or accessibility needs. Test it thoroughly to make sure it works well with different accents and speech patterns.
In this step,we have successfully created a new intent called WelcomeNewIntent, defined sample utterances for user greetings, and set a custom response. We built the bot to integrate these updates and tested it to ensure it responds correctly to user inputs.
Step 3: Creating Fallback intent
In the previous snippet, you can see the fallback intent message as "Intent Fallback intent is fulfilled". In this step, let's rephrase that message to make it clearer to the user that your chatbot doesn't understand the user's request.
In the
Intentssection of your bot, locate the defaultFallback Intent. This intent is triggered when the bot cannot match the user's input to any other intent.Click on that default
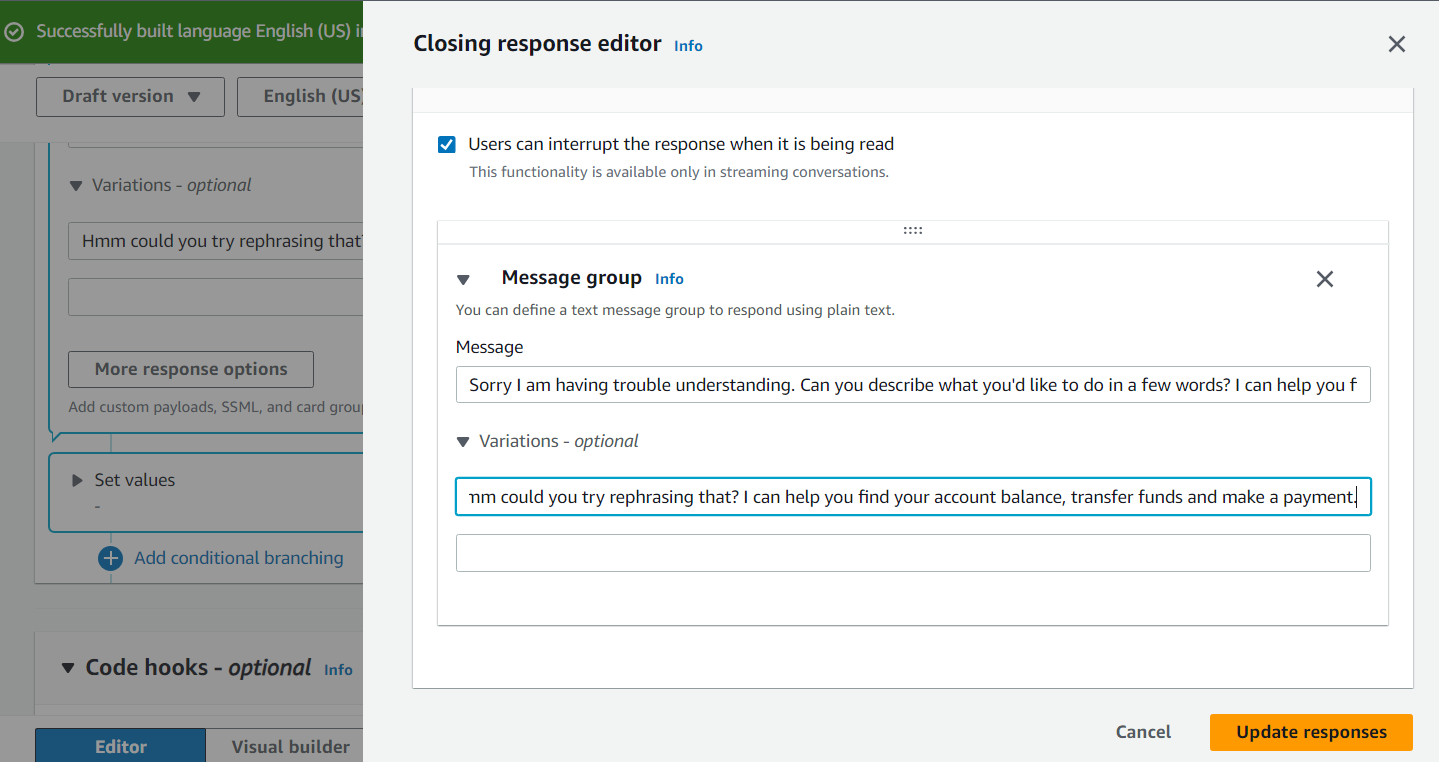
Fallback Intent, and under theClosing responsesection, add a message that will be displayed when the bot doesn’t understand the user’s input. For example, you can use: "Sorry! I'm having trouble understanding. Can you describe it in a different way?"To make the bot's responses more conversational, add
response variations. This ensures that the bot doesn't always give the same reply. For example, you could add variations like:"
Ahh sorry!! I didn’t get it. Are you trying to get your account balance?""
I’m not sure I understand. Can you explain it differently?""
Oops! That was unclear. Can you say it another way?"
Add the variations, click
Save Intent, then clickBuildto integrate the fallback intent into the bot, andFinally test the bot using the
Testwindow with random, unrecognized input to see the different responses.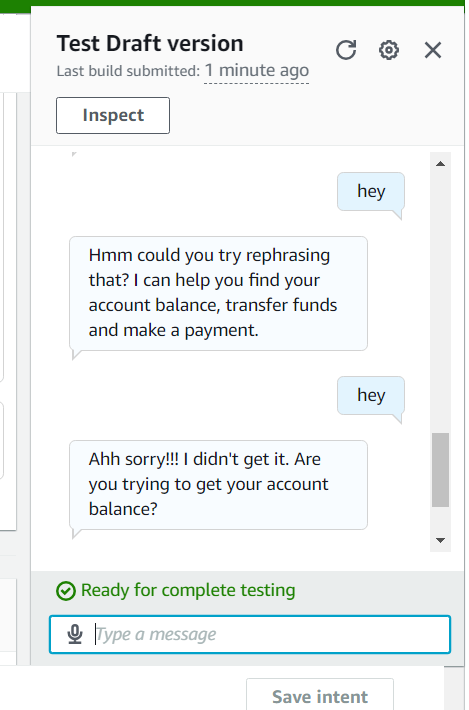
Step 4: Create a slot
A slot is a variable that represents a piece of information that the bot needs to fulfill a user’s request. Slots are used to capture user input for specific data points, allowing the bot to understand and process requests more effectively. Here’s a detailed breakdown of slots:
In the Amazon Lex console, choose Slot types in your left hand navigation panel.
click on
Add slot typeand chooseAdd blank slot type.Enter accountType for the Slot type name and Choose Add.
After successfully adding, you will see the Slot value resolution panel. Choose "
Restrict to slot values." This ensures that only the values you specify will be considered valid for accountType. Otherwise, Amazon Lex will use machine learning to accept other values that users frequently enter.To add these three account types, click on the value fields and start adding
Checking,Savings, andCreditusing theAdd valuebutton. For the credit value, you can specify synonyms that users might enter, such as credit card, amex, American Express, Visa, and MasterCard.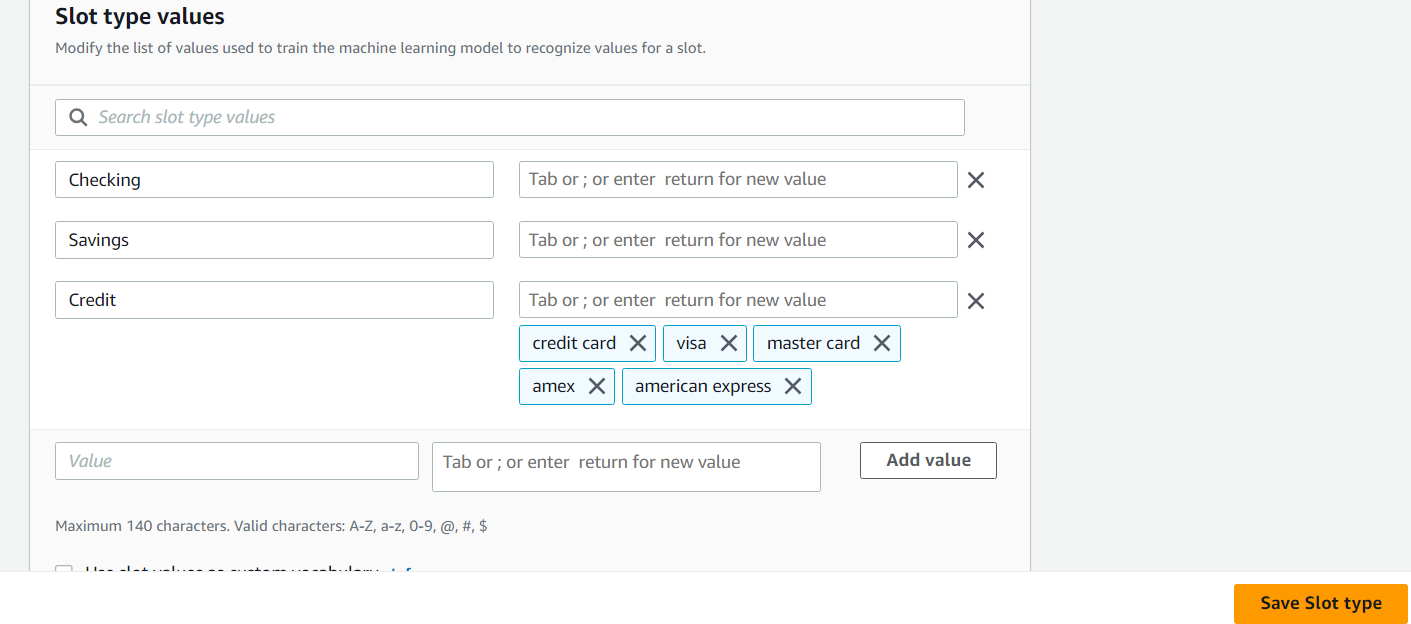
After adding values, click on the
save slot typeto save your changes. That’s it we are done with the slot creation.
In this step, we created a slot type called accountType to capture specific user input about their account type (e.g., Checking, Savings, Credit). By restricting slot values, we ensure that only predefined options are valid. We added account types and their synonyms, which helps the bot accurately understand user requests. Finally, we saved the slot type to complete the setup, enabling the bot to use this information to fulfill user queries.
Step 5: Create a check balance intent
In this step, we will create the CheckBalance intent in AWS Lex, allowing users to easily ask for their account balances. We'll define the intent, add example phrases users might say, and set up slots to gather user information for accurate and secure answers. By the end, our bot will be ready to assist users with their balance inquiries.
Navigate to the
Intentspage in your AWS Lex console. Click onCreate Intentto initiate the process of creating a new intent.Name your intent for example "
CheckBalance". This name should clearly reflect the purpose of the intent, which is to handle user requests related to checking their account balance.In the
Descriptionfield, provide an appropriate description for the intent. For example:
"This intent allows users to check the balance in their bank accounts."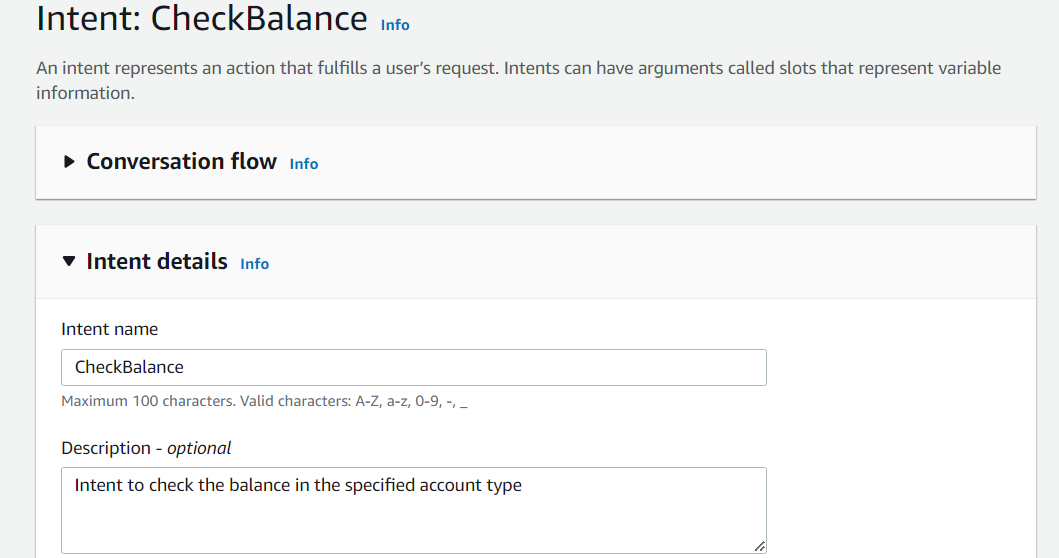
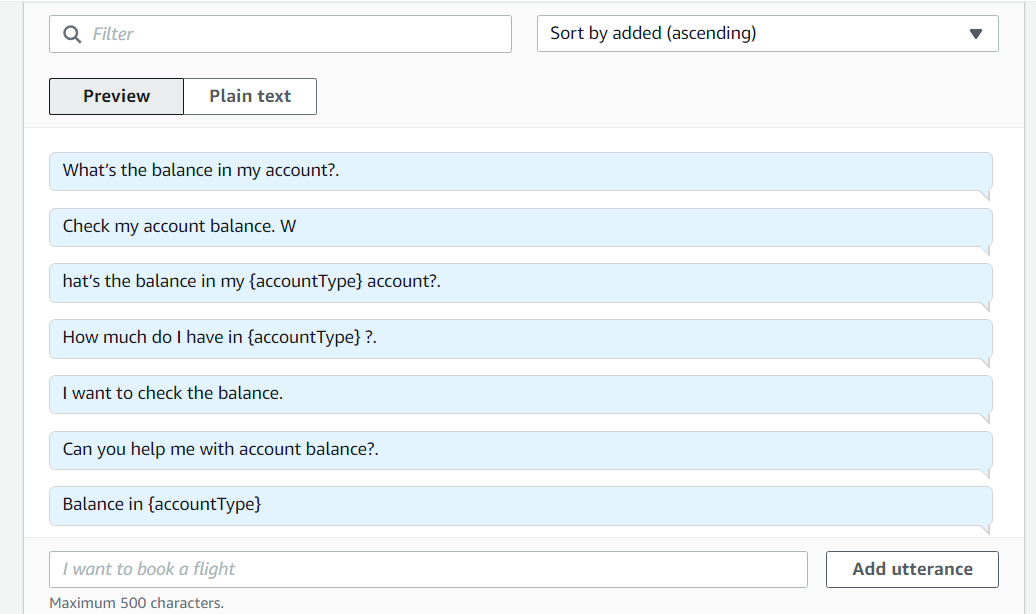
Under the
Sample utterancessection, add several phrases that users might say when they want to check their balance. These utterances help Lex understand user intent. Include phrases like:"What's the balance in my account?"
"Check my balance."
"What’s the balance in my {accountType} account?"
"Can you tell me my account balance?"
"How much money do I have in my account?"
"Show me my balance."
Next, move to the
Slotssection. Here, you will add the necessary slots to capture user input.Click on
Add slotto create a new slot named "accountType," select the previously created slot type (e.g., AccountType), and enter the prompt "For which account would you like to check your balance?" to guide the user in specifying the account type.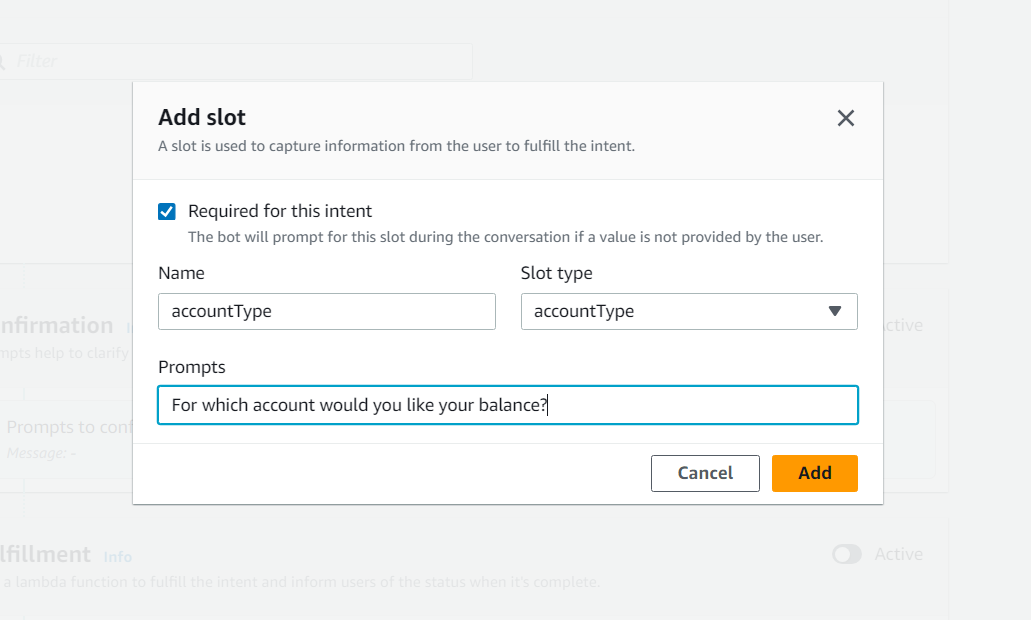
After adding the
accountTypeslot, create another slot nameddateOfBirthwith the built-in slot type Amazon.Date and use the prompt "For verification purposes, what's your date of birth?" to verify the user's identity before sharing sensitive information.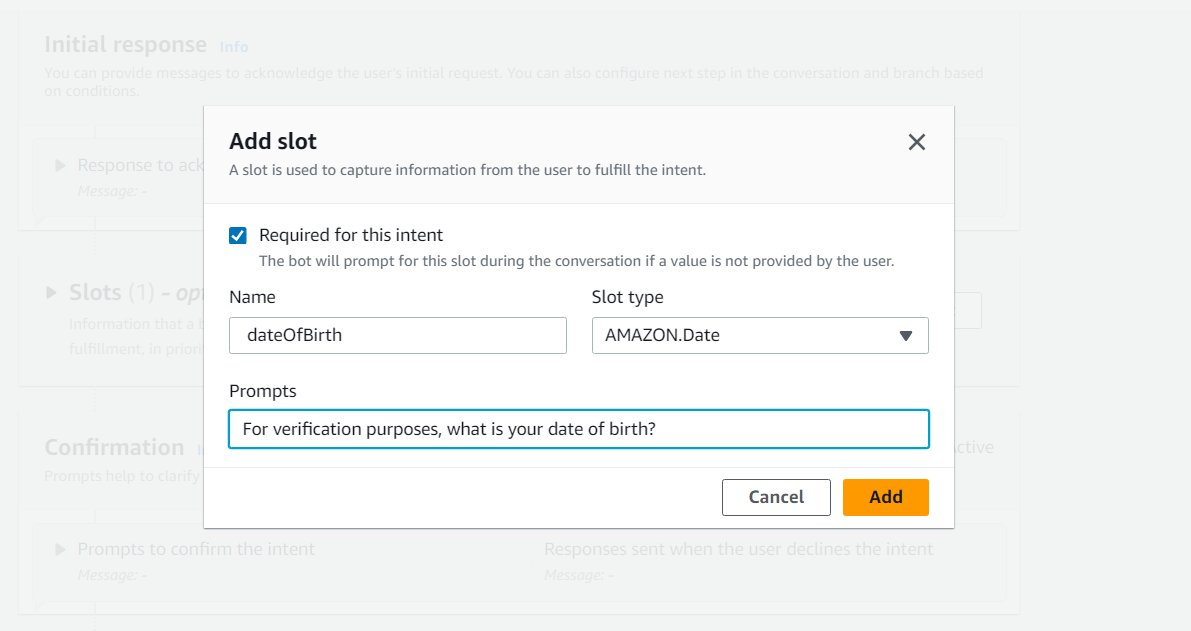
After setting up both slots, click
Save Intentto save your changes.Click the Build button to compile the new intent and slot configurations into your bot.
After building, use the Test window to enter sample phrases and ensure the bot correctly requests the account type and date of birth while accurately responding to balance inquiries.
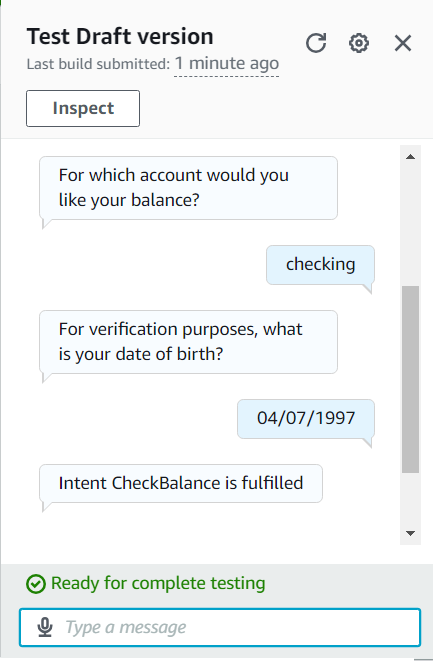
Our bot is now equipped to assist users with their account balance inquiries through the CheckBalance intent and its associated slots. We can proceed to enhance its capabilities by showing the numbers instead of “intent checkBalance is fulfilled message”
Step 6: Create Your AWS Lambda Function
In this step, we will create an AWS Lambda function named BankingBotEnglish. This function will handle requests from our Amazon Lex chatbot, using the CheckBalance and FollowupCheckBalance intents. It will retrieve session attributes and slot values, generate a random account balance, and respond to user inquiries.
Go to Lambda in your AWS Management Console
choose "
Author from scratch".name the function "
BankingBotEnglish".set runtime to
Python 3.12or later.create the function.
you will enter into your function here in the code source pane. click on the lambda_function.py and replace the existing code with this code.
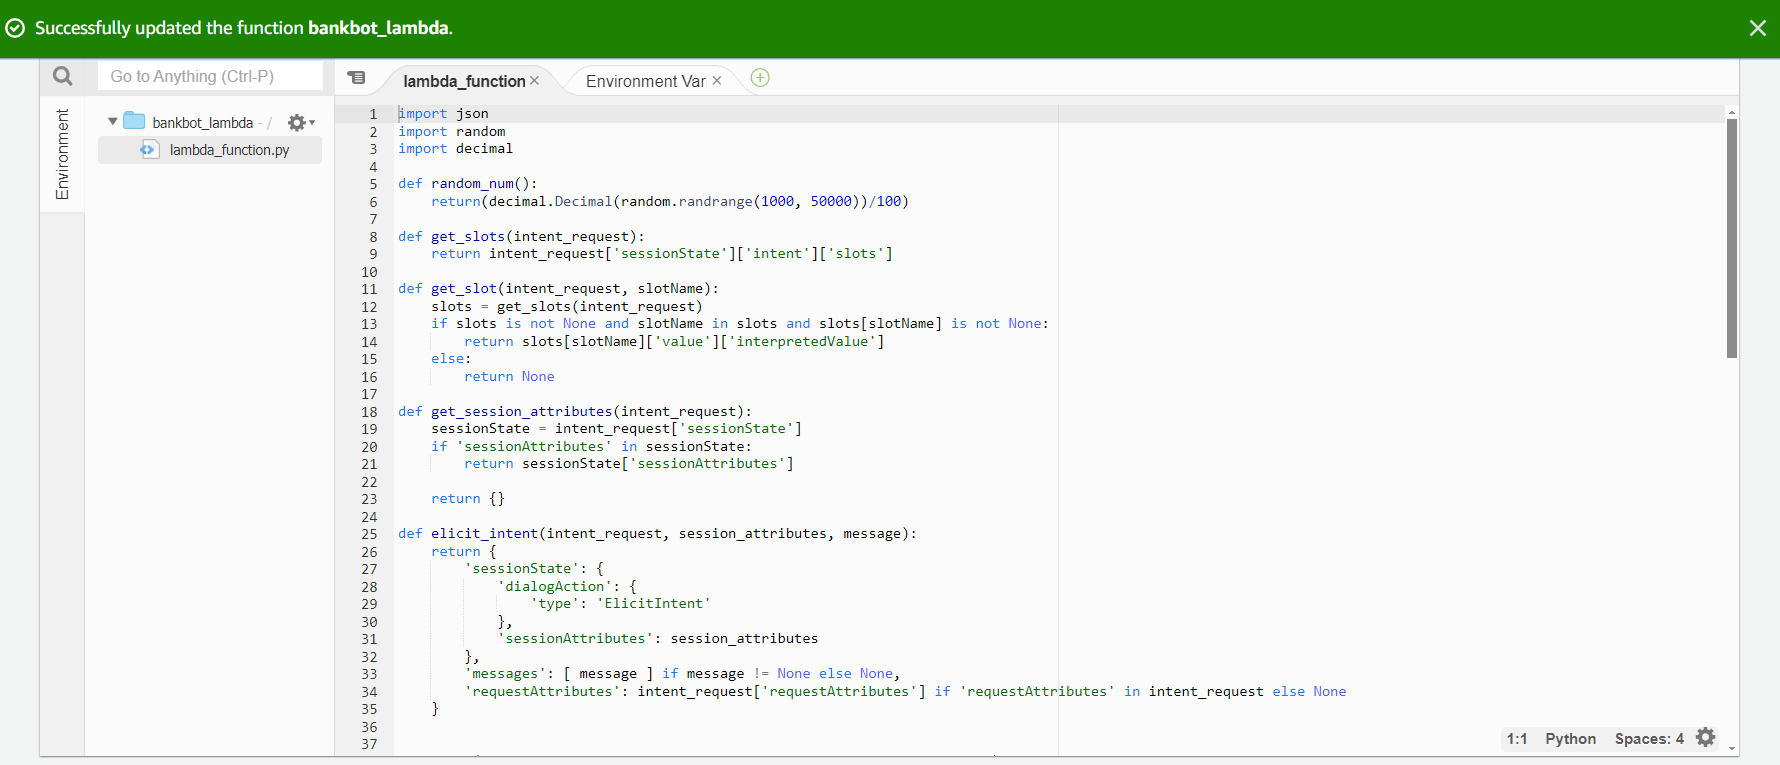
click "
Deploy" to complete the setup.
Step 7: Connect the lambda to amazon lex
Go to
amazon lexpage and click on the bot that we created in step 1. In my case, it’s ‘sample-bank-bot’.choose
Aliases, and click on the defaultTestBotAlias.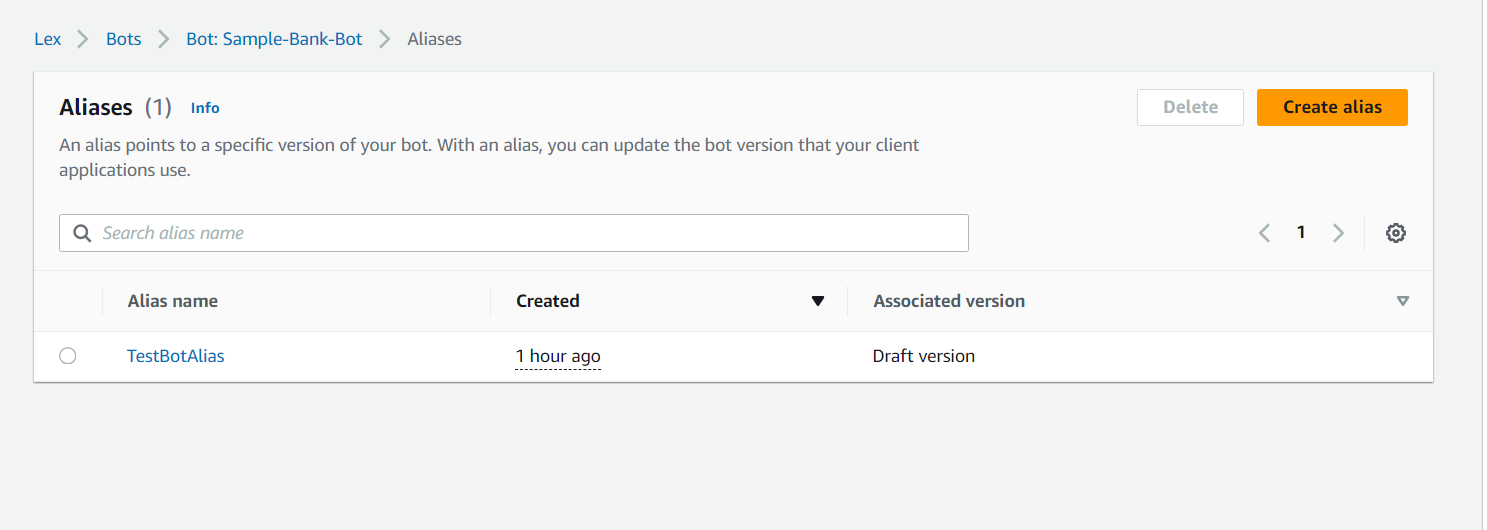
From the Languages panel, select English (US).
Click on
English (US)to open theLambda function panel, where you can link a Lambda function to the TestBotAlias version.Here choose source as the lambda function the one we created in step 2
BankingBotEnglishand set the version field to$LATEST.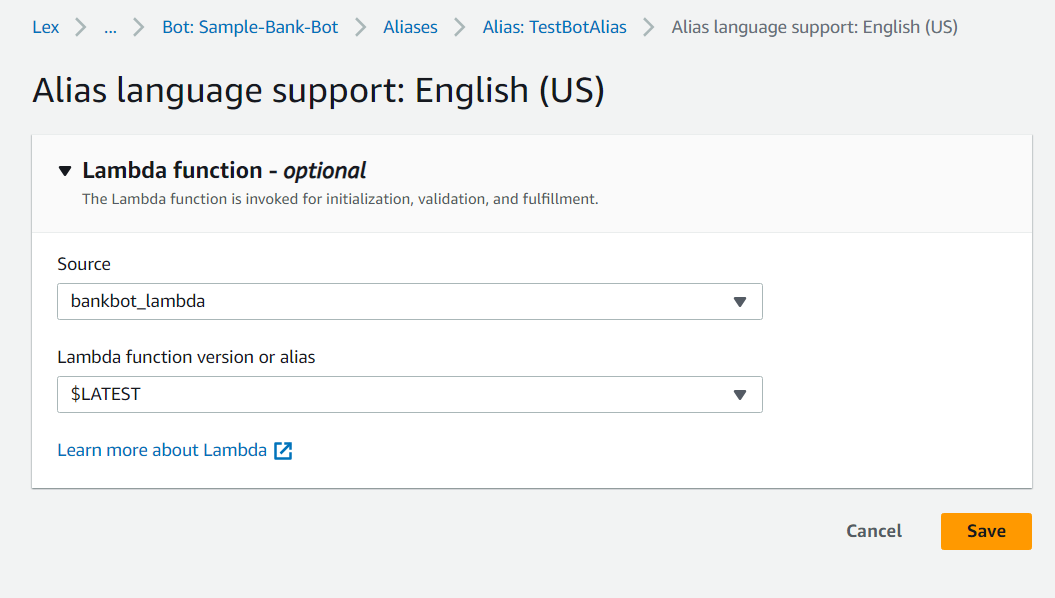
click save.
The Lambda function is ready for the BankingBot intents, but we need to specify which intent will use it in Amazon Lex. Let’s do it!!
Step 8: Connecting CheckBalance intent to Lambda Function
Click on the
CheckBalanceintent from your intents page.Scroll down to fulfilment pane,here expand the
On successful fulfilmentbubble and chooseadvanced options.Here in
Fulfilment Lambda code hookpanel, check the checkbox next to Use aLambda function for fulfilment.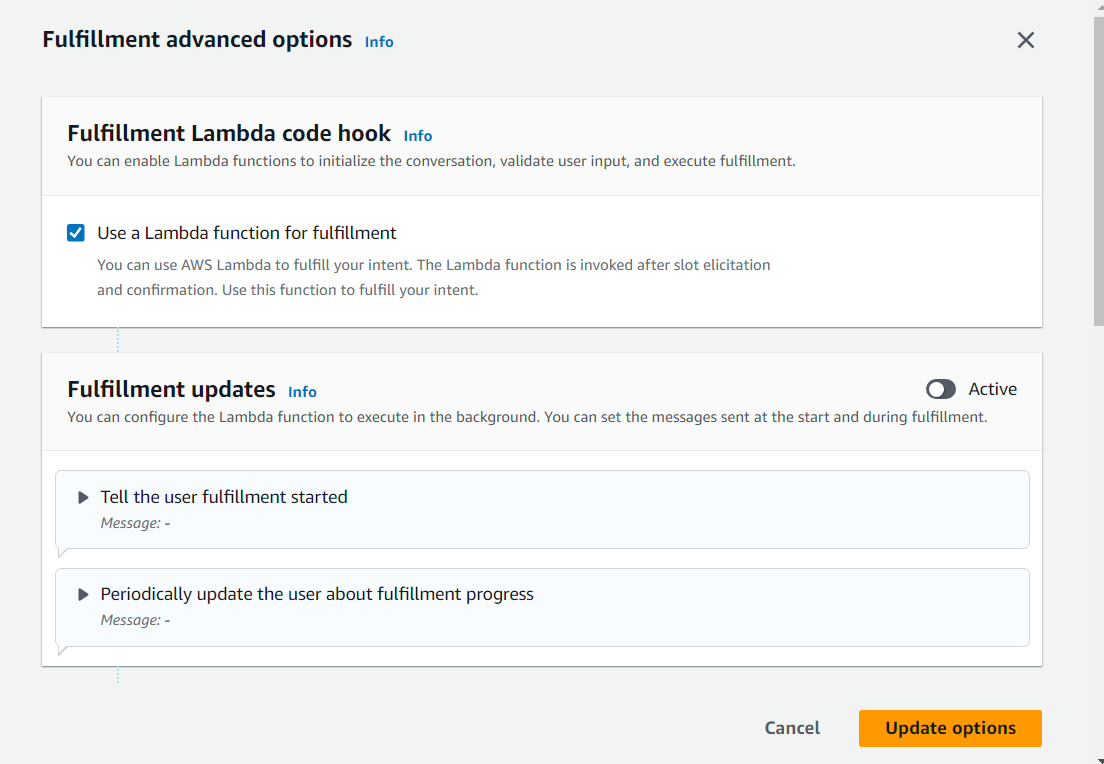
choose update options, followed by save intent, build and test.
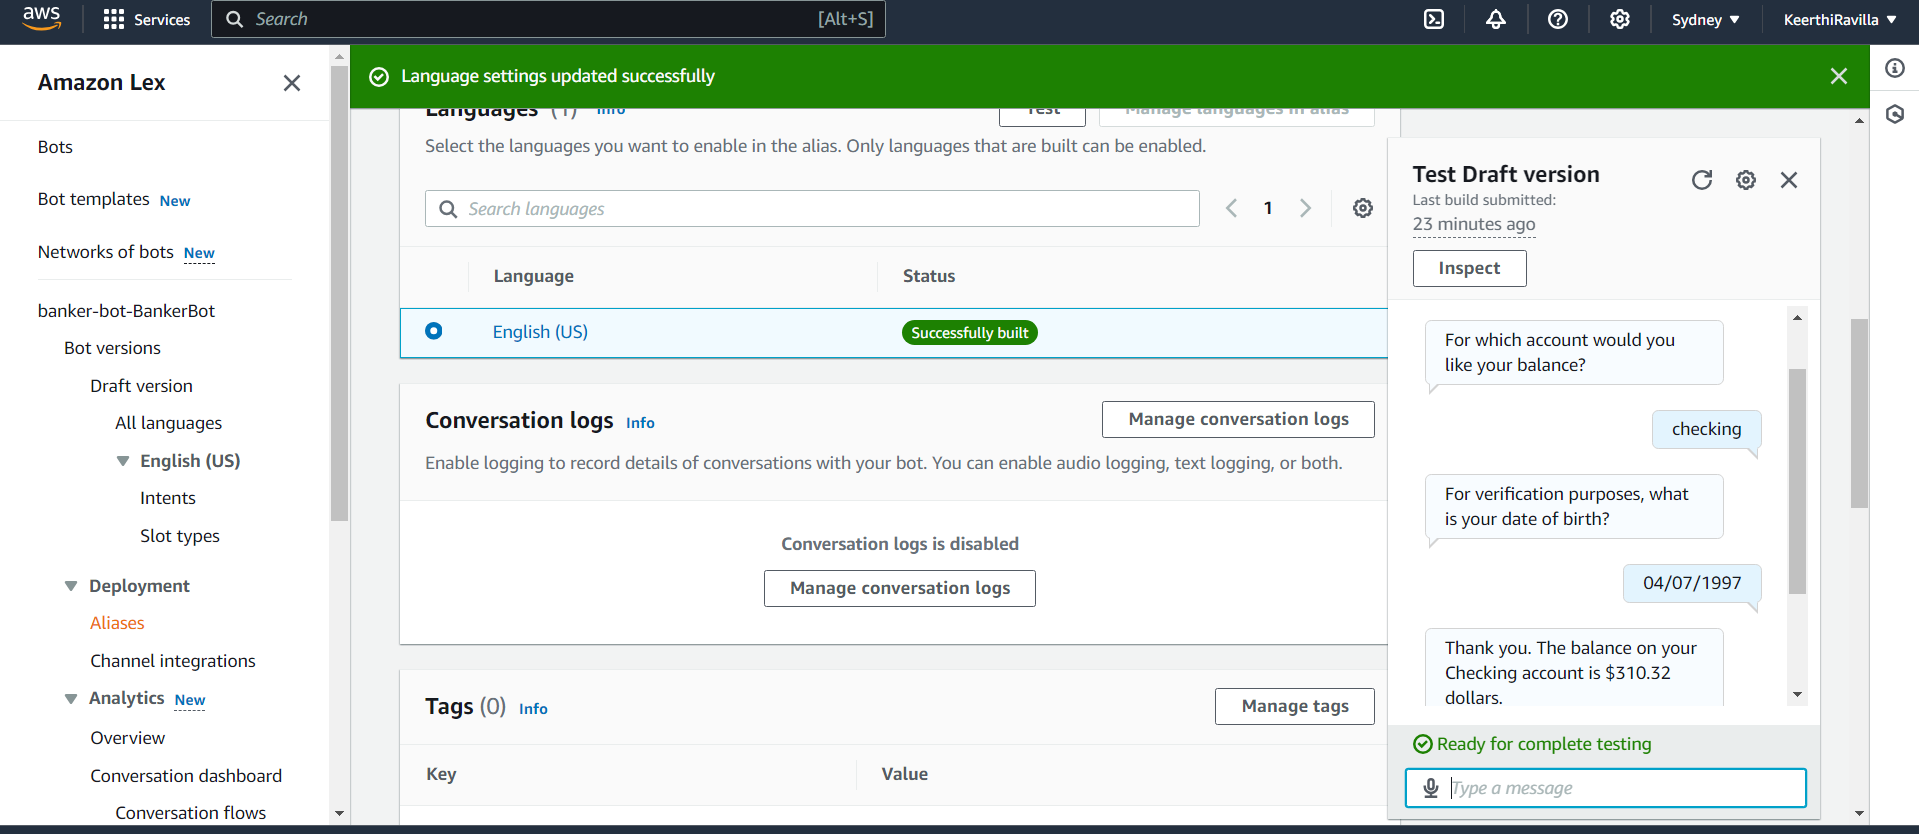
Now you can see that when a user successfully enters the account type and date of birth, our chatbot can provide the account balance successfully!!. Great what is missing here? the chatbot now will not be able share the information or carrry forward the information from one intent to another intent. let’s work on this in next step.
Step 6: Setting up context carryover
This technique helps your chatbot remember things it's learned about the user (like their birthday) from one intent and share them with other intents!
Go to the
CheckBalanceintent we created earlier.Scroll down to the
contexts panelto see theinputandoutput contextsoptions.Click on the
Output contextsdrop-down and then click theNew context tagbutton. Context tags in Amazon Lex store and check specific information across a conversation, preventing users from repeating themselves.
Name your new context
contextCheckBalanceand set the timeout for 5 turns or 90 seconds to limit how long the chatbot remembers a user's birthday for security reasons.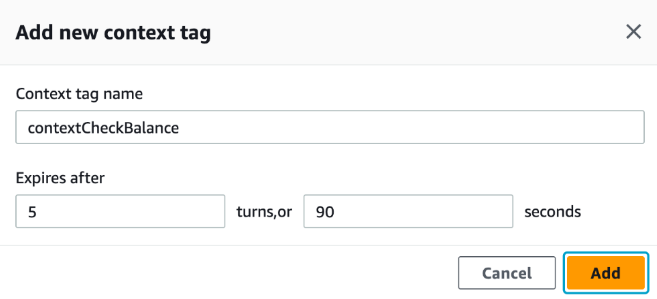
Choose
Add, thenSave intent,Build, andTestto ensure the bot works as usual without errors from the context tag.
Step 7: Create FollowupCheckBalance intent
Now that you are familiar with intent creation. Let’s go in step wise pattern
Name your intent “
FollowupCheckBalance” with a meaningful description like “Intent to allow a follow-up balance check request without authentication”.choose
input contextfrom context panel and addcontextCheckBalance.Add some sample utterances like:
How about my {accountType} account?.
What about {accountType} ?.
And in {accountType} ?
Add a new slot with name:
accountType, prompt: "For which account would you like your balance?" and slot type:accountType.Add another slot with name:
dateOfBirth, type:AMAZON.Date and prompt: “For verification purposes, what is your date of birth?”.After adding, expand the dateOfBirth slot, select Advanced options, scroll to the
Default valuespanel, and enter#contextCheckBalance.dateOfBirthto set default values for the intent's slots.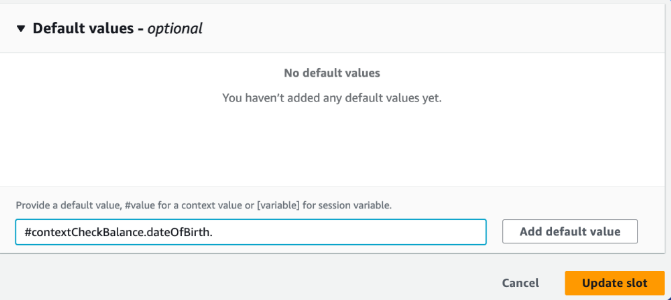
Choose "Add default value," then "Update slot,"
Go to the Fulfillment intent pane to ensure the Lambda function is connected to this intent, expand "
On successful fulfillment," choose "Advanced options," go to the Fulfillment Lambda code hook panel, and select the checkbox to enable a fulfillment Lambda for this intent.Choose
Add, thenSave intent,Build, andTest. Then try to trigger the new FollowupCheckBalance intent without triggering CheckBalance first, for example, by asking your chatbot, "What about checking?"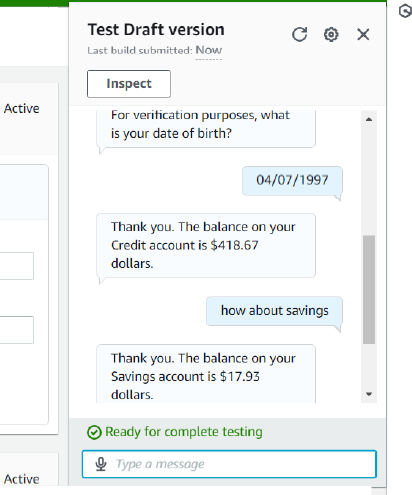
Everything is going well so far! But wait, besides checking the balance, we also perform transfers through bankingbots, right? Let's make our chatbot handle transfer operations too.
Step 8: Create Transfer intent
let’s do it super quick, as you would have become pro in creating intents by now!!
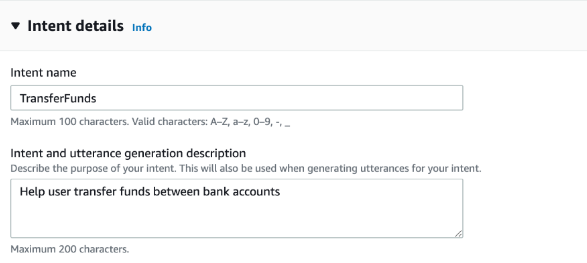
Create a intent with the name “TransferFunds”
Add proper description for it eg: “Help user transfer funds between bank accounts”
Sample utterances:. Can I make a transfer?.
I want to transfer funds.
I'd like to transfer {transferAmount} from {sourceAccountType} to {targetAccountType}.
Can I transfer {transferAmount} to my {targetAccountType}.
Would you be able to help me with a transfer?.
Need to make a transfer
Add a three new slots called with the below information
sourceAccountTypewith the prompt "Which account would you like to transfer from?" and the slot typeaccountType.targetAccountTypewith the prompt "Which account are you transferring to?" and the slot typeaccountType.transferAmountwith the prompt "How much money would you like to transfer?" and the slot type AMAZON.Number.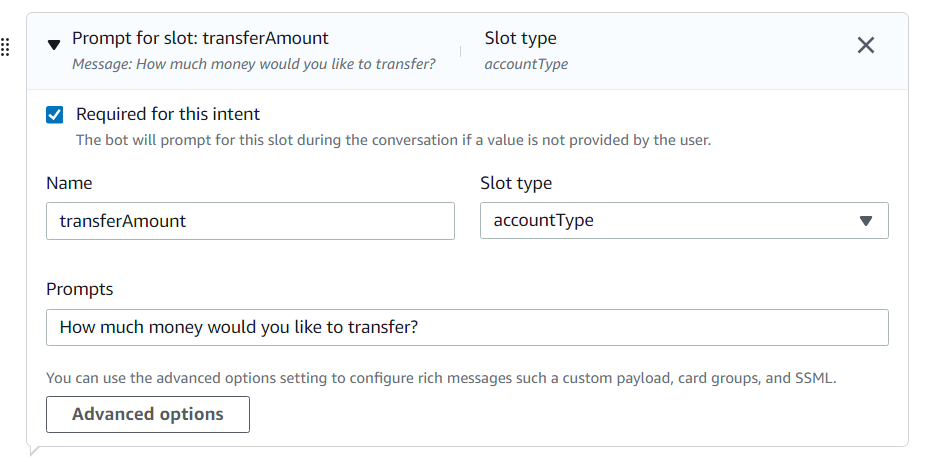
In the
Confirmationpanel, expandPrompts, and enter the Confirmation prompt as “Got it. So we are transferring {transferAmount} from {sourceAccountType} to {targetAccountType},” with theDecline response: “The transfer has been cancelled.” like shown in below snippet.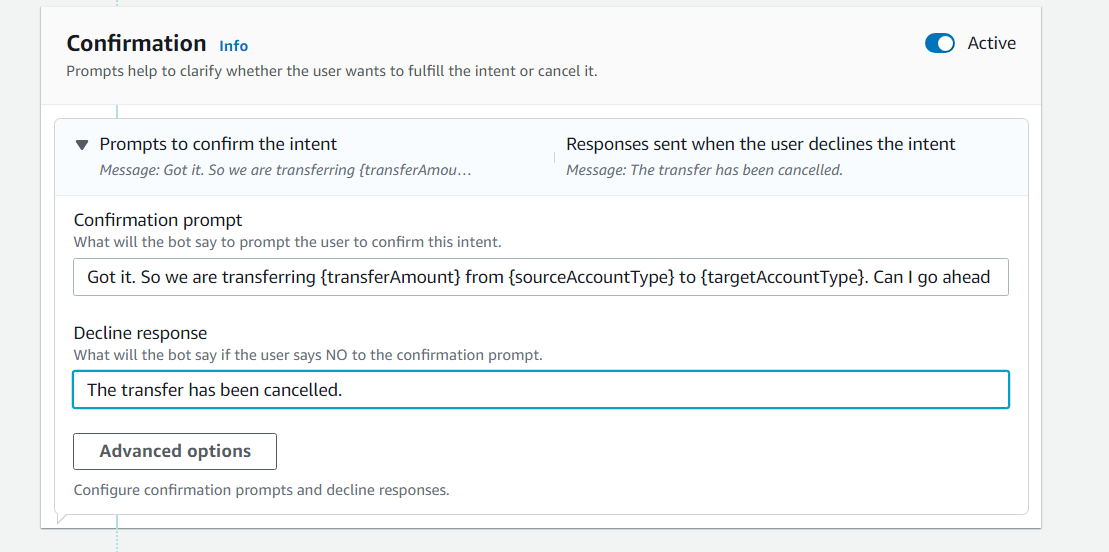
Scroll to the
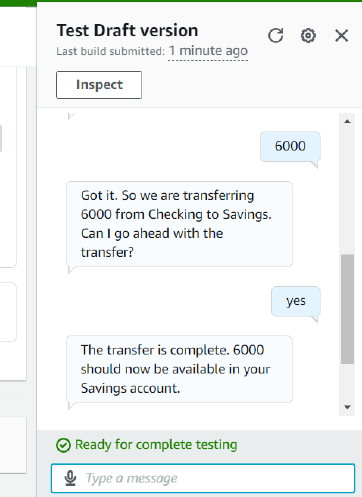
Closing responsepane and add the message: “The transfer is complete. {transferAmount} should now be available in your {targetAccountType} account.”
Now again save, build and test the intent.
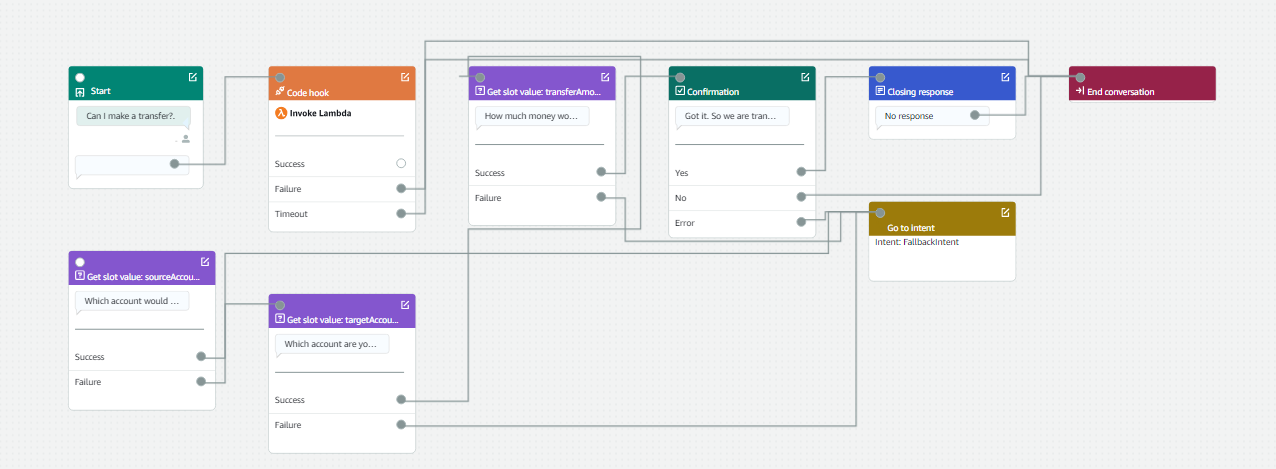
Visual representation
Visual representation of our intents and slots. you switching from editor to visual builder mode.
Warning!!! Make sure to delete the resources you created to avoid unnecessary charges.
Congratulations!!!🎉 You've sucessfully created a fully functional banking chatbot that can greet users, check balances, and transfer funds! Keep building on these skills for even more advanced features! 🚀. Check out the network.org platform for more interesting projects and keep learning. In our upcoming AWS series article, let's see how we can create all of this in less than 10 minutes.
Subscribe to my newsletter
Read articles from Keerthi Ravilla Subramanyam directly inside your inbox. Subscribe to the newsletter, and don't miss out.
Written by

Keerthi Ravilla Subramanyam
Keerthi Ravilla Subramanyam
Hi, I'm Keerthi Ravilla Subramanyam, a passionate tech enthusiast with a Master's in Computer Science. I love diving deep into topics like Data Structures, Algorithms, and Machine Learning. With a background in cloud engineering and experience working with AWS and Python, I enjoy solving complex problems and sharing what I learn along the way. On this blog, you’ll find articles focused on breaking down DSA concepts, exploring AI, and practical coding tips for aspiring developers. I’m also on a journey to apply my skills in real-world projects like predictive maintenance and data analysis. Follow along for insightful discussions, tutorials, and code snippets to sharpen your technical skills.