Deploying Azure Standard Load Balancer in Web-Tier via Terraform
 Ritesh Kumar Nayak
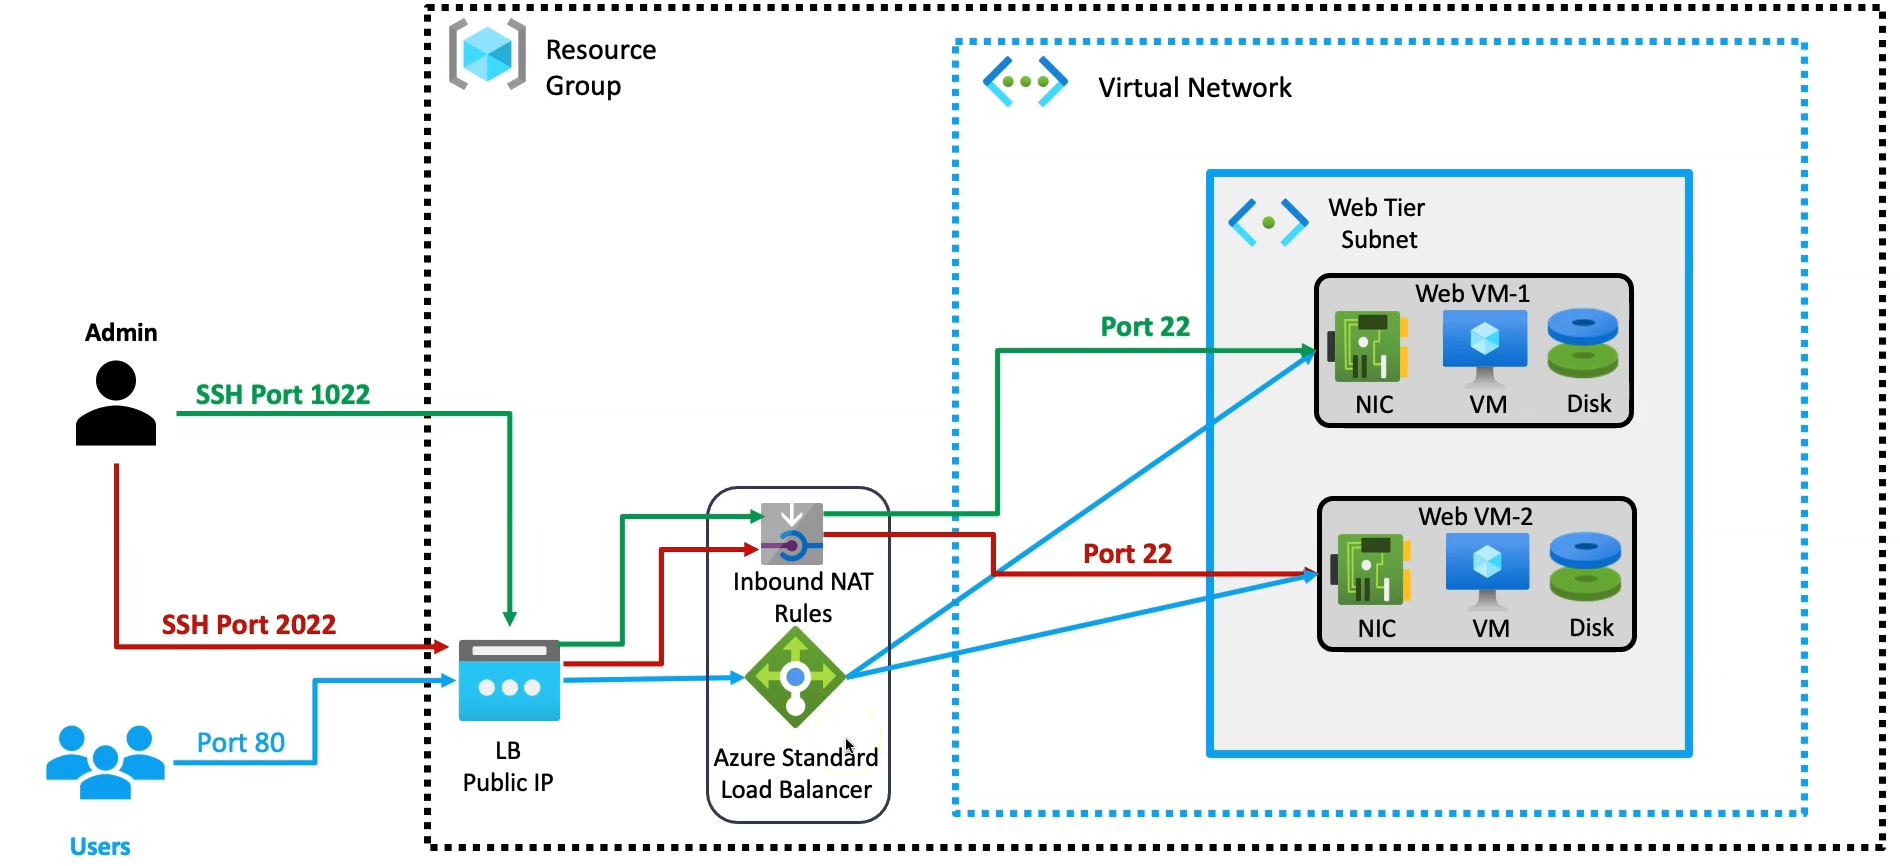
In this article, we’ll configure an Azure Load Balancer in front of our web servers, eliminating the need for public IP addresses on the individual servers. Instead, the load balancer will be exposed to handle incoming traffic and distribute it across the web servers. This setup ensures efficient traffic management, improves server performance, and enhances overall security by keeping the web servers within a private network, while the Load Balancer serves as the entry point for all external requests.
Azure Load Balancer
Azure Load Balancer is a fully managed service that distributes incoming network traffic across multiple virtual machines or services to ensure high availability and reliability. It operates at Layer 4 (Transport Layer) and supports both inbound and outbound scenarios, routing traffic based on IP and port.
Why it's important in front of your web servers:
Traffic Distribution: It balances traffic across multiple web servers, preventing any single server from being overwhelmed.
High Availability: If one server fails, the load balancer automatically redirects traffic to the healthy servers, ensuring continuous uptime.
Scalability: It helps your infrastructure scale by evenly distributing workloads during peak traffic periods.
Improved Performance: By spreading traffic across multiple servers, it optimizes resource utilization, ensuring faster response times for users.
Using Azure Load Balancer in front of your web servers enhances the resilience and scalability of your applications, keeping them accessible and performing efficiently.
Terraform Resources to be Used for Azure Standard Load Balancer
To set up the Azure Standard Load Balancer and configure it to manage traffic efficiently across our web servers, we will use the following Terraform resources:
azurerm_public_ip: Creates a public IP address for the Load Balancer, allowing external traffic to be directed to it.azurerm_lb: Defines the Azure Load Balancer resource.azurerm_lb_backend_address_pool: Sets up the backend pool where the web servers (VMs) will be grouped for load balancing.azurerm_lb_probe: Configures health probes to monitor the availability of the web servers.azurerm_lb_rule: Establishes the load balancing rules for traffic distribution across the backend servers.azurerm_network_interface_backend_address_pool_association: Associates the network interfaces of the web servers with the Load Balancer’s backend pool.
These resources will ensure seamless traffic distribution, increased availability, and optimized performance of our web servers.
Provision Standard Load Balancer
Step 1: Create a Public IP Address for the Azure Load Balancer
The first step in setting up the Azure Load Balancer is to create a Public IP. This IP will expose the Load Balancer to the internet, allowing external traffic to reach your web servers. It acts as the entry point for the traffic coming from the users and directs it to the Load Balancer for further distribution.
resource "azurerm_public_ip" "lb_web_publicip" {
    name = "${local.resource_name_prefix}-web-lb-publicip"
    allocation_method = "Static"
    location = azurerm_resource_group.rg.location
    resource_group_name = azurerm_resource_group.rg.name
    sku = "Standard"
    tags = local.common_tags

}
Resource Block:
The resource block defines the Azure public IP using theazurerm_public_ipresource.Resource Name:
The name of the public IP resource is defined as"${local.resource_name_prefix}-web-lb-publicip", which dynamically combines the prefix stored inlocal.resource_name_prefixwith the suffix-web-lb-publicipfor proper naming convention.Allocation Method:
Theallocation_methodis set to"Static", meaning the IP address assigned will not change and remains fixed.Location:
Thelocationparameter specifies the region where the public IP is being created. It references the location of the resource group (azurerm_resource_group.rg.location).Resource Group:
The public IP is associated with the resource group, as indicated byresource_group_name = azurerm_resource_group.rg.name, ensuring it is created within the specified resource group.SKU:
The SKU is set to"Standard", which provides high availability, resiliency and supports multiple zones, suitable for production workloads.Tags:
Tags are added to the public IP resource usingtags = local.common_tags. These tags allow for better organization and management of resources across Azure.
Step 2: Create Azure Standard Load Balancer
The Standard Load Balancer is a highly available, secure, and scalable service that balances traffic between the web servers in your backend pool. It distributes incoming traffic based on a set of rules and health probes, ensuring that the load is equally distributed across the available instances and preventing any server from being overwhelmed.
resource "azurerm_lb" "lb_web" {
    name = "${local.resource_name_prefix}-lb-web"
    resource_group_name = azurerm_resource_group.rg.name
    location = azurerm_resource_group.rg.location
    sku = "Standard"
    # We can add multiple IP configuration block and allocate multiple public IP to a single  load balancer
    frontend_ip_configuration {
      public_ip_address_id = azurerm_public_ip.lb_web_publicip.id
      name = "lb_web_ip_config-1"
    }
}
Resource Block:
The resource block is defined using theazurerm_lbresource to create a Load Balancer in Azure.Resource Name:
The load balancer is named as"${local.resource_name_prefix}-lb-web", dynamically concatenating thelocal.resource_name_prefixwith-lb-webfor consistent naming.Resource Group:
The load balancer is associated with a specific resource group, specified usingresource_group_name = azurerm_resource_group.rg.name.Location:
Thelocationspecifies where the load balancer is being deployed, referencing the same region as the resource group usingazurerm_resource_group.rg.location.SKU:
Theskuis set to"Standard", which provides advanced features like zone redundancy and supports high-availability scenarios.Frontend IP Configuration:
Public IP Assignment: The
frontend_ip_configurationblock specifies that the public IP address (azurerm_public_ip.lb_web_publicip.id) will be assigned to the load balancer. This is used to expose the load balancer to the internet.Name: The configuration is named
"lb_web_ip_config-1", allowing for multiple frontend configurations, which can be used to assign multiple public IPs if needed.
Step 3: Create Backend Pool
The Backend Address Pool is a group of virtual machines or web servers that receive the traffic distributed by the Load Balancer. All the web servers in this pool are considered for load balancing, and traffic is directed based on availability and health. This step is essential to ensure that multiple web servers can share the incoming traffic.
resource "azurerm_lb_backend_address_pool" "lb_backend_address_pool" {
  name = "lb-web-backend"
  loadbalancer_id = azurerm_lb.lb_web.id
}
Resource Block:
The resource block is defined using theazurerm_lb_backend_address_poolresource to create a Backend Address Pool for the load balancer.Resource Name:
The backend pool is named"lb-web-backend", indicating its role as the backend pool for the web servers managed by the load balancer.Load Balancer Association:
Theloadbalancer_idreferences the load balancer created in the previous step by usingazurerm_lb.lb_web.id. This links the backend pool to the specific load balancer.Backend Pool Purpose:
This backend pool will group the network interfaces (NICs) of the web servers that are part of the load balancing setup.
It acts as the target pool where the load balancer will distribute traffic, ensuring that the load is shared across all the backend VMs.
Step 4: Create Load Balancer Probe
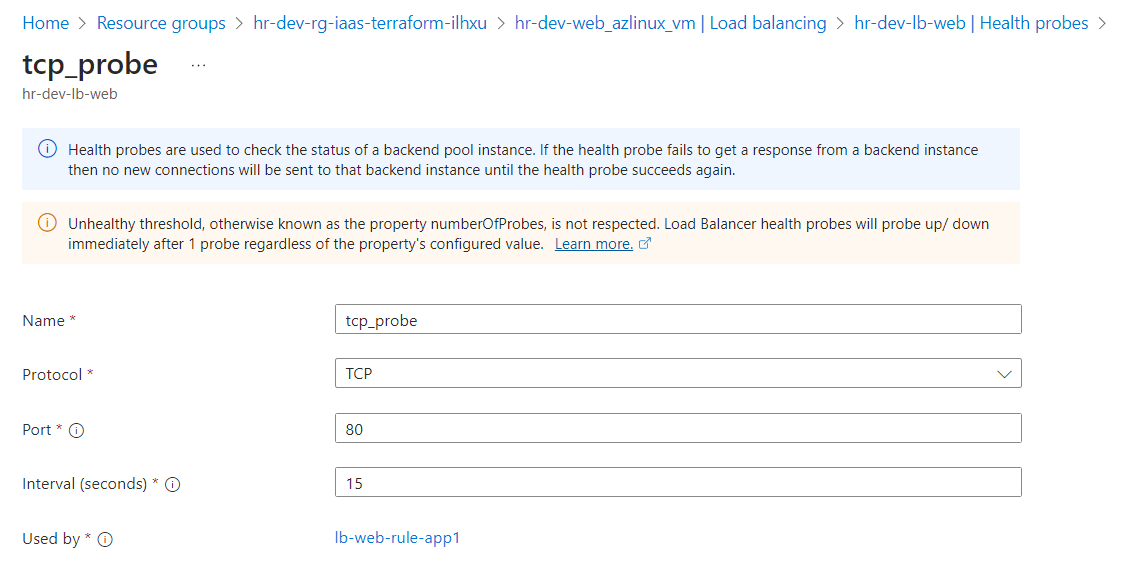
A Load Balancer Probe continuously checks the health of the web servers in the backend pool. It sends periodic requests to the servers, and if a server fails to respond, it is temporarily removed from the pool until it becomes healthy again. This ensures that traffic is only sent to healthy servers, enhancing the availability and reliability of the application.
resource "azurerm_lb_probe" "lb_web_probe" {
  name = "tcp_probe"
  loadbalancer_id = azurerm_lb.lb_web.id
  port = 80
  protocol = "Tcp"
}
Resource Block:
The resource block uses theazurerm_lb_proberesource to define a Health Probe for the Azure Load Balancer.Resource Name:
name = "tcp_probe": The probe is namedtcp_probe, indicating that it will monitor the health of backend servers using the TCP protocol.
Load Balancer Association:
Port Configuration:
port = 80: The probe checks the health of the backend servers by sending a request to port 80 (typically used for HTTP traffic) on each backend VM.
Protocol:
protocol = "Tcp": The probe uses the TCP protocol to verify if the backend VMs are responsive. This means the probe checks if the VM is accepting TCP connections on port 80.
Step 5: Create Load Balancer Rule
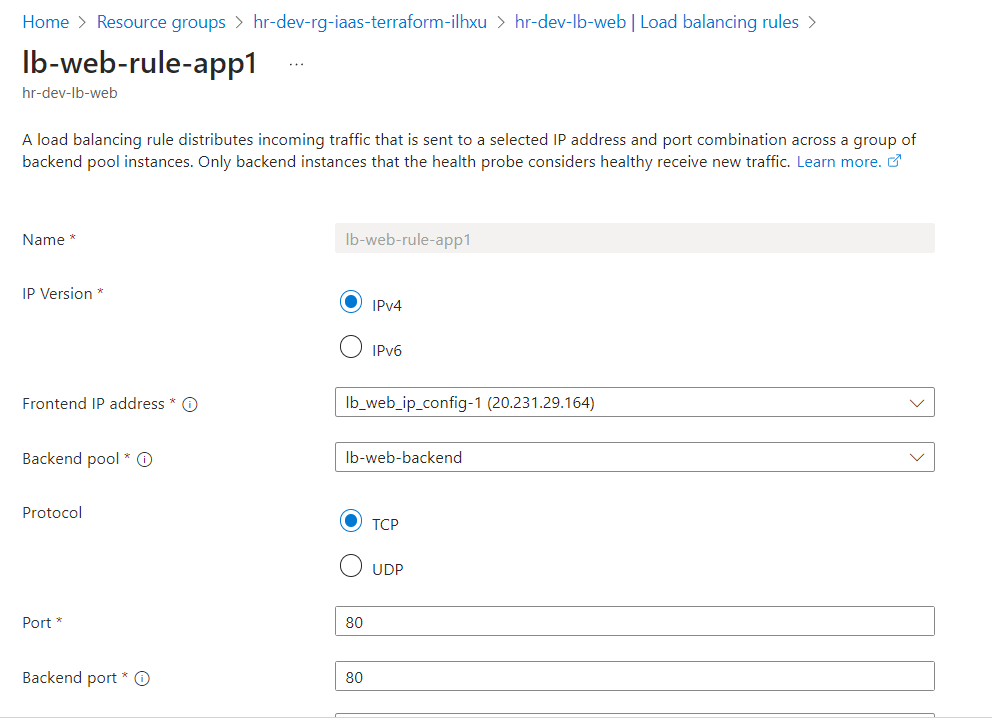
Load Balancer Rules define how traffic from the public IP should be distributed across the backend pool. You can set rules based on protocol (TCP, HTTP, etc.), port number, and session persistence to control how the load balancer routes the traffic to different web servers. This helps in routing traffic based on specific configurations.
resource "azurerm_lb_rule" "lb_rule_app1" {
  name = "lb-web-rule-app1"
  backend_port = 80
  frontend_port = 80
  loadbalancer_id = azurerm_lb.lb_web.id
  protocol = "Tcp"
  frontend_ip_configuration_name = azurerm_lb.lb_web.frontend_ip_configuration[0].name
  backend_address_pool_ids = [ azurerm_lb_backend_address_pool.lb_backend_address_pool.id ]
  probe_id = azurerm_lb_probe.lb_web_probe.id
}
Resource Block:
The resource block uses theazurerm_lb_ruleresource to define a Load Balancer Rule for distributing traffic to the web application.Resource Name:
The rule is named"lb-web-rule-app1", which defines the load balancing behavior specifically for traffic to the web applicationapp1.Port Configuration:
backend_port = 80: Specifies the port on the backend servers (web VMs) where the traffic will be directed.frontend_port = 80: Defines the port on the load balancer's frontend IP where traffic will arrive.Both ports are set to
80, indicating that HTTP traffic is being routed from clients to the web VMs.
Load Balancer Association:
Protocol:
protocol = "Tcp": Specifies the protocol as TCP, which is typical for HTTP traffic.
Frontend IP Configuration:
frontend_ip_configuration_name = azurerm_lb.lb_web.frontend_ip_configuration[0].name: Refers to the load balancer's frontend IP configuration that was set up earlier, linking this rule to the public IP of the load balancer.
Backend Address Pool:
Health Probe:
Step 6: Associate Network Interface and Standard Load Balancer
In this step, the Network Interface of each web server is associated with the Load Balancer’s backend pool. This allows the Load Balancer to direct traffic to the web servers via their network interfaces. Each server's network interface is linked to the backend pool so that it can participate in load balancing, ensuring smooth and efficient traffic distribution.
resource "azurerm_network_interface_backend_address_pool_association" "lb_web_nic_backendpool_association" {
    network_interface_id = azurerm_network_interface.web_linuxvm_NIC.id
    backend_address_pool_id = azurerm_lb_backend_address_pool.lb_backend_address_pool.id
    ip_configuration_name = azurerm_network_interface.web_linuxvm_NIC.ip_configuration[0].name
}
Resource Block:
The resource block usesazurerm_network_interface_backend_address_pool_associationto associate a Network Interface (NIC) of a VM with a Load Balancer's backend pool.Network Interface Association:
network_interface_id = azurerm_network_interface.web_linuxvm_NIC.id: Associates the Network Interface (NIC) of the VM (in this case,web_linuxvm_NIC) with the backend pool. The NIC is responsible for managing network connectivity for the VM.
Backend Pool Association:
IP Configuration:
ip_configuration_name = azurerm_network_interface.web_linuxvm_NIC.ip_configuration[0].name: Specifies the IP configuration used by the network interface. This ensures that the correct IP settings for the NIC are used when associating it with the load balancer.
Outputs
output "web_lb_public_ip" {
  value       = azurerm_public_ip.lb_web_publicip.ip_address
  description = "Public ip of load balancer"

}
output "web_lb_id" {
  value       = azurerm_lb.lb_web.id
  description = "Load Balancer Id"

}
output "web_lb_frontend_ip_configuration" {
  value       = [azurerm_lb.lb_web.frontend_ip_configuration]
  description = "Web LB Frontend IP configuration"

}
Verification on Azure Portal
Once the Terraform configuration is successfully applied, we will proceed to validate the resources on the Azure Portal. This step ensures that all the components, such as the public IP, load balancer, backend pool, probes, and network interface associations, have been deployed as expected. We will verify that:
Public IP: The static public IP for the Load Balancer is created and associated with the frontend configuration.

Load Balancer: The Azure Standard Load Balancer is visible with its frontend and backend configurations.

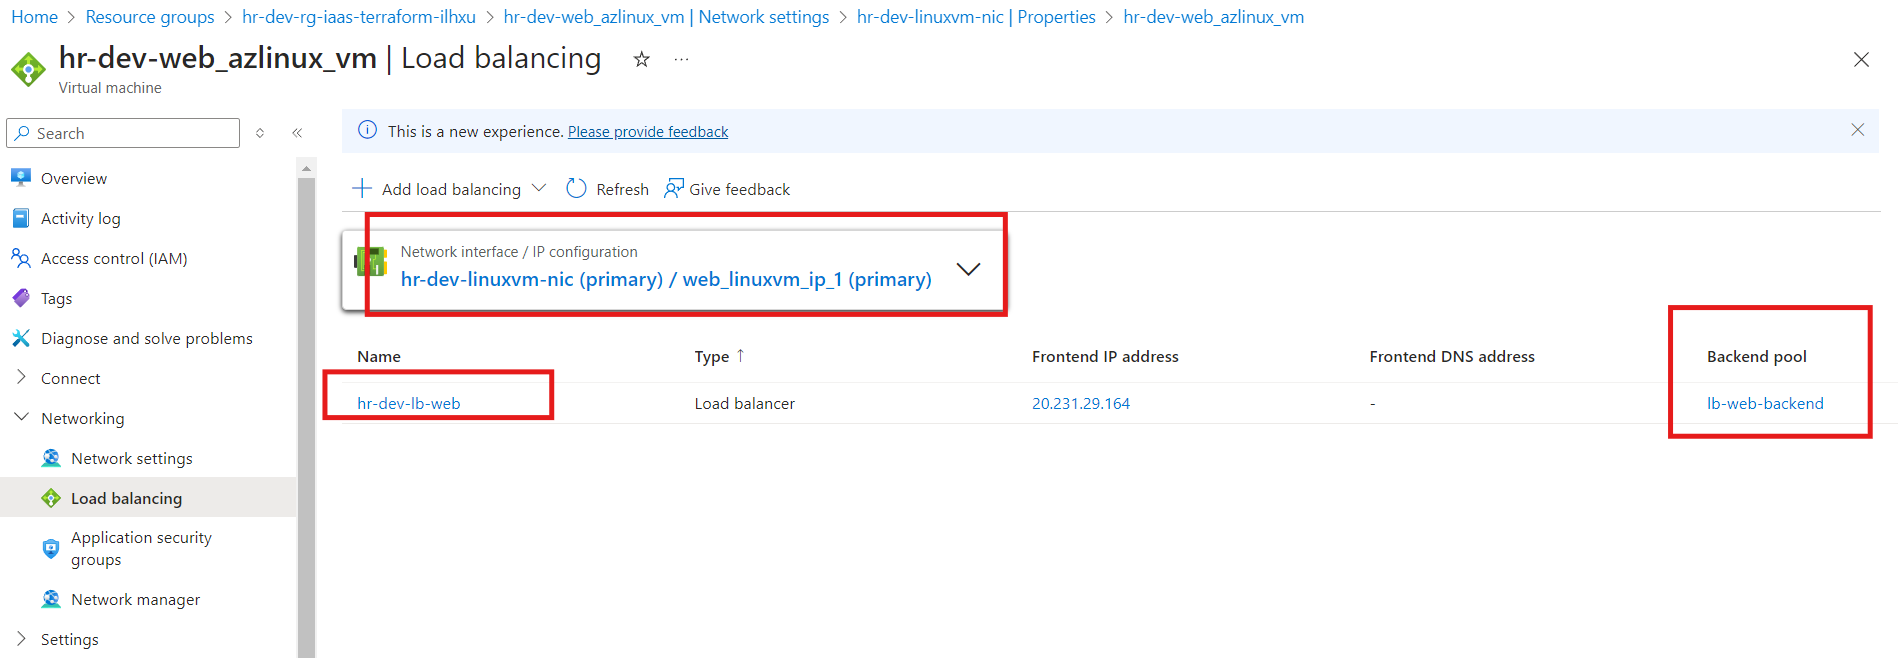
Backend Pool: The VMs or network interfaces are correctly associated with the load balancer’s backend pool.

Load Balancer Probes: The health probe is configured to monitor the health of the VMs via the specified protocol and port.
Load Balancer Rules: Traffic routing rules are set up correctly to forward traffic to the backend pool.
Network Interface: Ensure that the NICs are associated with the load balancer’s backend pool, allowing traffic to flow to the VMs.
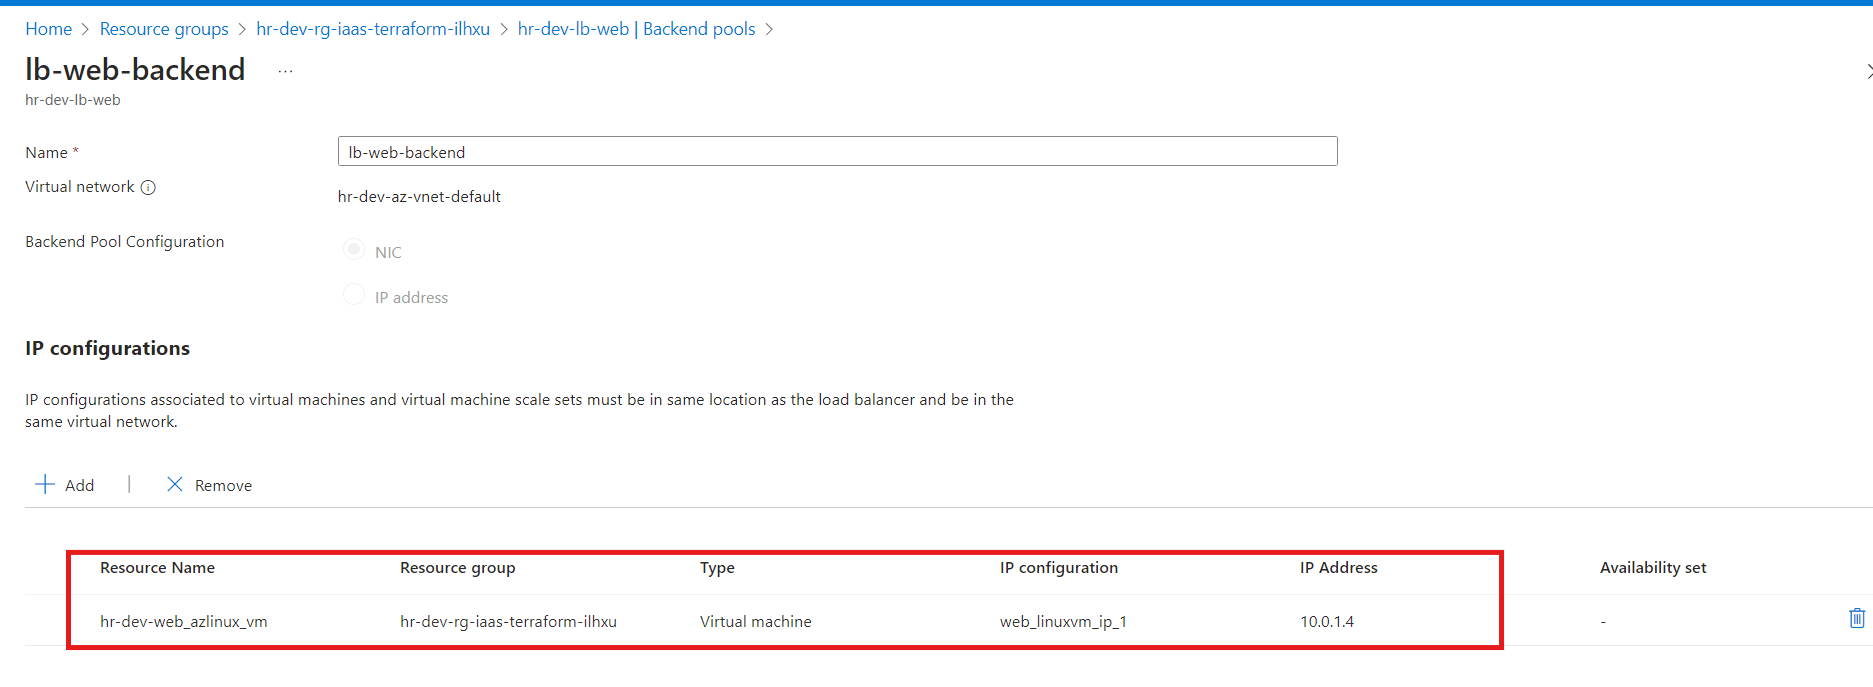
And we are able to access the static web page using the Load Balancer’s public IP as shown below

Inbound NAT Rule
An Inbound NAT rule in Azure Load Balancer allows you to direct specific inbound traffic from a public IP to a particular virtual machine (VM) or a specific port on a VM in the backend pool. This enables external users to connect to individual VMs through unique ports without exposing multiple public IPs for each VM.
Terraform Resources to be Used
To configure a NAT rule for an Azure Standard Load Balancer, we will use two Terraform resources:
azurerm_lb_nat_rule– This resource defines the NAT rule that will map external traffic from a specific port to an internal port on a VM in the backend pool.azurerm_network_interface_nat_rule_association– This resource associates the network interface of a virtual machine with the NAT rule, allowing the rule to forward traffic to the correct VM and port.
Create NAT Rule
This resource creates a NAT rule for an Azure Standard Load Balancer to allow SSH access to a backend VM by mapping an external port to the internal SSH port (22).
This configuration creates a NAT rule to allow external SSH access to a VM using the Load Balancer. When users access port 1022 on the Load Balancer’s public IP, it will forward the traffic to port 22 (SSH) on the backend VM.
resource "azurerm_lb_nat_rule" "lb_web_inbound_nat_rule_22" {
    name = "ssh-1022-vm-22"
    backend_port = 22   # LoadBalancer port which will be mapped to port 22 of VM
    frontend_port = 1022
    frontend_ip_configuration_name = azurerm_lb.lb_web.frontend_ip_configuration[0].name
    loadbalancer_id = azurerm_lb.lb_web.id
    protocol = "Tcp"
   # backend_address_pool_id = azurerm_lb_backend_address_pool.lb_backend_address_pool.id
    resource_group_name = azurerm_resource_group.rg.name
}
Resource Name:
azurerm_lb_nat_rule.lb_web_inbound_nat_rule_22This resource defines an inbound NAT rule for the load balancer.
NAT Rule Name:
- The name of the NAT rule is
"ssh-1022-vm-22". It maps the frontend port (1022) to the backend VM’s SSH port (22).
- The name of the NAT rule is
Backend Port:
backend_port = 22: This is the port on the VM that the load balancer will forward traffic to (SSH port on the VM).
Frontend Port:
frontend_port = 1022: The external port on the load balancer that will be exposed to users. It maps to the backend port (22) of the VM.
Frontend IP Configuration:
frontend_ip_configuration_name: Specifies the frontend IP configuration of the load balancer that will handle this traffic.
Load Balancer Association:
Protocol:
protocol = "Tcp": Specifies that the protocol for the NAT rule is TCP, which is required for SSH connections.
Resource Group:
resource_group_name = azurerm_resource_group.rg.name: Indicates the resource group where the NAT rule is created.
Associate Network Interface with NAT Rule
This resource associates the NAT rule created for the load balancer with the network interface of the backend VM. This allows traffic from the load balancer's NAT rule to be routed to the specified VM through its network interface.
resource "azurerm_network_interface_nat_rule_association" "lb_nic_nat_rule_associate" {
 nat_rule_id = azurerm_lb_nat_rule.lb_web_inbound_nat_rule_22.id
 network_interface_id = azurerm_network_interface.web_linuxvm_NIC.id
 ip_configuration_name =  azurerm_network_interface.web_linuxvm_NIC.ip_configuration[0].name

}
Resource Name:
azurerm_network_interface_nat_rule_association.lb_nic_nat_rule_associateThis resource creates an association between a NAT rule and the network interface of a VM.
NAT Rule ID:
Network Interface ID:
network_interface_id = azurerm_network_interface.web_linuxvm_NIC.id: Specifies the network interface of the backend VM (web_linuxvm_NIC) where the NAT rule will be applied. This ensures traffic is routed to the correct VM.
IP Configuration Name:
ip_configuration_name = azurerm_network_interface.web_linuxvm_NIC.ip_configuration[0].name: Specifies the IP configuration of the network interface. This defines which IP on the network interface is associated with the NAT rule.
This configuration links the NAT rule to the network interface of the backend VM. By doing so, it ensures that the traffic routed through the NAT rule on the Load Balancer is directed to the VM via its network interface.
NAT Rule Verification on Azure Portal
After applying the NAT rule changes the respective NAT rule has been attached to the Load Balancer as follows

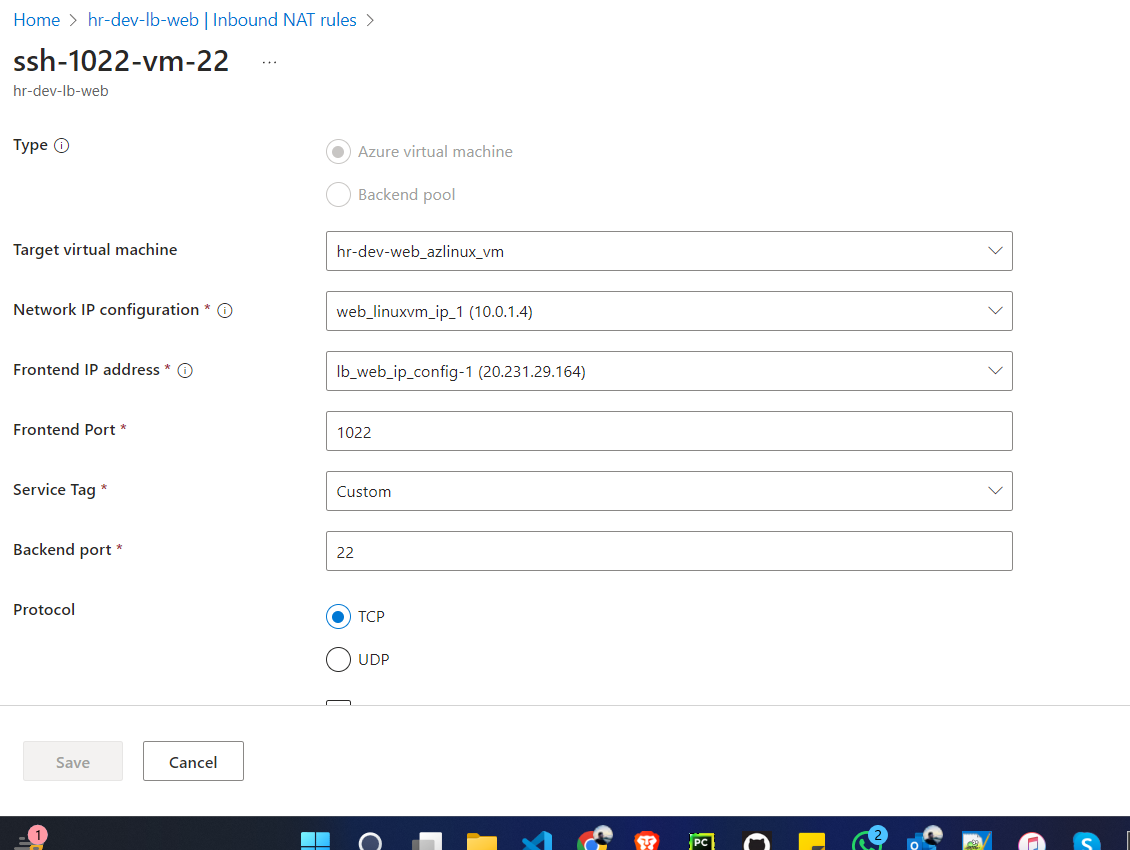
And now we are able to login to the VM via Load Balancer Public IP instead of VM’s actual IP.

The highlighted IP i.e. 20.231.29.164 (hr-dev-web-lb-publicip) is the Load Balancer public IP

Subscribe to my newsletter
Read articles from Ritesh Kumar Nayak directly inside your inbox. Subscribe to the newsletter, and don't miss out.
Written by

Ritesh Kumar Nayak
Ritesh Kumar Nayak
Passionate about helping organizations build scalable infrastructure and DevOps solutions with cloud technologies. Experienced in designing robust systems, automating processes, and driving efficiency through innovative cloud solutions. Advocate for best practices in DevOps and cloud computing, committed to enabling teams to achieve their full potential.