How Payment Gateways Work: Complete Guide with Razorpay Integration in Node.js
 Shivang Yadav
1. What is a Payment Gateway?
A payment gateway is a service that facilitates online payments between buyers and sellers. It acts as a bridge between the customer, the merchant, and the bank. Payment gateways securely transmit payment information for credit cards, debit cards, UPI, and other payment methods.
2. Components of a Payment Gateway
Merchant: The business or individual selling a product or service.
Customer: The buyer who makes the payment.
Acquiring Bank: The merchant's bank that receives the payment.
Issuing Bank: The customer’s bank that issues the credit or debit card.
Payment Processor: Handles the transaction processing and communicates between the acquiring bank and issuing bank.
Payment Gateway: The service that authorizes and handles the secure transmission of payment information.
3. How Payment Gateway Works: Transaction Flow
Here’s the step-by-step flow of how a payment gateway processes payments:
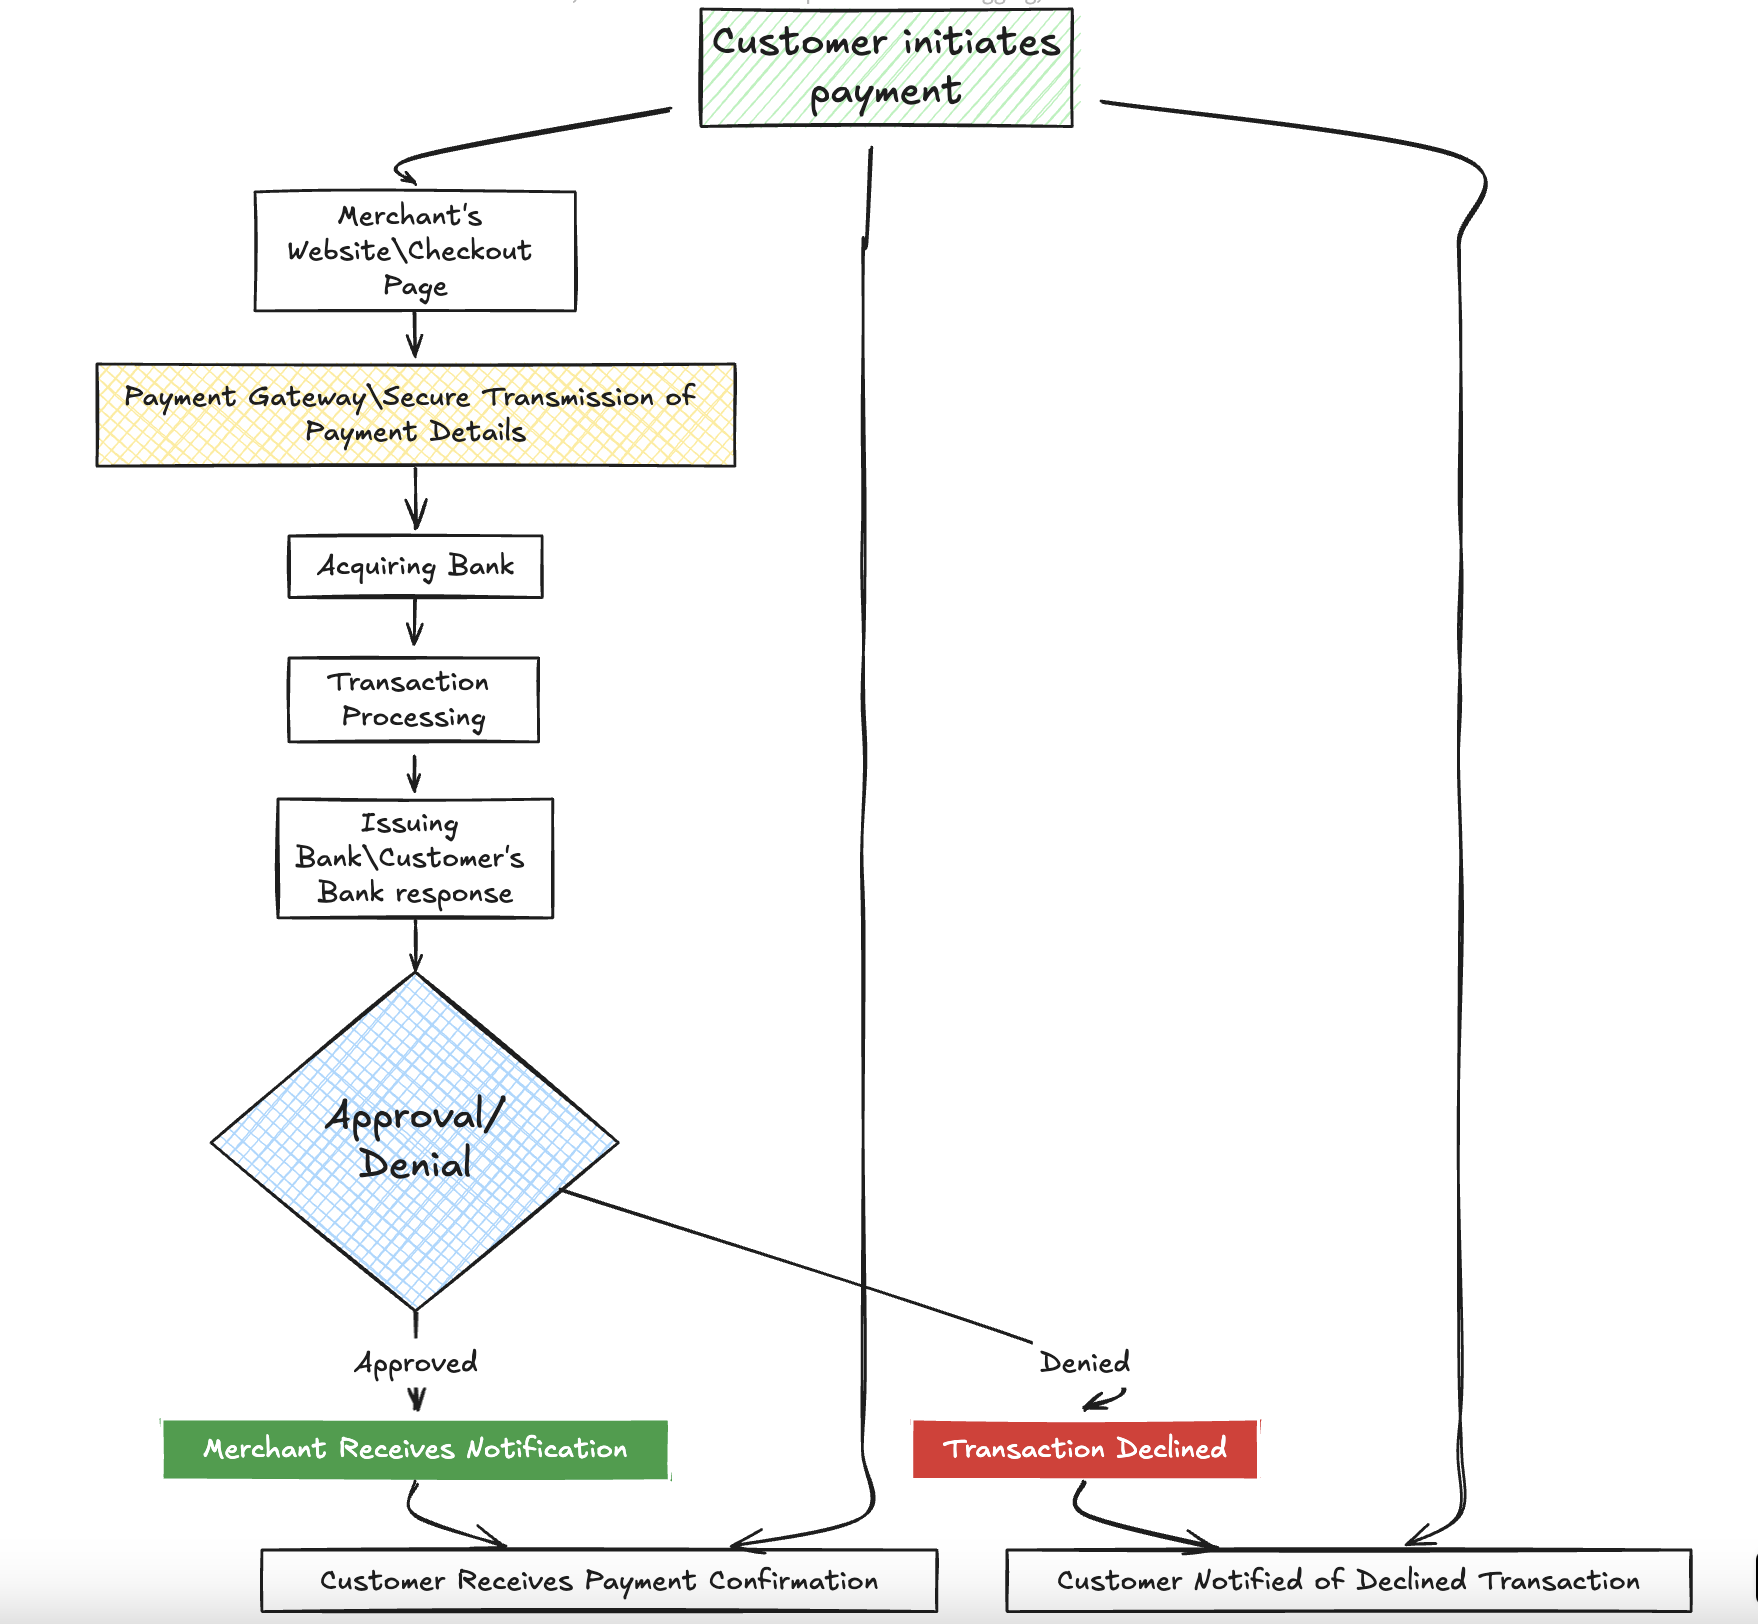
Step 1: Customer Initiates Payment
The customer selects products/services on a merchant’s website and proceeds to checkout.
At the checkout, the customer chooses a payment method (e.g., credit/debit card, UPI).
Step 2: Payment Gateway Authorization
- Once the customer submits the payment details, the payment gateway securely encrypts and transmits this information to the acquiring bank.
Step 3: Acquirer Requests Authorization
- The acquiring bank sends the payment request to the respective card network (e.g., Visa, MasterCard) or UPI network.
Step 4: Issuing Bank Validates
- The issuing bank (customer’s bank) checks if the customer has sufficient funds or credit limit and performs fraud checks.
Step 5: Approval or Denial
Based on the validation, the issuing bank approves or denies the transaction.
The decision is communicated back to the payment gateway.
Step 6: Payment Confirmation
The payment gateway informs the merchant if the payment was successful or failed.
If successful, the merchant processes the order.
Step 7: Settlement
- The acquiring bank collects the payment from the issuing bank and settles the amount with the merchant’s bank account, usually within a few business days.
4. Payment Gateway Security
SSL Encryption: Ensures secure data transmission between customers and payment gateways.
PCI-DSS Compliance: Industry standard for securely handling credit card information stated in Payment Card Industry Data Security Standard.
Tokenization: Sensitive data is replaced by unique identification symbols (tokens) that are exchanged during the payment.
3D Secure: 3D Secure (3-domain structure), an additional security layer that addresses issues of fraud in online debit or credit card transactions.
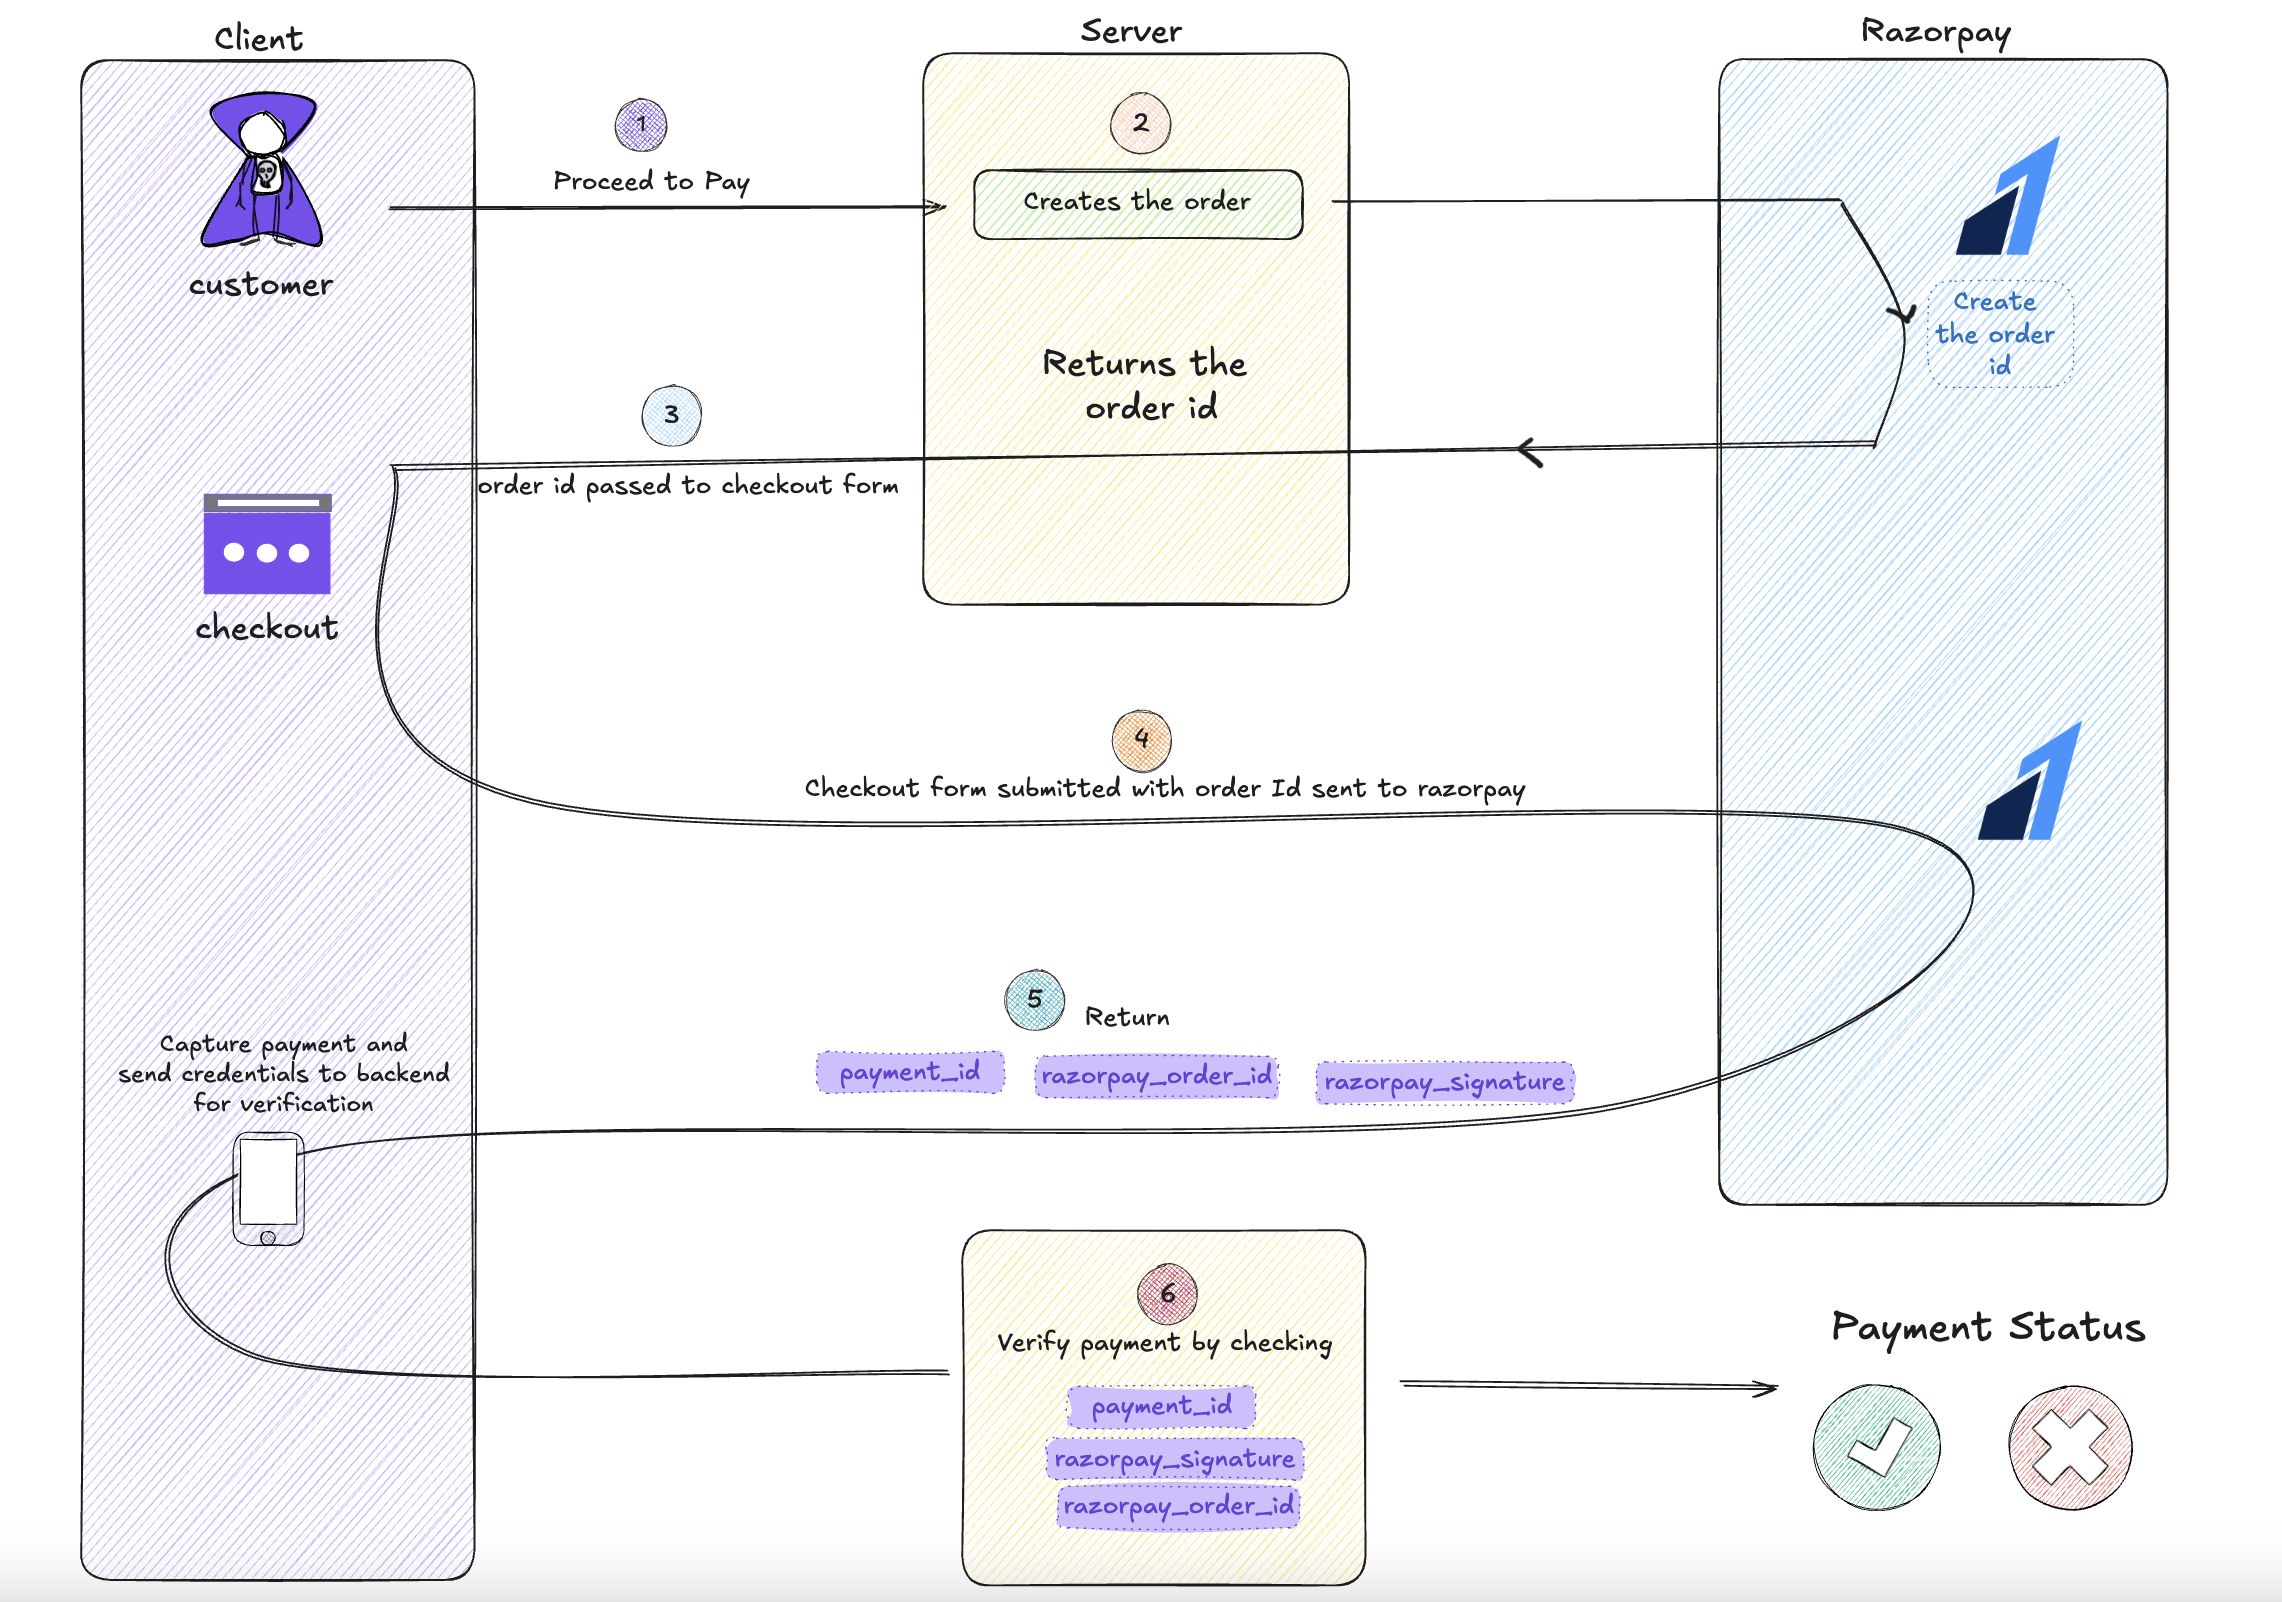
5. Introduction to Razorpay Payment Gateway
Razorpay is a popular payment gateway that supports multiple payment methods, including credit/debit cards, UPI, net banking, and wallets. Razorpay simplifies the process for merchants by providing an easy-to-integrate API for accepting payments.
6. Integrating Razorpay in Node.js Application
Let’s now go step by step on how to integrate Razorpay into a Node.js project.
Step 1: Install Required Packages
You need to install the Razorpay Node.js SDK and any other required dependencies.
npm install razorpay express body-parser
Step 2: Set up Razorpay Account
Sign up on Razorpay.
Create an API key in the Razorpay dashboard. You will get a
key_idandkey_secret, which will be used to authenticate API requests.
Step 3: Initialize Razorpay
In your Node.js application, you need to initialize Razorpay using the SDK. Create a file called payment.js to manage your payment logic.
const Razorpay = require("razorpay");

const razorpayInstance = new Razorpay({
  key_id: process.env.RAZORPAY_KEY_ID, // Replace with your Razorpay key_id
  key_secret: process.env.RAZORPAY_KEY_SECRET, // Replace with your Razorpay key_secret
});
Step 4: Create Payment Order API
You need to create an endpoint to generate a payment order before sending it to the client for payment.
app.post("/api/create-order", async (req, res) => {
  const { amount, currency, receipt } = req.body;

  try {
    const options = {
      amount: amount * 100, // amount in the smallest currency unit (e.g., paise for INR)
      currency,
      receipt,
    };

    const order = await razorpayInstance.orders.create(options);
    res.status(200).json(order);
  } catch (error) {
    res.status(500).json({ error: error.message });
  }
});
Step 5: Frontend Integration
On the client side, you need to display the Razorpay payment form. Use the Razorpay checkout script:
<script src="https://checkout.razorpay.com/v1/checkout.js"></script>
Then, initialize Razorpay when the user clicks on the "Pay Now" button.
const options = {
  key: "YOUR_RAZORPAY_KEY_ID", // Enter the Key ID generated from Razorpay Dashboard
  amount: order.amount, // Amount in paise
  currency: order.currency,
  name: "Merchant Name",
  description: "Test Transaction",
  order_id: order.id, // Order ID created in the backend
  callback_url: "/api/verify-payment", // Usually for verifying subscription
  prefill: {
    name: "Customer Name",
    email: "customer@example.com",
    contact: "9999999999",
  },
};
const rzp = new Razorpay(options);
rzp.open();
Step 6: Handle Payment Success
Once the payment is successful, Razorpay sends back a payment ID and order ID. You can use this data to verify the payment on the server side.
app.post("/api/verify-payment", (req, res) => {
  const { razorpay_order_id, razorpay_payment_id, razorpay_signature } = req.body;

  const body = razorpay_order_id + "|" + razorpay_payment_id;
  const crypto = require("crypto");
  const expectedSignature = crypto
    .createHmac("sha256", process.env.RAZORPAY_KEY_SECRET)
    .update(body.toString())
    .digest("hex");

  if (expectedSignature === razorpay_signature) {
    res.send({ success: true });
  } else {
    res.send({ success: false });
  }
});
7. Conclusion
A payment gateway ensures that online transactions are conducted securely and efficiently. In this blog, we discussed how payment gateways work, and we provided a detailed guide on integrating Razorpay with Node.js. You can now enable payments in your Node.js app using Razorpay, following this step-by-step guide.
Additional Resources
Subscribe to my newsletter
Read articles from Shivang Yadav directly inside your inbox. Subscribe to the newsletter, and don't miss out.
Written by
Shivang Yadav
Shivang Yadav
Hi, I am Shivang Yadav, a Full Stack Developer and an undergrad BTech student from New Delhi, India.