Building a Resume: A Journey into Cloud Serverless Architecture
 Daniel Her
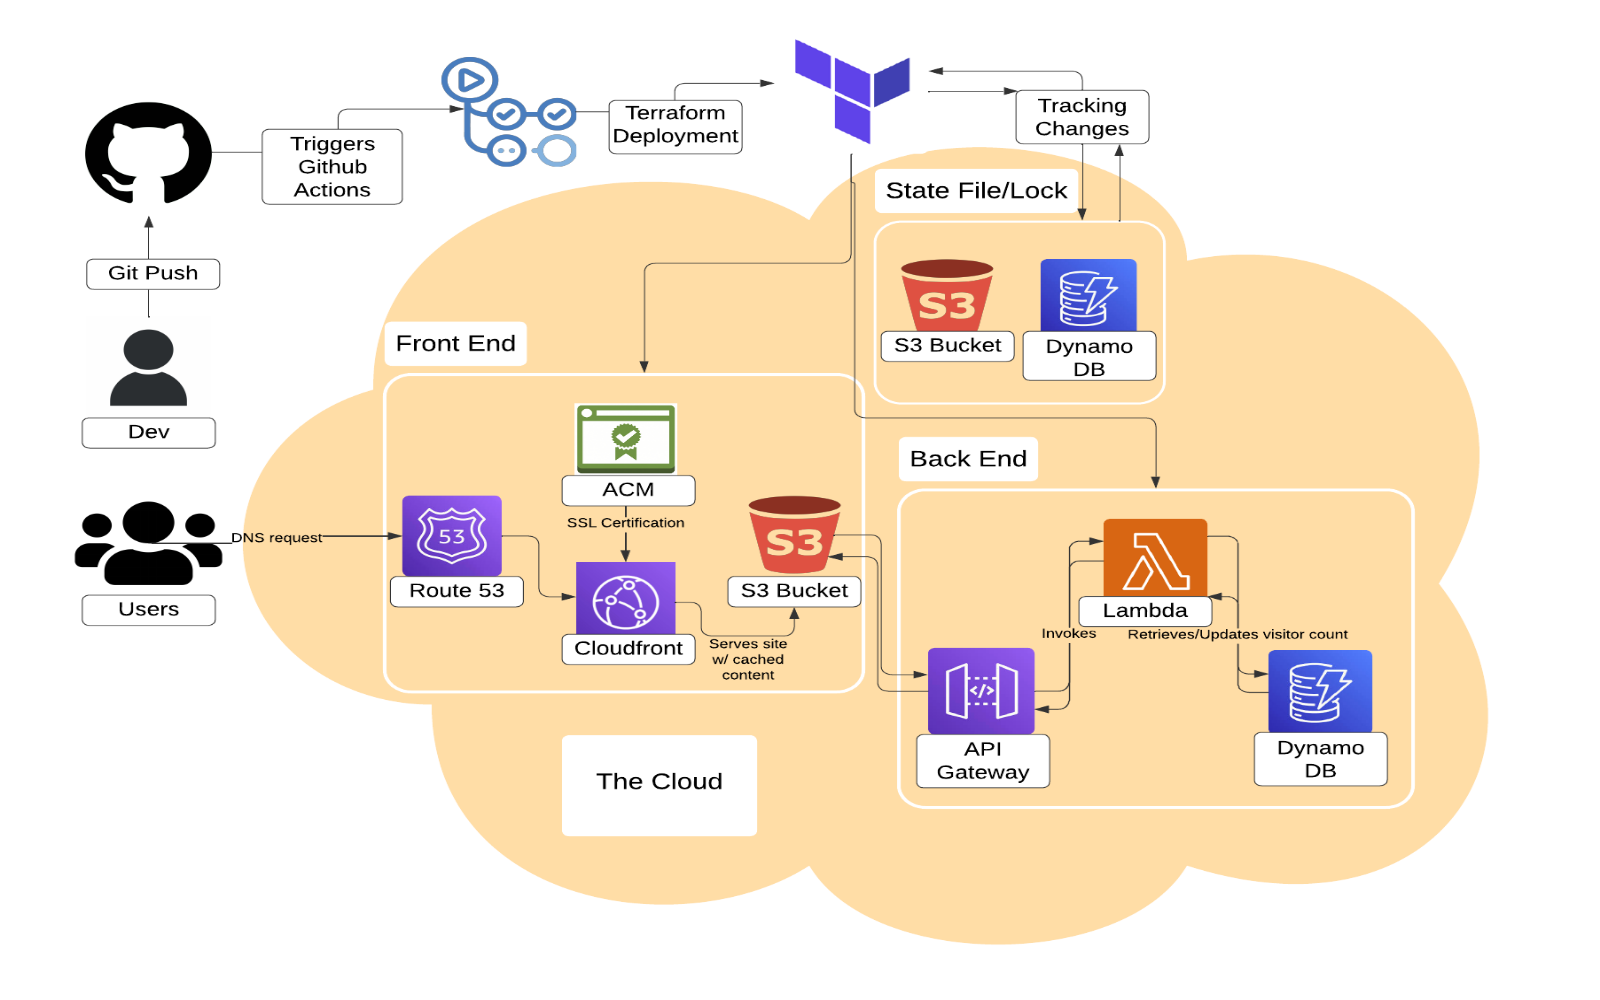
The diagram above is a snapshot of my latest project, where I’ve been exploring cloud architecture in depth. At first glance, it might seem unfamiliar to someone without a technical background—like I once was. Hi, I’m Daniel. When I was a social worker, things like this would have seemed confusing, but one thing that always stayed with me from my previous background was a simple question: is there a better way to do this? That curiosity drove me to explore software development to improve processes at my last job, which ultimately led me to cloud architecture.
With that mindset, let’s break down what you’re seeing and how I built it step by step. This project is a rendition of the Cloud Resume Challenge, which involves creating a cloud-native application to track website visitors. Like any good problem solver, I approached the project by breaking it down into smaller components. Here’s a step-by-step look at how I completed it:
Step 1: Build the Front End
The foundation of the project is a static website built with HTML, CSS, and JavaScript. I hosted the site in an S3 bucket, which simplifies the serving of static content.
Next, I used Route 53 for DNS configuration, registering a custom domain name that points to the S3 bucket. I also utilized AWS Certificate Manager (ACM) to provide an SSL certificate, ensuring my site is served over HTTPS for enhanced security.
To ensure fast, secure, and global delivery of my site, I integrated CloudFront, a Content Delivery Network (CDN). CloudFront caches my website at edge locations around the world, which ensures visitors experience lightning-fast load times, regardless of their location.
Step 2: Build the Backend
A key feature of the project is the dynamic visitor counter, with the count stored in a DynamoDB table. Each time someone visits the website, a Lambda function—triggered via API Gateway—increments the count and updates it in real time. I wrote the Lambda function in Python to handle communication with the DynamoDB table, then integrated it into the RESTful API I created. This serverless setup ensures I only pay for what I use, with no need to manage or scale servers. Once the backend is linked to the front end, the website will be fully operational—but we’re not done yet.
Step 3: Use Infrastructure as Code with Terraform
Given the number of services involved, managing the project manually would be inefficient. To streamline the process, I used Terraform, a powerful Infrastructure-as-Code (IaC) tool. Terraform allowed me to manage the project’s state and track changes, making it easier to rebuild or update the architecture whenever necessary. Here’s a snippet of the Terraform main file I used to configure management of the state file in an S3 bucket:
Step 4: Create a CI/CD Pipeline with GitHub Actions
To ensure the project is fully cloud-native and scalable, I set up a CI/CD pipeline using GitHub Actions. This pipeline automates the deployment process, applying changes to my AWS infrastructure whenever I push updates to my GitHub repository. Below is a snippet from the YAML file, highlighting how to configure IAM credentials with GitHub secrets:
Additional Features:
Along the way, I added a few extra features:
Downloadable Resume: Instead of hardcoding my resume into the homepage, I created a button that allows visitors to download it. This not only improves the design but also makes it easier to update by simply uploading a new resume to the S3 bucket instead of modifying the website’s code.
Terraform State Management: Instead of storing the Terraform state file in GitHub, I hosted it in another S3 bucket. I also integrated a DynamoDB table to enable state locking, ensuring that no two developers can modify the state concurrently. Both of these approaches enhances security.
Learning Points:
Configuring CORS: Properly configuring CORS (Cross-Origin Resource Sharing) in API Gateway was crucial for enabling my JavaScript code to communicate with the backend Lambda function. I had to ensure the correct headers and methods were allowed in the API Gateway settings. While it was a bit of a headache, this process deepened my understanding of web security and how browsers enforce cross-origin policies when interacting with AWS services.
Managing Terraform State: One challenge I faced was ensuring that Terraform properly tracked all my AWS resources, especially those created manually. I resolved this by using Terraform’s import functionality to bring existing resources into Terraform’s state.
Conclusion: Why This Project Matters
This project was more than just building a website—it was about mastering the process of architecting, deploying, and maintaining a fully cloud-based solution with modern infrastructure techniques. The skills I developed with AWS, Terraform, and GitHub Actions will be essential for designing future solutions.
Here's a link to the finished product!
Subscribe to my newsletter
Read articles from Daniel Her directly inside your inbox. Subscribe to the newsletter, and don't miss out.
Written by
