Git Commands Every Open Source Contributor Should Know
 Arya M. Pathak
Table of contents

Contributing to open source is a rewarding experience, but it can also feel intimidating if you're not comfortable navigating Git, especially during events like Hacktoberfest where speed and accuracy are crucial. Understanding the right Git commands will make your life easier and your contributions more effective. In this guide, we'll cover essential Git commands every contributor should know, including branching, rebasing, merging, managing conflicts, and many more. Let's dive in, yaar!
Branching: Managing Your Work Independently
Branching is a core concept in Git that allows developers to work on different features, bug fixes, or updates independently of the main codebase. Imagine you're working on a big project with a lot of friends. Everyone needs their own space to make changes without stepping on each other's toes. That's what branching is for.
git branch
The git branch command is used to list, create, or delete branches. In open source contributions, you often create a new branch for each feature or bug fix you work on. This keeps your work isolated and easy to integrate into the main project later.
Create a new branch:
git branch feature-xyzList all branches:
git branchDelete a branch:
git branch -d feature-xyz
By listing branches, you can see all the available branches in your repository. The -d flag allows you to delete branches that you no longer need, which helps keep your local environment clean.
git checkout
The git checkout command is used to switch between branches. Once you’ve created a new branch, you need to switch to it before making any changes. Like when you switch gears on your bike to climb uphill—checkout helps you shift your work area.
Switch to an existing branch:
git checkout feature-xyzCreate and switch to a new branch:
git checkout -b bugfix-abc
The -b option is a convenient way to create a new branch and switch to it in one command. This is particularly useful when you're starting work on a new feature or fix. Think of this as creating a new folder and directly jumping into it.
git switch
In recent versions of Git, the git switch command has become the preferred way to switch branches.
Switch to a branch:
git switch feature-xyzCreate and switch to a new branch:
git switch -c new-branch
git switch is a simpler and more intuitive way to change branches compared to git checkout, especially for beginners.
Rebasing and Merging: Keeping History Clean
When working with others, it's important to integrate your changes smoothly into the main project. Git offers two primary methods for doing this: rebasing and merging. This part is a bit tricky, but if you understand it, you'll be like a Git pro among your friends.
git rebase
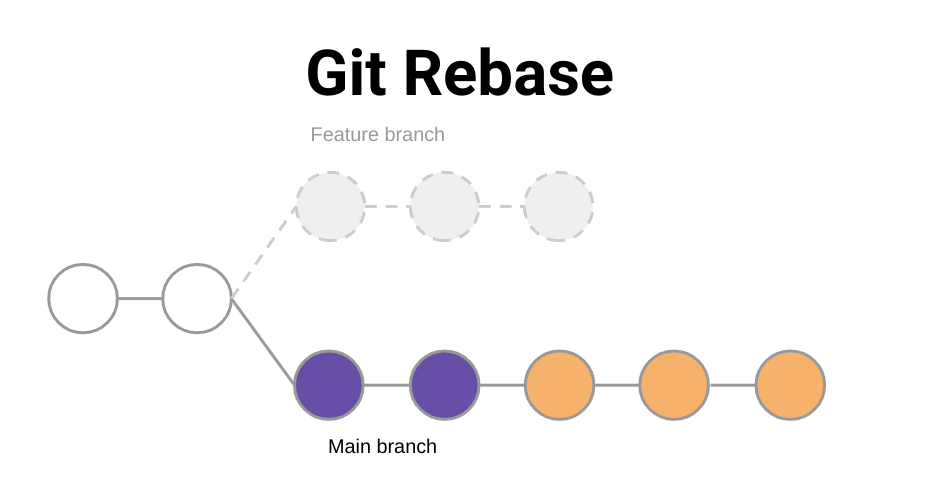
The git rebase command is used to apply your changes onto another branch, often keeping the commit history cleaner. Rebasing helps you move your branch to the tip of another branch, integrating all of the new commits.
- Rebase your branch onto
main:git rebase main
Rebasing is particularly useful when your branch is behind the main branch. It allows you to "replay" your commits on top of the latest changes, leading to a more linear and readable project history. However, you should avoid rebasing branches that have already been pushed to shared repositories—it can cause confusion for other contributors. Be careful, bhai, you don't want to mess up other people's work!
git merge
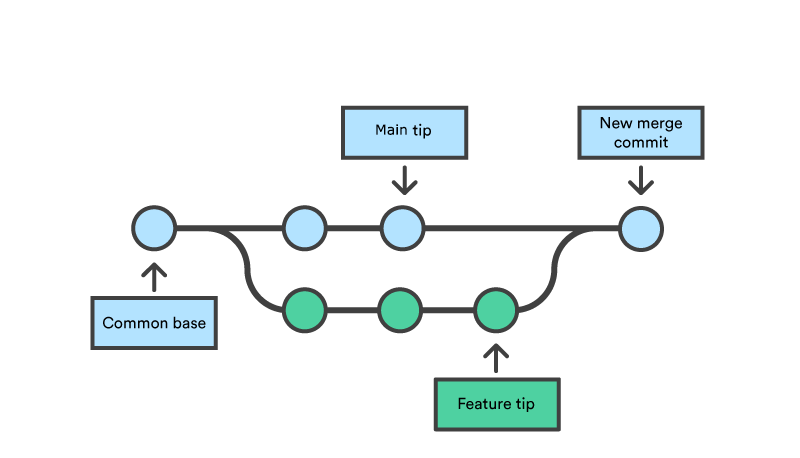
Merging is used to combine two branches. Unlike rebasing, merging preserves the history of both branches by creating a new commit called a "merge commit."
- Merge
feature-xyzintomain:git checkout mainthengit merge feature-xyz

While merging keeps all branches intact, it can sometimes create a cluttered commit history, especially in large projects. Nevertheless, it’s a safer method to use for shared branches since it maintains all of the original commits. The golden rule is to use merging when you want to keep track of everything that happened.
git pull
git pull is a command that combines fetching and merging changes from a remote repository to your local branch. This is the command you'll run every day to make sure your local version is up-to-date.
- Pull changes from remote:
git pull origin main
Using git pull, you can directly integrate changes from the remote branch to your local branch. Always pull the latest changes before starting to work, yaar, or you'll be in trouble.
git fetch
The git fetch command is used to retrieve the latest changes from a remote repository without merging them into your local branch. This lets you see what has changed before deciding to merge.
- Fetch changes from remote:
git fetch origin
Fetching is like bringing updates to your door. After you fetch, you can decide when and how to integrate them into your own work.
Handling Merge Conflicts: Resolving Collaboration Issues
Merge conflicts can occur when two branches modify the same parts of a file. Understanding how to handle these conflicts effectively is critical for contributors. These conflicts are like that group assignment where everyone tries to edit the same slide—confusion will happen!
git diff
The git diff command shows changes between commits, branches, or even between the working directory and a commit. When you have a merge conflict, git diff can help you understand what exactly is conflicting.
- View conflicts:
git diff
Use git diff to see differences and decide how to manually resolve them. It will display conflicting sections and markers that separate the changes from different branches.
git status
After resolving conflicts, you can use git status to confirm which files are in conflict and which have been resolved.
- Check conflict status:
git status
This command is especially helpful to verify if you have staged the resolved files properly. Once you’ve resolved all conflicts, you can add them to the staging area (git add <file>) and then complete the merge.
git mergetool
If you don’t want to manually edit conflicts, you can use git mergetool, which opens a graphical tool that makes conflict resolution easier.
- Launch merge tool:
git mergetool
This can make life a lot easier since it helps visualize the conflicts, making them less daunting.
Undoing Changes: Fixing Mistakes with Confidence
Mistakes happen, and Git offers several tools to help you undo changes effectively without panicking. Don't worry if you mess up—it happens to all of us!
git reset
The git reset command undoes changes by moving the HEAD to a previous commit. This command is quite powerful, but also potentially destructive if used without care.
Soft reset (keep changes in working directory):
git reset --soft HEAD~1Mixed reset (unstage changes):
git reset --mixed HEAD~1Hard reset (discard changes):
git reset --hard HEAD~1

A soft reset will keep your changes in the working directory, allowing you to make amendments. The hard reset, on the other hand, will discard everything, which is useful if you need to start over. Mixed reset is a middle-ground option.
git revert
Unlike git reset, which rewrites history, git revert is a safe way to undo changes without removing them from the project’s commit history. It creates a new commit that undoes the changes of a specified commit.
- Revert a commit:
git revert <commit-hash>
This is ideal for collaborative projects because it doesn't rewrite history, which means it’s less likely to confuse others. It’s like saying "Sorry, my bad!" in a more respectful way.
git stash
git stash is useful when you have uncommitted changes but need to quickly switch branches. It saves your changes without committing them, allowing you to work on something else.
Stash changes:
git stashApply stashed changes:
git stash applyList stashes:
git stash list
By using git stash, you can "shelve" changes for later without creating unnecessary commits. This is particularly helpful during open source contributions when you want to manage multiple tasks without cluttering your history.
git clean
git clean is used to remove untracked files from your working directory. It’s useful when you want to clean up build artifacts or other temporary files that aren’t tracked by Git.
- Remove untracked files:
git clean -f
Be careful with git clean, as it permanently deletes files. Always double-check before using this command.
Squashing Commits for Clean Pull Requests
When making pull requests (PRs) to an open source project, it’s often best to have a clean, concise commit history. Squashing commits helps combine multiple small commits into a larger, meaningful one. This way, your PR doesn't look like a collection of random thoughts!
Squashing with git rebase
Squashing is usually done with an interactive rebase.
- Start an interactive rebase:
git rebase -i HEAD~3
This command allows you to choose which commits to squash. After running it, you’ll be presented with a list of commits, and you can mark those that should be combined using the squash option. Squashing commits helps create a more polished and easier-to-review pull request, which maintainers will definitely appreciate.
git cherry-pick
The git cherry-pick command allows you to apply changes from specific commits in another branch. This can be useful if you want to apply a hotfix to multiple branches.
- Cherry-pick a commit:
git cherry-pick <commit-hash>
With git cherry-pick, you can bring specific changes without merging or rebasing everything from that branch.
Working with Remotes: Collaborating with Others
To contribute to open source, you need to interact with remote repositories on platforms like GitHub or GitLab. Let’s look at some common commands you’ll need.
git remote
The git remote command allows you to manage your remote connections.
Add a remote:
git remote add origin <url>List remotes:
git remote -vRemove a remote:
git remote remove origin
Adding a remote is like adding a shortcut to the place where all the code lives. You’ll use this when you first clone a repository.
git push
The git push command is used to upload your commits to a remote repository.
- Push changes to remote:
git push origin feature-xyz
When your work is complete, git push is how you send it up to be reviewed or merged.
git clone
To contribute to an existing project, you’ll first need to clone it to your local machine.
- Clone a repository:
git clone <url>
git clone takes a copy of the project and puts it on your computer so you can start working.
Conclusion
Understanding these Git commands will help you become a more effective and confident contributor to open source projects. Branching, merging, rebasing, handling conflicts, and undoing changes are foundational skills that every contributor should master. Learning to use these tools will not only enhance your productivity but will also make collaboration much smoother, especially during events like Hacktoberfest.
Remember, the best way to get comfortable with these commands is by practicing. Contribute to small projects, make mistakes, and learn from them. Git can be like magic once you get the hang of it—just remember to keep practicing, and you'll be the Git wizard among your friends in no time. Happy coding, and may your Git adventures be smooth and conflict-free!
Subscribe to my newsletter
Read articles from Arya M. Pathak directly inside your inbox. Subscribe to the newsletter, and don't miss out.
Written by

Arya M. Pathak
Arya M. Pathak
I am a Computer Engineering undergraduate at Vishwakarma Institute of Technology, Pune . With hands-on experience in software development and cloud-native applications, I specialize in Python, Go, C#, and full-stack web development using MERN, ASP.NET Core, and Angular. I have interned at Alemeno and CodingKraft, where I developed AI-driven compliance systems, Python execution engines, and secure web solutions. My projects include scalable microservices, machine learning pipelines, and secure banking APIs deployed on cloud platforms like Azure with Kubernetes and CI/CD automation. Adept in tools like Docker, Redis, RabbitMQ, and GitHub Actions, I am certified in Deep Learning and DevOps. I have a strong foundation in algorithms, having solved over 350 coding problems across platforms like Leetcode and Codeforces. Additionally, I actively contribute to open-source projects, mentoring initiatives, and hackathons.