Multi-AZ EKS Cluster Setup with Service for Pod Communication Verification
 Saurabh Adhau
Table of contents

Introduction
To create an Amazon EKS (Elastic Kubernetes Service) cluster in a Multi-AZ (Availability Zone) configuration and ensure that pods can communicate with each other across different AZs, you need to follow a detailed step-by-step process. This involves setting up an EKS cluster across multiple AZs, deploying an example application, and verifying cross-pod communication. This setup will also demonstrate high availability, resilience, and redundancy across different AZs.
Step 1: Prerequisites
AWS Account: Ensure you have an AWS account with sufficient permissions to create and manage EKS resources.
AWS CLI: Install the AWS CLI and configure it with your AWS credentials.
aws configurekubectl: Install
kubectlto interact with the Kubernetes cluster.curl -LO "https://dl.k8s.io/release/$(curl -L -s https://dl.k8s.io/release/stable.txt)/bin/linux/amd64/kubectl" chmod +x kubectl sudo mv kubectl /usr/local/bin/eksctl: Install
eksctl, a command-line tool for managing EKS clusters.curl --silent --location "https://github.com/weaveworks/eksctl/releases/download/0.140.0/eksctl_$(uname -s)_$(uname -m).tar.gz" | tar xz -C /tmp sudo mv /tmp/eksctl /usr/local/bin
Step 2: Create an EKS Cluster Across Multiple Availability Zones
Create the EKS Cluster using
eksctl:The following command creates an EKS cluster named
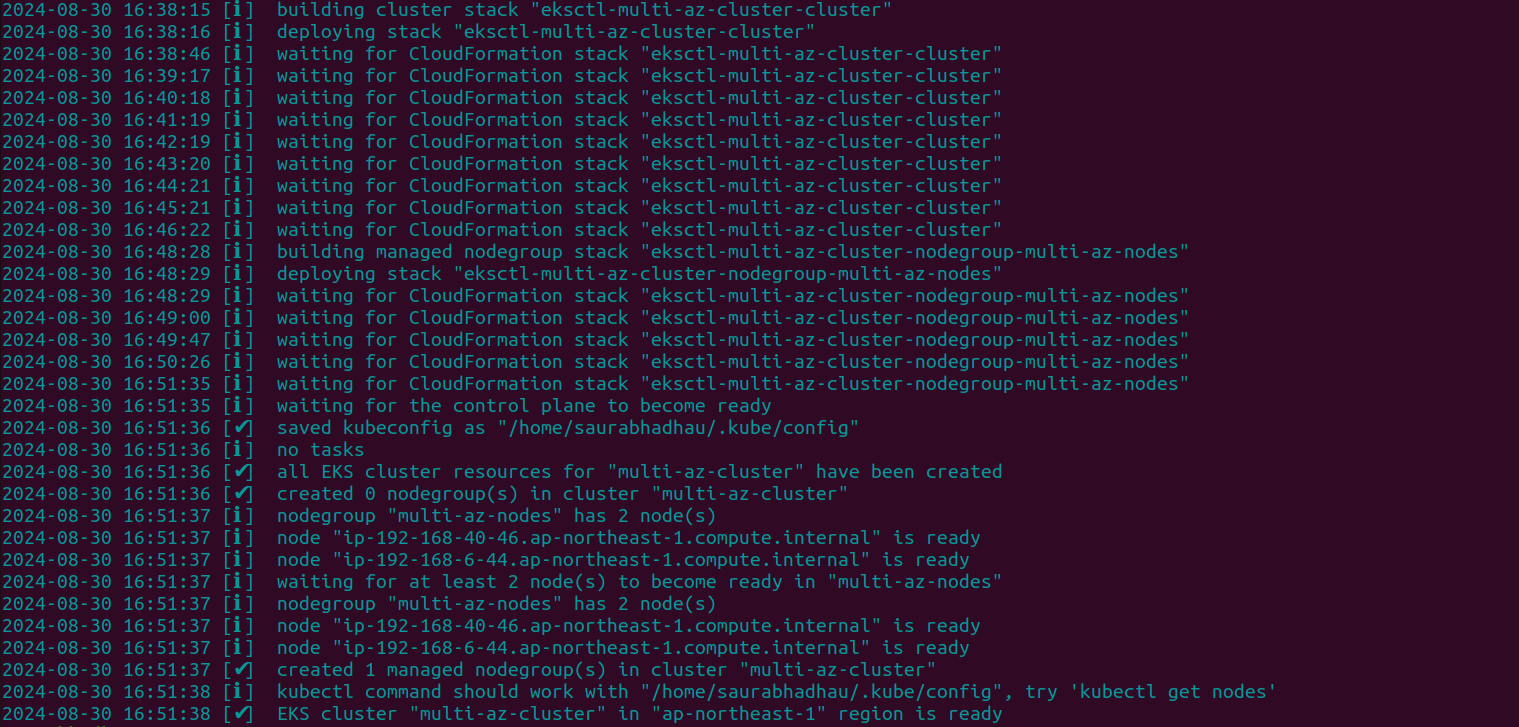
multi-az-clusterwith nodes distributed across three different AZs:eksctl create cluster \ --name multi-az-cluster \ --region ap-northeast-1 \ --zones ap-northeast-1a,ap-northeast-1d \ --nodegroup-name multi-az-nodes \ --node-type t2.micro \ --nodes 2 \ --nodes-min 2 \ --nodes-max 4--region ap-northeast-1: Specifies the AWS region.--zones ap-northeast-1a,ap-northeast-1d: Specifies the AZs for the cluster.--nodegroup-name multi-az-nodes: Names the node group.--nodes 2: Specifies the initial number of nodes.--nodes-min 2and--nodes-max 4: Configures the autoscaling range for the node group.After applying the above command you can see the output like this:

Verify the Cluster Creation:
Once the cluster is created, verify its status:
eksctl get cluster --name multi-az-clusterCheck the nodes:
kubectl get nodes --show-labelsThis command will display the nodes along with their AZ labels.
Step 3: Deploy an Example Application and Service
To test pod-to-pod communication across AZs, we'll deploy a simple nginx application with multiple replicas and create a Kubernetes Service to expose these pods.
Create a Deployment YAML File:
Create a file named
nginx-deployment.yaml:apiVersion: apps/v1 kind: Deployment metadata: name: nginx-deployment spec: replicas: 4 selector: matchLabels: app: nginx template: metadata: labels: app: nginx spec: affinity: podAntiAffinity: requiredDuringSchedulingIgnoredDuringExecution: - labelSelector: matchExpressions: - key: app operator: In values: - nginx topologyKey: "topology.kubernetes.io/zone" containers: - name: nginx image: nginx:latest ports: - containerPort: 80- Affinity Rules: The
podAntiAffinityrule ensures that the nginx pods are spread across different AZs for high availability.
- Affinity Rules: The
Create a Service YAML File:
Create a file named
nginx-service.yamlto expose thenginxpods.apiVersion: v1 kind: Service metadata: name: nginx-service spec: selector: app: nginx ports: - protocol: TCP port: 80 targetPort: 80 type: ClusterIPkind: Service: Defines the Kubernetes Service.selector: Matches thenginxpods created by the deployment.type: ClusterIP: Creates an internal service within the cluster that other pods can access.
Deploy the Application and Service:
Apply the deployment and service to the cluster:
 kubectl apply -f nginx-deployment.yaml
 kubectl apply -f nginx-service.yaml
Verify the Deployment and Service:
Check that the pods are running and spread across different AZs:
kubectl get pods -o wideCheck the service status and get its Cluster IP:
kubectl get svcYou should see an entry for
nginx-servicewith its internalClusterIP.

Step 4: Verify Pod Communication Across Availability Zones
To ensure that pods can communicate across AZs, we'll use a busybox pod to test communication with the nginx pods.
Deploy a
busyboxPod:Run the following command to create a
busyboxpod:kubectl run busybox --image=busybox --restart=Never -- sleep 3600This pod will run for 3600 seconds (1 hour) to allow you time to perform the communication test.

Test Communication with Nginx Pods via the Service:
Use the
kubectl execcommand to log into thebusyboxpod and test communication with thenginxservice:kubectl exec -it busybox -- /bin/shInside the
busyboxpod, test communication with thenginxservice by its service name, there are multiple ways to do it:wget --spider --timeout=1 nginx-service wget --spider --timeout=1 http://<nginx-pod-ip> wget --spider --timeout=1 http://nginx-serviceIf the service is reachable, you should get a response indicating that the service is available.

Step 5: Verify High Availability of the EKS Cluster
To ensure the EKS cluster is highly available across multiple AZs:
Check Node Availability:
Verify that your nodes are running in different AZs:
kubectl get nodes --show-labelsLook for the
topology.kubernetes.io/zonelabel to confirm nodes are distributed across AZs.Simulate an AZ Failure:
Simulate a failure by manually terminating an instance in one AZ through the AWS Management Console.
Monitor Pod Rescheduling:
Use the following command to monitor the pods:
kubectl get pods -o wide --watchKubernetes should reschedule the pods from the terminated instance to the remaining healthy nodes in other AZs. You can see the activity in the below images:


Check Application Availability:
Confirm that the application is still available by accessing the Nginx service through a
LoadBalancerorNodePort.If you've set up a service with a
LoadBalancertype, you can get the external IP and check access:kubectl get svcAccess the external IP in your browser to verify that the application is still accessible.

Step 6: Clean Up Resources
Once you have verified the communication and high availability, clean up the resources to avoid unnecessary charges:
eksctl delete cluster --name multi-az-cluster
Conclusion
By following these updated steps, you've created an EKS cluster across multiple Availability Zones, deployed an example application, and verified that pods can communicate across AZs using a Kubernetes Service, ensuring high availability and resilience. This setup helps maintain service continuity even when failures occur in one AZ.
Subscribe to my newsletter
Read articles from Saurabh Adhau directly inside your inbox. Subscribe to the newsletter, and don't miss out.
Written by

Saurabh Adhau
Saurabh Adhau
As a DevOps Engineer, I thrive in the cloud and command a vast arsenal of tools and technologies: ☁️ AWS and Azure Cloud: Where the sky is the limit, I ensure applications soar. 🔨 DevOps Toolbelt: Git, GitHub, GitLab – I master them all for smooth development workflows. 🧱 Infrastructure as Code: Terraform and Ansible sculpt infrastructure like a masterpiece. 🐳 Containerization: With Docker, I package applications for effortless deployment. 🚀 Orchestration: Kubernetes conducts my application symphonies. 🌐 Web Servers: Nginx and Apache, my trusted gatekeepers of the web.