Chapter - 5
 PIYUSH SHARMA
Docker Demystified: Unleashing the Power of Containers for Faster, Scalable Development
In today's fast-paced world of software development, the need for consistency, speed, and scalability has never been more crucial. Enter Docker—an open platform that has revolutionized how we develop, ship, and run applications. In this post, I’ll take you through the fundamentals of Docker, from what it is and how it works to the benefits it brings to developers and organizations alike.
What is Docker?
Docker is an open-source platform that allows developers to automate the deployment of applications inside lightweight, portable containers. These containers hold everything your application needs to run, ensuring that it will behave the same, regardless of the environment it's deployed in. By isolating applications from the underlying infrastructure, Docker enables you to deliver software more efficiently and with fewer headaches.
Why Use Docker?
Docker allows you to manage infrastructure similarly to how you manage applications. It provides standardization, making it perfect for Continuous Integration and Continuous Deployment (CI/CD) workflows. Developers can build, test, and deploy their applications swiftly, without worrying about environmental inconsistencies.
Key Benefits of Docker:
Fast and Consistent Delivery: Containerization ensures that the environment from development to production is uniform, reducing errors and discrepancies.
Scalability and Flexibility: Docker containers can run on any system—be it your local machine, data centers, or cloud environments.
Resource Efficiency: Docker is lightweight and uses fewer system resources compared to virtual machines, allowing you to run more workloads on the same hardware.
How Docker Works: The Architecture
Docker operates on a client-server architecture, making it highly modular and adaptable. Let’s break it down:
Docker Daemon (dockerd)
This is the engine behind Docker, managing images, containers, and networks. The daemon listens for API requests and is responsible for performing container-related actions.
Docker Client
The command-line interface (docker) communicates with the Docker Daemon. You issue commands like docker run, docker build, and docker pull, which the Docker Daemon then executes.
Docker Registries
Docker registries, like Docker Hub, are storage platforms where Docker images are kept. When you pull an image, it's fetched from the registry. You can also push your custom-built images to registries for future use or to share with your team.
Core Docker Concepts: Images and Containers
Docker’s magic lies in its ability to turn applications into containers. But how does this work?
Docker Images
An image is a read-only template that provides the foundation for creating containers. You can build your own image or use an existing one, like an official Ubuntu or Nginx image. Each image is composed of multiple layers, allowing Docker to reuse layers for efficiency.
Docker Containers
A container is a runnable instance of an image. It encapsulates the application and its environment, ensuring portability across systems. Containers are isolated but can share the host’s resources if needed, making them highly efficient compared to traditional virtual machines.
Example Command: Running Your First Docker Container
Running a container in Docker is simple. Here's a command to run a Ubuntu container with an interactive terminal:
docker run -it ubuntu /bin/bash
When you run this, Docker will:
Pull the Ubuntu image if it’s not already available locally.
Create and start a new container.
Attach your terminal to the container, giving you access to a Bash shell inside Ubuntu.
Conclusion: Docker's Power in Modern Development
Docker has fundamentally changed how software is built, tested, and deployed. By isolating applications in containers, Docker ensures that your code runs smoothly across various environments, whether it’s your laptop or a cloud provider. This consistency leads to faster delivery and a more responsive, scalable infrastructure.
In the next part of this series, we’ll dive deeper into Dockerfile and how to create custom images for your applications. Stay tuned!
What is a Container? A Comprehensive Guide
Let’s say you’re developing a killer web app with three key components: a React frontend, a Python API, and a PostgreSQL database. To work on this project, you’d need to install Node.js, Python, and PostgreSQL on your machine.
But here’s where things get tricky. How do you ensure you’re using the same versions as your team members or what’s running in production? How can you avoid conflicts with different dependencies already installed on your machine? This is where containers come to the rescue.
What Exactly is a Container?
A container is an isolated, self-sufficient environment that holds everything your app needs to run—without depending on the host machine’s software. Each component of your app, like the React frontend or the Python API, can run in its own container without interfering with other parts of the system.
Here’s what makes containers so powerful:
Self-Contained: Each container includes everything required to run the application—code, runtime, libraries, and system tools—independent of the host environment.
Isolated: Containers operate in isolation, meaning your app is shielded from the host machine, increasing security and preventing conflicts between dependencies.
Independent: Since containers are individually managed, stopping or deleting one doesn’t affect the others.
Portable: Containers can run anywhere, from your development environment to production in the cloud, ensuring consistency across platforms.
Containers vs. Virtual Machines (VMs)
At first glance, containers and VMs may seem similar, but they’re fundamentally different. A VM is an entire operating system with its own kernel, hardware drivers, and applications. Spinning up a VM to isolate a single app can be resource-heavy and inefficient.
Containers, on the other hand, are simply isolated processes. Multiple containers share the same OS kernel, making them lightweight and highly efficient. This allows you to run many containers on a single server, significantly reducing infrastructure overhead.
Pro Tip: In many cloud environments, VMs and containers are often used together. You can spin up a VM with a container runtime to host multiple containers, increasing resource utilization and cutting costs.
Running Your First Docker Container: A Hands-On Guide
Now that you understand the concept, let’s get practical! Below are the steps to run your first Docker container using Docker Desktop.
Step-by-Step Instructions:
Open Docker Desktop and use the Search field at the top.
Type
welcome-to-dockerand select the Pull button to download the image.
Once the image is pulled, click Run.
Expand the Optional settings.
Set Container name to
welcome-to-dockerand Host port to8080.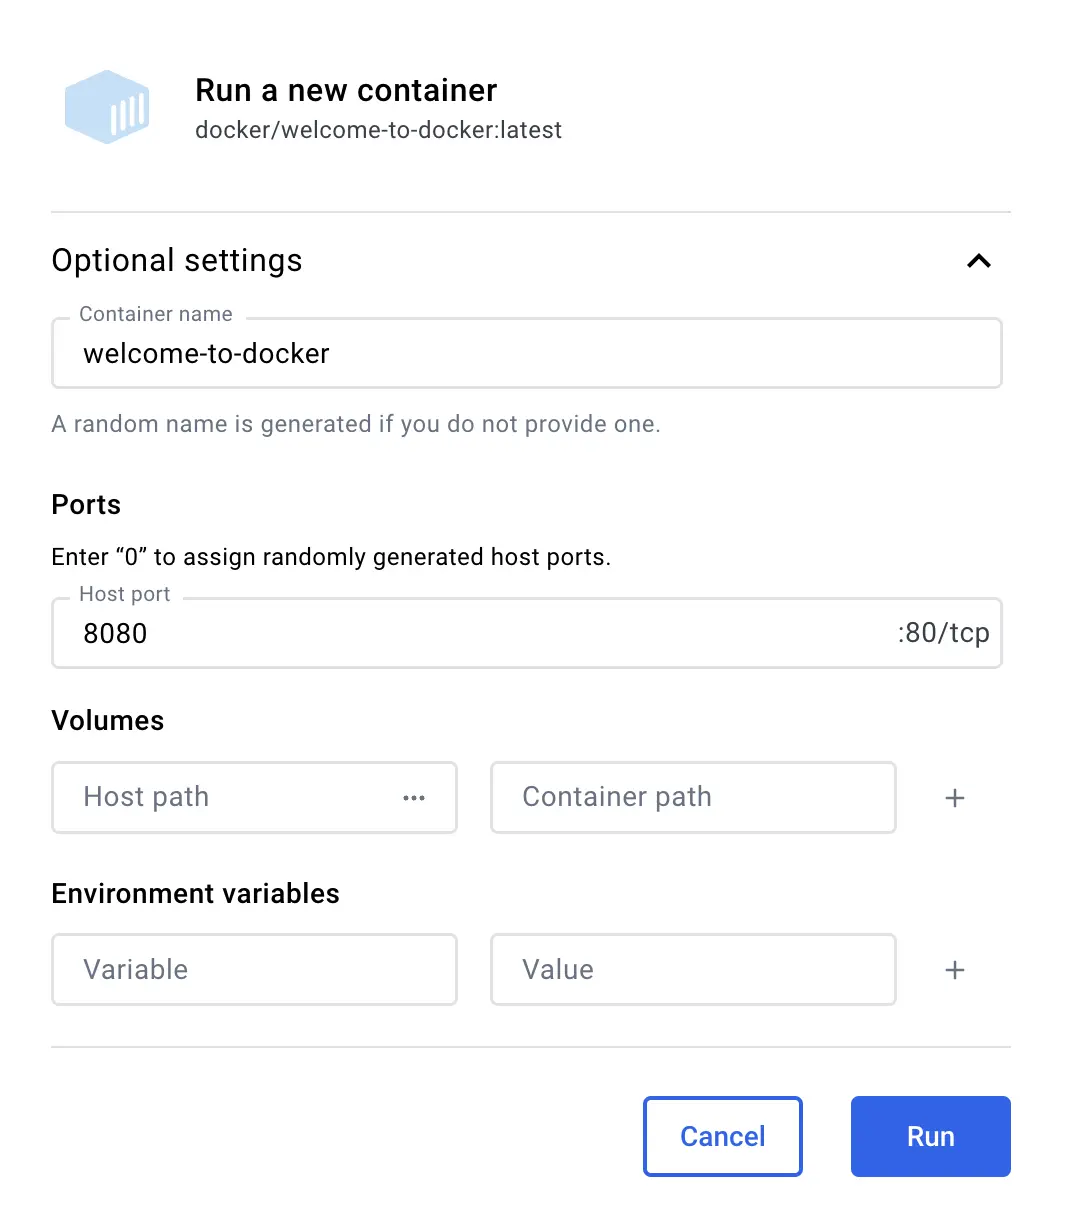
Finally, click Run to launch your container.
Congratulations! You’ve successfully run your first Docker container! 🎉
Viewing and Managing Your Docker Containers
Once your container is up and running, you can easily view and manage it using Docker Desktop. To do this:
Go to the Containers tab in the Docker Dashboard.
Here, you’ll see a list of all running containers.
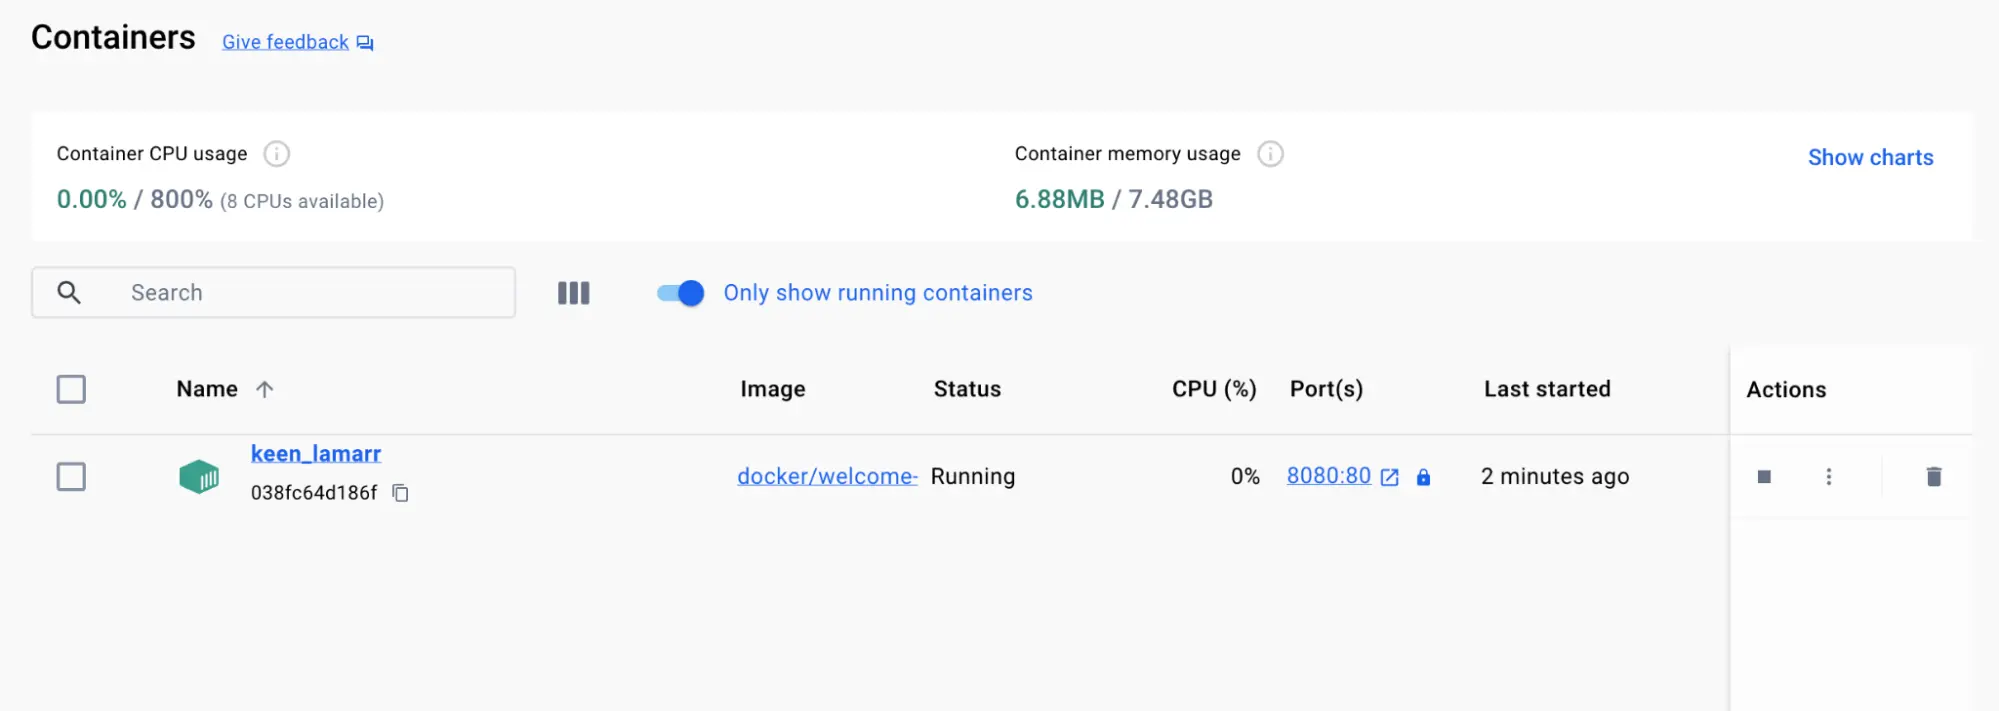
This container is running a simple web server that displays a basic webpage. In more complex projects, you’d have different containers for different parts of your application—like one for the frontend, one for the backend, and another for the database.
Accessing Your Container’s Frontend
When you run a container, you can expose its ports to the host machine. In this case, the welcome-to-docker container exposes port 8080. To access the frontend:
Open your browser and go to http://localhost:8080.

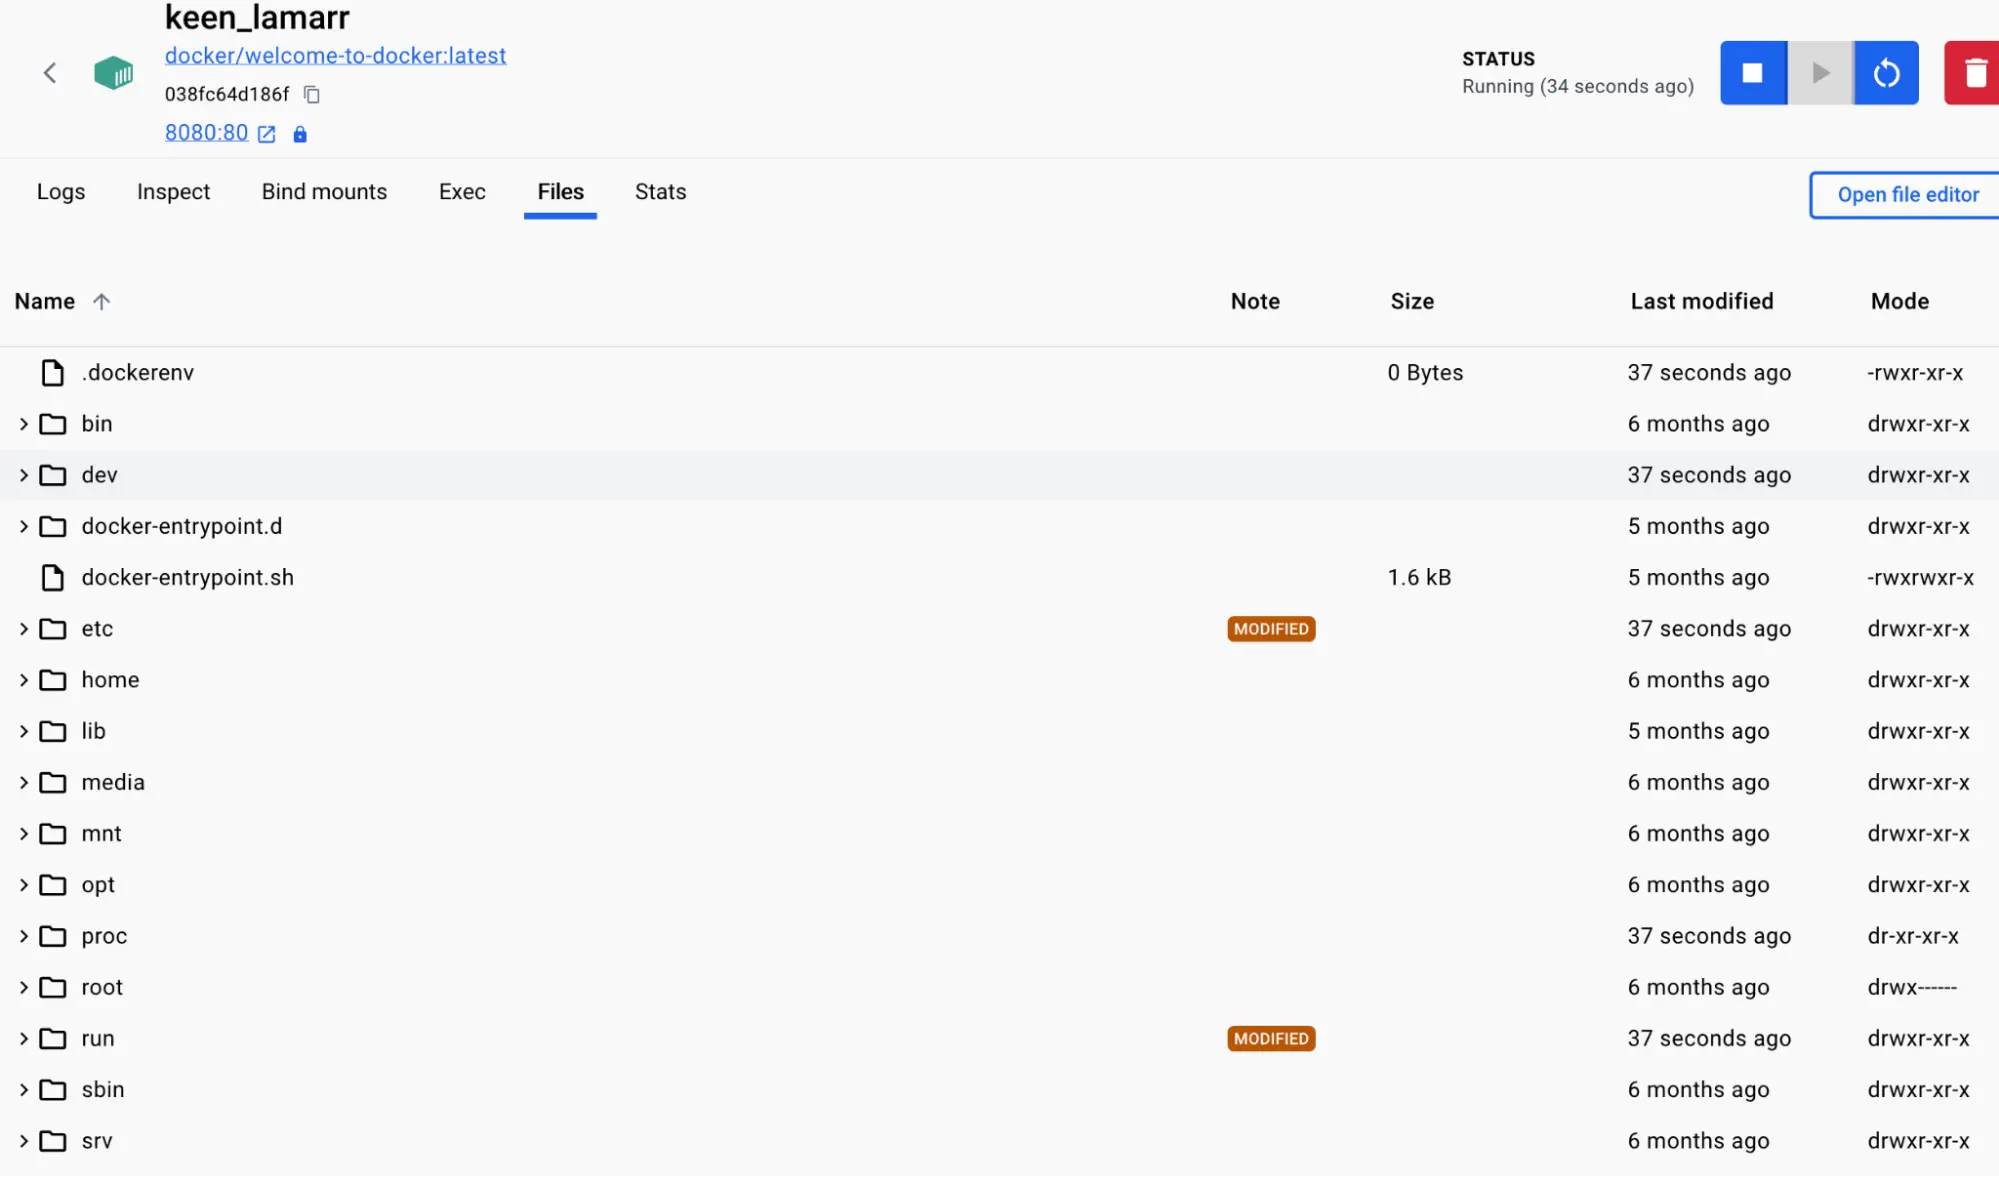
Exploring Your Container's File System
Docker Desktop also lets you explore your container’s isolated file system:
Go to the Containers tab in Docker Dashboard.
Select your container, then go to the Files tab.
Stopping Your Docker Container
The container will keep running until you stop it. To do this:
Navigate to the Containers view.
Find the container and click the Stop action.

What is an Image? Understanding the Foundation of Containers
In the previous sections, we explored what containers are and how they operate as isolated processes. But where do these containers get the files, libraries, and configurations they need? How can these environments be shared consistently across different systems? The answer lies in container images.
What is a Container Image?
A container image is a standardized package that contains everything required to run an application in a container. This includes the app’s code, runtime environment, libraries, and configuration files. You can think of a container image as a template for your container—once it's built, it can be deployed and run in any environment that supports containers.
For instance, a PostgreSQL image contains the database binaries, configuration files, and all necessary dependencies. Similarly, for a Python web app, the image will include the Python runtime, your app code, and any required libraries.
Key Characteristics of Container Images:
Images are immutable: Once an image is built, it cannot be changed. To make modifications, you need to create a new image or add layers on top of the existing one.
Images are composed of layers: Each layer in a container image represents a set of changes, such as added, modified, or deleted files. This layering system allows you to build on top of existing images, which is a crucial feature for reusability and optimization.
For example, if you’re developing a Python app, you can start with the official Python image and add layers to install your app’s dependencies and code. This enables you to focus solely on your app without worrying about setting up Python itself.
Finding and Using Docker Images
Images are not something you need to build from scratch. Docker Hub is the default repository where you can find over 100,000 pre-built images, making it easy to search, download, and run them locally. It’s essentially a global marketplace for container images.
Types of Docker Images:
Docker Official Images: These are a set of curated and secure images maintained by Docker, serving as a reliable starting point for most users.
Docker Verified Publishers: High-quality images created by trusted commercial publishers, verified by Docker to meet specific standards.
Docker-Sponsored Open Source: These images are published and maintained by open-source projects sponsored by Docker.
Popular images such as Redis, Memcached, and Node.js are available on Docker Hub, allowing you to get up and running with minimal setup. You can either use them as-is or customize them by adding layers for your application-specific needs.
Hands-On: Searching and Downloading a Docker Image
Now that you understand what a container image is, let’s walk through the process of finding and pulling a Docker image using Docker Desktop.
Step-by-Step Guide:
Open Docker Desktop and go to the Images section from the left-hand navigation menu.
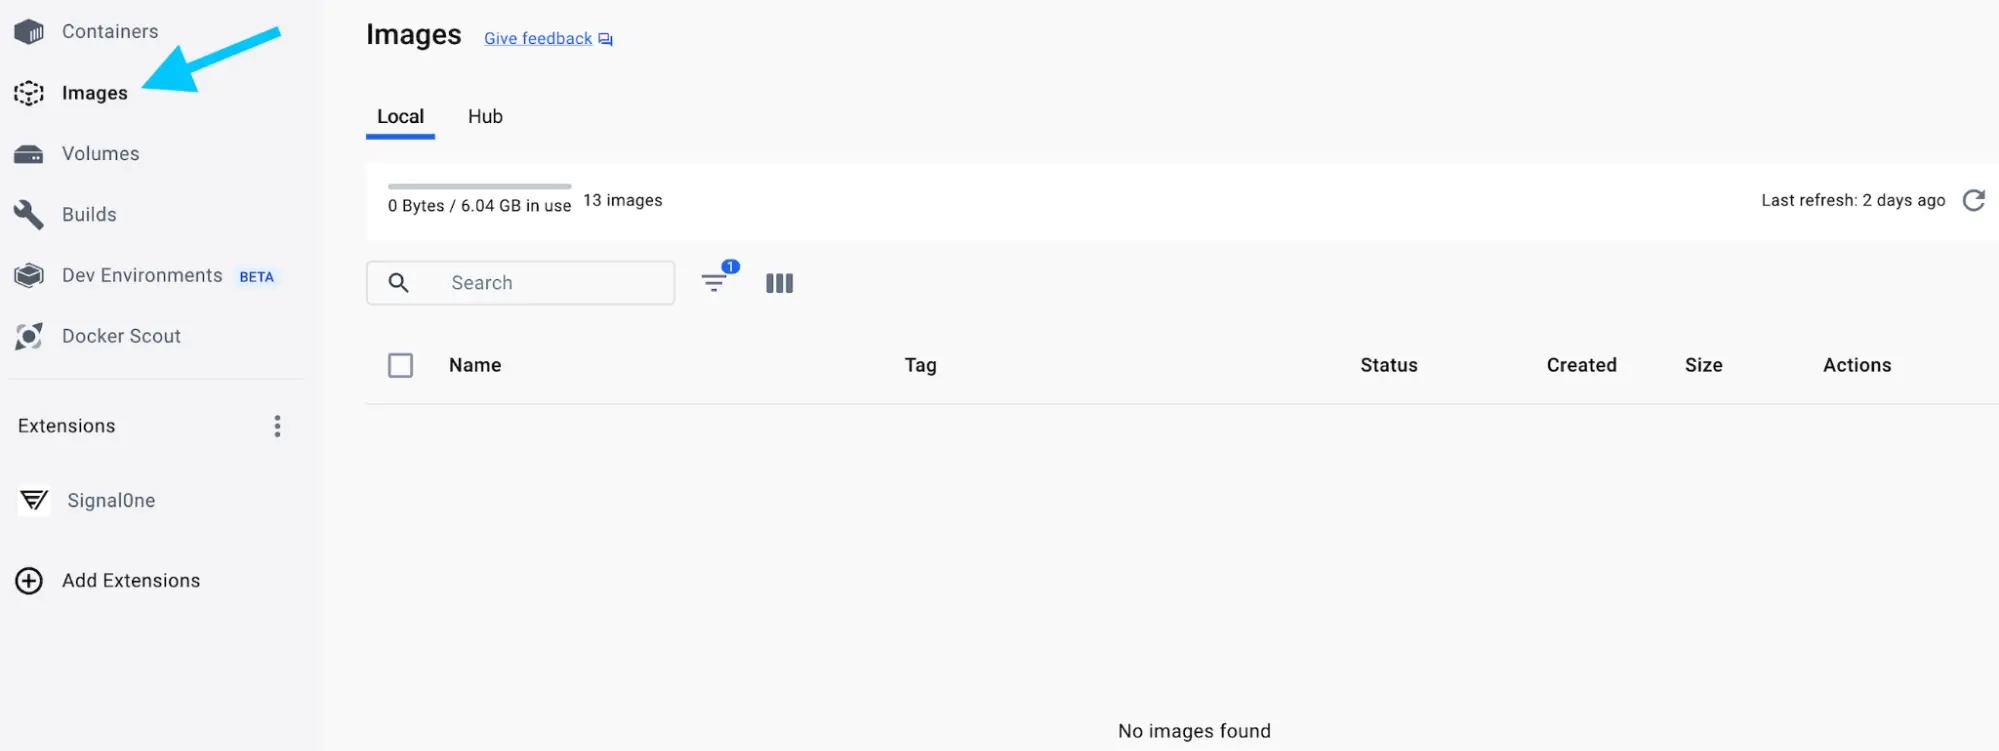
Click the Search images to run button or use the search bar at the top of the screen.
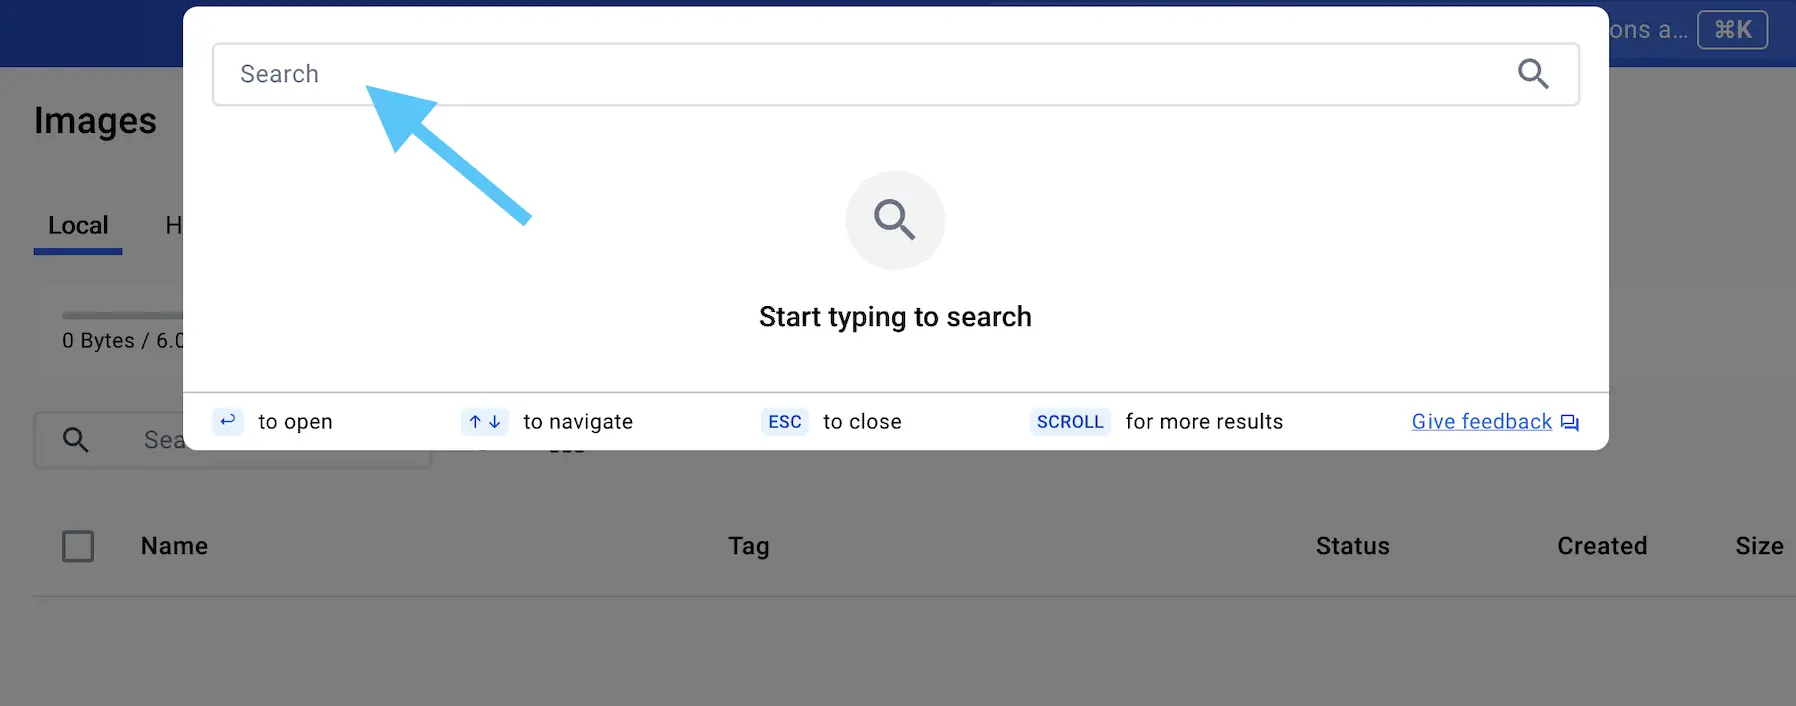
In the Search field, type
welcome-to-dockerand select thedocker/welcome-to-dockerimage.
Click Pull to download the image.
Understanding the Layers of a Docker Image
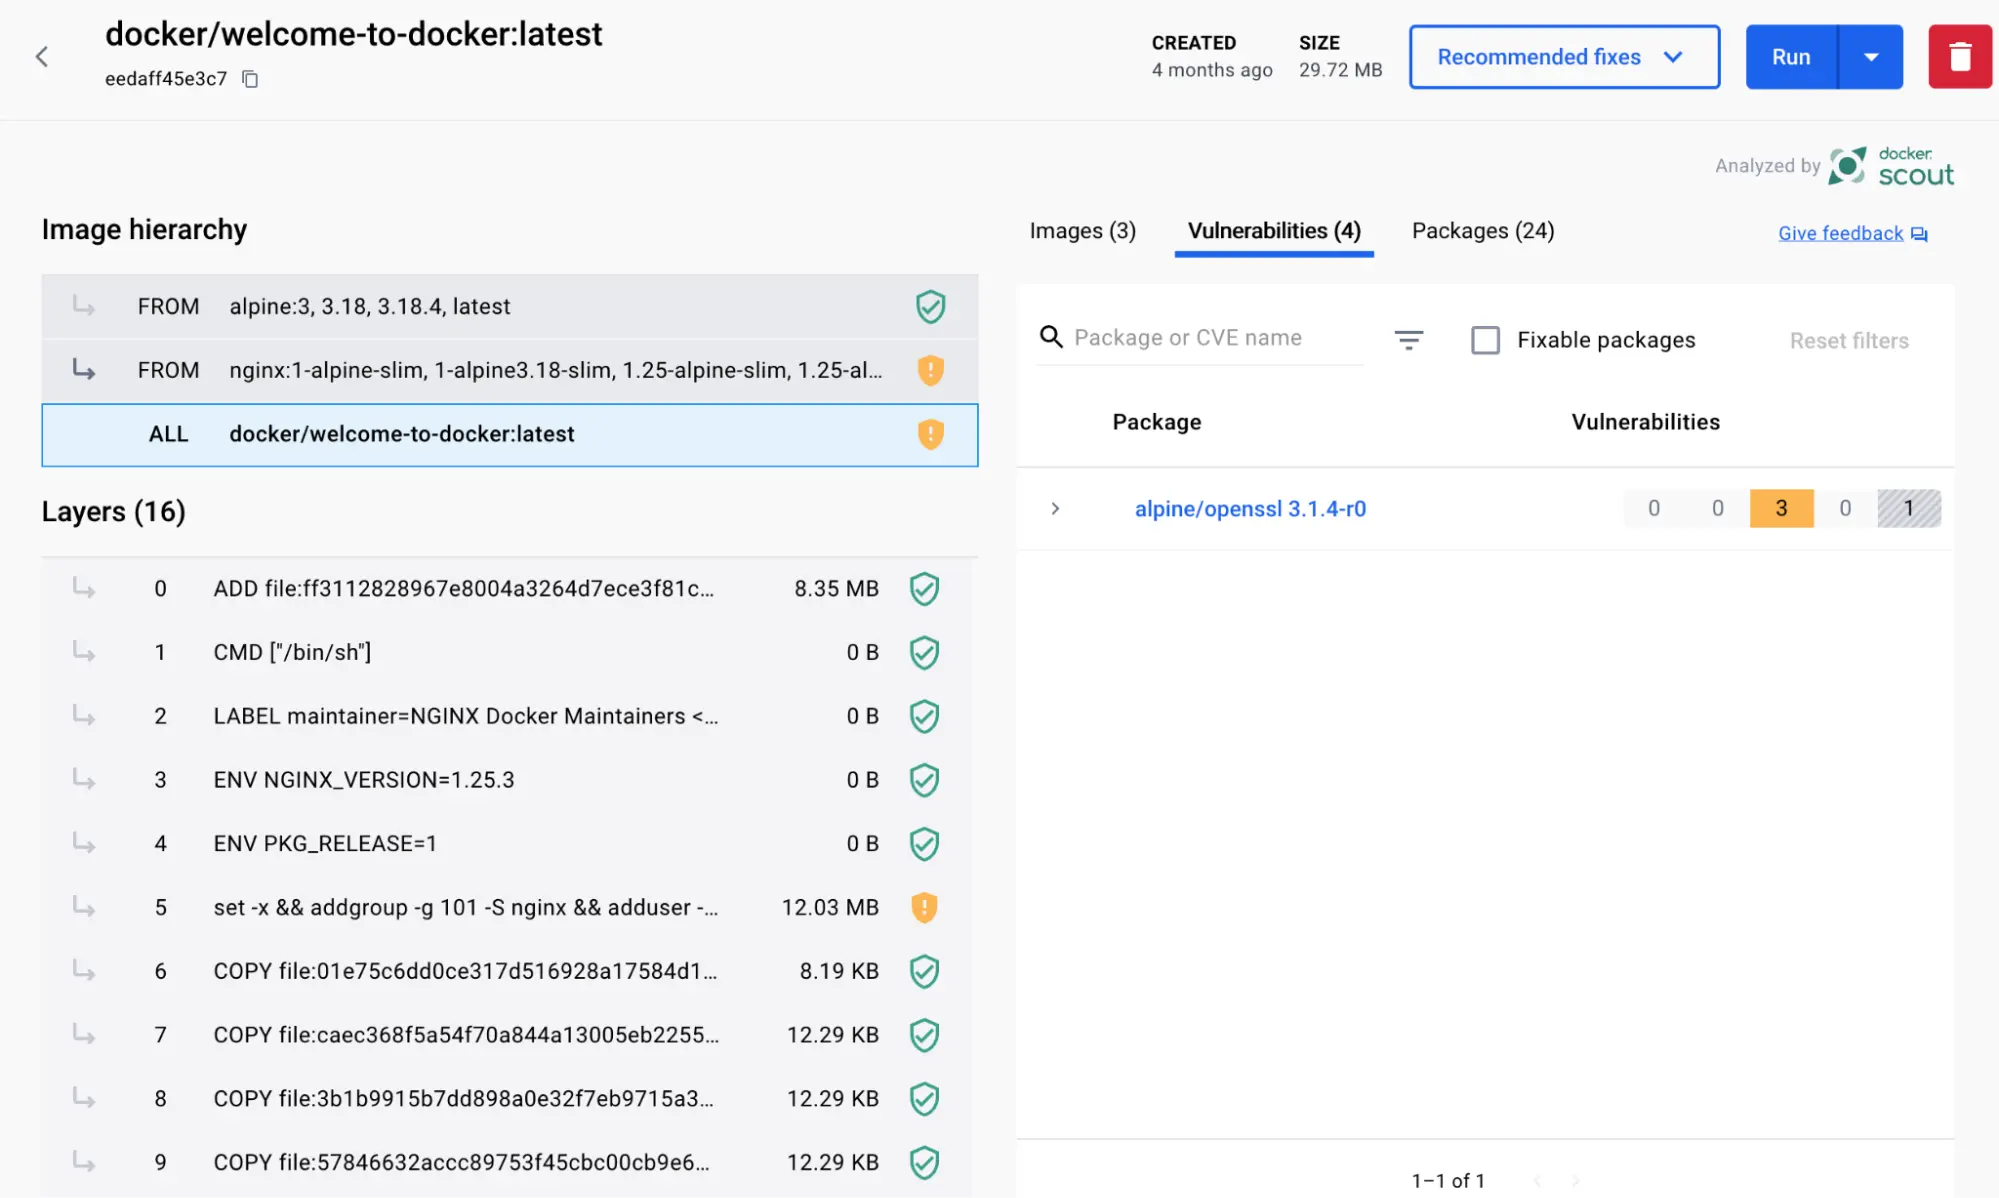
Once you’ve pulled an image, Docker Desktop allows you to view its details, including the layers that make up the image. This provides valuable insight into the structure of the image and what dependencies or libraries it contains.
Explore the Image:
Go to the Images view in Docker Desktop.
Select the docker/welcome-to-docker image to view more details.
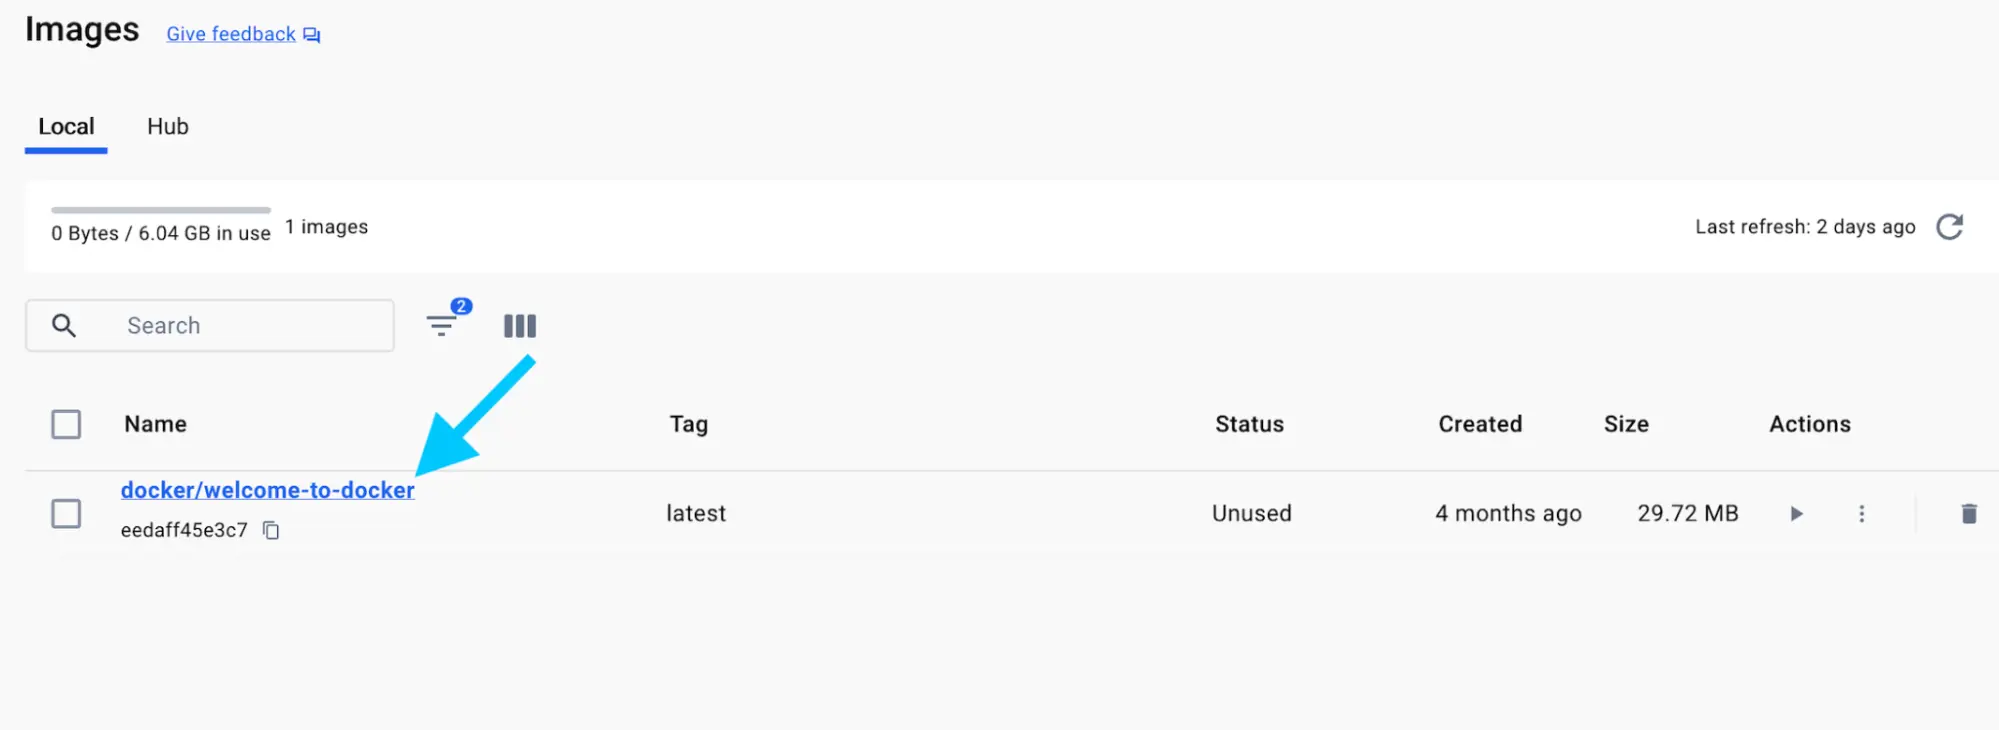
The details page will show you information about the layers, installed packages, and any vulnerabilities found in the image.
What is a Registry? Centralized Storage for Your Docker Images
So far, we’ve explored what a container is, how images are built, and where to find pre-built images. But how do you store, manage, and share these images across different environments? That’s where container registries come into play.
What is a Docker Registry?
A Docker registry is a centralized service where Docker images are stored, managed, and distributed. You can think of it as a warehouse for your container images, allowing you to store your custom images or pull pre-built images from a shared repository. A registry can be either public or private, depending on your use case.
Public vs. Private Registries
Public Registries: These registries allow anyone to download and use the images stored there. Docker Hub, the default public registry, hosts a vast collection of public images, including Docker Official Images and Verified Publisher Images.
Private Registries: These are secure registries meant for internal use, where only authorized users can access and store images. This is ideal for organizations with specific security requirements or for teams working on private projects.
Some popular private registry options include Amazon Elastic Container Registry (ECR), Azure Container Registry (ACR), Google Container Registry (GCR), and others like Harbor, JFrog Artifactory, and GitLab Container Registry.
Registry vs. Repository: Understanding the Difference
The terms registry and repository are often used interchangeably, but they refer to different concepts:
A registry is the overarching service that stores container images.
A repository is a collection of related images within a registry. It’s like a folder that organizes images based on their projects or versions.
For instance, in Docker Hub, you could have a repository called my-web-app, and within that repository, you may have different versions of the image such as v1.0, v2.0, etc.
The following diagram shows the relationship between a registry, repositories, and images:
diagram placeholder for registry vs repository explanation
Note: On Docker Hub’s free tier, you can create one private repository and unlimited public repositories. For more information, visit the Docker Hub pricing page.
Hands-On: Pushing an Image to Docker Hub
In this hands-on section, you’ll learn how to build, tag, and push a Docker image to your own Docker Hub repository.
Step 1: Sign up for a Free Docker Account
If you don’t already have a Docker account, head over to the Docker Hub page to sign up for free. You can sign in using your Google or GitHub account.
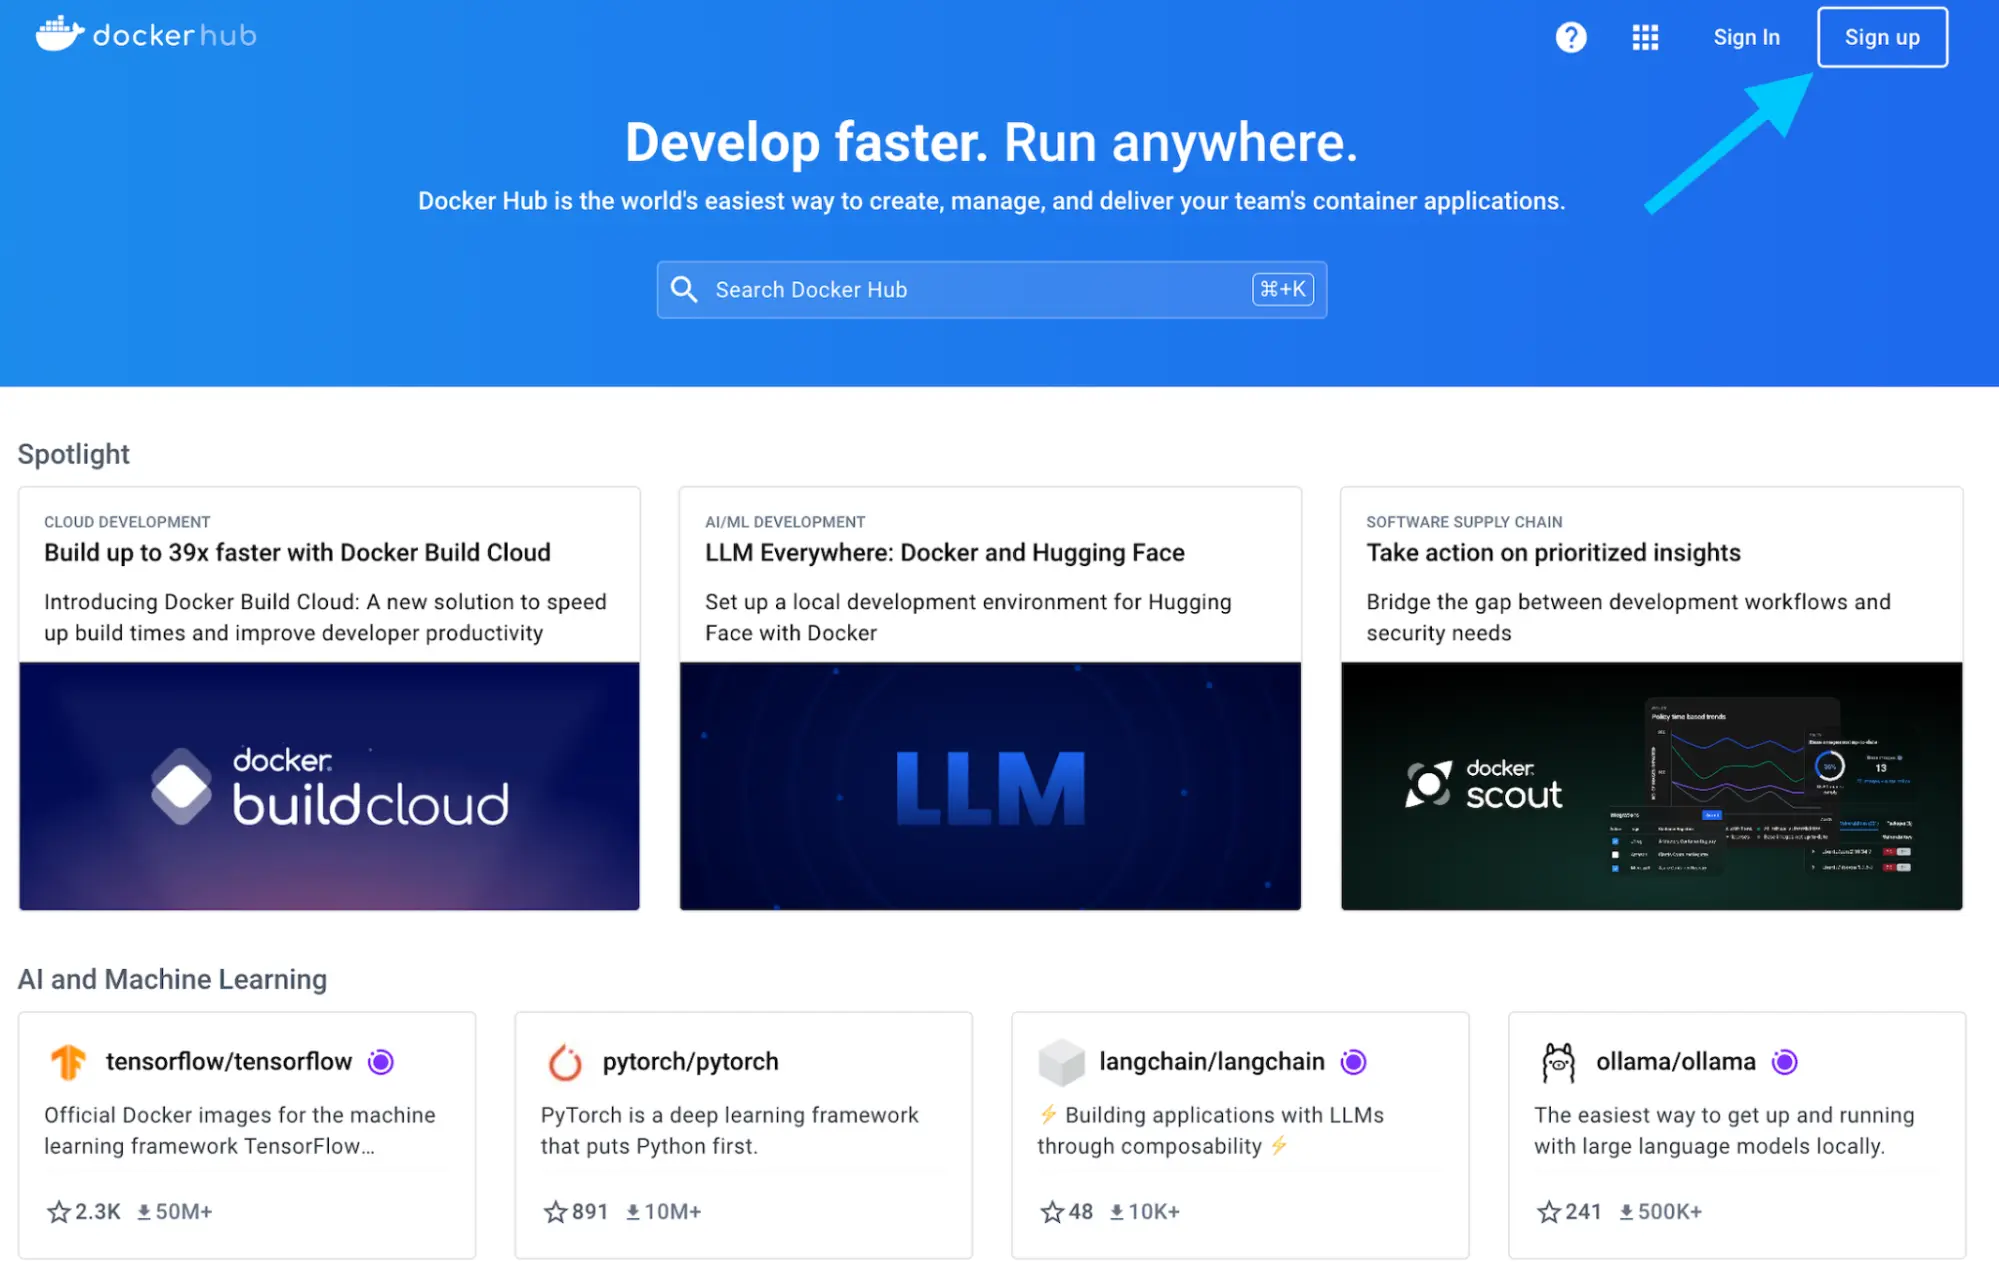
Step 2: Create a Repository on Docker Hub
Log in to Docker Hub.
Click the Create repository button in the top-right corner.
Name your repository
docker-quickstartand select your namespace (usually your username).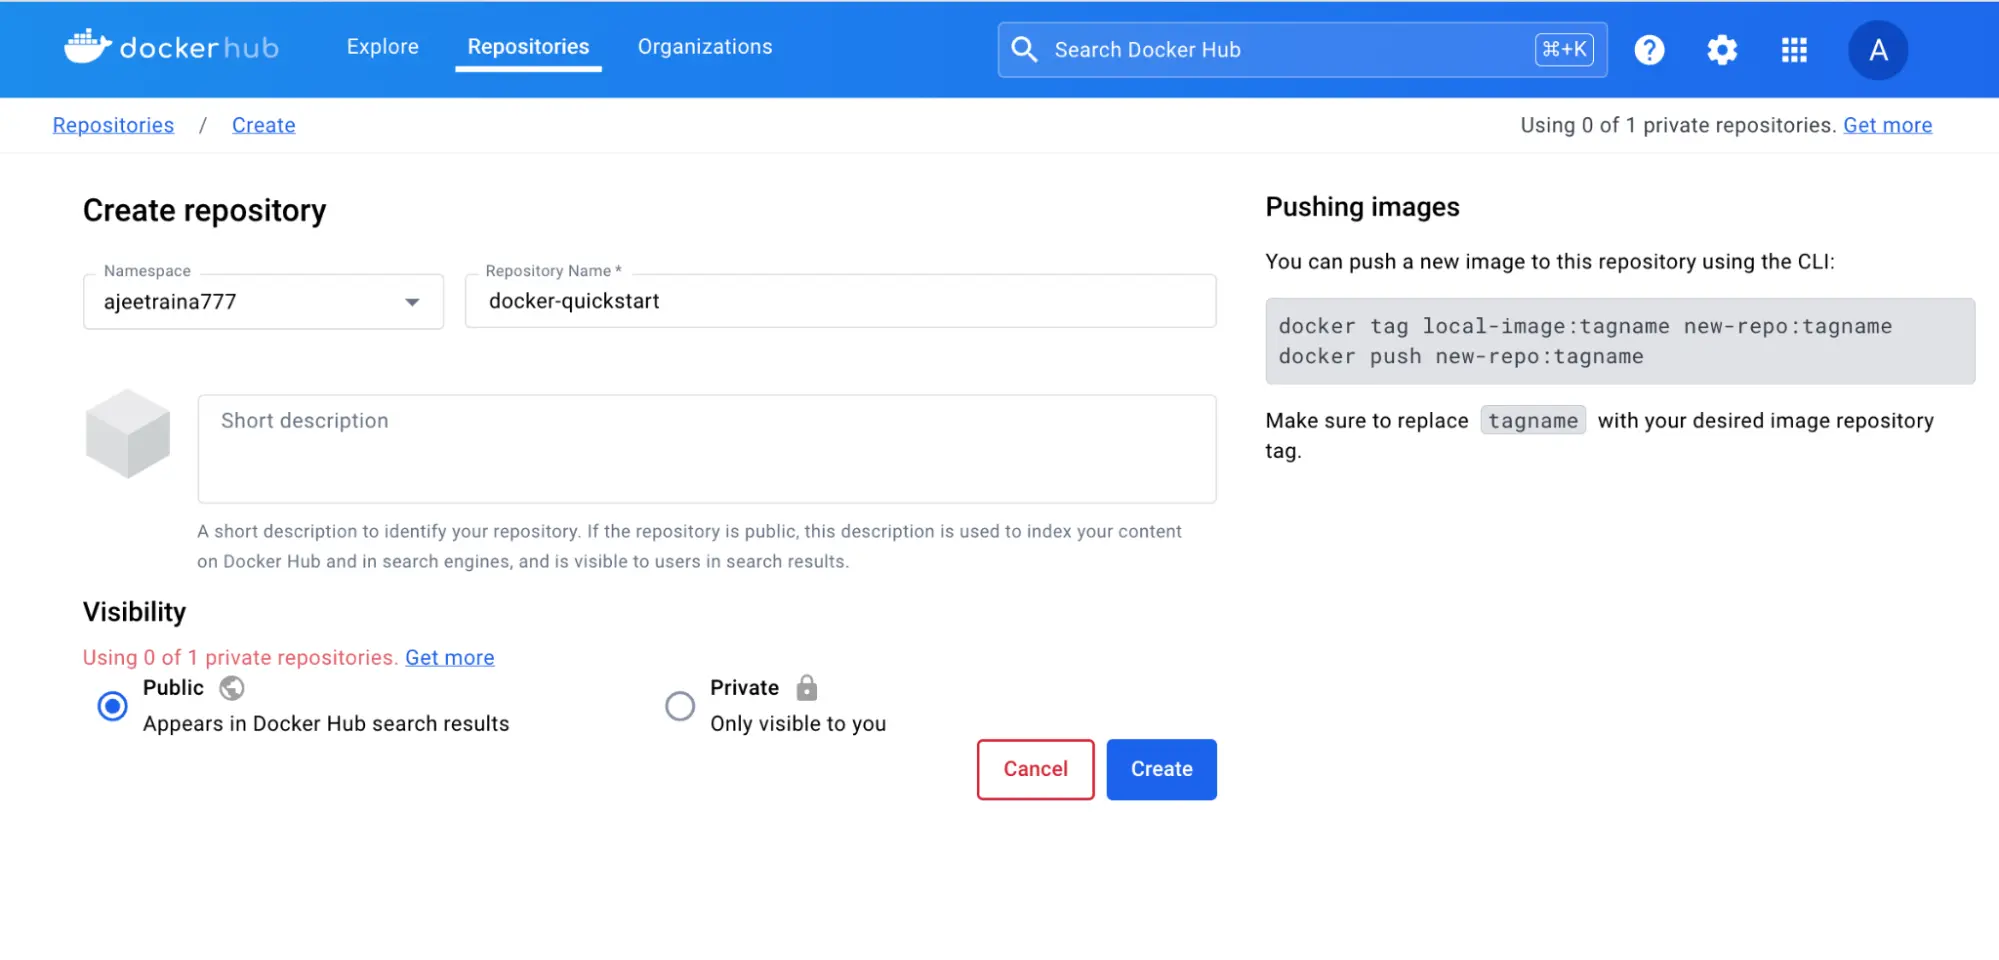
Set the visibility to Public and click Create.
Your repository is now created, but it’s currently empty. Let’s push an image to it.
Step 3: Build a Docker Image
Clone a sample Node.js project from GitHub:
bashCopy codegit clone https://github.com/dockersamples/helloworld-demo-nodeNavigate into the project directory:
bashCopy codecd helloworld-demo-nodeBuild the Docker image, substituting
YOUR_DOCKER_USERNAMEwith your actual Docker Hub username:bashCopy codedocker build -t YOUR_DOCKER_USERNAME/docker-quickstart .List the newly created Docker image:
bashCopy codedocker imagesYou should see an output similar to this:
 bashCopy codeREPOSITORY                                 TAG       IMAGE ID       CREATED         SIZE
 YOUR_DOCKER_USERNAME/docker-quickstart   latest    476de364f70e   2 minutes ago   170MB
Step 4: Test the Image Locally
You can test the image by starting a container using the following command (replace YOUR_DOCKER_USERNAME with your username):
bashCopy codedocker run -d -p 8080:8080 YOUR_DOCKER_USERNAME/docker-quickstart
Once the container is running, you can visit http://localhost:8080 in your browser to verify that the application is working.
Step 5: Tag and Push the Docker Image to Docker Hub
Tag the image with a version number using the following command:
bashCopy codedocker tag YOUR_DOCKER_USERNAME/docker-quickstart YOUR_DOCKER_USERNAME/docker-quickstart:1.0Push the image to your Docker Hub repository:
bashCopy codedocker push YOUR_DOCKER_USERNAME/docker-quickstart:1.0Open Docker Hub, navigate to your repository, and check the Tags section to verify that your image has been uploaded.

What is Docker Compose?
Now that you’ve familiarized yourself with running single container applications using Docker, you might wonder how to manage more complex systems, like running multiple services—databases, message queues, or caching layers—within your application. Do you cram everything into a single container? Or perhaps use multiple containers? And if so, how do you manage and connect them?
This is where Docker Compose comes in. It allows you to manage multiple containers in an organized and efficient way, without manually configuring networks, flags, and connections for each container.
Why Docker Compose?
Docker Compose simplifies multi-container management by allowing you to define and configure your containers in a single YAML file. Once configured, you can run your entire application stack with just one command.
This contrasts with using multiple docker run commands to spin up individual containers and manually configure their networks and dependencies. With Docker Compose, everything is handled declaratively. If you make changes, a simple re-run of docker compose up will apply those changes intelligently.
Dockerfile vs Compose file A Dockerfile defines how to build your container image, while a Compose file (
docker-compose.yml) defines how to run your containers, often referencing a Dockerfile to build images for specific services.
Hands-On: Running a Multi-Container App with Docker Compose
Let’s explore a hands-on example of Docker Compose in action, using a simple to-do list app built with Node.js and MySQL.
Step 1: Clone the Sample Application
Start by cloning the sample to-do list application from GitHub:
bashCopy codegit clone https://github.com/dockersamples/todo-list-app
cd todo-list-app
Inside the cloned repository, you'll find the compose.yaml file, which defines all the services that make up your application: Node.js (for the app) and MySQL (for the database).
Step 2: Build and Start the Application
Run the following command to build and start the application using Docker Compose:
bashCopy codedocker compose up -d --build
This command does several things:
Downloads the required images from Docker Hub (Node.js and MySQL).
Creates a network for the app.
Sets up a volume for MySQL to persist data.
Starts two containers: one for the Node.js app and one for the MySQL database.
After it’s up and running, you can access the to-do list app by opening http://localhost:3000 in your browser.
Step 3: Tear It Down
When you’re finished, you can clean up everything with:
bashCopy codedocker compose down
This will stop and remove the containers, though the data in the volumes will be preserved. If you also want to remove the volumes, you can add the --volumes flag:
bashCopy codedocker compose down --volumes
Alternatively, you can use Docker Desktop's GUI to remove the containers and related resources.
Let’s build something amazing together!
Connect with Me
GitHub: https://github.com/piyush-pooh
LinkedIn: https://www.linkedin.com/in/piyush-sharma-5250a0291/
Twitter: https://x.com/Piyush_poooh
Tags
#Git #Docker #DevOps #CloudComputing #AWS #Containerization #WebDevelopment #Programming #SoftwareEngineering #Tutorial
Subscribe to my newsletter
Read articles from PIYUSH SHARMA directly inside your inbox. Subscribe to the newsletter, and don't miss out.
Written by

PIYUSH SHARMA
PIYUSH SHARMA
"Passionate DevOps enthusiast, automating workflows and optimizing infrastructure for a more efficient, scalable future."