Cloud DevOps - Pakcage an App with AWS CodeBuild
 yyounos shaik
DIFFICULTY : MID-LEVEL TIME : 90 MINS COST : 0$
WHAT YOU’LL NEED:
An AWS account - Create one here!
Visual Studio Code - Download Here!
part-1 : Building an WebApp and IDE in AWS
AWS SERVICES :
AWS CodeBuild
Amazon S3
AWS CodeArtifact
AWS CodeCommit
AWS IAM
Amazon EC2
AWS CLI
Summary
In this project, we will continue building the web application that we started in the earlier sections. Our goal is to develop a fully functional web app using various AWS services. First, we will set up the necessary environment and tools, such as AWS CodeBuild for continuous integration and deployment, and Amazon EC2 for hosting. We'll also configure AWS IAM for secure access management and use AWS CLI for efficient command-line operations.
Once the web application is developed and thoroughly tested, we will proceed to store it in an Amazon S3 bucket. This step involves creating a bucket, configuring its permissions, and ensuring that the web app is accessible and secure. By the end of this project, you will have a comprehensive understanding of how to build and deploy a web application using AWS services, and how to manage it effectively within the AWS ecosystem.
Let’s Get Started…
Step 1 : Creating the Web App (part-1 to 3)
Login into your AWS IAM user :
If you still have your IAM user from the Web App with Cloud9 project, log in to your IAM Admin User.
Don't have an IAM user set up yet, or it's been deleted? Let's set up a new IAM user!. Head to your AWS Account as the root user.
Create a new IAM user called Yourname-IAM-Admin.
Make sure to select the checkbox next to Provide user access to the AWS Management Console - optional.
This does not apply to all accounts, but if you're prompted with a pop up panel that says Are you providing access to a person?, choose I want to create an IAM user.
Provide AdministratorAccess to your user.
Make sure to download the CSV file containing your user's sign-in details.
Log in to your AWS account as your IAM user.
Launch an EC2 Instance :
Go to AWS management console - search EC2.
Click on Launch Instances.
Name : Yourname-EC2.
AMI : Amazon Linux.
Instance Type : t2.micro (free tier).
Create Key pair : yourname.pem file.
Security group : allow Http and Https from either My IP or anywhere.
Storage : 8 x gp3.
Connect EC2 to VS Code :
Open VS Code.
Download Remote -SSH extension.
Go to remote explorers - Click on SSH settings Icon.
Configure the connection :
  Host < EC2 public IP Address>
  Hostname <EC2 Name>
  user ec2-user
  Identityfile <Path of your .pem file saved into your PC.
Save the Changes and connect the instance by clicking on Host name on the SSH.
Install Git, amazon Corretto, and Maven :
Run the following commands :
Git :
sudo dnf install git -yMaven :
  sudo wget https://repos.fedorapeople.org/repos/dchen/apache-maven/epel-apache-maven.repo -O /etc/yum.repos.d/epel-apache-maven.repo

  sudo sed -i s/\$releasever/6/g /etc/yum.repos.d/epel-apache-maven.repo

  sudo yum install -y apache-maven
Amazon corretto 8 :
  sudo amazon-linux-extras enable corretto8

  sudo yum install -y java-1.8.0-amazon-corretto-devel

  export JAVA_HOME=/usr/lib/jvm/java-1.8.0-amazon-corretto.x86_64

  export PATH=/usr/lib/jvm/java-1.8.0-amazon-corretto.x86_64/jre/bin/:$PATH
To verify the installations run these commands :
git -version
mvn -version
java -version
Create your web application :
Use mvn to generate a sample Java web app. To do this, use these commands :
  mvn archetype:generate \
     -DgroupId=com.yourname.app \
     -DartifactId=yourname-web-project \
     -DarchetypeArtifactId=maven-archetype-webapp \
     -DinteractiveMode=false
Modify the index.jsp file to customize the HTML code. Don't forget to replace from the following code with your name.
Save changes.
Create a Repository in AWS CodeCommit:
Create a new repository in the CodeCommit console.
Name:
yourname-repository.Description:
A Repository for the web application.
Run these commands into the EC2 terminal :
git config --global user.name "your name" git config --global user.email "your email" // commands for the git repository to be added into your EC2 instance. git init -b main git remote add origin <repository address> git push -u origin git remote -v // To check if the repository is set or not.Tip: If you face error into adding the git origin, remove the previous origin or create a different branch for the repository to be added into the instance.
Now we can commit and push our code! Here are the commands :
  git add .

  git commit -m "Initial commit. Updated index.jsp."

  git push -u origin main
When you run these commands, you'll be prompted for a username and password. But hold on, we need to figure out what those are and where to generate them.
Let's take a step back and create a username and password for AWS CodeCommit.
Head back to IAM management console.
On the left hand side panel open users.
Click on your IAM user profiles.
Head to security credentials. Scroll down to HTTPS Git credentials for AWS CodeCommit.
Click on
Generate Credentials.Download the
.excel filewhich contains the username and password.
Refresh the CodeCommit page and You will see the files into your repository.
Create Your CodeArtifact Domain and Repository:
Create a new domain called yourname-domain in CodeArtifact.
Create a new repository called webapp-packages in CodeArtifact.
Description: Packages for the web app.
Public upstream repository: maven-central-store.
Connect the CodeArtifact Repository:
View the connection instructions to connect your CodeArtifact repository.
Operating system: which operating system did you use to launch the EC2 instance?
Package manager: what was the package manager you installed?
Copy the command in Step 3. This will look similar to the below:

Run the command into your EC2 terminal.
If Error occurs stating no credentials found :
open IAM users.
Click on the user you are currently.
On the right side panel you can see create acess key.
Click on create and download the credentials.
run : aws configure
acess key : your acess key.
secret key : your secret key.
region : your location of the console e.g. eu-central-1.
output format : json
run the export command again.
create an settings.xml file.
Open the newly created settings.xml in your Cloud9 file explorer on the left hand panel.
Switch tabs back to your CodeArtifact console, and follow the remaining steps in the Connection instructions dialog. i.e. copy the code in Steps 4, 5, and 6. Add them in between the tags in settings.xml.
Save your changes to settings.xml!
Test Your CodeArtifact Connection:
Next, compile your application using this command: mvn -s settings.xml compile.
Head back to the CodeArtifact console.
Select yourname-packages repository.

Set up an IAM Policy for using CodeArtifact:
In the AWS Console, search for the IAM console in a new tab. You'll come back to the CodeArtifact console soon.
Click Policies in the left hand navigation panel.
Click Create policy.
Select the JSON tab.
  {
     "Version":"2012-10-17",
     "Statement":[
        {
           "Effect":"Allow",
           "Action":[
              "codeartifact:GetAuthorizationToken",
              "codeartifact:GetRepositoryEndpoint",
              "codeartifact:ReadFromRepository"
           ],
           "Resource":"*"
        },
        {
           "Effect":"Allow",
           "Action":"sts:GetServiceBearerToken",
           "Resource":"*",
           "Condition":{
              "StringEquals":{
                 "sts:AWSServiceName":"codeartifact.amazonaws.com"
              }
           }
        }
     ]
  }
Name the policy: codeartifact-yourname-consumer-policy.
For the description, let's add: Provides permissions to read from CodeArtifact.
Click Create policy.
Step 2 : Set up an S3 Bucket
It might occur to you why are we creatig an S3 bucket?
This S3 bucket will later store a file that gets created in the build process you’re about to set up. Let’s create this bucket in advance so that CodeBuild is configured properly in the next step!
What is the build process? What's the file that gets created?
The build process will take your web app's code and translate it into machine code that servers (like computers or EC2 instances) can understand and run. Building includes steps like compiling the code, running tests, and packaging the application.
Build artifacts are files that get created from this build process. For our project, we want our build process to create one build artifact that packages up everything a server could need to host our web app in one neat bundle. This bundle is called a WAR file (which stands for Web Application Archive, or Web Application Resource) and it works just like a zip file - a server will simply "unzip" your WAR file to find a bunch of files and resources (which are also build artifacts, i.e. a WAR file is a build artifact that bundles up other build artifacts) and host your web app straight away. Notice how you haven't been able to view your web app on a web browser so far in this project series - that's because we haven't created and deployed the WAR file yet!
Click Create Bucket and give the bucket a unique name e.g.
S3-build-artifacts-yourname.Leave all the other options as default.
Click Create Bucket.
Step 3 : Create CodeBuild build project
Log into the AWS Console and search for the CodeBuild console.
Select Create project.
Name the project yourname-web-build.
Expand the Additional configuration toggle right underneath the Name field.
Add a tag with key team and value devops.
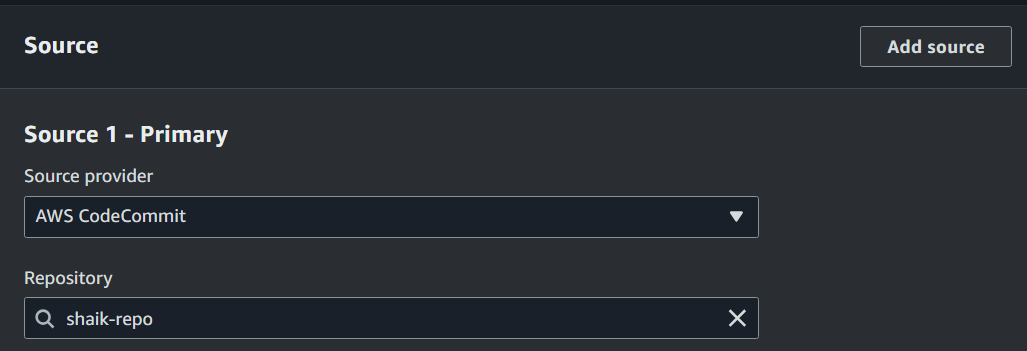
In the Source panel, select AWS CodeCommit as the source provider.

What does source mean?
CodeBuild is ready to start compiling your web app, but it doesn't know where your code is stored! Source means the location of the code that CodeBuild will fetch, compile, and package into a WAR file. The source can be a version control repository, such as AWS CodeCommit, where your project's code is maintained and managed.
Select yourname-web-project as the repository.
Select main as the branch.
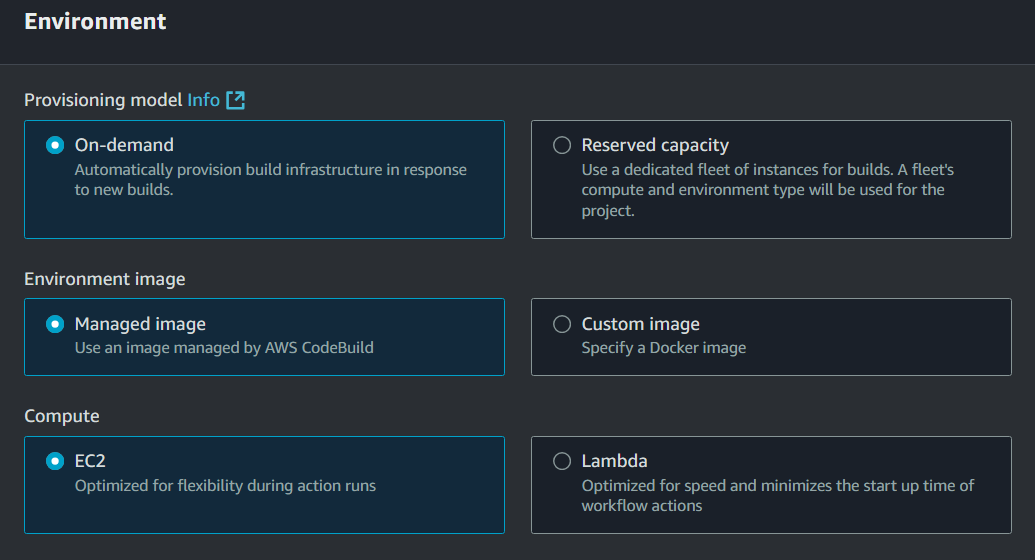
Under the Environment panel, choose to the following settings:
. Provisioning model: On-demand.
Environment image: Managed image.
Compute: EC2.

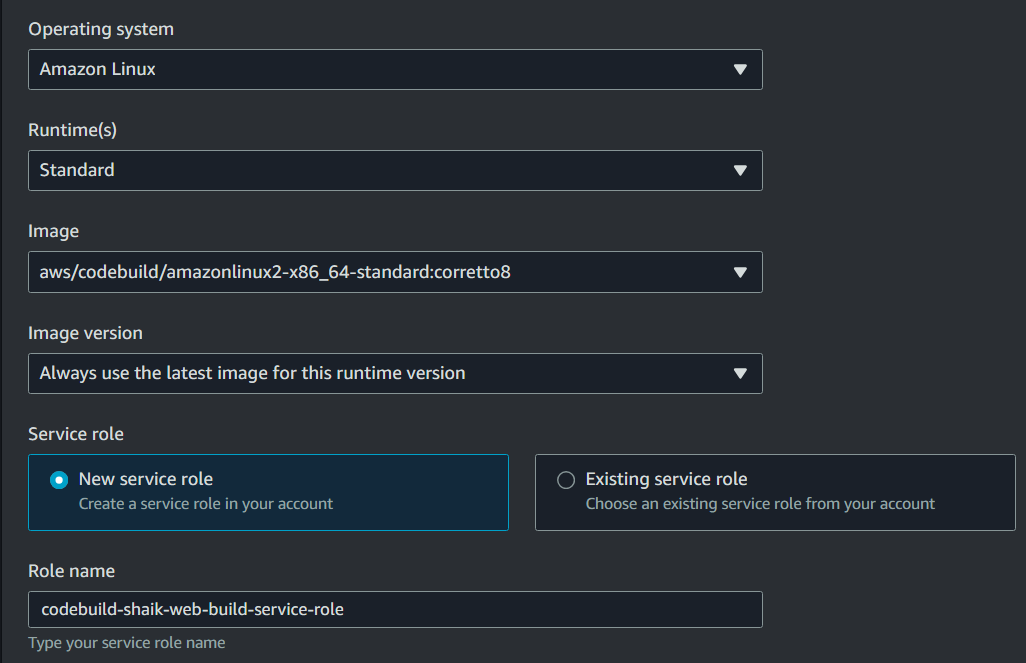
Operating System: Amazon Linux.
Runtime: Standard.
Image: aws/codebuild/amazonlinux2-x86_64-standard:coretto8.
Image version: Always use the latest image for this runtime version.
Service role: New service role.

Under the Buildspec panel, select the option to use a buildspec file.
Why is buildspec file, why are we using a buildspec file?
A buildpsec file tells CodeBuild exactly the commands to run during the build process. (i.e. “"run this command first to install the project dependencies, then run this command to compile the code). We haven’t created our buildspec file yet, it’s a great tool to automate and manage the build steps consistently.
Under the Artifacts panel, select Amazon S3 as your Type.
What are artifacts ? why are we linking it to an S3 bucket?
Artifacts are the files that CodeBuild will produce while building your project. So in this panel, we’re telling CodeBuild to Package all the artifacts it creates into a WAR file, name the WAR file yourname-web-build.zip and then store it in the S3 Bucket we created.
Under Bucket name, Choose the S3 bucket you created earlier.
Set the Name of your artifact to yourname-web-build.zip.
Change the Artifacts packaging option to Zip. This will make sure all the artifacts are bundled into one WAR file instead of getting stored in S3 individually!
Under the Logs panel , enable CloudWatch logs if it’s not enabled yet!
What are CloudWatch logs for?
CloudWatch logs collect and store log files from AWS services in your account. These log files are like diaries where everything that happens when the service is running gets recorded. By enabling CloudWatch logs for CodeBuild, we can keep an eye on CodeBuild's logs and get a record of exactly what happens during the build process. This helps us understand and fix any issues that come up, making it easier to see what worked and what didn't.
Set the CloudWatch group name to yourname-build-logs.
Set the stream name prefix to webapp.
What is a stream?
Think of stream as a dedicated channel where you can see all the activities and events for a group of log events in one place. In this case, your webapp stream will catch all the logs related to the build process of your web application.
Click create build project to finish!
Step 4 : Create Your Web App’s buildspec.yaml File
Now we have our build project set up, let's give it instructions on how to build our application. We'll create a buildspec.yml file in the root of our code repository.
What is a buildspec.yml file?
Do you remember coming across buildspec.yml just a few steps ago? As a recap, this file configures the commands that CodeBuild will run line by line to build your web app. Having a buildspec.yml file makes sure that every build follows the same steps and produce consistent results
Head back into EC2 terminal.
In your left side panel. right click on the yourname-web-project and select New File.
Name your new file buildspec.yml (naming must be exact!).. Copy in the below contents.
Make sure the name after --domain is the actual domain name for you CodeArtifact repository. Make sure to replace the 123456789012 placeholder after domain-owner with your own Account ID.
Don't know where to look for your Account ID? You can find it by switching back to any tab with your AWS Management Console (e.g. switch tabs back to your CodeBuild console), and click on your account name on the top right hand corner. This will reveal a handy little Acocount ID you can copy!
  # Tells CodeBuild that this is buildpsec file is written using version 0.2 of how buildspec files are written..
  version: 0.2
  # Tells CodeBuild the command to run each phase of the build process.
  phases:
  # telles codebuild the java runtime that should be installed when building this project.
    install:
      runtime-versions:
        java: corretto8
  # conatains commands to run before running your web app.
    pre_build:
      commands:
        - echo Initializing environment
        - export CODEARTIFACT_AUTH_TOKEN=`aws codeartifact get-authorization-token --domain nextwork --domain-owner 123456789012 --query authorizationToken --output text`
   # kicks off your build process with these two commands
   build:
      commands:
        - echo Build started on `date`
        - mvn -s settings.xml compile
  # runs another two commands in your terminal for post build phase.
    post_build:
      commands:
        - echo Build completed on `date`
        - mvn -s settings.xml package
  # this section includes commands to manage he WAR File that hets created during the build process.
  artifacts:
    files:
      - target/yourname-web-project.war
    discard-paths: no
Save the buildspec.yaml file by pressing Command + S (Mac), or Ctrl + S (Windows) on your keyboard.
Commit your latest changes and push it to CodeCommit by running the following prompts:
  # git commands to push the files into the codecommit
  git add .

  git commit -m "Adding buildspec.yml file"

  git push -u origin main
Step 5 :Modify your CodeBuild IAM role
In the AWS Console, head to your IAM console in a new tab. We'll use CodeBuild again soon!.
Select Roles in left hand navigation menu.
Search for codebuild to find your auto-generated role (it should be called codebuild-yourname-web-build-service-role) and click into it.
Why are we modifying our CodeBuild IAM role?
Do you remember selecting New service role when we were setting up our build environment with CodeBuild? That new service role gave CodeBuild the minimum permissions it needs to build your web app, which by default does not include access to your CodeArtifact repository! We'll need to modify the IAM role's permissions so it can fetch the necessary packages it needs to complete your web app's build process.
Click the Add permissions button.
Select Attach policies in the drop-down menu.

Search for codeartifact-yourname-consumer-policy, select the item and click Add permissions.
Step 6 : Testing the Build Project
Now we have everything in place to run our first build using CodeBuild!
Head back to your CodeBuild console.
Select the yourname-web-build project and select Start build.
Monitor the logs and wait for the build status to complete (this should take no more than 5 minutes).

Once the build is complete, head back to your S3 console in a new tab.
Open your S3-build-artifacts-yourname S3 bucket to verify you have a packaged WAR file inside a zip named yourname-web-build.zip.

Coool! you have succesfully built the web app using CodeBuild.
Nice Work!!!
Well done! you have come till this far - high five!! Let’s continue with next part of the series which will be using AWS CodeDeploy so until then stay tuned….
Subscribe to my newsletter
Read articles from yyounos shaik directly inside your inbox. Subscribe to the newsletter, and don't miss out.
Written by

yyounos shaik
yyounos shaik
An Aspring Cloud Engineer