Introduction to KeyCloak's OAuth 2.0 functionalities.
 Quang Phan
In my previous article, we talked about how we can utilize KeyCloak as an IAM solution to protect our API endpoints. In this blog, we will explore some of the fundamental functionalities of KeyCloak such as:
Client Credential Grant
Password Grant
Refresh Token & Rotation
Introspect Endpoint
Token Revocation
Key Rotation
These features are essential for managing authentication and authorization in modern applications. I will go through each in term of how you can set it up via KeyCloak Admin UI and how to test each using Postman.
I assume that you already have KeyCloak running in your local environment. If you do not, please refer to my previous blog. It shows you the installation steps as well as the initial step to create your KeyCloak realm.
KeyCloak also has an OpenId endpoints where if you simple perform a GET request to http://localhost:8080/realms/MyRealm/.well-known/openid-configuration it will display a lot of useful information.
{
    "issuer": "http://localhost:8080/realms/MyRealm",
    "authorization_endpoint": "http://localhost:8080/realms/MyRealm/protocol/openid-connect/auth",
    "token_endpoint": "http://localhost:8080/realms/MyRealm/protocol/openid-connect/token",
    "introspection_endpoint": "http://localhost:8080/realms/MyRealm/protocol/openid-connect/token/introspect",
    "userinfo_endpoint": "http://localhost:8080/realms/MyRealm/protocol/openid-connect/userinfo",
    "end_session_endpoint": "http://localhost:8080/realms/MyRealm/protocol/openid-connect/logout",
    "frontchannel_logout_session_supported": true,
    "frontchannel_logout_supported": true,
    "jwks_uri": "http://localhost:8080/realms/MyRealm/protocol/openid-connect/certs",
    "check_session_iframe": "http://localhost:8080/realms/MyRealm/protocol/openid-connect/login-status-iframe.html"
}
We will be using some of these to initiate the token request with KeyCloak.
Client Credential Grant
The Client Credential Grant is a flow in OAuth 2.0 that allows a client (such as a backend service) to authenticate itself directly with the authorization server and obtain an access token. This flow is typically used for machine-to-machine (M2M) communication where the client is acting on its own behalf, rather than on behalf of a user.
On left hand side, click Clients and click on Create client button.
Create a new client with a unique client id
private-test-clientwith the client typeOpenID Connectand click Next.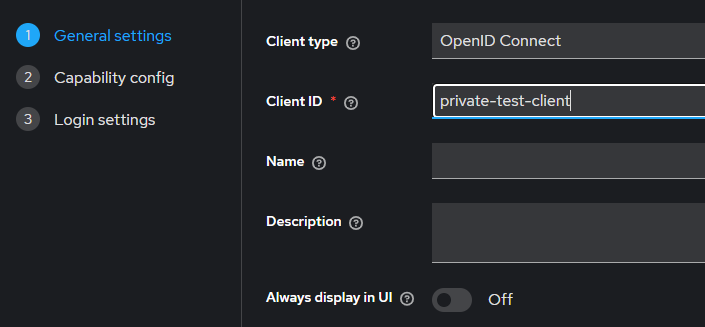
Set Client authentication to
ON, uncheck Direct access grants and check Service accounts roles. Direct access grants is just another word for the authorization code grant access which we are not interested in now. Service accounts roles is another name for the Client Credential Grant. Click Next & Save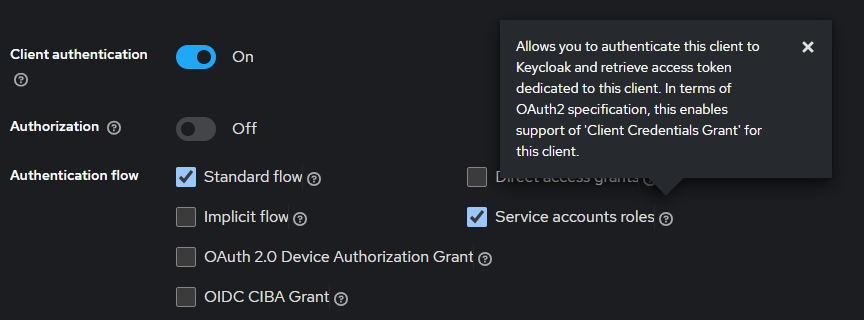
You should be in the client setting page, click on Credentials tab and you should see the Client Secret, copy it so that you can use in your Postman test.
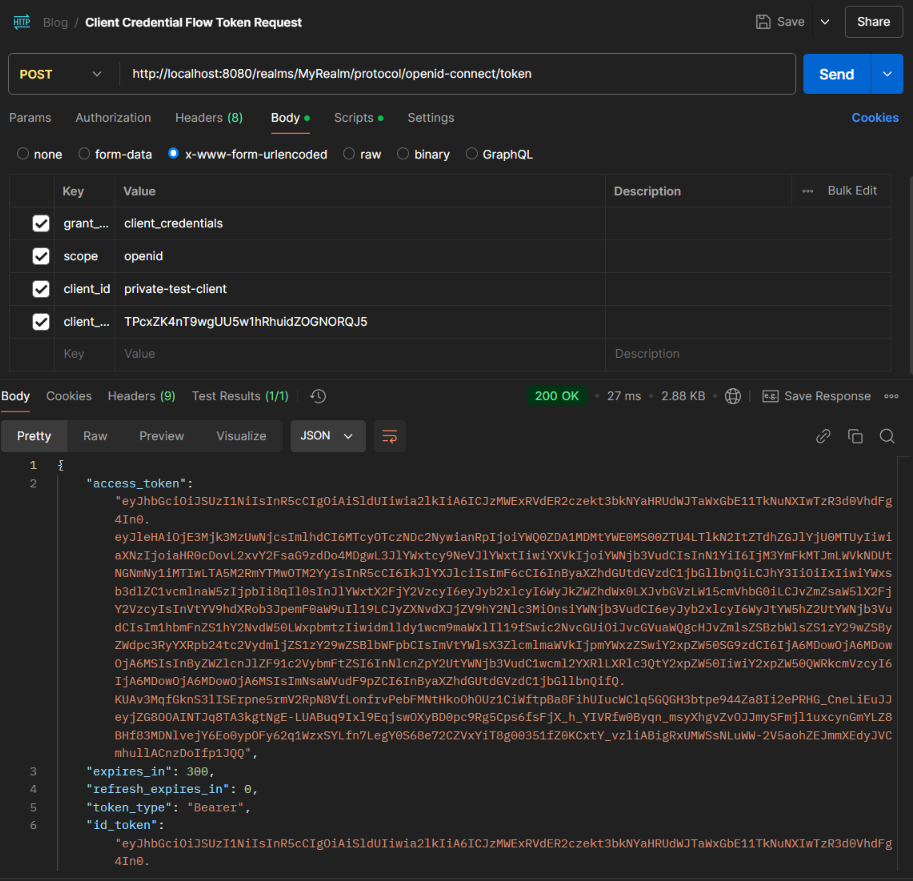
You can create a POST request using the following information:
 curl -X POST "http://localhost:8080/realms/MyRealm/protocol/openid-connect/token" \
      -H "Content-Type: application/x-www-form-urlencoded" \
      -d "grant_type=client_credentials" \
      -d "scope=openid" \
      -d "client_id=private-test-client" \
      -d "client_secret=TPcxZK4nT9wgUU5w1hRhuidZOGNORQJ5"
This is my equivalent setup in Postman.
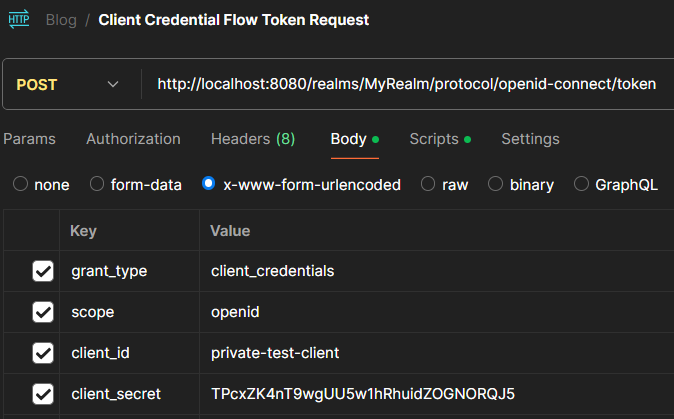
If things run smoothly, congratulations! You have just obtained your first JWT token from Keycloak in the Postman response. The JSON content of the response should look similar to the example below.
{
    "access_token": "eyJhbGc.....",
    "expires_in": 300,
    "refresh_expires_in": 0,
    "token_type": "Bearer",
    "id_token": "eyJhbGciOiJSUzI1NiI....",
    "not-before-policy": 0,
    "scope": "openid "
}
Password Grant
The Password Grant flow allows a client to obtain an access token by directly submitting the user's credentials (username and password) to the authorization server. This flow is suitable for trusted applications, such as mobile apps or web applications, where the client can securely handle the user's credentials.
On left hand side, click Users and click on Add user button.
Give a unique user name
test123and fill out the rest of the fields and click Create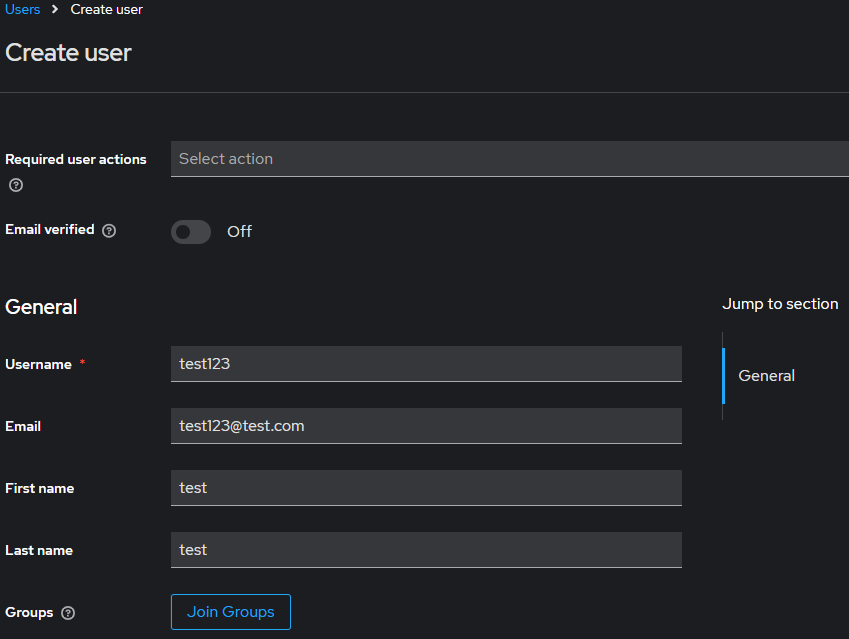
On the user details screen, click on Credentials tab and set a password for this user.
Next we will create a client, click on Clients on the left menu and select Create to add a new client.
Put
password-grant-clientas the Client ID andopenid-connectas the Client Protocol and click Next.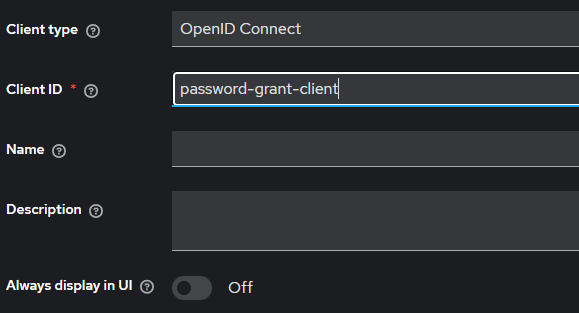
Set Client authentication to
ON, check Standard flow and Direct access grants. Click Next and Save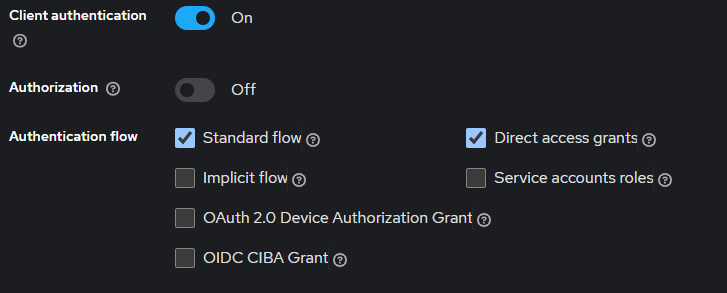
On the Client details screen, click on Credentials tab, here you will see the client secret. This secret is used by the client to authenticate with the KeyCloak server.
You can create a POST request using the following information:
 curl -X POST "http://localhost:8080/realms/MyRealm/protocol/openid-connect/token" \
      -H "Content-Type: application/x-www-form-urlencoded" \
      -d "grant_type=client_credentials" \
      -d "scope=openid" \
      -d "client_id=private-test-client" \
      -d "client_secret=TPcxZK4nT9wgUU5w1hRhuidZOGNORQJ5"
This is my equivalent setup in Postman. As you can see, in this flow we need to provide the Client ID, Client Secret, Username, and Password. Please note that the
grant_typedictates the type of request this is.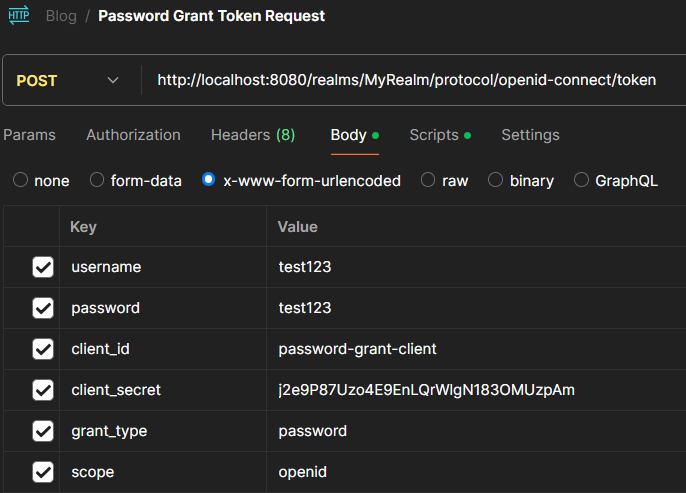
The Postman response should be very similar to the response from the Client Credential Grant request. It should at the very least provide you with a JWT token. If you copy and paste this token value into the jwt.io site, you can see the details of the token reflecting the identity you used to request it.
{
  "exp": 1729715788,
  "iat": 1729715488,
  "jti": "c2acfad4-5e7b-4fe7-ac56-5609538eaaaa",
  "iss": "http://localhost:8080/realms/MyRealm",
  "aud": "account",
  "sub": "4d6a6028-4af1-47b0-987a-79d896474120",
  "typ": "Bearer",
  "azp": "password-grant-client",
  "sid": "c5833348-8ff2-4b8c-a535-a599f88d6c86",
  "acr": "1",
  "allowed-origins": [
    "/*"
  ],
  "scope": "openid",
  "email_verified": false,
  "name": "test test",
  "preferred_username": "test123",
  "given_name": "test",
  "family_name": "test",
  "email": "test123@test.com"
}
Refresh Token
A refresh token is a special token that can be used to obtain a new access token without requiring the user to re-authenticate. This is particularly useful for maintaining a seamless user experience by allowing the client to refresh the access token when it expires, without interrupting the user's session. According to the OAuth 2.0 standard, refresh tokens should not be used with the Client Credential Grant, and that’s why Keycloak does not support it for this flow. Both the Authorization Code Grant and Password Grant offer token refresh capabilities. We will use the previous Password Grant setup above.
When you execute the request for a token using the Password Grant, you will see a refresh_token value in the response JSON. In the JSON data, you can see that our JWT token is only valid for the next 5 minutes, but our refresh token is valid for the next 30 minutes.
{
    "access_token": "eyJhbGciOiJSU......",
    "expires_in": 300,
    "refresh_expires_in": 1800,
    "refresh_token": "eyJhbGciOiJIUzUxMiIsInR5cCI....",
    "token_type": "Bearer",
    "id_token": "eyJhbGciOiJSUzI1NiIsIn...",
    "not-before-policy": 0,
    "session_state": "f00e840a-467e-48a6-b2f4-f10d6ce37578",
    "scope": "openid profile smile-scope registration-service-scope email"
}
herefore, when the access token expires, the client uses the refresh token to request a new access token from the authorization server. The authorization server verifies the refresh token and, if valid, issues a new access token (and possibly a new refresh token). This process can be repeated until the refresh token itself expires or is revoked.
curl -X POST "http://localhost:8080/realms/MyRealm/protocol/openid-connect/token" \
     -H "Content-Type: application/x-www-form-urlencoded" \
     -d "grant_type=refresh_token" \
     -d "refresh_token=eyJhbGciOiJIUz........" \
     -d "client_id=password-grant-client" \
     -d "client_secret=j2e9P87Uzo4E9EnLQrWlgN183OMUzpAm"
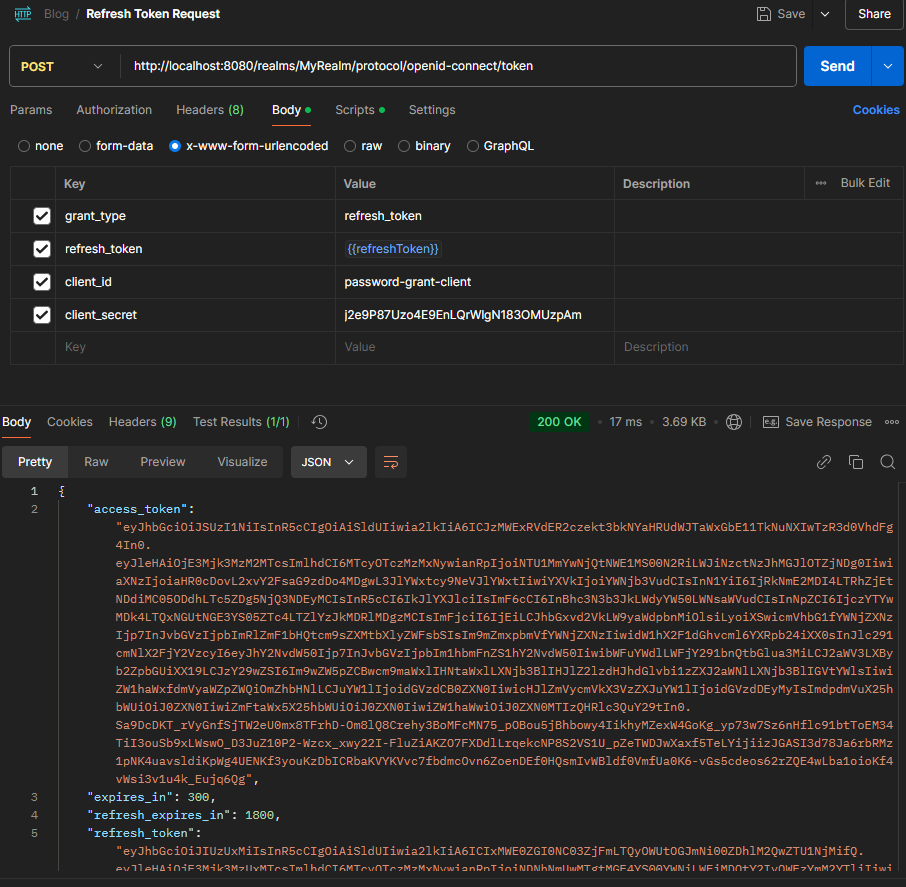
In my case when making this call from Postman, I receive a new access JWT Token and the same refresh token back with a renew expiration time for the next 30 minutes.
Introspect End Point
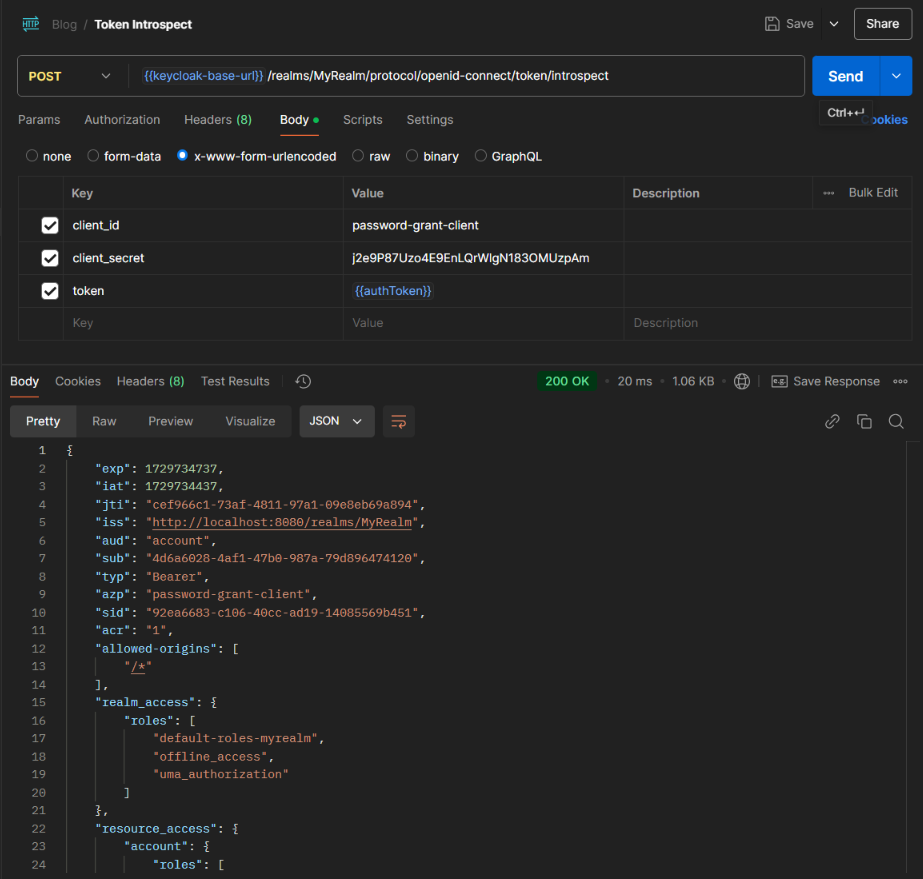
The introspection endpoint in OAuth 2.0 and OpenID Connect is a special endpoint provided by the authorization server, Keycloak, that allows clients to query the status and details of a token. This endpoint can be used to check whether a token (access token or refresh token) is active, expired, revoked, or otherwise invalid. The URL has the format of http://<keycloak-server>/realms/<realm-name>/protocol/openid-connect/token/introspect.
curl -X POST "http://localhost:8080/realms/MyRealm/protocol/openid-connect/token/introspect" \
     -H "Content-Type: application/x-www-form-urlencoded" \
     -d "token=<your-token>" \
     -d "client_id=<your-client-id>" \
     -d "client_secret=<your-client-secret>"
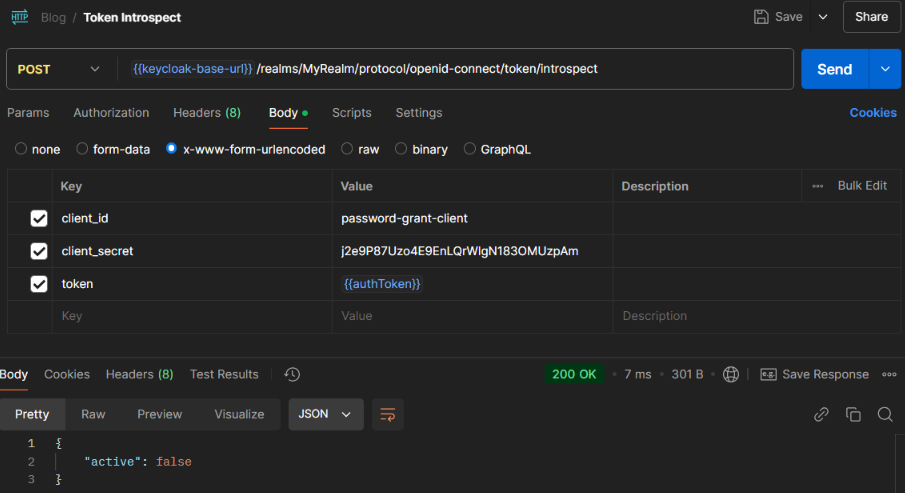
If the token is expired, revoked or invalid then the response simply show active: false
When the token is valid, you’d see the token details as a response from invoking this end point using your token and the client id and client secret.
Token Revocation
Token Revocation is a mechanism that allows an authorization server to invalidate an access token or refresh token. This is important for security, as it enables the server to revoke tokens that are no longer needed or that have been compromised, ensuring that unauthorized access is prevented. The endpoint URL for this function has the format of http://<keycloak-server>/realms/<realm-name>/protocol/openid-connect/revoke
To test this out, I simply generate a Client Credential Grant tok
en.
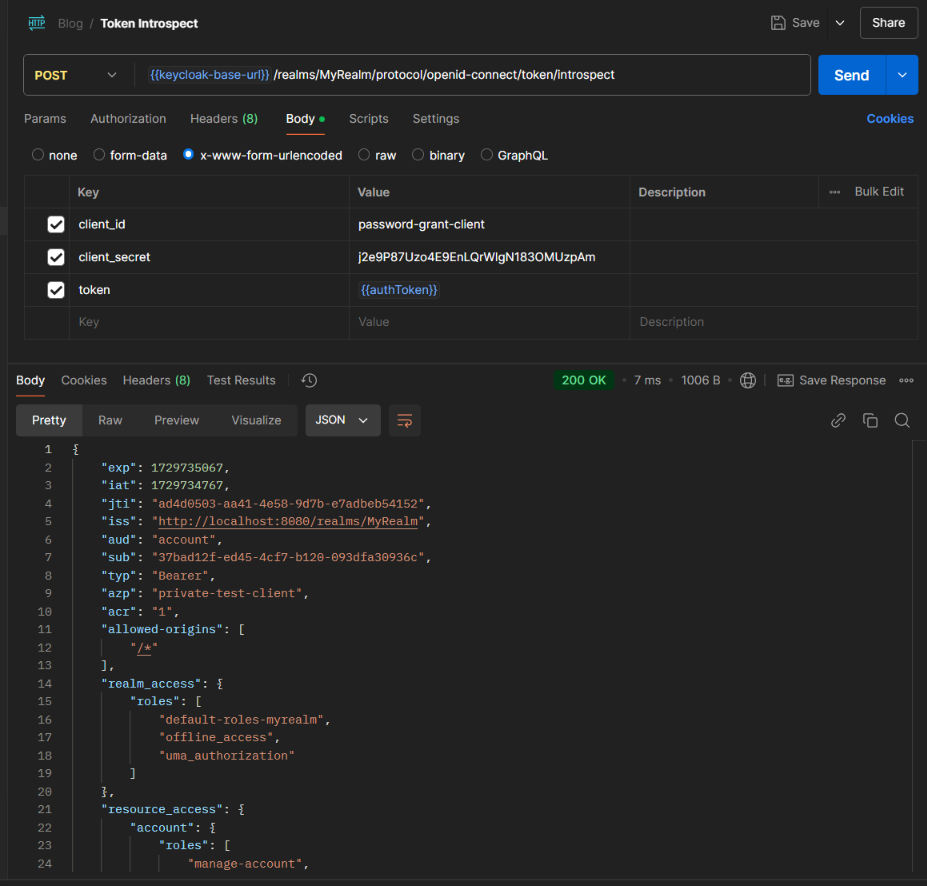
When testing this token against the introspective end point of KeyCloak, I can see it is valid because the returns displays the details of the access token:
Next I will attempt to revoke this token using KeyCloak’s revoke endpoint
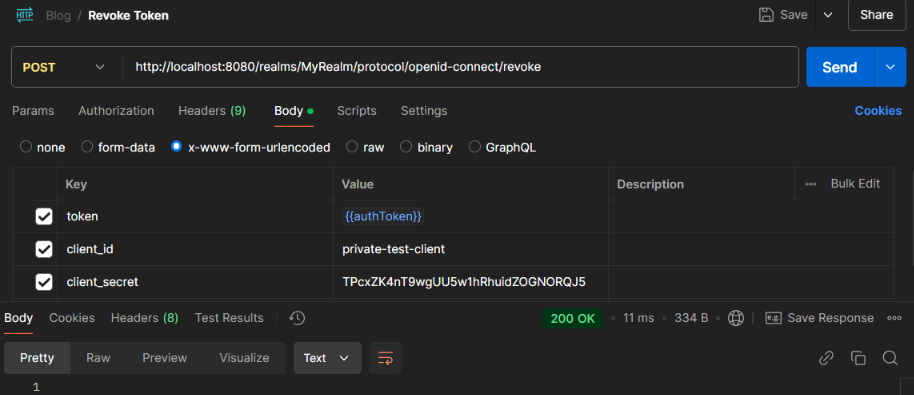
Upon calling the introspection endpoint, you will see that the token is now invalid even though the access token has not expired yet.
Key Rotation
Key Rotation is the process of periodically changing the cryptographic keys used to sign and verify tokens. By regularly rotating keys, the exposure time of any single key is limited, reducing the risk of long-term damage if a key is compromised. This practice ensures that even if a key is compromised, it will soon be replaced, minimizing potential damage.
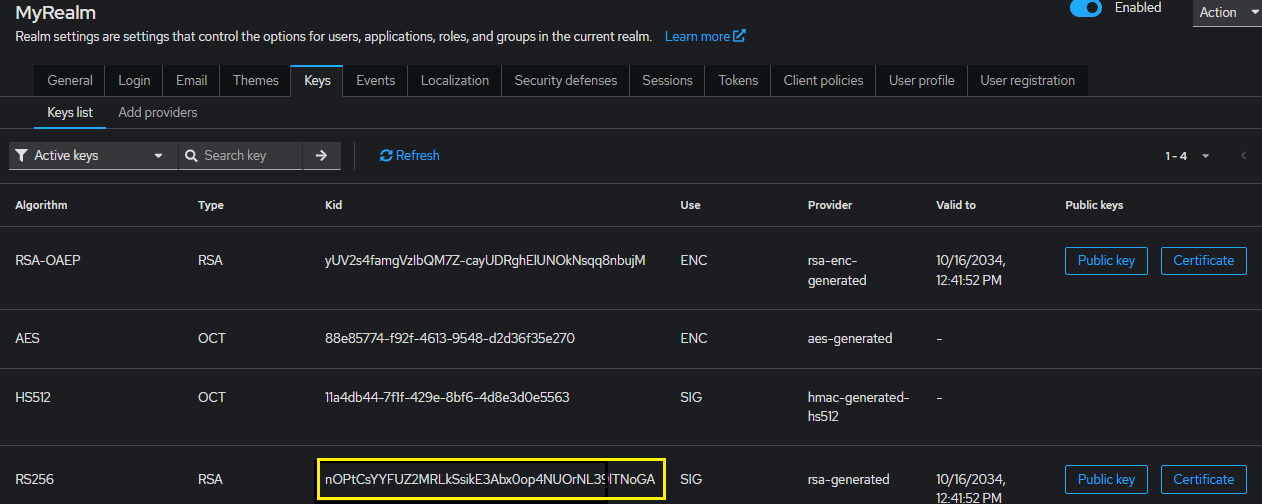
By default KeyCloak provide 5 default Keys, to see them click on Realm settings and click on Keys tab.

In the context of key rotation and token management, keys can be categorized as active, passive, or disabled. Active keys are the ones currently used to sign new tokens. When a new token is issued, it is signed with an active key, ensuring that the token is valid and can be verified by clients and services.
Passive keys are keys that were previously used to sign tokens but are no longer used for signing new ones. However, they are still kept in the system to verify tokens that were issued while they were active. This means that even after a key is no longer used to sign new tokens, it can still be used to check the validity of older tokens until they expire.
Disabled keys are keys that are no longer used for any purpose. They have been fully retired from the system and are not used to sign new tokens or verify old ones. These keys are typically removed from the system to prevent any accidental use.
During the key rotation process, a new key is generated and set as the active key. The previous active key becomes passive, allowing it to verify existing tokens. Passive keys are kept until all tokens signed with them have expired, at which point they are disabled and removed from the system.
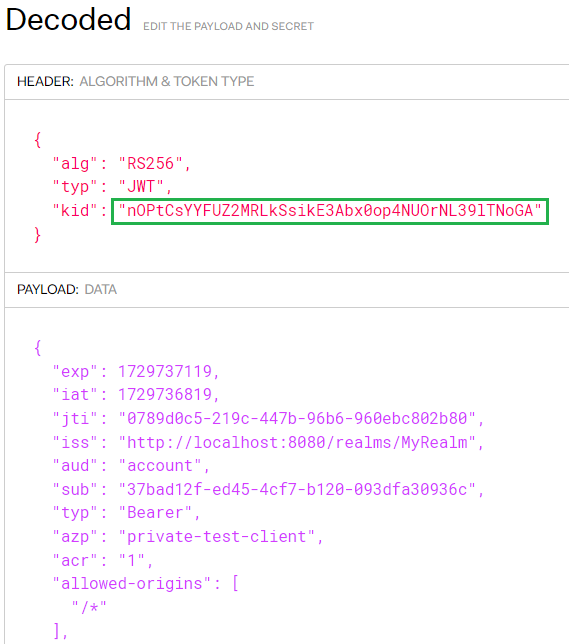
To manage keys, click on Realm Settings, Keys. By default KeyCloak uses rsa-generated key provider. When you send a request such as Client Credential Grant, the token is return, if you put your token into jwt.io, you’d see the Key Id value (kid).
If you look under the Key list, you’d see this value matches against the key with rs-generated provider.
Now, lets assume we want to retire this current key rsa-generated and use a new one calls new-rsa-generated.
Click on Realm settings, click on Keys tab, click on Add providers and select
rsa-generated.Set Active to
OFFwhile leaving Enabled toONand click Save. This will ensure JWT token signed by this key will still be valid.Click on Realm settings, click on Keys tab, click on Add providers and click on Add provider button
Under the Add provider window select
rsa-generated. Givenew-rsa-generatedas Name, Priority set to 100 which is the same as the provider we disabled in step 2. The rest of the settings should be as followed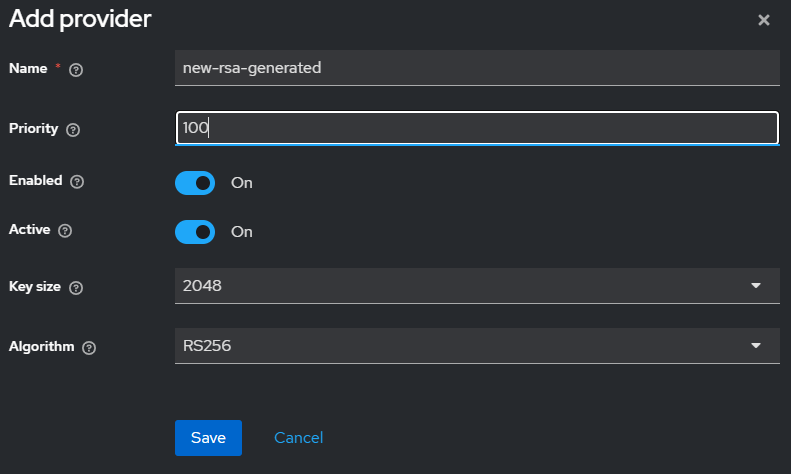
Click back on Keys tab and select Key list, you should see the new provider on the list
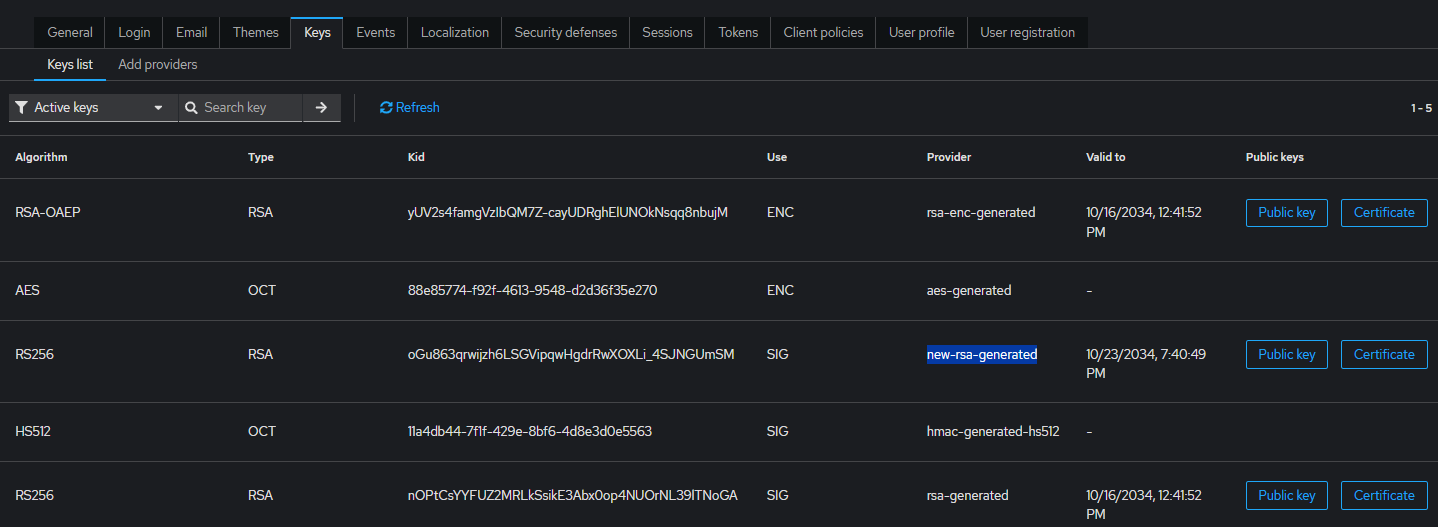
So at this point if you invoke KeyCloak token endpoint, your generated token will ahve the new key id which matches against the newly created Key Provider.
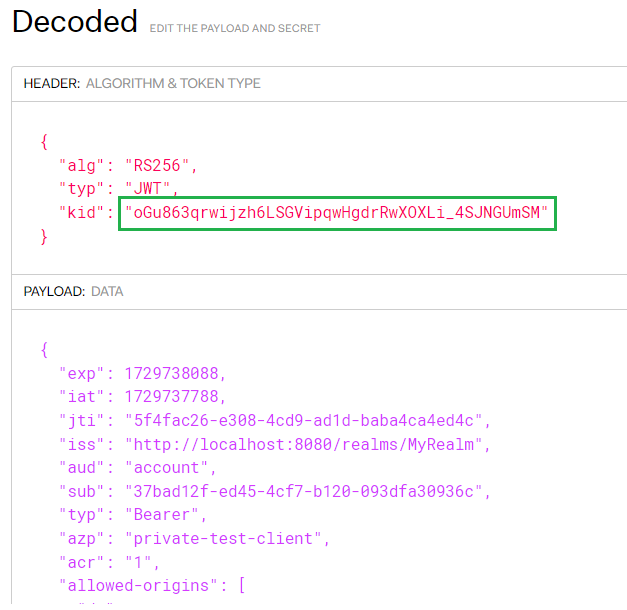

At this point, we have two tokens generated: one uses the new and active new-rsa-generated key, while the prior token uses the rsa-generated key, which is in passive mode but still enabled. If you check both tokens via the introspection endpoint and they are not expired yet, then both tokens remain valid.
However, if we disable the passive rsa-generated key, the token signed by that key will immediately be invalidated.
This key rotation mechanism allows us to switch out old keys while still ensuring that all non-expired tokens remain valid. It helps maintain uptime in terms of authorization and authentication for other services. By rotating keys, we enhance security by limiting the exposure of any single key and ensuring that compromised keys are quickly replaced. Additionally, this process supports compliance with security best practices and regulatory requirements, providing a robust and secure authentication system.
Subscribe to my newsletter
Read articles from Quang Phan directly inside your inbox. Subscribe to the newsletter, and don't miss out.
Written by
