How to Use MQTT in C# with MQTTnet
 EMQX
EMQXIntroduction
With the rise of IoT, the .Net framework has become increasingly popular in building IoT applications. Microsoft's .Net Core and .Net Framework provide developers with a set of tools and libraries to build IoT applications that can run on Raspberry Pi, HummingBoard, BeagleBoard, Pine A64, and more.
MQTTnet is a high-performance .Net library that implements the MQTT protocol. It is open source on GitHub and has a rich set of features, including MQTT 5.0 protocol and TLS/SSL supports.
This blog post demonstrates how to use the MQTTnet library to connect to a serverless MQTT broker. The whole project can be downloaded at MQTT Client Examples.
Prepare an MQTT Broker
EMQX Serverless is an MQTT broker offering on the public cloud with all the serverless advantages. You can start the Serverless deployment in seconds with just a few clicks. Additionally, users can get 1 million free session minutes every month, sufficient for 23 devices to be online for a whole month, making it perfect for tiny IoT test scenarios.
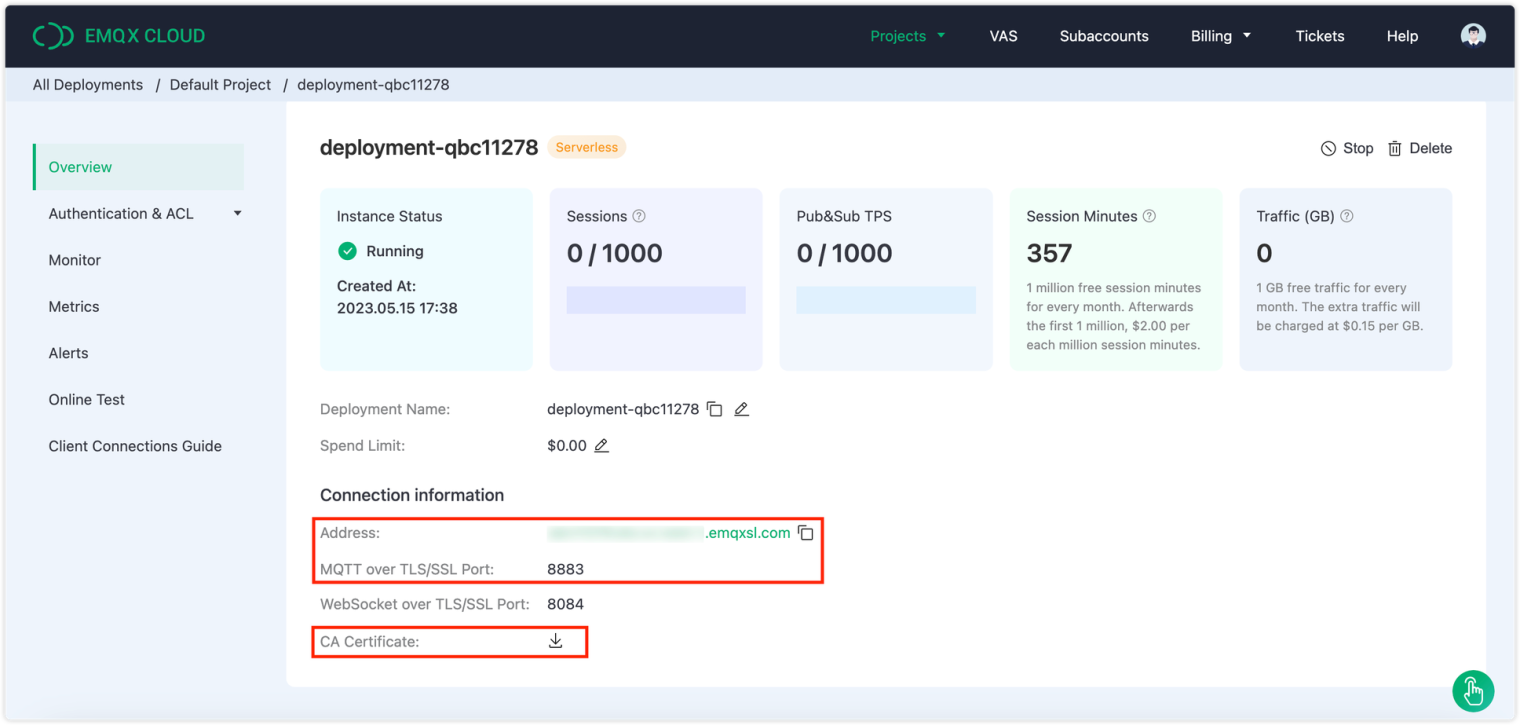
You can follow the guide in this blog to create a serverless deployment for free. Once you have completed the registration process with the online guide, you will get a running instance with the following similar information from the “Overview” in your deployment. We will use the connection information and CA certificate later.

MQTT C# Demo
1. Install .Net and Visual Studio
If you haven't installed the .NET environment on your computer yet, you can visit the official Microsoft documentation for detailed instructions.
Visual Studio is a comprehensive IDE for .NET developers that provides a feature-rich environment for developing, debugging, and deploying .NET applications. You can download and install it here, based on your computer's system and version.
2. Install the MQTTnet package
MQTTnet is delivered via NuGet package manager. To install it, create a Console Application and use NuGet to install the MQTTnet package. For detailed instructions on using NuGet in Visual Studio, refer to the official documentation. If you're using Visual Studio for Mac, refer to install and manage NuGet packages in Visual Studio for Mac.
3. Set up the MQTT connection
To connect to the EMQX Serverless broker, you need to create an instance of the MqttClientOptionsBuilder class and set the necessary options like broker address, port, username, and password. The code snippet below demonstrates how to create an instance of the MqttClientOptionsBuilder:
string broker = "******.emqxsl.com";
int port = 8883;
string clientId = Guid.NewGuid().ToString();
string topic = "Csharp/mqtt";
string username = "emqxtest";
string password = "******";
// Create a MQTT client factory
var factory = new MqttFactory();
// Create a MQTT client instance
var mqttClient = factory.CreateMqttClient();
// Create MQTT client options
var options = new MqttClientOptionsBuilder()
.WithTcpServer(broker, port) // MQTT broker address and port
.WithCredentials(username, password) // Set username and password
.WithClientId(clientId)
.WithCleanSession()
.Build();
Please replace the connection parameters with your EMQX connection information and login credentials.
Broker and port: Obtain the connection address and port information from the server deployment overview page.
Topic: Topics are used to identify and differentiate between different messages, forming the basis of MQTT message routing.
Client ID: Every MQTT client must have a unique client ID. You can use
Guid.NewGuid()to generate a new unique identifier in .NET.Username and password: To establish a client connection, please make sure that you provide the correct username and password. The following image shows how to configure these credentials under 'Authentication & ACL - Authentication' on the server side.

4. Using TLS/SSL
When connecting to EMQX Serverless, it is important to note that it relies on a multi-tenant architecture, which enables multiple users to share a single EMQX cluster. In order to ensure the security and reliability of data transmission within this multi-tenant environment, TLS is required. And if the server is utilizing a self-signed certificate, you must download the corresponding CA file from the deployment overview panel and provide it during the connection setup process.
To add TLS and set the certificate file to the MqttClientOptionsBuilder instance, you can use WithTls(). The following code snippet shows how to create a TLS instance of MqttClientOptionsBuilder:
string broker = "******.emqxsl.com";
int port = 8883;
string clientId = Guid.NewGuid().ToString();
string topic = "Csharp/mqtt";
string username = "emqxtest";
string password = "******";
// Create a MQTT client factory
var factory = new MqttFactory();
// Create a MQTT client instance
var mqttClient = factory.CreateMqttClient();
// Create MQTT client options
var options = new MqttClientOptionsBuilder()
.WithTcpServer(broker, port) // MQTT broker address and port
.WithCredentials(username, password) // Set username and password
.WithClientId(clientId)
.WithCleanSession()
.WithTls(
o =>
{
// The used public broker sometimes has invalid certificates. This sample accepts all
// certificates. This should not be used in live environments.
o.CertificateValidationHandler = _ => true;
// The default value is determined by the OS. Set manually to force version.
o.SslProtocol = SslProtocols.Tls12; ;
// Please provide the file path of your certificate file. The current directory is /bin.
var certificate = new X509Certificate("/opt/emqxsl-ca.crt", "");
o.Certificates = new List<X509Certificate> { certificate };
}
)
.Build();
5. Connect to the MQTT broker
Now that you have created the MQTT client and set up the connection options, you are ready to connect to the broker. Simply use the PublishAsync method of the MQTT client to establish a connection and start sending and receiving messages.
var connectResult = await mqttClient.ConnectAsync(options);
Here we use asynchronous programming, which allows message publishing while subscribing to prevent blocking.
6. Subscribe to topics
Once connected to the broker, you can verify the success of the connection by checking the value of ResultCode. If the connection is successful, you can subscribe to MQTT topics to receive messages.
if (connectResult.ResultCode == MqttClientConnectResultCode.Success)
{
Console.WriteLine("Connected to MQTT broker successfully.");
// Subscribe to a topic
await mqttClient.SubscribeAsync(topic);
// Callback function when a message is received
mqttClient.ApplicationMessageReceivedAsync += e =>
{
Console.WriteLine($"Received message: {Encoding.UTF8.GetString(e.ApplicationMessage.PayloadSegment)}");
return Task.CompletedTask;
};
Within this function, you can also print the the corresponding received messages. This allows you to view and process the received data as needed.
7. Publish messages
To send messages to the broker, use the PublishAsync method of the MQTT client. Here is an example for sending messages to the broker in a loop, with one message sent every second:
for (int i = 0; i < 10; i++)
{
var message = new MqttApplicationMessageBuilder()
.WithTopic(topic)
.WithPayload($"Hello, MQTT! Message number {i}")
.WithQualityOfServiceLevel(MqttQualityOfServiceLevel.AtLeastOnce)
.WithRetainFlag()
.Build();
await mqttClient.PublishAsync(message);
await Task.Delay(1000); // Wait for 1 second
}
8. Unsubscribe
To unsubscribe, call:
await mqttClient.UnsubscribeAsync(topic);
9. Disconnect
To disconnect, call:
await mqttClient.DisconnectAsync();
Complete Code
The following code shows how to connect to the server, subscribe to topics, and publish and receive messages. For a complete demonstration of all functions, see the project's GitHub repository.
using System.Security.Authentication;
using System.Security.Cryptography.X509Certificates;
using System.Text;
using MQTTnet;
using MQTTnet.Client;
using MQTTnet.Protocol;
class Program
{
static async Task Main(string[] args)
{
string broker = '******.emqxsl.com';
int port = 8883;
string clientId = Guid.NewGuid().ToString();
string topic = "Csharp/mqtt";
string username = 'emqxtest';
string password = '**********';
// Create a MQTT client factory
var factory = new MqttFactory();
// Create a MQTT client instance
var mqttClient = factory.CreateMqttClient();
// Create MQTT client options
var options = new MqttClientOptionsBuilder()
.WithTcpServer(broker, port) // MQTT broker address and port
.WithCredentials(username, password) // Set username and password
.WithClientId(clientId)
.WithCleanSession()
.WithTls(
o =>
{
// The used public broker sometimes has invalid certificates. This sample accepts all
// certificates. This should not be used in live environments.
o.CertificateValidationHandler = _ => true;
// The default value is determined by the OS. Set manually to force version.
o.SslProtocol = SslProtocols.Tls12;
// Please provide the file path of your certificate file. The current directory is /bin.
var certificate = new X509Certificate("/opt/emqxsl-ca.crt", "");
o.Certificates = new List<X509Certificate> { certificate };
}
)
.Build();
// Connect to MQTT broker
var connectResult = await mqttClient.ConnectAsync(options);
if (connectResult.ResultCode == MqttClientConnectResultCode.Success)
{
Console.WriteLine("Connected to MQTT broker successfully.");
// Subscribe to a topic
await mqttClient.SubscribeAsync(topic);
// Callback function when a message is received
mqttClient.ApplicationMessageReceivedAsync += e =>
{
Console.WriteLine($"Received message: {Encoding.UTF8.GetString(e.ApplicationMessage.PayloadSegment)}");
return Task.CompletedTask;
};
// Publish a message 10 times
for (int i = 0; i < 10; i++)
{
var message = new MqttApplicationMessageBuilder()
.WithTopic(topic)
.WithPayload($"Hello, MQTT! Message number {i}")
.WithQualityOfServiceLevel(MqttQualityOfServiceLevel.AtLeastOnce)
.WithRetainFlag()
.Build();
await mqttClient.PublishAsync(message);
await Task.Delay(1000); // Wait for 1 second
}
// Unsubscribe and disconnect
await mqttClient.UnsubscribeAsync(topic);
await mqttClient.DisconnectAsync();
}
else
{
Console.WriteLine($"Failed to connect to MQTT broker: {connectResult.ResultCode}");
}
}
}
Test
Run the project in Visual Studio, we can see the output information on the terminal window as follows. The client has successfully connected to the MQTT broker, and received a message every second.

You can also use MQTT Client Tool - MQTTX as another client for the message publishing and receiving the test. If you subscribe the “Csharp/mqtt" topic in MQTTX, you will receive the message every second.

When you publish a message to the topic, the server will receive the message and you can view it both on MQTTX and in the console.

Received message displayed on MQTTX

Received message displayed on terminal
Summary
This blog provides a step-by-step guide on connecting to a serverless MQTT deployment via the MQTTnet library. By following these instructions, you have successfully created a .Net application capable of publishing and subscribing to Serverless MQTT.
Originally published at https://www.emqx.com/en/blog/connecting-to-serverless-mqtt-broker-with-mqttnet-in-csharp
Subscribe to my newsletter
Read articles from EMQX directly inside your inbox. Subscribe to the newsletter, and don't miss out.
Written by

EMQX
EMQX
EMQX is the world's most scalable open-source MQTT broker with a high performance that connects 100M+ IoT devices in 1 cluster, while maintaining 1M message per second throughput and sub-millisecond latency.