Continuous Integration with Azure Pipelines
 Vivian fernandes
ARCHITECTURE OF THE APPLICATION
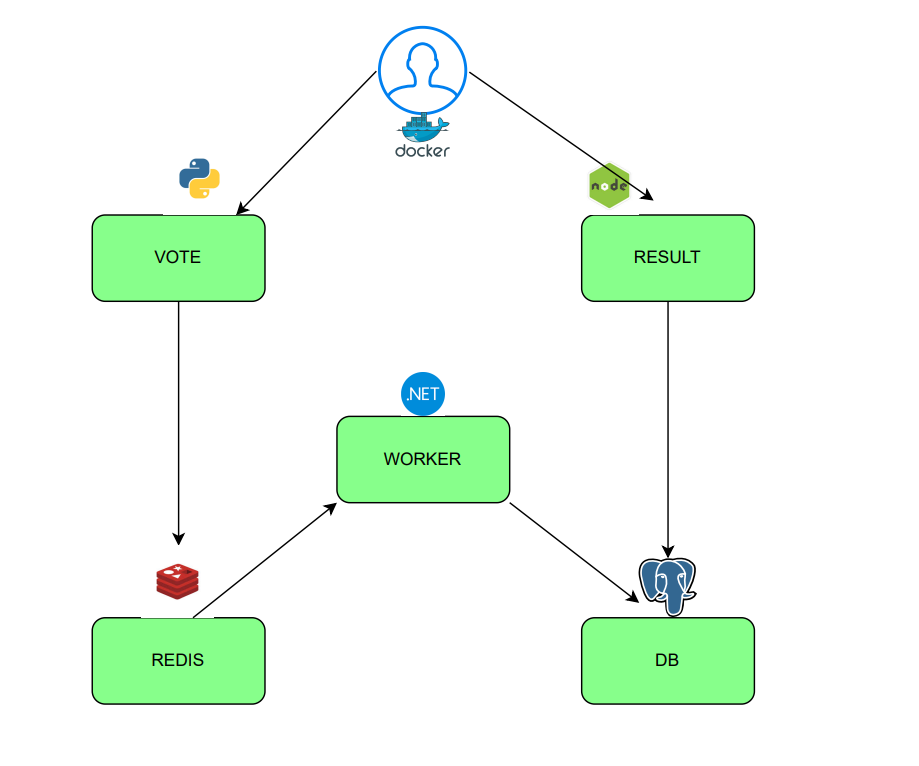
What is CICD
Continuous Integration / Continuous Delivery
IMP: If some user or developer goes to the repository and makes some changes to the code, this changes cannot be merged directly.
It needs to follow the proper procedure via CICD, so that we can make sure these changes will not impact the application.
Whatever changes made by the developer will usually go via following phases:

This CICD can be implemented on 2 methods:
Pull Requests: When developer makes a change, he will create something called Pull Requests. This Pull Requests will be sent out to the team members to review. During this Pull Requests, the CI steps will be executed. The reviewer can now just review the code since all other steps are executed in CI. He can just look at the code and can merge the changes.
Commit: Once the code is committed, the CI will run.
IMPORTANT TOOLS OF AZURE
REPOS: Used to store the repositories [equivalent to GITHUB].
RESOURCE GROUP: Every resource must have a resource group.
AZURE CONTAINER REGISTRY: Used to store Docker Images [equal to DOCKERHUB].
DOCKERFILES FOR EACH SERVICES
RESULT
FROM node:18-slim
# add curl for healthcheck
RUN apt-get update && \
apt-get install -y --no-install-recommends curl tini && \
rm -rf /var/lib/apt/lists/*
WORKDIR /usr/local/app
# have nodemon available for local dev use (file watching)
RUN npm install -g nodemon
COPY package*.json ./
RUN npm ci && \
npm cache clean --force && \
mv /usr/local/app/node_modules /node_modules
COPY . .
ENV PORT=80
EXPOSE 80
ENTRYPOINT ["/usr/bin/tini", "--"]
CMD ["node", "server.js"]
VOTE
# base defines a base stage that uses the official python runtime base image
FROM python:3.11-slim AS base
# Add curl for healthcheck
RUN apt-get update && \
apt-get install -y --no-install-recommends curl && \
rm -rf /var/lib/apt/lists/*
# Set the application directory
WORKDIR /usr/local/app
# Install our requirements.txt
COPY requirements.txt ./requirements.txt
RUN pip install --no-cache-dir -r requirements.txt
# dev defines a stage for development, where it'll watch for filesystem changes
FROM base AS dev
RUN pip install watchdog
ENV FLASK_ENV=development
CMD ["python", "app.py"]
# final defines the stage that will bundle the application for production
FROM base AS final
# Copy our code from the current folder to the working directory inside the container
COPY . .
# Make port 80 available for links and/or publish
EXPOSE 80
# Define our command to be run when launching the container
CMD ["gunicorn", "app:app", "-b", "0.0.0.0:80", "--log-file", "-", "--access-logfile", "-", "--workers", "4", "--keep-alive", "0"]
WORKER
# because of dotnet, we always build on amd64, and target platforms in cli
# dotnet doesn't support QEMU for building or running.
# (errors common in arm/v7 32bit) https://github.com/dotnet/dotnet-docker/issues/1537
# https://hub.docker.com/_/microsoft-dotnet
# hadolint ignore=DL3029
# to build for a different platform than your host, use --platform=<platform>
# for example, if you were on Intel (amd64) and wanted to build for ARM, you would use:
# docker buildx build --platform "linux/arm64/v8" .
# build compiles the program for the builder's local platform
FROM --platform=${BUILDPLATFORM} mcr.microsoft.com/dotnet/sdk:7.0 AS build
ARG TARGETPLATFORM
ARG TARGETARCH
ARG BUILDPLATFORM
RUN echo "I am running on $BUILDPLATFORM, building for $TARGETPLATFORM"
WORKDIR /source
COPY *.csproj .
RUN dotnet restore -a $TARGETARCH
COPY . .
RUN dotnet publish -c release -o /app -a $TARGETARCH --self-contained false --no-restore
# app image
FROM mcr.microsoft.com/dotnet/runtime:7.0
WORKDIR /app
COPY --from=build /app .
ENTRYPOINT ["dotnet", "Worker.dll"]
PROJECT STEPS – PHASE 1 [CI]
STEP 1: CREATE THE PROJECT TO AZURE REPOS
- Go to https://dev.azure.com/organization-name/ and create the project by adding project name and description and click on ‘Create’.
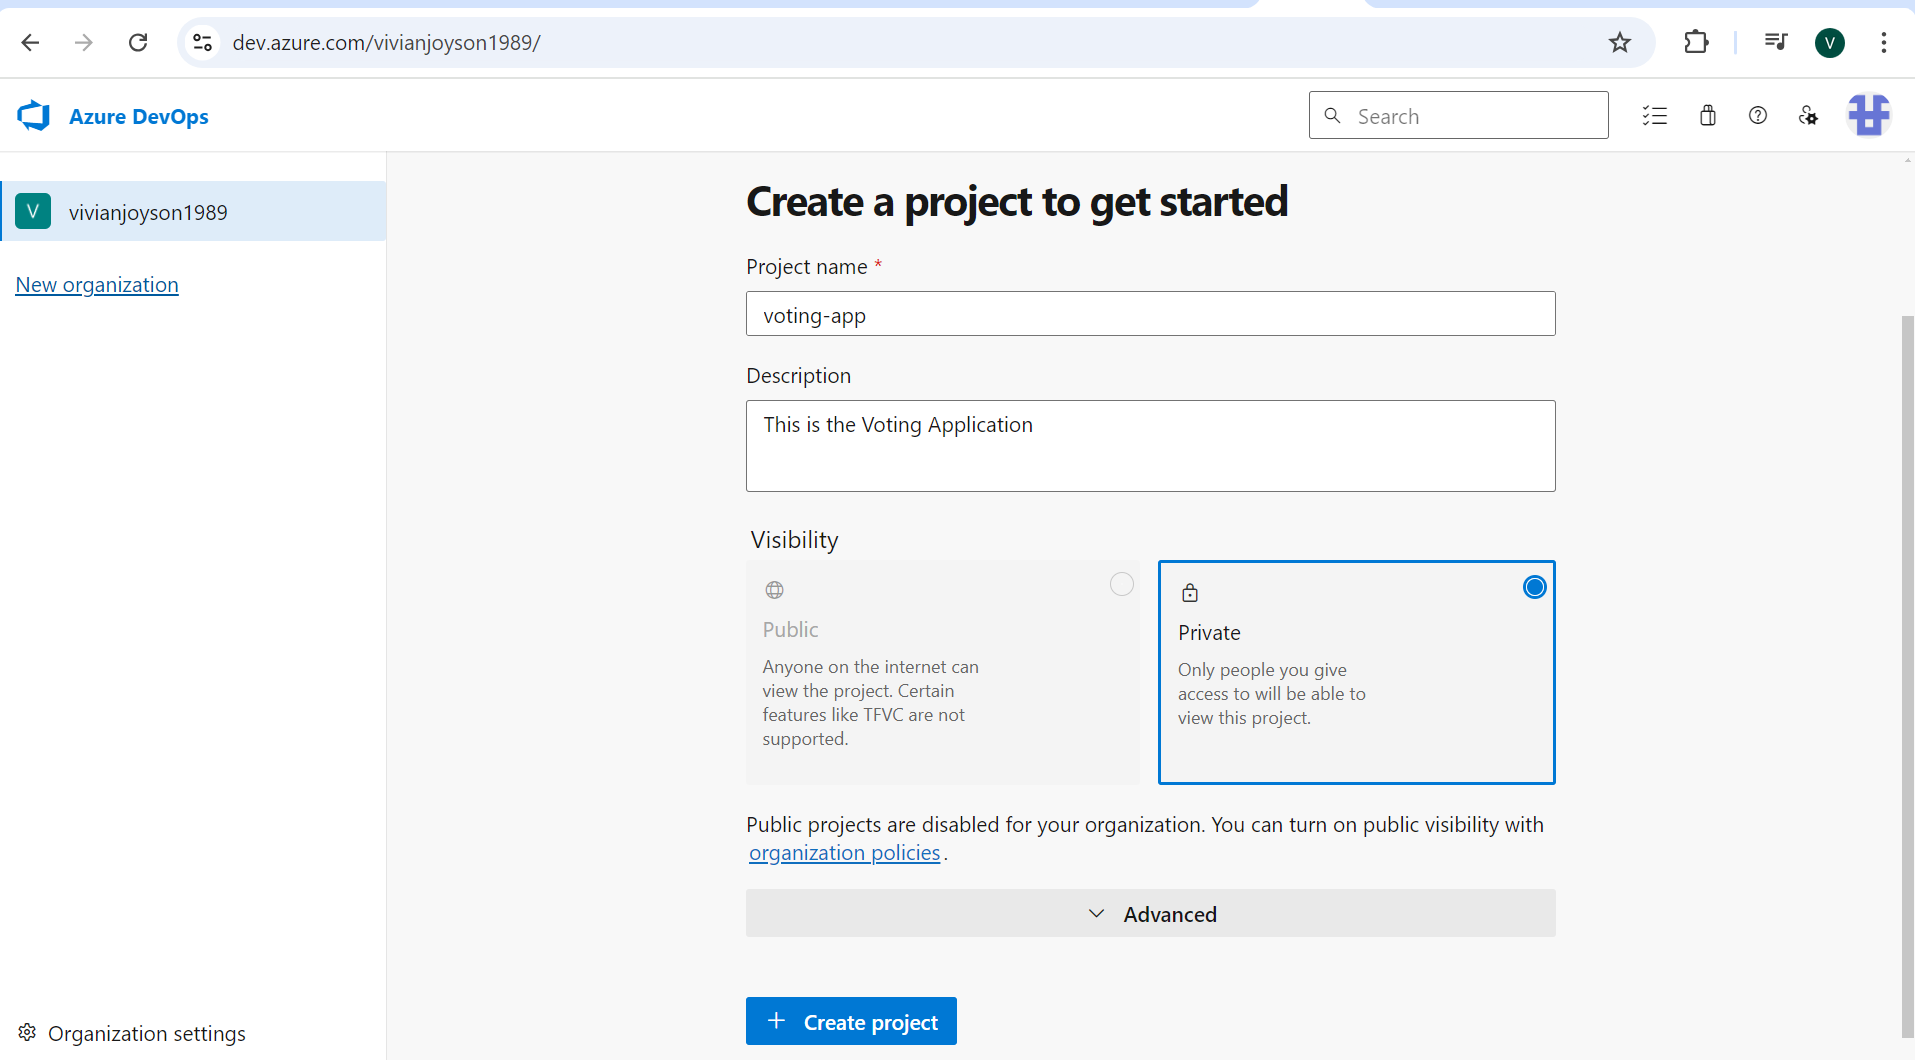
- Once created, you will see the Azure DevOps services.
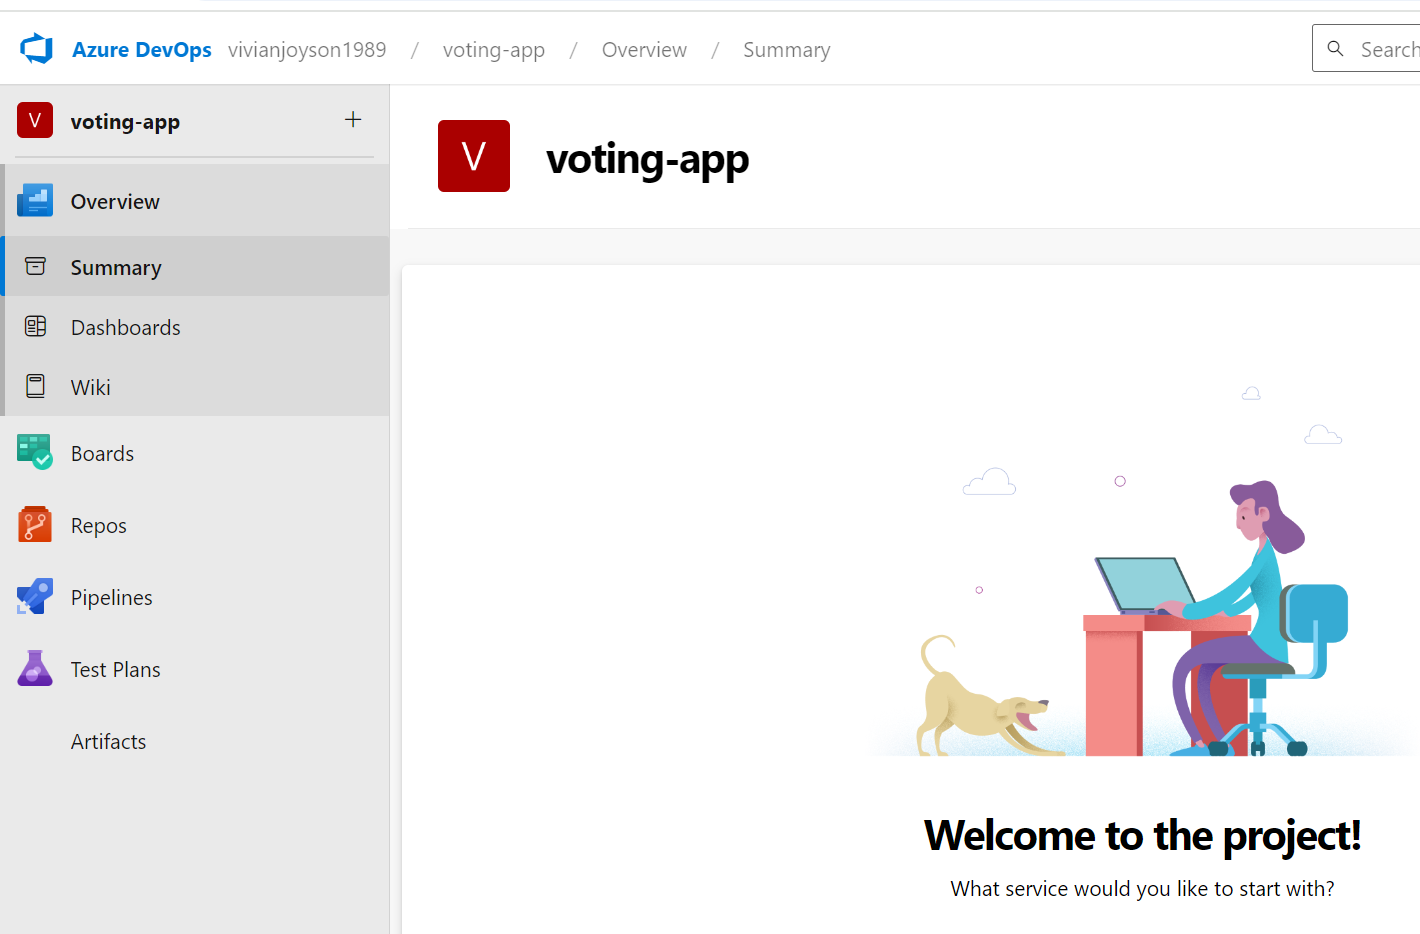
Click on ‘Repos’.
Under ‘Import a Repository’, click on ‘Import’ and clone the Github repository.
Once imported, you need to be very careful and check the default branch.
You need to change the default branch to ‘main’ branch by going to:
Repos -> main -> Click in 3 vertical dots and ‘Set as default’.
Now the default branch is set as ‘main’ .
STEP 2: CREATE THE RESOURCE GROUP
Go to the Azure Portal https://portal.azure.com/
Select the ‘Resource Group’ from Home section.
Click on ‘Create’.
Select the Subscription, Add the resource Group name and select the Region.
Click on ‘Review + Create’.
STEP 3: CREATE THE CONTAINER REGISTRY
Go to Azure Portal https://portal.azure.com/.
Search for ‘Container Registry’.
Create the container registry by selecting the subscription, resource group.
Add the Registry name, Location
Click on ‘Review + Create’.
STEP 4: CREATE THE PIPELINE
Go to the Azure DevOps and click on ‘Pipelines’.
Click on ‘Create Pipelines’ and ‘Azure Repos Git’.
Select the Repository ‘Voting App’.
Click on 2nd Docker to Build and Push Docker Image to Docker Container Registry.
It will ask for the login of Azure Portal. Login and select the Container Registry name and click on ‘Validate and Configure’ .
Once done, you will get an option to ‘Review your pipeline YAML’. You can just review it and it shows like below:
Default Pipeline Code
# Docker
# Build and push an image to Azure Container Registry
# https://docs.microsoft.com/azure/devops/pipelines/languages/docker
trigger:
- dependabot/npm_and_yarn/result/express-4.19.2
resources:
- repo: self
variables:
# Container registry service connection established during pipeline creation
dockerRegistryServiceConnection: '569d472a-24aa-4001-986c-b96a10403872'
imageRepository: 'votingapp'
containerRegistry: 'votingcontainervvn.azurecr.io'
dockerfilePath: '$(Build.SourcesDirectory)/result/Dockerfile'
tag: '$(Build.BuildId)'
# Agent VM image name
vmImageName: 'ubuntu-latest'
stages:
- stage: Build
displayName: Build and push stage
jobs:
- job: Build
displayName: Build
pool:
vmImage: $(vmImageName)
steps:
- task: Docker@2
displayName: Build and push an image to container registry
inputs:
command: buildAndPush
repository: $(imageRepository)
dockerfile: $(dockerfilePath)
containerRegistry: $(dockerRegistryServiceConnection)
tags: |
$(tag)
The main things we need to concentrate are:
Triggers
Resources
Variables
Stages
Triggers
This tells the pipeline when to trigger.
In this project, we are using path based triggers. So in the repository, when the changes are made to specific microservices, only that particular microservice repository is triggered.
STEP 5: UPDATE THE PIPELINE CODE FOR ‘RESULT’ APP
Now, I am updating the pipeline to trigger for the ‘Result’ directory only.
CODE FOR TRIGGERS
trigger:
paths: //we are setting path based pipeline for ‘result’
include:
- result/*
CODE FOR VARIABLES
variables:
# Container registry service connection established during pipeline creation
dockerRegistryServiceConnection: '09fd0370-6bf9-47e7-9fcf-780dfd023e96'
imageRepository: 'resultapp' //Update Name of repo
containerRegistry: 'votingcontainervvn.azurecr.io'
dockerfilePath: '$(Build.SourcesDirectory)/result/Dockerfile'
tag: '$(Build.BuildId)'
# Agent VM image name
pool:
name: 'azureagent' //Need to set a azureagent in free tier.. In Other plans it will give you the agent automatically
CODE FOR STAGES (BUILD)
stages:
- stage: Build
displayName: Build //Adding just Build Stage
jobs:
- job: Build
displayName: Build
steps:
- task: Docker@2 //Select the latest Docker
displayName: Build and push an image to container registry
inputs:
command: buildAndPush
repository: $(imageRepository)
dockerfile: $(dockerfilePath)
containerRegistry: $(dockerRegistryServiceConnection)
tags: |
$(tag)
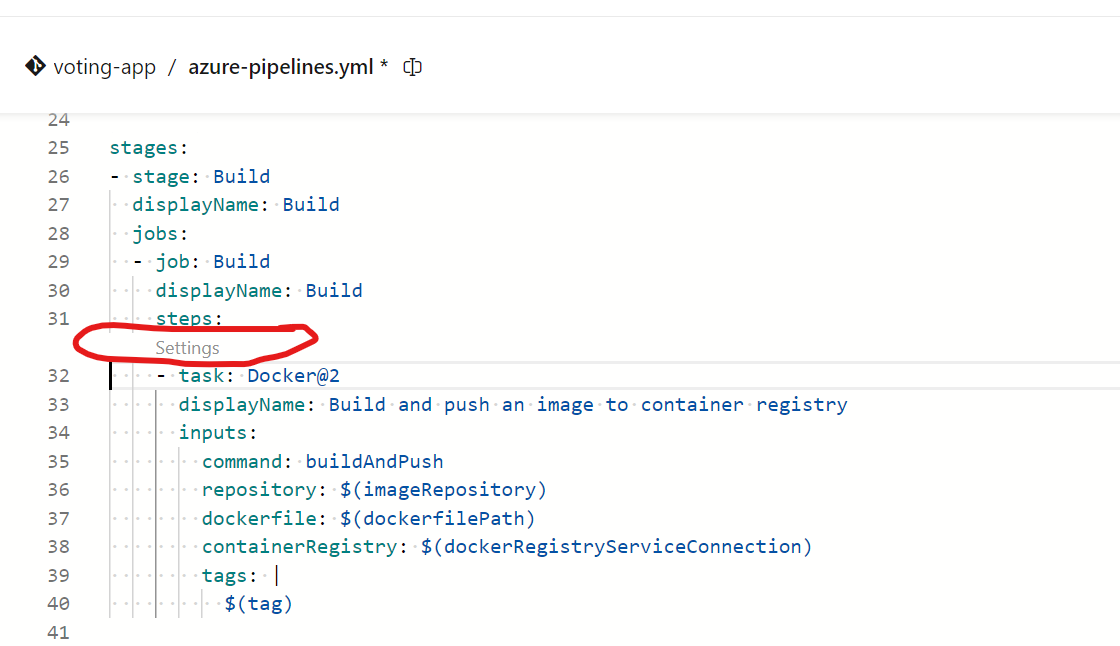
Now, click on ‘Settings’ and define the steps required.
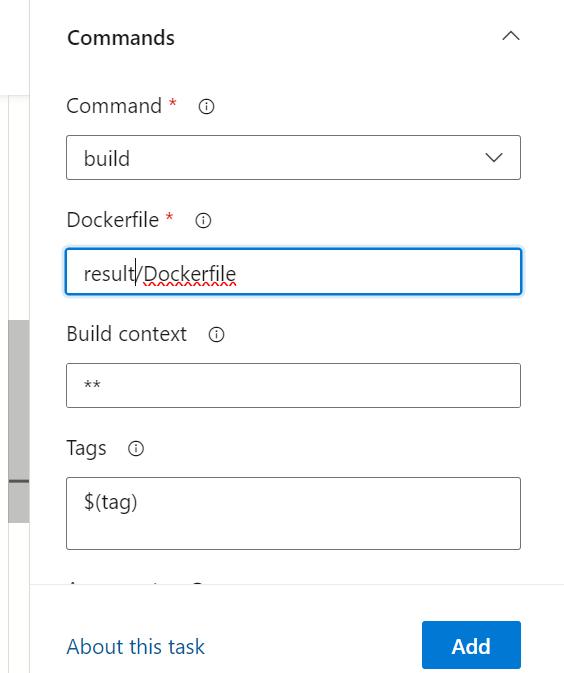
Once added, the code will automatically change accordingly.
ADD ANOTHER STAGE FOR PUSH
stages:
- stage: Push
displayName: Push //Change the name
jobs:
- job: Push
displayName: Push
steps:
- task: Docker@2
displayName: Push the image to container registry
inputs:
containerRegistry: '$(dockerRegistryServiceConnection)'
repository: '$(imageRepository)'
command: 'push'
tags: '$(tag)'
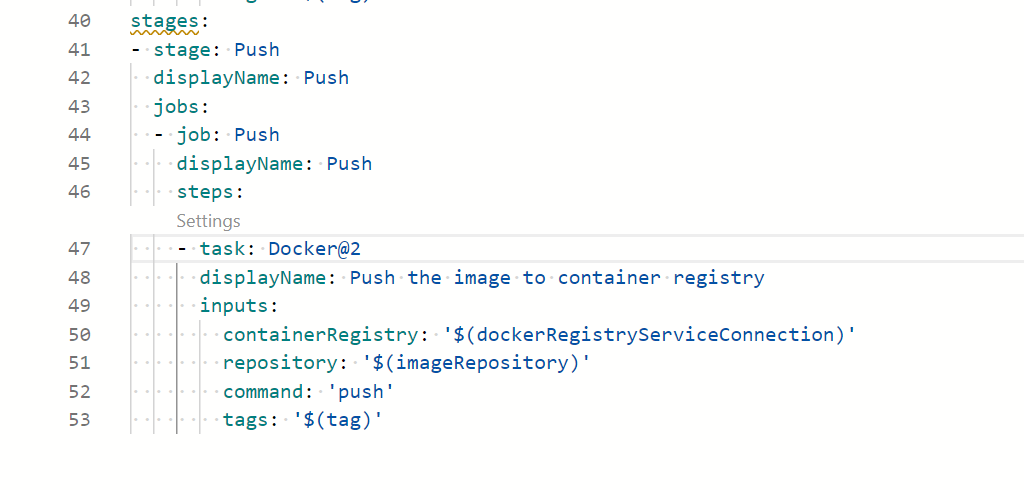
V. IMP: Since we are using Azure Pipelines and Azure Container Registry here, the Push directly works.
If we are using DockerHub, then we need to add another stage here named, “login” to login to DockerHub first and then push the image
STEP 6: CLICK ON ‘TEST AND RUN’
You might get an error when you run since there is no virtual machine to run azure agent is created. I got the error as:

STEP 7: CREATE THE VIRTUAL MACHINE
Create the Virtual machine by following the regular steps.
STEP 8: CONNECT VIRTUAL MACHINE WITH THE AZURE DEVOPS PIPELINE
Now, you need to connect the Azure Virtual Machine (Created) with the Azure DevOps account. To do so, first:
CREATE THE AGENT POOL
https://learn.microsoft.com/en-us/azure/devops/pipelines/agents/linux-agent?view=azure-devops
Also, you can refer the following steps:
Go to Azure devops -> Your Organization -> Project Settings -> Agent Pools -> Add Pool -> New -> Under Pool Type, select ‘Self Hosted’.
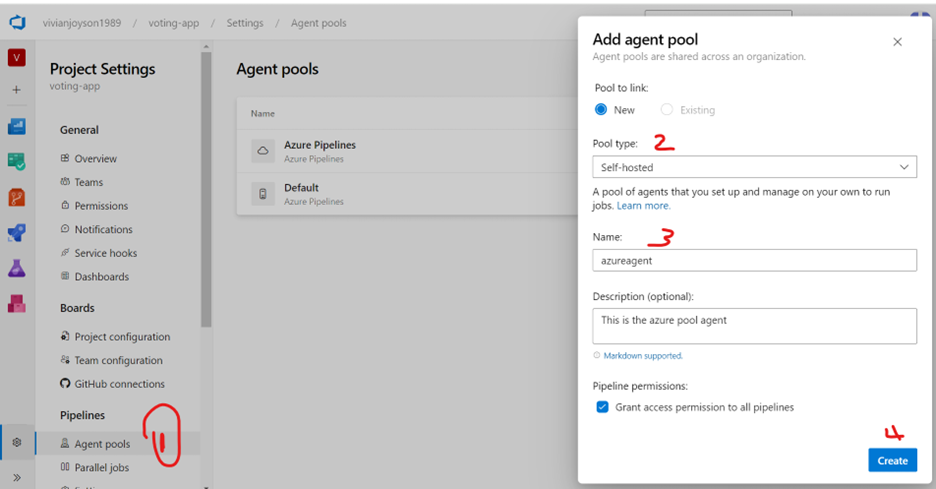
Once created, it will appear in the list.
CREATE THE NEW AGENT FROM AGENT POOL
Now, click on the newly created agent pool ‘azureagent’.

Once created, you need to click on “New Agent”.
Now, the list of commands will appear that you need to execute on the created Virtual Machine.
RUN THE COMMANDS ON THE VIRTUAL MACHINE
Download https://vstsagentpackage.azureedge.net/agent/3.246.0/vsts-agent-linux-x64-3.246.0.tar.gz
mkdir myagent && cd myagent
tar zxvf vsts-agent-linux-x64-3.246.0.tar.gz
./config.sh
When you run this, Azure Pipelines will appear and you need to connect to it.
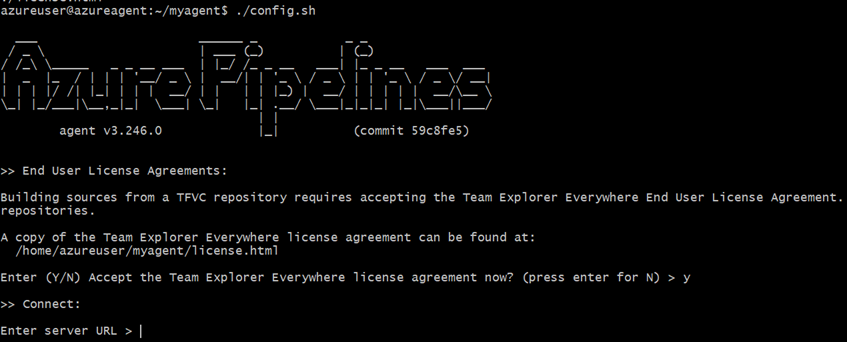
Add the Server URL: https://dev.azure.com/{your-organization}
Enter the authentication type (PAT):

How to Create PAT in AZURE
Go to the Settings
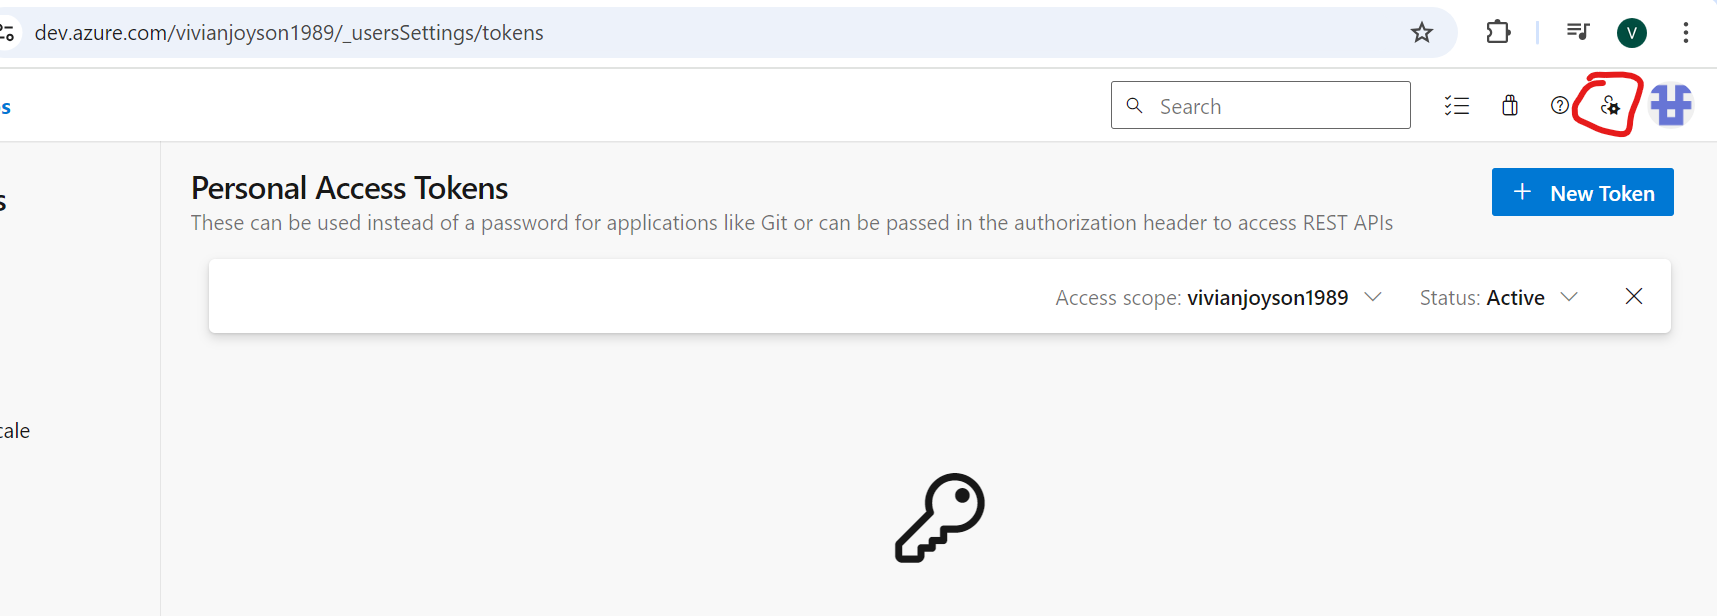
Create PAT with Full Access
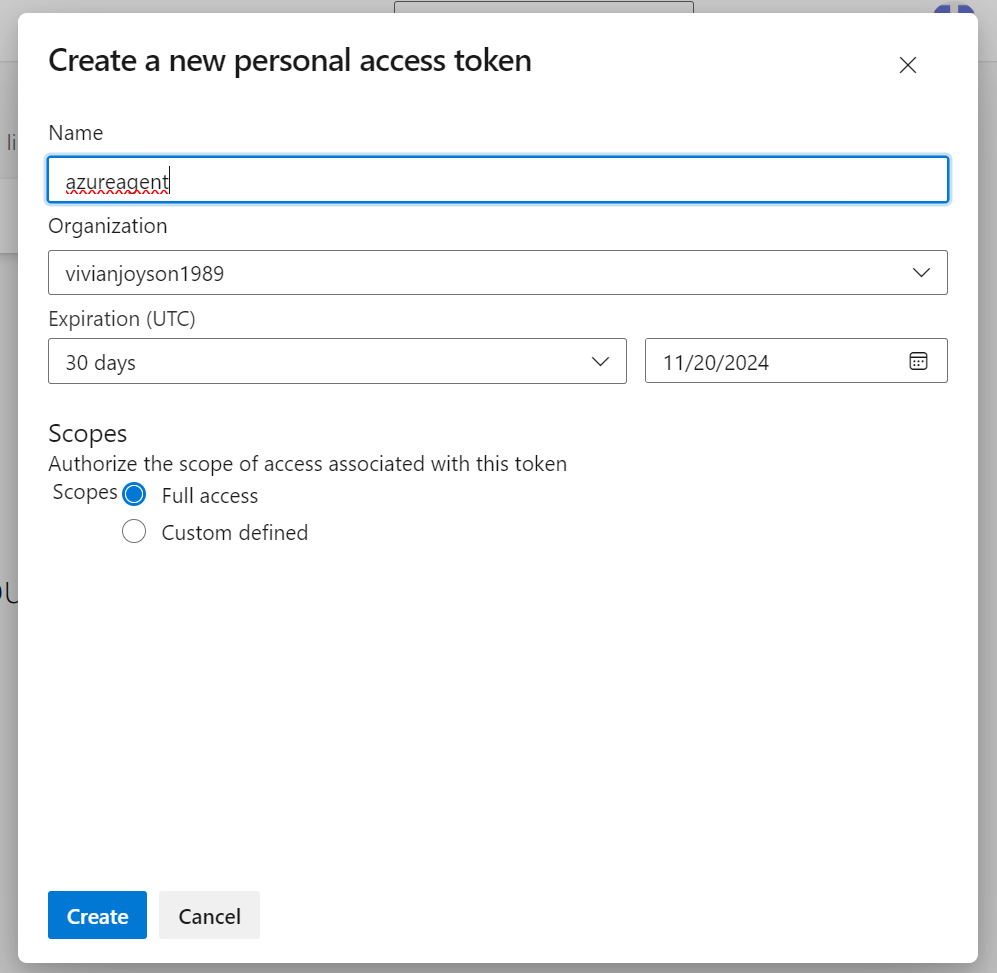
Once PAT created, you can run all the settings in the Virtual Machine.
RUN THE COMMAND TO ACTIVATE AZURE AGENT
./run.sh

INSTALL DOCKER
Meanwhile, install the docker using:
sudo apt install docker.io
Once installed, provide the access using:
sudo usermod -aG docker azureuser
sudo systemctl restart docker
./run.sh
STEP 9: RUN THE PIPELINE AGAIN
Now, getting the following error:
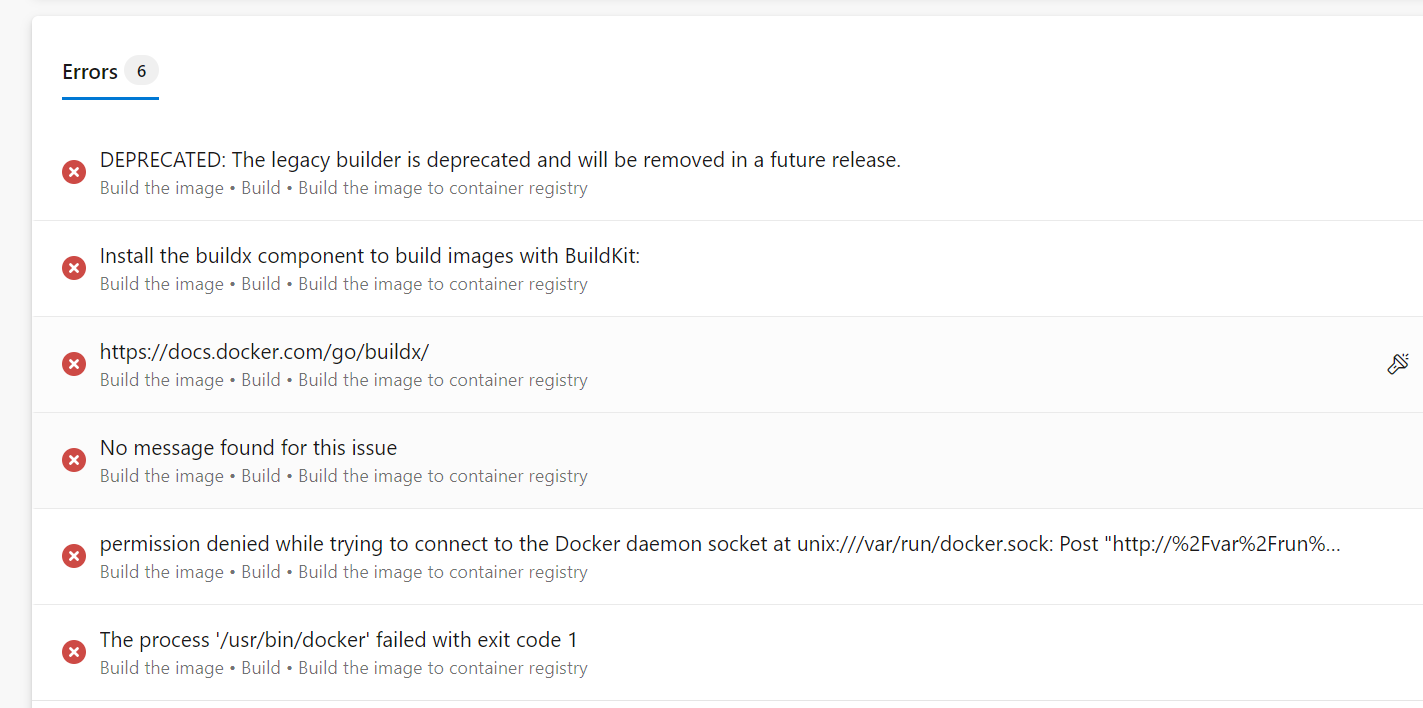
To resolve this, you can simple logout of the virtual machine using:
logout
Once logged out, re-login using the following command:
ssh -i azureagent_key.pem azureuser@57.159.8.225
Once done, restart the docker using:
sudo systemctl restart docker
You can also try to pull the sample docker for ‘hello-world’ and check if everything is good:
docker pull hello-world
Once done, go to the ‘myagent’ folder of the virtual machine and run:
./run.sh
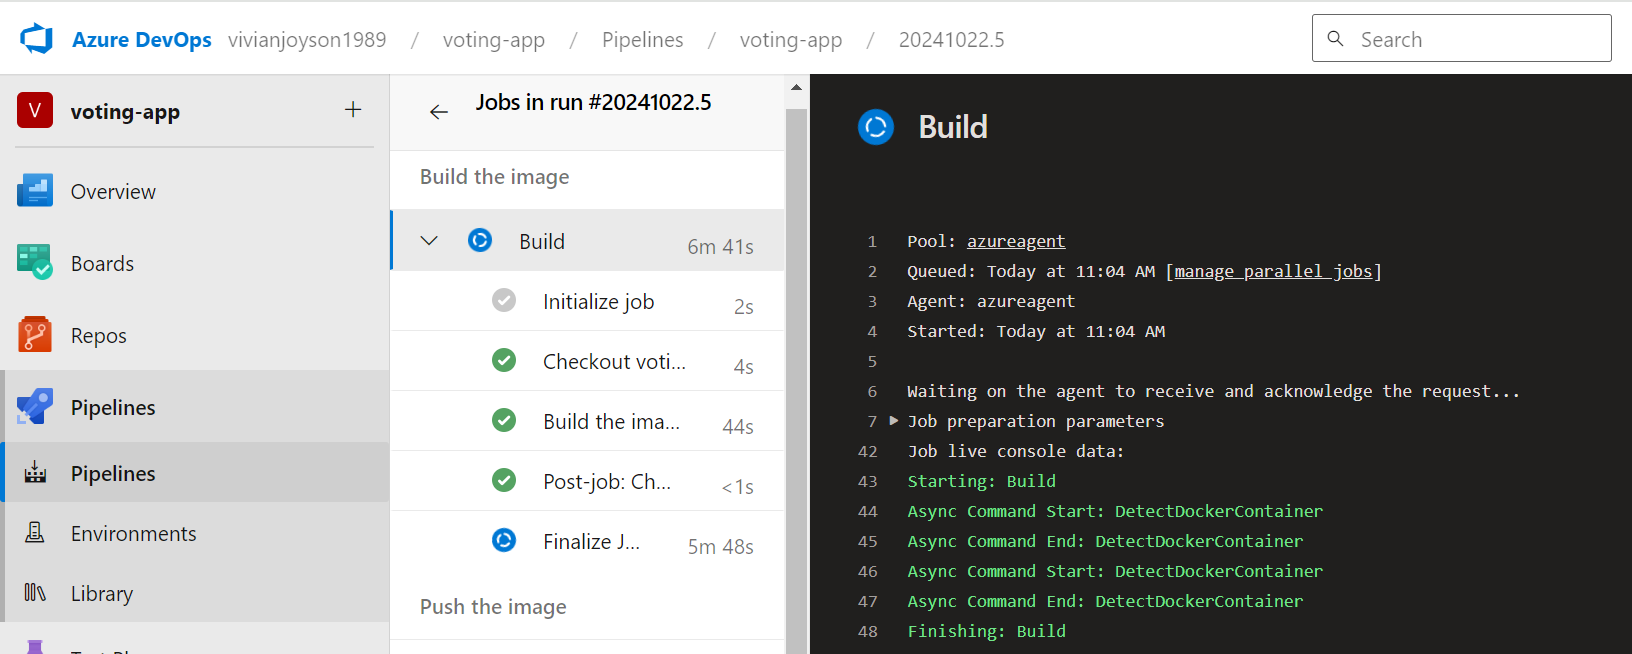
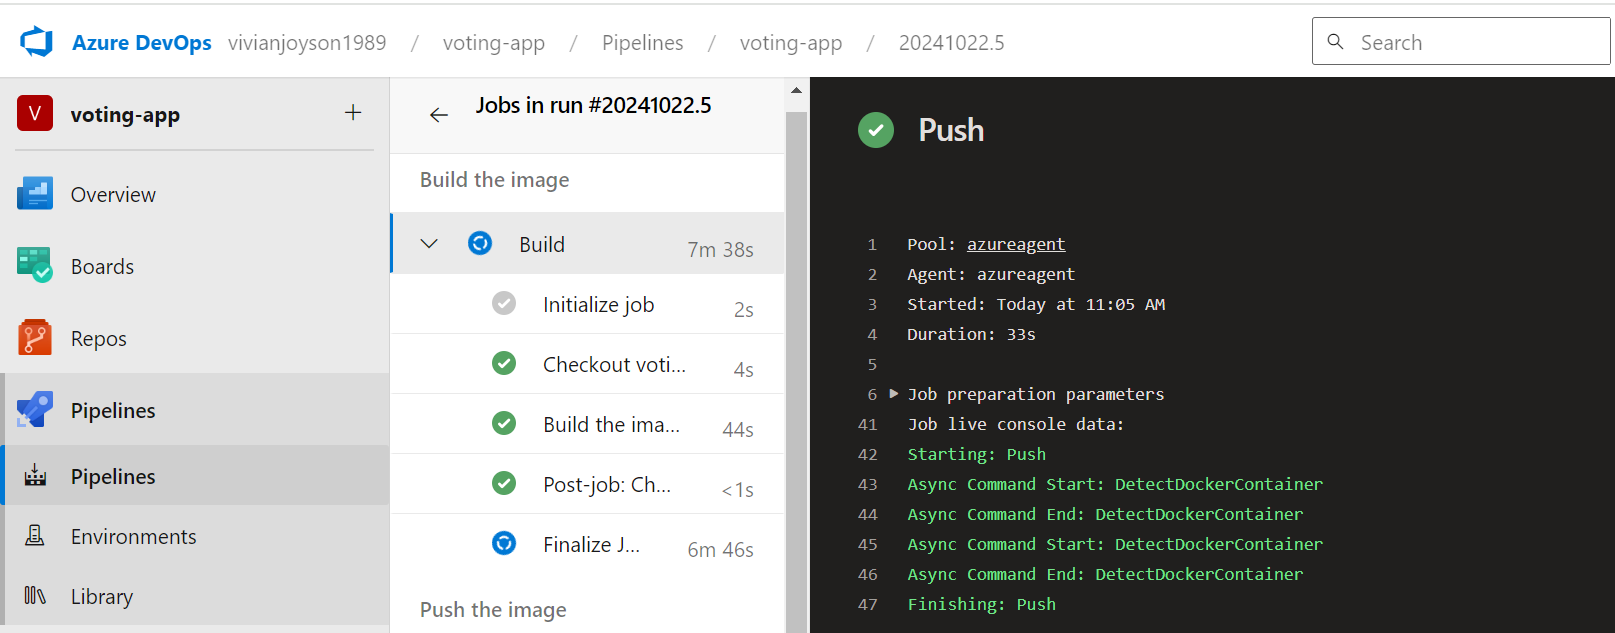
Now, run the pipeline again and it should work fine and show all the stages:
BUILD STAGE
PUSH STAGE
You can check all the failed and passed job by going to ‘voting-app’ pipeline:
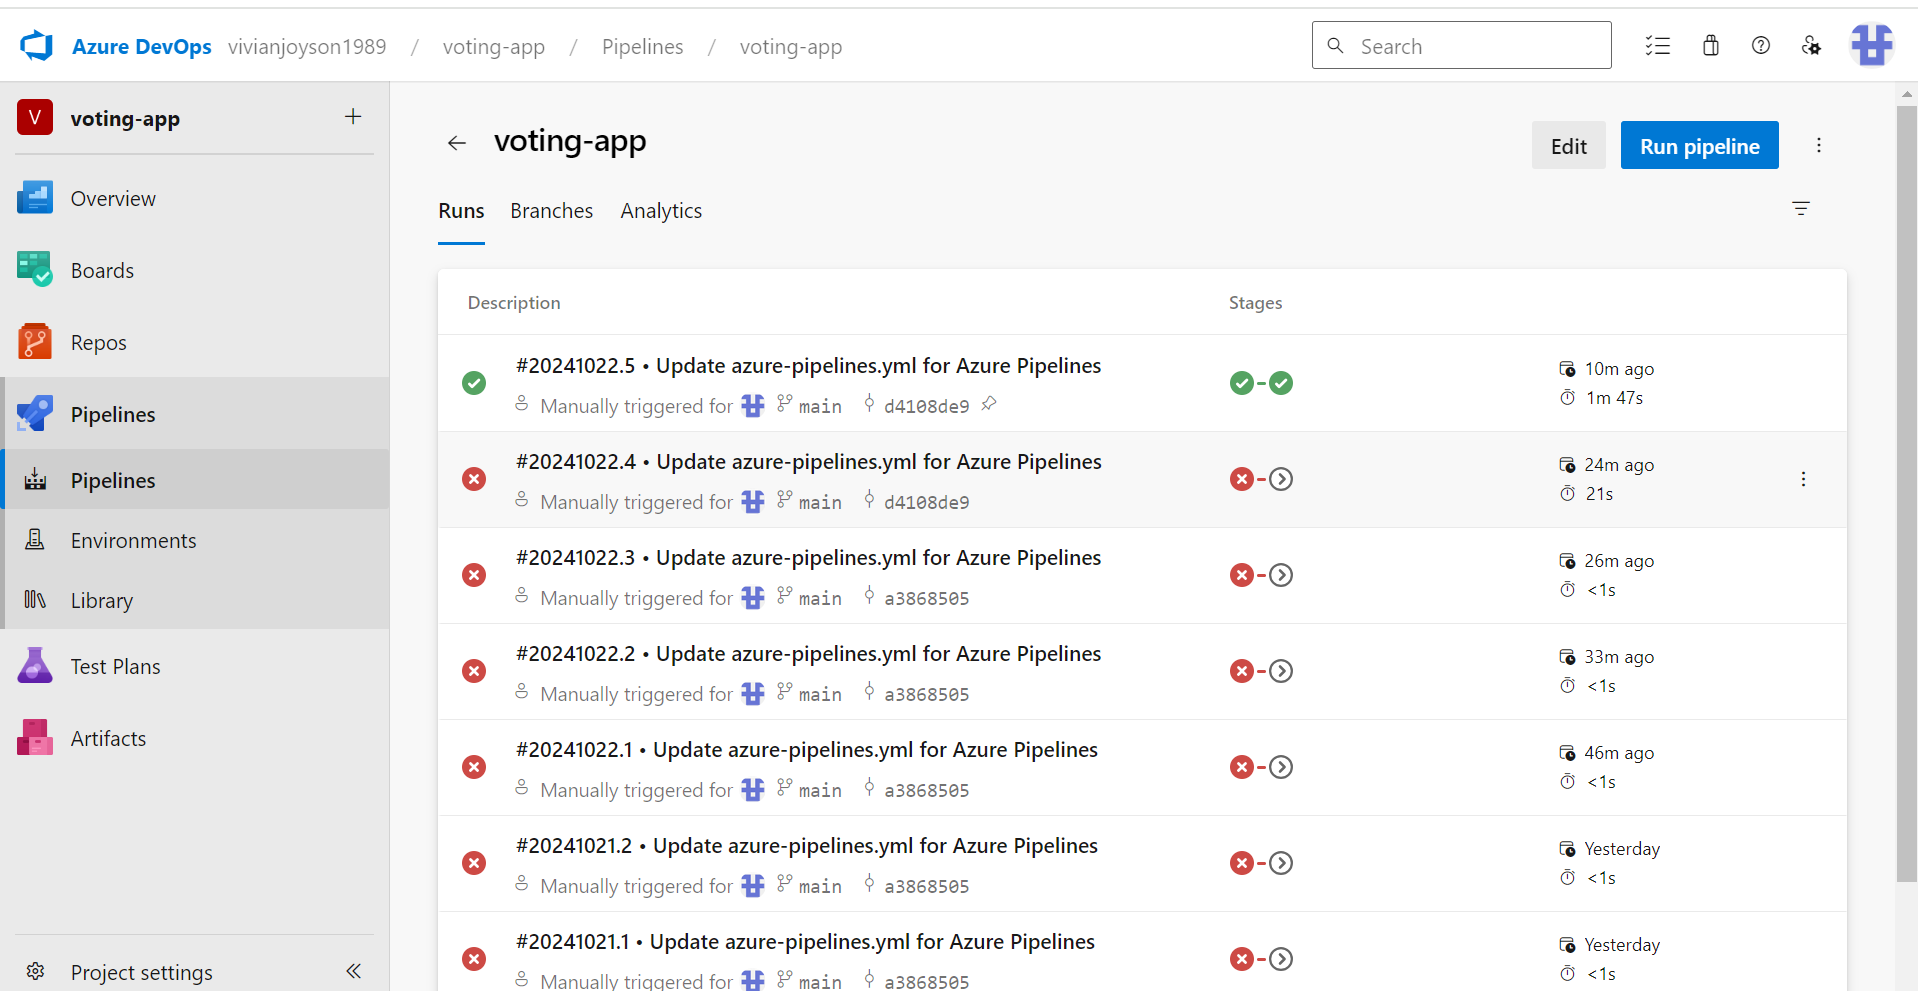
Now, if you make any changes to the “result” folder of the repository, the pipeline should trigger automatically.
STEP 10: CREATE PIPELINE FOR ‘VOTE.
To click the pipeline for ‘Worker’, just go to -> pipelines -> New Pipeline -> Azure Repos Git -> Select your project -> Docker -> Select subscription and container registry and ‘RUN’.
Update the pipeline accordingly by following same steps of STEP 5.
# Docker
# Build and push an image to Azure Container Registry
# https://docs.microsoft.com/azure/devops/pipelines/languages/docker
trigger:
paths:
include:
- vote/*
resources:
- repo: self
variables:
# Container registry service connection established during pipeline creation
dockerRegistryServiceConnection: 'd0087427-647d-47bb-9399-00ddabedc380'
imageRepository: 'votingapp'
containerRegistry: 'votingcontainervvn.azurecr.io'
dockerfilePath: '$(Build.SourcesDirectory)/vote/Dockerfile'
tag: '$(Build.BuildId)'
pool:
name: 'azureagent'
stages:
- stage: Build
displayName: Build stage
jobs:
- job: Build
displayName: Build
steps:
- task: Docker@2
displayName: Build the image to container registry
inputs:
containerRegistry: '$(dockerRegistryServiceConnection)'
repository: '$(imageRepository)'
command: 'build'
Dockerfile: 'vote/Dockerfile'
tags: '$(tag)'
- stage: Push
displayName: Push stage
jobs:
- job: Push
displayName: Push
steps:
- task: Docker@2
displayName: Push the image to container registry
inputs:
containerRegistry: '$(dockerRegistryServiceConnection)'
repository: '$(imageRepository)'
command: 'push'
tags: '$(tag)'
Its successfully done and you can check the jobs performed for ‘vote’ services at:
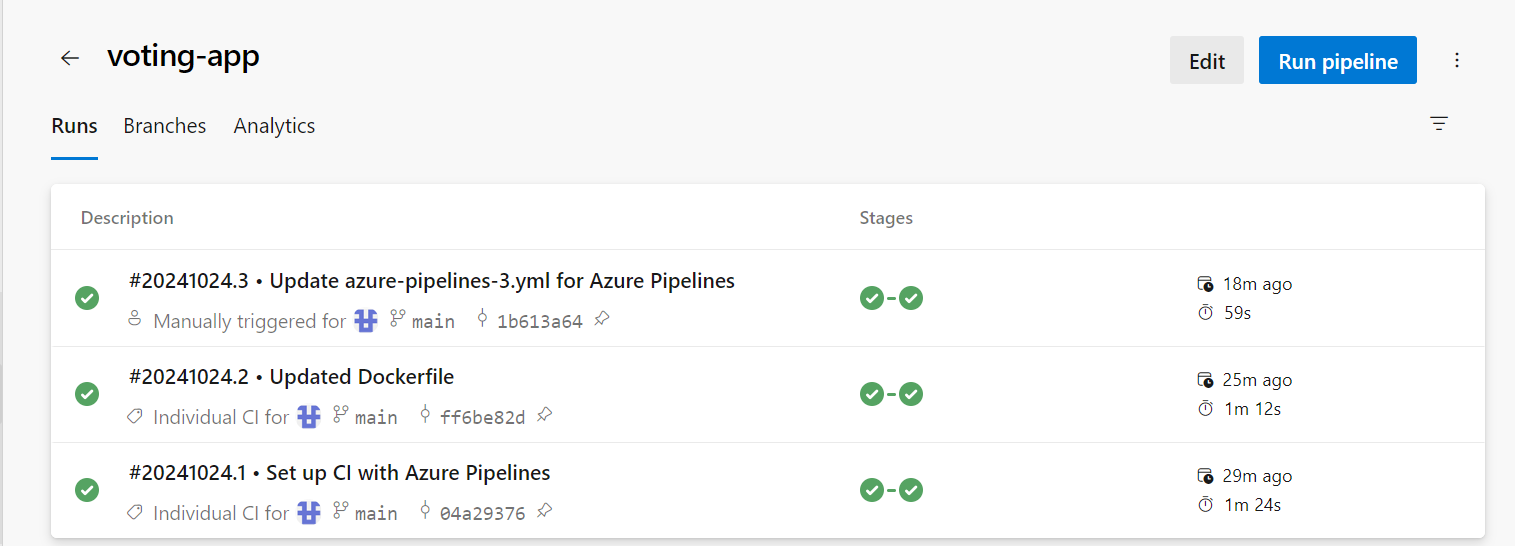
STEP 11: CREATE PIPELINE FOR ‘WORKER’
Pipeline for Worker Service is as follows:
# Docker
# Build and push an image to Azure Container Registry
# https://docs.microsoft.com/azure/devops/pipelines/languages/docker
trigger:
paths:
include:
- worker/*
resources:
- repo: self
variables:
# Container registry service connection established during pipeline creation
dockerRegistryServiceConnection: 'fa4d45c3-c27c-4195-aeb8-5998a2d3f024'
imageRepository: 'workerapp'
containerRegistry: 'votingcontainervvn.azurecr.io'
dockerfilePath: '$(Build.SourcesDirectory)/worker/Dockerfile'
tag: '$(Build.BuildId)'
pool:
name: 'azureagent'
stages:
- stage: Build
displayName: Build
jobs:
- job: Build
displayName: Build
steps:
- task: Docker@2
displayName: Build and push an image to container registry
inputs:
containerRegistry: '$(dockerRegistryServiceConnection)'
repository: '$(imageRepository)'
command: 'build'
Dockerfile: 'worker/Dockerfile'
tags: '$(tag)'
- stage: Push
displayName: Push
jobs:
- job: Push
displayName: Push
steps:
- task: Docker@2
displayName: Push an image to container registry
inputs:
containerRegistry: '$(dockerRegistryServiceConnection)'
repository: '$(imageRepository)'
command: 'push'
tags: '$(tag)'
When we run this, the pipeline worked after some small errors and the jobs run by ‘worker’ service are as follows:
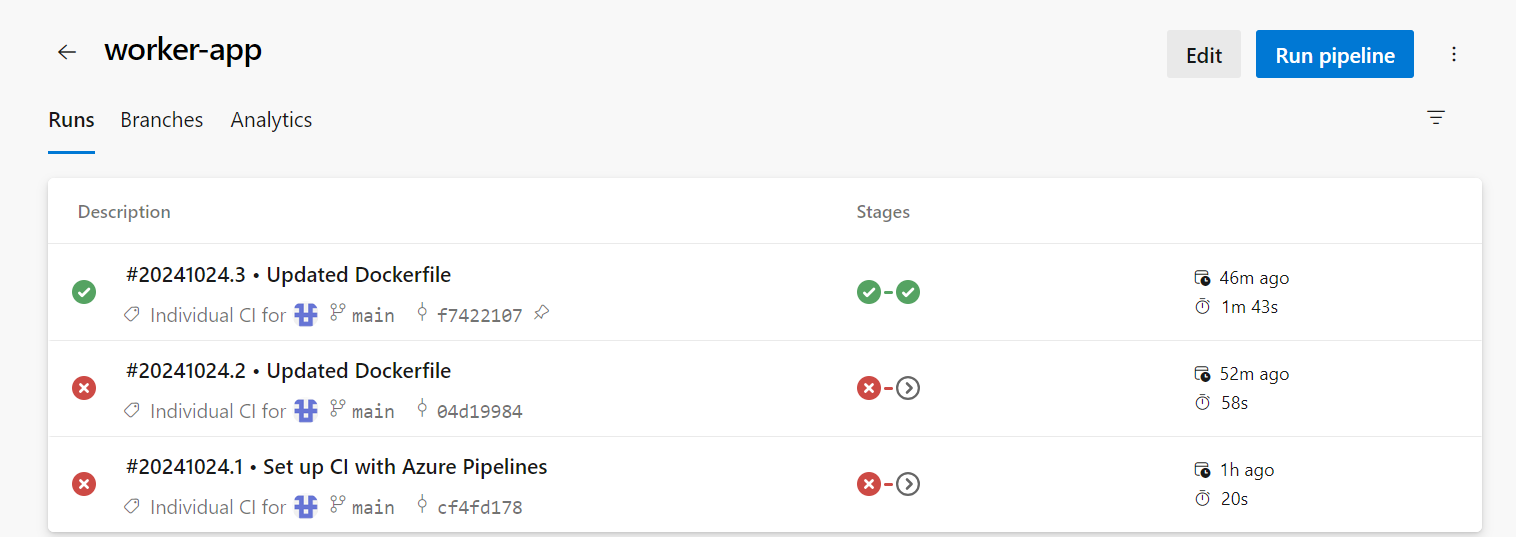
CONCLUSION
The pipeline is set up for all three services, and it will automatically trigger only for the specific microservice where changes are made, ensuring that updates are processed individually and efficiently.
Subscribe to my newsletter
Read articles from Vivian fernandes directly inside your inbox. Subscribe to the newsletter, and don't miss out.
Written by
