Labels, Selectors, Replica Sets, Deployments, Production Strategies
 Anas
Anas
Whatever mentioned in the spec section that’s what the pod is going to do.
Image Pull Policy: Official docs https://kubernetes.io/docs/concepts/containers/images/
apiVersion: v1                           # API version for the Pod definition
kind: Pod                                # Defines the object type as a Pod
metadata:                                # Metadata about the pod
  annotations:                           # Custom metadata annotations
    cni.projectcalico.org/containerID:    # Container ID for network plugin (Calico)
    cni.projectcalico.org/podIP:          # Pod's IP address
    cni.projectcalico.org/podIPs:         # List of pod IPs (single IP in this case)
  creationTimestamp: "2024-10-20T13:14:46Z" # Time when the pod was created
  labels:                                # Key-value pairs for identifying the pod
    run: day5                            # A label named 'run' with value 'day5'
  name: day5                             # Name of the pod
  namespace: default                     # Namespace where the pod is running
  resourceVersion: "2363"                # Version of the pod resource for updates
  uid: e1144b8f-1595-47a0-ab6d-676f2c93ab0c # Unique ID for the pod
spec:                                    # Pod specification
  containers:                            # List of containers within the pod
  - image: nginx                         # Image to be used (nginx)
    imagePullPolicy: Always              # Always pull the latest image
    name: day5                           # Container name
    resources: {}                        # No resource limits specified
    terminationMessagePath: /dev/termination-log # Path for termination messages
    terminationMessagePolicy: File       # Use a file for termination messages
    volumeMounts:                        # List of volumes mounted in the container
    - mountPath: /var/run/secrets/kubernetes.io/serviceaccount # Mount path for the service account token
      name: kube-api-access-tn9nc         # Volume name
      readOnly: true                      # The volume is read-only
  dnsPolicy: ClusterFirst                # Use cluster's DNS for name resolution
  enableServiceLinks: true               # Allows service environment variables
  nodeName: node01                       # Node where the pod is running
  preemptionPolicy: PreemptLowerPriority # Preempt lower-priority pods if needed
  priority: 0                            # Pod's priority (0 = lowest)
  restartPolicy: Always                  # Always restart the pod on failure
  schedulerName: default-scheduler       # Scheduler to use (default)
  securityContext: {}                    # Security settings (empty in this case)
  serviceAccount: default                # Service account name
  serviceAccountName: default            # Same as service account
  terminationGracePeriodSeconds: 30      # Grace period before forcefully killing the pod
  tolerations:                           # Conditions under which the pod is tolerated
  - effect: NoExecute                    # Effect if the condition is met
    key: node.kubernetes.io/not-ready    # Tolerate 'not-ready' condition
    operator: Exists                     # Tolerate if the key exists
    tolerationSeconds: 300               # For 300 seconds
  - effect: NoExecute                    # Same effect for 'unreachable' condition
    key: node.kubernetes.io/unreachable  # Tolerate 'unreachable' condition
    operator: Exists                     # Tolerate if the key exists
    tolerationSeconds: 300               # For 300 seconds
  volumes:                               # Volumes defined for the pod
  - name: kube-api-access-tn9nc           # Volume name
    projected:                           # Projected volume with multiple sources
      defaultMode: 420                   # File permissions for the volume
      sources:                           # Sources for the volume
      - serviceAccountToken:             # Service account token for accessing API
          expirationSeconds: 3607        # Token expiration time in seconds
          path: token                    # Path for the token
      - configMap:                       # Use ConfigMap for the CA certificate
          items:                         # Specific items to mount
          - key: ca.crt                  # CA certificate key
            path: ca.crt                 # Path where it will be mounted
          name: kube-root-ca.crt         # Name of the ConfigMap
      - downwardAPI:                     # Access downward API for pod metadata
          items:                         # Items from the downward API
          - fieldRef:                    # Reference to a field
              apiVersion: v1             # API version of the field
              fieldPath: metadata.namespace # Path to the namespace metadata
            path: namespace              # Mount path for the namespace info
status:                                  # Current status of the pod
  conditions:                            # List of pod conditions
  - lastProbeTime: null                  # Last time condition was probed (null)
    lastTransitionTime: "2024-10-20T13:14:53Z" # Last time condition transitioned
    status: "True"                       # Condition is true
    type: PodReadyToStartContainers      # Condition type: Ready to start containers
  - lastProbeTime: null                  # Same as above
    lastTransitionTime: "2024-10-20T13:14:46Z" # Transition time for initialization
    status: "True"                       # Initialization is complete
    type: Initialized                    # Condition type: Initialized
  - lastProbeTime: null                  # Same as above
    lastTransitionTime: "2024-10-20T13:14:53Z" # Transition time for readiness
    status: "True"                       # Pod is ready
    type: Ready                          # Condition type: Ready
  - lastProbeTime: null                  # Same as above
    lastTransitionTime: "2024-10-20T13:14:53Z" # Time when containers became ready
    status: "True"                       # Containers are ready
    type: ContainersReady                # Condition type: ContainersReady
  - lastProbeTime: null                  # Same as above
    lastTransitionTime: "2024-10-20T13:14:46Z" # Scheduled time for the pod
    status: "True"                       # Pod is scheduled
    type: PodScheduled                   # Condition type: PodScheduled
  containerStatuses:                     # Status of the containers in the pod
  - containerID: containerd://e5f98717eff0ad0038a4c5d9bfcedf206b3ef45b5bba9639183203ad04e9c438 # Container ID
    image: docker.io/library/nginx:latest # Image used by the container
    imageID: docker.io/library/nginx@sha256:28402db69fec7c17e179ea87882667f1e054391138f77ffaf0c3eb388efc3ffb # Image hash
    lastState: {}                        # Last known state (empty in this case)
    name: day5                           # Container name
    ready: true                          # Container is ready
    restartCount: 0                      # Number of restarts (none in this case)
    started: true                        # Container has started
    state:                               # Current state of the container
      running:                           # Container is running
        startedAt: "2024-10-20T13:14:53Z" # Time when the container started
    volumeMounts:                        # Volume mounts for the container
    - mountPath: /var/run/secrets/kubernetes.io/serviceaccount # Service account mount
      name: kube-api-access-tn9nc         # Volume name
      readOnly: true                      # Read-only access
      recursiveReadOnly: Disabled         # Recursive read-only is disabled
  hostIP: 172.30.2.2                     # IP address of the host node
  hostIPs:                               # List of IPs for the host node
  - ip: 172.30.2.2                       # Host IP
  phase: Running                         # Current phase of the pod (Running)
  podIP: 192.168.1.4                     # Pod's IP address
  podIPs:                                # List of pod IPs
  - ip: 192.168.1.4                      # Pod's IP
  qosClass: BestEffort                   # QoS class (BestEffort)
  startTime: "2024-10-20T13:14:46Z"      # Time when the pod started
Labels-Selectors & more in K8s
Labels are key-value pair, if you don’t add labels kubernetes by default will add it.
Question: What if you don’t add the label then what will be the key-value of that label?
Ans: The key will be run and value will be the name of the pod like in these way:
run: <pod-name>
Question: when you delete a cluster does all the resources will be deleted?
Ans No, except Persistent volume every resource will be deleted. And why persistent volume doesn’t delete because K8s initial goes was the data-lose should not happen, because if the data will be delete it’s gone.

More Abstraction → More Security need more efforts → More Customization have
Container - The most basic layer. It's a package of code and libraries that runs a single piece of software, like a web server or a database.
Pod - A group of one or more containers that work together. You can think of it like a small virtual machine.
ReplicaSet - A Kubernetes object that manages a set of Pods. It makes sure there are always a certain number of Pods running.
Deployments - A Kubernetes object that manages a ReplicaSet. It makes sure that the pods that are running are up to date with the latest version of the code.
Namespaces - Namespaces are like folders for your Kubernetes resources. This helps you organize and separate your resources.
Node - A physical or virtual machine where your Kubernetes Pods are running.
Cluster - A group of Nodes that work together to run your Kubernetes Pods.
Naming Convention of label:
kubectl get pods --show-labels
To delete a pod:
kubectl delete pod/label-demo

or

kubectl delete po/label-demo
Can create with these to flags:
kubectl apply -f <pod-name>.yaml

or

kubectl create -f <pod-name>.yaml
The key difference between kubectl apply and kubectl create lies in how they handle existing resources and their intended use:
kubectl create -f <pod-name>.yaml
Purpose: Creates a new resource (e.g., pod, deployment) from the provided YAML file.
Behavior:
If the resource doesn’t exist, it will be created.
If the resource already exists, it will throw an error (because it’s not meant to update or modify an existing resource).
Use Case: Use
createwhen you are sure the resource doesn't exist yet, and you're creating it for the first time.
kubectl apply -f <pod-name>.yaml
Purpose: Creates or updates a resource from the YAML file.
Behavior:
If the resource doesn’t exist, it will create it (like
create).If the resource already exists, it will update it with the new configuration specified in the YAML file (this is called declarative management).
Use Case: Use
applywhen you want to either create a new resource or update an existing one without having to delete it first.
Summary:
create: Only for creating new resources; it fails if the resource exists.apply: More flexible; it creates or updates resources as needed.
Question: Will the pod create again if we change the name of the pod?
Ans: If the spec: section will be changed or the name of the pod will be changed then the new pod will be created.
Note: Labels are very important.
Changing a Label on a Pod
To change the labels on a pod, you can use the following command:
kubectl label pod -l release=alpha1.1 work=tut
kubectl label: This command is used to add or update labels on resources.pod: Specifies that you are modifying a pod resource.l release=alpha1.1: This flag filters the pods by the existing labelrelease=alpha1.1. The command will apply the new label to all pods that match this filter.work=tut: This is the new label being added or updated on the selected pods.
Why to do this?
Changing labels is useful in various scenarios. For example, if your application is growing and you're currently using Ingress for traffic management, you might want to experiment with a Gateway for future enhancements. By adding a new label, you can test this new configuration in a proof of concept (POC) environment without altering the existing setup.
After successful testing, you can transition the configuration to production while keeping the original label intact. This approach allows for easier management and a smoother rollout of new features without disrupting the current application state.
To see pods that have a specific label, use the following command:
kubectl get pods -l release=alpha1.1
kubectl get pods -l run!=day5
If you want to edit the pod:
kubectl edit pod <name-of-the-pod>
Pods are Ephemeral in nature.
ReplicaSet
A ReplicaSet ensures that a specified number of pod replicas are running at any given time.
What are replicas?
Replicas are multiple instances of the same pod running in a Kubernetes cluster to ensure high availability, load balancing, and fault tolerance.
Key Points:
You can run
Heterogeneouspods in replicasAlthough not a common use case for a ReplicaSet, it is possible to run pods with different configurations (heterogeneous) by creating different ReplicaSets for each type of pod. A ReplicaSet is typically designed for homogeneous pods.
Heterogeneous means different type of pods are running like
NIGINX pod, REDIS pods, MONGODB podsetc…
You can run
Homogeneous or non-heterogeneouspods in replicasThis is the primary use case for ReplicaSets. They ensure that a specific number of identical (homogeneous) pods are running at all times. Each pod runs the same application and configuration, allowing for uniform scaling and failover.
Homogeneous means same type of pods are running like NGINX.
Homogeneous ReplicaSets
A homogeneous ReplicaSet is one where all the pods managed by the ReplicaSet are identical in terms of their configuration, including:
Container Images: All pods run the same container image.
Resource Requests and Limits: All pods have the same resource specifications (CPU, memory).
Environment Variables: All pods have the same set of environment variables.
Labels and Annotations: Pods share the same labels and annotations.
Heterogeneous ReplicaSets
A heterogeneous ReplicaSet is one where the pods managed by the ReplicaSet are not identical. This could mean that:
Different Container Images: Pods may run different container images or versions.
Varied Resource Requests and Limits: Pods may have different resource configurations.
Different Environment Variables: Pods may have different sets of environment variables.
Different Labels and Annotations: Pods may have different labels or annotations.
A ReplicaSet is primarily designed to maintain homogeneous pods but can technically manage different ReplicaSets to handle heterogeneous pods.
What is Replication Controller?
Ensures a specified number of pod replicas are running.
Provides self-healing by replacing failed or deleted pods.
Allows basic scaling of pods.
The Replica Controller was one of the earliest Kubernetes resources designed to ensure that a specified number of identical pod replicas were running at all times. If a pod failed or was deleted, the Replica Controller would create a new pod to replace it.
Features
Replica Management: Maintains a stable set of replicas.
Label Selector: Uses labels to identify which pods to manage.
Self-Healing: Automatically creates new pods if existing ones fail.
Limitations
Basic Functionality: Lacks advanced features such as rolling updates and versioning.
No History Management: Does not track changes or previous versions, making rollbacks cumbersome.
Why is it Not Recommended Now?
Limited Features: Doesn’t support advanced features like set-based selectors.
Superseded by ReplicaSet: ReplicaSets offer more flexibility and are used by Deployments.
No Rolling Updates: Doesn't support rolling updates or rollbacks natively.
Based on Older Architecture: Built on older Kubernetes architecture, now considered outdated.
Legacy Tool: Considered outdated in favor of ReplicaSets and Deployments for modern Kubernetes environments.
Simple Replication Controller (RC) YAML file with 3 replicas using the NGINX image:
apiVersion: v1
kind: ReplicationController
metadata:
  name: nginx-rc
spec:
  replicas: 3
  selector:
    app: nginx
  template:
    metadata:
      labels:
        app: nginx
    spec:
      containers:
      - name: nginx
        image: nginx:latest
        ports:
        - containerPort: 80
The selector in a Replication Controller (or ReplicaSet) is used to identify and manage the pods it controls. It matches the pods based on their labels, selector is a keyword in Kubernetes YAML configuration. It is used to define the criteria (based on labels) for selecting the pods that the controller (like a Replication Controller, ReplicaSet, or Deployment) will manage. It helps Kubernetes identify which pods are part of a specific
ReplicaSet:
- The ReplicaSet is a more advanced resource that builds on the concept of the Replica Controller. It ensures that a specified number of pod replicas are running, similar to the Replica Controller.
Features
Backward Compatibility: ReplicaSets are backward-compatible with Replica Controllers.
Label Selector: More flexible and powerful label selectors.
Part of Deployments: ReplicaSets are often managed by Deployments, which provide additional features.
Limitations
Manual Management: While it can manage replicas, it does not provide features for updates and rollbacks directly.
No Built-in Update Strategies: Lacks advanced deployment strategies like rolling updates.
apiVersion: apps/v1
kind: ReplicaSet
metadata:
  name: rs-demo
  labels:
    type: rs
    day: day5
spec:
  # modify replicas according to your case
  replicas: 3
  selector:
    matchLabels:
      release: alpha1.1
  template:
    metadata:
      labels:
        release: alpha1.1
    spec:
      containers:
      - name: php-redis
        image: us-docker.pkg.dev/google-samples/containers/gke/gb-frontend:v5
Key Points:
replicas: 3: Specifies that 3 pods will run.
matchLabels: release: alpha1.1: Selector ensures the ReplicaSet manages pods with this label.
template: Defines the pod configuration, using the
php-rediscontainer and the specified image.
apiVersion: apps/v1:
API Group:
appsis the API group. It contains resources for managing applications, such as ReplicaSets, Deployments, StatefulSets, etc.
Version:
v1indicates the version of the API within theappsgroup. Kubernetes API versions evolve over time, introducing new features and enhancements while sometimes deprecating older ones.
How to scale up pods:
Kubectl scale rs <name-of-the-pod> --replicas=5
This is not recommended form to scale up instead we use, HP(Horizontal Pod scaling and VP(Vertical Pod scaling) for scaling your number of pods based on traffic you are receiving.
update the yaml file then kubectl apply -f rc.yaml
instead of yaml update live
kubectl edit rs/nginx-rs it opens live object in terminal we can update replicas
after do kubectl get po
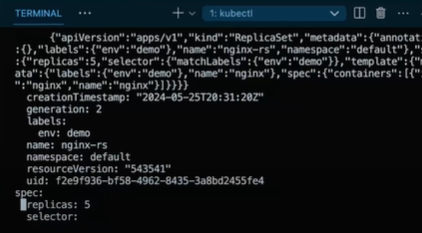
kubectl scale —replicas=10 rs/nginx-rs
How do i know that any Pod is a part of replicaset or not?

Check the labels:
Find the ReplicaSet:
kubectl get rsDescribe the ReplicaSet:
kubectl describe rs <replicaset-name>Check Owner References
The owner References section indicates that the Pod is managed by the ReplicaSet named rs-demo. The presence of this section ensures that Kubernetes maintains the relationship between the ReplicaSet and the Pods it creates. It also enforces rules about deletion and ownership, ensuring that Pods are properly managed according to their lifecycle tied to the ReplicaSet.
kubectl get pod rs-demo-nz44z -oyaml
Annotations:
Annotations in Kubernetes are key-value pairs that provide additional metadata about resources, such as Pods, Services, Deployments, etc. Unlike labels, which are used primarily for identifying and selecting objects, annotations are generally used to store non-identifying information that may be useful for tools and libraries that interact with the Kubernetes API.
Common Use Cases:
Storing information about the deployment process, such as the Git commit hash or build information.
Providing URLs or metadata for service discovery or documentation.
Capturing information for monitoring tools, like Prometheus.
Integrating with external services (e.g., annotations for Istio, external DNS, etc.).
How to annotate?
kubectl annotate pds <name-of-the-pod> maintainer='anasdeveloper@gmail.com'
Deployment in Production
What is a Deployment?
A Deployment in Kubernetes is a higher-level abstraction that manages the deployment and scaling of a set of Pods using ReplicaSets. It provides a declarative way to define the desired state of your application, enabling seamless updates and rollbacks.
Why We Don’t Use ReplicaSet Directly?
Manual Updates: Requires manual intervention for updates and management.
No Rolling Updates: Lacks built-in support for rolling updates, leading to potential downtime.
No Rollback: No native rollback mechanism for failed updates.
Complex Scaling: Scaling requires additional management and oversight.
Why We Need Deployments?
Declarative Management: Allows you to define the desired state, and Kubernetes handles the rest.
Rolling Updates: Supports seamless updates without downtime.
Easy Rollbacks: Simplifies reverting to previous versions if an update fails.
Automated Scaling: Manages scaling and ensures the desired number of replicas are running.
Version Control: Keeps a history of Replica Sets for easier management.
- Deployments are ideal for managing production applications where you need features like rolling updates, version control, and health monitoring. They simplify the deployment process and provide a robust framework for managing application lifecycles.
Questions to ask and based on these question we will decide which deployments strategies:
What is you business use case?
What is Error Budget?
What is SLA?:
Service Level Agreement (SLA) is a formal contract between a service provider and a customer that outlines expected service levels, including performance metrics, uptime guarantees, and response times. It helps set clear expectations and responsibilities for both parties.
What is the architecture of application?
Deployment Strategies
Rollout:
- A Rollout is a deployment strategy where updates are gradually applied to a set of instances or Pods. This method allows monitoring and validation of the new version before full deployment, ensuring that any issues can be addressed without impacting all users.
Canary:
- In a Canary deployment, a new version of the application is released to a small subset of users before rolling it out to everyone. This allows for testing in a real-world environment while minimizing the impact of potential failures. If successful, the rollout continues to the remaining users.
Blue-Green:
- The Blue-Green deployment strategy involves maintaining two identical environments (Blue and Green). The new version is deployed to the inactive environment (e.g., Green) while the active environment (Blue) serves traffic. Once the new version is verified, traffic is switched to Green, allowing for quick rollback if needed.
Custom:
- Custom deployment strategies can be tailored to specific needs, combining elements from various strategies. Examples include feature toggles, where features are enabled or disabled for specific users, or rolling updates with manual intervention for specific scenarios.
rollout-deploy.yaml
apiVersion: apps/v1
kind: Deployment
metadata:
  name: rollout-demo
  labels:
    app: rollout-demo
spec:
  replicas: 3
  selector:
    matchLabels:
      app: rollout-phase
  template:
    metadata:
      labels:
        app: rollout-phase
    spec:
      containers:
      - name: nginx
        image: nginx:1.14.2
        ports:
        - containerPort: 80
  strategy:
    type: RollingUpdate
    rollingUpdate:
      maxSurge: 50%
      maxUnavailable: 25%
only difference here is strategy
Rolling Out a Pod in Kubernetes
Commands to Remember:
Check Rollout History:
```bash
kubectl rollout history deploy

jaise niche vale example me hamne image change ki 1.9.1 then ham dekh skte h rollout history se and undo krne ke liye roullout undo use kr skte h
2. **Update Image in Deployment:**
Example:
```bash
kubectl set image deployment/my-deployment mycontainer=myimage:latest
Another Example:

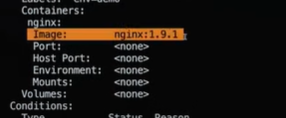
kubectl set image deploy/<name-of-the-deployment> nginx=nginx:latest
Undo Rollout to a Previous Version:
kubectl rollout undo deploy <deployment-name> --to-revision=1
Note: While it is essential to remember these commands for CKE or other Kubernetes certifications, updates can also be made directly in the spec section of a pod.
Question:
How many revisions are saved in a deployment?
Answer: By default, Kubernetes saves up to 10 revisions for each deployment. The 11th revision will delete the oldest one.
we can create yaml file using dry run

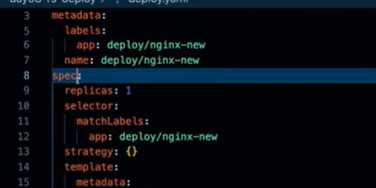
task 08 piyush
Replicaset
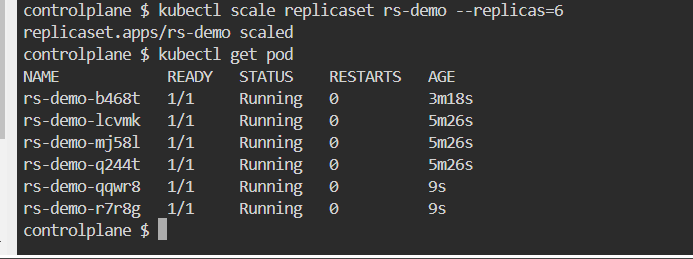
Create a new Replicaset based on the nginx image with 3 replicas

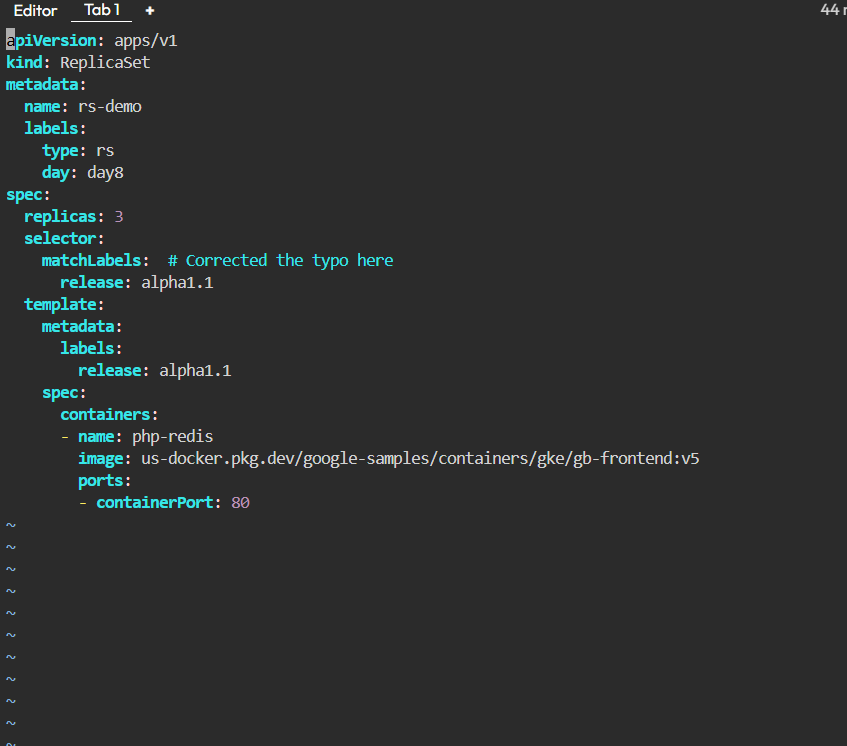
- Update the replicas to 4 from the YAML

- Update the replicas to 6 from the command line
Deployment
Create a Deployment named
nginxwith 3 replicas. The Pods should use thenginx:1.23.0image and the namenginx. The Deployment uses the labeltier=backend. The Pod template should use the labelapp=v1.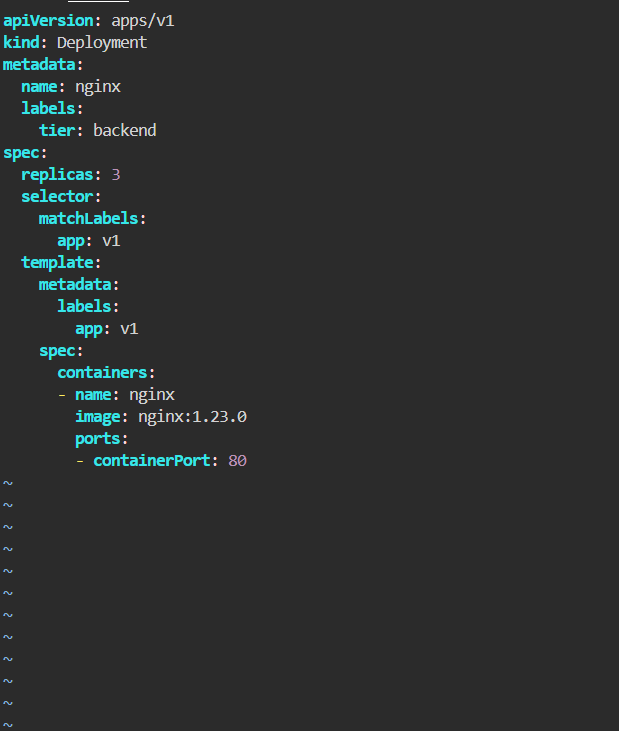
List the Deployment and ensure the correct number of replicas is running.


Update the image to nginx:1.23.4.

Verify that the change has been rolled out to all replicas.

Assign the change cause "Pick up patch version" to the revision.

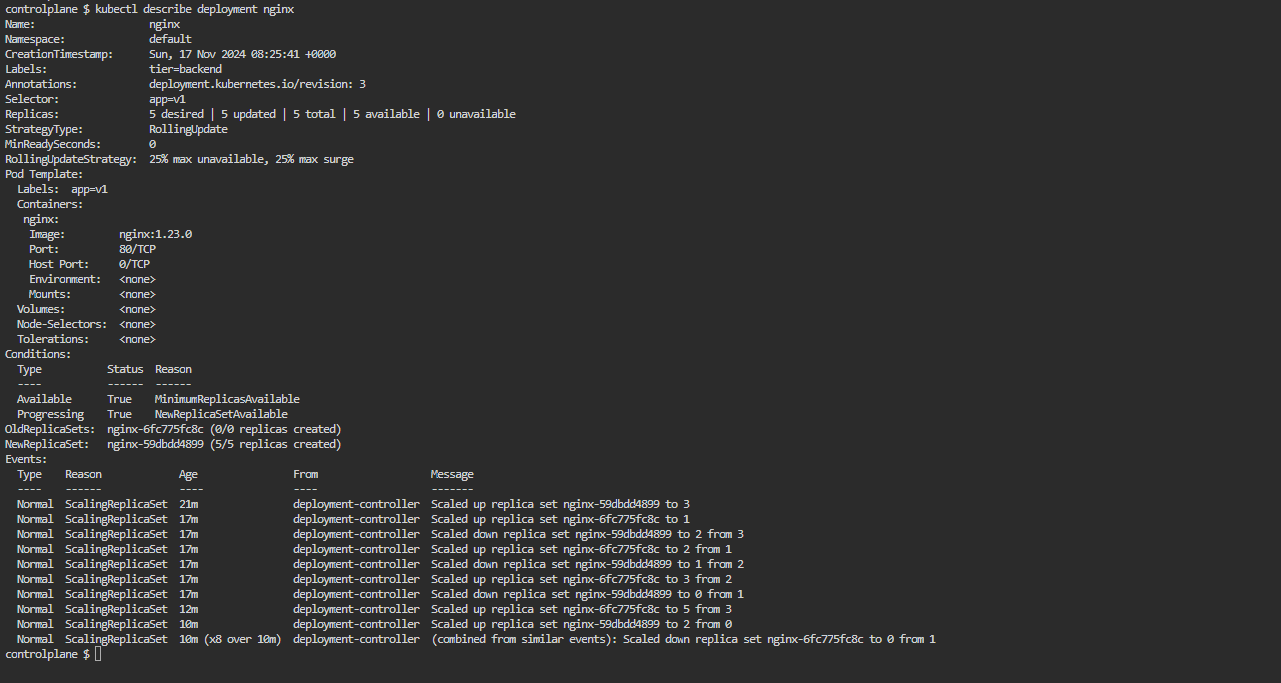
Scale the Deployment to 5 replicas.

Have a look at the Deployment rollout history.

Revert the Deployment to revision 1.

Ensure that the Pods use the image nginx:1.23.0.
Subscribe to my newsletter
Read articles from Anas directly inside your inbox. Subscribe to the newsletter, and don't miss out.
Written by
